Unicorn Rainbow Hooded Baby Poncho Free Crochet Pattern
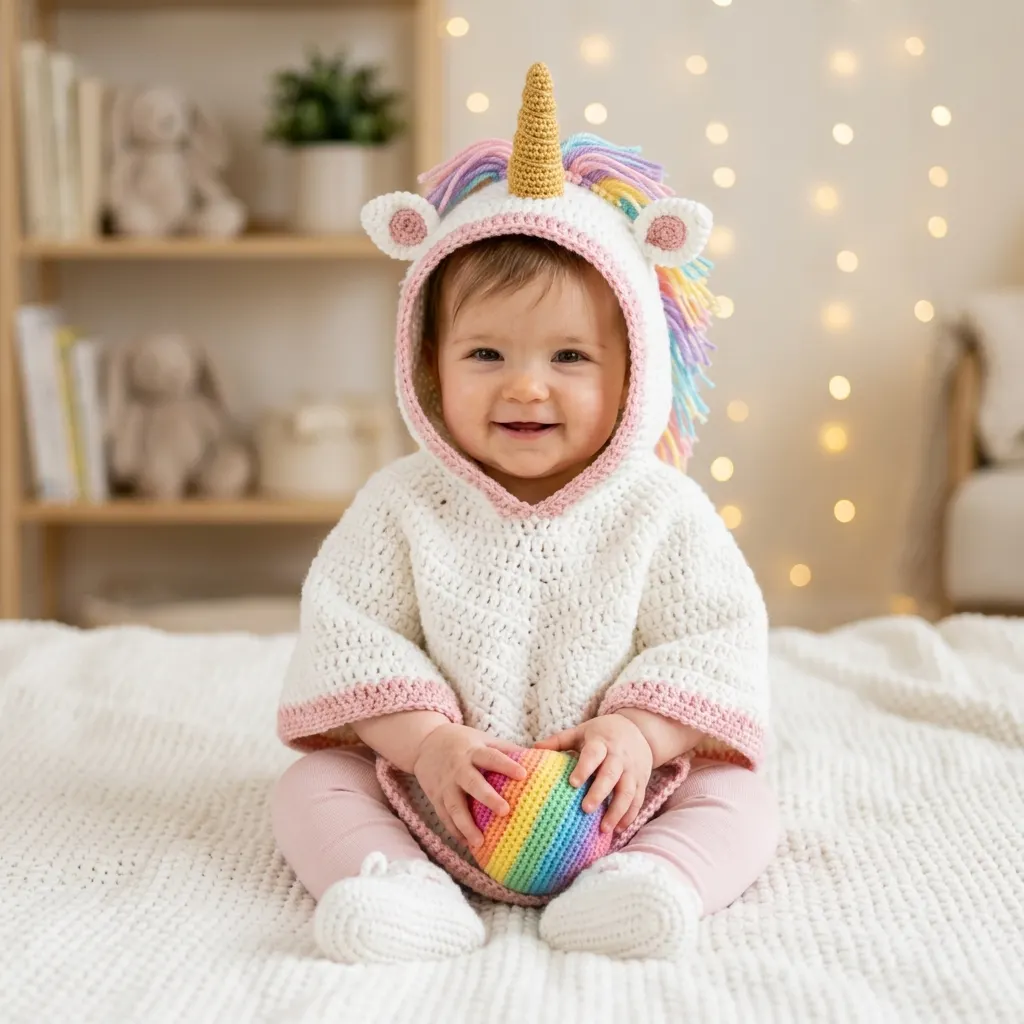
Go dig through your yarn stash right now because this is the project that deserves those special skeins you have been saving. You know the ones. That creamy off-white bulky yarn and those pastel leftovers from other projects are about to become the most photographed baby garment in your gift-giving history.
This unicorn hooded poncho looks incredibly detailed, but I promise the construction is more straightforward than you might expect. The body is just two rectangles of single crochet seamed at the shoulders. The hood works up flat and gets sewn on. The magic happens with the embellishments: a stuffed spiral horn, cute rounded ears, and a cascading rainbow mane that will make everyone gasp.
I would call this an intermediate project, but hear me out. If you can single crochet confidently and have attached pieces before, you can absolutely do this. The trickiest parts are working the horn in a continuous spiral and getting all those three-dimensional pieces attached neatly. Take your time with those steps and you will be fine.
Why This Crochet Pattern Works So Well
The genius of this unicorn baby poncho design is its simplicity underneath all that whimsy. Two flat rectangles. One flat rectangle for the hood. A few small pieces for the horn and ears. Some fringe for the mane. That is genuinely it.
The poncho silhouette is perfect for babies because there are no sleeves to wrestle chubby arms through. It just slips over the head and drapes beautifully. The drop-shoulder styling means it fits loosely and comfortably, which babies and parents both appreciate.
I estimate this project takes about 10 to 14 hours total. You could easily spread that across a week of evening crafting or power through it over a long weekend. The body panels take roughly 4 hours combined, the hood about 2 hours, and the embellishments and finishing fill the remaining time.
Materials You Will Need
Yarn A (main color, off-white): bulky weight (CYCA 5), approximately 400 yards / 366 m
Yarn B (accent color, soft pink): bulky weight (CYCA 5), approximately 80 yards / 73 m
Yarn C (horn, gold/mustard): bulky weight (CYCA 5), approximately 25 yards / 23 m
Yarn D (mane fringe): worsted or bulky weight (CYCA 4 or 5) in six colors: pastel pink, pastel lavender, pastel blue, pastel mint, pastel yellow, pastel peach, approximately 15 yards / 14 m of each color
Hooks: US K-10.5 / 6.5 mm (main hook) and US J-10 / 6.0 mm (for horn, ears, and detail work)
Notions: Yarn needle, stitch markers (at least 4), polyester fiberfill stuffing (small amount for horn), scissors
Yarn Suggestions That Work Beautifully
Lion Brand Pound of Love works wonderfully for this project. It is a worsted-bulky blend that creates a firm, durable fabric on the K hook. Look for Antique White and Pink Lemonade.
Paintbox Yarns Simply Chunky is another excellent choice with great stitch definition. Champagne White and Ballet Pink are perfect matches.
Caron Simply Soft Chunky offers a softer hand with a slight sheen if you prefer that look.
Any bulky weight yarn that achieves gauge will work. Just make sure the fabric feels firm but not stiff so the poncho holds its shape on a wiggly baby.
Gauge Information
With Yarn A and US K-10.5 / 6.5 mm hook, working in single crochet (sc):
13 stitches = 4 in / 10 cm
14 rows = 4 in / 10 cm
Please make a gauge swatch. Chain 18, work single crochet for 18 rows, block lightly, then measure. Gauge matters here because this is a fitted garment for a specific size range.
Finished Measurements
This pattern is written for size 6 to 12 months.
Abbreviations Used in This Crochet Tutorial
ch: chain
sl st: slip stitch
sc: single crochet (insert hook, yarn over, pull up a loop, yarn over, pull through both loops)
sc2tog: single crochet two together, a decrease (insert hook in next stitch, pull up loop, insert hook in following stitch, pull up loop, yarn over, pull through all three loops)
sc-inc: single crochet increase (work 2 sc in the same stitch)
st(s): stitch(es)
RS: right side
WS: wrong side
pm: place marker
rep: repeat
rnd: round
Step by Step Instructions for the Unicorn Hooded Poncho
Front Panel
With Yarn A and K hook, chain 37.
Row 1 (WS): Sc in second ch from hook and in each ch across. Turn. (36 sc)
Rows 2 through 31: Ch 1, turn. Sc in each st across. Turn. (36 sc each row)
After row 31, your panel should measure approximately 9 in tall and 11 in wide. Fasten off, leaving a 12 in tail for seaming.
Quick checkpoint: you have a flat rectangle, 36 stitches wide and 31 rows tall. Measure it. If your height is off, add or subtract rows to hit 9 inches.
Back Panel
Work exactly as for front panel.
Rows 1 through 31: (36 sc each row)
Fasten off, leaving a 12 in tail.
Shoulder Seaming
Hold front and back panels with wrong sides together so right sides face outward. The neck opening will be centered along the top edge.
Mark your shoulder zones like this:
Using Yarn A threaded on a yarn needle, whipstitch or mattress stitch the left shoulder (9 sts) and right shoulder (9 sts) only. Leave the center 18 stitches unworked on both panels. This creates your neck opening.
Neck Border
With RS facing, Yarn B, and K hook, join yarn at the right back corner of the neck opening.
Round 1: Sc evenly around the entire neck opening, working approximately 18 sc across the front top edge, 1 sc in each shoulder seam corner, and 18 sc across the back top edge. You should have approximately 38 sc total. Join with sl st to first sc. Do not fasten off. (38 sc)
Round 2: Ch 1. Sc in each st around. Join with sl st to first sc. Fasten off Yarn B. (38 sc)
Weave in ends. Your neck opening should have a clean pink border measuring approximately 5.5 in across.
Hood Construction
The hood is worked flat in rows then seamed at the top.
With Yarn A and K hook, chain 47.
Row 1 (WS): Sc in second ch from hook and in each ch across. Turn. (46 sc)
Rows 2 through 23: Ch 1, turn. Sc in each st across. Turn. (46 sc each row)
After row 23, your hood piece is a flat rectangle measuring approximately 14 in wide and 6.5 in tall.
Hood Top Seam: Fold the rectangle in half so row 1 meets row 23. With Yarn A and a yarn needle, whipstitch across the top edge (46 stitches) to close the top of the hood. This seam runs across the crown of the head.
Hood Face Border
With Yarn B and K hook, join yarn at the bottom right corner of the hood face opening.
Row 1: Sc evenly up the right side edge of the hood, across the top seam fold if any edge is exposed, and down the left side edge. Work approximately 23 sc on each side for a total of 46 sc. Turn. (46 sc)
Row 2: Ch 1, turn. Sc in each st. Turn. (46 sc)
Fasten off Yarn B. This pink border frames the face opening beautifully.
Attaching the Hood to the Poncho
Center the hood over the neck opening with wrong sides together so the right side of the hood faces outward. The bottom edge of the hood should align with the neck opening. Pin in place and double-check that everything is centered.
With Yarn B and a yarn needle, whipstitch the bottom edge of the hood to the neck opening, working through both the hood edge and the neck border. Sew all the way around.
Your hood should sit centered on the poncho, opening forward, with no twisting.
Horn
The horn is worked in a continuous spiral from the tip downward. Do not join rounds. Move your stitch marker up each round to track your place.
With Yarn C and J hook, make a magic ring.
Round 1: Work 3 sc into the magic ring. Do not join. Pm in first st. (3 sc)
Round 2: Sc-inc in each st around. (6 sc)
Round 3: (Sc in next st, sc-inc in next st) rep 3 times. (9 sc)
Round 4: (Sc in next 2 sts, sc-inc in next st) rep 3 times. (12 sc)
Round 5: (Sc in next 3 sts, sc-inc in next st) rep 3 times. (15 sc)
Round 6: (Sc in next 4 sts, sc-inc in next st) rep 3 times. (18 sc)
Round 7: Sc in each st around. (18 sc)
Sl st to next st. Fasten off, leaving a long tail for sewing.
Stuff horn firmly with fiberfill before closing. The finished horn should be approximately 2.5 in tall and 1.75 in wide at the base.
Ears (make 2)
With Yarn A and J hook, make a magic ring.
Round 1: Work 6 sc into the magic ring. Join with sl st. (6 sc)
Round 2: Ch 1. Sc-inc in each st around. Join with sl st. (12 sc)
Round 3: Ch 1. (Sc in next st, sc-inc in next st) rep 6 times. Join with sl st. (18 sc)
Round 4: Ch 1. Sc in each st around. Join with sl st. (18 sc)
Sl st to join. Fasten off, leaving a long sewing tail. Do not stuff. Pinch the base slightly to create a gentle cup shape.
For the inner ear detail, use Yarn B and a yarn needle to embroider a small oval of satin stitches in the center of each ear. This creates the pink inner ear visible in the finished piece.
Placing the Embellishments on the Hood
Horn: Position at the very top center of the hood, just forward of the crown seam. The base should sit flush against the hood fabric. Using your long Yarn C tail and a yarn needle, sew through every stitch of the base ring, securing the horn firmly so it stands upright.
Ears: Position one ear on each side of the horn, approximately 1.5 in to the left and right of the horn base, at roughly the same height. Sew each ear securely using the yarn tail, stitching through the base and into the hood fabric multiple times.
Rainbow Mane
Cut fringe strands of each mane color approximately 14 in long. You will need approximately 8 to 10 strands of each color.
Starting directly behind the horn and working toward the back of the hood along the center top seam, attach fringe using the standard method: fold two strands of the same color in half together, insert hook through the hood fabric along the seam line, pull the fold through to create a loop, draw the four ends through the loop, and pull snug.
Alternate colors as you work down the mane line. Attach approximately 5 to 7 fringe units, cycling through all six colors. After all fringe is attached, trim the ends to approximately 5 to 6 in so the mane cascades naturally. Separate and fluff the strands for maximum drama.
Outer Body Border
With RS facing, Yarn B, and K hook, join at any corner of the poncho hem.
Round 1: Sc evenly around the entire outer edge of the poncho, working sc across the bottom hem of the front panel, up the front side edge, across the shoulder join area, down the back side edge, and across the back hem. At each corner, work 3 sc into the corner stitch. Work approximately 36 sc across each bottom hem, 31 sc up each side edge, with 3 sc at each of the 4 corners. Total approximate stitch count: 142 sc. Join with sl st to first sc. (142 sc)
Round 2: Ch 1. Sc in each st around, working 3 sc in each marked corner st. Join with sl st. (150 sc)
Fasten off Yarn B. Weave in all ends.
Size Customization Tips
For 12 to 18 months: Chain 41 instead of 37 for each panel (40 stitches, 12.5 in wide). Work 35 rows (10 in tall). Hood starting chain 51. Add 2 rows to the hood.
For 18 to 24 months: Chain 45 for each panel (44 stitches, 13.5 in wide). Work 38 rows (11 in tall). Hood starting chain 55. Work 25 rows on the hood.
Each additional stitch adds approximately 0.3 in of width. Each additional row adds approximately 0.28 in of height. Always verify with your personal gauge swatch.
Finishing and Care
Weave in all yarn ends securely, working each tail through at least 1 in of stitches in two directions.
For blocking, submerge the finished poncho in cool water, gently squeeze out excess water without wringing, and lay flat on a blocking mat or clean towels. Smooth to measurements and pin corners square. Allow to dry fully. Keep the horn upright during drying by stuffing it firmly or propping it.
Machine wash on gentle cycle in cold water if your yarn allows. Lay flat to dry. Do not tumble dry, as heat can distort the stuffed horn. Hand washing is always safest given the three-dimensional embellishments.
You Did It!
This unicorn rainbow hooded baby poncho crochet pattern creates such a show-stopping gift. Every baby shower guest will want to know where you bought it, and you get to say you made it yourself. The combination of that squishy single crochet texture, the cheerful pink trim, and those whimsical embellishments makes this poncho photograph beautifully too.
I hope you had fun working through this tutorial. Thank you so much for choosing this pattern and trusting me to guide you through it. If you make one, I would absolutely love to see it! Tag me on Instagram or share a photo in our Facebook group.
Save this pattern to your Pinterest boards so you can find it easily when you are ready to make another one. And please drop a comment below if you give this a try. I read every single one and they honestly make my whole day.
You Might Also Like
- Sunset Ombre Mesh Halter Top Free Crochet Pattern
- Lavender Field Granny Square Pouch Free Crochet Pattern
- Sunset Ombre Beach Bikini Free Crochet Pattern
- Blush Pink Cable Heart Crop Top Free Crochet Pattern