Sunset Ombre Floral Square Poncho Free Crochet Pattern
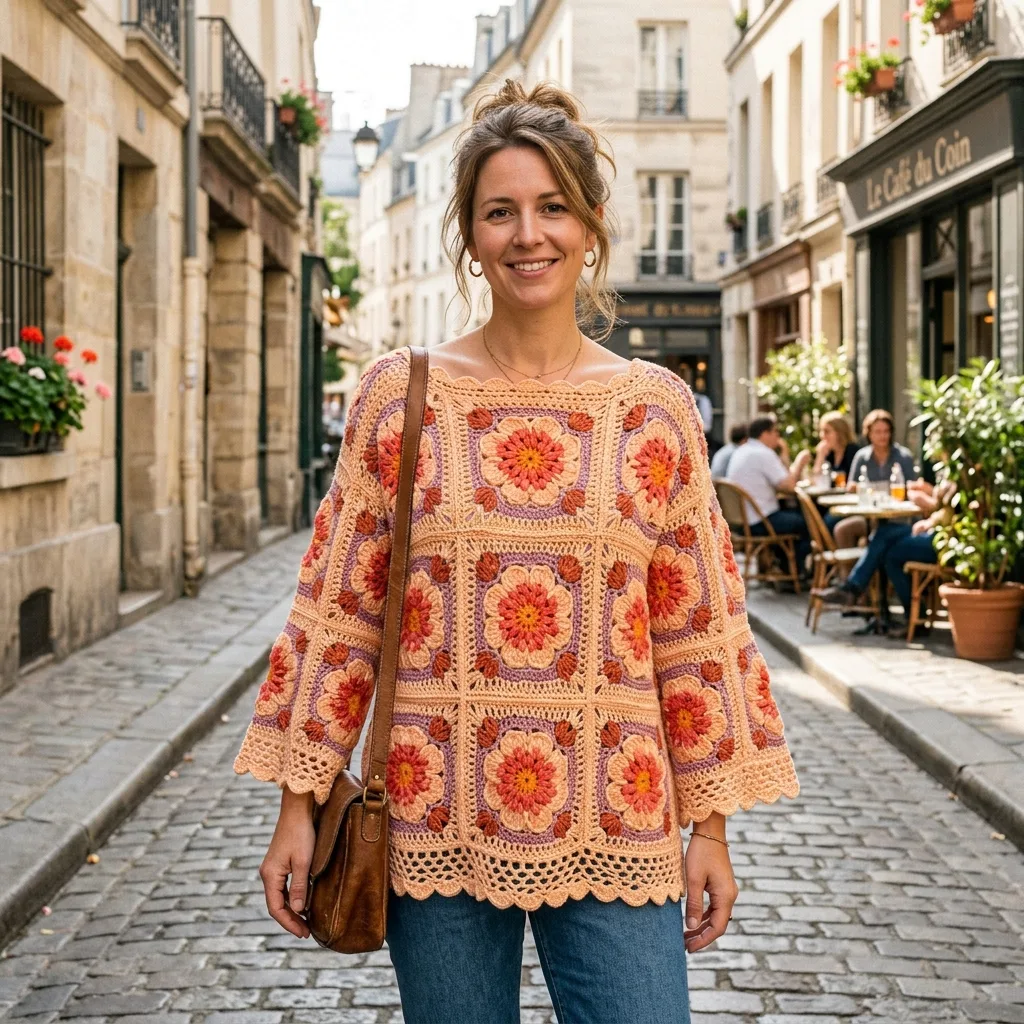
Last summer, I found myself standing in front of my yarn stash, staring at a collection of coral, peach, and golden yellow skeins I’d been hoarding for “the perfect project.” You know the ones. They sat there for two years, too pretty to use on anything ordinary. Then I saw a woman walking through a farmers market wearing this incredible granny square top, and I practically ran home to start designing. I wanted something that would showcase those sunset colors in a way that felt modern and wearable, not like a vintage throw pillow.
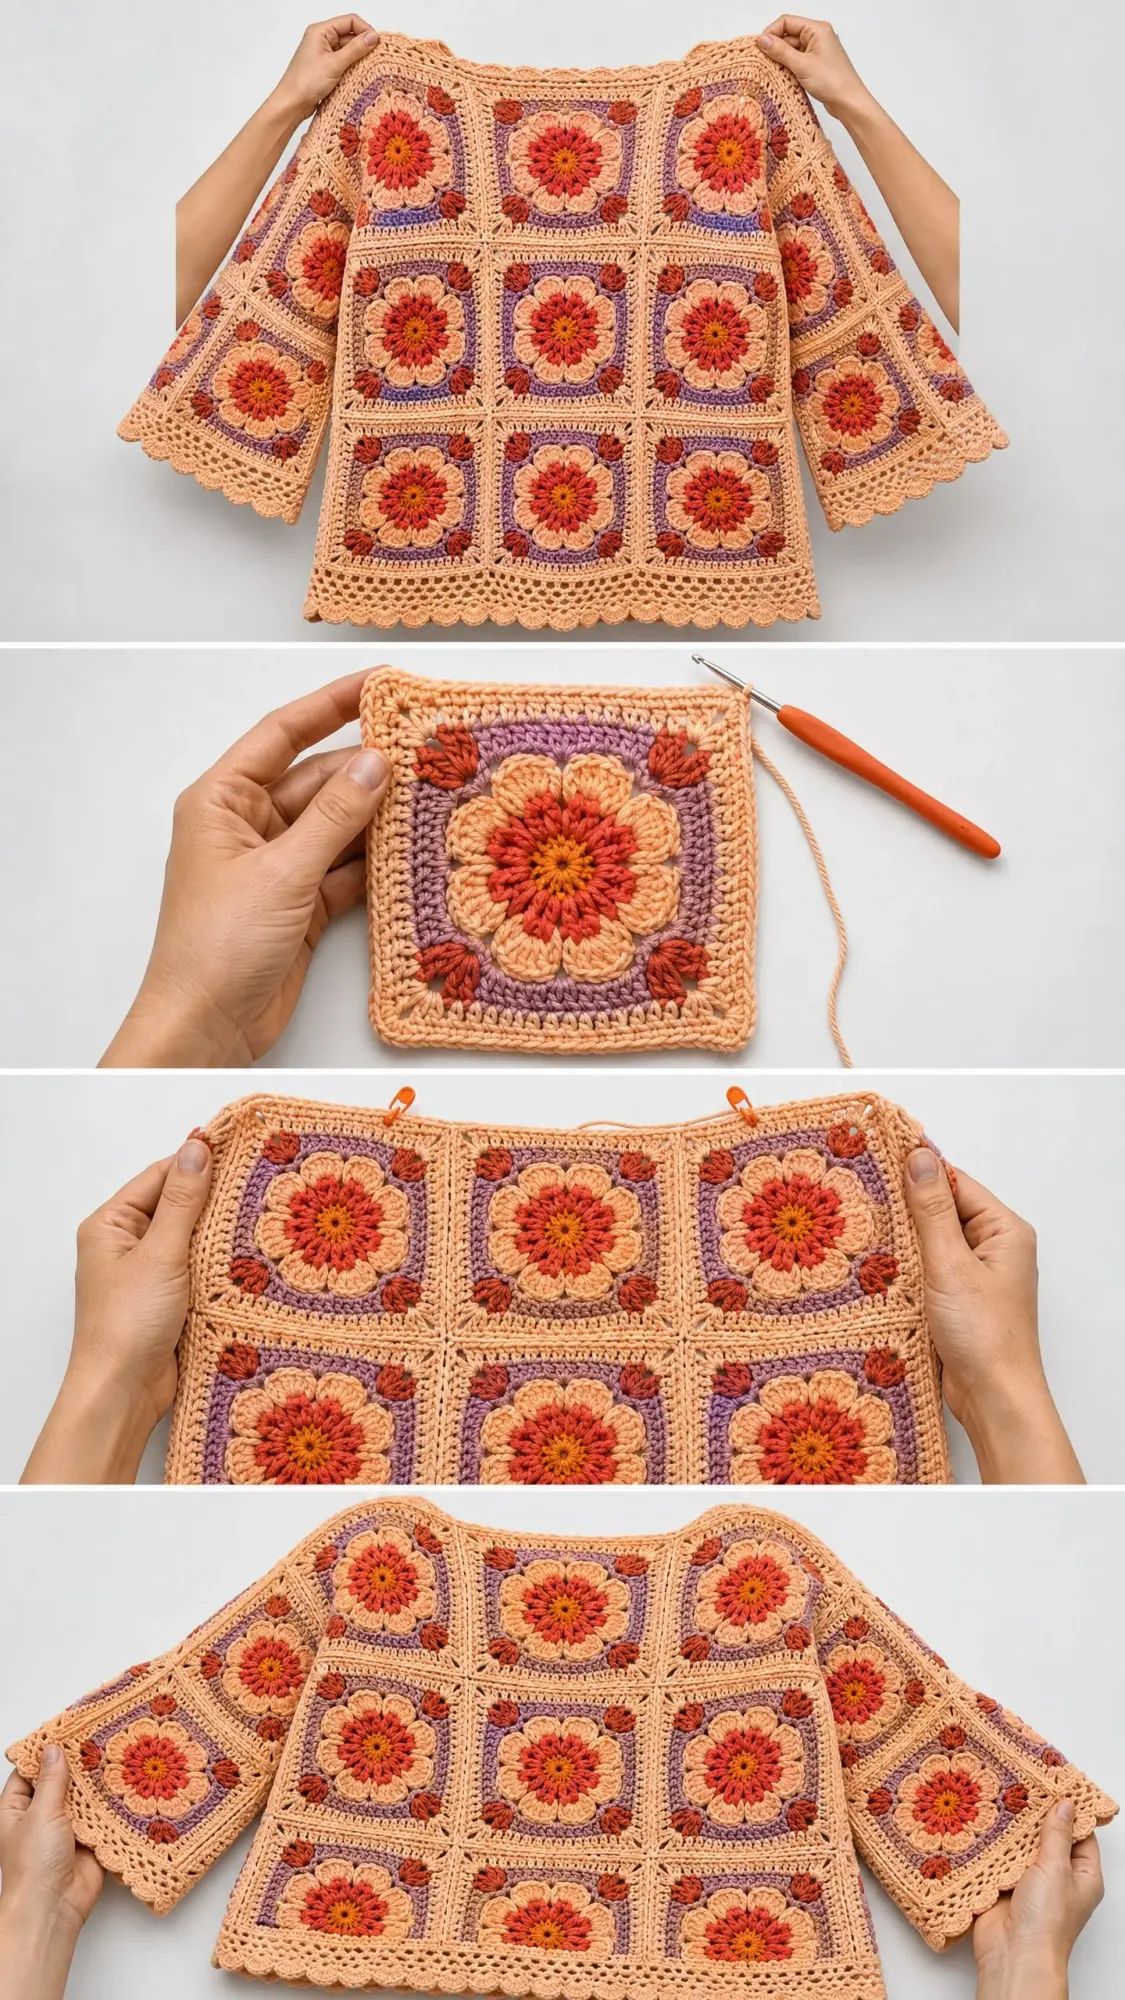
What came out of that obsession is this Sunset Ombre Floral Square Poncho. It’s built from 24 gorgeous floral granny squares arranged into two simple panels, then joined at the shoulders and sides. The raised flower centers pop off the fabric in the most satisfying way, and that warm ombre effect from golden yellow through coral to soft peach makes every single square feel like a tiny sunset.
I’ll be honest with you. This is not a weekend project. But if you’ve been wanting to level up your granny square game and create something truly stunning, this is the one. Grab your favorite worsted weight yarn and let’s make something beautiful together.
Why This Floral Square Poncho Pattern Works
This pullover-style poncho hits that sweet spot between cozy and stylish. The boxy, relaxed fit means it drapes beautifully over jeans or leggings without clinging. The three-quarter bell sleeves form naturally from the square construction, so there’s no complicated shaping to worry about.
The construction method is straightforward once you understand the flow. You’ll make 24 identical floral squares, join them as you go using a simple slip stitch technique, then seam the shoulders and sides. A pretty scalloped border finishes the hem, sleeves, and neckline.
Skill level: Intermediate. You should be comfortable with working into front loops and back loops separately, working around posts, and reading multi-round motif instructions. If you’ve made granny squares before and want to try something more dimensional, this is a perfect next step.
Time estimate: Plan for 30 to 40 hours total, depending on your speed with motif construction.
Finished Measurements
The pattern uses a flexible sizing system. You adjust the size by changing your hook size or yarn weight to make larger or smaller squares. The layout stays the same for all sizes: 3 squares wide by 4 squares tall for each panel.
Size Small: Bust 40 in / 102 cm, Length 24 in / 61 cm (square size 6.5 in / 16.5 cm)
Size Medium: Bust 44 in / 112 cm, Length 24 in / 61 cm (square size 7.25 in / 18.5 cm)
Size Large: Bust 48 in / 122 cm, Length 24 in / 61 cm (square size 8 in / 20.5 cm)
Size Extra Large: Bust 52 in / 132 cm, Length 24 in / 61 cm (square size 8.75 in / 22 cm)
The instructions below are written for size Medium. Check the Size Customization section for adjustments.
Materials Needed
Yarn: Worsted weight yarn (weight category 4), approximately 1,400 yards / 1,280 m total
Hook: US Size J-10 / 6 mm crochet hook (for size Medium)
Notions:
Yarn Suggestions
Lion Brand Wool-Ease works beautifully here. The 80% acrylic and 20% wool blend gives good stitch definition, gentle drape, and is machine washable on a gentle cycle.
Paintbox Yarns Simply DK held double is a budget-friendly option with excellent stitch definition and a wide color range to match the ombre palette.
Cascade 220 Superwash is the luxury choice. This 100% superwash merino wool blocks exceptionally well and the color saturation is vibrant.
Avoid very fluffy or hairy yarns as they’ll obscure the beautiful floral texture.
Gauge
One completed Floral Granny Square (through Round 7, before joining) measures 7.25 in / 18.5 cm from edge to edge, blocked.
In plain double crochet (dc) worked flat: 14 dc and 8 rows = 4 in / 10 cm.
Gauge matters here. A difference of even half an inch per square multiplies across all 24 squares, creating a garment that’s significantly too large or too small. Make one complete square and block it before committing to the full project.
Abbreviations and Stitch Definitions
Let me walk you through every stitch you’ll need. I’ll explain each one in plain language so nothing catches you off guard.
ch = chain. Wrap yarn over hook and pull through the loop on your hook. This creates one chain stitch.
sl st = slip stitch. Insert hook into stitch, yarn over, pull through both the stitch and the loop on your hook in one motion. Used for joining and moving across stitches.
sc = single crochet. Insert hook into stitch, yarn over and pull up a loop (2 loops on hook), yarn over and pull through both loops.
dc = double crochet. Yarn over, insert hook into stitch, yarn over and pull up a loop (3 loops on hook), yarn over and pull through 2 loops (2 loops remain), yarn over and pull through remaining 2 loops.
ch-sp = chain space. The gap created by chain stitches in a previous row or round. You’ll work into these spaces, not into individual chains.
sk = skip. Pass over the indicated number of stitches without working into them.
RS = right side. The front of your work, the side that faces outward on the finished garment.
WS = wrong side. The back of your work.
FLO = front loop only. Work into just the front loop of the stitch, leaving the back loop unworked.
BLO = back loop only. Work into just the back loop of the stitch.
Special Stitches
Raised Petal Stitch (RPS)
This creates the dimensional petals on Round 3. It’s easier than it sounds.
1. Insert hook from front to back around the post (the vertical part) of the dc from Round 1, directly below your current position
2. Yarn over and pull up a loop to the height of a dc
3. Yarn over and draw through 2 loops
4. Yarn over and draw through the remaining 2 loops
The completed stitch sits in front of Round 2, creating a raised petal that lies on the surface. This is what gives the flower its beautiful 3D effect.
Join-As-You-Go (JAYG) Slip Stitch Join
This technique lets you attach squares without a separate seaming step. You’ll use it on Round 7 when connecting squares.
1. Work up to the corner or side stitch where you need to join
2. Remove hook from working loop
3. Insert hook through the corresponding ch-sp of the adjacent completed square, front to back
4. Replace working loop onto hook
5. Pull the working loop through the adjacent square’s ch-sp (this completes the slip stitch join)
6. Continue working Round 7, repeating at each matching point along the shared edge
Scallop Stitch
This creates the pretty wavy border on the hem, sleeves, and neckline.
1. Sc in first st
2. Skip 2 sts
3. Work 5 dc in next st (this is your shell)
4. Skip 2 sts
5. Sc in next st
Repeat steps 2 through 5 around.
Pattern Notes Before You Begin
Each panel consists of 12 squares arranged in a 3-column by 4-row grid. You’ll make 2 panels (24 squares total).
Color sequence for every square:
All rounds are worked with RS facing. Join each round with a sl st to the first stitch unless instructed otherwise.
The ch 3 at the beginning of a dc round counts as 1 dc throughout this pattern. The ch 1 at the beginning of a sc round does not count as a stitch.
Floral Granny Square Instructions
Make 24 total (12 for Front Panel, 12 for Back Panel).
Round 1 (Color A)
Magic ring (or ch 4, sl st to first ch to form ring).
Ch 3 (counts as first dc), work 11 dc into ring.
Sl st to top of ch-3 to join. (12 dc)
Round 2 (Color B)
Join Color B to any st with a sl st.
Ch 1 (does not count as st).
Work 2 sc in each st around.
Sl st to first sc to join. (24 sc)
Round 3 (Color C)
This round creates the raised petals by working around the posts of Round 1 stitches.
Join Color C with sl st to the space between any two sc of Round 2 (directly above a Round 1 dc post).
Ch 1.
Working a Raised Petal Stitch (RPS) around each Round 1 dc post:
[Sc in sp between Round 2 sts, RPS around next Round 1 dc post, sc in next sp between Round 2 sts] 12 times.
Sl st to first sc to join.
Fasten off Color C. (12 RPS and 24 sc = 36 sts)
The sc stitches are worked into the spaces between Round 2 sts, not into the top of the stitches. The RPS stitches are worked around the Round 1 dc posts. This keeps the petals standing up in front.
Round 4 (Color B)
Join Color B with sl st to the top of any RPS (the raised petal tip).
Ch 3 (counts as first dc).
Dc in same st.
[Ch 2, 2 dc in top of next RPS] 11 times.
Ch 2, sl st to top of ch-3 to join. (24 dc and 12 ch-2 sps)
Round 5 (Color D)
Join Color D with sl st to any ch-2 sp.
Ch 3 (counts as dc), 2 dc in same ch-2 sp, ch 2, 3 dc in same ch-2 sp (corner made).
[Ch 1, 3 dc in next ch-2 sp] twice, ch 1.
(3 dc, ch 2, 3 dc) in next ch-2 sp (corner), [ch 1, 3 dc in next ch-2 sp] twice, ch 1.
Rep from to 2 more times.
Sl st to top of ch-3 to join.
(48 dc, 4 ch-2 corner sps, 8 ch-1 sps)
Round 6 (Color D)
Sl st across to first corner ch-2 sp (sl st into each of next 2 dc, then into ch-2 sp).
Ch 3 (counts as dc), (2 dc, ch 2, 3 dc) in same corner sp.
[Ch 1, 3 dc in next ch-1 sp] 3 times, ch 1, (3 dc, ch 2, 3 dc) in corner sp.
Rep from to 2 more times.
[Ch 1, 3 dc in next ch-1 sp] 3 times, ch 1.
Sl st to top of ch-3 to join.
(60 dc, 4 ch-2 corner sps, 12 ch-1 sps)
Round 7 – Joining Round (Color E)
For a standalone square (no joining):
Sl st to first corner ch-2 sp.
Ch 3 (counts as dc), (2 dc, ch 2, 3 dc) in same corner sp.
[Ch 1, 3 dc in next ch-1 sp] 4 times, ch 1, (3 dc, ch 2, 3 dc) in corner sp.
Rep from to 2 more times.
[Ch 1, 3 dc in next ch-1 sp] 4 times, ch 1.
Sl st to top of ch-3 to join.
(72 dc, 4 ch-2 corner sps, 16 ch-1 sps)
For a joining square (JAYG on one or two edges):
Work Round 7 as above, but replace each ch-2 corner sp on a shared edge with: ch 1, sl st to corresponding corner sp of adjacent square, ch 1.
Replace each ch-1 sp along the shared edge with: sl st to corresponding ch-1 sp of adjacent square (no ch worked).
Continue working non-shared sides normally.
Square Checkpoint
Each completed square should measure 7.25 in / 18.5 cm from edge to edge, blocked flat. The flower should be centered and the four corners should be right angles. If your square is smaller, go up a hook size. If larger, go down a hook size.
Panel Construction and Joining Order
Work the squares in this specific order so JAYG joins are always worked into a completed edge.
Row 1 (Bottom Row)
Square 1 (bottom left): Work all 7 rounds with no JAYG joins. This is your foundation square.
Square 2 (bottom center): Work Rounds 1 through 6 completely. On Round 7, work the left edge with JAYG joins to the right edge of Square 1. All other three sides are worked normally.
Square 3 (bottom right): Work Rounds 1 through 6 completely. On Round 7, work the left edge with JAYG joins to the right edge of Square 2.
Row 2
Square 4 (left): On Round 7, JAYG the bottom edge to top of Square 1.
Square 5 (center): On Round 7, JAYG the bottom edge to top of Square 2, and JAYG the left edge to right edge of Square 4. At the shared inner corner where all four squares meet, work: ch 1, sl st to the shared corner junction, ch 1.
Square 6 (right): On Round 7, JAYG the bottom edge to top of Square 3, and JAYG the left edge to right edge of Square 5.
Row 3
Square 7: JAYG to top of Square 4.
Square 8: JAYG to top of Square 5 and left edge of Square 7.
Square 9: JAYG to top of Square 6 and left edge of Square 8.
Row 4
Square 10: JAYG to top of Square 7.
Square 11: JAYG to top of Square 8 and left edge of Square 10.
Square 12: JAYG to top of Square 9 and left edge of Square 11.
Make one Front Panel and one Back Panel following this exact sequence.
Panel Checkpoint
Each completed panel should measure approximately 21.75 in / 55 cm wide by 29 in / 73.5 cm tall before blocking. After wet blocking, aim for 22 in / 56 cm wide by 29 in / 73.5 cm tall.
Assembly Instructions
Shoulder Seams
Place the Front Panel and Back Panel together with WS facing each other (RS facing outward on both sides).
The shoulder seam spans the outermost square on each side of the top edge: the leftmost square and the rightmost square.
Using a yarn needle threaded with Color E, work a mattress stitch seam along the top edge of the left square (approximately 7.25 in / 18.5 cm) for the left shoulder. Fasten off.
Repeat for the right square for the right shoulder.
The center top edge remains open (approximately 7.25 in / 18.5 cm) to form the neckline.
Side Seams
Seam from the bottom hem upward through 2 full squares (approximately 14.5 in / 37 cm) on each side.
Leave the upper 2 squares (approximately 14.5 in / 37 cm) open on each side for the sleeve opening.
Assembly Checkpoint
The garment should now have a defined neckline at the top center, two sleeve openings on the sides, and closed side seams at the lower half. Bust should measure approximately 44 in / 112 cm.
Scalloped Border Instructions
Hem Border
The hem border is worked along the bottom edges of both panels as one continuous round.
Round 1 (foundation sc): Join Color E with sl st to any bottom edge ch-1 sp or corner sp.
Ch 1 (does not count as st).
Work sc evenly around the entire bottom opening, placing:
Sl st to first sc to join. (84 sc)
Round 2 (scallop):
Ch 1. Sc in first sc.
Sk 2 sc, 5 dc in next sc, sk 2 sc, sc in next sc.
Rep from to 13 more times.
Sl st to first sc to join. Fasten off Color E. (14 scallops)
Sleeve Border (make 2)
Round 1: Join Color E at the base of sleeve opening.
Ch 1.
Work sc evenly around the sleeve opening. (60 sc)
Round 2:
Ch 1. Sc in first sc.
Sk 2 sc, 5 dc in next sc, sk 2 sc, sc in next sc.
Rep 9 more times.
Sl st to first sc to join. Fasten off Color E. (10 scallops)
Neckline Border
Round 1: Join Color E at right shoulder seam junction.
Ch 1.
Work sc evenly around the entire neckline opening. (36 sc)
Round 2:
Ch 1. Sc in first sc.
Sk 2 sc, 5 dc in next sc, sk 2 sc, sc in next sc.
Rep 5 more times.
Sl st to first sc to join. Fasten off Color E. (6 scallops)
Size Customization Tips
To size up: Use a larger hook (US K-10.5 / 6.5 mm for Large, US L-11 / 8 mm for Extra Large) or use a slightly heavier yarn.
To size down: Use a smaller hook (US I-9 / 5.5 mm for Small) or a lighter DK weight yarn.
To add length: Add one additional row of squares to each panel (making 3 wide by 5 tall). This adds approximately 7.25 in / 18.5 cm to the length and requires 8 additional squares.
Finishing and Blocking
Weave in all ends on the WS, working each tail through at least 1.5 in / 4 cm of stitches in two directions.
For wet blocking, soak panels in cool water with gentle wool wash for 15 to 20 minutes. Gently press water out and roll in a clean towel. Pin to blocking mats, measuring each square to confirm 7.25 in / 18.5 cm. Allow to dry completely (typically 24 hours).
For acrylic yarn, use steam blocking instead. Hold a steam iron approximately 1 in above the surface, never touching the yarn.
Care Instructions
Wool or wool-blend: Hand wash in cool water with wool wash. Lay flat to dry.
Acrylic: Machine wash on gentle cold cycle in a mesh laundry bag. Tumble dry on low or lay flat.
Store folded flat, never on a hanger, as the crochet fabric will stretch at the shoulders.
You Did It!
I hope you love making this Sunset Ombre Floral Square Poncho as much as I loved designing it. There’s something so satisfying about watching those raised petals pop up and seeing the color gradient come together square by square. Thank you for trusting me with your yarn and your time. If you make one, I’d absolutely love to see it! Tag me on Instagram or share a photo in my Facebook group.
If this pattern is calling to you, go ahead and pin it to your crochet board so you can find it when you’re ready to start. And please drop a comment below if you give it a try. I read every single one and your photos make my whole week!
You Might Also Like
- Coral Sunset Crochet Summer Boots Free Pattern
- Sage Green Textured Baby Outfit Set Free Crochet Pattern
- Winter Snowflake Crochet Hoodie Free Crochet Pattern
- Lavender Daisy Granny Square Bag Free Crochet Pattern