Strawberry Baby Romper Free Crochet Pattern
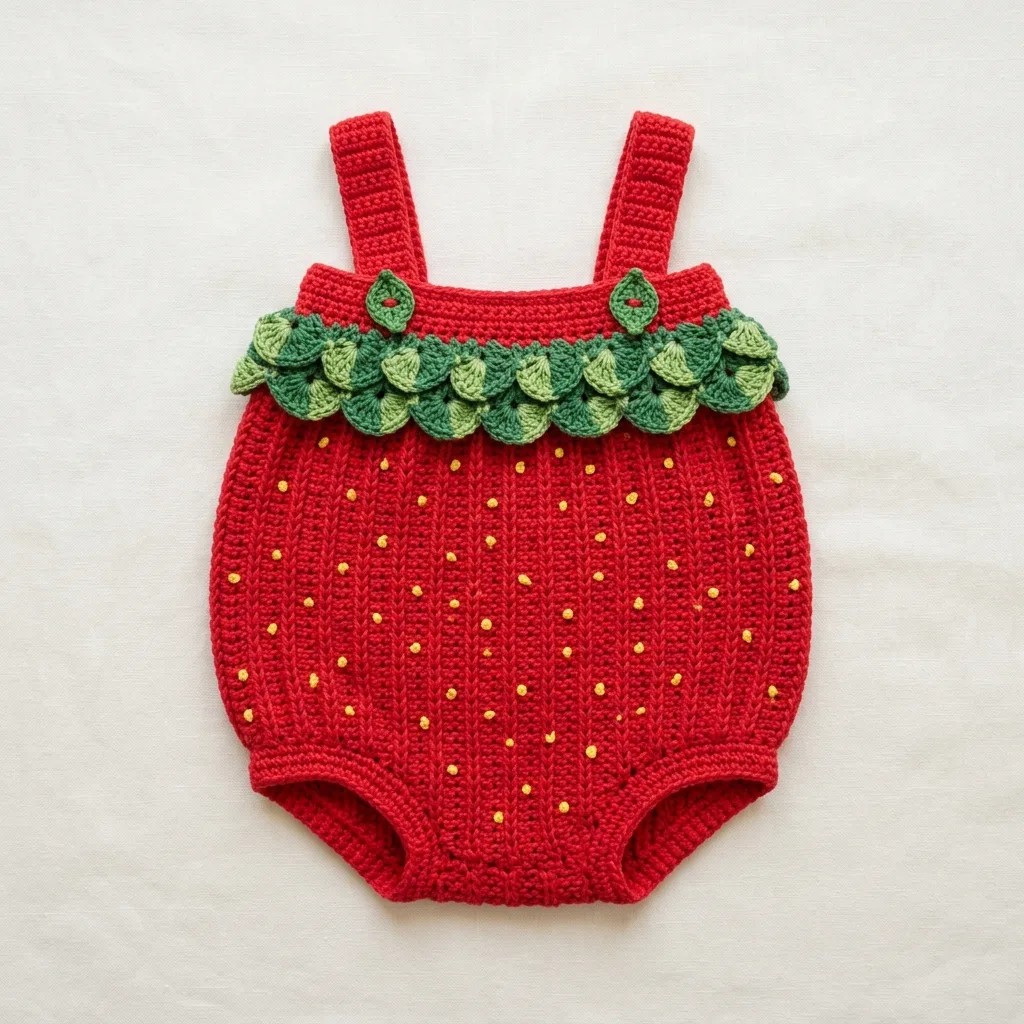
I’ve been on the hunt for the perfect summer baby outfit pattern, and this one stopped me in my tracks. This strawberry baby romper is hands down my favorite baby garment I’ve come across in ages.
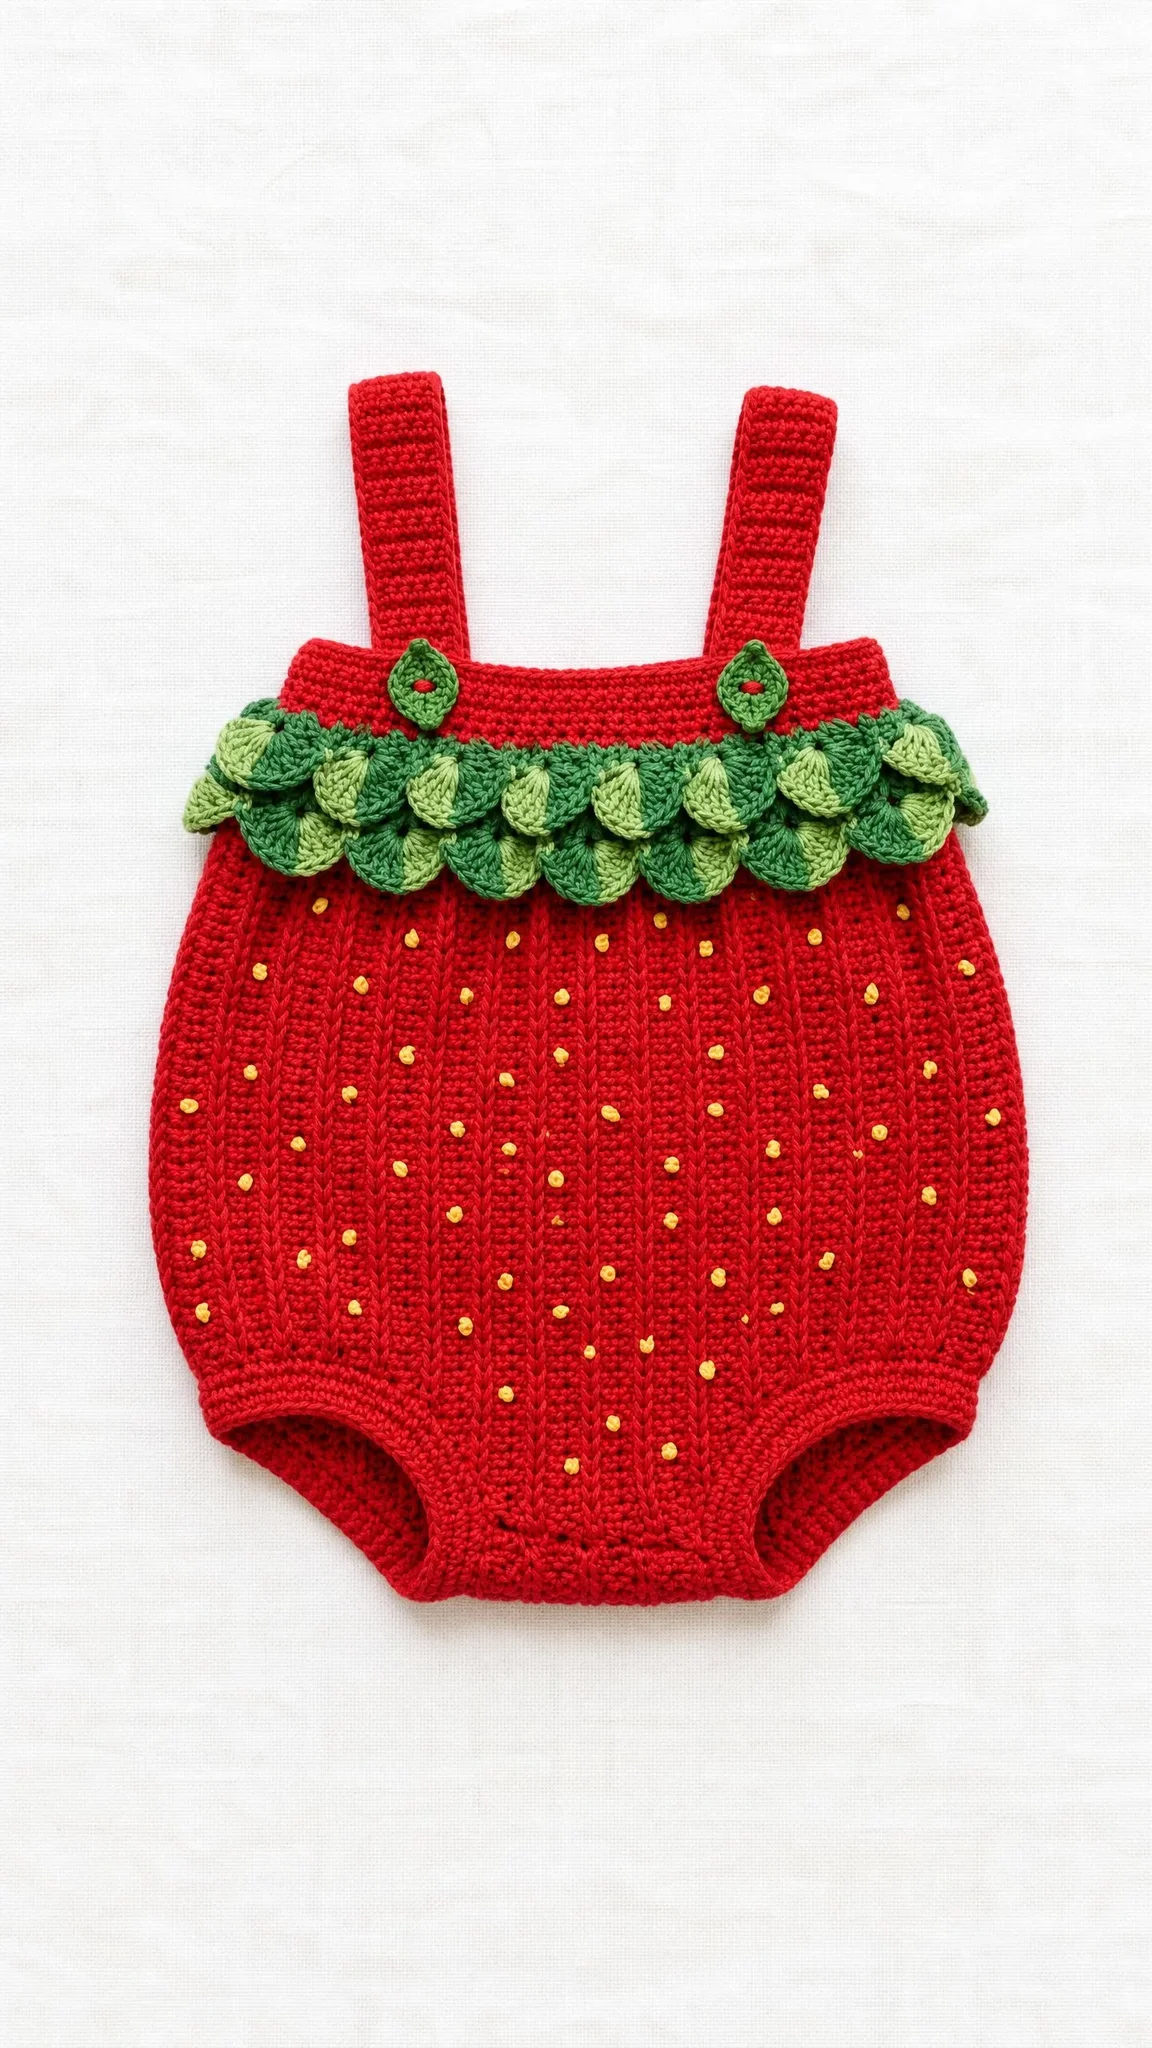
The design is absolutely adorable. A plump red body covered in tiny yellow seeds, topped with a lush collar of crocheted leaves. It looks like something straight out of a boutique, but you can make it yourself with basic stitches and a little patience.
If you’ve got a baby shower coming up or just want to make something special for your own little one, this crochet pattern delivers. Let me walk you through everything you need to know.
Why This Strawberry Baby Romper Pattern Works So Well
The genius of this design is in the details. The main body uses half double crochet through the back loop only, which I’ll call hdc-blo from here on out. This stitch creates those beautiful vertical ribs you see running down the romper. It gives the fabric stretch and texture while mimicking the natural lines of a real strawberry.
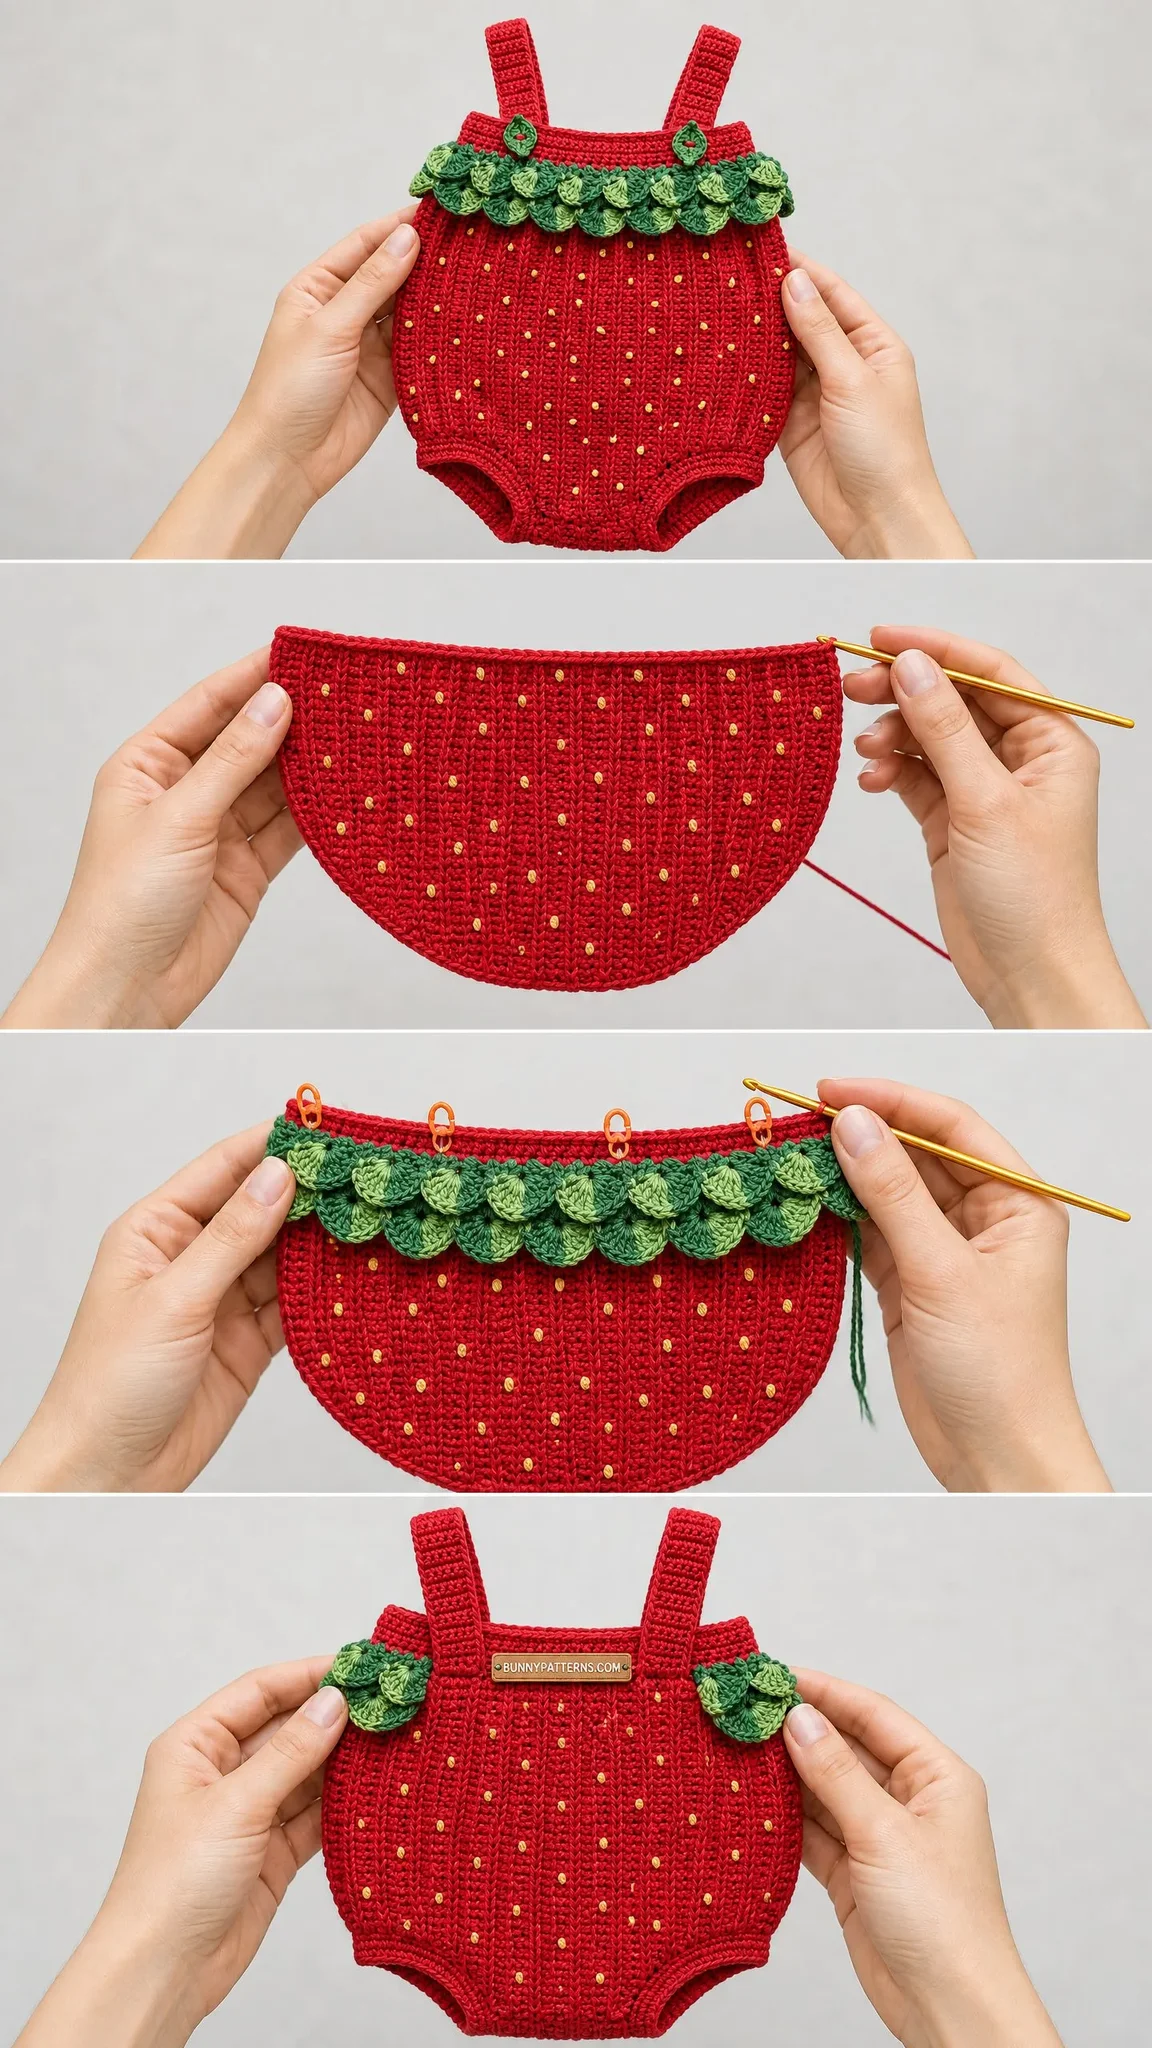
The construction is smarter than it looks at first glance. You start by making two separate leg tubes, then join them at the crotch and work upward in one continuous piece. This method eliminates bulky seams where baby sits and creates that signature bubble shape.
The leaf ruffle at the top is where this pattern really shines. You’ll make individual leaf motifs in two shades of green, then arrange them in an overlapping collar that looks exactly like a strawberry’s calyx. Those little yellow French knots or surface stitches become the seeds scattered across the body.
Skill Level and Time Estimate
This is an intermediate level crochet pattern. You should feel comfortable working in the round, making basic increases and decreases, and following multi-step stitch instructions for the leaf motifs.
Don’t let that scare you off if you’re a confident beginner. The main body uses just one stitch repeated over and over. The trickier parts are the shaping and the leaf assembly, both of which I’ll explain in detail.
Time estimate: Plan for 10 to 16 hours of work. The leaf ruffle takes the longest since you’re making about 30 individual motifs and attaching them one by one. Put on a good audiobook and settle in.
Finished Measurements
This romper fits babies 3 to 6 months old with the following dimensions:
The fabric has generous stretch thanks to the back loop only technique, so these measurements are starting points rather than rigid limits.
Materials You’ll Need
Yarn
You’ll need worsted weight yarn (Category 4) in four colors:
Yarn Suggestions
Lion Brand Vanna’s Choice works beautifully for this project. It’s affordable, machine washable, and holds stitch definition well. Try Scarlet for the red, Dusty Green for dark green, Fern for light green, and Mustard for the seeds.
Cascade 220 Superwash is a premium option if you want something softer against baby’s skin. It’s 100% superwash wool but still machine washable.
Whatever you choose, avoid fuzzy or highly textured yarns. You want smooth yarn that shows off the ribbed texture and makes your leaf motifs crisp and clear.
Hook and Notions
Gauge
18 hdc x 14 rows = 4 inches or 10 cm worked in the round in hdc-blo, blocked.
Gauge matters for a fitted garment like this. Make a swatch at least 5 inches square, block it, and measure the center. Go up a hook size if your swatch is too small, down if it’s too large.
Abbreviations and Stitch Definitions
Let me walk you through every abbreviation you’ll encounter. I’m defining them all upfront so you won’t get stuck mid-row wondering what something means.
Special Stitches
Hdc-blo (Half Double Crochet Through Back Loop Only)
Insert your hook into the back loop only of the stitch. That’s the loop furthest from you when looking at your work. Yarn over, pull up a loop so you have 3 loops on hook. Yarn over and pull through all 3 loops. One hdc-blo complete.
This stitch creates raised vertical ribs on the right side of your fabric.
Hdc2tog (Decrease)
Yarn over, insert hook into next stitch, yarn over and pull up a loop. You have 3 loops on hook. Yarn over again, insert hook into the following stitch, yarn over and pull up a loop. Now you have 5 loops on hook. Yarn over and pull through all 5 loops. You’ve turned two stitches into one.
Leaf Motif
Each leaf is worked separately in Color B or Color C, then attached to the romper. You’ll make approximately 28 to 32 leaves total, roughly half in each green shade.
Step 1: Ch 7.
Step 2: Starting in the 2nd ch from hook, sc in next 2 ch, hdc in next 2 ch, dc in next 1 ch. In the last ch, work (2 dc + ch 2 + 2 dc). This forms the pointed tip of your leaf.
Step 3: Rotate your work to continue along the opposite side of the foundation chain. Dc in next 1 ch, hdc in next 2 ch, sc in next 2 ch, sl st in the first ch at the base of the leaf.
Step 4: Ch 1, do not turn. Sl st in the back bump of the base chain to close. Fasten off, leaving a 6 inch tail for attaching.
Each finished leaf measures approximately 1 inch long and 0.5 inch wide.
Surface Slip Stitch Seeds
Thread your yarn needle with Color D. Bring the yarn from wrong side to right side at your chosen spot. Insert the needle back down through the center of that same stitch, creating a small raised dot on the surface. Pull snug but not tight enough to pucker the fabric. Knot securely on the wrong side.
You can also use French knots if you’re comfortable with that embroidery technique.
Pattern Notes Before You Begin
A few things to keep in mind as you work:
1. The body is worked in two separate leg tubes first, then joined at the crotch and continued as one piece.
2. Place a locking stitch marker at the beginning of every round and move it up as you go.
3. When working hdc-blo in the round, do not turn between rounds. Work continuously.
4. At the end of each round, sl st to the first hdc to close, then ch 1. This ch 1 does NOT count as a stitch throughout the entire pattern.
5. The wrong side of hdc-blo fabric has a chain-like texture. The right side has raised vertical ribs. Make sure your right side faces outward consistently.
Step by Step Instructions
Part 1: First Leg Tube
With Color A and leaving a 10 inch tail, ch 41. Sl st to first ch to form a ring, being careful not to twist.
Round 1: Ch 1 (does not count as st, now and throughout). Hdc in each ch around. Sl st to first hdc to join. (40 hdc)
Round 2: Ch 1. Hdc-blo in each st around. Sl st to first hdc to join. (40 hdc)
Rounds 3 through 10: Repeat Round 2 eight more times. (40 hdc each round)
After Round 10, your leg tube measures approximately 3 inches tall.
Do not fasten off. Cut yarn leaving a 10 inch tail. Place the loop onto a stitch holder or length of scrap yarn. Set aside.
Part 2: Second Leg Tube
Work exactly as First Leg Tube through Round 10. (40 hdc)
Do not fasten off and do not cut yarn. This live yarn will be used for joining.
Part 3: Joining at Crotch and Body
Arrange both leg tubes so the right side faces outward and the openings are at the top.
Joining Round: Place the first leg tube on your left and the live second leg tube on your right. With the working yarn still attached to the second leg tube, holding both tubes parallel with their tops aligned:
Ch 2. Insert hook into any stitch of the first leg tube at the top edge. This ch 2 forms the crotch bridge.
Work across the first leg tube: hdc-blo in each of the 40 sts of the first leg tube. (40 hdc worked)
Ch 2 at the far side of the first leg tube. This is the second crotch bridge.
Work across the second leg tube: hdc-blo in each of the 40 sts of the second leg tube. (40 hdc worked)
Now work into the chain bridges: work 1 hdc into each of the 2 ch on the far side, then 1 hdc into each of the 2 ch on the near side.
Sl st to first hdc of the round to join.
Total joining round count: 40 + 2 + 40 + 2 = 84 sts. (84 hdc)
Round 1 of Body: Ch 1. Hdc-blo in each st around. Sl st to join. (84 hdc)
Rounds 2 through 3: Repeat Round 1. (84 hdc each round)
Round 4 (decrease round): Ch 1. Hdc-blo in 19 sts, dec over next 2 sts repeat 4 times. Sl st to join. (80 hdc)
Rounds 5 through 7: Ch 1. Hdc-blo in each st around. Sl st to join. (80 hdc each round)
Round 8 (decrease round): Ch 1. Hdc-blo in 18 sts, dec over next 2 sts repeat 4 times. Sl st to join. (76 hdc)
Rounds 9 through 11: Ch 1. Hdc-blo in each st around. Sl st to join. (76 hdc each round)
Round 12 (decrease round): Ch 1. Hdc-blo in 17 sts, dec over next 2 sts repeat 4 times. Sl st to join. (72 hdc)
Rounds 13 through 14: Ch 1. Hdc-blo in each st around. Sl st to join. (72 hdc each round)
Checkpoint: After Round 14, the piece from crotch to current round measures approximately 4 inches. Body circumference is approximately 16 inches. The silhouette should taper slightly from hips to waist.
Part 4: Yoke Shaping (Worked Flat in Two Panels)
The yoke divides into front and back panels of 36 stitches each. You’ll work each panel separately, turning each row.
Mark the midpoint by placing a stitch marker after the 36th stitch of Round 14. The first 36 stitches are the FRONT. The remaining 36 stitches are the BACK.
Front Yoke Panel
Do not cut yarn. Work back and forth flat on the first 36 sts.
Row 1 (RS): Ch 1, turn. Hdc-blo in each of next 36 sts. (36 hdc)
Row 2 (WS): Ch 1, turn. Hdc-blo in each st across. (36 hdc)
Row 3 (RS, decrease row): Ch 1, turn. Dec over first 2 sts, hdc-blo in next 32 sts, dec over last 2 sts. (34 hdc)
Row 4 (WS): Ch 1, turn. Hdc-blo in each st across. (34 hdc)
Row 5 (RS, decrease row): Ch 1, turn. Dec over first 2 sts, hdc-blo in next 30 sts, dec over last 2 sts. (32 hdc)
Row 6 (WS): Ch 1, turn. Hdc-blo in each st across. (32 hdc)
Row 7 (RS, decrease row): Ch 1, turn. Dec over first 2 sts, hdc-blo in next 28 sts, dec over last 2 sts. (30 hdc)
Row 8 (WS): Ch 1, turn. Hdc-blo in each st across. (30 hdc)
Do not fasten off. Now divide for strap openings.
Left Strap Neck Opening (Front):
Row 9 (RS): Ch 1, turn. Hdc-blo in first 9 sts only. Turn. (9 hdc)
Row 10 (WS): Ch 1, turn. Hdc-blo in each of 9 sts. (9 hdc)
Row 11 (RS): Ch 1, turn. Dec over first 2 sts, hdc-blo in next 7 sts. (8 hdc)
Row 12 (WS): Ch 1, turn. Hdc-blo in each of 8 sts. (8 hdc)
Fasten off Color A. Mark these 8 stitches.
Center neck: Skip 12 center stitches of Row 8. These form the front neckline opening.
Right Strap Neck Opening (Front):
Rejoin Color A with a standing hdc-blo in the 19th stitch of Row 8.
Row 9 (RS): Hdc-blo in same st and in each of the remaining 8 sts. (9 hdc)
Row 10 (WS): Ch 1, turn. Hdc-blo in each of 9 sts. (9 hdc)
Row 11 (RS): Ch 1, turn. Hdc-blo in first 7 sts, dec over last 2 sts. (8 hdc)
Row 12 (WS): Ch 1, turn. Hdc-blo in each of 8 sts. (8 hdc)
Fasten off Color A. Mark these 8 stitches.
Back Yoke Panel
Rejoin Color A with a standing hdc in the first of the remaining 36 stitches at the back of Round 14, with RS facing.
Row 1 (RS): Hdc-blo in same st and in each of the next 35 sts across the back. (36 hdc)
Row 2 (WS): Ch 1, turn. Hdc-blo in each st across. (36 hdc)
Row 3 (RS, decrease row): Ch 1, turn. Dec over first 2 sts, hdc-blo in next 32 sts, dec over last 2 sts. (34 hdc)
Row 4 (WS): Ch 1, turn. Hdc-blo in each st across. (34 hdc)
Row 5 (RS, decrease row): Ch 1, turn. Dec over first 2 sts, hdc-blo in next 30 sts, dec over last 2 sts. (32 hdc)
Row 6 (WS): Ch 1, turn. Hdc-blo in each st across. (32 hdc)
Row 7 (RS, decrease row): Ch 1, turn. Dec over first 2 sts, hdc-blo in next 28 sts, dec over last 2 sts. (30 hdc)
Row 8 (WS): Ch 1, turn. Hdc-blo in each st across. (30 hdc)
Do not fasten off. Divide for back strap anchors exactly as for front.
Left Strap Neck Opening (Back):
Row 9 (RS): Ch 1, turn. Hdc-blo in first 9 sts. (9 hdc)
Row 10 (WS): Ch 1, turn. Hdc-blo in 9 sts. (9 hdc)
Row 11 (RS): Ch 1, turn. Dec over first 2 sts, hdc-blo in 7 sts. (8 hdc)
Row 12 (WS): Ch 1, turn. Hdc-blo in 8 sts. (8 hdc)
Fasten off. Mark these 8 stitches.
Skip 12 center stitches of Row 8 for back neckline opening.
Right Strap Neck Opening (Back):
Rejoin Color A with a standing hdc-blo in the 19th stitch of Row 8 at the back.
Row 9 (RS): Hdc-blo in same st and in remaining 8 sts. (9 hdc)
Row 10 (WS): Ch 1, turn. Hdc-blo in 9 sts. (9 hdc)
Row 11 (RS): Ch 1, turn. Hdc-blo in 7 sts, dec over last 2 sts. (8 hdc)
Row 12 (WS): Ch 1, turn. Hdc-blo in 8 sts. (8 hdc)
Fasten off. Mark these 8 stitches.
Part 5: Straps (Make 2)
Each strap is worked flat, 8 stitches wide, for approximately 4.5 inches or about 16 rows at gauge.
Left Strap:
Rejoin Color A to the 8 marked stitches at the top of the Left Front strap anchor, RS facing.
Row 1 (RS): Ch 1. Hdc-blo across 8 sts. (8 hdc)
Row 2 (WS): Ch 1, turn. Hdc-blo across 8 sts. (8 hdc)
Rows 3 through 16: Repeat Row 2. (8 hdc each row)
Fasten off leaving a 12 inch sewing tail.
Right Strap:
Work the same as Left Strap on the Right Front strap anchor 8 stitches. Fasten off leaving a 12 inch sewing tail.
Seam straps to back: With RS facing, align the end of the Left Strap with the Left Back strap anchor. Using the sewing tail and yarn needle, whipstitch or mattress stitch through both layers, joining all 8 stitches. Repeat for Right Strap to Right Back anchor.
Checkpoint: After seaming, the romper should have two closed armholes and two strap bridges. The finished height from crotch to top of strap should be approximately 11 inches.
Part 6: Yoke Edging and Ruffle Base
With Color B and RS facing, join yarn at the top-left side of the front yoke at the point where the body transitions to yoke shaping.
Work 1 round of sc evenly around the entire upper body circumference at the yoke join line. Work 1 sc in each stitch or row-end as needed to maintain flatness.
Target stitch count: 72 sc evenly distributed.
Sl st to first sc to join. (72 sc)
Part 7: Leaf Ruffle Assembly
Make 30 Leaf Motifs total: 15 in Color B (dark green) and 15 in Color C (light green), following the Leaf Motif instructions above.
Using the tails left on each leaf, sew or sl-st each leaf base to the ruffle base edging. Alternate colors loosely, angling leaves so they fan outward and overlap slightly. Space leaves approximately every 2 to 2.5 stitches around. The leaves should form a full, lush collar.
Add 2 upright accent leaves in Color B at the center front top of the ruffle, so they stand slightly above the ruffle line.
Part 8: Leg Edging
With Color A and RS facing, join yarn at the inside of one leg opening at the crotch bridge.
Work 1 round of sc around the leg opening, working into the foundation chain stitches and row edges as needed. Work approximately 40 sc evenly around. Sl st to join. Fasten off. (40 sc)
Repeat for second leg opening. (40 sc)
Optional: Work 1 additional round of sl st along each leg edge for a neater finish.
Part 9: Seed Embellishments
Thread a yarn needle with Color D.
Using surface slip stitch or French knot method, place yellow seed dots across the entire body in a random but balanced pattern. Aim for approximately 40 to 50 seeds total.
Place seeds roughly every 1 to 1.5 inches, distributed in the gaps between the ribbed columns. Avoid placing seeds on the yoke area, which is covered by leaves.
Weave in all Color D tails securely on the wrong side.
Size Customization Tips
Newborn (0 to 3 months): Reduce starting leg chain to 37 ch (36 working sts per leg). After joining, work with 76 sts. Total height approximately 9.5 inches.
6 to 9 months: Increase starting leg chain to 45 ch (44 working sts per leg). After joining, work with 92 sts. Add 2 more rows to leg tubes. Total height approximately 12 inches.
12 months: Increase starting leg chain to 49 ch (48 working sts per leg). After joining, work with 100 sts. Add 4 rows to leg tubes and 2 extra rows to body before yoke. Total height approximately 13 inches.
For any size change, adjust your leaf ruffle base and leaf count proportionally.
Finishing and Blocking
Weave in all remaining ends. At the crotch join, use the starting tails to close any small gaps at the bridge points.
Wet blocking is strongly recommended. Soak the finished romper in cool water with a drop of gentle soap for 15 minutes. Squeeze out excess water gently. Roll in a clean towel. Lay flat on a blocking mat and pin to finished measurements. Allow to dry completely.
For acrylic yarn, steam blocking with an iron held 1 inch above the surface works well. Do not press directly.
Care Instructions
Machine wash on gentle cycle in cool water if using machine-washable yarn. Lay flat to dry. Do not tumble dry on high heat. Store folded to avoid stretching the straps.
Thank you so much for choosing this strawberry baby romper crochet pattern. I really hope you enjoy making it as much as I enjoyed putting this tutorial together for you. If you make one, I would absolutely love to see it. Tag me on Instagram or share a photo on Facebook.
This sweet little romper makes such a memorable gift. Save it to your Pinterest boards so you can find it when that next baby shower invitation arrives, and drop a comment below if you give it a try. I always love hearing how your projects turn out!
You Might Also Like
- Terracotta Rust Textured Clutch Bag Free Crochet Pattern
- Lavender Wildflower Crochet Crown Free Crochet Pattern
- Pastel Pink Bunny Baby Romper Free Crochet Pattern
- Navy and Gold Heart Tote Bag Free Crochet Pattern