Sage Green Ruffle Baby Romper Free Crochet Pattern
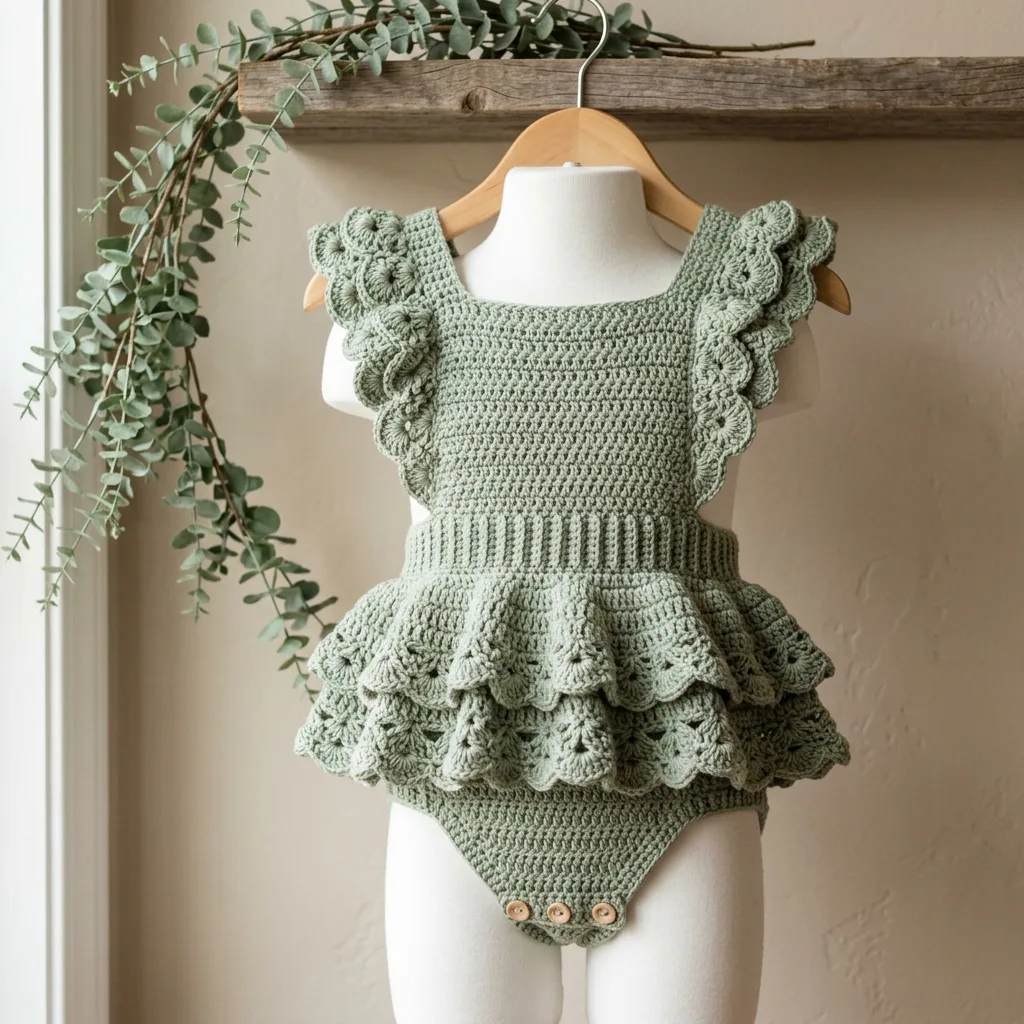
This is a heirloom-quality baby romper with flutter sleeves, a ribbed waistband, and two tiers of scalloped ruffles. The construction is top-down with a square neckline bodice worked in single crochet. You will need DK weight yarn, a 3.5mm hook, and intermediate crochet skills.
The finished piece features floral crochet trim on the shoulders, wooden button closures at the back neck and crotch, and that gorgeous sage green color that works for any season. Sizes range from 3-6 months through 12-18 months.
I designed this romper to be both practical and beautiful. The snap-crotch gusset makes diaper changes easy, while the shell stitch ruffles create that classic vintage baby aesthetic everyone loves.
Why This Baby Romper Pattern Works So Well
The construction method here is smart and efficient. You start at the neckline and work your way down, which means you can try the piece on as you go if you have a little one nearby. The bodice uses simple single crochet (sc) throughout, giving you a dense, sturdy fabric that holds its shape beautifully.
The magic happens at the waist. Switching to back-loop-only stitches creates natural ribbing that stretches slightly, just like the waistband on your favorite pants. Then the ruffle section explodes outward with dramatic shell stitches that cascade in two layers.
Those flutter sleeves with the floral trim? They are worked separately and attached at the armholes. This gives you total control over placement and lets you customize the fit.
Skill Level and Time Commitment
This pattern sits firmly at the intermediate level. You should feel comfortable working in the round, picking up stitches along edges, and reading a multi-section garment pattern. If you have completed at least two garment projects before, you will find this achievable with patience.
Expect to spend 10 to 16 hours on this project depending on your experience. I recommend spreading it across several sessions rather than marathon crocheting. Your hands will thank you, and you will make fewer mistakes when you are fresh.
The trickiest parts are the armhole separation round and attaching the lower ruffle tier. I will walk you through both step by step.
Materials You Will Need
Yarn: DK weight (CYCA 3) in sage green
Recommended yarns:
Choose a smooth yarn with clear stitch definition. Avoid fuzzy or textured yarns because they will obscure your beautiful scallop shells and floral motifs. Cotton or cotton-blend yarns work best for baby garments since they breathe well and feel soft against delicate skin.
Hooks:
Notions:
Safety note: Do not use buttons larger than 3/4 inch for infant safety. Secure all buttons very firmly with multiple passes of thread.
Gauge (Please Do Not Skip This)
With your primary E-4 / 3.5 mm hook in single crochet:
18 stitches x 22 rows = 4 inches / 10 cm square, blocked
With your ribbing D-3 / 3.25 mm hook in back-loop-only single crochet:
20 stitches x 24 rows = 4 inches / 10 cm
I know swatching is not the fun part. But gauge is critical for this garment. Even a half-stitch-per-inch difference will affect the chest measurement by over one inch across the full circumference. Make a swatch at least 6 inches square before starting.
Finished Measurements
Size 1 (3-6 months):
Size 2 (6-12 months):
Size 3 (12-18 months):
All measurements include approximately 0.5 inches of positive ease.
Abbreviations and Stitch Definitions
blo = back loop only: insert your hook under only the back loop of the stitch instead of both loops
ch = chain: yarn over, pull through the loop on your hook
ch-sp = chain space: the gap created by a chain in the previous row
dc = double crochet: yarn over, insert hook, yarn over and pull up a loop, yarn over and pull through 2 loops, yarn over and pull through remaining 2 loops
hdc = half double crochet: yarn over, insert hook, yarn over and pull up a loop, yarn over and pull through all 3 loops
inc = increase: work 2 single crochets in the same stitch
pm = place marker
rnd = round
RS = right side
sc = single crochet: insert hook, yarn over and pull up a loop, yarn over and pull through both loops
sc2tog = single crochet two together (decrease): insert hook in first stitch and pull up a loop, insert hook in next stitch and pull up a loop, yarn over and pull through all 3 loops
sk = skip
sl st = slip stitch: insert hook, yarn over and pull through both the stitch and the loop on your hook
sm = slip marker
st(s) = stitch(es)
WS = wrong side
yo = yarn over
Throughout this pattern, stitch counts appear first for Size 1, followed by Size 2 in brackets, then Size 3 in braces. Example: 72 [80] {88}.
Special Stitches
Scallop Shell
In the designated stitch or space, work: 2 dc, ch 1, 2 dc, ch 1, 2 dc. This creates a 6-dc fan shell with two chain-1 spaces within it. You will see this decorative waved edge on all ruffle tiers and sleeve edges.
Floral Sleeve Motif
This flat flower is worked separately and sewn to the top of each flutter sleeve. You will make 2 total.
To make one flower:
Ch 4, sl st to form a ring.
Rnd 1: Ch 1, work 8 sc into ring, sl st to first sc. (8 sc)
Rnd 2: [Ch 3, sk 1 st, sl st into next st] 4 times. (4 ch-3 loops)
Rnd 3: Into each ch-3 loop work [sc, hdc, 3 dc, hdc, sc]. (4 petals)
Fasten off leaving a 10 inch tail for sewing.
Shell Stitch Row
[Sk 2 sts, 5 dc in next st, sk 2 sts, sc in next st] across or around. This 6-stitch repeat forms the main shell fabric of the ruffle skirt panels.
Scallop Edge Round
[Sc in first dc of shell, ch 3, sc in last dc of shell, ch 2, sc in sc between shells] around. This closes and scallops the lower edge of each ruffle tier.
Back-Loop-Only Rib
Sc in the blo of every stitch across. Working blo in every row creates the horizontal ribbing texture visible at the waist.
Pattern Notes Before You Begin
1. The bodice is worked top-down, beginning at the neckline in joined rounds with the right side always facing.
2. The back has a small opening at center back with a single button and loop closure. You achieve this by working the back bodice flat for the first 3 rows, then joining to work in the round.
3. Armhole openings are created by placing markers and working armhole chains during yoke shaping. Flutter sleeves are then worked outward from picked-up armhole stitches.
4. Turning chains throughout this pattern do NOT count as stitches unless specifically noted.
5. Work all increases and decreases as noted. Do not substitute increase types as this affects the flat geometry of the bodice.
Section 1: Bodice
The bodice is worked from the neckline down to the underarm. You will first work the back panel flat, then join to work in the round, creating the square neckline and armhole openings as you go.
Back Panel (worked flat, RS facing)
Foundation chain: Ch 37 [41] {45}.
Row 1 (RS): Sc in second ch from hook and in each ch across. Turn. (36 [40] {44} sc)
Row 2 (WS): Ch 1, sc in each st across. Turn. (36 [40] {44} sc)
Row 3 (RS): Ch 1, sc in each st across. Turn. (36 [40] {44} sc)
This short flat section creates the back neckline opening. After Row 3, do not fasten off.
Joining to Work in the Round (Neckline Join)
After Row 3, chain 5 [5] {7} for the right shoulder strap base.
Front panel: Ch 37 [41] {45} for front neckline. Working across this new chain, sc in second ch from hook and in each ch across until you have 36 [40] {44} sc on the front. Do not turn.
Now join the front panel to the back panel by working the left shoulder strap: ch 5 [5] {7}, sl st to the beginning of the back panel Row 3 edge to join into a round.
You now have a rectangular neckline loop with:
Total neckline circumference: 82 [90] {102} sts
Place a stitch marker at each of the 4 corners of the neckline rectangle.
Bodice Body Rounds
You are now working in joined rounds, RS facing, starting at the left back corner and working clockwise.
Rnd 1: Ch 1, sc around entire neckline, working sc across the back (36 [40] {44} sc), sc across the left shoulder strap chs (5 [5] {7} sc), sc across the front (36 [40] {44} sc), sc across the right shoulder strap chs (5 [5] {7} sc), sl st to first sc to join. (82 [90] {102} sc)
Rnd 2: Ch 1, [sc to 1 st before corner marker, inc, sm, inc] 4 times, sc to end, sl st to join. (90 [98] {110} sc)
Rnd 3: Ch 1, sc in each st around, sl st to join. (90 [98] {110} sc)
Rnd 4: Ch 1, [sc to 1 st before corner marker, inc, sm, inc] 4 times, sc to end, sl st to join. (98 [106] {118} sc)
Rnd 5: Ch 1, sc in each st around, sl st to join. (98 [106] {118} sc)
Rnd 6: Ch 1, [sc to 1 st before corner marker, inc, sm, inc] 4 times, sc to end, sl st to join. (106 [114] {126} sc)
Rnd 7: Ch 1, sc in each st around, sl st to join. (106 [114] {126} sc)
For Size 3 only, work one additional increase round:
Rnd 8: Ch 1, [sc to 1 st before corner marker, inc, sm, inc] 4 times, sc to end, sl st to join. ({134} sc)
Rnd 9: Ch 1, sc in each st around, sl st to join. ({134} sc)
Final stitch counts after all shaping rounds:
CHECKPOINT 1: The bodice yoke should measure approximately 2 inches from the neckline edge. The piece should lie flat without cupping or ruffling.
Armhole Separation Round
In this round you will separate the front and back bodice sections and create the armhole openings by chaining across the underarm.
For each size, the back and front sections each have:
Separation Round: Ch 1, sc across front section (43 [47] {55} sc), ch 5 [5] {6}, skip 10 [10] {12} sts (the armhole sts on the right side), sc across back section (43 [47] {55} sc), ch 5 [5] {6}, skip 10 [10] {12} sts (the armhole sts on the left side), sl st to first sc to join. (96 [104] {122} total sts including chains)
Rnd after separation: Ch 1, sc in each st and each ch around, sl st to join. (96 [104] {122} sc)
CHECKPOINT 2: After the armhole separation round and the following sc round, your bodice circumference at the underarm should measure approximately 16 inches for Size 1, 17.5 inches for Size 2, and 19 inches for Size 3.
Bodice Lower Section
Continue working even in sc rounds until the bodice reaches the required height:
Each even round: Ch 1, sc in each st around, sl st to join. (96 [104] {122} sc)
CHECKPOINT 3: The bodice from neckline to bottom edge should measure 4.5 inches for Size 1, 5 inches for Size 2, or 5.5 inches for Size 3.
Do not fasten off. Proceed to Section 2.
Section 2: Waistband
Switch to smaller hook (D-3 / 3.25 mm) for all waistband rounds.
The waistband is worked in back-loop-only single crochet. This creates the ribbed elastic appearance at the waist.
Rnd 1: Ch 1, sc in blo of each st around, sl st to first sc to join. (96 [104] {122} sc)
Rnds 2-8: Ch 1, sc in blo of each st around, sl st to first sc to join. (96 [104] {122} sc)
The waistband is 8 rounds of blo sc, producing approximately 1.5 inches of ribbed fabric.
Switch back to primary hook (E-4 / 3.5 mm) after Round 8.
CHECKPOINT 4: The waistband should measure exactly 1.5 inches tall and should have a visible horizontal ribbing texture.
Do not fasten off. Proceed to Section 3.
Section 3: Ruffle Skirt
The ruffle skirt consists of two tiers. Each tier begins with an increase round to create ruffle volume, followed by shell stitch rounds and a scallop edge round.
Upper Ruffle Tier
Increase Round (Ruffle Foundation):
Size 1: Ch 3 (counts as first dc), dc in same st, 2 dc in each st around, sl st to top of ch-3 to join. (192 dc)
Size 2: Ch 3 (counts as first dc), dc in same st, [2 dc in next 25 sts, dc in next st] 4 times, sl st to top of ch-3 to join. (204 dc)
Size 3: Ch 3 (counts as first dc), dc in same st, [2 dc in next 29 sts, dc in next st] 4 times, sl st to top of ch-3 to join. (240 dc)
Sc Transition Round: Ch 1, sc in each dc around, sl st to first sc to join. (192 [204] {240} sc)
Upper Ruffle Shell Rounds
Shell Round 1: Ch 1, [sk 2 sts, 5 dc in next st, sk 2 sts, sc in next st] around, sl st to first sc to join. (32 [34] {40} shells)
Shell Round 2: Ch 3 (counts as dc), 2 dc in same st, [sc in 3rd dc of next shell, 5 dc in sc between shells] around, ending with sc in 3rd dc of last shell, sl st to top of ch-3 to join.
Shell Round 3: Repeat Shell Round 1.
Upper Ruffle Scallop Edge Round: Ch 1, [sc in first dc of shell, ch 2, sc in 3rd dc of shell, ch 2, sc in 5th dc of shell, ch 2, sc in sc between shells, ch 2] around, sl st to first sc to join.
Fasten off and weave in ends on the upper ruffle edge.
CHECKPOINT 5: The upper ruffle tier should measure approximately 2.5 inches for Size 1, 2.75 inches for Size 2, and 3 inches for Size 3.
Lower Ruffle Tier
The lower ruffle is attached to the front-loop-only stitches of the waistband’s increase round. Attach yarn to any front loop of the upper ruffle increase round with a sl st.
Increase Round for Lower Ruffle:
Size 1: Ch 1, 2 sc in each front loop around. (192 sc)
Size 2: Ch 1, work 2 sc in 100 loops and 1 sc in 4 loops (placed evenly). (204 sc)
Size 3: Ch 1, work 2 sc in 118 loops and 1 sc in 4 loops (placed evenly). (240 sc)
Lower Ruffle Shell Rounds
Shell Round 1: Ch 1, [sk 2 sts, 5 dc in next st, sk 2 sts, sc in next st] around, sl st to first sc to join. (32 [34] {40} shells)
Shell Round 2: Ch 3 (counts as dc), 2 dc in same st, [sc in 3rd dc of next shell, 5 dc in sc between shells] around, ending sc in 3rd dc of last shell, sl st to top of ch-3 to join.
Lower Ruffle Scallop Edge Round: Ch 1, [sc in first dc of shell, ch 2, sc in 3rd dc of shell, ch 2, sc in 5th dc of shell, ch 2, sc in sc between shells, ch 2] around, sl st to first sc to join.
Fasten off and weave in ends.
CHECKPOINT 6: After both ruffle tiers, the total ruffle section should measure 4 inches for Size 1, 4.5 inches for Size 2, and 5 inches for Size 3.
Section 4: Diaper Cover
The diaper cover is worked flat, beginning by picking up stitches across the bottom front edge of the lower ruffle tier’s base.
Front Diaper Panel
Pickup Row: With RS facing and primary hook, attach yarn to the first st of the front half of the lower ruffle increase round. Sc across 48 [52] {61} sts (the front half). Turn. (48 [52] {61} sc)
Row 1 (WS): Ch 1, sc2tog, sc to last 2 sts, sc2tog. Turn. (46 [50] {59} sc)
Row 2 (RS): Ch 1, sc2tog, sc to last 2 sts, sc2tog. Turn. (44 [48] {57} sc)
Row 3: Ch 1, sc2tog, sc to last 2 sts, sc2tog. Turn. (42 [46] {55} sc)
Row 4: Ch 1, sc2tog, sc to last 2 sts, sc2tog. Turn. (40 [44] {53} sc)
Row 5: Ch 1, sc2tog, sc to last 2 sts, sc2tog. Turn. (38 [42] {51} sc)
Rows 6-7: Ch 1, sc in each st across. Turn. (38 [42] {51} sc)
Row 8: Ch 1, sc2tog, sc to last 2 sts, sc2tog. Turn. (36 [40] {49} sc)
Row 9: Ch 1, sc2tog, sc to last 2 sts, sc2tog. Turn. (34 [38] {47} sc)
Row 10: Ch 1, sc2tog, sc to last 2 sts, sc2tog. Turn. (32 [36] {45} sc)
For Size 1 only, continue:
Row 11: Ch 1, sc2tog, sc to last 2 sts, sc2tog. Turn. (30 sc)
Row 12: Ch 1, sc2tog, sc to last 2 sts, sc2tog. Turn. (28 sc)
Rows 13-14: Ch 1, sc in each st across. Turn. (28 sc)
Continue decreasing and shaping according to your size until the diaper cover reaches 3 inches for Size 1, 3.5 inches for Size 2, or 4 inches for Size 3.
Work 3 button loops along the front crotch edge by chaining 3-4 stitches and skipping stitches to create loops that fit your 5/8 inch buttons.
Repeat the pickup and shaping process for the back diaper panel, then sew the side seams and attach buttons.
Section 5: Flutter Sleeves
Pick up stitches around each armhole opening. Work 2-3 rounds of sc, then work shell stitches and a scallop edge to match the ruffle tiers.
Sew one floral sleeve motif to the top of each flutter sleeve where it meets the shoulder.
Finishing
Weave in all ends with your tapestry needle. Block the romper gently by pinning it flat and misting with water, or steam blocking carefully.
Sew the back neck button securely at the center back opening. Sew the 3 crotch buttons to the back panel, aligning with the front button loops.
Give all buttons a firm tug to test security before dressing baby.
Tips for Success
Take breaks. This is a multi-session project. Rushing leads to mistakes, especially in the armhole separation round.
Use stitch markers liberally. Mark your corners, mark your shell repeats, mark the beginning of each round. You will thank yourself later.
Count after every round in the bodice. Catching an error immediately is so much easier than frogging 10 rounds.
Block before assembly. The shell stitches in the ruffles will look dramatically better after blocking.
Thank you so much for choosing this pattern for your next baby project. I hope you love making this romper as much as I loved designing it. If you make one, I would absolutely love to see it! Tag me on Instagram or share a photo in my Facebook group.
Save this pattern to your Pinterest boards so you can find it easily when you are ready to start. And if you have any questions or want to share your finished romper, please leave a comment below. I read every single one and love hearing from you!
You Might Also Like
- Ocean Blues Beaded Sea Creature Anklet Free Crochet Pattern
- Pink Rose Garden Crochet Vase Free Crochet Pattern
- Pastel Sunset Granny Tote Bag Free Crochet Pattern
- Lavender Peony Bloom Crochet Dress Free Crochet Pattern