Sage Green Mesh Tie Cardigan Free Crochet Pattern
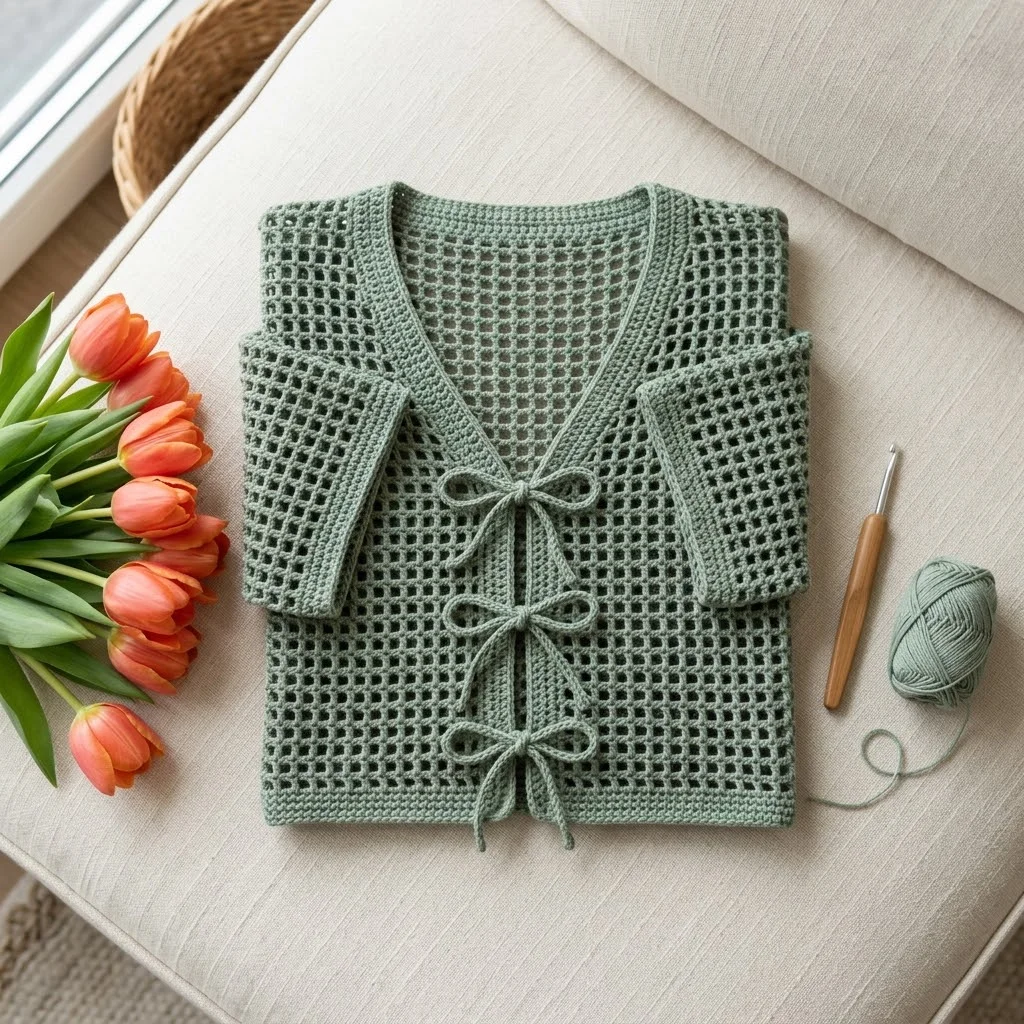
Cardigans look intimidating, right? All those pieces, the shaping, the finishing work. I hear this all the time from crocheters who stick to blankets and scarves because garments feel like too big a leap. But here is the truth. This mesh tie cardigan is far more approachable than it looks. The open stitch pattern works up quickly, the construction is straightforward, and those adorable bow ties at the front are just simple chains threaded through. If you can crochet a basic grid and sew a few seams, you can absolutely make this cardigan. Beginners with a few projects under their belts, this one is for you. And experienced makers? You will fly through it in a weekend.

Why You Will Love This Mesh Tie Cardigan Crochet Pattern
This sage green mesh tie cardigan combines a classic open stitch pattern with a modern silhouette. The V-neckline flatters every body type. The three delicate bow closures add a feminine, romantic touch without any complicated button bands or buttonhole calculations.
The mesh stitch pattern creates natural breathability, making this cardigan perfect for spring layering or cool summer evenings. It is lightweight enough to throw over a sundress but substantial enough to feel like a real finished garment.
What makes this crochet pattern special is the simplicity hiding behind the polished look. You are essentially creating rectangles with some basic shaping, then joining them together. No fancy decreases. No complex colorwork. Just rhythmic, meditative stitching that produces something genuinely wearable.
Materials You Will Need
Before you start, gather everything so you can work uninterrupted. There is nothing worse than running out of yarn mid-sleeve.
Yarn:
Hook:
Notions:
Gauge:
Skill Level
This mesh tie cardigan crochet pattern is rated intermediate beginner. If you have completed a few dishcloths, a simple scarf, or a basic beanie, you are ready for this project.
You should be comfortable with:
Stitch Abbreviations and Definitions
Let me walk you through every stitch you will use. Even if you know these, a quick refresher never hurts.
Ch = Chain. Wrap yarn over hook, pull through loop on hook. This creates the foundation and the spaces in your mesh.
Dc = Double crochet. Yarn over, insert hook into stitch, yarn over and pull up a loop (3 loops on hook), yarn over and pull through 2 loops (2 loops on hook), yarn over and pull through remaining 2 loops. This is your main stitch.
Sk = Skip. Pass over the indicated stitch without working into it.
Sl st = Slip stitch. Insert hook, yarn over, pull through both the stitch and the loop on your hook in one motion. Used for joining.
St/sts = Stitch/stitches.
Sp = Space. The gap created by chains in the mesh pattern.
Rep = Repeat.
Understanding the Mesh Stitch Pattern
The mesh creates an open grid of squares. Each “cell” of the grid consists of one double crochet, one chain, skip one stitch, then another double crochet. When stacked row over row, this creates the characteristic checkerboard of holes you see in the finished cardigan.
Practice Swatch (highly recommended):
Ch 22.
Row 1: Dc in 4th ch from hook (the skipped chains count as your first dc), *ch 1, sk 1 ch, dc in next ch*, rep from * to * across. (10 mesh cells, 20 sts counting chains as stitches)
Row 2: Ch 3 (counts as dc), turn, *dc in ch-1 sp, ch 1*, rep from * to * across, dc in top of turning chain. (10 mesh cells, 20 sts)
Rep Row 2 until your swatch measures at least 5 inches square. Measure your gauge. Adjust hook size if needed.
Size Information
This crochet tutorial provides instructions for size Medium, which fits a 36 to 38 inch bust with approximately 2 inches of positive ease. The finished cardigan measures approximately 40 inches at the bust when laid flat and buttoned/tied.
To adjust size: Add or subtract 8 chains to your foundation chain for each size up or down. Each 8 chains adds approximately 2 inches to the width.
Pattern Instructions: Back Panel
The back panel is a simple rectangle. No shaping required here.
Foundation: Ch 82.
Row 1: Dc in 4th ch from hook, *ch 1, sk 1 ch, dc in next ch*, rep from * to * across. (40 mesh cells, 80 sts)
Rows 2 through 45: Ch 3 (counts as dc), turn, *dc in ch-1 sp, ch 1*, rep from * to * across, dc in top of turning chain. (40 mesh cells, 80 sts)
Your back panel should measure approximately 20 inches wide and 18 inches tall. Fasten off and weave in ends.
Pattern Instructions: Left Front Panel
The front panels include V-neck shaping. Do not worry, it is just decreasing one mesh cell every few rows on the neckline edge.
Foundation: Ch 42.
Row 1: Dc in 4th ch from hook, *ch 1, sk 1 ch, dc in next ch*, rep from * to * across. (20 mesh cells, 40 sts)
Rows 2 through 20: Ch 3, turn, work in mesh pattern across. (20 mesh cells, 40 sts)
Begin V-Neck Shaping (Row 21):
Row 21: Ch 3, turn, work in mesh pattern until 2 mesh cells remain, dc in next ch-1 sp, dc in top of turning chain (skip the final ch 1). (19 mesh cells)
Rows 22 through 24: Work even in mesh pattern. (19 mesh cells)
Row 25: Rep Row 21 decrease. (18 mesh cells)
Rows 26 through 28: Work even. (18 mesh cells)
Continue this pattern, decreasing 1 mesh cell at the neckline edge every 4th row, until you have 14 mesh cells remaining.
Work even until piece measures 18 inches from foundation, matching the back panel length.
Fasten off.
Pattern Instructions: Right Front Panel
Work as for Left Front Panel, but reverse the shaping. Your decreases will happen at the beginning of the row instead of the end.
Rows 1 through 20: Work as for Left Front.
Row 21 (decrease row): Ch 2 (does not count as stitch), turn, sk first ch-1 sp, dc in next dc, continue in mesh pattern across. (19 mesh cells)
Continue mirroring the Left Front shaping.
Pattern Instructions: Sleeves (Make 2)
The sleeves are worked flat and seamed.
Foundation: Ch 58.
Row 1: Dc in 4th ch from hook, *ch 1, sk 1 ch, dc in next ch*, rep from * to * across. (28 mesh cells, 56 sts)
Rows 2 through 30: Work even in mesh pattern. (28 mesh cells, 56 sts)
Each sleeve should measure approximately 14 inches wide and 12 inches long. Fasten off.
Assembly: Joining the Pieces
This is where your cardigan comes together. Take your time here. Good seaming makes all the difference.
Step 1: Join Shoulder Seams
Place the back panel and one front panel right sides together. Using your yarn needle and a length of yarn approximately 18 inches long, whipstitch or mattress stitch the shoulder seams together, joining approximately 5 inches from each outer edge. This leaves the center open for your neckline.
Repeat with the second front panel.
Step 2: Attach Sleeves
Find the center of one sleeve’s top edge. Match this point to the shoulder seam. Pin in place. Pin the sleeve edges to the front and back body panels, measuring 7 inches down from the shoulder seam on each side.
Whipstitch the sleeve cap to the body.
Repeat with the second sleeve.
Step 3: Side and Underarm Seams
Fold the cardigan so front and back panels align at the side edges. Starting at the bottom hem, whipstitch up the side seam and continue down the underarm of the sleeve to the cuff.
Repeat on the other side.
Adding the Edging
The solid border around the neckline and front edges gives this cardigan its polished, finished look.
Round 1: Join yarn at the bottom right front corner. Sc evenly up the right front edge, around the neckline, and down the left front edge. Work approximately 3 sc for every 2 rows along the vertical edges. Work 1 sc in each stitch along the neckline. Sl st to join.
Round 2: Ch 1, sc in each sc around. Sl st to join.
Rounds 3 through 5: Rep Round 2.
Fasten off and weave in ends.
Add the same edging to each sleeve cuff and the bottom hem of the body.
Creating the Tie Closures
Those sweet little bow ties are simply chains with single crochet edging. You will make 6 ties total, which creates 3 bow closures.
For each tie:
Ch 60. Sc in 2nd ch from hook and each ch across. (59 sc)
Fasten off, leaving a 6 inch tail.
Using your yarn needle, attach one tie to the left front edge and its partner directly across on the right front edge. Space your three pairs of ties evenly along the front opening. The sample shows them at approximately 3 inches, 8 inches, and 13 inches from the bottom hem.
Tie each pair in a simple bow.
Care Instructions
This mesh tie cardigan deserves gentle treatment to maintain its shape and drape.
Styling Your Finished Cardigan
This versatile piece works with so many outfits. Layer it over a fitted tank and high waisted jeans for everyday wear. Pair it with a midi skirt and sandals for a more feminine look. The sage green color coordinates beautifully with whites, creams, soft pinks, and denim.
The open mesh means you will want to wear something underneath. A simple camisole or fitted tee in a coordinating or contrasting color looks lovely peeking through the grid pattern.

Troubleshooting Tips
My mesh looks uneven: This usually means your tension varies between the double crochets and the chain stitches. Try to keep consistent pressure on your working yarn. Blocking helps tremendously.
My front panels are different lengths: Count your rows carefully and measure frequently. Use a row counter if counting is not your strong suit.
The neckline is too wide/narrow: Adjust how many mesh cells you decrease, or adjust the frequency of your decrease rows. More decreases = narrower neckline. Fewer decreases = wider neckline.
The sleeves are too tight at the shoulder: Increase the number of rows where you attach the sleeve cap to the body.
I really hope you enjoy making this sage green mesh tie cardigan as much as I enjoyed designing it. It is the kind of project that feels special while you are making it and looks absolutely beautiful when finished. If you give this crochet pattern a try, I would love to see your version! Tag me on Instagram or share a photo in our Facebook group.
Save this pattern to your Pinterest boards so you can find it when you are ready to start. And if you make your own mesh tie cardigan, please drop a comment below. I read every single one and your photos absolutely make my day.
You Might Also Like
- Coral Sunset Ruffled Baby Romper Free Crochet Pattern
- Mustard Yellow Boho Tote with Brown Leather Tassels Pattern
- Warm Autumn Terracotta Shoulder Bag Free Crochet Pattern
- Ocean Waves Ombre Granny Square Blanket Free Crochet Pattern