Pastel Rainbow Shell Stitch Bodysuit Free Pattern
Introduction
Crochet bodysuits look intimidating. I get it. Between the bust shaping, the fitted seat, and keeping those shell stitches lined up through all those color changes, this seems like a project only advanced crocheters should attempt.
But here’s the truth. If you can work a double crochet and follow a simple repeat, you can make this bodysuit. The shell stitch pattern is just five double crochets worked into one spot. That’s it. The short-row cup shaping sounds fancy, but it’s really just working fewer stitches across certain rows to build height where you need it. I promise this is more approachable than it appears.
Whether you’re an intermediate crocheter ready to level up or an advanced maker looking for your next satisfying project, this pattern breaks everything down into manageable pieces. You’ll work flat panels, seam them together, and finish with gorgeous scalloped edging. By the end, you’ll have a stunning handmade bodysuit that looks like it belongs in a boutique window.
About This Crochet Pattern
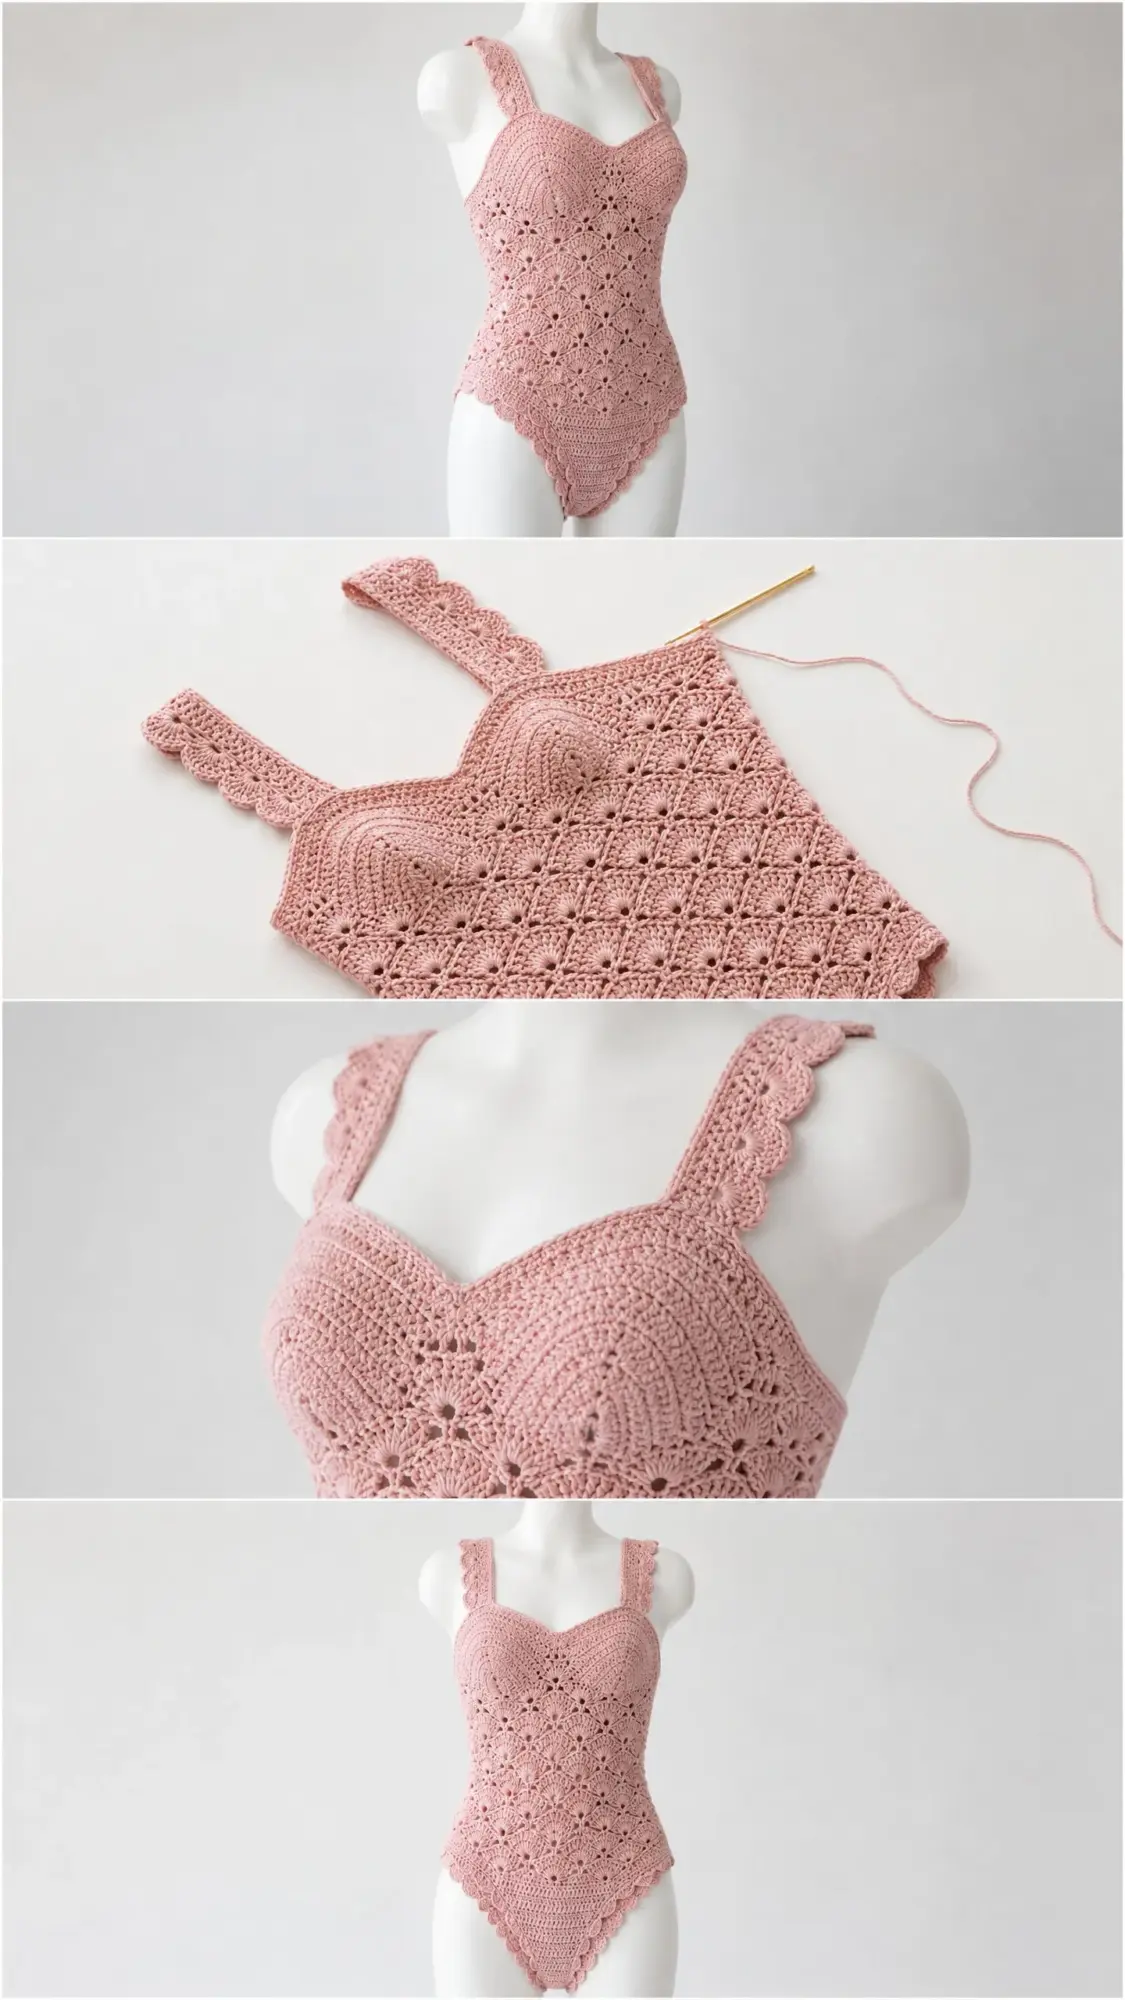
This shell stitch bodysuit features a classic fan pattern that creates beautiful texture and just the right amount of stretch for a comfortable fit. The design includes a sweetheart-style bust worked in two cup panels, a fitted waist and hip section, and a high-cut leg opening finished with delicate scalloped edging.
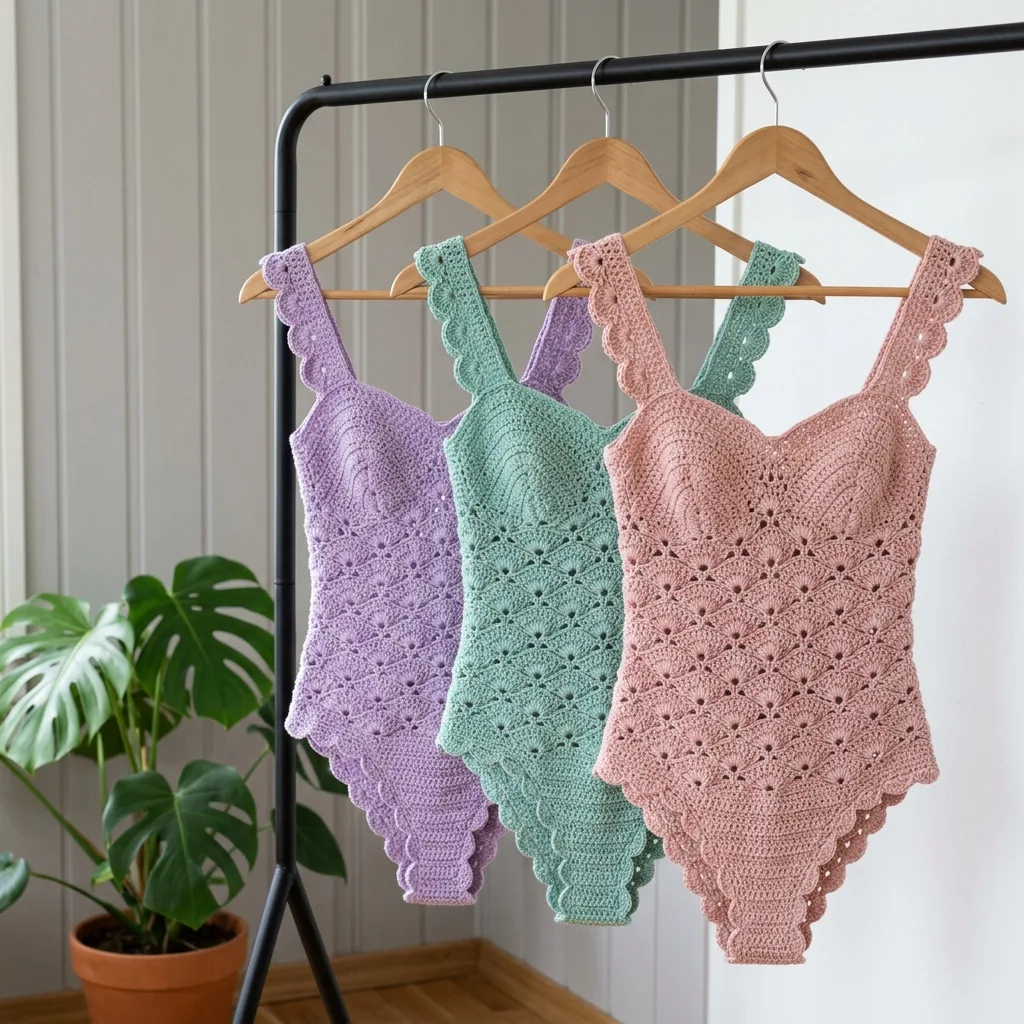
What makes this pattern special is the horizontal color bands that progress through soft pastels. The image shows three gorgeous versions in solid lavender, mint green, and dusty rose. Each one demonstrates how beautifully the shell stitch pattern catches the light and creates depth.
The garment is constructed in four main pieces. You’ll work the front body and back body as flat panels, then make two straps separately. Everything gets seamed together at the end, which means no tricky working in the round with shaping to worry about.
Skill level: Intermediate to Advanced. This rating comes from the bust cup shaping, managing multiple color changes, and achieving a proper garment fit. If you’re comfortable with basic shell stitches and have done some simple shaping before, you’re ready for this.
Time estimate: Approximately 20 to 30 hours for an experienced intermediate crocheter. First-time garment makers should allow extra time for fitting and adjustments.
Finished Measurements
This pattern is written for a size Medium with the following finished dimensions:
Size customization guidance appears at the end of the pattern. If you’re making a different size, please swatch, calculate, and adjust your starting chain before beginning.
Materials Needed
Yarn: Fingering weight (CYCA 1 Super Fine) cotton or cotton-blend yarn. Approximately 1,400 yards (1,280 m) total divided across five colors:
Hook: US B-1 / 2.25 mm (recommended for gauge accuracy with cotton fingering weight)
Notions:
Yarn Suggestions
Paintbox Yarns Simply DK Cotton (100% cotton, 137 yards per 50 g ball). Note: this is a DK weight option. If you choose this, size up to a US D-3 / 3.25 mm hook and re-swatch to achieve gauge. The fabric will be slightly more drapey.
Lion Brand 24/7 Cotton in fingering weight (100% mercerized cotton, 186 yards per 50 g ball). Works beautifully at the stated hook size and produces excellent stitch definition for the shell pattern.
Scheepjes Catona (100% mercerized cotton, 62 yards per 10 g ball). Premium stitch definition, wide color range ideal for the pastel palette, slightly firmer hand that holds the bodysuit shape well.
Substitution note: Choose a smooth, non-fuzzy yarn with minimal stretch. Avoid acrylic blends for a bodysuit worn as swimwear, as they absorb water heavily. Mercerized cotton provides the best shape retention and color vibrancy. Whatever yarn you choose, achieving gauge is mandatory for a wearable result.
Gauge
After blocking:
Swatch instructions: Chain 37. Work in shell stitch pattern (see Special Stitches) for 20 rows. Block swatch. Measure the center 4 inches.
Do not skip swatching. A difference of even half a shell repeat across the body will result in a 3-inch circumference discrepancy. Trust me on this one.
Abbreviations
Special Stitches
Shell Stitch (Shell)
Work 5 dc all into the same stitch or space. This creates a fan of 5 double crochets that spread into a shell shape. Think of it like placing five posts in one hole, and they naturally fan out.
Shell Row
Row begins with a turning chain of 3 (counts as first dc of first shell throughout pattern). Skip 2 stitches. Work Shell (5 dc) into next stitch. Skip 2 stitches. Single crochet into next stitch. Continue across, alternating Shell and sc. End with dc into last stitch to close the edge.
Connecting Row (Plain Row)
Chain 1, turn. Single crochet into first dc. Chain 2. Single crochet into center (third) dc of next shell. Chain 2. Repeat across. Single crochet into top of turning chain at end. This row re-establishes anchor points for the next shell row.
Scallop Edging
Join yarn with sl st. Chain 1. Work 1 sc, then chain 3, then sl st back into the first ch to form a small picot, then sc again into the same stitch, skip 1 stitch. Repeat across for standard scallop.
For wider scallop at hem: work (sc, ch 3, 3 dc, ch 3, sc) all into the same stitch, skip 2 stitches, repeat across.
Shell Increase
Work Shell into indicated stitch as normal, then work a second Shell into the very next stitch. This places two fans side by side and adds 4 stitches effectively to the working fabric.
Shell Decrease
Skip the center dc of one shell on the previous row and work sc into the gap instead of into the center dc. This collapses one fan.
Bust Cup Foundation
The cup is worked over a multiple of 6 plus 1 stitches. Cups are built using short rows that add height to the center while leaving edge stitches unworked to create a curved upper edge and sweetheart shaping.
Slip Stitch Join
Insert hook into indicated stitch, yarn over, pull loop through stitch and through loop on hook. Creates a flat, nearly invisible seam when used for side seaming on wrong side.
Pattern Notes Before You Begin
1. The bodysuit is worked in four main pieces: Front Body (one piece worked flat), Back Body (one piece worked flat), Left Strap, and Right Strap. The bust cups are integrated into the Front Body during construction.
2. Color changes happen at the beginning of a shell row. Always change color on the last yarn-over of the last stitch of the previous row, so the new color forms the top of that stitch correctly.
3. The shell stitch repeat used throughout is a multiple of 6 plus 1 for the working stitches (not counting the turning chain). When adding or removing stitches for shaping, always adjust in increments of 6 to maintain pattern integrity.
4. Right side is defined as the side facing you when the first shell row is worked.
5. All edging is worked after assembly with Color A.
6. Turn work at the end of every flat row unless otherwise instructed.
7. Stitch counts in parentheses at the end of each row reflect the total number of working stitches in that row, not counting turning chains unless otherwise noted.
8. The gusset is a separate small rectangle seamed to join the front and back lower sections at the crotch. It is worked in Color E.
9. A snap closure or hook-and-eye at the inner gusset is optional but recommended for swimwear use.
10. Read the entire pattern before beginning. I know this feels tedious, but for a fitted garment like this, understanding the construction flow really helps.
Step-by-Step Pattern Instructions
Front Body
The Front Body is worked from the bottom hem upward, beginning with the hip and waist section, then transitioning to the bust cups.
Foundation Chain: Using Color E, chain 109.
Row 1 (ws, foundation row): Starting in second ch from hook, sc across. (108 sc)
Row 2 (rs, scallop setup, still Color E): Ch 3, turn. This row establishes the lower scallop edge. Work (3 dc, ch 1, 3 dc) all into first st, skip 2 sts, sc into next st, skip 2 sts. Rep from beg pattern to end. Fasten off Color E after this row. (18 scallop shells placed, 108 sts consumed)
Note: The scallop hem row is decorative and does not alter the working stitch count for subsequent rows. Row 3 will be worked back into the foundation chain edge, treating it as the true working base.
Rejoin Color E at the beginning of the foundation chain (the starting tail end), with rs facing.
Row 3 (rs, first shell row, Color E): Ch 3 (counts as dc). Sk first 2 sts of foundation chain. Work Shell into next st. Sk 2 sts. Sc into next st. Continue pattern across, ending with dc into last st. (17 shells, 18 sc including anchor sc, 1 beg dc, 1 end dc)
Stitch count note: 17 shells x 5 dc = 85 dc from shells. Plus 1 beg dc, 1 end dc = 87 dc. Plus 18 sc anchors. Total positions used in Row 3 = 108. This is correct.
Row 4 (ws, connecting row, Color E): Ch 1, turn. Sc into top of first dc. Ch 2. Sc into center dc of first shell. Ch 2. Sc into each anchor sc from prev row, placing ch 2 before and after each. End with sc into top of t-ch. (36 sc, 36 ch-2 sps)
Change to Color D at end of Row 4 on last pull-through.
Row 5 (rs, shell row, Color D): Ch 3, turn. Sk ch-2 sp, work Shell into next sc (anchor sc from prev row), sk ch-2 sp, sc into next sc (the sc over shell center). Rep across. End with dc into last sc. (17 shells, 18 sc, 2 edge dc)
Row 6 (ws, connecting row, Color D): Ch 1, turn. Work connecting row as established. (36 sc, 36 ch-2 sps)
Row 7 (rs, shell row, Color D): As Row 5. (108 working positions)
Row 8 (ws, connecting row, Color D): As Row 6. Change to Color C at end of Row 8.
Row 9 (rs, shell row, Color C): As Row 5. (108 working positions)
Row 10 (ws, connecting row, Color C): As Row 6.
Row 11 (rs, shell row, Color C): As Row 5. (108 working positions)
Row 12 (ws, connecting row, Color C): As Row 6. Change to Color B at end of Row 12.
Row 13 (rs, shell row, Color B): As Row 5. (108 working positions)
Row 14 (ws, connecting row, Color B): As Row 6.
Row 15 (rs, shell row, Color B): As Row 5. (108 working positions)
Row 16 (ws, connecting row, Color B): As Row 6. Change to Color A at end of Row 16.
CHECKPOINT 1: After Row 16, your Front Body piece should measure approximately 8 inches (20 cm) in height from the hem scallop to the working edge, and 18 inches (46 cm) wide. This is the full hip and waist section.
Waist Shaping (Rows 17-20, Color A)
To create gentle waist shaping, decrease 6 stitches (1 full shell repeat) over the next two shell rows.
Row 17 (rs, shell row with decrease, Color A): Ch 3, turn. Work in est shell pattern across first 48 sts (8 shells completed). At center, skip one sc anchor and work dc instead of Shell into the next available sc position, then sc into the following shell center, then continue pattern across. This collapses one shell at center. End as est. (16 shells, 1 center dc, 17 anchor sc visible, 2 edge dc)
Row 18 (ws, connecting row, Color A): Ch 1, turn. Work connecting row as established across all sts. (34 sc, 34 ch-2 sps)
Row 19 (rs, shell row, Color A): Ch 3, turn. Work shell pattern across, placing a Shell into each anchor sc and sc over each shell center. (16 shells, 17 sc, 2 edge dc)
Row 20 (ws, connecting row, Color A): As Row 18. (34 sc, 34 ch-2 sps)
CHECKPOINT 2: After Row 20, piece should measure approximately 10 inches (25 cm) tall and 17 inches (43 cm) wide at the working edge. This is the waist level.
Bust Section Setup (Rows 21-24, Color A)
The bust section is worked in two halves to create the sweetheart separation. First work the right cup, then the left cup, then join.
Row 21 (rs, shell row, Color A): Ch 3, turn. Work 7 shells across first half of piece (consuming 43 sts including edge dc). Place marker. Leave remaining sts unworked. (7 shells, 8 sc, 1 beg dc)
Row 22 (ws, connecting row, Color A, right cup): Ch 1, turn. Work connecting row across 44 sts only. (15 sc, 14 ch-2 sps)
Row 23 (rs, shell row with armhole shaping, Color A, right cup): Ch 3, turn. Work 6 shells. Final position: sc into last anchor. Leave the outermost edge dc unworked to create the slight inward angle of the sweetheart neckline. (6 shells, 7 sc, 1 beg dc)
Row 24 (ws, connecting row, Color A, right cup): Ch 1, turn. Work connecting row across 38 sts. (13 sc, 12 ch-2 sps). Fasten off.
Right Cup Short-Row Shaping (Rows 25-30, Color A)
This is where the magic happens for creating that 3D cup shape. Don’t let the short rows intimidate you. You’re simply working fewer stitches each time to build height in the center.
Rejoin yarn at the innermost stitch of the right cup (center of body edge) with rs facing.
Row 25 (rs): Ch 3. Work 3 shells from center outward only (over 19 sts). Turn. (3 shells, 4 sc, 1 beg dc)
Row 26 (ws): Ch 1, turn. Work connecting row over these 19 sts. (7 sc, 6 ch-2 sps)
Row 27 (rs): Ch 3. Work 2 shells from center. Turn. (2 shells, 3 sc, 1 beg dc)
Row 28 (ws): Ch 1, turn. Work connecting row over 13 sts. (5 sc, 4 ch-2 sps)
Row 29 (rs): Ch 3. Work 1 shell. Sc to end. (1 shell, 2 sc, 1 beg dc)
Row 30 (ws): Ch 1, turn. Work connecting row over 7 sts. (3 sc, 2 ch-2 sps). Fasten off.
This short-row sequence builds a raised dome at the center of the cup, creating 3D cup shaping.
Left Cup (Rows 21-30, Color A)
Rejoin Color A at the center marker placed in Row 21, with rs facing, at the stitch immediately left of center.
Work Rows 21 through 30 mirroring the right cup exactly, reversing all shaping directions (begin shells from the outer edge and work toward center for the short rows).
After Row 30 of left cup, fasten off.
CHECKPOINT 3: After both cups are complete, the bust section should measure approximately 5 inches (13 cm) tall from Row 17 upward, and each cup should be approximately 8.5 inches (22 cm) wide at the base and 4.5 inches (11 cm) tall at the tallest point of the short-row dome.
Back Body
The Back Body is worked identically to the Front Body through Row 20 (waist shaping complete), but without bust cup construction. After Row 20, continue as follows.
Rows 21-28 (Color A, full-width shell rows): Work in est shell pattern across all 102 sts (maintaining 16 shells per shell row, 17 sc per connecting row, 2 edge dc). (102 working positions per shell row)
Armhole shaping begins at Row 29.
Row 29 (rs, armhole shaping, Color A): Ch 3, turn. Skip first 7 sts (skip 1 shell worth). Sl st into next sc anchor. Ch 3. Continue shell pattern across to last 7 sts. Leave last 7 sts unworked. (14 shells, 15 sc, 2 edge dc)
Row 30 (ws, connecting row): Ch 1, turn. Work connecting row across 88 sts. (30 sc, 30 ch-2 sps)
Rows 31-32: Continue in est shell pattern over 88 sts. (88 working positions per shell row)
After Row 32, the back body is complete. Do not fasten off. Turn work.
Back top edge finishing: Work 1 row sc across the top 88 sts. (88 sc). Fasten off.
CHECKPOINT 4: The Back Body piece should now measure approximately 15 inches (38 cm) tall from the hem scallop row to the top edge, and approximately 14.5 inches (37 cm) wide at the top (post-armhole shaping). The hip and waist width matches the Front Body.
Straps (Make 2, Color A)
Each strap is a rectangular flat panel 1.5 inches wide and 9 inches long with scallop edging on both long sides.
Foundation Chain: Chain 10.
Row 1: Sc in second ch from hook and across. (9 sc)
Rows 2-36: Ch 1, turn. Sc across. (9 sc per row)
After Row 36, do not fasten off. Work scallop edging along both long edges as follows: with rs facing, join at bottom corner. Work (sc, ch 3, sc) into corner. Work sc edging up the long side, placing (ch 3 between every 3 sc) to create a scalloped effect. Work corner. Continue along opposite long edge. Sl st to starting point. Fasten off.
Each strap should measure 9 inches (23 cm) long and 1.5 inches (3.8 cm) wide after edging. Make 2.
Gusset Panel (Color E)
The gusset is a small rectangle that joins the front and back lower edges.
Foundation Chain: Chain 19.
Row 1: Sc in second ch from hook and across. (18 sc)
Rows 2-12: Ch 1, turn. Sc across. (18 sc)
After Row 12, fasten off. The gusset should measure approximately 3 inches (7.5 cm) wide and 2 inches (5 cm) tall. Set aside.
Assembly Instructions
Step 1: Block all pieces before seaming. See Blocking section below.
Step 2: Side seams. With wrong sides held together, use a tapestry needle and matching yarn to work slip stitch seams along both side edges of Front and Back Body pieces, beginning at the hip and ending at the armhole shaping. The armhole opening is left unworked at this stage.
Step 3: Gusset attachment. With wrong sides together, center the gusset at the lower front crotch edge. Seam the top edge of the gusset to the front lower edge using sl st join. Seam the bottom edge of the gusset to the back lower edge. The sides of the gusset fold and are seamed to the inner leg edges of both pieces, forming the crotch seam.
Step 4: Strap attachment. Position left strap between left front cup top and left back top edge. Pin in place. Using tapestry needle and Color A, seam each strap end securely with whip stitch, passing through 8-10 stitches at each attachment point for strength.
Step 5: Leg openings. The leg openings are formed naturally by the high-cut shape of the hip section. No additional cutting is required.
Edging (Color A)
Work all edging after assembly is complete.
Leg Opening Edging
Join Color A at inner gusset seam. Work 1 rnd sc evenly around entire leg opening, placing approximately 1 sc per sc row end and 1 sc per dc row end. Adjust to even multiple of 3. Then work 1 rnd of wide scallop edging as described in Special Stitches. Fasten off. Repeat for second leg opening.
Armhole Edging
Join Color A at underarm seam. Work 1 rnd sc around armhole opening, then 1 rnd scallop edging. Fasten off. Repeat for second armhole.
Top Edge Edging (Sweetheart Neckline)
Join Color A at right strap top edge. Work sc across top of right strap, continue sc across right cup top edge, work across center sweetheart dip (place extra sc into corner to fill), work across left cup, across left strap. Work 1 rnd of scallop edging. Fasten off.
Lower Hem Edging
The scallop was worked as part of construction at the hem. If additional reinforcement is needed after blocking, work 1 additional row of sc along the inner side of the hem scallop.
Size Customization Tips
To make a smaller or larger size, adjust the starting chain in increments of 12 (to maintain both the 6-stitch shell repeat and bilateral symmetry). Each 12-chain increment changes the finished hip circumference by approximately 2 inches (5 cm).
For a size Small (32 inch bust, 34 inch hip): Start with chain 97 (96 working stitches, 16 shells per row).
For a size Large (36 inch bust, 38 inch hip): Start with chain 121 (120 working stitches, 20 shells per row).
For a size Extra Large (38 inch bust, 40 inch hip): Start with chain 133 (132 working stitches, 22 shells per row).
Adjust strap length by adding or subtracting rows in pairs to maintain symmetry. For a longer torso, add 2-4 additional shell rows in the Color C or Color D section before beginning waist shaping. For a shorter torso, reduce by 2-4 rows in those sections.
Cup size adjustments: For a fuller cup, add 2 additional short rows in each cup, working 4 shells instead of 3 at the widest short-row round. For a smaller cup, eliminate Rows 29 and 30 of the short-row sequence.
Finishing and Blocking
Wet blocking is strongly recommended for all cotton and cotton-blend yarns. This step truly transforms the finished piece.
Step 1: Soak the finished assembled bodysuit in cool water with a small amount of wool wash or gentle soap for 20 minutes.
Step 2: Gently press out excess water. Do not wring.
Step 3: Lay flat on a clean towel. Roll in towel and press to remove more moisture.
Step 4: Lay flat on a blocking mat. Shape to measurements using rust-proof pins. Pin along the scalloped edges, spreading each scallop point to its full extent. Pin the cup domes to maintain their 3D shape (a small crumpled towel placed inside each cup during drying helps preserve the dome).
Step 5: Allow to dry completely before removing pins, typically 24-48 hours depending on humidity.
After blocking, the yarn will relax and the shell stitch fans will open to their full width and drape. The garment will grow approximately 5-8% in each direction, which is accounted for in the pattern’s stitch counts.
If using the garment as swimwear, consider applying a light coat of fabric stiffener to the gusset lining only after blocking.
Care Instructions
Machine wash on gentle cycle in cold water in a mesh laundry bag, or hand wash in cool water. Do not tumble dry. Lay flat to dry. Do not iron directly on crochet. Steam blocking may be used between wears to restore shape. Store folded or laid flat, not hung, to prevent stretching from the weight of the garment.
Final Thoughts
Thank you so much for choosing this crochet bodysuit pattern. I really hope the detailed instructions help you feel confident tackling the bust shaping and color changes. This is the kind of project that looks absolutely stunning when finished, and you deserve to wear something you made with your own hands.
If you make this bodysuit, I would absolutely love to see it! Tag me on Instagram or share a photo in my Facebook group. Seeing your finished projects is genuinely the best part of designing patterns.
Go ahead and pin this pattern to your crochet board so you can find it when you’re ready to start. And if you have any questions along the way, drop a comment below. I’m always happy to help troubleshoot. Happy crocheting!
You Might Also Like
- Rose Gold Monarch Crochet Mini Dress Free Pattern
- Terracotta Earth Tone Backpack Free Crochet Pattern
- Coastal Blue Granny Square Patchwork Cardigan Free Pattern
- Coral Sunset Granny Square Tote Free Crochet Pattern