Ocean Breeze Mesh Cropped Hoodie Free Crochet Pattern
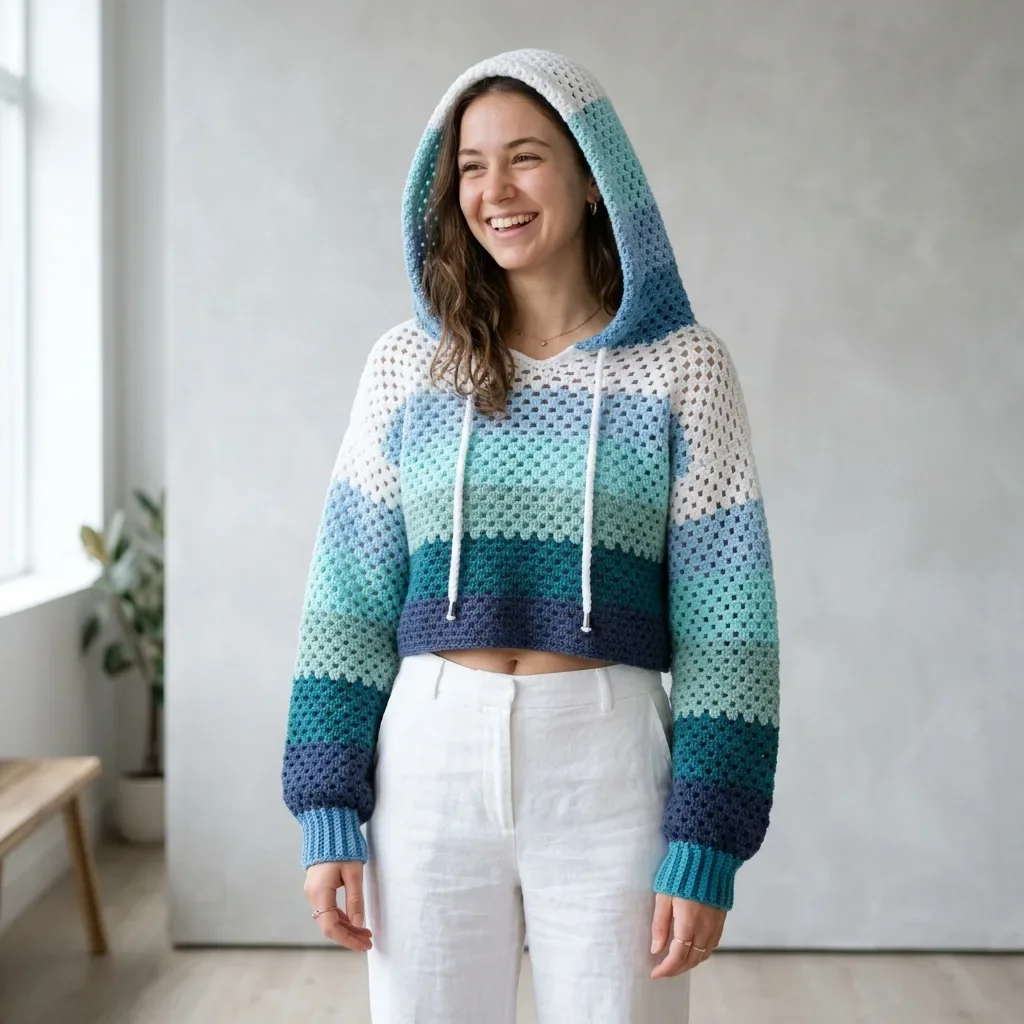
This is a cropped pullover hoodie worked in granny mesh stitch. You need intermediate skills, seven colors of worsted weight yarn, and two hook sizes. The construction involves flat panels, seaming, and a hood picked up from the neckline.
The ombre color scheme transitions from deep navy at the hem through teals, aqua, mint, and periwinkle, finishing with white at the hood. The result looks like an ocean gradient. The open mesh fabric keeps the sweater lightweight and breathable despite its hoodie silhouette.
The body hits at your natural waist with a slightly cropped length. Sleeves are oversized with a dropped shoulder for that relaxed, cozy vibe. A drawstring cord threads through the hood’s front edge for both function and style.
Why You Will Love This Crochet Hoodie Pattern
The granny mesh stitch creates beautiful drape without feeling heavy. Each row works up quickly because you are skipping stitches and working chain spaces between your double crochets. The open texture also means this hoodie works for three seasons, not just winter.
The color stripe sequence does all the visual work for you. No complicated colorwork charts or carrying yarns. Just change colors at the start of designated rows and watch the gradient build itself. It feels almost magical seeing those ocean tones stack up.
This pattern offers six sizes from XS through 2XL, with finished bust measurements ranging from 32 inches to 52 inches. The design includes 2 to 4 inches of positive ease built in, giving you that relaxed fit you see in the photos.
Materials You Will Need
Yarn: Worsted weight yarn in seven colors. You will use approximately 200 to 220 yards per 100 gram skein.
Here is your color lineup from hem to hood:
Total yardage by size:
Hooks:
Notions:
Recommended Yarn Options
Lion Brand Pound of Love works wonderfully here. It comes in tons of solid colors, washes easily, and gives crisp stitch definition in mesh patterns.
Paintbox Yarns Simply Worsted offers an extensive color range for building your own ombre. The smooth finish blocks beautifully.
Cascade 220 Superwash is your luxury option. The superwash merino gives incredible drape and softness while remaining machine washable.
Avoid fuzzy or highly textured yarns. They will obscure your mesh pattern and muddy the color transitions.
Gauge Information
Getting gauge right matters a lot for garments. Take time to swatch before diving in.
With larger hook (J-10/6.0 mm) in granny mesh stitch:
With smaller hook (I-9/5.5 mm) in sc ribbing:
If your swatch runs large, go down a hook size. If it runs small, go up a hook size.
Finished Measurements
Instructions are written for size XS with larger sizes in parentheses (S, M, L, XL, 2XL).
| Size | Bust | Length |
|---|---|---|
| XS | 32 in / 81 cm | 14 in / 35.5 cm |
| S | 36 in / 91.5 cm | 14.5 in / 37 cm |
| M | 40 in / 101.5 cm | 15 in / 38 cm |
| L | 44 in / 112 cm | 15.5 in / 39.5 cm |
| XL | 48 in / 122 cm | 16 in / 40.5 cm |
| 2XL | 52 in / 132 cm | 16.5 in / 42 cm |
Sleeve length from underarm to cuff measures approximately 17 inches for all sizes. You can adjust this easily, and I will show you how later.
Abbreviations and Stitch Definitions
Let me walk you through every stitch and abbreviation you will encounter.
ch = chain: Yarn over, pull through the loop on your hook. This creates the foundation for your work.
sl st = slip stitch: Insert hook, yarn over, pull through both the stitch and the loop on your hook in one motion. Used for joining and seaming.
sc = single crochet: Insert hook, yarn over, pull up a loop (2 loops on hook), yarn over, pull through both loops.
dc = double crochet: Yarn over, insert hook, yarn over, pull up a loop (3 loops on hook), yarn over, pull through 2 loops, yarn over, pull through remaining 2 loops.
flo = front loop only: Work into just the front loop of the stitch instead of both loops. Creates the ribbed texture in the cuffs and hem.
t-ch = turning chain: The chain(s) worked at the beginning of a row that count as your first stitch.
RS = right side: The public-facing side of your work.
WS = wrong side: The inside of your finished piece.
sk = skip: Pass over the indicated stitch without working into it.
sp = space: The gap created by chain stitches, where you will sometimes place stitches.
Special Techniques
Granny Mesh Stitch (Worked Flat)
This is the main fabric for your hoodie. It creates an open grid pattern that is both beautiful and quick to work.
Foundation row (RS): Chain the required number. Work 1 dc in the 4th chain from hook (the skipped chains count as dc plus ch 1). Ch 1, skip 1 chain, dc in next chain. Repeat from across. Turn.
Working row: Ch 4 (counts as dc plus ch 1). Skip the first dc and first ch-sp. Dc in next dc, ch 1. Repeat from across. End with dc in the 3rd chain of the turning chain. Turn.
Repeat the working row throughout. You are essentially creating columns of double crochets separated by chain 1 spaces.
Important counting note: When the pattern gives stitch counts for the mesh body, it refers to the number of dc posts only, not the chain spaces. So “40 dc” means 40 vertical double crochet posts across the row.
Single Crochet Ribbing
The cuffs and hem use this technique, worked perpendicular to the body.
Row 1: Ch 7, sc in 2nd chain from hook and in each chain across. Turn. (6 sc)
Subsequent rows: Ch 1, sc in flo of each sc across. Turn.
Working in the front loop only creates those stretchy horizontal ridges you see in traditional ribbing. The ribbing is then attached to the garment edge.
Color Change Method
Change colors at the beginning of a new row. Work your last dc of the previous color until 2 loops remain on your hook. Then pull up the new color and complete the stitch. Fasten off the old color and weave in ends as you go.
Since each color appears only once in this pattern, you will fasten off each color when finished rather than carrying it up the side.
Pattern Instructions
Back Panel
Hem Ribbing
Using the smaller hook and Color A, ch 7.
Ribbing Row 1: Sc in 2nd chain from hook and each chain across. Turn. (6 sc)
Ribbing Rows 2 through 48 (54, 60, 66, 72, 78): Ch 1, sc in flo of each sc across. Turn.
After the last ribbing row, rotate the ribbing 90 degrees so the long edge faces you.
Body Setup Row (RS, larger hook, Color A):
Ch 1, work 48 (54, 60, 66, 72, 78) sc evenly across the long edge of the ribbing. Turn. (48, 54, 60, 66, 72, 78 sc)
Mesh Foundation Row (RS):
Ch 4 (counts as dc plus ch 1). Skip 1 sc. Dc in next sc, ch 1, skip 1 sc. Repeat from across to last sc, dc in last sc. Turn. (25, 28, 31, 34, 37, 40 dc including t-ch dc)
Mesh Working Row:
Ch 4, skip first dc and first ch-sp. Dc in next dc, ch 1. Repeat from across. Dc in 3rd ch of t-ch. Turn. (same dc count as previous row)
Body Color Stripe Sequence:
Work the mesh working row continuously, changing colors as follows:
Total body rows by size:
After the final row, fasten off with a long tail for seaming.
Checkpoint: Your back panel should measure approximately 8 (8.5, 9, 9.5, 10, 10.5) inches wide and 12 (12.5, 13, 13.5, 14, 14.5) inches tall from top of ribbing to final row.
Back Neckline Shaping
The center 7 (8, 9, 10, 11, 12) dc posts form the back neck opening. Work shoulders separately.
Right Back Shoulder:
Rejoin yarn at the right edge. Work mesh row across the first 9 (10, 11, 12, 13, 14) dc posts. Turn. Work 1 more mesh row. Fasten off.
Left Back Shoulder:
Skip the center 7 (8, 9, 10, 11, 12) dc posts. Rejoin yarn at the next dc. Work mesh row across the remaining 9 (10, 11, 12, 13, 14) dc posts. Turn. Work 1 more mesh row. Fasten off.
Front Panel
Work the front panel exactly as the back panel through all body rows with the same color sequence.
Front Neckline Shaping
Left Front Shoulder:
Row 1: Work mesh row across the first 9 (10, 11, 12, 13, 14) dc posts. Turn.
Row 2: Work mesh row across same stitches. Fasten off.
Center Front: Skip the center 7 (8, 9, 10, 11, 12) dc posts. Leave them unworked to form the neck opening.
Right Front Shoulder:
Rejoin yarn at the next dc after center stitches.
Row 1: Work mesh row across remaining 9 (10, 11, 12, 13, 14) dc posts. Turn.
Row 2: Work mesh row. Fasten off.
Sleeves (Make 2)
Cuff Ribbing
Using the smaller hook and Color A, ch 7.
Ribbing Row 1: Sc in 2nd ch from hook and in each ch across. Turn. (6 sc)
Ribbing Rows 2 through 26 (28, 30, 32, 34, 36): Ch 1, sc in flo of each sc across. Turn.
After the last ribbing row, rotate 90 degrees. Work into row-end edges to begin sleeve body.
Sleeve Setup Row (RS, larger hook, Color A):
Ch 1, work 26 (28, 30, 32, 34, 36) sc evenly across the long edge of cuff ribbing. Turn.
Sleeve Mesh Foundation Row (RS):
Ch 4, skip 1 sc. Dc in next sc, ch 1, skip 1 sc. Repeat from to last sc, dc in last sc. Turn. (14, 15, 16, 17, 18, 19 dc)
Sleeve Increases
The sleeve widens from cuff to underarm. Each increase row adds 1 dc at each end (2 dc total).
Increase at beginning of row: Ch 6 instead of ch 4, work dc in 4th ch from hook, ch 1, skip 1 ch, then continue mesh row as normal.
Increase at end of row: After last dc of mesh row, ch 1, dc in the same stitch (the 3rd ch of the t-ch).
For XS and S:
Rows 1 through 3: Mesh working row, no increase.
Row 4: Increase row. (16, 17 dc)
Rows 5 through 7: Mesh working row, no increase.
Row 8: Increase row. (18, 19 dc)
Rows 9 through 11: Mesh working row, no increase.
Row 12: Increase row. (20, 21 dc)
Rows 13 through 15: Mesh working row, no increase.
Row 16: Increase row. (22, 23 dc)
Rows 17 through 19: Mesh working row, no increase.
Row 20: Increase row. (24, 25 dc)
Rows 21 through 22: Mesh working row, no increase.
Final dc count: (24, 25 dc)
For M and L:
Rows 1 through 3: Mesh working row, no increase.
Row 4: Increase row. (18, 19 dc)
Rows 5 through 7: Mesh working row, no increase.
Row 8: Increase row. (20, 21 dc)
Rows 9 through 11: Mesh working row, no increase.
Row 12: Increase row. (22, 23 dc)
Rows 13 through 15: Mesh working row, no increase.
Row 16: Increase row. (24, 25 dc)
Rows 17 through 19: Mesh working row, no increase.
Row 20: Increase row. (26, 27 dc)
Rows 21 through 23: Mesh working row, no increase.
Final dc count: (26, 27 dc)
For XL and 2XL:
Rows 1 through 3: Mesh working row, no increase.
Row 4: Increase row. (20, 21 dc)
Rows 5 through 7: Mesh working row, no increase.
Row 8: Increase row. (22, 23 dc)
Rows 9 through 11: Mesh working row, no increase.
Row 12: Increase row. (24, 25 dc)
Rows 13 through 15: Mesh working row, no increase.
Row 16: Increase row. (26, 27 dc)
Rows 17 through 19: Mesh working row, no increase.
Row 20: Increase row. (28, 29 dc)
Rows 21 through 24: Mesh working row, no increase.
Final dc count: (28, 29 dc)
Sleeve Color Stripe Sequence:
Rows 1 through 3: Color A
Rows 4 through 6: Color B
Rows 7 through 9: Color C
Rows 10 through 12: Color D
Rows 13 through 15: Color E
Rows 16 through 18: Color F
Rows 19 onward: Color G
Fasten off with a long tail for seaming.
Checkpoint: Each sleeve should measure approximately 5 (5.5, 6, 6.5, 7, 7.5) inches wide at the underarm edge and approximately 17 inches long.
Assembly
Step 1: Shoulder Seams
Hold the back and front panels with right sides facing outward. Align the right shoulder edges. Using a tapestry needle and Color G yarn, whipstitch through corresponding stitches across the shoulder. Fasten off and weave in the end. Repeat for the left shoulder.
Step 2: Mark Armhole Openings
Measure down 8.5 (9, 9.5, 10, 10.5, 11) inches from the shoulder seam along each side edge. Place stitch markers at these points on both front and back.
Step 3: Set In Sleeves
Match the center top of each sleeve to the shoulder seam. Seam the sleeve top edge to the body armhole edge using whipstitch, with right sides facing outward. The sleeve top should fit exactly between your two armhole markers.
Step 4: Side and Sleeve Seams
Starting at the sleeve cuff edge, seam up the sleeve and continue down the body side in one continuous seam, ending at the bottom hem ribbing. Repeat for the other side.
Hood
Hood Pickup Row
With right side facing, join Color G yarn at the right front shoulder seam. Using the larger hook, work sc evenly around the entire neckline opening.
Neckline pickup counts by size:
Turn after the pickup row.
Hood Mesh Foundation Row (WS):
Ch 4, skip 1 sc. Dc in next sc, ch 1, skip 1 sc. Repeat from to last sc, dc in last sc. Turn. (23, 25, 27, 29, 31, 33 dc)
Hood Body:
Work the mesh working row for 21 (21, 22, 22, 23, 23) total rows (including foundation row), maintaining the same stitch count throughout, in Color G.
Hood Seam:
Fold the hood in half lengthwise so the first and last row align at the top. Whipstitch across the top to close. Fasten off and weave in the end.
Hood Edging:
With right side facing and using the larger hook and Color G, join yarn at the bottom right front corner of the hood. Work 1 row of sc up the right front edge, around the face opening, and down the left front edge. Work 1 sc per row end. Fasten off.
Drawstring:
Thread your white cord through the ch-1 spaces along the front two rows of the hood, starting at the right front corner and exiting at the left front corner. Knot each end to prevent fraying.
Finishing
Weave in all remaining yarn ends securely.
Blocking:
Wet blocking gives the best results. Submerge the finished hoodie in cool water with a small amount of wool wash for 15 to 20 minutes. Lift gently and squeeze out excess water. Do not wring. Roll in a clean dry towel and press firmly. Lay flat on a blocking mat, pin to finished measurements, and let dry completely. This opens up the mesh beautifully.
Size Customization Tips
To adjust width: Each additional 2 dc in the foundation row adds approximately 1 inch of width. Add or subtract dc in pairs to maintain the mesh pattern.
To adjust length: Add or remove mesh rows in the Color G section of the body. Each row adds approximately 0.57 inches.
To adjust sleeve length: Add or remove mesh rows in the Color G section of the sleeve.
Tips for Success
Take your time with the seaming. Good seams make the difference between a homemade look and a professional finish.
Block before you wear it, especially if you used acrylic yarn. The mesh really opens up and the drape improves dramatically.
When changing colors, work that last yarn over of the previous stitch with your new color. This keeps your color transitions crisp.
Count your stitches regularly, especially through the first few rows of each section. Catching a mistake early saves frogging later.
I hope you love making this Ocean Breeze Mesh Cropped Hoodie as much as I loved designing it. The gradient effect is so satisfying to watch come together, and the finished hoodie is exactly the kind of piece you will reach for again and again.
If you make this crochet hoodie pattern, I would absolutely love to see your finished piece. Tag me on Instagram or share a photo in my Facebook group. Seeing your color combinations always inspires me.
Save this pattern to your Pinterest boards so you can find it when you are ready to start. And please drop a comment below if you have questions or want to share your progress. I read every single one and love hearing from you!
You Might Also Like
- Gray Tabby Cat Bow Sweater Free Crochet Pattern
- Daisy Meadow Crochet Tote Free Pattern
- Ocean Wave Crochet Crop Top and Fringe Pants Pattern
- Lavender Jellyfish Baby Blanket Free Crochet Pattern