Ocean Blue Starfish Baby Blanket Free Crochet Pattern
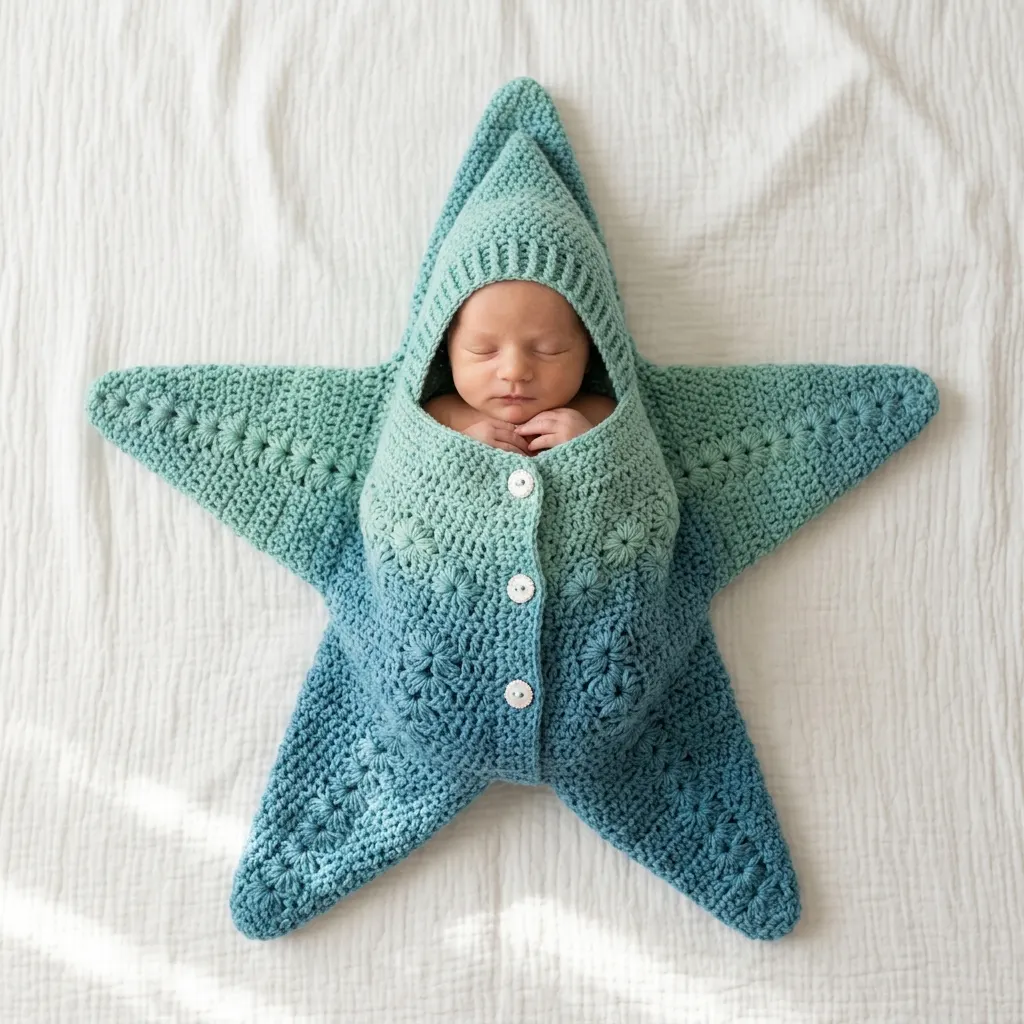
When I sat down to design this starfish baby cocoon, I had a clear vision. I wanted something that would photograph beautifully for newborn sessions, keep a tiny baby snug and warm, and look absolutely adorable from every angle. The five-pointed star shape with that gorgeous ombre fade from mint to deep ocean blue? I am SO pleased with how it turned out!
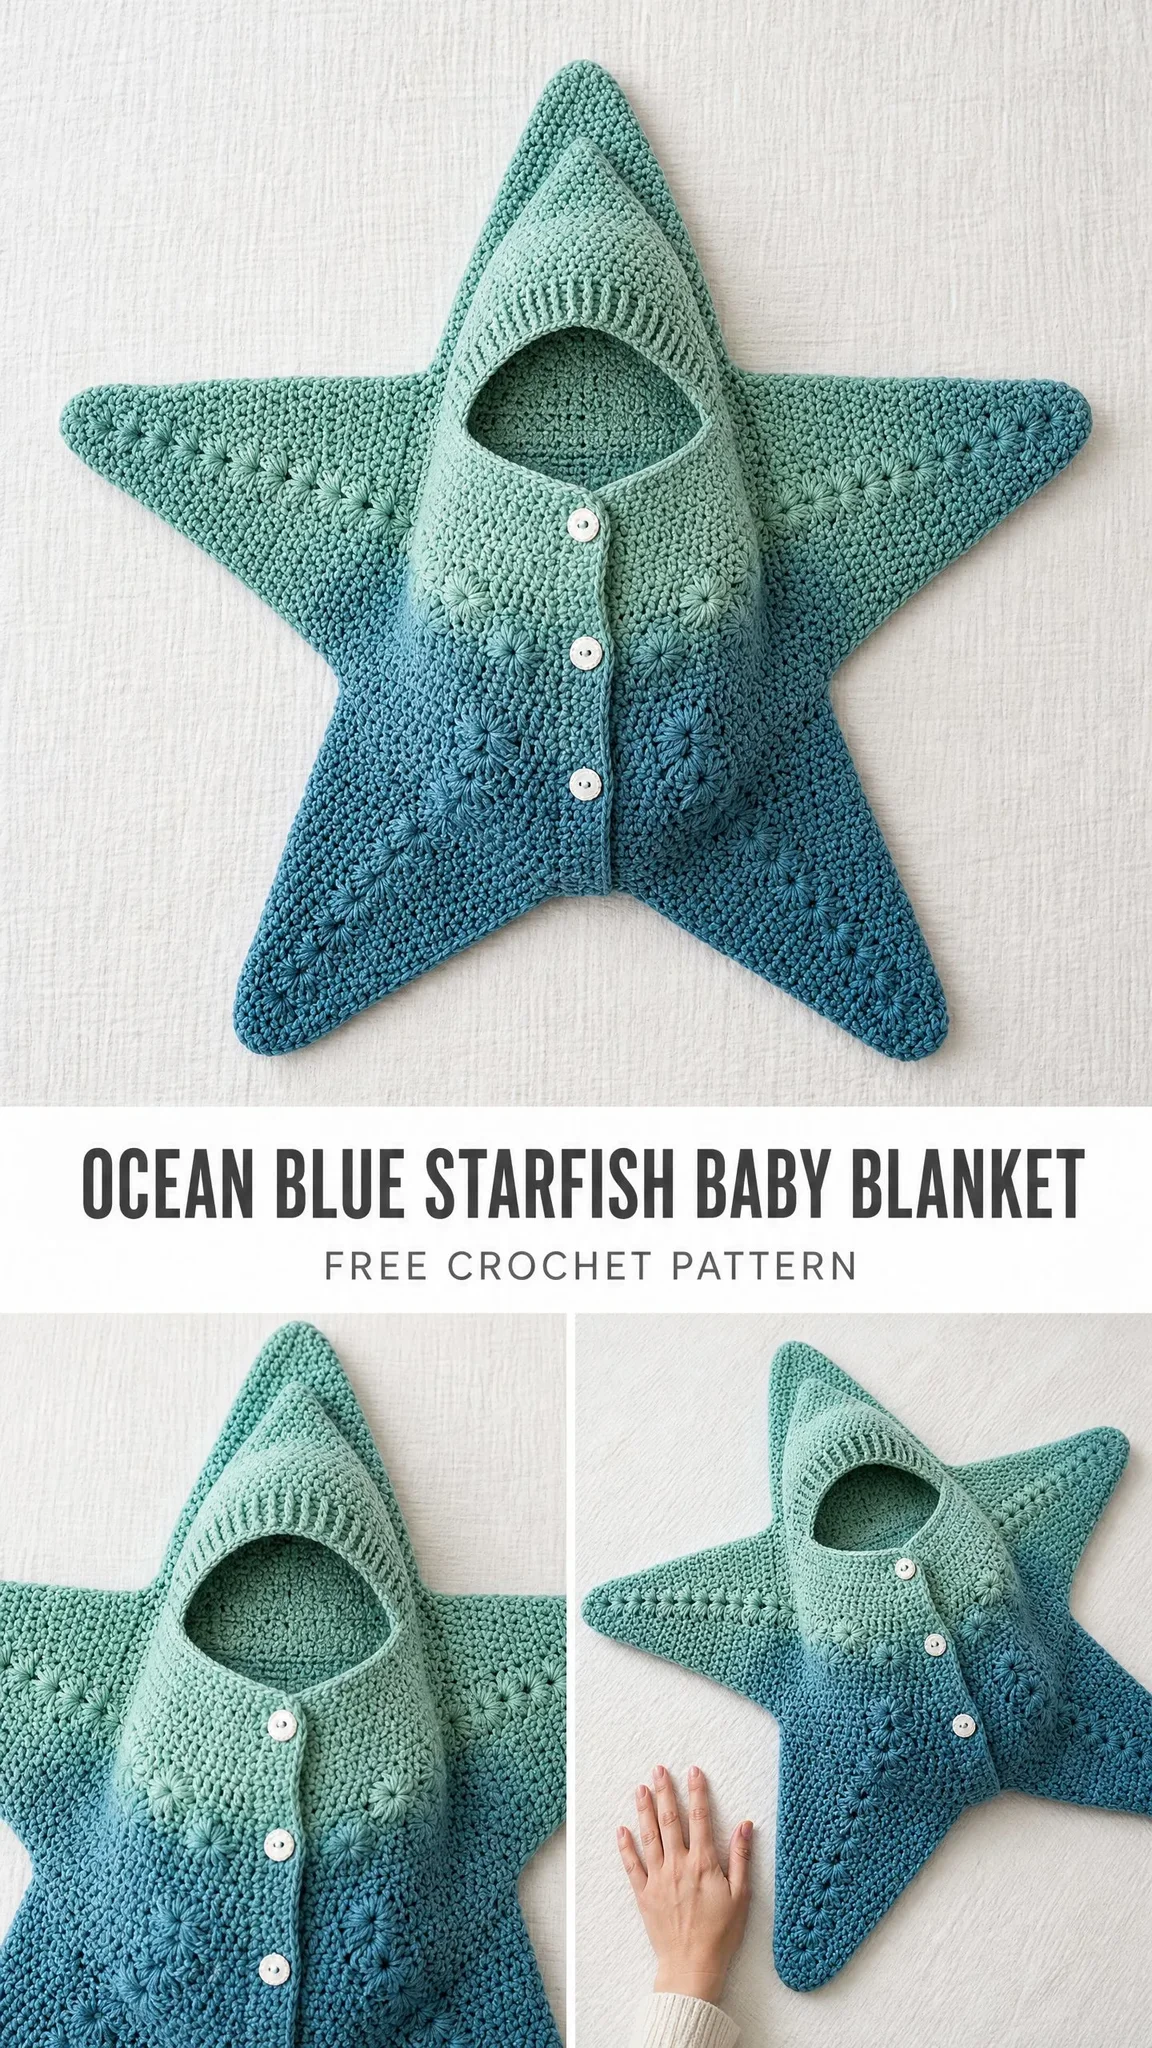
This little cocoon wraps a newborn in cozy softness while creating the most precious photo opportunity you can imagine. The flower cluster texture adds visual interest without being fussy, and the button front makes it easy to get baby in and out. Every design choice was intentional.
Whether you are making this for your own little one, gifting it to an expectant friend, or adding it to your newborn photography prop collection, this pattern delivers. Let me walk you through every single step.
About This Starfish Baby Cocoon Pattern
This crochet pattern creates a hooded baby cocoon shaped like a five-pointed starfish. The finished piece measures approximately 22 inches from point to point, sized perfectly for newborns up to three months old. A matching pointed hood keeps baby’s head warm and completes the starfish look.
The construction might look complicated, but I have broken it down into manageable pieces. You will crochet individual arm sections, join them together to form the star shape, then seam the front and back panels. The hood attaches at the top point with a ribbed brim framing baby’s face.
Skill level: Intermediate. You should be comfortable with basic stitches, working in rows, seaming, and following a multi-part pattern. If you have made garments or amigurumi before, you have the skills for this project.
Time estimate: Plan for 12 to 18 hours depending on your experience level.
Materials You Will Need
Gathering your materials before you start makes the whole process smoother. Here is everything you need for this starfish baby cocoon crochet pattern.
Yarn:
Approximately 650 yards of worsted weight yarn, which is Category 4, in an ombre colorway graduating from mint or sage green at the top to medium teal or slate blue at the bottom.
You have a few options for achieving this ombre effect:
Option 1: Lion Brand Mandala Baby yarn cakes held double throughout. Each cake contains approximately 590 yards, so you will need two cakes. Choose a colorway that graduates from teal to blue.
Option 2: Paintbox Yarns Simply Aran in three colors. Purchase one skein each in Seafoam Green, Spearmint Green, and Mineral Blue. Transition colors gradually every 15 to 20 rows.
Option 3: Paintbox Yarns Simply DK held double. Purchase approximately 325 yards each of two complementary teal shades. Holding double creates that firm, cushioned texture you see in the photos.
Whatever yarn you choose, make sure it is soft enough for newborn skin. Look for labels that say baby-safe or superwash. Avoid scratchy fibers. The yarn needs enough body to hold those star points firm after blocking.
Hook: US Size I-9, which is 5.5 mm, or the size needed to match gauge.
Notions:
Gauge
Getting gauge right matters for this project. The star shape will not hold its proportions if your gauge is significantly off.
14 single crochet stitches by 16 rows equals 4 inches squared in single crochet after blocking.
One flower cluster motif measures approximately 1.25 inches in diameter.
Make a 6-inch swatch before you begin. Adjust your hook size up or down as needed until you match gauge.
Stitch Abbreviations and Definitions
Let me walk you through every abbreviation you will encounter in this pattern. I have included plain-English explanations so nothing feels mysterious.
ch = chain. Wrap yarn over hook and pull through the loop on your hook. This creates one chain stitch.
sc = single crochet. Insert hook into stitch, yarn over and pull up a loop so you have 2 loops on hook, yarn over and pull through both loops.
sc2tog = single crochet two together, which is a decrease. Insert hook into first stitch, yarn over and pull up a loop. Insert hook into next stitch, yarn over and pull up a loop. You now have 3 loops on hook. Yarn over and pull through all 3 loops. This turns 2 stitches into 1.
dc = double crochet. Yarn over, insert hook into stitch, yarn over and pull up a loop so you have 3 loops, yarn over and pull through 2 loops, yarn over and pull through remaining 2 loops.
hdc = half double crochet. Yarn over, insert hook into stitch, yarn over and pull up a loop so you have 3 loops, yarn over and pull through all 3 loops at once.
sl st = slip stitch. Insert hook into stitch, yarn over and pull through both the stitch and the loop on your hook in one motion. Used for joining and moving yarn without adding height.
BLO = back loop only. Each stitch has two loops at the top that look like a little V. The back loop is the one farther from you. Working in BLO only creates a ribbed texture.
RS = right side, which is the side that faces outward when finished.
WS = wrong side, which faces inward.
st(s) = stitch or stitches.
rnd = round.
pm = place marker.
rep = repeat.
Special Stitch: Flower Cluster (fl-cl)
This stitch creates that beautiful raised petal texture you see across the entire star body. It looks impressive but breaks down into simple steps. Take your time learning it before you dive into the pattern.
How to work the flower cluster:
Step 1: Insert hook into the indicated stitch or space.
Step 2: Yarn over and pull up a loop. You now have 3 loops on hook.
Step 3: Yarn over and pull through 2 loops. You now have 2 loops remaining. This is one half double crochet started but not completed.
Step 4: Insert hook into the SAME stitch or space.
Step 5: Yarn over and pull up a loop. You now have 4 loops on hook.
Step 6: Yarn over and pull through 2 loops. You now have 3 loops on hook.
Step 7: Repeat Steps 4 through 6 two more times. You should have 5 loops on hook, which represents 4 petals started.
Step 8: Yarn over and pull through all 5 loops on hook. Chain 1 to close the cluster.
That chain 1 at the end does NOT count as a stitch unless specifically instructed. Each flower cluster occupies one stitch position and is worked into one stitch.
Practice this a few times on a swatch until it feels natural. The motion becomes rhythmic quickly.
Pattern Notes Before You Begin
A few important things to understand before you start crocheting:
The cocoon is made from two identical flat star shapes. One becomes the front panel, one becomes the back panel. You join them by single crocheting around the outside edges, leaving the hood opening at the top center point.
Each star panel is built from 5 separate arm pieces that you crochet in rows, then join together. This modular approach makes the pattern much more manageable than trying to work the entire star in rounds.
The front panel has a button band running vertically down the center. This is worked as a separate strip and sewn on.
The right side of your work is the side with the visible flower cluster texture. The bumps should face outward.
When joining panels, place wrong sides together so right sides face out on both surfaces.
Part 1: Back Star Panel Arms (Make 5)
Each arm starts wide at the base and tapers to a point at the tip. You will make 5 identical arms for the back panel.
Color placement: Begin in sage or mint. Transition to mid-teal at approximately Row 22, then to slate blue by Row 40. Your exact transition rows depend on your yarn choice.
Foundation: Chain 25.
Row 1 (RS): Single crochet in 2nd chain from hook and in each chain across. (24 sc)
Row 2 (WS): Chain 1, turn. Single crochet in first stitch. Work (flower cluster in next stitch, single crochet in next stitch) 11 times. Single crochet in last stitch. (24 sts)
Row 3: Chain 1, turn. Sc2tog over first 2 stitches. Single crochet in each stitch across to last 2 stitches. Sc2tog. (22 sc)
Row 4: Chain 1, turn. Single crochet in first stitch. Work (flower cluster in next stitch, single crochet in next stitch) 10 times. Single crochet in last stitch. (22 sts)
Row 5: Chain 1, turn. Sc2tog. Single crochet across to last 2 stitches. Sc2tog. (20 sc)
Row 6: Chain 1, turn. Single crochet in first stitch. Work (flower cluster in next stitch, single crochet in next stitch) 9 times. Single crochet in last stitch. (20 sts)
Row 7: Chain 1, turn. Sc2tog. Single crochet across to last 2 stitches. Sc2tog. (18 sc)
Row 8: Chain 1, turn. Single crochet in first stitch. Work (flower cluster in next stitch, single crochet in next stitch) 8 times. Single crochet in last stitch. (18 sts)
Row 9: Chain 1, turn. Sc2tog. Single crochet across to last 2 stitches. Sc2tog. (16 sc)
Row 10: Chain 1, turn. Single crochet in first stitch. Work (flower cluster in next stitch, single crochet in next stitch) 7 times. Single crochet in last stitch. (16 sts)
Row 11: Chain 1, turn. Sc2tog. Single crochet across to last 2 stitches. Sc2tog. (14 sc)
Row 12: Chain 1, turn. Single crochet in first stitch. Work (flower cluster in next stitch, single crochet in next stitch) 6 times. Single crochet in last stitch. (14 sts)
Row 13: Chain 1, turn. Sc2tog. Single crochet across to last 2 stitches. Sc2tog. (12 sc)
Row 14: Chain 1, turn. Single crochet in first stitch. Work (flower cluster in next stitch, single crochet in next stitch) 5 times. Single crochet in last stitch. (12 sts)
Row 15: Chain 1, turn. Sc2tog. Single crochet across to last 2 stitches. Sc2tog. (10 sc)
Row 16: Chain 1, turn. Single crochet in first stitch. Work (flower cluster in next stitch, single crochet in next stitch) 4 times. Single crochet in last stitch. (10 sts)
Row 17: Chain 1, turn. Sc2tog. Single crochet across to last 2 stitches. Sc2tog. (8 sc)
Row 18: Chain 1, turn. Single crochet in first stitch. Work (flower cluster in next stitch, single crochet in next stitch) 3 times. Single crochet in last stitch. (8 sts)
Row 19: Chain 1, turn. Sc2tog. Single crochet across to last 2 stitches. Sc2tog. (6 sc)
Row 20: Chain 1, turn. Single crochet in first stitch. Work (flower cluster in next stitch, single crochet in next stitch) 2 times. Single crochet in last stitch. (6 sts)
Row 21: Chain 1, turn. Sc2tog. Single crochet in next 2 stitches. Sc2tog. (4 sc)
Row 22: Chain 1, turn. Work (flower cluster in next stitch, single crochet in next stitch) 2 times. (4 sts)
Row 23: Chain 1, turn. Sc2tog. Sc2tog. (2 sc)
Row 24: Chain 1, turn. Sc2tog. (1 sc)
Fasten off, leaving a 12-inch tail for seaming.
Checkpoint: Each completed arm should measure approximately 7 inches wide at the base and approximately 11 inches from base to tip.
Make 5 identical arms total for the back panel.
Part 2: Front Star Panel Arms (Make 5)
Work exactly as the back star panel arms. You will have 10 arms total when finished, 5 for the back and 5 for the front.
Part 3: Assembling the Star Panels
Now comes the satisfying part where your star takes shape!
Step 1: Lay all 5 back panel arms with right sides facing up in a five-pointed star formation. The wide base edge of each arm faces the center. The long side edges of adjacent arms should touch.
Step 2: Using your yarn needle and yarn tails, seam the adjacent inner side edges of neighboring arms together. Seam approximately 8 rows along each inner edge junction. This creates the concave inner corners of the star shape.
Step 3: Close the center hole. With right side facing, join yarn at any base corner. Work single crochet evenly around the center opening, working into the base edges of all 5 arms. Work approximately 5 single crochet stitches per arm base section for a total of about 25 single crochet around the center. Slip stitch to join and fasten off. Weave in ends.
Step 4: Work a perimeter round to neaten edges. With right side facing, join yarn at any point. Work 1 round of single crochet around the entire outer edge of the assembled star. At each outer point tip, work 3 single crochet in the tip stitch to keep the point sharp. At each inner concave corner, work sc2tog to pull the corner snug. Work 1 single crochet in each stitch along the arm side edges.
Fasten off.
Repeat the assembly process for the front panel arms.
Checkpoint: Each assembled star panel should measure approximately 22 inches from outer point to outer point. Lay flat and check that it lies smooth without cupping or ruffling. Block lightly if needed.
Part 4: Button Band
The button band creates the front opening with a clean, professional finish.
Foundation: Chain 8.
Row 1: Single crochet in 2nd chain from hook and in each chain across. (7 sc)
Row 2: Chain 1, turn. Single crochet in the back loop only of each stitch across. (7 sc)
Repeat Row 2 until the ribbed strip measures approximately 18 inches long, or long enough to reach from the hood opening to the bottom point of the star.
Fasten off, leaving a long tail for sewing.
Part 5: Hood Body
The hood is worked in rows to create a curved tube that tapers to a point at the top.
Foundation: Chain 36.
Row 1: Single crochet in 2nd chain from hook and in each chain across. (35 sc)
Rows 2 through 30: Chain 1, turn. Single crochet in each stitch across. (35 sc)
Begin decreasing for the pointed top:
Row 31: Chain 1, turn. Sc2tog. Single crochet across to last 2 stitches. Sc2tog. (33 sc)
Row 32: Chain 1, turn. Single crochet in each stitch across. (33 sc)
Continue alternating a decrease row and a plain row until 3 stitches remain.
Final Row: Chain 1, turn. Sc3tog (insert hook in first stitch and pull up a loop, insert hook in second stitch and pull up a loop, insert hook in third stitch and pull up a loop, yarn over and pull through all 4 loops). (1 sc)
Fasten off.
Fold the hood in half lengthwise with right sides together. Seam the back edge from the pointed top to create the hood shape. Turn right side out.
Part 6: Hood Ribbed Brim
Work the same ribbed pattern as the button band.
Foundation: Chain 8.
Row 1: Single crochet in 2nd chain from hook and in each chain across. (7 sc)
Row 2: Chain 1, turn. Single crochet in back loop only of each stitch across. (7 sc)
Repeat Row 2 until the ribbed strip measures approximately 13 inches, matching the hood’s face opening circumference.
Fasten off, leaving a tail for sewing. Attach the ribbed brim around the face opening of the hood.
Part 7: Final Assembly
Step 1: Place the front and back star panels with wrong sides together so the textured right sides face outward on both surfaces.
Step 2: Join yarn at one side of the top point, which will become the hood opening. Work single crochet evenly through both layers around the entire perimeter of the star, joining the front and back panels. Leave the top point open for attaching the hood.
Step 3: Position the button band down the center front of the cocoon. Pin in place. Using a yarn needle and matching yarn, whip stitch the button band to the front panel along both long edges.
Step 4: Attach the hood to the open top point of the cocoon. The hood’s open face edge should align with the cocoon’s front opening. Whip stitch securely all around the hood attachment.
Step 5: Sew the four buttons evenly spaced along one side of the button band. Create corresponding buttonholes by gently stretching the stitches on the opposite side of the opening, or crochet small chain loops during the button band construction.
Finishing
Weave in all remaining ends securely. Block the completed cocoon by lightly misting it with water and pinning it flat on your blocking mat. Stretch the star points gently to create crisp, defined tips. Allow to dry completely.
Give your finished cocoon a final inspection. Tug gently on the buttons to make sure they are secure. Check all seams.
Your starfish baby cocoon is ready for its debut!
Tips for Success
Blocking makes a huge difference. Do not skip this step. The star points will look much more defined after proper blocking.
Weave in ends as you go. With all those separate arm pieces, you will have a lot of tails. Weaving them in as you complete each piece keeps the finishing process manageable.
Take progress photos. Lay out your completed arms in the star formation before seaming. This helps you visualize the final result and catch any sizing inconsistencies early.
Consider your yarn color placement. If you are manually transitioning colors, lay out your arms together periodically to make sure the ombre effect looks consistent across all pieces.
I hope this step by step crochet tutorial helps you create something truly special. This starfish cocoon makes an unforgettable baby shower gift or newborn photo prop. The combination of that beautiful ombre colorway and the textured flower clusters results in a finished piece that looks far more complex than it actually is.
Thank you so much for choosing this pattern! If you make one, I would absolutely love to see your finished cocoon. Tag me on Instagram or share a photo in my Facebook group. Seeing your creations genuinely makes my day.
If this pattern caught your eye, go ahead and save it to your Pinterest boards so you can find it when you are ready to start. And if you do make this little starfish cocoon, drop a comment below! I love hearing how projects turn out and seeing the color combinations you choose.
You Might Also Like
- Sage Garden Lace Cardigan Free Crochet Pattern
- Coral Sunset Peplum Dress Free Crochet Pattern
- Pink Variegated Monstera Crochet Plant Free Pattern
- Dusty Rose Heart Cutout Crochet Top Free Pattern