No-Sew Long-Eared Dog Amigurumi Pattern
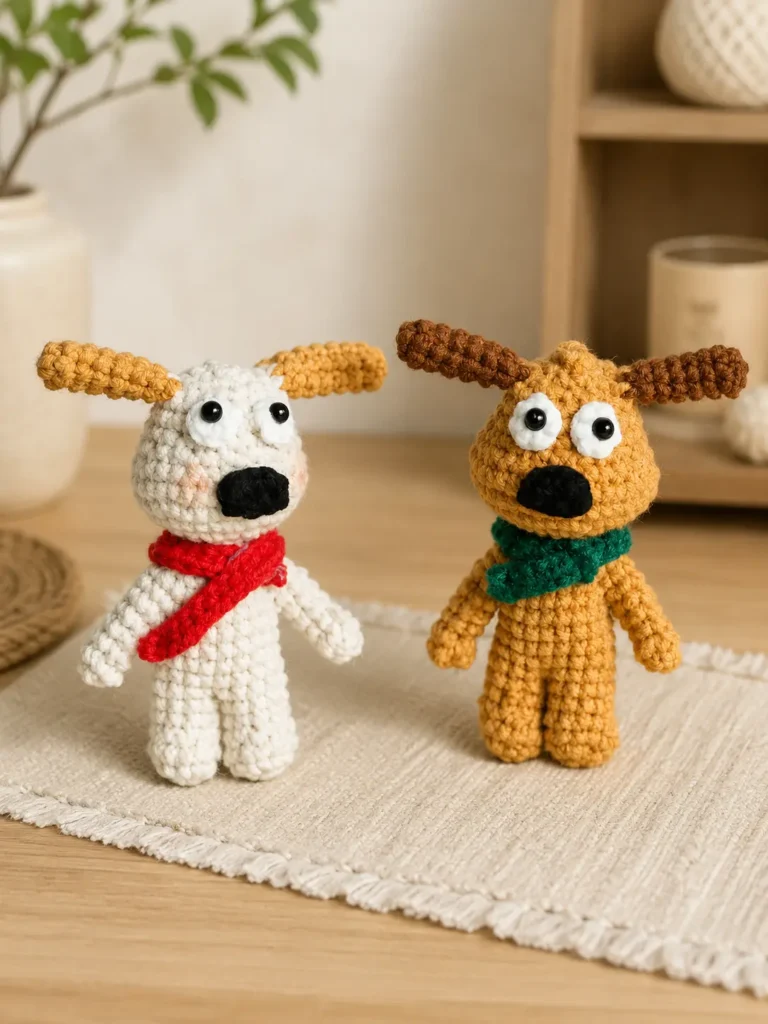
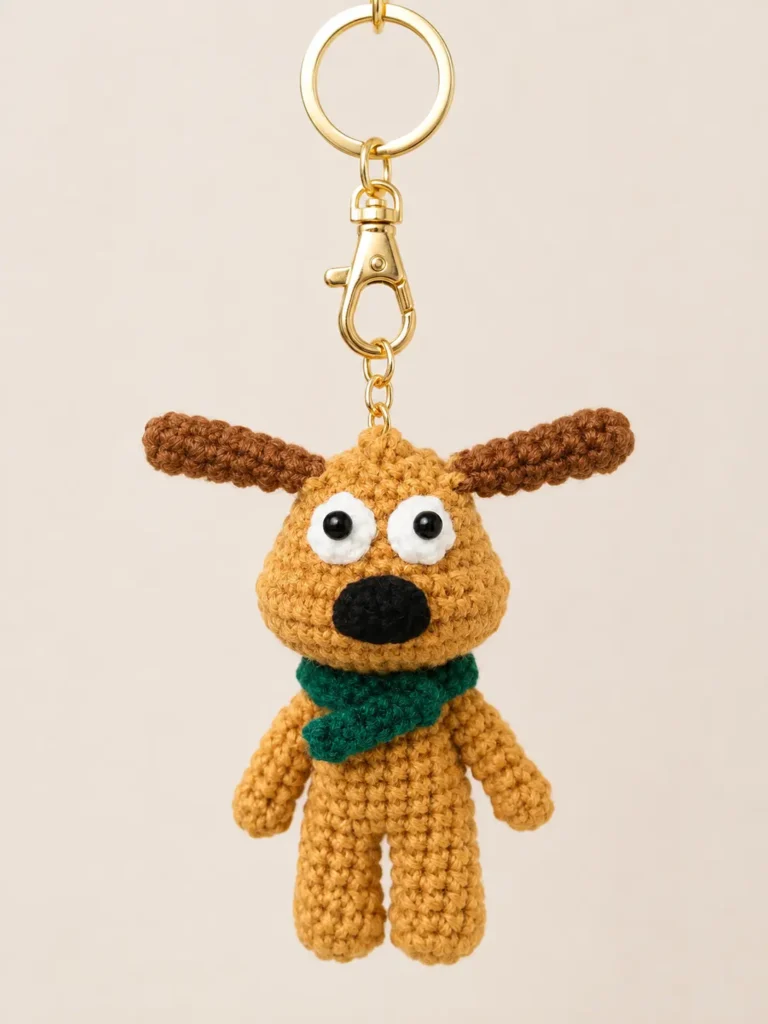
This No-Sew Long-Eared Dog Amigurumi Pattern creates an adorable floppy-eared puppy with a rounded head, tiny arms, short legs, and a removable crochet scarf.
The main parts of the dog are joined directly while crocheting. The legs flow into the body, the arms are incorporated into the shoulders, and the ears are crocheted into the head. You will only need to sew on the white eye circles and the nose.
Although commonly described as a no-sew design, this is technically a low-sew amigurumi pattern because the facial features are attached afterward. It is still a wonderful choice when you want to avoid sewing multiple body parts together.
This pattern uses US crochet terms and is best suited to an advanced beginner who is comfortable working in continuous rounds, making decreases, and joining pieces while crocheting. New to written instructions? Our guide to reading an amigurumi pattern explains the abbreviations, round numbers, and stitch counts.
Jump to section
Pattern Notes
Work in continuous rounds unless otherwise stated. Do not join the rounds with a slip stitch.
Place a stitch marker in the first stitch of every round and move it up as you work. Our tutorial on counting rounds in crochet can help you keep the shaping sections properly aligned.
Crochet firmly enough that the stuffing does not show through the stitches. Using a hook slightly smaller than the size recommended on the yarn label usually creates a neat amigurumi fabric.
Stuff the legs, body, and head gradually. The arms and ears remain unstuffed.
The stitch count at the end of each round appears inside brackets.
Use an invisible decrease whenever the pattern says dec. This produces a smoother surface than a standard single crochet decrease.
The pattern begins several pieces with a magic ring. Review the difference between a magic ring and a chain circle if you need help choosing or closing your starting loop.
When making contrasting ears or a multicolored scarf, use a clean color transition such as the method shown in our changing colors in amigurumi tutorial.
Why You’ll Love This Long-Eared Dog
This little crochet dog is:
- Made mostly in one continuous piece
- Designed with long, floppy, unstuffed ears
- Finished with a removable loop-style scarf
- Easy to customize with different yarn colors
- Small enough for gifts, nursery decorations, or desk companions
- A good introduction to joining amigurumi parts while crocheting
The finished dog has a simple, soft shape that looks especially cute in beige, cream, brown, gray, or pastel yarn.
Finished Size
Using sport-weight yarn and a 2.25 mm crochet hook, the finished dog will measure approximately 14–16 cm (5½–6¼ inches) tall, not including the fully extended ears.
The exact size will depend on your yarn, hook size, stuffing, and crochet tension.
For a slightly larger dog, use DK-weight yarn with a 2.5–3 mm hook. Keep in mind that changing the yarn thickness will also change the amount of yarn required.
You can consult our yarn weight, gauge, and hook size guide when choosing an alternative yarn. For internationally recognized yarn categories, the Craft Yarn Council’s Standard Yarn Weight System is also a useful reference.
Skill Level
Advanced beginner
You should be familiar with:
- Working in continuous rounds
- Making a magic ring
- Single crochet
- Increases
- Invisible decreases
- Crocheting pieces together
- Counting stitches and rounds
Materials
- Sport-weight or 4-ply cotton or cotton-acrylic yarn, approximately 125–160 m per 50 g
- Main body color: approximately 25–35 g
- Contrasting yarn for the ears, optional
- White yarn for the eye circles
- Black yarn for the nose
- Yarn in your preferred scarf color
- 2.25 mm crochet hook
- Two 5–6 mm black safety eyes
- Polyester fiberfill
- Yarn needle
- Stitch marker
- Scissors
- Pink blush or pink embroidery thread, optional
For a softer appearance, choose a smooth cotton-acrylic blend. A tightly twisted cotton yarn will produce more defined stitches and a firmer finished toy.
Abbreviations
- MR – magic ring
- ch – chain
- sc – single crochet
- inc – 2 sc in the same stitch
- dec – invisible single crochet decrease
- sl st – slip stitch
- FO – fasten off
All instructions use US crochet terminology.
No-Sew Long-Eared Dog Crochet Pattern
Arms
Make two using the main body color.
Rnd 1: 6 sc in MR. [6]
Rnds 2–5: Sc around. [6]
FO. Do not stuff.
Leave the top of each arm open. The six stitches from the final round will be worked directly into the body later.
Set both arms aside.
Ears
Make two using the main body color or a contrasting color.
Rnd 1: 6 sc in MR. [6]
Rnds 2–7: Sc around. [6]
FO. Do not stuff.
Flatten each ear gently. The six stitches will form three pairs, with three stitches along each side of the flattened ear.
The ears will be joined directly to the head during Round 26.
Eye Circles
Make two using white yarn.
Rnd 1: 6 sc in MR. [6]
Join with a sl st or use an invisible finish.
FO, leaving a long tail for sewing.
Insert one 5–6 mm safety eye through the center of each white eye circle. Attach the washer securely to the back of the circle.
The safety eyes are secured to the white circles rather than inserted directly through the head. The completed circles will be sewn onto the face after the head is closed.
For a completely yarn-based face, embroider the black eye centers instead.
Nose
Use black yarn.
Ch 4.
Starting in the second ch from the hook:
- Sc in the next 2 ch
- Work 3 sc in the final ch
- Continue along the opposite side of the foundation chain
- Sc in the next ch
- Work 2 sc in the last ch
[8]
FO, leaving a long tail for sewing.
The finished nose should have a small horizontal oval shape.
Scarf
Use your chosen scarf color.
Ch 34.
Starting in the seventh ch from the hook, sc in each remaining ch. [28]
FO and weave in the ends.
The first six unworked chains create a small loop. When dressing the dog, pass the opposite end of the scarf through this loop.
Set the scarf aside until the dog is complete.
First Leg
Use the main body color.
Rnd 1: 6 sc in MR. [6]
Rnd 2: Inc ×6. [12]
Rnd 3: Sc around. [12]
Rnd 4: 6 sc, dec ×3. [9]
Rnds 5–6: Sc around. [9]
Stuff the foot and leg lightly. Add enough fiberfill to hold the shape without stretching the stitches.
FO and cut the yarn.
Second Leg
Use the main body color.
Rnd 1: 6 sc in MR. [6]
Rnd 2: Inc ×6. [12]
Rnd 3: Sc around. [12]
Rnd 4: Dec ×3, 6 sc. [9]
Rnds 5–6: Sc around. [9]
Stuff the second leg lightly.
Do not fasten off. Continue directly with the body.
Body
Place the two legs next to each other. Make sure the shaped sections of both feet face forward.
The decreases made in Round 4 should sit toward the front of each foot.
Join the Legs
Rnd 7: Crochet 9 sc around the first leg, then immediately crochet 9 sc around the second leg. [18]
There is no joining chain between the legs.
After completing the first stitch in the first leg, gently pull the working yarn to keep the connection firm. A small space between the legs can be closed later with a remaining yarn tail if necessary.
Rnds 8–10: Sc around. [18]
Begin stuffing the lower body. Add the stuffing in small pieces and distribute it evenly around the leg join.
Join the Arms
Position one arm on each side of the body. Check the dog from the front and back to make sure the arms are placed evenly.
The arms remain open and unstuffed.
In Round 11, work around all six open stitches of each arm as part of the body round. These arm stitches are added to the existing 18 body stitches, increasing the total stitch count to 30.
Do not skip any body stitches during this round.
Rnd 11:
- 4 sc on the body
- 6 sc around the first arm
- 9 sc on the body
- 6 sc around the second arm
- 5 sc on the body
[30]
Check the arm placement before continuing. Both arms should point downward and sit at approximately the same height.
For additional placement advice, see our guide to attaching amigurumi limbs evenly.
Rnd 12: 2 sc, dec, 6 sc, dec, 5 sc, dec, 6 sc, dec, 3 sc. [26]
Rnd 13: Sc, dec, 6 sc, dec, 3 sc, dec, 6 sc, dec, 2 sc. [22]
Rnd 14: Dec, 6 sc, dec, sc, dec, 6 sc, dec, sc. [18]
Rnd 15: (Sc, dec) ×6. [12]
Finish stuffing the body firmly, paying particular attention to the shoulder area and the spaces around the joined arms.
Do not fasten off. Continue directly with the head.
Head
The head is worked directly from the final body round, so there is no neck seam.
Rnd 16: (Sc, inc) ×6. [18]
Rnd 17: (Sc, inc, sc) ×6. [24]
Rnd 18: 6 sc, (sc, inc) ×6, 6 sc. [30]
Rnd 19: 6 sc, (sc, inc, sc) ×6, 6 sc. [36]
Rnds 20–21: Sc around. [36]
Rnd 22: 6 sc, (sc, dec, sc) ×6, 6 sc. [30]
Rnd 23: 6 sc, (sc, dec) ×6, 6 sc. [24]
Rnds 24–25: Sc around. [24]
Begin stuffing the head firmly.
Add small pieces of fiberfill at a time. Push the stuffing toward the sides of the head to maintain a smooth, rounded shape.
Avoid placing one large piece of stuffing in the center, as this can make the head lumpy.
Join the Ears
Flatten each ear so that its six stitches form three pairs.
During the ear joins, every joining sc is worked through:
- The next stitch of the head
- Both layers of the flattened ear
Insert the hook through the next head stitch, then through the corresponding pair of ear stitches. Yarn over and complete one sc through all layers.
Three sc will attach each ear to the head.
Rnd 26:
- Sc, dec, sc
- Join the first flattened ear with 3 sc
- (2 sc, dec) ×2
- 2 sc
- Join the second flattened ear with 3 sc
- Sc, dec, sc
[20]
Check that the ears extend outward evenly. The flattened sides should face forward and backward rather than upward and downward.
Rnd 27: Sc, dec ×3, (sc, dec) ×2, dec ×2, sc, dec. [12]
Rnd 28: (Sc, dec) ×4. [8]
Finish stuffing the head.
Add extra stuffing around the sides and top of the head, but do not overstuff the areas directly beneath the ears. Overstuffing can force the ears upward instead of allowing them to hang naturally.
Cut the yarn, leaving a long tail.
Thread the tail through the front loops of the remaining eight stitches. Pull firmly to close the opening.
Secure the yarn and hide the tail inside the head.
Face Assembly
The body construction is complete. Only the eye circles and nose need to be sewn on.
Attach the Eye Circles
Place the two white eye circles close together on the front of the head.
The inner edges may touch or overlap very slightly. Position them symmetrically before sewing.
The eyes should sit approximately in the lower half of the head, leaving enough space beneath them for the nose.
Pin both circles temporarily and check the face from several angles.
Using the white yarn tail from one eye circle, sew around its outside edge with small stitches. Keep the black safety eye facing forward.
Repeat with the second eye circle.
Before securing the yarn, check that:
- Both black eyes face in the same direction
- The white circles sit at the same height
- The inner edges are close together
- The circles lie flat against the head
Hide the remaining yarn tails inside the head.
Attach the Nose
Position the black nose directly below the eye circles.
Center it between the two eyes, leaving a small space between the nose and the bottom edges of the white circles.
Sew around the outside edge using the long black yarn tail.
For a slightly raised nose, place a very small amount of fiberfill beneath it before closing the final section. Do not add too much stuffing or the nose may lose its oval shape.
Secure the yarn and hide the tail inside the head.
Add the Blush
Add a small amount of pink blush beneath each eye, if desired.
You can use cosmetic blush and a small brush or embroider two or three short horizontal stitches with pink yarn.
Apply the color gradually to avoid making the cheeks too dark.
Finishing the Scarf
Wrap the scarf around the dog’s neck.
Pass the long straight end through the chain loop at the opposite end. Pull gently until the scarf sits neatly around the neck.
Do not tighten it excessively. The scarf should rest comfortably between the head and shoulders without distorting the neck.
Adjust the straight end so it hangs slightly to one side.
Final Shaping
Weave in all remaining yarn ends.
Use your fingers to shape the dog:
- Gently flatten and lengthen the ears
- Smooth the sides of the head
- Shape the feet so they face forward
- Pull the arms slightly downward
- Distribute the body stuffing evenly
- Adjust the scarf so the loop faces forward or to the side
If the ears curl inward, lightly dampen them and leave them flattened until completely dry. Always test your yarn before using steam or heat, especially when working with acrylic fibers.
Helpful Pattern Tips
- Check the Feet: Before joining the legs, position the decrease sections toward the front so both feet face forward.
- Join the Arms Carefully: Round 11 uses all 18 body stitches plus 6 stitches from each arm, giving 30 stitches in total. Do not skip any body stitches.
- Stuff Gradually: Add small pieces of fiberfill as you work, especially around the feet, leg join, shoulders, and sides of the head.
- Leave the Ears Unstuffed: The ears should remain flat and flexible so they hang naturally.
- Count Your Stitches: Check the stitch count after every shaping and joining round, especially when attaching the arms and ears.
- Color Ideas: Try beige with brown ears, cream with caramel ears, gray with charcoal ears, or a pastel body with contrasting ears. Add a bright scarf or make one ear a different color for a playful look.
Frequently Asked Questions
Is This Pattern Completely No-Sew?
The legs, arms, body, head, and ears are joined while crocheting. Only the eye circles and nose are sewn on, making it technically a low-sew pattern.
Can I Embroider the Eyes?
Yes. Embroider the black eye centers on the white circles or stitch simple closed eyes directly onto the head.
Can I Make the Ears Longer?
Yes. Add the same number of extra sc rounds to both ears before fastening off.
Can I Make the Dog Larger?
Use thicker yarn with a larger hook. DK yarn and a 2.5–3 mm hook will create a slightly larger dog without changing the stitch counts.
Can I Sew the Ears on Instead?
Yes. Complete the head without joining the ears, then sew the flattened ears to the sides. Joining them during Round 26 gives a more secure, low-sew finish.
More Cute Amigurumi Patterns
After completing your long-eared dog, try the Long Neck Sid crochet pattern for another character with a distinctive silhouette.
The Ruffled Collar Teddy Bear is a lovely choice when you want to practice making a dressed amigurumi animal.
For another sweet bunny-inspired design, make the Mini Bunny with Carrot Bag.
Prefer a smaller and faster project? The Cherry Keychain crochet pattern makes a colorful handmade accessory or gift.
This No-Sew Long-Eared Dog Amigurumi Pattern is a charming project for crocheters who enjoy making animals but prefer to avoid attaching many separate pieces.
Joining the legs, arms, body, head, and ears while crocheting creates a strong construction with very little finishing work. Once the two eye circles and nose are attached, your floppy-eared puppy is ready to wear its scarf.
Experiment with different body colors, contrasting ears, embroidered expressions, and scarf combinations to give every little dog its own personality.