26 Crochet No-Sew Christmas Projects to Add to Your Making List
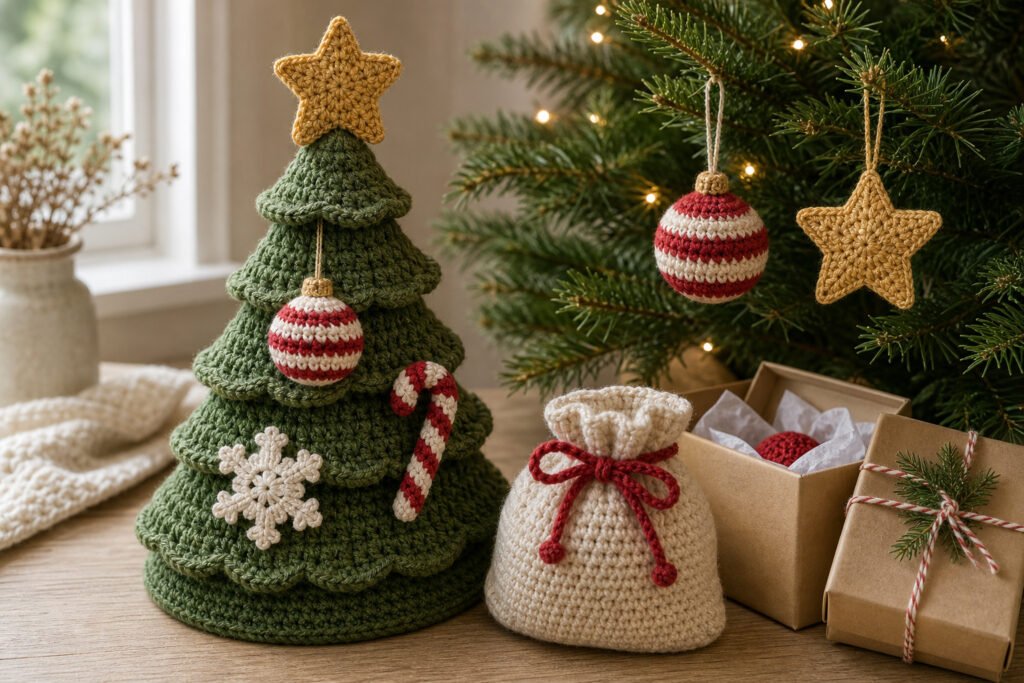
Looking for no sew christmas crochet ideas that keep assembly to a minimum? These 26 projects include tree ornaments, table accents and reusable gift packaging, from a flat star to a drawstring bag.
Some designs are worked in one piece; others use parts worked directly onto the main shape or tied in place. You will still need to finish yarn ends, but there are no separate pieces to sew together.
For more ideas that build on this collection, explore more crochet Christmas bauble patterns.
Before You Start
These patterns use US crochet terminology. Check the difficulty and construction notes before choosing a project: a flat decoration is different from a shaped stocking, bell or standing angel.
Match the yarn to the job. Cotton gives the coaster and gift box a firmer finish, while a soft yarn suits stuffed baubles and character ornaments. Keep your tension even where branches, rims or hanging loops need to hold their shape.
Have a yarn needle ready for weaving in ends, even though the projects do not need sewn assembly. For the drawstring bag, the separate chain is threaded through the eyelets; the reusable bow is secured by tying. The crochet candle is for decorative display only, so keep it away from flames and heat.
Crochet terminology: This article uses US crochet terms. Check the abbreviations for each project.
Mini Christmas Tree

This no-sew mini Christmas tree brings a little festive greenery to a shelf, mantelpiece or place setting. Its cone-shaped silhouette and scalloped branch tiers give it a recognisable tree shape without separate decorations to attach.
The broad, flat base and light stuffing help the tree stand upright. Keeping the stuffing gentle matters: too much can push the base out of shape and make the tree less steady.
For a different display, the optional hanging loop lets you use it as a Christmas ornament instead. The standing version works especially well where you want a small decoration that does not need propping up.
No-Sew Mini Christmas Tree

Quick-reference card. Follow the complete written instructions below.
Materials
- Smooth green DK yarn: Approximately 20â30 g; a smooth yarn helps the branch tiers show clearly.
- 3.5 mm crochet hook: Use a smaller hook if needed to make a firm fabric that holds stuffing.
- Toy stuffing: Enough to fill the cone lightly without rounding the base.
- Stitch marker, scissors and yarn needle: The needle is for weaving in ends, not attaching pieces.
Size and Fit
One sample size: approximately 7 cm tall, with a cone about 5 cm across at the base; the lowest branch tier extends beyond it. Finished size varies with yarn and tension.
Gauge
Approximately 20 single crochet stitches and 24 rounds per 10 cm in firm single crochet. Exact gauge is not essential, but the fabric should be close enough to contain stuffing.
Abbreviations
US crochet terms.
- ch = chain
- sc = single crochet
- hdc = half double crochet
- sl st = slip stitch
- inc = work 2 sc in one stitch
- FLO = front loop only
- BLO = back loop only
Pattern
- Before you begin Work the cone and base in continuous rounds; do not join or turn unless instructed. Mark the first stitch of each round. Numbers in brackets are core stitch counts and exclude the decorative branch stitches.
- Optional hanging loop If you want a hanging tree, ch 16 and sl st in the first chain to form a loop. Without fastening off, make an adjustable ring directly beneath the loop and begin Cone Round 1 in that ring. For a standing tree, begin with an adjustable ring and omit the loop.
- Cone, Rounds 1â4 Round 1: 6 sc in the adjustable ring; pull tight. [6] Round 2: (sc, inc) 3 times. [9] Round 3: sc in each stitch. [9] Round 4: (2 sc, inc) 3 times. [12]
- Branch tier method Immediately after each specified cone round, work into the FLO of that round, beginning with its first stitch: (sl st in the next FLO, 3 hdc in the next FLO, sl st in the next FLO) around. This uses every front loop once and creates scallops. Do not count these stitches as a cone round. On the following cone round, work into the unused BLO; thereafter use both loops until the next tier.
- First tier and Cone Rounds 5â8 Work a branch tier on Round 4: 4 scallops. Round 5: sc in the BLO of each Round 4 stitch. [12] Round 6: (3 sc, inc) 3 times. [15] Round 7: sc in each stitch. [15] Round 8: (4 sc, inc) 3 times. [18] Work a branch tier on Round 8: 6 scallops.
- Cone Rounds 9â12 Round 9: sc in the BLO of each Round 8 stitch. [18] Round 10: (5 sc, inc) 3 times. [21] Round 11: sc in each stitch. [21] Round 12: (6 sc, inc) 3 times. [24] Work a branch tier on Round 12: 8 scallops.
- Cone Rounds 13â16 Round 13: sc in the BLO of each Round 12 stitch. [24] Round 14: (7 sc, inc) 3 times. [27] Round 15: sc in each stitch. [27] Round 16: (8 sc, inc) 3 times. [30] Work a branch tier on Round 16: 10 scallops. Fasten off the cone and weave its end into the inside. Leave the 30 unused back loops of Round 16 available for joining.
- Flat base With green yarn, make a separate flat circle in continuous rounds. Round 1: 6 sc in an adjustable ring. [6] Round 2: inc in each stitch. [12] Round 3: (sc, inc) 6 times. [18] Round 4: (2 sc, inc) 6 times. [24] Round 5: (3 sc, inc) 6 times. [30] Keep the yarn attached.
- Crochet the base to the cone Hold the base against the open bottom of the cone, with the outside of each piece facing out. Starting with the first stitch of Base Round 5 and the first unused BLO of Cone Round 16, work 1 sc through both loops of the base stitch and the corresponding cone back loop. Continue around, matching one base stitch to one cone back loop. Before the final 5 joining stitches, add stuffing to the cone. Keep the base flat and the stuffing light, then complete the join. [30 joining sc] Sl st in the first joining sc, fasten off and weave in the end.
Finishing
- Flatten the base gently with your fingers and spread the lowest tier so the tree stands evenly.
- If you made a hanging loop, check that it is secure before hanging the tree.
Helpful Tips
- Firm stitches and a broad, lightly stuffed base help the tree stand. Overstuffing can make the base bulge.
- Keep the front loops of Cone Round 16 free after making its tier: they are used for decoration, while the unused back loops anchor the base.
- For a place setting, omit the hanging loop and keep the bottom especially flat.
Round Christmas Bauble

A soft bauble brings the look of a traditional tree ornament without the worry of breakage in a storage box. Its broad centre stripe gives it a festive look, whether you choose classic Christmas colours or shades that suit your decorations.
This no-sew Christmas crochet project is worked as one rounded piece, with the hanging loop incorporated into the top rather than attached as a separate part. It is a satisfying choice for a confident beginner who wants to practise shaping and colour changes.
An even distribution of stuffing helps the bauble keep its shape without looking lumpy or exposing the filling through the fabric. Before hanging it, check that the loop feels secure so the ornament sits neatly on a branch.
No-Sew Striped Christmas Bauble

Quick-reference card. Follow the complete written instructions below.
Materials
- DK yarn: Small amounts of smooth cotton or acrylic in two colours: A for the lower and upper sections, and B for the centre stripe
- Crochet hook: 3 mm, or a size that makes a firm fabric with no gaps large enough for stuffing to show
- Toy stuffing: A small amount
- Other tools: Stitch marker and scissors; a yarn needle is optional for hiding the final tail
Size and Fit
Approximately 5â6 cm in diameter at the suggested gauge. The chain loop has 24 stitches; its finished length will vary with tension.
Gauge
Approximately 22 single crochet stitches and 30 rounds to 10 cm in a firm fabric. Exact gauge is less important than keeping the stuffing enclosed.
Abbreviations
US crochet terms.
- ch = chain
- sc = single crochet
- inc = work 2 sc in one stitch
- inv dec = invisible decrease: draw up a loop through the front loop of each of the next 2 stitches, then yarn over and pull through both loops
- sl st = slip stitch
- st = stitch
Pattern
- Before you begin Work in continuous rounds without joining or turning. Mark the first stitch of each round and move the marker up as you work. Use colour A for Rounds 1â6.
- Round 1 Make a magic ring and work 6 sc into it. Pull the ring closed. (6 sts)
- Round 2 Inc in each stitch around. (12 sts)
- Round 3 (Sc in next st, inc in next st) 6 times. (18 sts)
- Round 4 (Sc in next 2 sts, inc in next st) 6 times. (24 sts)
- Round 5 (Sc in next 3 sts, inc in next st) 6 times. (30 sts)
- Round 6 (Sc in next 4 sts, inc in next st) 6 times. On the final sc, make the last yarn-over with colour B so the next round begins in B. (36 sts)
- Rounds 7â10 With B, sc in each stitch around. (36 sts each round)
- Round 11 With B, sc in each stitch around. On the final sc, make the last yarn-over with colour A so the next round begins in A. (36 sts)
- Round 12 With A, sc in each stitch around. (36 sts)
- Round 13 (Sc in next 4 sts, inv dec) 6 times. (30 sts)
- Round 14 (Sc in next 3 sts, inv dec) 6 times. (24 sts)
- Round 15 (Sc in next 2 sts, inv dec) 6 times. (18 sts)
- Round 16 (Sc in next st, inv dec) 6 times. (12 sts) Add stuffing evenly now, filling the sides without stretching the stitches apart.
- Round 17 and hanging loop Inv dec 6 times. (6 sts) Add a final small pinch of stuffing if needed. Without fastening off, ch 24, then sl st into the first sc of Round 17 to anchor the other end of the loop. Do not work into the chain.
Finishing
- Cut colour A, leaving a tail of about 20 cm, and pull it through the slip stitch. Pass the tail through the front loop of each of the six remaining stitches, then pull gently to close the opening beneath the loop.
- Weave the tail securely under several stitches in the bauble and hide the end. Check that both ends of the chain loop are anchored before hanging.
Helpful Tips
- At each colour change, cut the old colour with a tail of about 10 cm and weave that tail under several stitches on the inside before adding stuffing. The bauble needs no sewn-on parts.
- Add stuffing in small pieces so the sphere stays rounded rather than lumpy. Stop if the fabric begins to show gaps.
- For a tidy stripe boundary, change colour on the last yarn-over of the final stitch of the preceding round, as directed.
Five-Point Star Ornament

This flat, five-point star brings a little sparkle to a Christmas tree and looks just as lovely tied to a wrapped parcel. Its simple outline makes it easy to pair with other decorations, whether you favour a traditional or more pared-back look.
The star is made in one piece, with the points growing from a central circle and a hanging loop built into the final point. If the tips curl slightly, gentle blocking can help the star lie flat and show off its shape.
Five-Point Star Ornament

Quick-reference card. Follow the complete written instructions below.
Materials
- Yarn: A small amount of firm cotton DK in gold
- Hook: 3.5 mm, or a size that makes a firm fabric
- Other: Tapestry needle, scissors and, if needed, pins and a blocking mat
Size and Fit
One small ornament with five equal points. Exact dimensions depend on your yarn and tension; use the stated stitch counts for the sample size.
Gauge
Exact gauge is not essential. Work firmly enough that the points hold their shape without making the fabric difficult to stitch.
Abbreviations
US crochet terms.
- ch = chain
- sc = single crochet
- sc2tog = single crochet two stitches together
- sl st = slip stitch
- st(s) = stitch(es)
Pattern
- Centre, round 1 Make a magic ring. Ch 1, work 10 sc into the ring, pull it closed and join with a sl st to the first sc. Do not count the ch 1 or joining sl st as a stitch. (10 sc)
- Centre, round 2 Ch 1. Work 2 sc in each sc around; join with a sl st to the first sc. Do not count the ch 1 or joining sl st. You now have 20 outer-edge stitches: five groups of four. (20 sc)
- Point 1 Ch 1. Row 1: Sc in the first four sc of round 2. Ch 1, turn. (4 sc) Row 2: Sc2tog twice. Ch 1, turn. (2 sts) Row 3: Sc2tog. (1 st) To return to the centre edge, work one sl st into the side edge of row 2, one into the side edge of row 1, then one into the fourth sc of this pointâs centre-edge group. These travelling sl sts do not count as point stitches.
- Points 2â4 For each point, work row 1 as 1 sc in each of the next four unused sc of centre round 2. Work rows 2 and 3 exactly as for point 1, then travel back down the side and slip stitch into the fourth centre-edge sc of that pointâs group. After point 4, four unused centre-edge sc remain.
- Point 5 and hanging loop Work rows 1â3 across the final four unused centre-edge sc as for point 1. From the tip stitch, ch 14 and sl st into that same tip stitch to close the hanging loop. Fasten off. The loop is part of the star; no piece needs attaching.
Finishing
- Weave in the starting tail on the back of the centre and the finishing tail along the back of the final point.
- If the points curl, lightly dampen the star, gently pin the five tips into shape on a blocking mat and leave it to dry fully. Avoid stretching the loop.
Helpful Tips
- Mark the first stitch of centre round 2 if you find it hard to identify after joining.
- Keep the travelling slip stitches loose enough that they do not pull the sides of the points inward.
- For a parcel decoration, pass ribbon through the crocheted loop rather than sewing anything to the star.
Striped Candy Cane
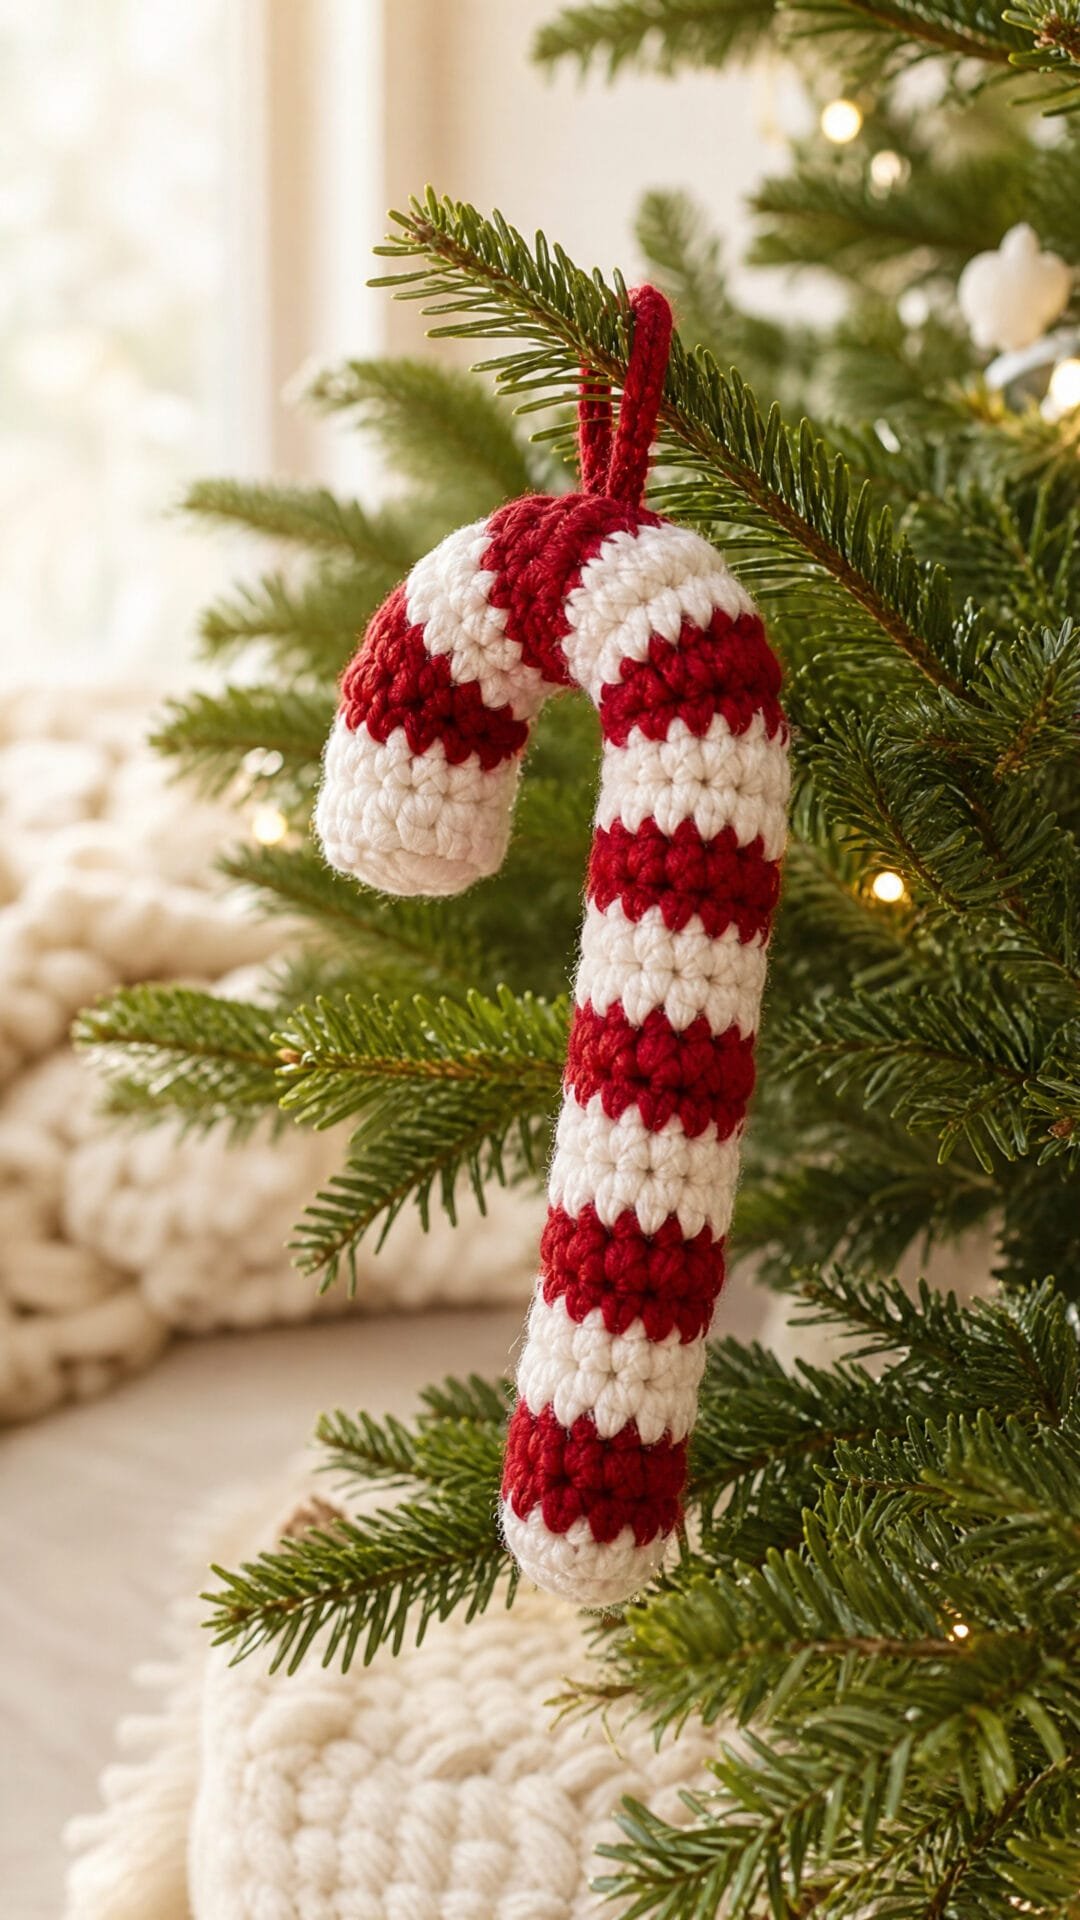
This no-sew Christmas crochet candy cane is a soft hanging decoration with red-and-white stripes and a rounded hooked top. It is worked as one continuous piece, so there are no separate parts to attach.
The curve comes from shaping the outside and inside of the hook rather than inserting wire. That gives the cane its familiar outline while keeping it soft enough to hang on a tree or add to a gift.
Keep the stuffing light through the bend. Too much filling can make the top look bulky and resist the curve; just enough to support the shape will leave the hook pliable.
Striped Candy Cane

Quick-reference card. Follow the complete written instructions below.
Materials
- Smooth worsted-weight yarn: Small amounts of red and white
- Crochet hook: A size that makes a firm fabric without visible stuffing gaps; 3.5 mm is a suggested starting point
- Toy stuffing: A small amount
- Stitch marker: To mark the first stitch and the outside of the bend
Size and Fit
One sample size: 12 stitches around the tube, with 44 rounds before closing and an 18-chain hanging loop. At the suggested gauge, expect roughly 14â16 cm in height, excluding the loop. Finished dimensions depend on tension and shaping.
Gauge
Aim for approximately 20 sc and 22 rounds per 10 cm in firm single crochet. An exact gauge is less important than a fabric that conceals the stuffing.
Abbreviations
US crochet terms.
- ch = chain
- sc = single crochet
- sc2tog = single crochet two stitches together
- sl st = slip stitch
- st(s) = stitch(es)
Pattern
- Before you begin Work in joined rounds. Join each round with a sl st into its first sc, then ch 1 to begin the next round. The join and turning chain do not count as stitches; work the next roundâs first stitch into the first sc, not the join. At a colour change, make the joining sl st with the new colour. Leave the unused yarn inside the tube and bring it back at the next change without pulling it tight.
- Rounds 1â2: red base With red, make a magic ring. Round 1: ch 1, work 6 sc into the ring and join. Round 2: ch 1, work 2 sc in each st around and join. You have 12 sts.
- Rounds 3â26: straight stem Work 1 sc in each of the 12 sts around, joining each round. Make rounds 3â5 red, 6â8 white, 9â11 red, 12â14 white, 15â17 red, 18â20 white, 21â23 red and 24â26 white. Begin adding small amounts of stuffing around round 15. Keep the tube filled but pliable.
- Rounds 27â44: hooked top Keep the first stitch of each round marked as the outside of the bend. Work three-round bands: 27â29 red, 30â32 white, 33â35 red, 36â38 white, 39â41 red and 42â44 white. On rounds 28, 31, 34, 37, 40 and 43, work 2 sc in the first st, sc in the next 4 sts, sc2tog over the next 2 sts, then sc in the next 5 sts; join. This places the increase outside and the decrease inside the curve while retaining 12 sts. On every other round from 27â44, sc in each st around and join. Add a little stuffing as you go, especially before the opening becomes difficult to reach. Shape the bend gently with your fingers.
- Rounds 45â46: close the top Change to red when joining round 44; cut the white yarn and tuck its end inside. Round 45: ch 1, sc2tog 6 times around and join; 6 sts. Round 46: ch 1, sc2tog 3 times around and join; 3 sts. Do not ch 1. With the working loop still on the hook, insert the hook through the front loop of each of the three remaining stitches, then yarn over and pull through those front loops and the loop on the hook to draw the opening shut.
- Hanging loop From the closed top, ch 18 and sl st into the closure point to form a loop. Fasten off and use the hook to draw the yarn end into the tube.
Finishing
- Ease the stuffed tube into a candy-cane curve, with the increased stitches on the outside of the hook.
- Tuck any remaining yarn ends inside using the hook. No pieces need sewing together.
Helpful Tips
- Stuff lightly around the hook: overfilling makes the curved top bulky and can push it towards a straighter shape.
- If stuffing shows between stitches, use a smaller hook rather than packing in less stuffing.
- The red base takes five rounds before the regular three-round colour bands begin; this gives the bottom of the tube a closed cap.
Mini Christmas Stocking

This mini Christmas stocking is an open little pocket for a folded note or a wrapped sweet. Its familiar shape makes it a cheerful addition to a gift or a Christmas display.
The shaped heel is what gives it the bend of a real stocking. Short rows form a shallow cup at the back, while the front remains uninterrupted; the work then continues upwards as one piece. Take your time around the heel, as that is the part that needs the most attention.
A contrasting cuff highlights the opening, and the hanging loop is crocheted directly into it rather than attached as a separate piece. That keeps the stocking a no-sew project while giving you a handy way to hang it.
Mini Christmas Stocking

Quick-reference card. Follow the complete written instructions below.
Materials
- Medium-weight acrylic yarn: Small amounts of red for the stocking and a contrasting colour for the cuff and loop.
- Crochet hook: 4 mm, or a size that gives a firm fabric without making the opening stiff.
- Stitch marker: For marking the start of the toe rounds.
- Yarn needle and scissors: For weaving in ends and trimming yarn.
Size and Fit
One sample size: 24 stitches around the opening, approximately 15 cm in circumference at the suggested gauge. It is intended for a small note or wrapped sweet, not for wearing.
Gauge
Aim for approximately 16 sc and 18 rounds to 10 cm in firm, un-stretched fabric. Exact gauge is not essential, but a loose fabric may leave gaps.
Abbreviations
US crochet terms.
- ch = chain
- sc = single crochet
- inc = work 2 sc in the same stitch
- sl st = slip stitch
- rnd = round
Pattern
- Toe, rnd 1 With red, make a magic ring and work 6 sc into it. Pull the ring closed. Work the toe and foot in continuous rounds; mark the first stitch of each round. (6 sc)
- Toe, rnd 2 Inc in each stitch. (12 sc)
- Toe, rnd 3 *Sc in next stitch, inc in next stitch; repeat from * around. (18 sc)
- Toe, rnd 4 *Sc in next 2 stitches, inc in next stitch; repeat from * around. (24 sc)
- Foot, rnds 5â11 Sc in each stitch around. Keep the tube open. At the end of rnd 11, do not fasten off. (24 sc per rnd)
- Heel, rows 1â5 The heel is worked back and forth over the next half of the tube; leave the other 12 stitches unworked for the instep. Row 1: sc in the next 12 stitches, turn. Row 2: sc in the next 10 stitches, turn. Row 3: sc in the next 8 stitches, turn. Row 4: sc in the next 6 stitches, turn. Row 5: sc in the next 4 stitches, turn. Shortening the rows leaves stitches at the edges for the return rows to pick up.
- Heel, rows 6â13 Row 6: sc across all 4 stitches of row 5, then sc in the next unworked stitch at that edge of an earlier, longer heel row; turn. For each of rows 7â13, sc across every stitch of the preceding row, then sc in the next unworked heel stitch at that edge; turn after rows 7â12 only. Each row has one more stitch than the last: 5, 6, 7, 8, 9, 10, 11 and 12 stitches. Pick up the edge stitches in order, without skipping one. This shallow cup pushes the heel behind the foot and gives the stocking its bend.
- Leg, rnd 1 From the end of heel row 13, sc in each of the 12 unworked instep stitches, then sc in each of the 12 stitches across the top of heel row 13. Join with a sl st to the first sc. The heel and instep now form one round again. (24 sc)
- Leg, rnds 2â8 Ch 1, sc in each stitch around and join with a sl st to the first sc. Repeat for seven rounds in total. The ch 1 does not count as a stitch. On the joining sl st of rnd 8, change to the contrasting colour. (24 sc per rnd)
- Cuff, rnds 1â3 With the contrasting colour, ch 1, sc in each stitch around and join with a sl st to the first sc. Repeat for three rounds in total. (24 sc per rnd)
- Cuff and hanging loop, rnd 4 Ch 1, sc in each stitch around and join with a sl st to the first sc. Ch 14, then sl st into that same first sc to close the hanging loop directly onto the cuff. Fasten off. The 14 chains are the loop, not part of the 24-stitch opening.
Finishing
- Weave in the starting and finishing ends without drawing the opening closed.
- Ease the heel into shape with your fingers. Place a small note or a wrapped sweet inside; leave the top open.
Helpful Tips
- Use a marker on the first toe stitch so you can identify the next 12 stitches for heel row 1.
- On the widening heel rows, the extra stitch is picked up from an earlier heel row. It is not an increase worked into the preceding row.
- If a small gap appears at a heel corner, close it while weaving in a yarn end; do not add an extra stitch to the leg round.
Six-Arm Snowflake
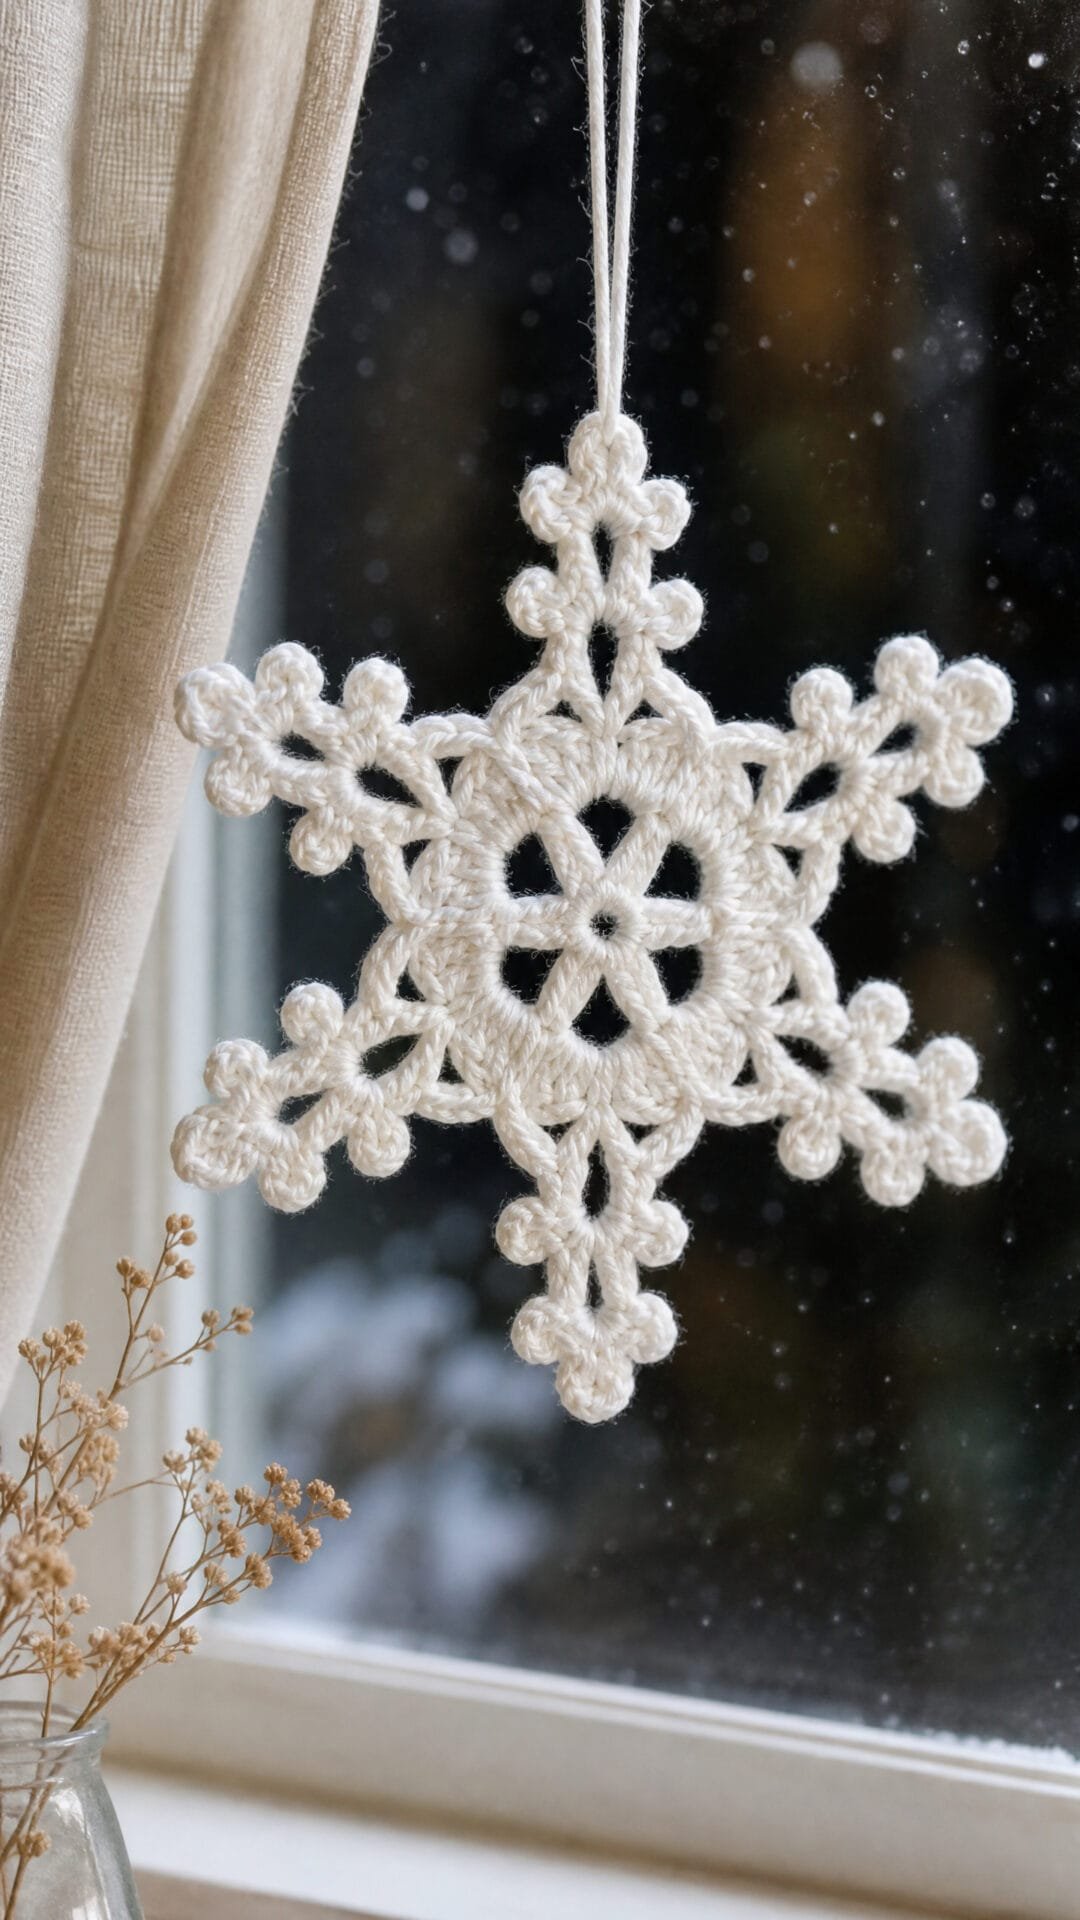
This openwork snowflake makes a light decoration for a Christmas tree or window. The spaces between its six arms give it a delicate outline that shows up especially well against a darker background.
The arms grow from a shared centre, and the hanging loop is incorporated into the last one, so there are no separate pieces to attach. Blocking can help the points sit more symmetrically, but the snowflake is ready to display without it.
Six-Arm Snowflake
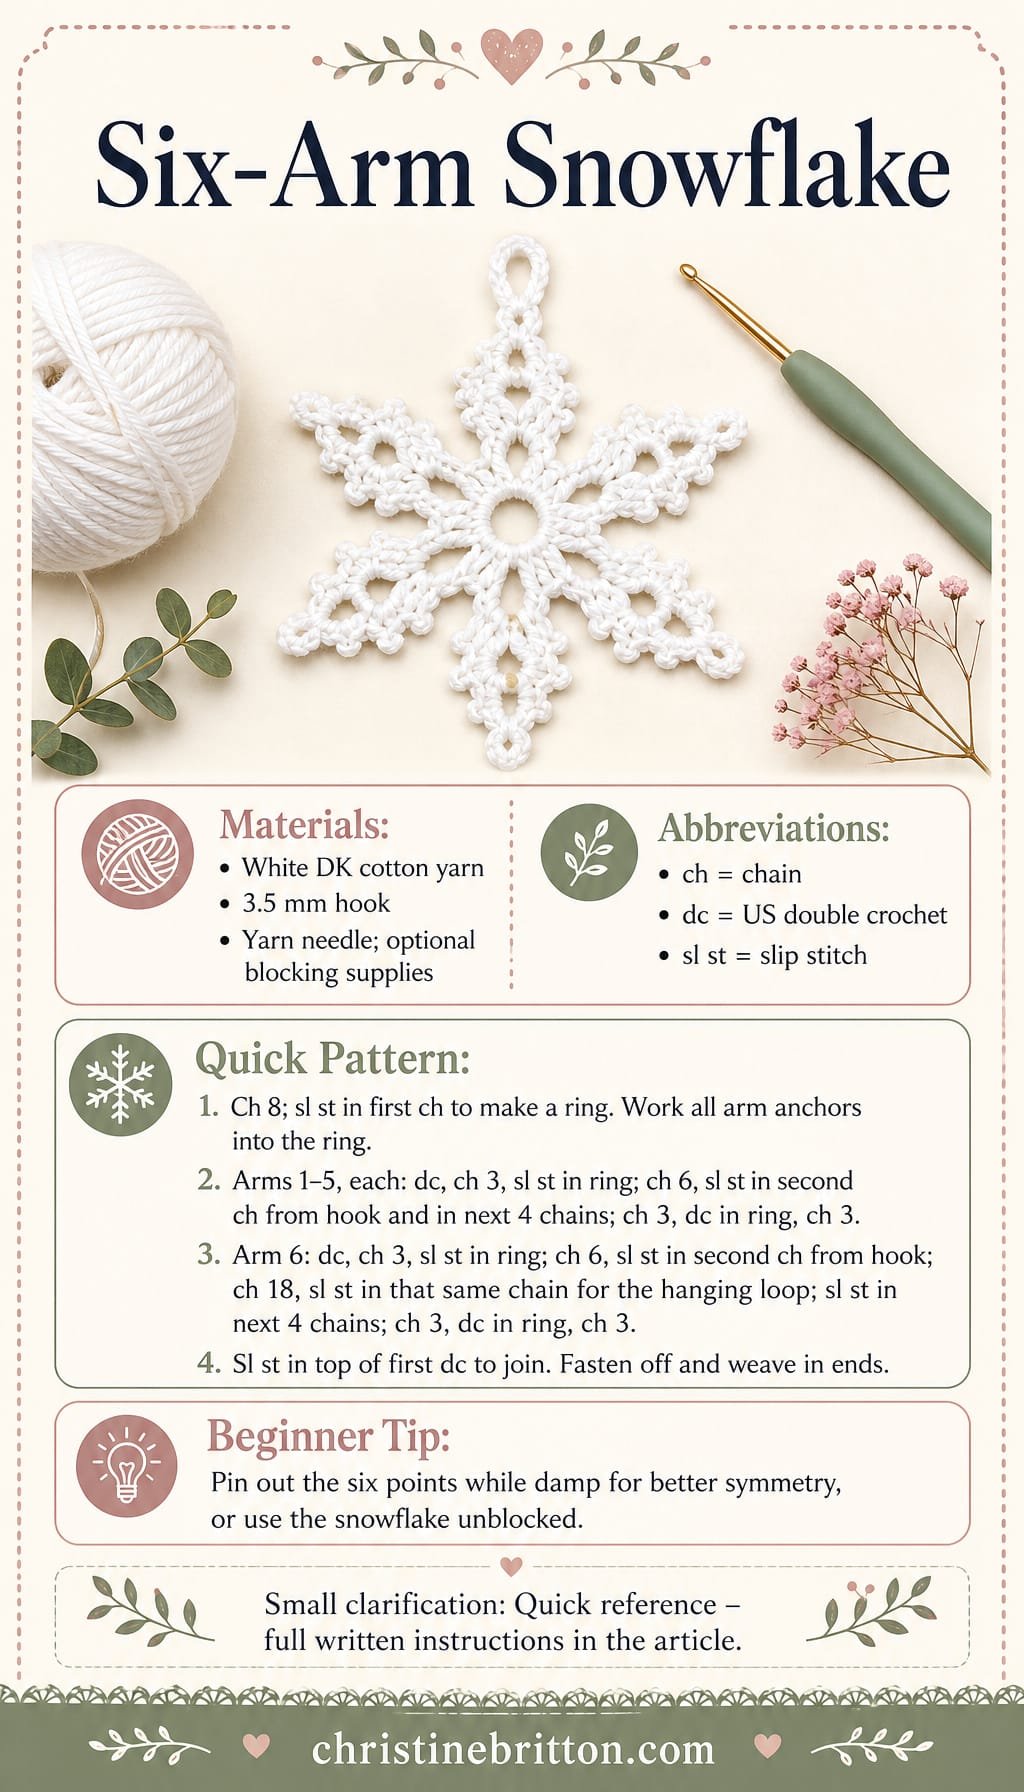
Quick-reference card. Follow the complete written instructions below.
Materials
- Yarn: A small amount of white DK cotton yarn; cotton holds the points well when blocked.
- Hook: 3.5 mm crochet hook
- Other: Yarn needle; rustproof pins and a blocking mat if blocking
Size and Fit
One decorative size. The finished diameter depends on your yarn, tension and blocking. To make a larger or smaller snowflake, change the yarn weight and use a suitable hook; keep all six arms identical.
Gauge
Gauge is not critical. Work firmly enough for the arms to hold their shape without pulling the central ring closed.
Abbreviations
US crochet terms.
- ch = chain
- dc = double crochet
- sl st = slip stitch
Pattern
- Central ring Ch 8. Sl st in the first ch to form a ring. Work the arm stitches into the centre of this ring, not into its individual chains.
- Arm 1 Dc in the ring, ch 3, sl st in the ring. Ch 6; sl st in the second ch from the hook, then sl st in each of the remaining 4 chains to return to the ring. Ch 3, dc in the ring, ch 3. The final ch 3 makes the space before the next arm.
- Arms 2â5 Repeat Arm 1 four more times, working every dc and ring-anchoring sl st into the central ring.
- Arm 6 and hanging loop Dc in the ring, ch 3, sl st in the ring. Ch 6 and sl st in the second ch from the hook. Ch 18 and sl st in that same second chain to form the hanging loop. Sl st in each of the remaining 4 chains to return to the ring. Ch 3, dc in the ring, ch 3. Sl st in the top of the first dc to join; fasten off.
Finishing
- Weave in both yarn ends without drawing the central ring tight.
- If desired, dampen the snowflake, pin out all six tips and side loops evenly, and leave it to dry completely. Blocking improves symmetry, but the snowflake can be hung without it.
Helpful Tips
- Keep the six ch-3 spaces between arms visible as you work; they help separate the points.
- Make the slip stitches down each arm’s chain loosely enough that the point lies flat.
Open Gift Box

This little open gift box offers a reusable way to present a small, light wrapped gift. Its square shape and contrasting rim make it feel festive without needing a separate lid.
A firm fabric helps the sides stand, while a defined fold between the base and walls gives the box a clear outline. Distinct corners reinforce the shape without sewn seams.
It works particularly well for a gift that can sit comfortably inside the box rather than one that needs the box to support its weight. The open top also lets the wrapping remain part of the display.
Open Gift Box

Quick-reference card. Follow the complete written instructions below.
Materials
- Main yarn: About 50 g of sturdy worsted-weight cotton or cotton-blend yarn
- Contrast yarn: About 10 g of the same weight for the rim
- Hook: 4 mm (US G/6), or a size that makes a firm fabric
- Notions: Four stitch markers and a yarn needle for weaving in ends
Size and Fit
One size: approximately 10 cm square at the base and 5â6 cm tall at the suggested gauge. The box is open at the top; check that your wrapped gift will fit inside before filling it.
Gauge
Aim for approximately 16 sc and 18 rows per 10 cm in firm, flat fabric. Exact gauge is not critical, but looser stitches will make softer sides and change the finished size.
Abbreviations
US crochet terms.
- ch = chain
- sc = single crochet
- BLO = back loop only
- sl st = slip stitch
- rnd = round
- st(s) = stitch(es)
Pattern
- Base, row 1 With main yarn, ch 17. Sc in the second ch from the hook and in each remaining ch; 16 sc.
- Base, rows 2â18 Ch 1, turn, and sc in each st across; 16 sc per row. Do not fasten off after row 18.
- Perimeter rnd Ch 1 and turn. Sc in each of the 16 sts of row 18. Continue down the side, working 1 sc into the end of each of rows 17 through 2 (16 sc). Work 1 sc into each of the 16 available underside loops of the foundation chain. Continue up the other side with 1 sc into the end of each of rows 2 through 17 (16 sc). Sl st into the first sc to join; 64 sc. Place a marker at each change between these four groups of 16 sts. Do not count the joining sl st or turning chain as a stitch.
- Wall, rnd 1 Ch 1. Sc BLO in each of the 64 perimeter sts. Sl st into the first sc to join; 64 sc. This round forms the fold where the sides turn upwards.
- Wall, rnds 2â8 Ch 1. Sc through both loops in each st around; sl st into the first sc to join. Repeat for seven rounds in total, keeping the four marked changes between sides aligned; 64 sc per round. Fasten off the main yarn after rnd 8.
- Contrast rim, rnds 9â10 Join contrast yarn in the first st of the round. Ch 1 and sc in each st around; sl st into the first sc to join. Work one more round in the same way; 64 sc per round. Fasten off.
Finishing
- Weave in the ends without pulling the fabric out of shape.
- Finger-crease the box along the four marked changes between sides, then gently press the base flat and shape the corners upright. Remove the markers.
Helpful Tips
- Keep the stitches snug rather than using a loose, drapey tension; the dense fabric helps the sides stand.
- Work one stitch per specified row end and foundation loop on the perimeter round. Extra stitches there will make the walls flare.
- The box is intended for a small, light wrapped gift. It has no lid and is not designed to carry a heavy item.
Hanging Christmas Bell
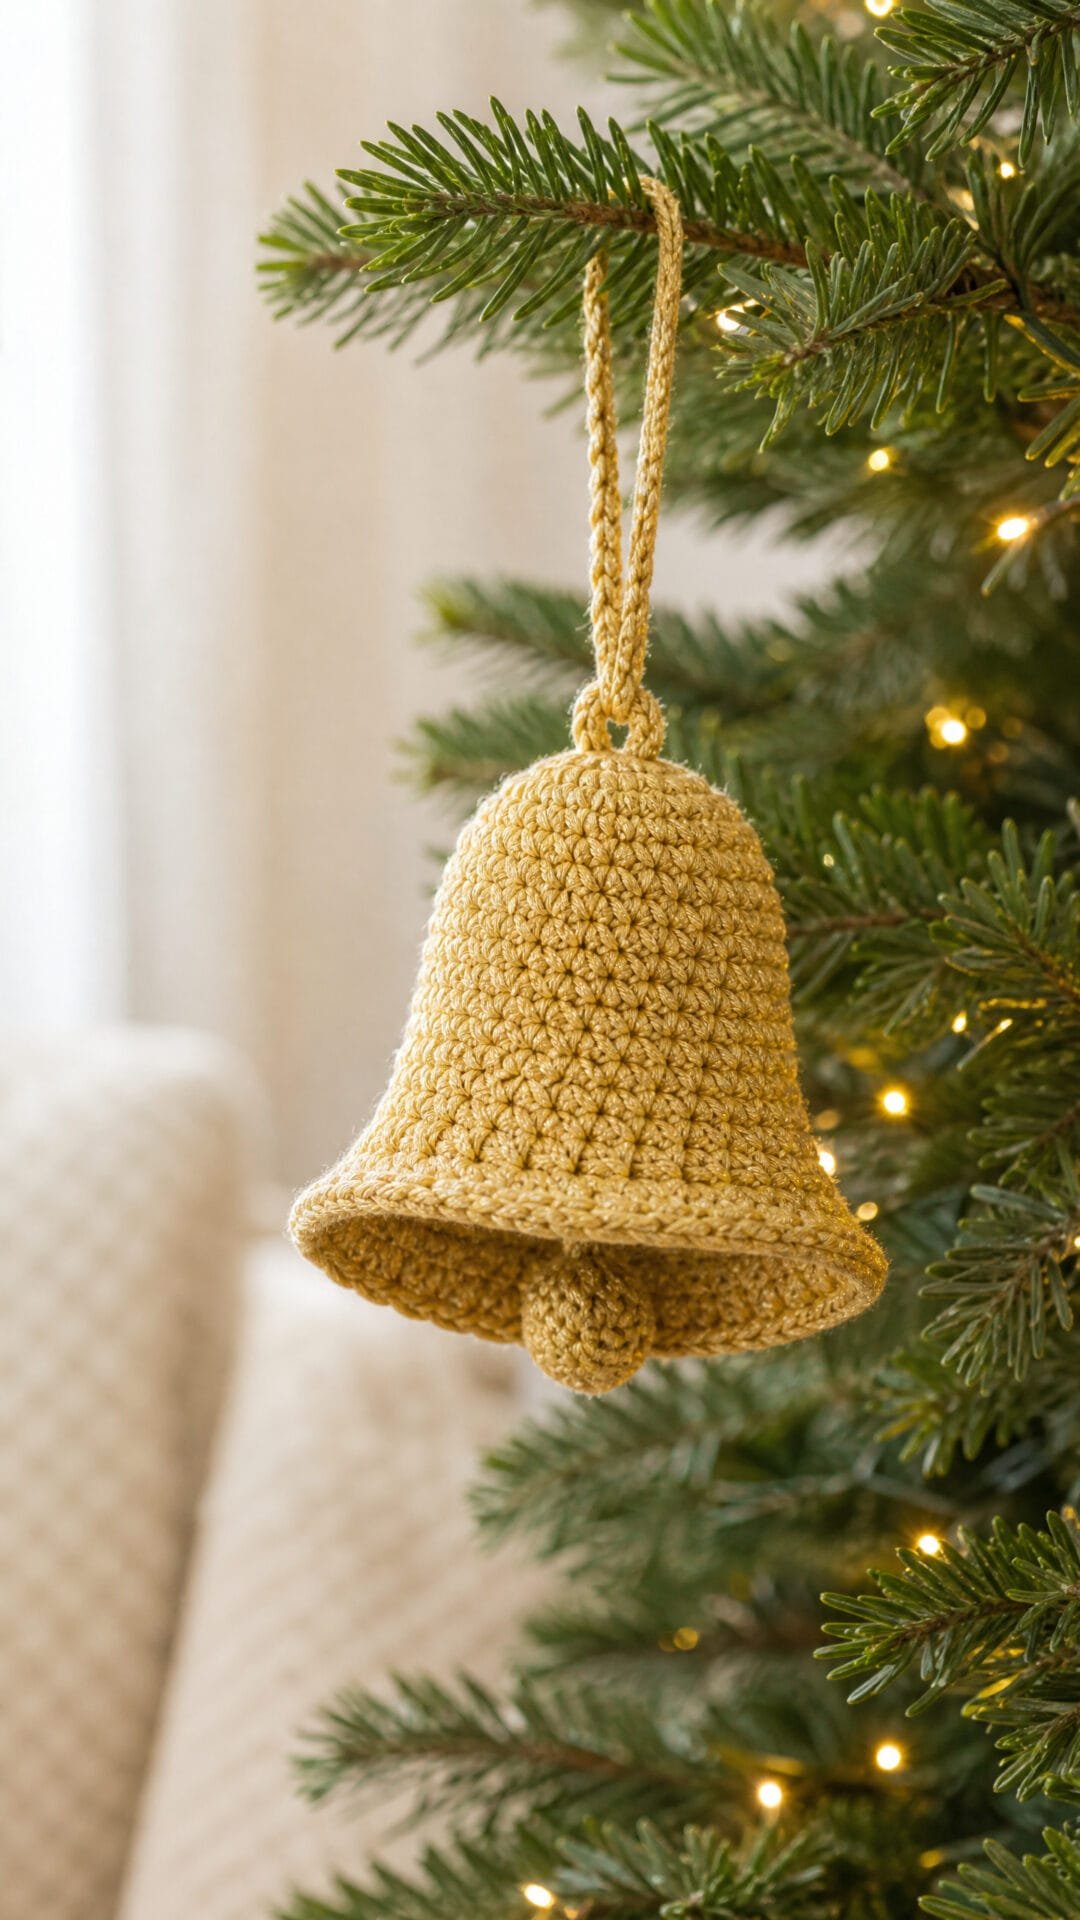
This hanging Christmas bell has a rounded crown, an open base and a gently flared rim. The widening lower edge gives it a recognisable bell silhouette without adding a separate trim.
Its top loop and visible clapper are part of the crochet construction, making it a no-sew decoration for a tree or festive garland. The clapper is decorative rather than functional: this soft bell will not ring.
A firm fabric helps the rim keep its outline, while a relaxed lower edge lets the flare sit naturally. The pattern card below contains the complete instructions.
Hanging Christmas Bell

Quick-reference card. Follow the complete written instructions below.
Materials
- Gold DK cotton yarn: Approximately 20 g for one bell
- 3 mm crochet hook: Or a size that produces a firm fabric
- Stitch marker: To identify the first stitch of each round
- Yarn needle and scissors: For weaving in ends and trimming yarn
Size and Fit
One sample size. At the suggested gauge, the 54-stitch rim has an estimated diameter of about 8.5 cm, and the 17-round bell is approximately 7 cm deep, excluding the hanging loop and clapper. Exact dimensions depend on tension.
Gauge
Approximately 20 sc and 24 rounds per 10 cm in firm single crochet. Gauge is a guide to size; a dense fabric helps the rim hold its outline.
Abbreviations
US crochet terms.
- ch = chain
- sc = single crochet
- dc = double crochet
- sl st = slip stitch
- inc = work 2 sc in the same stitch
- st(s) = stitch(es)
- 5-dc bobble = Work 5 unfinished dc into the indicated stitch, then yarn over and draw through all 6 loops on the hook.
Pattern
- Before you begin Work the bell from the crown down in joined rounds. Unless stated otherwise, ch 1 at the start of a round; it does not count as a stitch. Join each round with a sl st in its first sc. Do not turn.
- Round 1 Make a magic ring and work 6 sc into it. Pull the ring closed and join. (6 sc)
- Hanging loop With the working yarn still attached, ch 18 and sl st into the same first sc of Round 1 to form a loop. Keep the chain and its anchoring slip stitch out of the way when working the next round.
- Round 2 Ch 1, inc in each of the 6 sc of Round 1; join. Work into the sc, not into the hanging loop or slip stitches. (12 sc)
- Round 3 Ch 1, *sc in next st, inc in next st; repeat from * 6 times; join. (18 sc)
- Round 4 Ch 1, *sc in next 2 sts, inc in next st; repeat from * 6 times; join. (24 sc)
- Rounds 5â9 Ch 1, sc in each st around; join. (24 sc each round)
- Round 10 Ch 1, *sc in next 3 sts, inc in next st; repeat from * 6 times; join. (30 sc)
- Round 11 Ch 1, sc in each st around; join. (30 sc)
- Round 12 Ch 1, *sc in next 4 sts, inc in next st; repeat from * 6 times; join. (36 sc)
- Round 13 Ch 1, sc in each st around; join. (36 sc)
- Round 14 Ch 1, *sc in next 5 sts, inc in next st; repeat from * 6 times; join. (42 sc)
- Round 15 Ch 1, *sc in next 6 sts, inc in next st; repeat from * 6 times; join. (48 sc)
- Round 16 Ch 1, *sc in next 7 sts, inc in next st; repeat from * 6 times; join. (54 sc)
- Round 17 Ch 1, sc in each st around; join. Fasten off. (54 sc)
- Clapper Turn the bell so you can reach the inside of the crown. Join a new length of yarn with a sl st in a Round 1 sc away from the hanging-loop anchor. Ch 21 for the cord. Work a 5-dc bobble into the third ch from the hook, then ch 1 to secure it. Fasten off. The bobble sits at the end of the cord; the cord remains attached to the crown.
Finishing
- Weave the clapper yarn end into the bobble and along the cord without drawing the bobble upwards.
- Weave in the other ends securely. Leave the bottom open and gently shape the flared rim with your fingers.
Helpful Tips
- If the clapper does not show beneath your bell, add chains to its cord before making the bobble; if it hangs too low, use fewer chains.
- Keep the rim stitches firm but not tight. A tight final round can pull the flare inwards.
- The bobble is decorative: this soft bell is not designed to make a ringing sound.
Flat Holly Wreath

This flat holly wreath brings a little Christmas detail to a door handle or wrapped parcel without the bulk of a stuffed decoration. Its open centre and pointed outer edge give it the familiar shape of a wreath while keeping it light enough to hang from its crocheted loop.
The berries are raised stitches worked into the wreath itself, so there are no beads or separate pieces to attach. They add texture and colour without changing the wreathâs flat construction. This is a good choice if you enjoy working in the round and want a small project with a more decorative edge.
Flat Holly Wreath

Quick-reference card. Follow the complete written instructions below.
Materials
- Green DK cotton yarn: Approximately 20 g for the ring, edging and hanging loop.
- Red DK cotton yarn: A small amount for six bobbles; use a separate length for each berry.
- 4 mm crochet hook: Adjust the hook size if needed to obtain a firm fabric that lies flat.
- Stitch marker and yarn needle: For marking the start of each round and weaving in ends.
Size and Fit
One size. At the stated gauge, expect an opening of approximately 6â7 cm and an overall diameter of approximately 11â13 cm, including the pointed edging. These are estimates, not tested finished measurements.
Gauge
Approximately 18 sc and 20 rounds per 10 cm in sc worked in the round. Exact gauge is less important than a ring that lies flat.
Abbreviations
US crochet terms.
- ch = chain
- sc = single crochet
- hdc = half double crochet
- dc = double crochet
- sl st = slip stitch
- inc = work 2 sc in the same stitch
- bobble = Work 4 partial dc in the same stitch: [yarn over, insert hook, yarn over and pull up a loop, yarn over and pull through 2 loops] four times. Yarn over and pull through all 5 loops. The bobble counts as one stitch.
Pattern
- Before you begin Work the ring in a continuous spiral with its right side facing you. Move the marker to the first stitch of each new round. Do not join or turn between rounds. The initial chain forms the open centre; do not crochet over the opening.
- Foundation and round 1 With green, ch 36. Check that the chain is not twisted, then sl st into the first ch to form a ring. Sc in each ch around. Place a marker in the first sc. (36 sc)
- Round 2 [Sc in the next 5 sts, inc] 6 times. (42 sc)
- Round 3 [Sc in the next 6 sts, inc] 6 times. (48 sc)
- Round 4 [Sc in the next 7 sts, inc] 6 times. (54 sc)
- Round 5 [Sc in the next 8 sts, inc] 6 times. (60 sc)
- Round 6: berries [Sc in the next 4 sts, bobble in the next st using red, sc in the next 5 sts using green] 6 times. (60 sts) For each bobble, change to a fresh length of red on the last pull-through of the fourth preceding green sc. Drop green behind the bobble without cutting it. Work the four partial dc with red, then use green for the final pull-through through all 5 loops. Cut red, leaving ends long enough to weave in. Gently push each bobble towards the right side of the wreath.
- Pointed leaf edging Continue with green. Define a leaf as (sc, hdc, dc, ch 2, sl st in the second ch from the hook, dc, hdc, sc), all worked in one base stitch. Work [sl st in the next st, leaf in the next st, sl st in the next st, sc in the next 2 sts] 6 times. Make the hanging loop as directed below, then work the bracketed sequence 6 more times. The edging uses all 60 stitches of round 6 and makes 12 leaves.
- Integrated hanging loop After the first six edging repeats, ch 14 and sl st into the top of the sc just worked to close the loop. Work 18 sc around the chain loop, inserting the hook beneath the chain rather than into its individual stitches. Sl st into the same anchoring sc, then continue with the remaining six edging repeats. The loop does not use another stitch of round 6.
- Close the edging After the twelfth leaf repeat, sl st into the first edging sl st and fasten off green.
Finishing
- Weave in every red end on the wrong side, securing each berry without pulling the fabric into a pucker. Weave in the green ends.
- Ease the leaf points into shape. If needed, lightly dampen the wreath and lay it flat to dry, keeping the centre open.
Helpful Tips
- Keep the green yarn loose where it passes behind each red bobble so the ring stays flat.
- The short red colour change may show in the top of the sc immediately before a bobble; this sits beside the raised berry.
- If the ring cups, try a slightly larger hook. If it ripples markedly, try a smaller hook; keep the stitch counts unchanged.
If youâd like to keep building your crochet skills, take a look at more crochet Christmas snowflake patterns.
Flat Gingerbread Person

This flat gingerbread person is a cheerful choice for a no-sew Christmas decoration. Its familiar shape comes from a single crocheted body, with the arms and legs worked directly from its edges rather than attached as separate pieces.
Raised, contrast-colour buttons give the figure a little character without an embroidered face. The plain silhouette leaves the shape easy to recognise, while the hanging loop makes it suitable for a tree or a festive garland.
The shaping and edge attachments make this an intermediate project, but the construction stays compact. Keep the fabric firm so the head and limbs hold their outline when the decoration hangs.
Flat Gingerbread Person

Quick-reference card. Follow the complete written instructions below.
Materials
- Brown DK cotton yarn: Approximately 20â30 g for the figure and hanging loop.
- Contrast DK cotton yarn: A small length for two buttons.
- 3 mm crochet hook: Or a size that produces a firm fabric without large gaps.
- Tapestry needle and scissors: For weaving in ends; no assembly sewing is required.
Size and Fit
One size: approximately 13 cm tall, excluding the hanging loop, and 11â12 cm across the arms at the suggested gauge. This is a decoration, not a fitted item.
Gauge
Approximately 20 sc and 22 rows to 10 cm in firm, flat sc fabric. Exact gauge is not essential, but a loose fabric will give the figure less definition.
Abbreviations
US crochet terms.
- ch = Chain.
- sc = Single crochet.
- sl st = Slip stitch.
- inc = Work 2 sc in the same stitch.
- dec = Single crochet 2 stitches together.
- bobble = In one stitch, work (yarn over, insert hook, draw up a loop, yarn over and draw through 2 loops) four times; yarn over and draw through all 5 loops on the hook. Counts as one stitch.
- RS = Right side, with the raised buttons facing you.
Pattern
- Before you begin Use brown yarn unless a contrast-colour button is specified. Ch 1 to turn after each row; the turning chain never counts as a stitch. Make the bobbles on rows 5 and 9 face the same side of the fabric. If necessary, push each completed bobble towards the RS.
- Torso, rows 1â4 Ch 13. Row 1: sc in the second ch from the hook and in each ch across; 12 sc. Rows 2â4: ch 1, turn, sc in each stitch across; 12 sc.
- Torso, row 5: first button Ch 1, turn. Sc in the first 5 stitches, working the final yarn-over of the fifth sc with contrast yarn. Work a contrast bobble in the next stitch, completing its final yarn-over with brown. Sc in the remaining 6 stitches; 12 stitches. Keep the brown yarn loose behind the bobble rather than pulling it tight. Cut the contrast yarn, leaving an end to weave in.
- Torso, rows 6â8 Ch 1, turn, sc in each stitch across each row; 12 sc per row.
- Torso, row 9: second button Repeat row 5, using a fresh length of contrast yarn; 12 stitches.
- Torso, rows 10â12 Ch 1, turn, sc in each stitch across each row; 12 sc per row.
- Neck and head, rows 13â17 Row 13: ch 1, turn, dec, sc 8, dec; 10 stitches. Row 14: ch 1, turn, dec, sc 6, dec; 8 stitches. Row 15: ch 1, turn, sc across; 8 stitches. Row 16: ch 1, turn, inc, sc 6, inc; 10 stitches. Row 17: ch 1, turn, inc, sc 8, inc; 12 stitches.
- Head, rows 18â23 Rows 18â20: ch 1, turn, sc across; 12 stitches per row. Row 21: ch 1, turn, dec, sc 8, dec; 10 stitches. Row 22: ch 1, turn, dec, sc 6, dec; 8 stitches. Row 23: ch 1, turn, dec, sc 4, dec; 6 stitches. Fasten off.
- Legs With the RS facing, find the 12 unused loops along the underside of the torsoâs starting chain. Leave the middle 4 loops unworked. For the first leg, join brown yarn to an outer loop, ch 1 and sc into that loop and the next 3 loops, moving towards the middle; 4 sc. Rows 2â4: ch 1, turn, sc across; 4 sc. Row 5: ch 1, turn, dec twice; 2 sc. Row 6: ch 1, turn, sc across; 2 sc. Fasten off. Repeat in the 4 outer loops at the opposite end of the starting chain, again beginning at the outside edge.
- Arms With the RS facing, locate the 4 row-end spaces from torso rows 8â11 along one side. Join brown yarn in the row-8 space, ch 1 and work 1 sc into each of those 4 row-end spaces; 4 sc. Rows 2â4: ch 1, turn, sc across; 4 sc. Row 5: ch 1, turn, dec twice; 2 sc. Row 6: ch 1, turn, sc across; 2 sc. Fasten off. Repeat on the other side, again attaching to the row-end spaces of torso rows 8â11.
- Hanging loop With the RS facing, join brown yarn with a sl st in either of the two centre stitches of head row 23. Ch 18, then sl st back into the same stitch to form a loop. Fasten off.
Finishing
- Weave in all yarn ends on the back, securing the contrast ends without flattening the bobbles.
- Gently smooth the arms, legs and head into shape. If desired, lightly dampen and lay the figure flat to dry; do not stretch the hanging loop.
Helpful Tips
- The two buttons each replace one sc; do not add an extra stitch beside a bobble.
- Count the starting-chain loops before making the legs: four for each leg and four left clear between them.
- Work arm stitches into the specified row ends rather than making separate arm pieces. This keeps the decoration no-sew.
Flameless Crochet Candle

This little flameless candle brings a soft festive accent to a mantel or table without a separate flame to sew on. Its yellow flame flows into a cream candle body, making it a satisfying one-piece project if you enjoy shaping small crochet decorations.
It is a stuffed ornament, not a cover for a real candle or light. Display it on a stable surface well away from naked flames, hot bulbs and other heat sources.
Flameless Crochet Candle

Quick-reference card. Follow the complete written instructions below.
Materials
- Smooth DK cotton yarn: Small amounts of cream for the candle and yellow for the flame.
- 3 mm crochet hook: Or a hook size that makes a firm fabric with no gaps for the stuffing.
- Toy stuffing: A small amount.
- Stitch marker and yarn needle: For tracking rounds and weaving in ends.
Size and Fit
One decorative size. At the stated gauge, the candle body is approximately 5.7 cm across and 6.5 cm high, with a flame approximately 3 cm high. These are gauge-based estimates, not tested finished measurements.
Gauge
Approximately 20 sc and 20 rounds to 10 cm in firm single crochet. An exact match is less important than a fabric that contains the stuffing.
Abbreviations
US crochet terms.
- BLO = Back loop only
- dec = Single crochet decrease: draw up a loop in each of the next two stitches, yarn over and pull through all three loops
- inc = Work 2 sc in the same stitch
- MR = Magic ring
- sc = Single crochet
- st(s) = Stitch(es)
Pattern
- Before you begin Work in continuous rounds without joining or turning. Mark the first stitch of each round and move the marker up as you work. Begin at the tip of the flame with yellow yarn.
- Flame, rounds 1â3 Round 1: Work 4 sc in a MR. (4 sts) Round 2: Sc in each st. (4 sts) Round 3: (Inc, sc) twice. (6 sts)
- Flame, rounds 4â6 Sc in each st for 3 rounds. (6 sts each round) At the last stitch of round 6, complete the stitch with cream yarn. Leave the yellow tail inside the flame; the flame does not need stuffing.
- Cream top, rounds 7â11 Round 7: Inc in each st. (12 sts) Round 8: (Sc, inc) 6 times. (18 sts) Round 9: (Sc in next 2 sts, inc) 6 times. (24 sts) Round 10: (Sc in next 3 sts, inc) 6 times. (30 sts) Round 11: (Sc in next 4 sts, inc) 6 times. (36 sts)
- Candle sides, rounds 12â24 Round 12: Sc BLO in each st to turn the edge of the top. (36 sts) Rounds 13â24: Sc in each st for 12 rounds. (36 sts each round)
- Base, rounds 25â28 Round 25: (Sc in next 4 sts, dec) 6 times. (30 sts) Round 26: (Sc in next 3 sts, dec) 6 times. (24 sts) Round 27: (Sc in next 2 sts, dec) 6 times. (18 sts) Round 28: (Sc, dec) 6 times. (12 sts) Add a little stuffing. Spread it evenly and keep the base as flat as possible.
- Close the base, rounds 29â30 Round 29: Dec 6 times. (6 sts) Add a final small pinch of stuffing only if needed. For round 30, flatten the six-stitch opening so three stitches sit opposite the other three. Working through both loops of one stitch on the near side and the corresponding stitch on the far side, make 1 sc through each opposing pair. (3 sc) This crochets the base closed without sewing. Fasten off.
Finishing
- Weave the cream end into the stuffed body. Gently shape the top and press the base flat so the candle stands steadily.
- Display on a stable surface, away from naked flames, hot bulbs and other heat sources. Do not place it over a candle or light.
Helpful Tips
- If stuffing shows between stitches, use a smaller hook or work more firmly.
- Keep the stuffing light near the base; overstuffing can make the candle rock.
- The yellow tail tucked inside the narrow flame can help it hold its shape without wire.
Christmas Cracker Decoration

This no-sew Christmas cracker brings the familiar shape of a festive table cracker to a reusable crochet decoration. Its striped, softly rounded centre sits between narrow necks and open, flared tips, with integral ties adding a bow-like detail.
The shape is worked as one continuous tube, so there are no separate pieces to attach. The contrast between the firm necks and lightly filled centre gives the decoration its cracker silhouette without making it a container.
It makes a cheerful addition to a Christmas display or place setting, but it is purely decorative: it does not open, hold a surprise or have a snap.
No-Sew Christmas Cracker Decoration

Quick-reference card. Follow the complete written instructions below.
Materials
- Smooth DK yarn: Approximately 15 g each of two contrasting colours: A for the tips and some stripes, B for the remaining stripes.
- 3.5 mm crochet hook: Or a size that produces a firm fabric that holds the stuffing.
- Toy stuffing: A small amount for the central barrel.
- Stitch marker and yarn needle: For marking the first stitch and weaving in ends; no pieces are sewn together.
Size and Fit
One decorative size. At the stated gauge, the 20-round tube is approximately 9 cm long, and its 24-stitch barrel is approximately 12 cm around before stuffing. The tips remain open.
Gauge
Approximately 20 sc and 22 rounds per 10 cm in firm, unstuffed fabric. Exact gauge is not critical, but the fabric should not show large gaps.
Abbreviations
US crochet terms.
- ch = chain
- sc = single crochet
- sl st = slip stitch
- inc = work 2 sc in the same stitch
- dec = single crochet 2 stitches together (sc2tog)
- rnd = round
- st = stitch
Pattern
- Before you begin Work in joined rounds. At the end of each round, sl st to the first sc, then ch 1 to begin the next round; neither the joining sl st nor the beginning ch 1 counts as a stitch. Keep the two flared ends open. A crocheted cord is made by ch 13, then sl st in the second ch from the hook and in each of the remaining 11 chains, returning to its base stitch. Cord chains and slip stitches do not count towards the round’s stitch total.
- First flared tip â colour A Ch 18 and sl st to the first ch to form a ring, taking care not to twist it. Rnd 1: Ch 1, sc in the first ch and make a cord from that sc. Sc in each of the next 8 chains. Sc in the next ch and make a second cord from that sc. Sc in each of the remaining 8 chains; join. (18 sc, plus 2 cords.) Rnd 2: (Sc in the next st, dec over the next 2 sts) 6 times; join. (12 sc.) Rnd 3: Dec 6 times; join. (6 sc.)
- Increase to the barrel Rnd 4: Inc in each st around; join. (12 sc.) Rnd 5: (Sc in the next st, inc in the next st) 6 times; join. (18 sc.) Change to B for the next round. Rnd 6: (Sc in each of the next 2 sts, inc in the next st) 6 times; join. (24 sc.)
- Striped barrel Work 1 sc in each of the 24 sts in every round from Rnd 7 through Rnd 14, joining each round. Use B for Rnds 7â8, A for Rnds 9â10, B for Rnds 11â12 and A for Rnds 13â14. Before starting Rnd 15, place a little stuffing in the barrel, keeping it away from the narrow first tip.
- Second neck Change to B. Rnd 15: (Sc in each of the next 2 sts, dec over the next 2 sts) 6 times; join. (18 sc.) Rnd 16: (Sc in the next st, dec over the next 2 sts) 6 times; join. (12 sc.) Adjust the stuffing now, while the opening is accessible; do not overfill. Rnd 17: Dec 6 times; join. (6 sc.)
- Second flared tip â colour A Rnd 18: Inc in each st around; join. (12 sc.) Rnd 19: (Sc in the next st, inc in the next st) 6 times; join. (18 sc.) Rnd 20: Sc in the first st and make a cord from that sc. Sc in each of the next 8 sts. Sc in the next st and make a second cord from that sc. Sc in each of the remaining 8 sts; join. (18 sc, plus 2 cords.) Fasten off.
- Changing colours At each colour change, work the final yarn-over of the last sc in the preceding round with the new colour, then join and continue as directed. Fasten off the old colour and secure its tail on the inside of the tube where accessible.
Finishing
- Weave in the accessible yarn ends, or use the hook to draw them under several stitches on the inside. No seam or attached piece is required.
- At each tip, bring its two integral cords towards the adjacent narrow neck and tie them together in a small bow. The crocheted shaping forms the neck; the bows are decorative and need not be pulled tight.
- Shape the lightly stuffed barrel with your hands. Leave both flared tips open.
Helpful Tips
- Mark the first sc of each round so the joining slip stitch is not mistaken for a stitch.
- Keep the six-stitch necks firm and leave the tips unstuffed; this helps the central stuffing stay in the barrel.
- This is a decoration, not a functioning Christmas cracker. It has no snap or contents.
Holly Sprig

This no-sew holly sprig adds a small festive detail to a gift tag or place setting. The leaves and raised berries are formed around a shared centre, so there are no separate pieces to attach.
The leaves get their pointed outline from a narrow tip and a fuller middle. A firm, even fabric helps them hold that shape without wire; take care not to tug the tips out of line when handling the sprig.
This is a satisfying little project for crocheters comfortable working along both sides of a foundation. Its low-profile leaves sit neatly against paper or beside a folded napkin, while the berries add a touch of texture.
No-Sew Crochet Holly Sprig

Quick-reference card. Follow the complete written instructions below.
Materials
- Green firm cotton DK yarn: A small amount for the stem and leaves.
- Red cotton DK yarn: A small amount for the berries.
- 3 mm crochet hook: Use a hook that gives you a firm fabric.
- Tapestry needle and pins: For weaving in ends and shaping the leaves.
Size and Fit
One sprig: a 5-chain stem, two leaves made over 9-chain foundations, and three berries. Finished dimensions depend on your yarn and tension. The flat sprig is intended for a gift tag or napkin decoration.
Gauge
Gauge is not critical. Crochet firmly enough that the leaves hold their shape without wire.
Abbreviations
US crochet terms.
- ch = chain
- sl st = slip stitch
- sc = single crochet
- hdc = half double crochet
- yo = yarn over
Pattern
- Stem and shared centre With green, ch 5 for the stem. Ch 3 more, then sl st into the first of those 3 chains to make a small centre ring. Keep the working yarn attached.
- First leaf From the centre ring, ch 9. Working back towards the ring, make a sl st in the second ch from the hook, sc in the next ch, hdc in the next ch, 2 hdc in each of the next 2 chains, hdc in the next ch, sc in the next ch and sl st in the last ch. Now work along the unused side of the same foundation chain, travelling towards the leaf tip: sl st in the first chain, sc in the next, hdc in the next, 2 hdc in each of the next 2 chains, hdc in the next, sc in the next and sl st in the next. Sl st into the chain at the tip. Fasten off, leaving an end to weave in.
- Second leaf Join green with a sl st in the centre ring. Work a second leaf exactly as for the first, beginning with ch 9. Fasten off. Spread the leaves into a shallow V with the stem below them.
- Berries Join red with a sl st in the centre ring and ch 1. Make a bobble in the ring as follows: *yo, insert the hook into the ring, pull up a loop, yo and pull through 2 loops; repeat from * twice more, then yo and pull through all 4 loops on the hook. Ch 1 and sl st into the ring to secure the berry. Make 2 more bobbles in the same ring, securing each with ch 1 and a sl st into the ring. Fasten off.
Finishing
- Weave the green leaf ends down through their leaves and secure all ends on the back. Do not pull the tips inward.
- Pin the dampened leaves flat in a shallow V, drawing each tip to a point. Let them dry fully before removing the pins. Firm cotton, close stitches and this shaping keep the leaves pointed without wire.
- For a gift tag, pass ribbon through the centre ring or around the stem. For a napkin decoration, tuck the sprig beneath a napkin tie rather than fastening it to the fabric.
Helpful Tips
- Work into the unused loops on the opposite side of each leaf foundation; do not work the second side into the stitches just made.
- Keep the slip stitches at the leaf tips loose enough to preserve a clear point.
- If the centre ring feels crowded, ease the stitches around it before weaving in the red ends.
Tiny Santa Hat

This little Santa hat brings a playful touch to a Christmas tree or a festive place setting. Its ribbed white cuff gives way to a tapered red crown, with a white crocheted tip worked as part of the hat rather than attached as a separate pom-pom.
For a hanging ornament, a soft cuff is part of the charm: it can flex around a branch and need not keep a rigid shape. A hat displayed upright at a place setting asks more of its brim. Ribbing may bend or curl even when the crochet fabric is dense, so a firm-looking cuff is not necessarily self-supporting.
If you want the hat to stand rather than hang, allow for a stiffened cuff. Otherwise, enjoy the softer shape as a lightweight decoration.
Tiny Santa Hat

Quick-reference card. Follow the complete written instructions below.
Materials
- DK yarn: Small amounts of white and red.
- 3.5 mm crochet hook: Or a size that gives a firm fabric without gaps.
- Stitch marker and yarn needle: For tracking rounds and weaving in ends.
- Optional textile stiffener: For a brim intended to stand on a table; follow the productâs instructions.
Size and Fit
One sample size. At the target gauge, the cuff measures approximately 10 cm around and 2.5 cm deep before shaping. The finished hat is approximately 7 cm tall. Gauge changes will change the finished size.
Gauge
Target gauge: 20 single crochet stitches and 24 rounds per 10 cm in firm fabric; 20 rows of cuff ribbing measure approximately 10 cm along the edge that becomes the circumference. Exact gauge is less important than a dense fabric.
Abbreviations
US crochet terms.
- ch = chain
- sc = single crochet
- BLO = back loop only
- sl st = slip stitch
- inc = work 2 sc in the same stitch
- dec = single crochet 2 stitches together
Pattern
- White ribbed cuff, Row 1 With white, ch 6. Sc in the second ch from the hook and in each remaining ch. You have 5 sc.
- White ribbed cuff, Rows 2â20 Ch 1, turn; sc BLO in each of the 5 stitches. After Row 20, do not fasten off.
- Join the cuff Bring Row 20 to the foundation-chain edge without twisting the strip. Sl st through corresponding loops along the two short ends, making 5 sl sts. Fasten off white. The row ends form the edge from which the red hat is worked.
- Red hat, Round 1 Join red at the cuff seam. Work 1 sc into the end of each of the 20 cuff rows around the edge: 20 sc. Place a marker in the first sc. Work the red rounds continuously, moving the marker at the start of each round; do not join.
- Red hat, Round 2 Sc in each stitch around: 20 sc.
- Red hat, Round 3 Repeat [sc in the next 3 stitches, dec] 4 times: 16 sc.
- Red hat, Round 4 Sc in each stitch around: 16 sc.
- Red hat, Round 5 Repeat [sc in the next 2 stitches, dec] 4 times: 12 sc.
- Red hat, Round 6 Sc in each stitch around: 12 sc.
- Red hat, Round 7 Repeat [sc in the next stitch, dec] 4 times: 8 sc.
- Red hat, Round 8 Sc in each stitch around: 8 sc.
- Red hat, Round 9 Dec 4 times: 4 sc. On the final decrease, complete the last yarn-over with white instead of red. Cut red, leaving a tail to weave inside the hat.
- White bobble, Round 1 Continuing directly from the red tip, inc in each of the 4 stitches: 8 sc.
- White bobble, Round 2 Sc in each stitch around: 8 sc.
- White bobble, Round 3 Dec 4 times: 4 sc. Cut white, leaving a tail. Pull the tail through the working loop, then draw it through the front loops of the remaining 4 stitches and pull closed.
Finishing
- Weave in the ends, taking care not to pull the narrow tip out of shape.
- For a tree ornament, pass a separate length of yarn through stitches near the tip and knot its ends together to make a hanging loop. No sewn attachment is needed.
- For a place setting, flatten and shape the cuff so its lower edge rests evenly. A soft crocheted cuff can bend or curl and may not hold the hat upright on its own. If an upright display is wanted, apply textile stiffener to the cuff and allow it to dry supported in the desired shape.
Helpful Tips
- Work the cuff seam loosely so it does not pinch the ribbing.
- Mark the first red stitch: the red and white tip rounds are worked in a spiral, so there is no joining slip stitch to mark their beginnings.
- A smaller hook can make the cuff firmer, but a dense soft cuff is not the same as a stiffened brim for upright display.
Mini Mitten Ornament
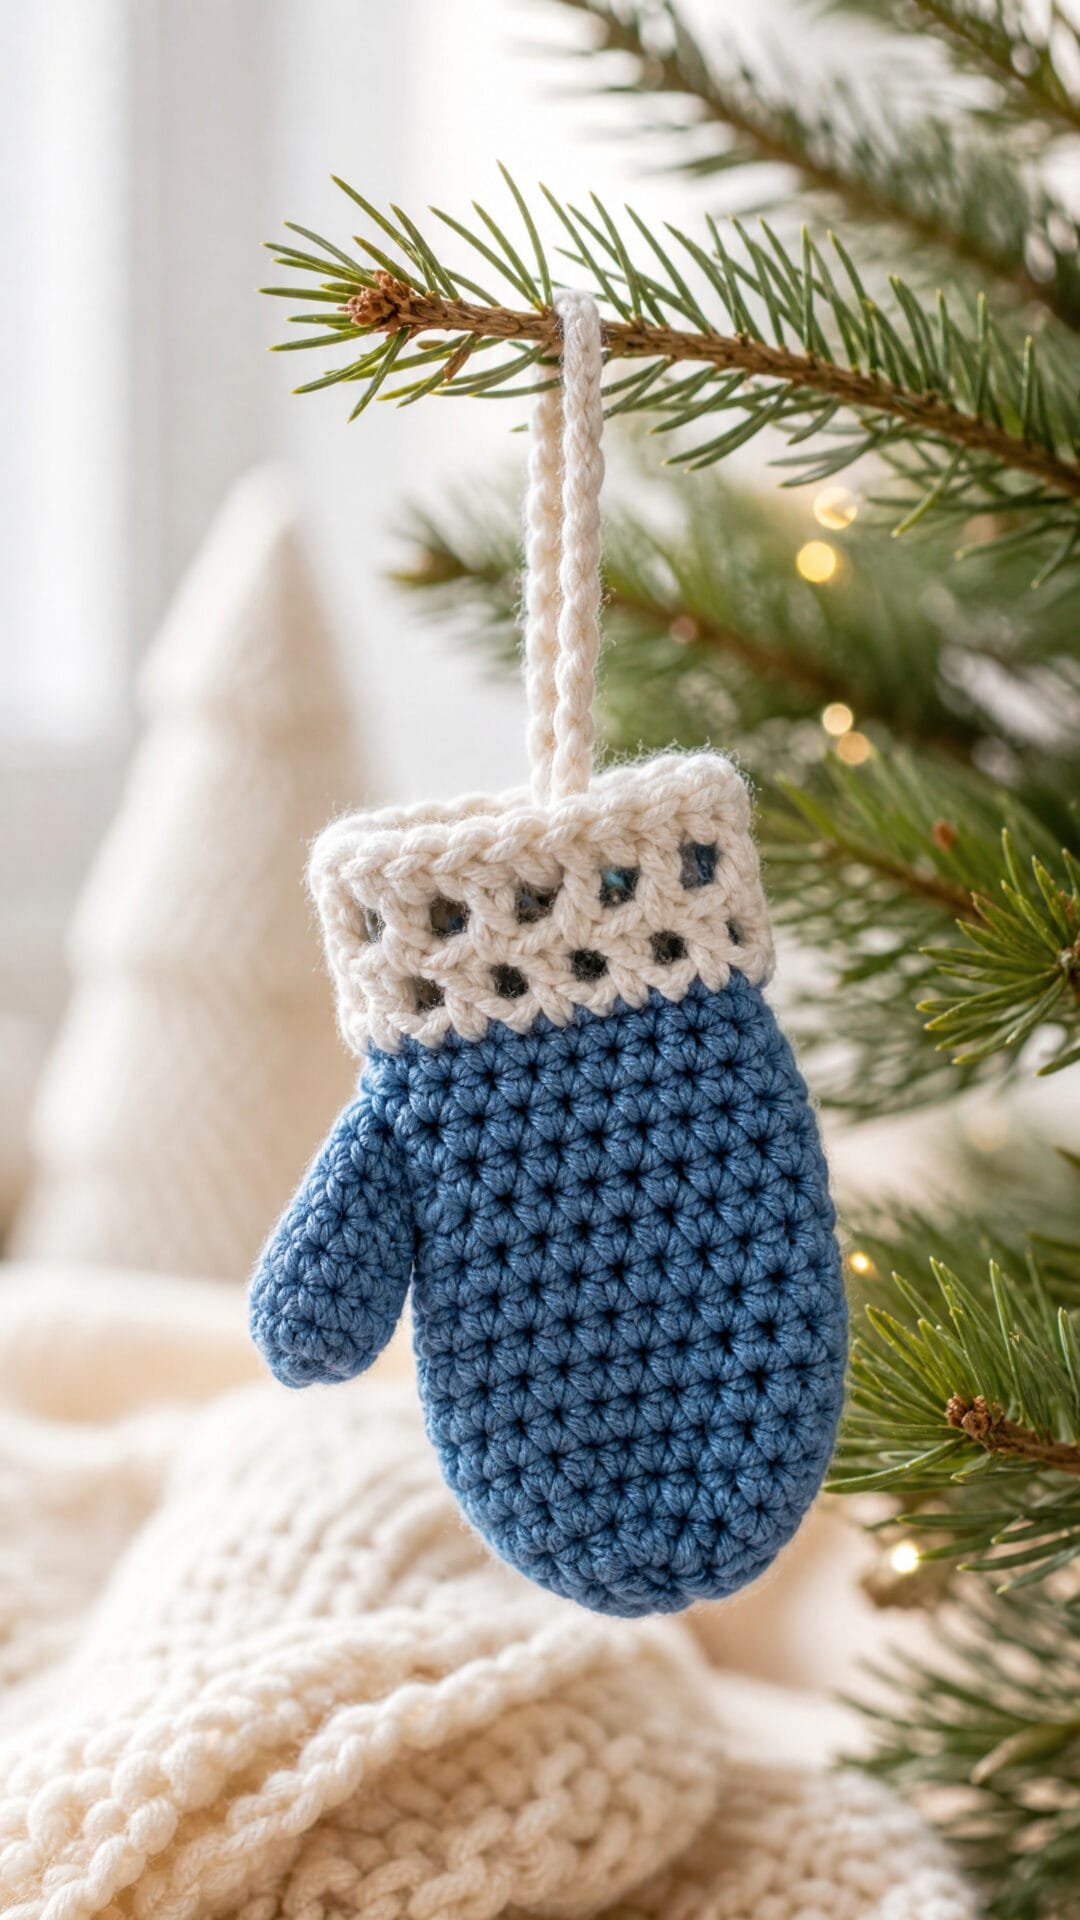
This little mitten brings a familiar winter shape to a Christmas tree or a wrapped gift. Its blue hand, contrasting open cuff and hanging loop give it the look of a miniature mitten rather than a flat decoration.
The thumb is part of the mittenâs construction, not a separate piece to sew on. An opening formed in the side of the hand provides the starting point for the thumb, while the rest of the hand closes into a rounded fingertip. Take a moment to identify that opening before working the thumb so it sits in the right place.
This is a good choice if youâre comfortable crocheting in the round and want a small project with a little more shaping than a simple ornament. The cuff stays open, adding to the mitten shape even when itâs hanging up.
Mini Mitten Ornament

Quick-reference card. Follow the complete written instructions below.
Materials
- Soft worsted-weight yarn: A small amount of blue for the hand and thumb, plus a small amount in a contrasting colour for the cuff and hanging loop.
- 3.5 mm crochet hook: Or a size that gives a firm fabric without obvious gaps.
- Stitch marker: For marking the first stitch of each continuous round.
- Yarn needle and scissors: For closing the fingertips and weaving in ends.
Size and Fit
One decorative mitten, designed to be approximately 6 cm long and 4â5 cm wide when laid flat, excluding the thumb and hanging loop. Finished size will vary with yarn and tension.
Gauge
Exact gauge is not critical. Keep the single crochet stitches firm and even; a looser fabric will make a larger ornament.
Abbreviations
US crochet terms.
- ch = chain
- sc = single crochet
- sc2tog = single crochet two stitches together; one decrease
- sl st = slip stitch
- st(s) = stitch(es)
Pattern
- Cuff With the contrasting yarn, ch 18. Sl st into the first ch to form a ring, taking care not to twist it. Rnd 1: Ch 1, sc in each ch around; sl st into the first sc to join. (18 sc) Rnds 2â3: Ch 1, sc in each st around; sl st into the first sc to join. (18 sc each rnd) The joining sl sts and beginning ch-1s do not count as stitches.
- Hanging loop After joining cuff Rnd 3, ch 14 and sl st into the same first sc where the round was joined. Fasten off the contrasting yarn. The chain forms a loop attached to the cuff; it does not count towards the cuff stitches.
- Hand Join the blue yarn in the first sc of cuff Rnd 3. Work the hand in continuous rounds without joining; mark the first stitch of each round. Rnds 1â3: Sc in each st around. (18 sc each rnd) Rnd 4: Sc in the next 4 sts, ch 3, skip the next 3 sts, sc in the remaining 11 sts. (15 sc and 3 ch; 18 positions around) Rnd 5: Sc in each of the 4 sc before the opening, sc in each of the 3 ch, then sc in each of the remaining 11 sc. (18 sc) Rnds 6â8: Sc in each st around. (18 sc each rnd) Rnd 9: [Sc in the next st, sc2tog] 6 times. (12 sc) Rnd 10: Sc2tog 6 times. (6 sc) Fasten off, leaving a tail. Thread it through the front loops of the remaining 6 sts and pull gently to close the rounded fingertip. Secure the tail inside.
- Thumb Join the blue yarn at one end of the thumb opening. Rnd 1: Work 1 sc into each of the 3 skipped hand stitches along the lower edge, then 1 sc into the underside of each of the 3 chains along the upper edge. (6 sc) Work in continuous rounds, marking the first stitch. Rnd 2: Sc in each st around. (6 sc) Rnd 3: Sc2tog 3 times. (3 sc) Fasten off, leaving a tail. Thread it through the front loops of the remaining 3 sts and pull closed. Secure the tail inside.
Finishing
- Weave in the cuff and thumb yarn ends without pulling the cuff opening shut.
- If there are small gaps at the corners of the thumb opening, use a nearby yarn tail to draw them closed, then secure it inside.
- Straighten the hanging loop and gently shape the mitten by hand.
Helpful Tips
- Check that the cuff chain is not twisted before joining it into a ring.
- The three skipped hand stitches remain available beneath the chain opening; they become the lower edge of the thumb.
- When working hand Rnd 5, crochet into the three chains themselves, not into the space beneath them.
Reusable Gift Bow

A crocheted bow gives a wrapped parcel a festive finish without becoming part of the wrapping. This one is a single strip with gently tapered ends, so the loops and tails are formed when you tie it rather than made as separate pieces.
The strip wraps around the parcel and stays in place with its own knot; there is no need to stitch the loops together. Leave the bow easy to undo, and the recipient can remove it without cutting it and use it on another gift.
Reusable Gift Bow

Quick-reference card. Follow the complete written instructions below.
Materials
- DK-weight cotton-blend yarn: Approximately 45â60 m in red or your chosen colour; a smooth yarn helps the loops hold their shape.
- Crochet hook: 4 mm, or a size that gives the stated gauge.
- Scissors and tapestry needle: For fastening off and weaving the yarn ends into the strip.
- Small wrapped parcel: The sample strip is sized for a box approximately 8 cm wide and 3 cm deep where the bow wraps around it.
Size and Fit
One strip, approximately 60 cm long. At the stated gauge, the central section is about 5.5 cm wide and the tapered ends about 4.5 cm wide. The strip is intended to pass beneath a small parcel and tie on top; check the parcel size before fastening off if you want longer tails.
Gauge
16 sc and 16 rows = 10 cm in rows of US single crochet. Gauge affects the strip length and whether it will tie around your parcel.
Abbreviations
US crochet terms.
- ch = chain
- sc = single crochet
- sc2tog = single crochet two stitches together; decreases by one stitch
- st = stitch
Pattern
- Before you begin Work back and forth in rows. At the end of every row except Row 96, ch 1 and turn. The turning ch does not count as a stitch.
- Foundation and Row 1 Ch 8. Sc in the second ch from the hook and in each remaining ch. (7 sc)
- Rows 2â4 Sc in each st across. (7 sc per row)
- Row 5: widen the strip Work 2 sc in the first st, sc in each of the next 5 sts, and 2 sc in the last st. (9 sc)
- Rows 6â92 Sc in each st across. (9 sc per row)
- Row 93: taper the strip Sc2tog over the first 2 sts, sc in each of the next 5 sts, then sc2tog over the last 2 sts. (7 sc)
- Rows 94â96 Sc in each st across. (7 sc per row) After Row 96, fasten off.
- Tie the bow Place the middle of the strip beneath the parcel. Bring both ends to the top and tie a snug single knot. Make a loop with each end, tie the loops together as you would a shoelace bow, then adjust the loops and trailing ends. If the centre feels bulky, fold the strip lengthwise only where you tie the knot; leave the loops flat. Untie the bow to remove and reuse it.
Finishing
- Weave each yarn end into stitches on its own end of the strip and trim. Do not stitch the loops or tails together.
- Flatten and straighten the loops by hand after tying.
Helpful Tips
- For a different parcel, make a strip long enough to go around its width and depth with length left for the knot, two loops and two tails. Add or omit plain 9-stitch rows in Rows 6â92; at this gauge, four rows change the length by about 2.5 cm.
- Tie the bow snugly enough to stay on the parcel, but not so tightly that it is difficult to undo and reuse.
Christmas Angel
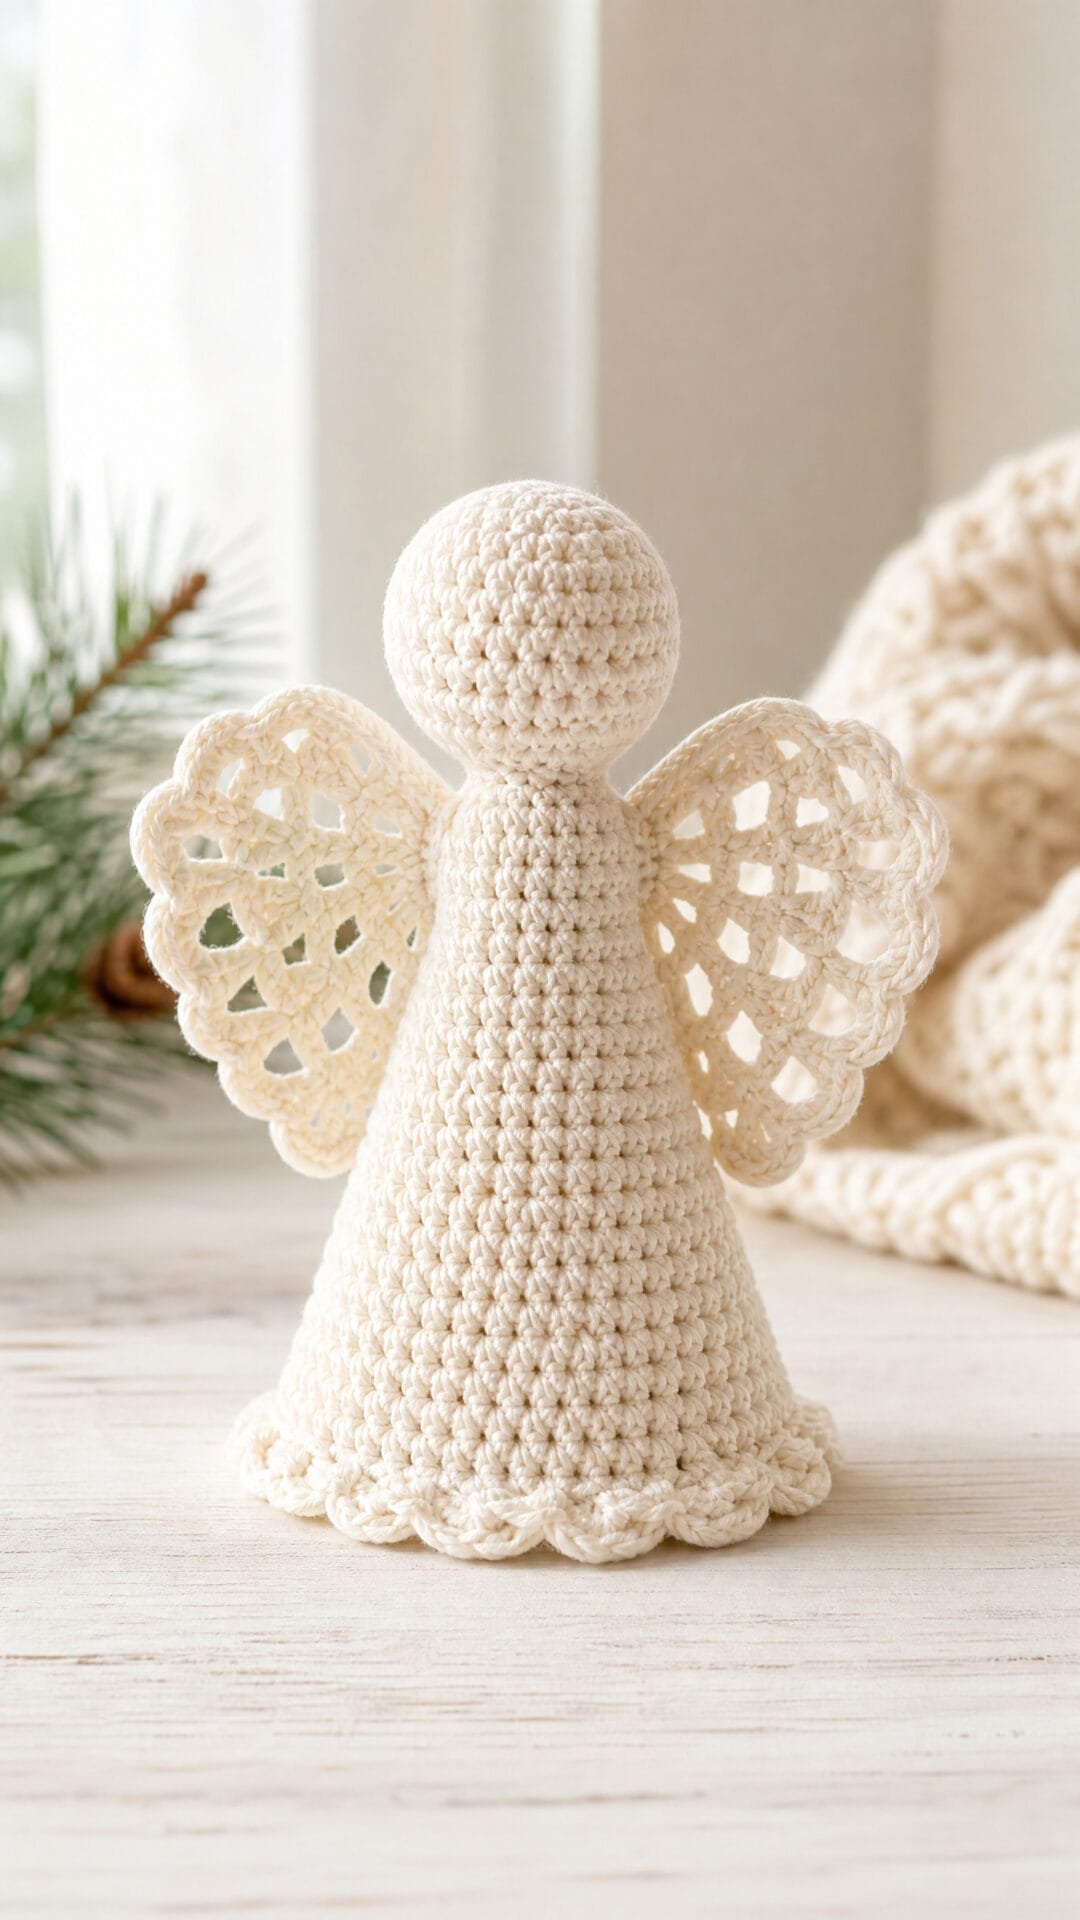
This little Christmas angel makes a simple decoration for a mantelpiece, shelf or festive table. Its flared dress is open underneath, giving it a light look while allowing it to stand on a level surface.
The dress needs a firm fabric and a stable lower edge to keep its shape. The head is lightly stuffed, so it looks rounded without weighing down the narrow neck or pushing the skirt out of shape.
Openwork wings grow directly from the upper body, giving the angel its distinctive silhouette without separate pieces to sew on. You can display it standing or add the optional hanging loop if you would rather use it as an ornament.
No-Sew Crochet Christmas Angel

Quick-reference card. Follow the complete written instructions below.
Materials
- Cotton DK yarn: Approximately 20 g in cream
- Crochet hook: 3 mm, or a size that makes a firm fabric without gaps in the head
- Toy stuffing: A small amount for the head only
- Other tools: Stitch marker and yarn needle for weaving in ends
Size and Fit
One size. At the suggested gauge, the angel is approximately 7.5 cm tall, with a skirt base about 4.3 cm in diameter. It has an open, unstuffed skirt and is intended to stand on a level surface. The optional loop allows it to hang instead.
Gauge
Aim for approximately 22 sc and 24 rounds per 10 cm in firm fabric. Exact gauge is less important than a head fabric that holds stuffing and a skirt edge that does not buckle.
Abbreviations
US crochet terms.
- ch = chain
- sc = single crochet
- sc2tog = single crochet two stitches together; one decrease
- sl st = slip stitch
- st(s) = stitch(es)
Pattern
- Before you begin Work the dress upwards from its open bottom edge. Join each round with a sl st to its first sc, then ch 1 to begin the next round; neither the joining sl st nor the ch 1 counts as a stitch. Number the sc in each round from the first sc after the join. Keep the line of joins at the back so you can locate the wing positions later.
- Foundation and dress, rounds 1â2 Ch 30 loosely and join with a sl st to form a ring, taking care not to twist it. Round 1: Ch 1, sc in each ch around; join. (30 sc) Round 2: Ch 1, sc in each st around; join. (30 sc)
- Dress, rounds 3â5 Round 3: Ch 1, *sc in next 3 sts, sc2tog; repeat from * around; join. (24 sc) Rounds 4â5: Ch 1, sc in each st around; join. (24 sc each round)
- Dress, rounds 6â8 Round 6: Ch 1, *sc in next 2 sts, sc2tog; repeat from * around; join. (18 sc) Rounds 7â8: Ch 1, sc in each st around; join. (18 sc each round) Round 8 will be the attachment round for the wings.
- Neck, rounds 9â10 Round 9: Ch 1, *sc in next st, sc2tog; repeat from * around; join. (12 sc) Round 10: Ch 1, sc in each st around; join. (12 sc) Leave the skirt unstuffed.
- Head, rounds 11â15 Round 11: Ch 1, *sc in next st, work 2 sc in next st; repeat from * around; join. (18 sc) Round 12: Ch 1, *sc in next 2 sts, work 2 sc in next st; repeat from * around; join. (24 sc) Rounds 13â15: Ch 1, sc in each st around; join. (24 sc each round)
- Close the head, rounds 16â18 Round 16: Ch 1, *sc in next 2 sts, sc2tog; repeat from * around; join. (18 sc) Round 17: Ch 1, *sc in next st, sc2tog; repeat from * around; join. (12 sc) Add a small amount of teased stuffing to the head now, keeping the neck and skirt clear. Round 18: Ch 1, sc2tog 6 times; join. (6 sc) Fasten off, leaving a tail. Thread it through the front loops of the six remaining stitches, pull the opening closed and secure the tail inside the head.
- Reinforce the skirt base With the dress upright, join yarn to the underside of any foundation chain at the bottom edge. Ch 1 and work 1 sc into the underside of each of the 30 foundation chains; join to the first sc. (30 sc) Fasten off. This extra round firms the edge without closing or stuffing the skirt.
- First openwork wing Find round 8, which has 18 sc, and count its stitches from the first sc beside the back joining line. Attach yarn by working an sc under a horizontal bar of round-8 stitch 4. Ch 3, skip stitch 5, then work an sc under a horizontal bar of stitch 6. This is wing row 1: 2 sc and one ch-3 arch. Row 2: Ch 1, turn, sc in the first sc, ch 5, sc in the other sc. Row 3: Ch 1, turn, sc in the first sc, ch 7, sc in the other sc. Fasten off.
- Second openwork wing On the other side of the back joining line, work wing row 1 in the opposite direction: attach with an sc under a horizontal bar of round-8 stitch 16, ch 3, skip stitch 15 and work an sc under a horizontal bar of stitch 14. Work rows 2 and 3 exactly as for the first wing. Fasten off. Each wing is attached directly to the body at two stitches; no sewing is needed.
- Optional hanging loop Join yarn through a stitch at the closed top of the head, ch 18 and sl st back into the same top stitch to form a loop. Fasten off and weave the ends into the head.
Finishing
- Weave in all ends without drawing the skirt edge tight.
- Gently spread the wings and flatten the reinforced skirt edge with your fingers. If needed, lightly dampen the cotton skirt and let it dry standing on a level surface.
Helpful Tips
- Use firm cotton DK rather than a very soft yarn: the open skirt relies on its flared shape and reinforced edge to stand.
- Stuff the head lightly. Too much stuffing can push into the neck and distort the dress.
- When attaching a wing, catch a horizontal bar of each specified round-8 stitch without piercing through the body.
Woodland Mushroom Ornament

This woodland mushroom brings a playful red-and-cream accent to a Christmas tree, garland or wrapped gift. Its raised pale spots give the cap texture, while the hanging loop is part of the ornament rather than a separate piece to attach.
The narrow stem looks best when it has enough support to stand upright without feeling packed. Keep the cap softly filled, too: too much stuffing can round out its broad underside and make the mushroom look more like a ball. A firm crocheted fabric helps hold the shape without relying on extra stuffing.
Woodland Mushroom Ornament
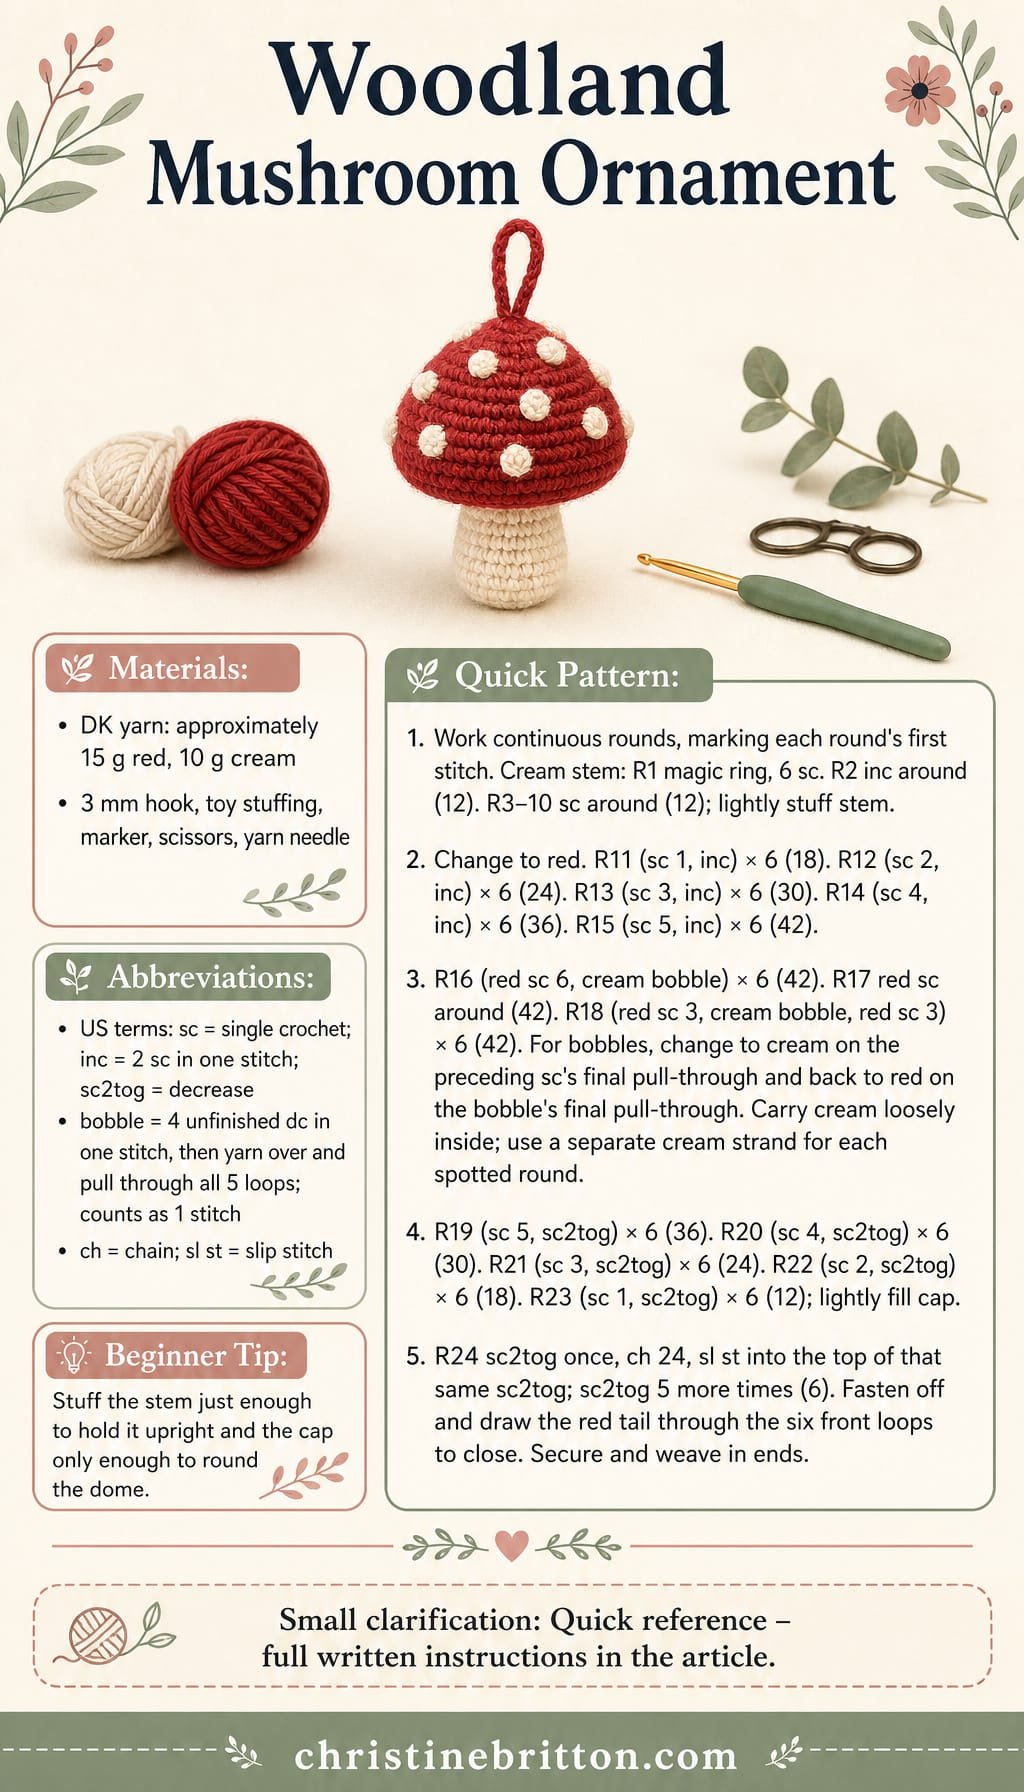
Quick-reference card. Follow the complete written instructions below.
Materials
- DK yarn: Approximately 15 g red and 10 g cream cotton or firm acrylic. Use the cream for both stem and spots.
- 3 mm crochet hook: Or a size that produces firm stitches with no visible stuffing gaps.
- Toy stuffing: A small amount.
- Other tools: Stitch marker, scissors and a yarn needle for weaving in ends.
Size and Fit
One sample size: approximately 9â10 cm tall and 6 cm across, excluding the hanging loop. Finished dimensions depend on yarn, hook and tension.
Gauge
Aim for approximately 22 sc and 25 rounds per 10 cm in firm, unstretched fabric. Exact gauge is less important than a dense fabric that contains the stuffing.
Abbreviations
US crochet terms.
- ch = chain
- sc = single crochet
- inc = work 2 sc in the same stitch
- sc2tog = single crochet 2 stitches together
- sl st = slip stitch
- bobble = In the next stitch, work 4 unfinished double crochets: for each, yarn over, insert hook, pull up a loop, yarn over and pull through 2 loops. Yarn over and pull through all 5 loops on the hook. Counts as 1 stitch.
Pattern
- Before you start Work in continuous rounds without joining or turning. Mark the first stitch of each round and move the marker up as you work. All stitch counts exclude the hanging-loop chains and slip stitch.
- Stem, round 1 With cream, make a magic ring and work 6 sc into it. Pull the ring closed. (6)
- Stem, round 2 Inc in each stitch around. (12)
- Stem, rounds 3â10 Sc in each stitch around. (12 each round) Lightly fill the stem now, adding just enough stuffing to keep it upright without stretching the stitches.
- Cap underside, round 11 Change to red on the final pull-through of round 10’s last sc. (Sc 1, inc) 6 times. (18)
- Cap underside, rounds 12â15 Round 12: (sc 2, inc) 6 times. (24) Round 13: (sc 3, inc) 6 times. (30) Round 14: (sc 4, inc) 6 times. (36) Round 15: (sc 5, inc) 6 times. (42)
- Spotted dome, round 16 (Sc 6 in red, work 1 bobble in cream in the next stitch) 6 times. (42) For each bobble, change to cream on the final pull-through of the preceding red sc; make the four unfinished double crochets in cream, then use red for the bobble’s final pull-through. Carry the cream loosely inside the cap between bobbles. Leave its ends inside and cut the cream after the sixth bobble.
- Spotted dome, round 17 Sc in red in each stitch around. (42)
- Spotted dome, round 18 (Sc 3 in red, work 1 cream bobble in the next stitch, sc 3 in red) 6 times. (42) Change colours as in round 16, carrying cream loosely inside between bobbles. Cut the cream after this round, leaving its ends inside.
- Shape the top, rounds 19â22 Continue in red. Round 19: (sc 5, sc2tog) 6 times. (36) Round 20: (sc 4, sc2tog) 6 times. (30) Round 21: (sc 3, sc2tog) 6 times. (24) Round 22: (sc 2, sc2tog) 6 times. (18)
- Fill and close, rounds 23â24 Round 23: (sc 1, sc2tog) 6 times. (12) Add a little stuffing to the cap, keeping its underside broad and its dome softly rounded; do not pack it tightly. Round 24: Work the first sc2tog, ch 24, then sl st into the top of that same sc2tog to form the hanging loop. Work sc2tog 5 more times. (6) Fasten off, leaving a tail to close the opening.
Finishing
- Thread the red tail through the front loops of the six remaining stitches and pull gently to close the top. Secure the tail inside the cap.
- Weave in the cream starting end and any accessible ends without sewing on extra pieces. Smooth the cap into a dome and check that the hanging loop is secure.
Helpful Tips
- A smaller hook and firm stitches support the narrow stem more effectively than extra stuffing.
- Keep the cream floats slack inside the cap so the spots do not pull the red fabric inward.
- If the cap starts to look like a ball, remove a little stuffing before closing it.
For another related project collection, browse more Christmas crochet garland patterns.
Stacked Snowman Ornament

This stacked snowman brings a cheerful, handmade touch to a Christmas tree without separate pieces to sew on. The lower ball narrows into a neck before widening into the head, giving the ornament its familiar two-ball silhouette in one continuous piece.
The raised orange nose is worked into the head, while small crocheted surface details form the eyes instead of beads. Firm fabric helps the stuffing stay hidden and keeps the shape defined; take care not to overstuff the neck or the two balls may lose their distinction.
This is a satisfying choice if you are comfortable shaping crochet in the round and want a no-sew Christmas ornament with a little more character than a plain bauble. The full pattern below explains how the facial details and hanging loop fit into the construction.
Stacked Snowman Ornament

Quick-reference card. Follow the complete written instructions below.
Materials
- White DK yarn: Approximately 25 g of smooth yarn for the snowman and hanging loop.
- Orange and black DK yarn: Small lengths for the nose and eyes.
- Crochet hook: 3 mm, or a size that produces firm fabric with no gaps when stuffed.
- Toy stuffing: A small amount.
- Other tools: Stitch marker, scissors and a yarn needle for weaving in the final end.
Size and Fit
One size. At the stated gauge, expect approximately 11 cm from the base to the top of the head and 5 cm across the lower ball, excluding the hanging loop. The chain loop adds approximately 3â4 cm when hanging. Finished dimensions will vary with yarn, hook and stuffing.
Gauge
Aim for approximately 22 sc and 24 rounds per 10 cm in firm, unstuffed fabric. An exact gauge is less important than a fabric that keeps the stuffing enclosed.
Abbreviations
US crochet terms.
- ch = chain
- dec = invisible decrease: insert the hook under the front loop of each of the next two stitches, yarn over and draw through both front loops, then yarn over and draw through both loops on the hook
- inc = work 2 sc in the same stitch
- sc = single crochet
- sl st = slip stitch
- st(s) = stitch(es)
Pattern
- Before you begin Work in a continuous spiral without joining rounds or fastening off between the body and head. Mark the first stitch of each round and move the marker up as you work. Use white unless another colour is specified. Stuff firmly enough to define both balls, but do not stretch the stitches.
- Lower ball, R1âR6 R1: Work 6 sc in a magic ring. (6) R2: Inc in each st around. (12) R3: (Sc 1, inc) 6 times. (18) R4: (Sc 2, inc) 6 times. (24) R5: (Sc 3, inc) 6 times. (30) R6: (Sc 4, inc) 6 times. (36)
- Lower ball, R7âR15 R7âR11: Sc in each st around. (36 each round) R12: (Sc 4, dec) 6 times. (30) R13: (Sc 3, dec) 6 times. (24) R14: (Sc 2, dec) 6 times. (18) Stuff the lower ball now. R15: (Sc 1, dec) 6 times. (12) This narrow round is the neck; do not close it.
- Head, R16âR19 Continue directly from the neck with the white yarn. R16: (Sc 1, inc) 6 times. (18) R17: (Sc 2, inc) 6 times. (24) R18: (Sc 3, inc) 6 times. (30) R19: Sc in each st around. (30)
- Orange bobble nose, R20 Sc in the first 14 sts, but complete the final draw-through of the 14th sc with orange, leaving an orange tail inside the head. In st 15, make an orange bobble: [yarn over, insert hook in the st, draw up a loop, yarn over and draw through 2 loops] 4 times in that same st. There are 5 loops on the hook; yarn over with white and draw through all 5 loops. Cut the orange yarn, leaving its end inside. Sc in the remaining 15 sts with white. (30 sts, counting the bobble as one st) Push the bobble towards the outside if needed.
- Head, R21âR25 R21âR22: Sc in each st around. (30 each round) R23: (Sc 3, dec) 6 times. (24) R24: (Sc 2, dec) 6 times. (18) R25: (Sc 1, dec) 6 times. (12) Leave the head opening accessible for the eyes.
- Crocheted eyes Place one small black surface slip stitch over st 12 of R21 and another over st 18 of R21, with the nose between them on R20. For each eye, hold a short black strand inside the open head. Insert the hook from outside through a gap beside the chosen stitch and draw up a black loop. Insert the hook through a nearby gap, draw up another black loop and pull it through the loop on the hook. Cut the strand, pull its end through the final loop, then use the hook to draw that end inside. Tie the two ends of each eye together inside the head. Tie the two orange ends together inside as well, without pulling the nose flat. Stuff the head, keeping the neck defined.
- Close head and make hanging loop, R26âR27 Continue with the attached white yarn. R26: Dec 6 times. (6) Add a little stuffing if required. R27: Dec 3 times. (3) Without fastening off, ch 18 and sl st into the first st of R27 to form a loop. Fasten off, leaving a tail. Thread the tail through the front loops of the three R27 stitches and pull gently to close the small opening without drawing the hanging loop inside.
Finishing
- Weave the white end securely into the head, taking care not to distort the hanging loop.
- Shape the lower ball and head with your hands, and check that the bobble nose projects outwards.
Helpful Tips
- If stuffing shows between stitches, use a smaller hook rather than reducing the stitch counts.
- Keep the surface-slip-stitch eyes small; long loose loops can catch when the ornament is handled.
- The orange bobble replaces one sc in R20. Do not add a stitch after it to compensate.
Little Penguin Ornament

This little penguin brings a cheerful character to your Christmas decorations, with a rounded black body, a clear white front and a tiny orange beak. Its compact shape makes it especially sweet hanging from a tree or tucked into a festive display.
The white front is formed as you crochet the body rather than added afterwards. Keeping the unused yarn relaxed behind the work helps the colour block sit smoothly, without pulling the penguin out of shape.
The short wings are crocheted directly into the sides, and the beak is attached in the same way. That gives the ornament its character without any separate pieces to sew on.
Little Penguin Ornament

Quick-reference card. Follow the complete written instructions below.
Materials
- Smooth DK yarn: Small amounts of black, white and orange.
- Crochet hook: 3 mm, or a size that makes a firm fabric through which stuffing will not show.
- Stuffing: A small amount of polyester toy stuffing.
- Safety eyes: Two 4 mm black eyes with backs. Omit them if making the ornament for a young child.
- Other: Stitch marker and scissors.
Size and Fit
One ornament, approximately 7 cm tall excluding the hanging loop when made with DK yarn and a 3 mm hook. Exact size depends on your yarn and tension.
Gauge
A precise gauge is not essential. Work firmly enough to contain the stuffing.
Abbreviations
US crochet terms.
- ch = chain
- sc = single crochet
- sl st = slip stitch
- inc = work 2 sc in the same stitch
- invdec = invisible single crochet decrease over the next 2 stitches
- st(s) = stitch(es)
Pattern
- Before you begin Work the body from the bottom up in continuous rounds. Mark the first stitch of each round and move the marker upwards as you work. Count from the marked stitch as stitch 1; this numbering identifies the face and wing positions. Work through both loops unless instructed otherwise.
- Body, rounds 1â4 With black, work 6 sc into a magic ring. Round 1: 6 sts. Round 2: inc in each st (12 sts). Round 3: (sc, inc) 6 times (18 sts). Round 4: (sc in next 2 sts, inc) 6 times (24 sts).
- White front, rounds 5â16 For each round, sc in stitches 1â8 with black, stitches 9â16 with white, and stitches 17â24 with black (24 sts per round). On a colour change, make the final yarn-over of the preceding sc with the new colour. From the first white section onwards, carry white loosely inside the 16 black stitches between white sections; let black float loosely behind each 8-stitch white section. Keep both strands relaxed so the body does not pucker. After round 16, cut white and leave its end inside the body.
- Wings Make the wings now, while you can still reach inside the body. For the first wing, insert the hook under both loops of round 10, stitch 5, and draw up a loop of a separate black strand. Ch 4, sc in the second ch from the hook and in each of the next 2 ch, then sl st under both loops of round 9, stitch 5. Fasten off and tuck both ends inside. Repeat at round 10, stitch 20, securing that wing with a sl st in round 9, stitch 20. Each wing is a short flap anchored to two body stitches; do not sew it down.
- Beak and eyes For the beak, draw up a loop of orange yarn through round 12, stitch 12. Ch 3, sc in the second ch from the hook, sl st in the next ch, then sl st through round 12, stitch 13. Fasten off and tuck the ends inside. Insert the safety eyes through round 14, stitches 11 and 14, and secure their backs inside the body.
- Shape and stuff, rounds 17â19 Continue with the attached black body yarn. Round 17: (sc in next 2 sts, invdec) 6 times (18 sts). Round 18: (sc, invdec) 6 times (12 sts). Stuff the body firmly but without stretching the white front; keep stuffing clear of the opening. Round 19: invdec 6 times (6 sts). Add a little more stuffing before the next round if needed.
- Close and make the hanging loop, round 20 Invdec 3 times (3 sts). Sl st in the first stitch of round 20, ch 25, then sl st back into that same stitch to form a hanging loop. Fasten off. Use the hook to draw the tail into the body through the tiny top opening.
Finishing
- Check that the wings hang freely at the sides and gently shape the stuffed body into an oval.
- Tuck any visible yarn ends into the body with the crochet hook. No pieces need sewing on.
Helpful Tips
- At each colour change, complete the preceding stitch with the incoming colour; changing after the stitch will shift the edge of the white front.
- The white section stays at stitches 9â16 in every straight round. Recount from the marker if its edges begin to wander.
- Safety eyes are not suitable for items intended for children under three.
Reindeer Head Ornament

This no-sew reindeer head makes a cheerful Christmas tree decoration, with branched antlers and a raised red nose that give it a recognisable character. Its facial details are crocheted rather than glued on, so the finished look comes entirely from the yarn.
The head is made first, then the antlers and facial features are worked directly into it. Firm yarn helps the antler branches hold their shape, while the stuffed head gives the ornament a rounded silhouette.
This is an intermediate project because placing the details neatly takes some attention. Keep track of the back of the head as you work: it gives you a reliable reference point for keeping the antlers and face aligned.
Reindeer Head Ornament

Quick-reference card. Follow the complete written instructions below.
Materials
- Brown DK yarn: Approximately 15 g for the head.
- Firm cotton DK yarn: Approximately 4 g for the antlers, plus a little for the hanging loop. Choose a colour that contrasts with the head.
- Red and black DK yarn: Small lengths for the nose and eyes.
- 2.5 mm crochet hook: Or a size that makes dense stitches so the stuffing does not show.
- Other supplies: A stitch marker, a small amount of toy stuffing and a crochet hook for drawing ends into the head.
Size and Fit
One ornament. At the suggested gauge, the head is approximately 5 cm wide and 7 cm tall; the antlers and hanging loop add height. These dimensions are estimates, not measured results.
Gauge
Target approximately 24 sc and 26 rounds per 10 cm in continuous rounds before stuffing. Exact gauge is less important than a firm fabric.
Abbreviations
US crochet terms.
- ch = chain
- dc = double crochet
- inc = work 2 sc in one stitch
- inv dec = invisible decrease: sc the front loops of the next 2 stitches together
- rnd = round
- sc = single crochet
- sl st = slip stitch
- st = stitch
Pattern
- Head: placement guide Work the head from the crown down in continuous rounds; do not join or turn. Place the beginning-of-round marker at the back and move it up each round. Number each round’s stitches from the marker in the direction of work. The front centre is stitch 19 on a 36-stitch round.
- Head, rnds 1â6 With brown, make a magic ring. Rnd 1: 6 sc in ring (6). Rnd 2: inc in each st (12). Rnd 3: (sc, inc) 6 times (18). Rnd 4: (2 sc, inc) 6 times (24). Rnd 5: (3 sc, inc) 6 times (30). Rnd 6: (4 sc, inc) 6 times (36).
- Head, rnds 7â17 Rnds 7â12: sc in each st (36 each rnd). Rnd 13: (4 sc, inv dec) 6 times (30). Rnd 14: (3 sc, inv dec) 6 times (24). Rnd 15: (2 sc, inv dec) 6 times (18). Stuff the head firmly, keeping its shape round. Rnd 16: (sc, inv dec) 6 times (12). Add a little stuffing if needed. Rnd 17: inv dec 6 times (6). Fasten off. Use the crochet hook to draw the tail through the front loops of the remaining 6 stitches, pull the opening closed and draw the tail inside.
- Antlers Work each antler directly into rnd 4 of the completed head with firm cotton DK. For the first antler, join yarn with a sl st to rnd 4 stitch 9. Row 1: sc in stitches 9 and 8; turn (2 sc). Rows 2â4: ch 1, sc in each of the 2 stitches; turn (2 sc). Row 5: ch 1, sc in each stitch; do not turn. For the tip, ch 4, sl st in the second ch from the hook and in the next 2 ch, then sl st into the last sc of row 5. Working down that outer edge of the stalk, sl st into the side of row 4; ch 4, sl st back along all 3 usable chains and sl st into the same row-4 edge. Sl st into the side of row 3; ch 3, sl st back along both usable chains and sl st into the same row-3 edge. Fasten off and draw the ends inside the head with the hook. For the second antler, repeat exactly, except join at rnd 4 stitch 17 and work row 1 into stitches 17 and 18, in that order. The tines will point outwards.
- Raised red nose At the front of the completed head, join red with a sl st under the surface strands of rnd 10 stitch 18. Ch 1. In rnd 10 stitch 19, work a bobble: make 5 unfinished dc in that same stitch, leaving the final loop of each dc on the hook, then yarn over and pull through all 6 loops. Ch 1 to secure the bobble. Sl st under the surface strands of rnd 10 stitch 20. Fasten off and draw both ends inside the head.
- Crocheted eyes With black, make one small surface eye across rnd 9 stitches 14 and 15: join with a sl st under the surface strands of stitch 14, ch 1, sl st under the surface strands of stitch 15 and fasten off. Repeat across rnd 9 stitches 23 and 24 for the other eye. Draw all ends inside with the hook.
- Hanging loop Join the antler-colour cotton with a sl st under the top of rnd 1 stitch 1. Ch 22, then sl st into the same head stitch to form a loop. Fasten off and draw both ends inside the head.
Finishing
- Gently shape the stuffed head and straighten the antler stalks and tines with your fingers.
- Check that the loop is secure and that no yarn ends or stuffing are visible.
Helpful Tips
- Use the same small hook and firm cotton for the antlers; loose chain stitches make the tines less sturdy.
- The antlers, nose, eyes and loop are attached by crochet stitches. Drawing ends into the stuffing with a hook avoids sewing.
- Keep the back marker in place until all the numbered facial and antler positions have been found.
Festive Heart Ornament


This flat heart brings a small pop of Christmas colour to a tree or a wrapped present. Its simple silhouette looks festive on its own and pairs easily with other handmade decorations.
The shape grows from a pointed base into two rounded lobes, both formed from the same piece of crochet rather than attached separately. A crocheted hanging loop keeps the ornament no-sew, making it a satisfying project for a confident beginner.
Festive Heart Ornament

Quick-reference card. Follow the complete written instructions below.
Materials
- Cotton DK yarn: Approximately 10 g in deep red.
- Crochet hook: 3.5 mm, or a size that gives a firm fabric.
- Other tools: Scissors and a smaller hook for drawing yarn ends through the backs of stitches.
Size and Fit
One size: approximately 7.5 cm wide and 5.5 cm high, excluding the hanging loop, at the suggested gauge.
Gauge
Approximately 20 sc and 20 rows per 10 cm. Exact gauge is not essential, but keep the fabric firm.
Abbreviations
US crochet terms.
- ch = chain
- sc = single crochet
- sc2tog = single crochet two stitches together
- sl st = slip stitch
- st(s) = stitch(es)
Pattern
- Pointed lower section, Row 1 Ch 4. Sc in the second ch from the hook and in each remaining ch. (3 sc)
- Rows 2â7 Ch 1, turn. Work 2 sc in the first st, sc in each st across until one st remains, then work 2 sc in the last st. Repeat this row six times in total. The row counts are 5, 7, 9, 11, 13 and 15 sc. Do not fasten off.
- First lobe, Row 8 Ch 1, turn. Sc in the first 7 sts of Row 7. Leave the centre st and the final 7 sts of Row 7 unworked. (7 sc)
- First lobe, Row 9 Ch 1, turn. Sc in each st across. (7 sc)
- First lobe, Row 10 Ch 1, turn. Sc2tog, sc in each of the next 3 sts, sc2tog. (5 sc)
- First lobe, Row 11 Ch 1, turn. Sc2tog, sc in the next st, sc2tog. (3 sc) Fasten off.
- Second lobe, Row 8 With the same face of the heart towards you as for the first lobeâs Row 8, join the yarn with a sl st in the outermost of the 7 unworked stitches at the far end of Row 7. Ch 1, sc in that same st and in the next 6 sts, working towards the centre. Leave the single centre st unworked. (7 sc)
- Second lobe, Rows 9â11 Work Rows 9â11 exactly as for the first lobe, ending with 3 sc. Fasten off.
- Hanging loop Join the yarn with a sl st in the unused centre st of Row 7, between the lobes. Ch 18, then sl st into the same centre st to close the loop. Fasten off.
Finishing
- Draw each yarn end through the backs of several stitches with a small hook; no sewing is needed.
- Gently flatten the heart, arranging the two lobe tops evenly. Let the loop hang from the centre between them.
Helpful Tips
- Count the 15 stitches of Row 7 before starting the lobes: 7 for each lobe and one unused centre stitch.
- For a shorter or longer hanging loop, change the chain length; this does not alter the heartâs stitch counts.
- Keep the turning chain out of the stitch count throughout.
Christmas Pennant Garland

This no-sew Christmas pennant garland brings a cheerful strip of red and green bunting to a mantel or shelf. The triangular pennants are worked directly from the cord, so they become part of the garland rather than separate pieces to attach later.
The design is easy to adapt to your display space: the spacing stays consistent while you decide how many pennants suit the spot. Measure as you go if you have a particular shelf in mind, rather than relying on a fixed finished length.
Christmas Pennant Garland
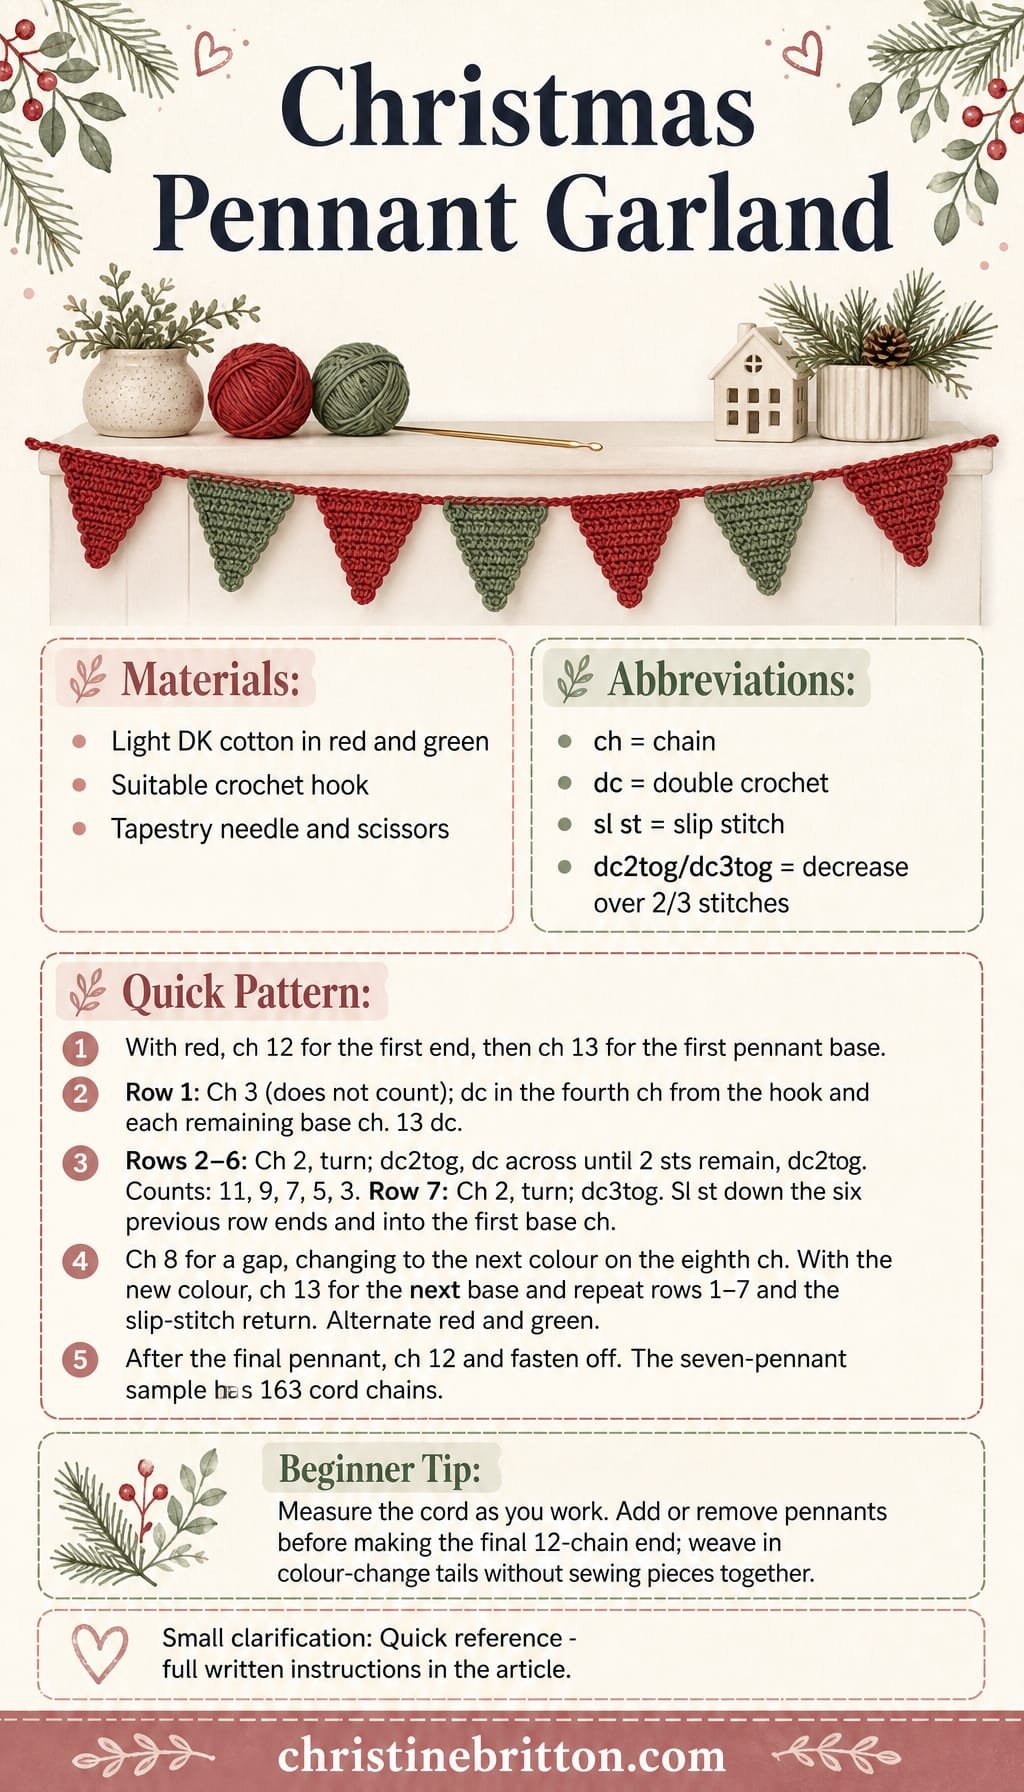
Quick-reference card. Follow the complete written instructions below.
Materials
- Light DK cotton yarn: Red and green; the amount depends on the number of pennants.
- Crochet hook: A size suitable for your yarn; use a larger hook if your foundation chains are tight.
- Tapestry needle and scissors: For weaving in ends and cutting yarn.
Size and Fit
Make seven pennants for the sample colour sequence: red, green, red, green, red, green, red. Each pennant begins on 13 cord chains. There are 8 cord chains between pennants and 12 at each end. Make more or fewer pennants to suit your shelf; measure the cord as you go rather than relying on a fixed finished reach. For N pennants, the cord contains 24 + 13N + 8(N â 1) chains, excluding the turning chains.
Gauge
Exact gauge is not essential. Use a firm, comfortable fabric and light DK cotton to help limit sagging. Finished dimensions depend on your yarn and tension.
Abbreviations
US crochet terms.
- ch = chain
- dc = double crochet
- sl st = slip stitch
- dc2tog = double crochet two stitches together; decreases by one stitch
- dc3tog = double crochet three stitches together; decreases by two stitches
Pattern
- Start the cord With red, ch 12 for the first end section, then ch 13 for the first pennant base. Keep the chain loose enough to lie flat.
- Pennant row 1 Ch 3; these turning chains do not count as a stitch. Dc in the fourth chain from the hook, which is the last chain of the 13-chain base. Dc in each of the remaining 12 base chains. You have 13 dc.
- Pennant rows 2â6 Ch 2 and turn at the start of each row; turning chains do not count as stitches. Dc2tog over the first 2 stitches, dc in each stitch until 2 stitches remain, then dc2tog over those last 2 stitches. Repeat this row five times. The stitch counts after rows 2â6 are 11, 9, 7, 5 and 3.
- Pennant row 7 and return to the cord Ch 2, turn, and dc3tog over the 3 remaining stitches. Without fastening off, sl st down the side edge into each of the previous six row ends, then sl st into the first chain of this pennantâs 13-chain base. You are back at the cord, ready to extend it.
- Add the next pennant Ch 8 for the gap. To alternate colours, make the eighth gap chain by pulling the next colour through the loop with your hook; cut the previous colour, leaving a tail to weave in. With the new colour, ch 13 for the next base and repeat pennant rows 1â7 and the slip-stitch return. Continue alternating red and green. Each new pennant is worked directly into its own section of cord, not attached afterwards.
- Finish the cord After returning to the cord from your final pennant, ch 12 for the second end section and fasten off. For the seven-pennant sample, this gives 12 starting chains, seven 13-chain bases, six 8-chain gaps and 12 ending chains: 163 cord chains in all.
Finishing
- Weave colour-change tails securely through the nearby pennant stitches. No sewing or assembly is needed.
- Lay the garland flat and gently straighten the triangles. Avoid stretching the cord.
- Drape the cord across a mantel or shelf, supporting it at the ends and, if needed, along a longer span.
Helpful Tips
- Add or remove a pennant before working the final 12-chain end section. Each additional pennant adds one 8-chain gap and one 13-chain base.
- If a chain section pulls tight beneath a pennant, loosen your chain tension or use a slightly larger hook for the cord.
Peppermint Coaster

A peppermint coaster brings a little Christmas colour to the table while giving a festive mug a practical place to rest. Its red-and-white wedges create the sweet-shop look without adding bulky decoration beneath the cup.
For a coaster, appearance is only part of the job. A flat surface helps a mug sit steadily, while an absorbent fabric catches small drips before they reach the table. Aim for a circle that rests evenly rather than one that cups or ripples.
Peppermint Coaster

Quick-reference card. Follow the complete written instructions below.
Materials
- Cotton DK yarn: Small amounts of red and white. Choose colourfast cotton, particularly if the coaster may get wet.
- Crochet hook: 4 mm, or a size that makes a firm fabric which lies flat.
- Other tools: Stitch marker, scissors, tapestry needle and a ruler.
Size and Fit
The eight-round sample has 48 stitches around its outer round; its diameter depends on your yarn and tension. Measure your mug base. After round 8, add rounds if needed until the flat circle is at least 2 cm wider than the base, allowing roughly 1 cm of coaster beyond the mug on each side. Then work the edging. Keep the same six-wedge increase rule for every added round.
Gauge
No fixed gauge is required. Check that the circle lies flat and feels firm enough to support a mug. Measure the actual work rather than relying on a stated diameter.
Abbreviations
US crochet terms.
- sc = single crochet
- inc = work 2 sc in the same stitch
- sl st = slip stitch
- st(s) = stitch(es)
Pattern
- Colour and round method Each round has six equal sections, alternating red and white; each section forms one wedge. Start the first section in red. Carry the unused yarn loosely inside the stitches so both colours remain attached. At every section boundary, change to the next colour on the final yarn-over of the sectionâs last sc. This includes the final white section, which changes to red ready for the join. Join each round with a sl st in its first sc, then chain 1; neither the join nor the chain counts as a stitch. Mark the first sc and do not work into the joining sl st.
- Round 1 Make a magic ring with red. Work 6 sc into the ring, alternating one red sc and one white sc, changing colour on the final yarn-over of every stitch. Pull the ring closed and join as described above. You have six one-stitch sections. (6 sts)
- Round 2 Inc in each stitch, changing colour on the final yarn-over of the second sc of each inc. Join. Each section now has 2 stitches. (12 sts)
- Round 3 In each of the six sections, work sc in the first stitch, then inc in the next stitch. Change colour on the final yarn-over of the sectionâs last sc; join at the end of the round. (18 sts)
- Round 4 In each section, work sc, inc, sc across its 3 stitches. Change colour at each section boundary and join. (24 sts)
- Round 5 In each section, work 2 sc, inc, sc across its 4 stitches. Change colour at each section boundary and join. (30 sts)
- Round 6 In each section, work 2 sc, inc, 2 sc across its 5 stitches. Change colour at each section boundary and join. (36 sts)
- Round 7 In each section, work 3 sc, inc, 2 sc across its 6 stitches. Change colour at each section boundary and join. (42 sts)
- Round 8 In each section, work 3 sc, inc, 3 sc across its 7 stitches. Change colour at each section boundary and join. (48 sts)
- Optional larger rounds If the circle is not yet at least 2 cm wider than your mug base, add joined rounds, making exactly one inc in each of the six sections per round. For round 9, work 4 sc, inc, 3 sc in each 8-stitch section (54 sts); for round 10, work 4 sc, inc, 4 sc in each 9-stitch section (60 sts). For any further round, place one inc near the middle of each section and sc in its other stitches. Every section gains one stitch and the round gains six. Continue alternating section colours and measuring after each round.
- Edging When the circle is large enough, work one joined round of loose sl sts, one in each stitch, with no increases. Change colour at the same six section boundaries so the wedges continue through the edge. Fasten off both colours.
Finishing
- Weave in the starting and finishing yarn ends with a tapestry needle; no pieces need sewing together.
- Lay the coaster flat and ease it into a circle by hand. If washing or dampening it, check the red yarn for colour transfer first and let the coaster dry fully before use.
Helpful Tips
- Do not pull the carried yarn tight across a section: it can make the coaster curl. If the circle develops waves, check that you have made only one increase per section in each round.
- The carried red yarn may show faintly through the white stitches. Keep it enclosed consistently for an even appearance.
- Keep the slip-stitch edging loose so it does not draw in the outer edge.
Drawstring Gift Bag

This little gift bag offers a reusable alternative to wrapping paper for a small present. Its rectangular base helps it stand upright, while the sides are worked directly from the base, so there are no pieces to sew together.
The top remains open until the drawstring is pulled, making it easy to slip a gift inside and reopen the bag later. For a taller present, extend the straight-sided section before the eyelets; the opening and drawstring can then be worked as written.
No-Sew Crochet Drawstring Gift Bag

Quick-reference card. Follow the complete written instructions below.
Materials
- Green worsted-weight cotton-blend yarn: Approximately 50 g for the bag.
- Cream worsted-weight cotton-blend yarn: A small amount for the drawstring.
- Crochet hook: 4 mm, or a size that produces a firm fabric.
- Other: Stitch marker and scissors. A small crochet hook or safety pin is useful for threading the cord.
Size and Fit
One sample size: approximately 7.5 cm wide à 4.5 cm deep à 8 cm high, measured with the bag open. Suitable for a small gift. To make it taller, add plain single-crochet rounds before the eyelet round; each extra round adds approximately 0.5â0.6 cm at the stated gauge.
Gauge
Approximately 16 single crochet stitches and 18 rows or rounds per 10 cm in firm single crochet. Gauge is a guide to finished size; use a dense fabric that will support the contents.
Abbreviations
US crochet terms.
- ch = chain
- sc = single crochet
- sl st = slip stitch
- st(s) = stitch(es)
- rnd = round
Pattern
- Base, Row 1 With green, ch 13. Sc in the second ch from the hook and in each remaining ch. (12 sc)
- Base, Rows 2â8 Ch 1, turn, and sc in each st. (12 sc per row) Do not fasten off after Row 8.
- Rnd 1 â base perimeter Pivot to work around the outside of the rectangle. Work 8 sc down the first side, placing one sc in the end of each row; 12 sc across the underside of the foundation chain, placing one sc in each chain; 8 sc up the opposite side, one in each row end; and 12 sc across Row 8. Sl st in the first sc to join. (40 sc) Mark the first stitch of each round if helpful.
- Rnds 2â13 â sides Ch 1, sc in each st around, and sl st in the first sc to join. Repeat for every round. (40 sc per round) The perimeter round forms the turn from the base to the upright sides; do not add corner increases.
- Rnd 14 â eyelets Ch 1, *sc in each of the next 3 sts, ch 2, skip the next 2 sts; repeat from * 7 more times. Sl st in the first sc to join. (24 sc and eight ch-2 spaces; 40 positions around)
- Rnd 15 Ch 1, sc in each sc and in each individual chain stitch around. Sl st in the first sc to join. (40 sc)
- Rnd 16 â rim Ch 1, sc in each st around. Sl st in the first sc to join. (40 sc) Fasten off.
- Drawstring With cream, ch 100 and fasten off, leaving short ends for knots. Starting at any eyelet, thread the chain alternately in and out through all eight eyelets until both ends emerge beside each other. Tie a small knot at each cord end to help prevent it slipping back through. Pull the ends to close the bag and tie them in a bow.
Finishing
- Weave in the bagâs yarn tails with a crochet hook by drawing them through several stitches on the inside; no sewing is needed.
- Ease the rectangular base into shape with your hands so the bag stands upright. Do not pull the drawstring so tightly that the eyelets distort.
Helpful Tips
- Count 40 positions around each round, treating each chain in an eyelet as one position.
- For a taller bag, work extra plain rounds after Rnd 13, then make the eyelets and rim exactly as written.
- If the drawstring feels too short for a comfortable bow, add chains before fastening it off.
Holly Napkin Ring

This holly napkin ring adds a small festive detail to a place setting without taking up space on the table. Its pointed leaf and raised berries are crocheted directly onto the band, so there are no separate decorations to sew on.
Rolled napkins vary in thickness, so a fixed starting count cannot guarantee a good fit. Check the band against the napkin you intend to use as it grows: it should sit comfortably around the roll and slide off without tugging or squeezing. The washable finish makes it a practical choice for a decoration you can bring out again next Christmas.
No-Sew Holly Napkin Ring

Quick-reference card. Follow the complete written instructions below.
Materials
- Washable DK cotton yarn: Small amounts of green and red
- Crochet hook: 3.5 mm, or a size that gives a firm but flexible fabric
- Tapestry needle: For weaving in ends only
- Rolled napkin: Use the intended napkin to check the fit as you work
Size and Fit
The band is 5 single crochet stitches wide. Its length is set by your rolled napkin rather than a fixed row count. Work until the starting and finishing edges meet comfortably around the napkin without stretching or squeezing it; the joined ring should slide off easily.
Gauge
No fixed gauge is required. Make a firm, flexible fabric and check the band against the intended napkin before joining.
Abbreviations
US crochet terms.
- ch = chain
- sc = single crochet
- hdc = half double crochet
- dc = double crochet
- sl st = slip stitch
- 4-dc bobble = Work four unfinished dc into the indicated stitch: for each, yarn over, insert hook, draw up a loop, yarn over and draw through two loops. With five loops left on the hook, yarn over and draw through all five.
Pattern
- Band With green, ch 6. Row 1: Sc in the second ch from the hook and in each remaining ch; 5 sc. Turn. Row 2: Ch 1, sc in each of the 5 stitches; turn. Repeat Row 2 until the band reaches comfortably around your rolled napkin with its starting and finishing edges meeting. Keep the band flat when checking; do not stretch it to make the edges meet.
- Join the band Remove the band from the napkin and form it into a ring without twisting it. Hold the finishing row against the foundation-chain edge, with the seam on the outside where the holly will cover it. Sl st through each finishing-row stitch and its corresponding foundation-chain loop, working across all 5 pairs. Fasten off. Number the 5 seam slip stitches from one side of the band to the other.
- Pointed leaf Join green with a sl st in seam stitch 3. Ch 7. Starting in the second ch from the hook, work sc, hdc, dc, dc, hdc, sc along one side of the chain. Rotate the leaf and work into the unused loops on the opposite side of those same 6 chains, travelling from the base towards the tip: sc, hdc, dc, dc, hdc, sc. Ch 1 and sl st into the first sc made at the tip. Fasten off.
- Berries Join red with a sl st in seam stitch 1. Work a 4-dc bobble into that same seam stitch, ch 1 to secure it, then sl st into the same seam stitch. Fasten off. Make a second berry in seam stitch 5 in exactly the same way. Gently push each bobble towards the outside of the ring before tightening its securing chain.
Finishing
- Weave in all ends securely on the inside of the ring. No leaf or berry needs to be sewn on.
- Wash according to the yarn label, reshape the leaf while damp and let the ring dry before use.
Helpful Tips
- If the ends only meet when the band is pulled tight, add another row and check again.
- Keep the 5 joining slip stitches loose enough to work into when adding the holly.
Frequently Asked Questions
Does no-sew mean I can put away my yarn needle?
You will not need it to attach separate pieces, but a yarn needle is useful for weaving in and securing loose ends.
Which projects are less complex?
The reusable gift bow is marked beginner. The flat star, heart and pennant garland are marked confident beginner; choose those before the intermediate shaped ornaments if you are still building confidence.
Can I hang every project on a Christmas tree?
No. Several designs include hanging loops, but the coaster, napkin ring, open gift box and drawstring bag serve other purposes. Check the individual project before making it for your tree.
How can I help a flat snowflake or star keep its shape?
Use an even tension, then gently shape the finished piece. A light blocking can help openwork snowflakes lie flat; let them dry completely before hanging.
Final Thoughts
Choose a project by how you plan to use it: a light ornament for the tree, a cotton piece for the table, or a reusable bag or bow for wrapping. The construction notes will help you find the right level of shaping without adding sewn assembly.