Mini Potted Puff Flower – Free Crochet Pattern (Beginner Friendly)
Make a tiny desk plant that never wilts! This mini potted puff flower works up fast, uses scrap yarn, and looks adorable on shelves, office desks, or as a gift. If you’re new to amigurumi, start with the first-amigurumi step-by-step guide and learn the magic ring vs. chain circle plus yarn weight, gauge & hook size. Want more tiny makes? Try the crochet bee pattern or the cute frog keychain afterward. This mini potted puff flower crochet pattern is beginner-friendly and perfect for quick wins.
- Skill level: Easy / Confident Beginner
- Time: ~45–60 minutes
- Finished size (DK + 2.5 mm hook): Pot ≈ 5–6 cm tall; overall ≈ 8–10 cm
- Great for: scrap yarn, party favors, market sets, teacher gifts
External reference for sizing standards: Craft Yarn Council – Yarn Weight System (helpful if you substitute yarns).
Jump to pattern
Materials & Tools
- Yarn (DK / #3 or light worsted)
- Pot: brown/terracotta
- Soil: dark brown
- Flower: petal color + yellow center
- Stem/leaf: green
- Hook: 2.0–2.5 mm (match your yarn and tension)
- Stuffing: small pinch for the pot base
- Floral wire (optional but recommended): 1 piece cut to pot height + flower height
- Tape + craft glue for wrapping the wire with yarn
- No-wire option provided in Assembly.
- Stability (optional): small cardboard disc for the base + a few pellets/beans for weight
- Notions: yarn needle, scissors, stitch marker
- Technique refreshers:
- Invisible Decrease (useful if you resize the pot)
- Changing Colors in Amigurumi (for striped pots or two-tone petals)
- How to Read an Amigurumi Pattern (quick symbol & abbreviation guide)
These supplies keep your mini potted puff flower sturdy, upright, and cute at tiny scale.
Abbreviations:
- MR = Magic Ring
- sc = single crochet
- inc = 2 sc in same st
- BLO = back loop only
- FLO = front loop only
- dc = double crochet
- FPdc = front-post double crochet
- dc3tog = 3 dc closed together (unfinished cluster)
- dc5tog = 5 dc closed together
- sl st = slip stitch
- ch = chain
Puff-Style Petal Refresher (Quick Tips)
This flower uses dc clusters to create plush “puff” petals (not the traditional puff stitch). Keep these in mind for neat, even petals:
- Even loop height: When working dc3tog, pull each dc to the same height before closing the cluster.
- Tension check: After closing a cluster, give the working yarn a gentle snug so petals sit round and close.
- Clean center: Cinch the flower base’s MR firmly so the center doesn’t gape when you add the yellow puff ball.
- Curl control: If petals curl forward, lightly steam-shape them with your fingers (no heavy blocking needed for minis).
- Consistency: Count aloud for each dc in the cluster (1-2-3) to avoid accidental dc2tog.
New to troubleshooting tiny projects? Skim Top 10 Amigurumi Mistakes to Avoid for fast fixes (tension, gaps, stuffing peeks).
Pattern – Mini Crochet Flower Pot (🪴)
Abbreviations: MR, sc, inc, BLO, dc, FPdc, sl st
Pot
- R1: MR, 6 sc (6)
- R2: inc ×6 (12)
- R3: (sc, inc) ×6 (18)
- R4: (2 sc, inc) ×6 (24)
- R5: BLO 24 sc (24) ← creates a crisp turn for the pot walls
- R6–R8: 24 sc (24 each)
- R9: 24 dc (24)
- R10: 24 FPdc (around R9 posts) (24)
Fasten off. Lightly stuff the bottom so the pot stands (you can add a small cardboard disc and a few pellets inside for extra stability). This base gives your mini potted puff flower a sturdy, proportional pot.
Sizing note: If your pot feels loose or wobbly, go down 0.5 mm in hook size or add 1 more round of sc before R9 for a slightly taller wall.
Pattern – Soil Insert (🌱)
Abbreviations: MR, sc, inc, sl st
Soil
- R1: MR, 6 sc (6)
- R2: inc ×6 (12)
- R3: (sc, inc) ×6 (18)
- R4: (2 sc, inc) ×6 (24)
Do not stuff. The disk should sit snugly just under the pot’s rim. If it feels loose, add one more increase round (3 sc, inc) ×6 → 30 and lightly ease it in; if it’s too tight, steam it for a few seconds and press flat. A snug soil disk keeps the mini potted puff flower centered and upright.
Pro tip: For a clean top edge, you can slip stitch once around the disk after R4 to firm up the circumference before assembly.
Pattern – Poseable Stem (🌿)
Materials: floral wire, green yarn, tape, tiny dab of craft glue (optional)
- Cut wire to the combined height of the pot + flower (add ~1–2 cm wiggle room).
- Anchor a tail: Tape a short green yarn tail to one wire tip.
- Wrap tightly: Spiral-wrap the wire with green yarn so no metal shows.
- Secure end: Trim and tack the yarn end with a tiny drop of glue (or weave it under the last wraps).
- Tip cover (optional): If gifting to kids, bend the top tip into a small loop before wrapping so it’s not sharp.
No-wire option:
- Make a firm ch-cord: ch 16–22 (match desired height), sl st back down the chain; or crochet a tight i-cord.
- You’ll stitch this fabric stem to the soil disk and flower base during Assembly for stability.
Pattern – Leaf (🍃) — make 1–2
- R1: ch 6
- R2 (work back down the chain): sl st in 2nd ch from hook, sc, hdc, dc, ch 2, sl st in last chain.
Fasten off, leaving a long tail for sewing to the stem near the rim.
- For a bigger leaf, start with ch 7–8 and insert an extra dc before the ch-2 tip.
- For a pointier tip, replace ch 2 with ch 3, then sl st back to the same stitch
- A small leaf scale keeps the mini potted puff flower looking proportional.
Pattern – Puff Flower (🌸 5 petals)
Base:
- MR, 10 sc, sl st to join (10) This gives you 10 base stitches → 5 petals (each petal uses 2 sts).
Petals (work all the way around ×5):
- ch 3
- dc3tog in the current stitch
- dc3tog in the next stitch
- ch 3, sl st in the same (second) stitch to anchor the petal
Repeat steps 1–4 for each pair of base stitches until you have 5 petals. Fasten off and weave the tail to the back.
Shaping tips:
- Keep each dc in the dc3tog the same height for full, even petals.
- If petals crowd, push them apart evenly with your fingers; a light steam helps them relax into a round.
Pattern – Flower Center (🌼)
Tiny puff ball center:
- MR, (ch 1, dc5tog, ch 1, sl st), pull the ring tight to close.
- Fasten off, leaving a tail for sewing.
Tips for a neat sphere:
- Keep each dc in the dc5tog the same height before closing.
- After tightening the MR, tug the starting tail once more to eliminate any gap.
- If you want a slightly larger center, add one more dc to make dc6tog.
- The rounded center makes the mini potted puff flower pop.
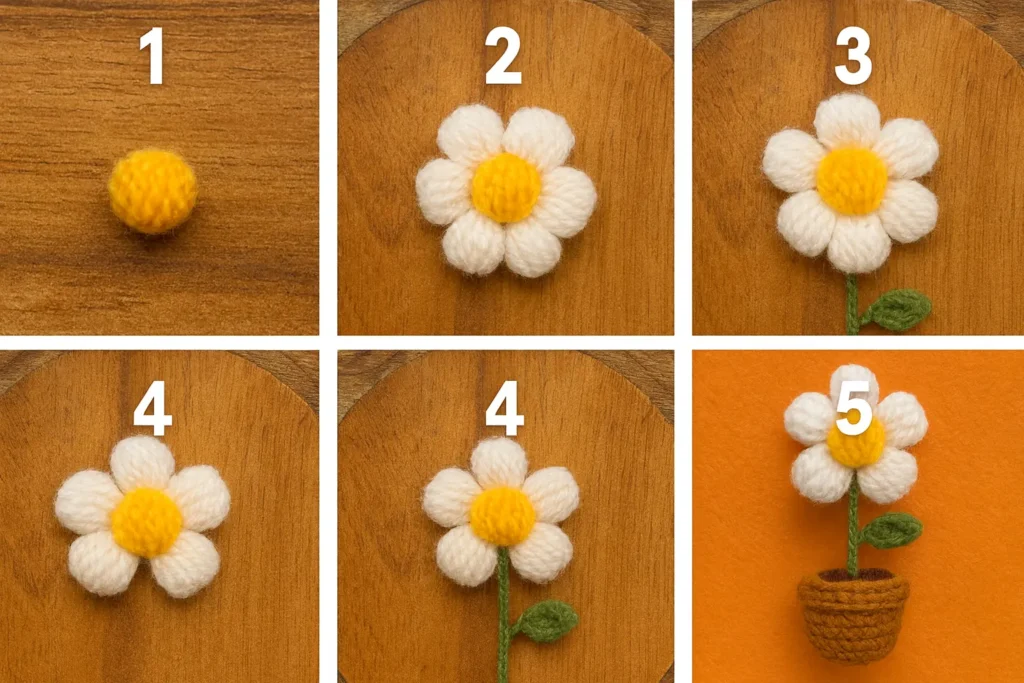
Assembly (🧩)
- Join stem to soil disk
- Poke the wrapped wire (or fabric stem) through the center of the soil disk.
- On the underside, bend the wire tip into a tiny loop (or knot the fabric stem tail), then pull it back to sit snug. Add a small dab of glue if you want it permanent.
- Seat the soil in the pot
- Place the disk inside the pot so it rests just under the rim.
- If it’s loose, add one securing stitch at 12, 3, 6, and 9 o’clock from the soil edge into the pot wall (tiny overcast stitches).
- For extra stability, drop a cardboard disc and a few pellets in the base before fully seating the soil.
- Attach the flower to the stem
- Thread the flower base tail on a needle and stitch through the MR opening of the flower base around the stem top.
- Take 3–4 passes from multiple angles so it won’t spin; knot and weave in the end inside the petals.
- Sew the yellow center
- Position the puff directly over the MR; stitch around the base of the puff 3–4 times so it sits tight.
- Tug the MR tail once more to close any tiny gap before weaving in.
- Add leaves
- Place 1–2 leaves on the stem just above the rim; sew with the long tails.
- Angle them slightly for a natural look.
- Shape & final checks
- Curve the stem gently.
- Fluff and evenly space the 5 petals.
- Press the pot base on a flat surface; if wobbly, add a tiny pinch of stuffing or a thicker card disc.
Now your mini potted puff flower is ready to display!
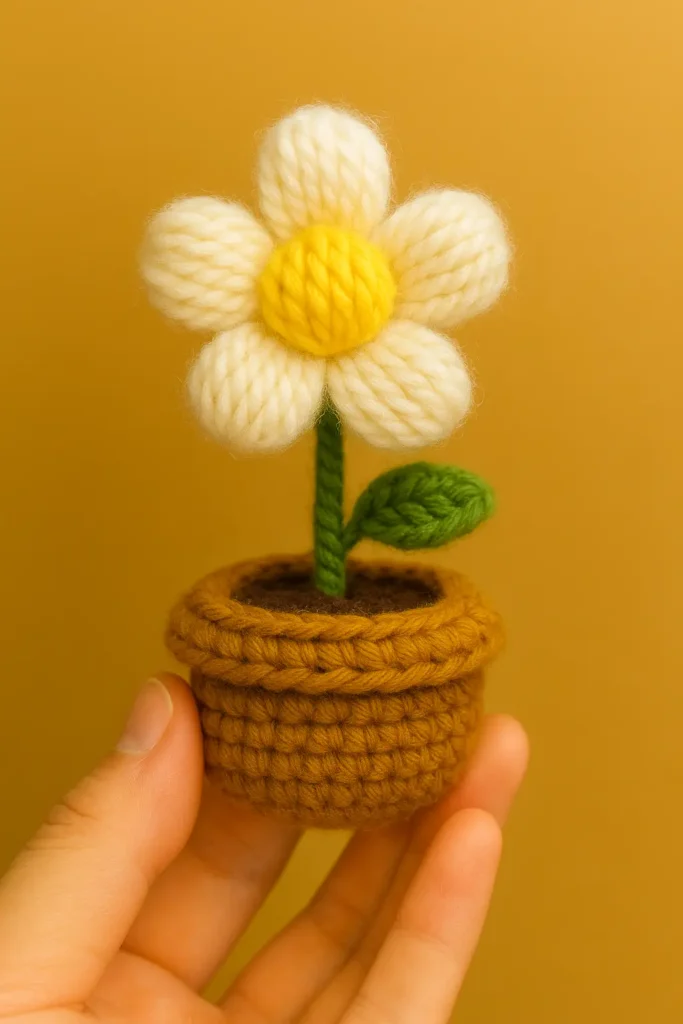
Safety note: For gifts to young kids, use the no-wire stem and secure all pieces thoroughly.
Size & Yarn Weight Guide
Use this table to predict finished size and tweak your hook for a firm, upright mini pot.
| Yarn weight | Hook | Pot height | Notes |
|---|---|---|---|
| Sport (#2) | 2.0 mm | ~4–5 cm | Tight, very “mini”; great for fridge magnets |
| DK (#3) | 2.5 mm | ~5–6 cm | Recommended balance of speed + structure |
| Worsted (#4) | 3.0–3.5 mm | ~6–7.5 cm | Slightly larger “small pot”; adjust stuffing |
Fit tuning
- If the soil disk is loose: add one increase round (3 sc, inc) ×6 → 30 sts and ease it in.
- If the pot walls ripple: drop hook size by 0.5 mm or remove one sc round before the dc/FPdc rim.
- If the pot leans: add a cardboard disc + a pinch of pellets at the base, then restuff lightly.
These tweaks help every mini potted puff flower stand straight and neat.
Customization & Variations
Color play
- Make a trio set in pastel gradients (light–mid–dark) for a cute windowsill display.
- Two-tone pots: work R9 (dc) in a contrast color, then R10 (FPdc) back in the main color for a banded rim.
No-wire version
- Use a short chain cord (sl st back) or a tight i-cord. Stitch both ends firmly during assembly to keep the stem upright.
Magnet / Clip / Keychain
- Glue a strong magnet to the pot base for fridge décor.
- Add a bulldog clip behind the pot for notes/photos.
- Shorten the stem and attach a split ring to turn it into a mini keychain bloom.
Gift & set ideas
- Pair your mini potted puff flower with another tiny make: a crochet macaron, mini cake, or ice cream cone for a sweet-themed bundle.
- Seasonal swap: pink petals for spring, sunflower colors for summer, warm terracotta + mustard for fall, icy whites for winter.
- Desk trio: combine this pot with a sea friend like the free whale or a cheery bird like the duck keychain.
FAQs about Mini Potted Puff Flower
Can I resize this Mini Potted Puff Flower pattern?
Yes. Use a smaller hook (tighter fabric) for a tinier pot, or a larger hook/yarn for a slightly bigger “small pot.” Add or remove one sc round before the dc/FPdc rim to tweak height.
What can I use instead of floral wire for the stem?
Make a firm chain cord (sl st back) or a tight i-cord and sew both ends securely to the soil disk and the flower base.
How do I turn this Mini Potted Puff Flower into a keychain?
Shorten the stem, stitch the flower firmly, and attach a split ring behind the flower base. Avoid wire for kid-safe gifts.
My petals look uneven—what am I doing wrong?
When working dc3tog, pull each dc to the same height before closing. After closing, give the working yarn a gentle snug and lightly steam-shape if needed.
Can I sell the finished items?
Yes, bundle mini potted puff flower sets for markets; please credit the pattern source (.com).
What’s a good next project after this mini plant?
Try a simple animal to practice shaping: the amigurumi bunny (free pattern) or the amigurumi owl are both quick and beginner-friendly.
That’s it a mini potted puff flower you can whip up in under an hour, perfect for gifts, desks, and market sets. Mix petal colors, try the no-wire stem, and build a trio for instant décor. Happy hooking!
💖 Loved this pattern? Pin this mini potted puff flower for later so you can find it fast next time!