Ivory Windowpane Midi Dress Crochet Pattern
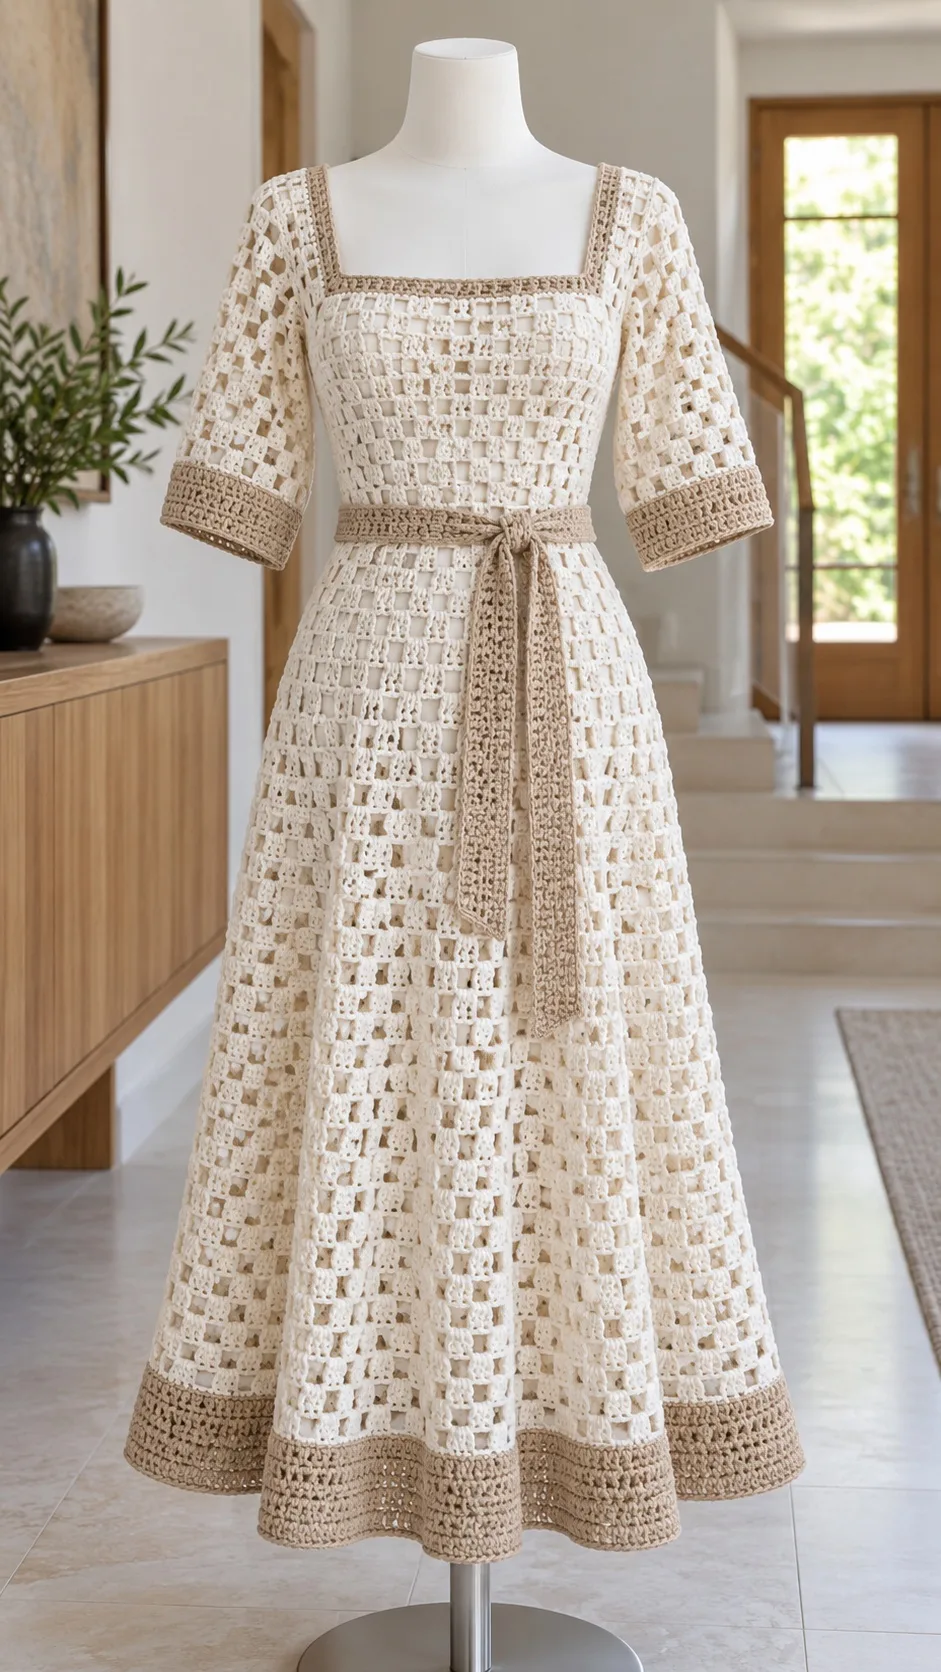
Crocheting a full dress sounds intimidating, doesn’t it? All those pieces, the shaping, the assembly. It feels like something only advanced makers attempt. But here’s the truth: this Ivory Windowpane Midi Dress breaks down into manageable flat panels that you work separately and then join together. No complicated circular yokes. No confusing top-down construction. Just straightforward rectangles with a beautiful lattice stitch pattern.
If you can work a double crochet and count your stitches, you already have the core skills for this project. The lattice pattern itself is simply blocks of three double crochets alternating with chain-3 spaces. That’s it. The elegance comes from repetition and proper blocking, not from complex techniques. The square neckline? It’s shaped by leaving the center stitches unworked and continuing each shoulder separately.
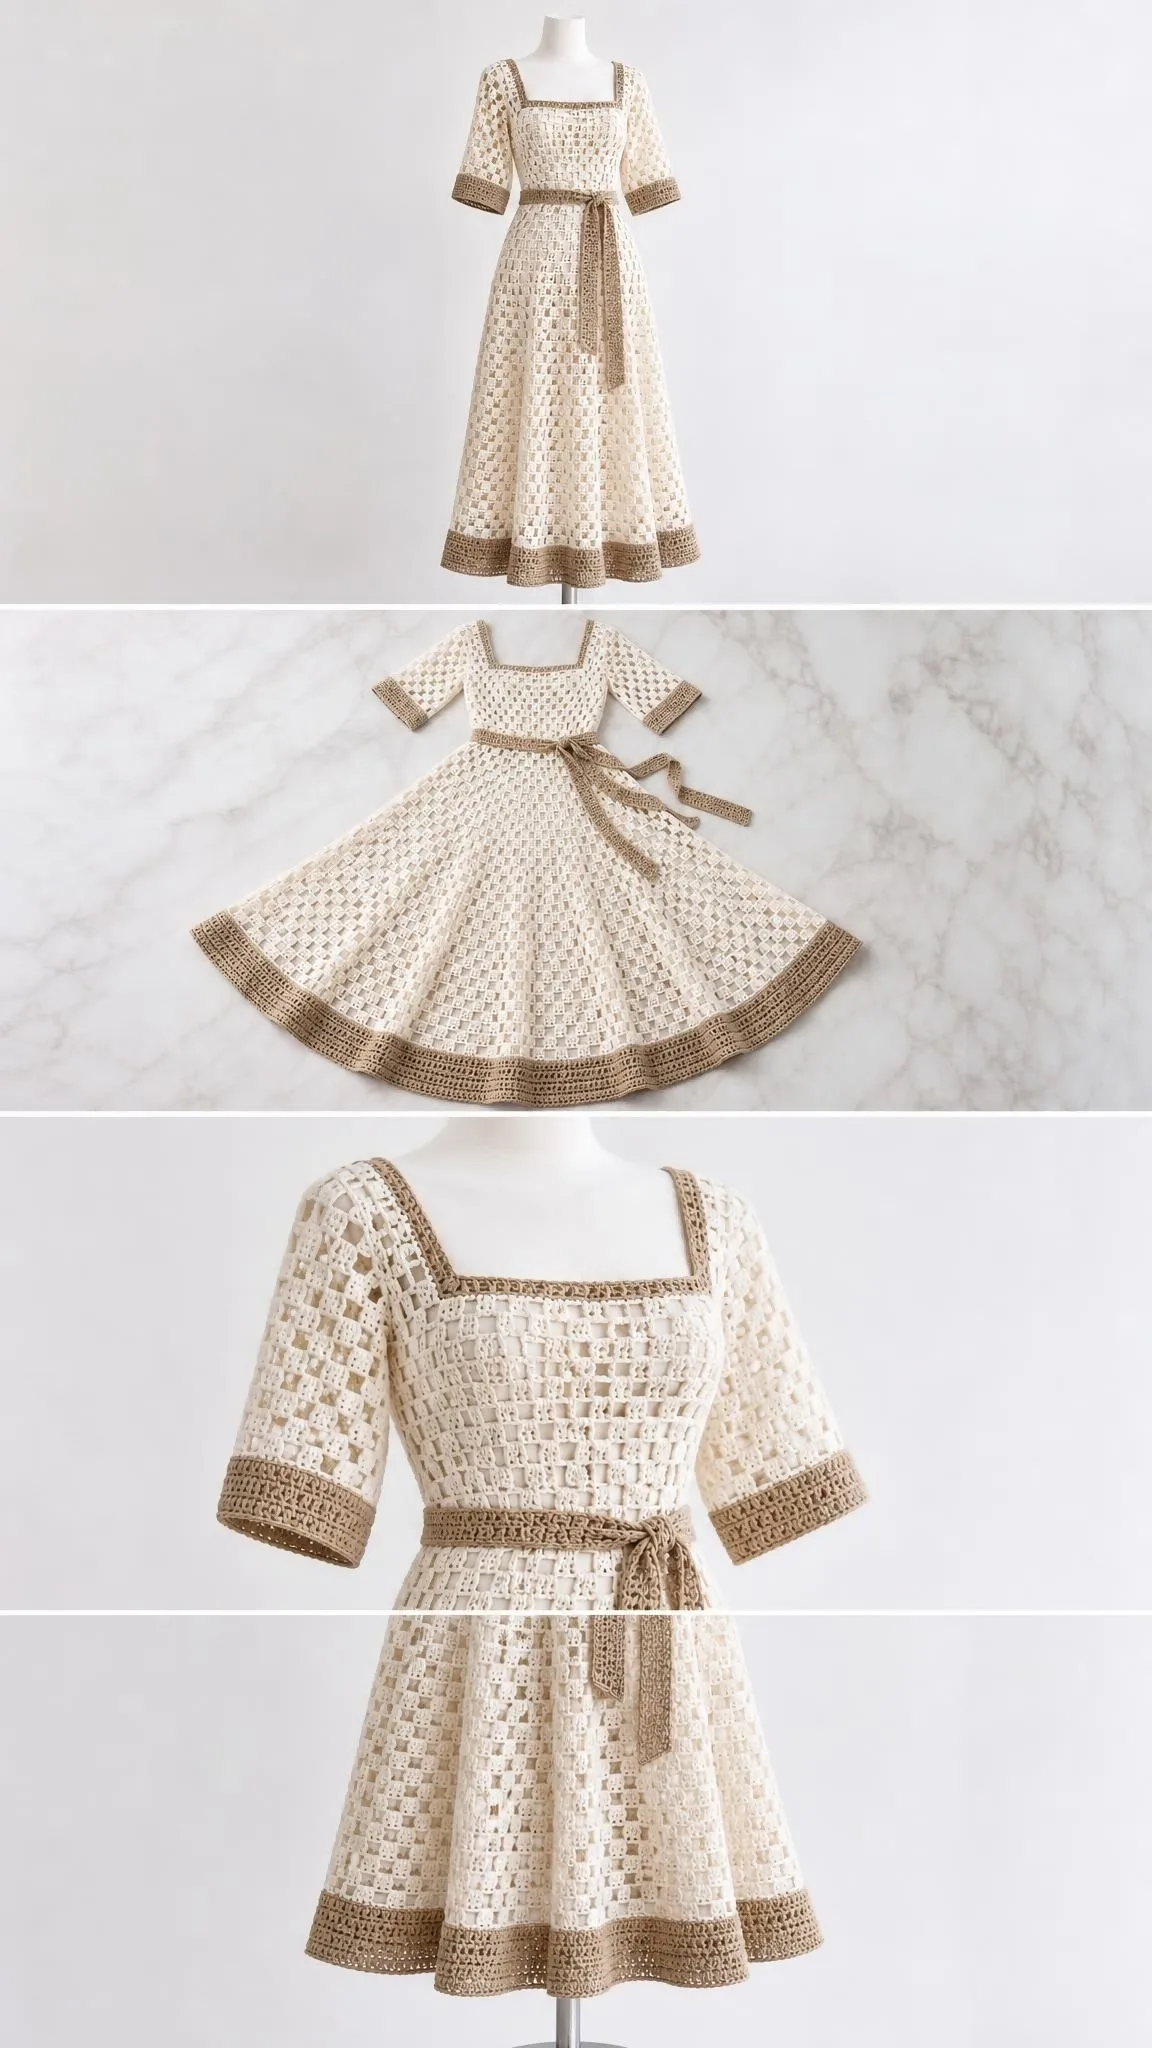
This midi dress features a fitted bodice, an A-line skirt with gorgeous drape, elbow-length sleeves, and a contrasting sand-colored belt, cuffs, and hem border. The openwork lattice creates that stunning windowpane effect while the construction method keeps everything approachable. Whether you’ve made garments before or this is your first wearable project, the step-by-step approach here will guide you through every join and seam.
About This Design
The Ivory Windowpane Midi Dress is a sophisticated crochet garment featuring a classic lattice stitch pattern throughout. The design creates a checkerboard effect of solid blocks and open windows, giving the dress an airy, elegant appearance perfect for warm weather events or layered over a slip for cooler occasions.
Key design elements include:
- Square neckline shaped by working shoulders separately
- Elbow-length lattice sleeves with gathered cuffs
- Calf-length A-line skirt made from six panels joined and gathered at the waist
- Sand-colored accents on the cuffs, hem border, and tie belt
- Side zipper closure for easy dressing
The dress is worked as flat bodice panels (front and back), six rectangular skirt panels, and two sleeve rectangles. Everything comes together through mattress stitch seams and a gathered waist join. This modular construction means you can work on pieces during short sessions and see progress quickly.
Skill Level
Intermediate to Advanced
While the individual stitch pattern is straightforward, this project requires comfort with:
- Working flat panels and turning
- Counting stitches consistently across long rows
- Seaming multiple pieces together
- Installing a zipper
- Blocking and finishing techniques
If you’ve successfully completed a cardigan or structured top, you’re ready for this dress.
Finished Measurements
Before you begin, compare these measurements to a well-fitting garment in your wardrobe:
| Piece | Measurement |
|---|---|
| Finished bust | approximately 100 cm |
| Intended body bust | 90-94 cm (with 6-10 cm ease) |
| Untied waist | 100 cm |
| Cinched waist with belt | 80-90 cm |
| Skirt length | 70 cm below waist |
| Bodice (shoulder to waist) | 40 cm |
| Sleeve length | 28 cm |
| Neck gap | 20 cm wide |
| Armhole perimeter | approximately 40 cm |
Important: This is a single-size pattern. If you need different measurements, you’ll need to recalculate the number of lattice repeats based on your gauge swatch.
Materials
Yarn
Smooth sport-weight cotton, approximately 300 m per 100 g
- Main color (Ivory): 910 g (2730 m)
- Accent color (Sand): 120 g (360 m) total
These amounts include a planning allowance. Confirm your actual yardage needs by weighing your gauge swatch.
Hooks
- 3.5 mm hook for main fabric
- 3.0 mm hook for firm borders and belt
Adjust hook size as needed to achieve gauge.
Notions
- Tapestry needle
- Removable stitch markers
- Tape measure
- Scissors
- Blocking mats and rust-resistant pins
- Sewing needle and matching thread
- 40 cm dress zipper
- 1 m of 10 mm cotton tape (for waist stabilization)
- Opaque slip for wearing (the openwork requires a lining underneath)
Gauge
Blocked main-stitch gauge: 4 lattice repeats and 10 rows = 10 x 10 cm
One lattice repeat measures approximately 2.50 cm wide.
Border gauge: 20 single crochet (sc) and 24 sc rows = 10 cm
Making Your Gauge Swatch
Using the 3.5 mm hook and the lattice stitch pattern described below, chain 52 (for N = 8 repeats). Work at least 20 rows following the pattern instructions.
Blocking your swatch:
- Wet-block the swatch
- Dry flat for 24 hours
- Hang for 12 hours to check for cotton growth
- Measure the central 10 cm away from edges
- Recheck length after hanging
Cotton yarn can stretch significantly when worn. This hanging test helps you anticipate how the finished dress will behave. Keep your swatch for washing and colorfastness tests.
Abbreviations and Special Stitches
Before diving into the pattern, let’s define every abbreviation you’ll encounter:
- ch = chain
- sc = single crochet (insert hook, pull up loop, yarn over, pull through both loops)
- hdc = half double crochet
- dc = double crochet (yarn over, insert hook, pull up loop, yarn over, pull through 2 loops twice)
- tr = treble crochet
- sl st = slip stitch
- st(s) = stitch(es)
- sp = space
- RS/WS = right side/wrong side
- BLO = back loop only
- rep = repeat
- N = number of horizontal motif repeats in a piece
Parentheses group stitches worked in the same place.
Brackets identify a sequence to be repeated.
Understanding the Lattice Repeat
One lattice repeat consists of: ch 3 followed by 3 dc
The row always starts with one edge dc. So a row with N repeats contains:
- 3N + 1 dc total
- N chain-3 spaces
The beginning ch 3 counts as the first dc. Keep your blocks positioned directly above blocks from the previous row to form the square window columns.
The Lattice Stitch Pattern
This is the core pattern used throughout the dress. Master this section before starting the bodice.
Foundation Row
Chain 6N + 4 (where N is your number of repeats)
Row 1: Dc in fourth ch from hook, [ch 3, skip 3 ch, dc in each of next 3 ch] N times.
The skipped three turning chains do not count on this foundation row.
Count: 3N + 1 dc and N spaces.
Row 2 (and all plain rows)
Ch 3, turn, skip first dc, dc in each of next 2 dc, [ch 3, skip ch-3 space, dc in each of next 3 dc] N-1 times, ch 3, skip last space, dc in final edge dc.
Count: 3N + 1 dc, N spaces.
Row 3 (mirror row)
Ch 3, turn, skip first edge dc, [ch 3, skip space, dc in each of next 3 dc] N times.
Count: 3N + 1 dc, N spaces.
Continue alternating Rows 2 and 3. Do not mistake a ch-3 window for a turning chain. The pattern creates a grid of solid blocks and open spaces that align vertically.
Pattern Notes
Read through all instructions before starting. A few important points:
- Work flat and turn after every row
- Mark Row 1 as RS (right side)
- Count at every row end and check measurements after each 10 cm
- Fasten off with 20 cm tails for seaming
- Seams consume only the edge loops
- Do not remove a motif to force a measurement. Correct your gauge first.
- For neckline shoulders, restart yarn at a complete motif boundary. Do not carry yarn across the neck gap.
- Main pieces use ivory. Use sand on the last two skirt rows, borders, and belt.
Instructions
Back Bodice
With main color (ivory) and 3.5 mm hook, work the foundation with N = 20. You’ll be working upward from the waist.
Row 1: Work foundation row. Count: 20 lattice repeats.
Rows 2-37: Work the next plain recipe row. Count: 20 lattice repeats per row.
After Row 37, mark the central 8 repeats as the back neck opening. You’ll work the outer 6 repeats at each side separately for the shoulders, leaving the marked center unworked.
Rows 38-40 (each shoulder): Continue the recipe over the outer 6 repeats only. Count: 6 lattice repeats per shoulder.
Fasten off both shoulders.
Front Bodice
Begin the same as the back with N = 20.
Row 1: Work foundation row. Count: 20 lattice repeats.
Rows 2-30: Work the next plain recipe row. Count: 20 lattice repeats per row.
After Row 30, leave the central 8 repeats unworked. Work each shoulder separately over 6 repeats. This creates the square neckline, which begins lower on the front than the back.
Rows 31-40 (each shoulder): Continue the recipe over this shoulder only. Count: 6 lattice repeats per shoulder.
Fasten off both shoulders.
Skirt Panels (Make 6)
Work from waist downward. Start with N = 12. Each rectangular panel is 30 cm wide. When all six panels are joined, the combined 180 cm top edge will be gathered to fit the 100 cm bodice waist.
Row 1: Work foundation row. Count: 12 lattice repeats.
Rows 2-70: Work the next plain recipe row, following the color plan. Count: 12 lattice repeats per row.
Checkpoint: Block all six panels to 70 cm length, within one row of tolerance. Width should be 30 cm.
Sleeves (Make 2)
Use main color, 3.5 mm hook, and N = 16. Work from shoulder edge to cuff. Both sleeve rectangles start 40 cm wide. You’ll gather the wrist edge to the cuff later for a slight balloon shape.
Sleeve Row 1: Work foundation row. Count: 16 lattice repeats.
Sleeve Rows 2-24: Continue the plain recipe row. Count: 16 lattice repeats per row.
Checkpoint: Each rectangle should be 40 cm wide and approximately 24 cm long before the border. Ensure both sleeves match.
Waist Tie Belt
With 3.0 mm hook and belt color (sand):
Belt Row 1: Ch 8, sc in second chain and next 6 chains. Count: 7 sc.
Belt Row 2 and every following row: Ch 1, turn, sc BLO in each stitch. Count: 7 sc per row.
Continue until the belt measures 160 cm. Record your total row count since row gauge varies.
Checkpoint: Belt should be 160 cm x approximately 3.5 cm. Do not stretch while measuring. Make it longer only if needed to tie comfortably.
Assembly
Gather your yarn tails, tapestry needle, 3.5 mm hook (for optional slip-stitch seams), zipper, sewing needle, thread, and cotton waist tape.
Join 1: Shoulders
Mattress-stitch corresponding outer shoulder edges, aligning 6 complete motifs on each seam. Count: 2 shoulder seams, 6 motifs each.
Join 2: Sleeves
Mark 20 cm down each side of front and back from the shoulder seam. Match the sleeve midpoint to the shoulder seam, then sew the 40 cm upper edge around this opening. For puff styling, ease 2 cm at the sleeve midpoint. Count: 2 sleeves attached.
Join 3: Sides
Sew from waist to armhole on the right side. On the left, leave the bodice portion of the 40 cm zipper opening. Continue that opening into the skirt below waist as needed. Close sleeve underarms. Count: 2 side seams, 1 zipper opening.
Join 4: Skirt
Align equal row ends and mattress-stitch six panels into a ring, retaining the left-side zipper gap. Count: 6 panel joins, including the partial zipper seam.
Join 5: Waist
Quarter-mark both bodice and skirt. Run two gathering threads through skirt foundation loops and draw to 100 cm, matching quarter marks. Sew to bodice waist. Sew stabilizing cotton tape inside the waist without stretching. Count: 1 continuous 100 cm waist join.
Join 6: Closure
Hand-baste then backstitch zipper tapes to the inside of the left opening. Keep teeth clear of crochet loops. Secure top and lower stops. Count: 1 working zipper, 40 cm opening closed.
Checkpoint: Shoulders should be level. Waist measures 100 cm before belt. Armholes are approximately 40 cm perimeter. Zipper opens without catching. Try the dress over the intended slip before trimming any yarn tails. Confirm adequate sitting and walking room.
Edgings and Details
Use ivory and sand yarns with the 3.0 mm hook. The accent color goes on the hem, neckline, and cuffs.
Neckline Border
Neck Round 1: Join sand at back neck. Sc evenly around, working approximately 2 sc per dc-row end and 1 sc per stitch. Adjust at steps to lie flat. At square inside corners, work sc2tog (pull up a loop in each of 2 stitches, yarn over and draw through all 3 loops) across the corner. Join with sl st. Count: E sc (record E after fitting the edge flat).
Neck Round 2: Ch 1, sc in each sc, join. For any remaining inner steps, work sc2tog and record the decrease total D. Count: E-D sc (for square/boat neck, use E sc if flat).
Hem Border
Hem Round 1: With sand, sc evenly along lower edge without drawing it in. Work one sc per dc and one per chain. Do not count seam loops twice. Count: H sc (record H).
Hem Rounds 2-8: Ch 1, sc BLO in every sc, join. Count: H sc per round.
Cuffs (Make 2)
Cuff Row 1: With sand, ch 9, sc in second ch and across. Count: 8 sc.
Cuff Row 2 and every subsequent row: Ch 1, turn, sc BLO across until strip fits comfortably around hand and wrist, approximately 22-24 cm. Count: 8 sc per row.
Cuff Join: Sew strip ends together to form a ring. Evenly gather sleeve edge to cuff ring and sew through edge loops. Count: 2 cuff rings, each approximately 4 cm deep.
Checkpoint: Every border should lie flat with no puckering. Both sleeve openings match. Belt ties easily. Record E, D, H, and C counts for future reference.
Finishing
Weaving in Ends
Pass each yarn end through at least 5 cm of solid stitches, reverse direction twice, and trim only after the first wash.
Blocking
Soak according to yarn label instructions. Lift the garment supported, press between towels, and lay flat to finished measurements. Shape any scallops gently.
Final Check
After fully dry, hang for 12 hours. Remeasure length and check zipper, belt, and all details.
Final Measurements:
- Bust: approximately 100 cm
- Bodice: 40 cm
- Skirt: 70 cm plus border
- Sleeves: 28 cm plus cuff depth
Cotton can grow during wear. Only shorten after the hanging check. Store folded, not suspended from shoulders.
Care Instructions
Follow your yarn’s care label. For cotton, cool gentle hand washing and flat drying are a conservative starting point. Test colors first. Support the full wet garment and avoid wringing. Remove the belt before washing.
Safety notes:
- This is an adult garment requiring an opaque slip for coverage
- Check any buttons or pearl embellishments regularly
- Keep long belt ends clear of moving equipment and flames
- Ensure the hem length doesn’t cause tripping
Tips for Success
Take your time with gauge. This entire pattern depends on achieving the correct stitch and row counts. If your gauge is off, your dress won’t fit.
Block each piece before assembly. It’s much easier to join pieces that have been blocked to their correct dimensions.
Use stitch markers liberally. Mark the beginning of rows, the center of necklines, and any shaping points.
Try on as you go. Once the bodice is assembled, try it on (over a slip) to check the fit before attaching the skirt.
Don’t skip the cotton tape. The waist stabilization prevents the gathered area from stretching out of shape over time.
Making This Dress Your Own
While this pattern specifies ivory with sand accents, the design works beautifully in other color combinations:
- Classic white with soft gray borders for a minimalist look
- Dusty rose with cream accents for a romantic feel
- Navy blue with white borders for nautical style
- Sage green with natural tan for an earthy aesthetic
You could also adjust the sleeve length (add or remove rows) or modify the skirt length by working more or fewer rows on each panel.
Final Thoughts
This Ivory Windowpane Midi Dress is a statement piece that showcases both your crochet skills and your patience. The lattice stitch creates an elegant, timeless look while the modular construction keeps the project manageable. Every panel you complete is progress you can see and feel.
The finished dress is perfect for summer garden parties, beach weddings, or any occasion where you want to wear something truly special that you made with your own hands. Paired with the right slip underneath and that beautiful sand-colored belt cinched at the waist, this dress has a vintage elegance that never goes out of style.
Thank you so much for choosing this pattern for your next crochet project. I’d absolutely love to see your finished dress! Share your photos on Instagram or in our Facebook group so we can celebrate your gorgeous work together.
If you love this pattern, save it to your Pinterest boards so you can find it whenever you’re ready to start. And please drop a comment below if you make this dress. I’d love to hear how it turns out and see your color choices!
You Might Also Like
- Blush Pink Rose Garden Bracelet Free Crochet Pattern
- Dusty Rose Floral Lace Bucket Bag Free Crochet Pattern
- Champagne Gold Bell Sleeve Crochet Top Free Pattern
- Lavender Mint Shell Stitch Baby Dress Free Crochet Pattern