Free Crochet Santa Claus Gnome Pattern (Plush Amigurumi)
Today I’m sharing a free crochet Santa Claus gnome pattern that turned my desk into a tiny North Pole in one weekend. 🎅✨ Worked with soft plush yarn, this easy Christmas amigurumi has a tall red hat, fluffy white beard and a round little nose that peeks out just enough to cause trouble. If counting rounds still makes you sweat a bit, you can warm up first with my beginner-friendly guide First Amigurumi – Step-by-Step Guide and then come back to this festive troublemaker.
Once you finish your Santa Claus gnome, pop him next to other Christmas makes like this Free Crochet Christmas Tree Pattern and a couple of snowman or reindeer amigurumi, and suddenly your shelf looks like a tiny handmade North Pole.
Jump to section
Plush Santa Claus Gnome Pattern at a Glance
- Skill level: Confident beginner (you only need basic stitches + simple increases and decreases)
- Techniques used: magic ring, single crochet in the round, increases, invisible decreases, working in FLO and simple sewing of parts
- Yarn: super bulky / plush (weight 6) in classic Santa colors
- Hook size: 6.0 mm (or size needed for tight stitches)
- Construction:
- Stuffed body with black belt
- Separate legs/boots and arms
- Squishy nose
- Tall Santa hat with pom-pom and white brim
- Brushed, fluffy beard added with lark’s head knots
- Uses: Christmas decor, shelf sitter, gift, or even a tree ornament if you add a hanging loop at the back of the hat.
Materials & Tools for Your Plush Santa Claus Gnome
To keep this free crochet Santa Claus pattern soft, chunky and quick to finish, I’m using super bulky plush yarn. You can absolutely substitute another weight, but the size of your Santa gnome will change.
Yarn (super bulky / plush, weight 6)
- Red – hat, body, sleeves, pants
- White – hat brim, pom-pom, beard, cuffs (optional)
- Cream / light peach – nose and hands
- Black – belt and boots (legs)
- Yellow (any weight) – belt buckle (optional)
Hook & tools
- 6.0 mm crochet hook (or size that gives you tight stitches)
If you’re unsure which hook works best with plush yarn, my guide on Yarn Weight, Gauge & Hook Size walks you through choosing the right combo. - Polyester fiberfill stuffing
- Yarn needle
- Scissors
- Stitch marker (super helpful to keep track of rounds in this Santa Claus crochet pattern)
For the neatest result, try to keep your tension firm so the stuffing doesn’t peek through between the stitches.
Abbreviations & Skill Level
This plush Santa Claus gnome crochet pattern is written in US terms and worked mostly in continuous rounds.
Abbreviations used
- MR – magic ring
- sc – single crochet
- inc – increase (2 sc in the same stitch)
- dec – invisible decrease
- st(s) – stitch(es)
- FLO – front loop only
If you’re still practicing your basic stitches, you can review how to make a magic ring in my tutorial Magic Ring vs Chain Circle in Amigurumi, refresh your single crochet with How to Single Crochet, and see how to close rounds neatly with the Invisible Decrease in Crochet.
Skill level:
I’d rate this Santa gnome as a confident beginner:
- You should be comfortable working in the round with a magic ring.
- You’ll use simple increases and invisible decreases to shape the body, hat and nose.
- There’s a bit of sewing to attach the arms, legs, nose and hat—but nothing too scary, I promise.
Once you’re happy with the materials and stitches, we can dive into the next Part – the full step-by-step Plush Santa Gnome pattern (body, arms, legs, nose, hat, beard, and assembly).
Step-by-Step Plush Santa Claus Gnome Pattern

Work in continuous rounds (no joining, no chaining up) unless I say otherwise. Use a stitch marker to mark the first stitch of each round so you don’t get lost—if counting rounds is tricky for you, my quick tips in How to Count Rounds in Crochet can really help.
Body (Red Coat with Black Belt)
BODY (make 1 – red with black belt)
With red plush yarn:
- R1: MR, 6 sc (6)
- R2: inc in each st around (12)
- R3: sc, inc repeat 6× (18)
- R4 (FLO): 2 sc, inc repeat 6× (24)
- R5: sc in each st around (24)
Change to black (belt):
- R6–R7: sc in each st around (24)
Change back to red:
- R8: sc in each st around (24)
Shape the top:
- R9: 6 sc, dec repeat 3× (21)
- R10: 5 sc, dec repeat 3× (18)
- R11: sc in each st around (18)
- R12: sc, dec repeat 6× (12)
- R13: sc in each st around (12)
Fasten off. Stuff the body firmly.
Thread the tail through all 12 sts, pull tight to close, then weave in.
If you’re anxious about color changes between red and black on the belt line, you can use the techniques from Changing Colors in Amigurumi to keep those stripes clean and crisp.
Arms (Sleeves + Hands)
ARMS (make 2 – peach + red)
With cream/peach yarn:
- R1: MR, 6 sc (6)
- R2: sc, inc repeat 3× (9)
- R3: sc in each st around (9)
Change to red:
- R4–R7: sc in each st around (9)
Fasten off, leaving a long tail for sewing.
Stuff the peach part firmly for the hand; add a little stuffing in the red part so the sleeve stays soft and slightly bendable.
Optional detail: embroider or surface-slip-stitch a thin white cuff at the color change to mimic fluffy Santa cuffs.
Legs & Boots
LEGS (make 2 – black + red)
With black yarn (boots):
- R1: MR, 6 sc (6)
- R2: sc, inc repeat 3× (9)
- R3–R4: sc in each st around (9)
Change to red (pants):
- R5–R6: sc in each st around (9)
Fasten off, leaving a long tail for sewing.
Stuff the black part well so the boots hold their shape; add a light amount of stuffing in the red part so the legs stay soft and not too stiff.
Nose
NOSE (make 1)
With cream or light peach yarn:
- R1: MR, 4 sc (4)
- R2: sc, inc repeat 4× (8)
- R3: sc in each st around (8)
Fasten off, lightly stuff, and leave a long tail for sewing later.
This little nose will peek out from under the hat and over the beard, so make sure it’s nicely rounded.
Tall Santa Hat with Pom-Pom
TALL SANTA HAT
(with pom-pom and FLO white brim)
Start with white plush yarn (for the pom-pom):
- R1: MR, 6 sc (6)
- R2: inc in each st around (12)
- R3: sc in each st around (12)
- R4: dec around (6)
Change to red plush yarn:
- R5–R6: sc in each st around (6)
- R7: 2 sc, inc repeat 2× (8)
- R8: 3 sc, inc repeat 2× (10)
- R9: 4 sc, inc repeat 2× (12)
- R10: 5 sc, inc repeat 2× (14)
- R11: 6 sc, inc repeat 2× (16)
- R12: 7 sc, inc repeat 2× (18)
- R13: sc in each st around (18)
- R14: 8 sc, inc repeat 2× (20)
- R15: 9 sc, inc repeat 2× (22)
- R16: sc in each st around (22)
- R17: 10 sc, inc repeat 2× (24)
Change to white yarn, work in FLO for the brim:
- R18 (FLO): sc, inc repeat 12× (36)
- R19: sc in each st around (36)
Fasten off and weave in the end.
You can stuff the hat lightly if you want it to stand up tall, or leave it unstuffed and shape the tip to one side for a floppy, cozy Santa look.
Fluffy Beard
BEARD
Cut white yarn into strands about 10–12 cm (4–5″) long.
On the front of the body, pick a row just above the belt where you want the top of the beard to sit.
For each strand:
- Fold the strand in half.
- Insert your hook into a stitch on the body and pull the folded loop through.
- Pull the two loose ends through the loop (a lark’s head knot) and tighten.
Repeat this across several stitches until the beard looks full and fluffy.
You can add more rows of strands below if you’d like a longer beard.
Trim the beard into your preferred shape—a long triangle, a rounded beard, or something in between. If your yarn has multiple plies, you can gently separate or brush them out with a small comb or slicker brush to make the beard look extra soft and cloud-like.
Mrs. Claus variation: skip the front beard and instead attach long white strands on each side of the head area, braid them, and tie the ends with tiny red bows.
Tiny Belt Buckle (Optional)
BELT BUCKLE (optional)
With yellow yarn and a yarn needle:
- Embroider a small rectangle in the center of the black belt.
- If you’d like more contrast, add a few black stitches inside the yellow rectangle so it looks like an open buckle around the belt.
Assembly: Turn Pieces into a Santa Claus Gnome
Now it’s time to bring your free crochet Santa Claus pattern to life! If you often struggle with placing arms and legs symmetrically, my tutorial Attach Amigurumi Limbs Evenly has simple tricks using pins and counting stitches that you can apply here.
1. Attach the legs
- Turn the body upside down.
- Position the two black/red legs on the bottom front edge of the body so the boots peek out slightly.
- Sew them in place using the long tails, making sure they line up and your gnome can stand or sit nicely.
2. Attach the arms
- Place the arms on each side of the body at belt level or just a little above.
- Sew them on and angle them slightly forward, as if Santa is holding his beard or a tiny present.
3. Add the nose
- Center the nose on the front of the body, just above the belt and right at the top of the beard area.
- Sew it on firmly, shaping it into a neat oval or round ball as you go.
4. Finish and shape the beard
- Check for any gaps in the beard and add extra strands where needed.
- Trim the ends into a smooth triangle or rounded shape, matching the look you want from your reference model.
5. Attach the hat
- Place the hat on top of the body so the white brim comes down low, almost touching the top of the nose and hiding the “head” area.
- Sew the brim all the way around to secure the hat to the body.
- Bend the tip of the hat to one side (or to the back) and lightly tack it in place with a few stitches if you want it to stay there.
6. Optional hanging loop
- If you’d like to use this Santa Claus gnome as a Christmas ornament, add a loop of yarn to the back or top of the hat.
- Make a small chain loop or simply tie a strand into a loop and secure it firmly on the inside of the hat.
📌 Pin for later
Tips for Crocheting Your First Santa Claus Gnome
If this is one of your first big Christmas projects, don’t stress, this free crochet Santa Claus pattern is very forgiving.
- If you’re nervous about common mistakes like stuffing lumps or loose joins, you can skim Top 10 Amigurumi Mistakes to Avoid before you start.
- For readers who like to understand the structure of patterns first, my guide How to Read an Amigurumi Pattern walks through abbreviations, brackets and repeats step by step.
- If you’re more comfortable with other basic stitches and want to practice first, you can try a flat swatch using How to Half Double Crochet or How to Double Crochet and then come back to this Santa Claus gnome.
Remember: plush yarn can hide tiny tension issues, so this is actually a very kind project for slightly imperfect stitches.
Fun Variations: Mrs Claus, Mini Ornament & Color Changes
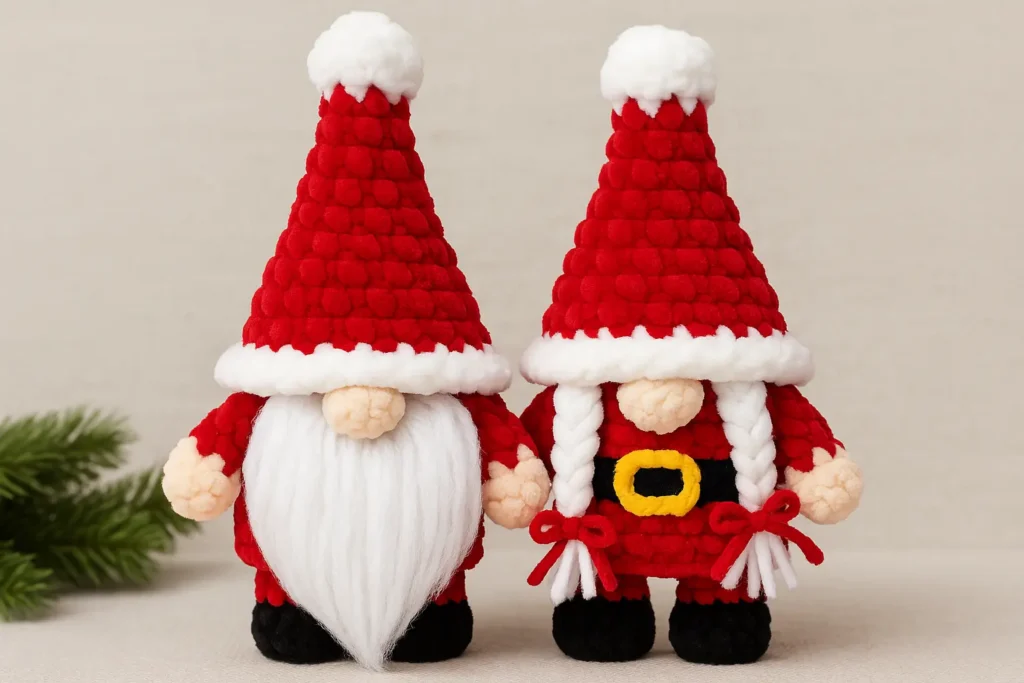
Once you’ve finished your first Santa Claus gnome crochet pattern, it’s very easy to tweak the details and build a whole Christmas family.
- Mrs Claus Gnome: skip the front beard and instead add braided white pigtails on both sides, like I described in the beard section. You can also give her a narrower beard “collar” and a slightly shorter hat.
- Mini Santa Hat Ornament: if you only want a quick project, you can adapt the hat instructions in this pattern or make a separate tiny hat using the Mini Santa Hat Crochet Pattern and hang it next to your gnome.
- Soft Pastel or Candy Colors: for a cute, less-traditional look, you can keep the same structure but switch your palette to pink, cream and gold—similar to the vibe of my Ice Cream Cone Crochet Pattern, which also looks adorable on a dessert-themed Christmas shelf.
- Matchy-Matchy Gifts: pair your Santa gnome with another cute character keychain like the Amigurumi Duck Pattern – Free Keychain or the grumpy-but-cute Free Grinch Crochet Pattern for a fun gift set.
Feel free to experiment with different beard lengths, boots colors and hat bends until your Santa Claus gnome has the exact personality you want.
More Christmas & Holiday Amigurumi You Might Love
If you enjoyed this free crochet Santa Claus gnome pattern, you’ll probably like building a full Christmas village of plush toys:
- Add a snowy friend with the Free Crochet Snowman Pattern and sit him next to Santa.
- Crochet a little helper using the Free Crochet Reindeer Pattern and place it by Santa’s boots.
- For something sweet and cozy, you can try my Free Crochet Gingerbread Man Pattern and display him with your gnome on a cookie tray.
- If you like decorating for both Halloween and Christmas, the bright colors in the Crochet Pattern for Candy Corn and the spooky-cute Crochet Ghost Pattern – Free Variations transition perfectly from October straight into festive winter displays.
Mix and match them on your shelf, under the tree or on your craft table for photos.
Safety Notes for Gifts
If you’re making this Santa Claus crochet pattern as a gift for a baby or toddler, it’s important to think about safety:
- Avoid small parts like plastic safety eyes or buttons for very young children, embroider eyes instead.
- Make sure all pieces (nose, arms, legs, hat, hanging loop) are sewn on very securely.
- Check that there are no long loose strands in the beard that could wrap around little fingers.
For more detailed toy safety guidance, you can read the American Academy of Pediatrics article How to Buy Safe Toys, which explains what to look out for with small parts and age recommendations.
FAQ – Free Crochet Santa Claus Gnome Pattern
Is this free crochet Santa Claus gnome pattern beginner-friendly?
Yes, this free crochet Santa Claus gnome pattern is perfect for confident beginners. If you can make a magic ring, single crochet, increase and invisible decrease, you’ll be able to follow the rounds easily, especially with the help of What Is Amigurumi? if you’re brand new to stuffed toys.
How long does it take to finish this Santa Claus crochet pattern?
Most crocheters can finish this Santa Claus crochet pattern over a weekend: one evening for the body and hat, and another evening for arms, legs, nose, beard and assembly. Using plush yarn and a 6.0 mm hook makes the pieces grow quickly.
What yarn can I use instead of plush for this free crochet Santa Claus pattern?
You can absolutely work this free crochet Santa Claus pattern with worsted-weight yarn and a smaller hook (like 3.0–3.5 mm); your gnome will just turn out smaller and less squishy. Just keep your stitches tight and use the same color layout for the hat, coat, belt and boots.
Can I hang this Santa Claus gnome as a Christmas ornament?
Yes! If you add a simple chain loop to the top or back of the hat, this Santa Claus gnome crochet pattern turns into a perfect hanging ornament for your tree, door handle or garland. A smaller hook and thinner yarn will make a lighter, more ornament-sized Santa.
Can I sell finished toys made from this free crochet Santa Claus pattern?
In general, you’re welcome to sell small batches of finished gnomes made by hand from this free crochet Santa Claus pattern, as long as you credit “Pattern by .com” in your listing or at your craft table and do not copy or redistribute the written pattern itself.