Dusty Rose Heart Cutout Crochet Top Free Pattern
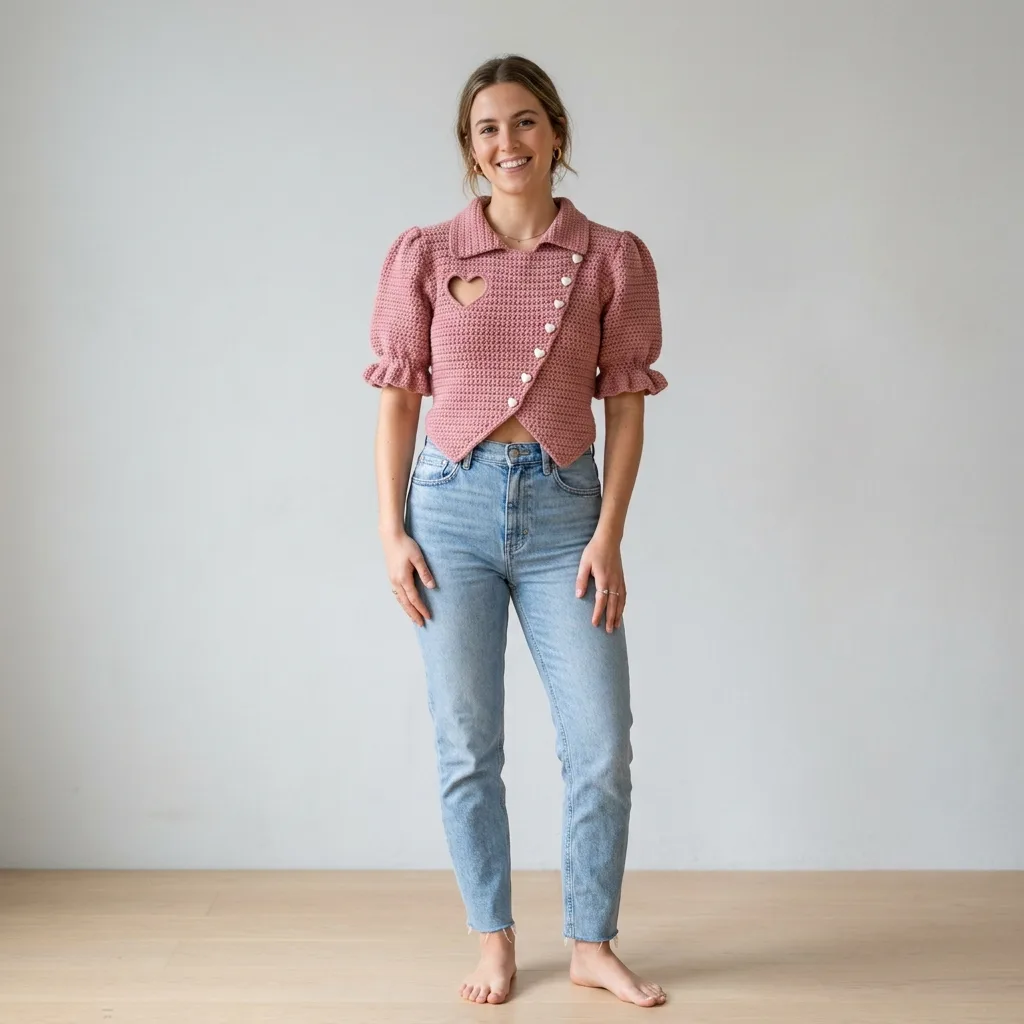
I don’t know about you, but I have a serious weakness for tops that feel both romantic and a little bit daring. Something about a heart cutout just makes my crafter heart skip a beat. When you add puff sleeves and those adorable heart-shaped buttons into the mix? I was absolutely sold.
This dusty rose crochet top delivers all the cozy handmade charm with a modern, flirty twist. The fitted bodice, asymmetric double-breasted closure, and pointed hem create such a polished silhouette. It looks like something you would find in a boutique, but you get to make it yourself.
If you have been searching for a crochet garment pattern that feels special and stands out from the usual cardigans and pullovers, this is your sign to grab your hook. Let me walk you through everything you need to know to create this stunning piece.
About This Dusty Rose Crochet Top Pattern
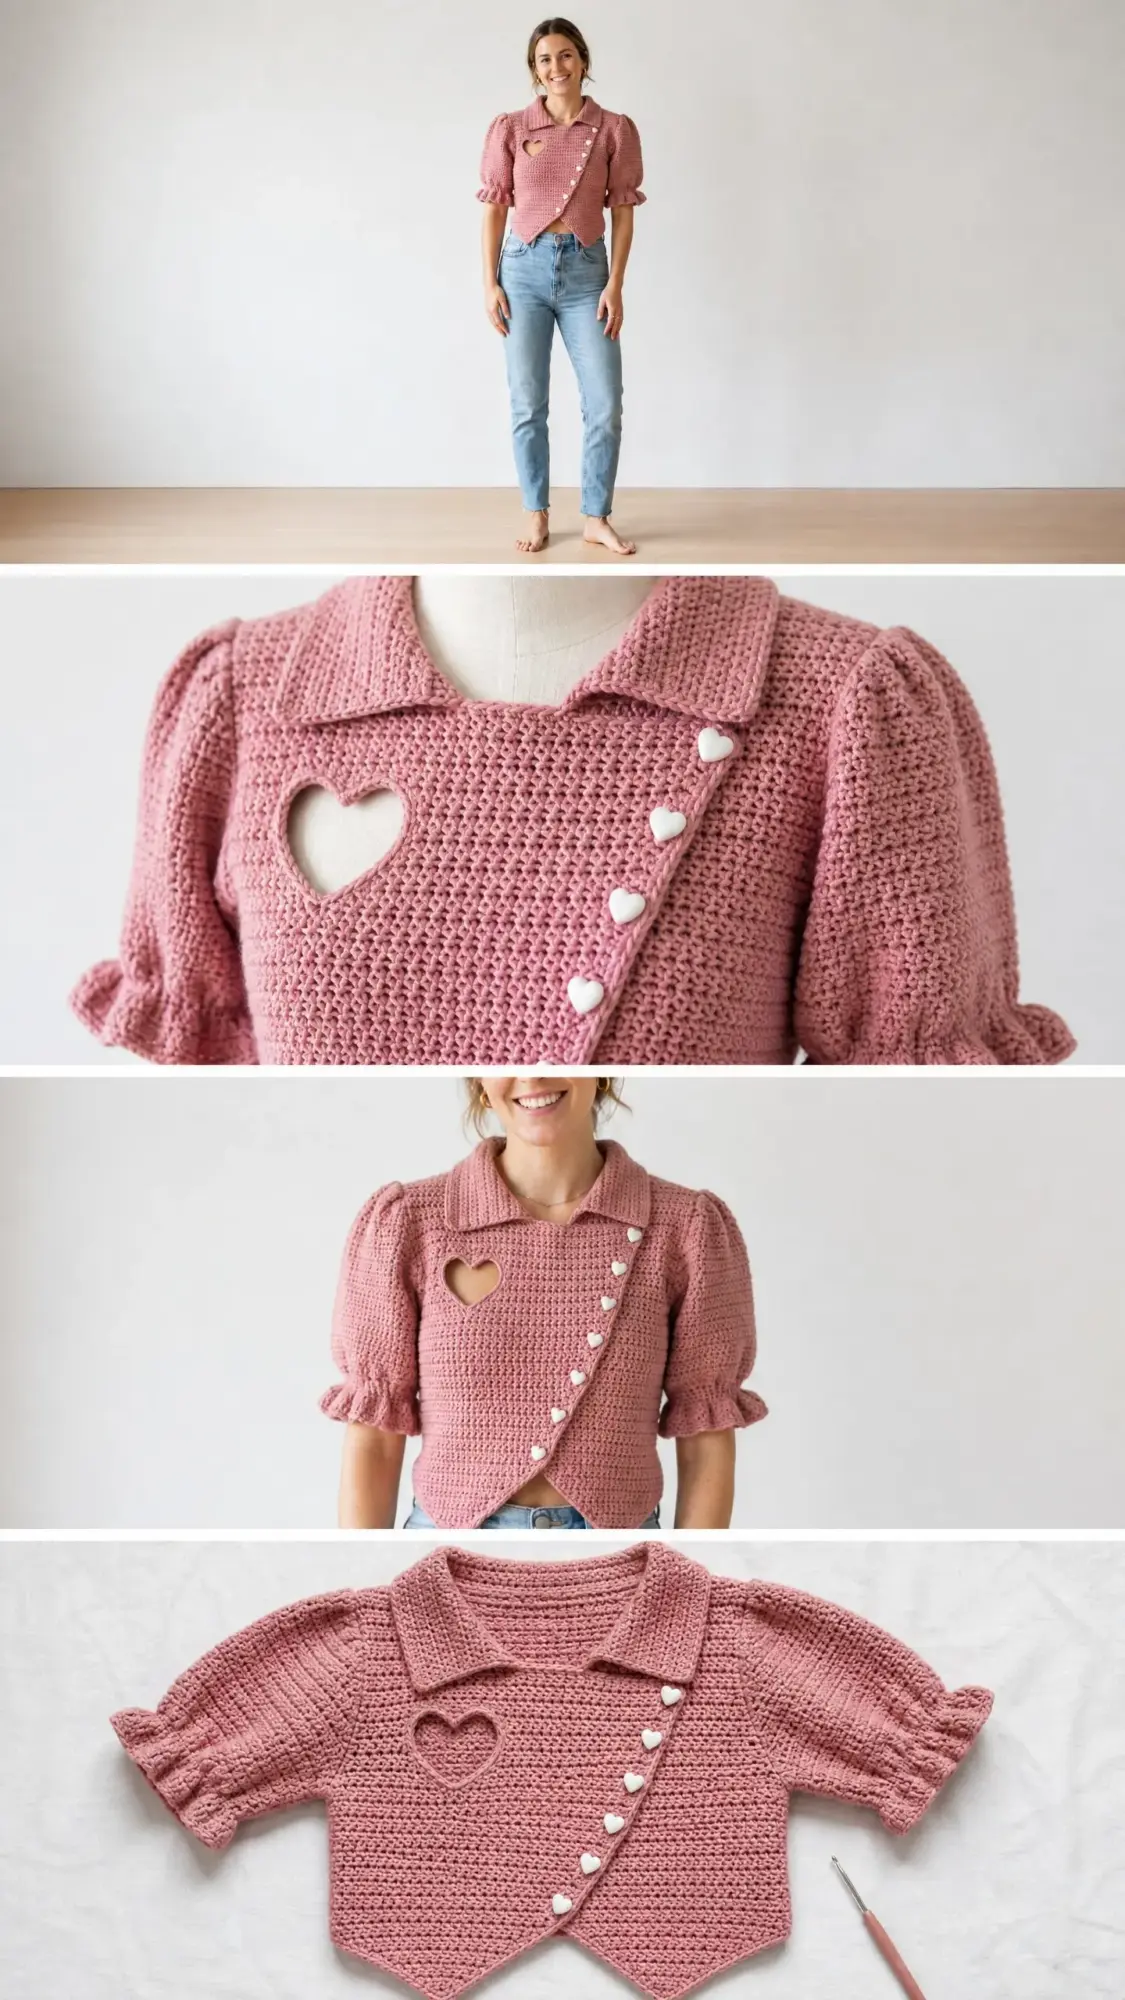
This cropped crochet top sits at or just above your natural waist. The structured fitted bodice has a slightly relaxed bust and features a gorgeous double-breasted front opening. The right front panel overlaps the left at an angle, creating that signature V-shaped lapel opening that looks incredibly sophisticated.
The real showstopper is the heart-shaped cutout at the upper right chest. It is worked as a negative space during construction, which sounds intimidating but I promise I will walk you through it step by step. A wide, flat, pointed lapel collar frames the neckline beautifully.
The puff sleeves are worked in the round with increases at the sleeve cap to create that gorgeous volume. They taper down to a fitted upper arm and cuff, finished with an adorable ruffle edging. Five to six cream-colored heart-shaped buttons run diagonally along the front overlap, adding the perfect finishing touch.
The main stitch throughout is half double crochet (hdc) worked in both loops. This creates a dense, even, structured fabric that holds its shape without blocking to a lacy drape. Perfect for a fitted garment like this.
Skill Level
I would rate this pattern as intermediate to advanced. You will need to feel comfortable with working flat panels and seaming them together, shaping a sleeve cap, working a heart cutout as a planned negative space, constructing a collar, and attaching ruffle edging.
If any of those techniques sound new to you, do not worry. Every technique is explained step by step in the special stitches and pattern notes sections below. Take your time and read through everything before you start.
Time estimate: Approximately 20 to 30 hours for an experienced intermediate crocheter working at a steady pace.
Finished Measurements
This crochet top pattern is written for a size Small/Medium with the following finished measurements:
Size customization tips are provided at the end of this pattern.
Materials You Will Need
Yarn: Approximately 900 to 1,000 yards / 820 to 915 meters of worsted weight yarn (CYCA 4), in dusty rose or antique pink
Hook: US size G-6 / 4.00 mm (adjust to achieve gauge)
Notions:
Yarn Suggestions
Option 1: Lion Brand Vanna’s Choice in Dusty Rose (100% acrylic, 170 yards / 156 meters per 3.5 oz / 100 g skein). Budget-friendly, widely available, holds stitch definition beautifully, and is machine washable. You will need approximately 6 skeins.
Option 2: Paintbox Yarns Simply DK used held double (100% acrylic, 137 yards / 125 meters per 1.76 oz / 50 g ball). Holding two strands together achieves a worsted weight equivalent with exceptional softness. Choose shade Dusty Rose or Vintage Pink. You will need approximately 14 balls.
Option 3: We Are Knitters The Wool in Rose (100% Peruvian wool, 87 yards / 80 meters per 1.76 oz / 50 g skein). A premium natural fiber option with gorgeous stitch definition and a slight halo. Requires hand washing. You will need approximately 12 skeins.
Substitution note: Any yarn that achieves the stated gauge at worsted weight is suitable. Avoid yarns with very high elasticity, as the fitted bodice relies on the fabric holding its structure. A smooth or lightly twisted plied yarn will show the stitch texture most clearly. Always swatch before beginning.
Gauge
16 hdc x 12 rows = 4 inches / 10 cm, worked flat in rows, turning with ch 1 (not counted as a stitch throughout this pattern).
Gauge swatch instructions: Chain 22. Row 1: Hdc in second chain from hook and in each chain across. (21 hdc) Ch 1, turn. Repeat Row 1 until swatch measures at least 5 inches tall. Block lightly if desired. Measure the center 16 stitches across 12 rows.
Adjust hook size up if your swatch is too small (too few stitches per inch) or down if your swatch is too large (too many stitches per inch). Gauge is non-negotiable for proper fit in a cropped garment. Trust me on this one.
Abbreviations (US Terms)
Before we dive into the pattern, let me define all the abbreviations you will encounter:
Special Stitches
Half Double Crochet 2 Together (hdc2tog)
This is your decrease stitch. Here is how to work it: Yarn over, insert hook in next stitch, yarn over, pull up a loop (3 loops on hook). Do not complete the stitch yet. Yarn over, insert hook in following stitch, yarn over, pull up a loop (5 loops on hook). Yarn over, draw through all 5 loops on hook. One decrease made. Counts as 1 stitch.
Puff Sleeve Increase Row
Work 2 hdc in the same stitch (inc). This is simply a standard increase and is listed here for clarity since it is used repeatedly in sleeve cap construction.
Heart Cutout
The heart cutout is a planned negative space created in two steps during the construction of the right front panel. It is not worked in the round. The specific row-by-row instructions for the cutout are given within the Right Front Panel section.
In summary: on one row you work to the cutout position, chain a specified number of stitches to bridge over the cutout opening, skip the corresponding stitches, and continue. On the following row you work into those chain stitches to close the upper edge of the cutout and work separately on each half of a split lower lobe. The heart shape is completed by working the two lower lobes of the heart with sc edging added later to define the curves.
Ruffle Edging
Join yarn at any stitch. Round 1: Work 1 sc in each stitch around. Round 2: Work 3 hdc in each stitch around. Sl st to join. This creates a soft, full ruffle. For the cuff, which has approximately 24 stitches, Round 2 will yield 72 hdc, creating a generous ruffle.
Lapel Collar
The collar is worked flat as a wide rectangular panel with shaped outer corners to create the pointed lapel effect. Full instructions are given in the Collar section.
Important Pattern Notes
Please read these notes before starting. They will save you confusion later.
1. This pattern is worked in pieces: Back Panel, Left Front Panel, Right Front Panel (with heart cutout), two Sleeves, and the Collar. Pieces are seamed together using a slip stitch seam on the wrong side, which creates a neat, low-bulk join.
2. Chain 1 at the beginning of every row is used as the turning chain. It does NOT count as a stitch. Always insert your hook into the first stitch of the row (the stitch directly at the base of the turning chain) when beginning a new row.
3. All stitch counts are provided at the end of every row or round in parentheses, for example: (40 hdc).
4. Stitch markers are recommended at the beginning and end of every row when working the front panels, as the asymmetric shaping can cause confusion about row edges.
5. The right side (RS) of the fabric is the side facing you on odd-numbered rows, assuming you begin Row 1 on the RS. The smooth V-texture of hdc should face outward on the finished garment.
6. The pointed hem at the front is created by working decreases at the center front edge of each front panel over the final rows, shaping the fabric into a downward point.
7. The double-breasted overlap: the right front panel is wider than the left at the hem and overlaps to the left when worn. The buttons are placed diagonally along this overlap.
8. Sleeve construction: Sleeves are worked flat in rows for the cap (to allow armhole shaping and seaming), then joined in the round for the body of the sleeve, then decreased at the cuff. The ruffle is added last.
9. The heart cutout: the finished heart opening measures approximately 2.5 inches / 6.5 cm wide and 2 inches / 5 cm tall. If you modify gauge, the heart cutout stitch counts will need to be adjusted proportionally.
10. Seaming order: (1) Seam shoulder seams. (2) Set in sleeves. (3) Seam side seams and sleeve seams in one continuous seam. (4) Attach collar. (5) Add button band edging. (6) Add cuff ruffles. (7) Sew buttons.
Crochet Top Pattern Instructions
Back Panel
The back is worked as a single flat rectangle with minimal shaping, slightly tapered at the waist.
Foundation: Chain 71.
Row 1 (RS): Hdc in second chain from hook and in each chain across. Ch 1, turn. (70 hdc)
Rows 2 through 8: Hdc in each stitch across. Ch 1, turn. (70 hdc)
Waist shaping begins here. The waist is reduced by 6 stitches total (3 decreases each side) over 3 decrease rows, then increased back out over 3 increase rows.
Row 9 (decrease row): Hdc2tog, hdc to last 2 sts, hdc2tog. Ch 1, turn. (68 hdc)
Row 10: Hdc in each stitch across. Ch 1, turn. (68 hdc)
Row 11 (decrease row): Hdc2tog, hdc to last 2 sts, hdc2tog. Ch 1, turn. (66 hdc)
Row 12: Hdc in each stitch across. Ch 1, turn. (66 hdc)
Row 13 (decrease row): Hdc2tog, hdc to last 2 sts, hdc2tog. Ch 1, turn. (64 hdc)
Rows 14 through 17: Hdc in each stitch across. Ch 1, turn. (64 hdc)
Row 18 (increase row): 2 hdc in first st, hdc to last st, 2 hdc in last st. Ch 1, turn. (66 hdc)
Row 19: Hdc in each stitch across. Ch 1, turn. (66 hdc)
Row 20 (increase row): 2 hdc in first st, hdc to last st, 2 hdc in last st. Ch 1, turn. (68 hdc)
Row 21: Hdc in each stitch across. Ch 1, turn. (68 hdc)
Row 22 (increase row): 2 hdc in first st, hdc to last st, 2 hdc in last st. Ch 1, turn. (70 hdc)
Rows 23 through 26: Hdc in each stitch across. Ch 1, turn. (70 hdc)
Armhole shaping begins here. You will bind off stitches at the beginning of the next 2 rows to create the armhole openings, then continue straight.
Row 27 (armhole bind-off, right armhole): Sl st across first 6 sts. Ch 1. Hdc in each stitch across to last 6 sts. Leave last 6 sts unworked. Ch 1, turn. (58 hdc)
Note: The 6 sl sts at the beginning and the 6 unworked sts at the end form the two armhole notches. You now work on the remaining 58 sts.
Rows 28 through 30: Hdc in each stitch across. Ch 1, turn. (58 hdc)
Row 31 (armhole decrease row): Hdc2tog, hdc to last 2 sts, hdc2tog. Ch 1, turn. (56 hdc)
Row 32: Hdc in each stitch across. Ch 1, turn. (56 hdc)
Row 33 (armhole decrease row): Hdc2tog, hdc to last 2 sts, hdc2tog. Ch 1, turn. (54 hdc)
Rows 34 through 38: Hdc in each stitch across. Ch 1, turn. (54 hdc)
Shoulder and neck shaping begin here.
Row 39: Hdc in first 16 sts. Ch 1, turn. Leave remaining sts unworked. This is the left shoulder. (16 hdc)
Row 40: Hdc in each stitch across. Ch 1, turn. (16 hdc)
Row 41: Hdc in each stitch across. Fasten off. (16 hdc)
Rejoin yarn to the right shoulder. Count 16 stitches from the right armhole edge. Skip the center 22 stitches (this is the back neckline opening).
Row 39R: Hdc in next 16 sts. Ch 1, turn. (16 hdc)
Row 40R: Hdc in each stitch across. Ch 1, turn. (16 hdc)
Row 41R: Hdc in each stitch across. Fasten off. (16 hdc)
CHECKPOINT: The back panel should measure approximately 14 inches / 35.5 cm from foundation chain to top of shoulder. The width at the bust (Row 26 area) should be approximately 17.5 inches / 44.5 cm.
Left Front Panel
The left front panel forms the underlap of the double-breasted closure. It is narrower than the right front panel.
Foundation: Chain 37.
Row 1 (RS): Hdc in second chain from hook and in each chain across. Ch 1, turn. (36 hdc)
Rows 2 through 8: Hdc in each stitch across. Ch 1, turn. (36 hdc)
Waist shaping: decrease at the left side seam edge only (right edge of fabric as you look at it).
Row 9 (decrease row): Hdc to last 2 sts, hdc2tog. Ch 1, turn. (35 hdc)
Row 10: Hdc in each stitch across. Ch 1, turn. (35 hdc)
Row 11 (decrease row): Hdc to last 2 sts, hdc2tog. Ch 1, turn. (34 hdc)
Row 12: Hdc in each stitch across. Ch 1, turn. (34 hdc)
Row 13 (decrease row): Hdc to last 2 sts, hdc2tog. Ch 1, turn. (33 hdc)
Rows 14 through 17: Hdc in each stitch across. Ch 1, turn. (33 hdc)
Row 18 (increase row): Hdc to last st, 2 hdc in last st. Ch 1, turn. (34 hdc)
Row 19: Hdc in each stitch across. Ch 1, turn. (34 hdc)
Row 20 (increase row): Hdc to last st, 2 hdc in last st. Ch 1, turn. (35 hdc)
Row 21: Hdc in each stitch across. Ch 1, turn. (35 hdc)
Row 22 (increase row): Hdc to last st, 2 hdc in last st. Ch 1, turn. (36 hdc)
Rows 23 through 26: Hdc in each stitch across. Ch 1, turn. (36 hdc)
Armhole shaping: the armhole is at the left edge (left as worn, right edge of fabric).
Row 27 (armhole bind-off): Hdc across to last 6 sts. Leave last 6 sts unworked. Ch 1, turn. (30 hdc)
Rows 28 through 30: Hdc in each stitch across. Ch 1, turn. (30 hdc)
Row 31 (armhole decrease row, armhole side only): Hdc to last 2 sts, hdc2tog. Ch 1, turn. (29 hdc)
Row 32: Hdc in each stitch across. Ch 1, turn. (29 hdc)
Row 33 (armhole decrease row): Hdc to last 2 sts, hdc2tog. Ch 1, turn. (28 hdc)
Rows 34 through 38: Hdc in each stitch across. Ch 1, turn. (28 hdc)
Shoulder: the left shoulder is 16 sts wide (matching the back). The remaining stitches above the armhole shaping belong to the lapel/collar area and will fold back.
Row 39: Hdc in first 16 sts only. Ch 1, turn. Leave remaining 12 sts unworked (these form the base of the collar notch). (16 hdc)
Row 40: Hdc in each stitch across. Ch 1, turn. (16 hdc)
Row 41: Hdc in each stitch across. Fasten off. (16 hdc)
Left Front Hem Point Shaping
Return to the foundation chain edge of the left front panel. The pointed hem at center front is created by adding shaping rows at the lower center front corner. With RS facing, rejoin yarn at the lower right corner of the left front panel (the center front edge at the hem).
Pick up row: Join yarn at the lower center front corner. Work 12 hdc evenly along the lower center front edge of the left panel (the right edge as the fabric faces you). Ch 1, turn. (12 hdc)
Row A: Hdc2tog, hdc to last 2 sts, hdc2tog. Ch 1, turn. (10 hdc)
Row B: Hdc2tog, hdc to last 2 sts, hdc2tog. Ch 1, turn. (8 hdc)
Row C: Hdc2tog, hdc to last 2 sts, hdc2tog. Ch 1, turn. (6 hdc)
Row D: Hdc2tog, hdc to last 2 sts, hdc2tog. Ch 1, turn. (4 hdc)
Row E: Hdc2tog twice. Ch 1, turn. (2 hdc)
Row F: Hdc2tog. Fasten off. (1 hdc)
This creates a neat downward point at the center front hem of the left panel.
Right Front Panel
The right front panel is wider than the left, forming the overlap. It contains the heart cutout.
Foundation: Chain 43.
Row 1 (RS): Hdc in second chain from hook and in each chain across. Ch 1, turn. (42 hdc)
Rows 2 through 8: Hdc in each stitch across. Ch 1, turn. (42 hdc)
Waist shaping: decrease at the right side seam edge only (left edge of fabric as you look at it, the edge that will be seamed to the back).
Row 9 (decrease row): Hdc2tog, hdc to end. Ch 1, turn. (41 hdc)
Row 10: Hdc in each stitch across. Ch 1, turn. (41 hdc)
Row 11 (decrease row): Hdc2tog, hdc to end. Ch 1, turn. (40 hdc)
Row 12: Hdc in each stitch across. Ch 1, turn. (40 hdc)
Row 13 (decrease row): Hdc2tog, hdc to end. Ch 1, turn. (39 hdc)
Rows 14 through 17: Hdc in each stitch across. Ch 1, turn. (39 hdc)
Row 18 (increase row): 2 hdc in first st, hdc to end. Ch 1, turn. (40 hdc)
Row 19: Hdc in each stitch across. Ch 1, turn. (40 hdc)
Row 20 (increase row): 2 hdc in first st, hdc to end. Ch 1, turn. (41 hdc)
Row 21: Hdc in each stitch across. Ch 1, turn. (41 hdc)
Row 22 (increase row): 2 hdc in first st, hdc to end. Ch 1, turn. (42 hdc)
Rows 23 through 26: Hdc in each stitch across. Ch 1, turn. (42 hdc)
Armhole shaping: armhole is at the right edge (right as worn, left edge of fabric as you look at it).
Row 27 (armhole bind-off): Sl st across first 6 sts. Ch 1. Hdc in each remaining stitch across. Ch 1, turn. (36 hdc)
Rows 28 through 30: Hdc in each stitch across. Ch 1, turn. (36 hdc)
Row 31 (armhole decrease row): Hdc2tog, hdc to end. Ch 1, turn. (35 hdc)
Row 32: Hdc in each stitch across. Ch 1, turn. (35 hdc)
Row 33 (armhole decrease row): Hdc2tog, hdc to end. Ch 1, turn. (34 hdc)
Rows 34 through 36: Hdc in each stitch across. Ch 1, turn. (34 hdc)
Heart Cutout Rows
Here comes the fun part. The heart cutout is positioned 4 stitches in from the center front edge and spans 10 stitches wide.
Row 37 (heart top arch): Hdc in sts 1 through 18 (18 hdc). Ch 10. Skip next 10 sts. Hdc in sts 29 through 34 (6 hdc). Ch 1, turn. (18 hdc + 10 ch-bridge + 6 hdc; working sts = 24 hdc, bridge = 10)
Row 38 (heart lobe split row): Hdc in first 6 sts. Hdc in each of next 10 ch-sts of the bridge (working across the top of the cutout opening, closing the top arch). Hdc in next 8 sts. At stitch 25 (counting from the right edge), you will now create the two lower lobes of the heart by dividing into two separate sections.
Left lobe of heart: Hdc in next 5 sts only. Ch 1, turn. (5 hdc)
Row 38a: Hdc2tog, hdc in next st, hdc2tog. Ch 1, turn. (3 hdc)
Row 38b: Hdc3tog (insert hook in first st, yo, pull up loop; insert hook in second st, yo, pull up loop; insert hook in third st, yo, pull up loop; yo, draw through all 7 loops). Fasten off. (1 st, forms lower left point of heart)
Right lobe of heart: Rejoin yarn 5 sts to the right of the split on Row 38. Hdc in next 5 sts. Ch 1, turn. (5 hdc)
Row 38a-R: Hdc2tog, hdc in next st, hdc2tog. Ch 1, turn. (3 hdc)
Row 38b-R: Hdc3tog. Fasten off. (1 st, forms lower right point of heart)
The center stitch between the two lobes is left open, creating the dip at the top-center of the heart shape. Weave in ends.
After completing the heart cutout, rejoin yarn at the top of the right front panel and continue with the remaining upper body rows.
Rows 39 through 41 (upper chest, above cutout):
Row 39: Hdc in each stitch across. Ch 1, turn. (34 hdc)
Row 40: Hdc in each stitch across. Ch 1, turn. (34 hdc)
Row 41 (shoulder and collar split): Hdc in first 16 sts (this is the shoulder section). Leave remaining 18 sts unworked (these form the base of the right front collar/lapel). Ch 1, turn. (16 hdc)
Row 42: Hdc in each stitch across. Ch 1, turn. (16 hdc)
Row 43: Hdc in each stitch across. Fasten off. (16 hdc)
Right Front Hem Point Shaping
Worked the same as for the left front, at the lower center front corner of the right front panel.
Pick up row: Join yarn at the lower center front corner of the right front panel. Work 12 hdc evenly along the lower center front edge. Ch 1, turn. (12 hdc)
Row A: Hdc2tog, hdc to last 2 sts, hdc2tog. Ch 1, turn. (10 hdc)
Row B: Hdc2tog, hdc to last 2 sts, hdc2tog. Ch 1, turn. (8 hdc)
Row C: Hdc2tog, hdc to last 2 sts, hdc2tog. Ch 1, turn. (6 hdc)
Row D: Hdc2tog, hdc to last 2 sts, hdc2tog. Ch 1, turn. (4 hdc)
Row E: Hdc2tog twice. Ch 1, turn. (2 hdc)
Row F: Hdc2tog. Fasten off. (1 hdc)
Heart Cutout Edging
After all panels are assembled, work a sc edging around the heart cutout opening as follows. Join yarn at any point along the inner edge of the heart opening. Work 1 sc in each stitch and 1 sc in each row end around the full perimeter of the heart. At the lower cleft (the inverted V between the two lobes), work a sl st at the innermost point to draw the cleft inward slightly. At the two lower lobe points, work 3 sc in the single stitch at each tip to allow the fabric to spread into a rounded point. Sl st to join, fasten off.
Sleeves (Make 2)
Each sleeve is worked from the top of the sleeve cap down to the cuff. The cap is worked flat in rows to allow seaming into the armhole.
Sleeve Cap (worked flat):
Foundation: Chain 35.
Row 1 (RS): Hdc in second chain from hook and in each chain across. Ch 1, turn. (34 hdc)
Row 2: 2 hdc in first st, hdc to last st, 2 hdc in last st. Ch 1, turn. (36 hdc)
Row 3: Hdc in each stitch across. Ch 1, turn. (36 hdc)
Row 4: 2 hdc in first st, hdc to last st, 2 hdc in last st. Ch 1, turn. (38 hdc)
Row 5: Hdc in each stitch across. Ch 1, turn. (38 hdc)
Row 6: 2 hdc in first st, hdc to last st, 2 hdc in last st. Ch 1, turn. (40 hdc)
Row 7: Hdc in each stitch across. Ch 1, turn. (40 hdc)
Row 8: 2 hdc in first st, hdc to last st, 2 hdc in last st. Ch 1, turn. (42 hdc)
Row 9: Hdc in each stitch across. Ch 1, turn. (42 hdc)
Row 10: 2 hdc in first st, hdc to last st, 2 hdc in last st. Ch 1, turn. (44 hdc)
Row 11: Hdc in each stitch across. Ch 1, turn. (44 hdc)
Row 12: 2 hdc in first st, hdc to last st, 2 hdc in last st. Ch 1, turn. (46 hdc)
Row 13: Hdc in each stitch across. Ch 1, turn. (46 hdc)
Continue with cap decrease rows and sleeve body as directed, then add the ruffle edging at the cuff using the ruffle technique described in the special stitches section.
Assembly and Finishing
Follow the seaming order outlined in the pattern notes. Take your time with seaming. Use a slip stitch seam on the wrong side for a clean, low-bulk finish. Block the collar and hem points for crisp, professional-looking details.
Sew on your heart-shaped buttons diagonally along the right front overlap. Space them evenly for the most polished look.
You Did It!
Thank you so much for choosing this crochet top pattern for your next project. I truly hope you love making it as much as I loved designing it. There is something so satisfying about creating a garment this detailed with your own two hands.
If you make this dusty rose heart cutout top, I would absolutely love to see it! Tag me on Instagram or share a photo in my Facebook group. Seeing your finished projects honestly makes my entire day.
Save this pattern to your Pinterest boards so you can find it easily when you are ready to start. And please drop a comment below if you
You Might Also Like
- Ocean Wave Hexagon Throw Free Crochet Pattern
- Terracotta Desert Shell Purse Free Crochet Pattern
- Ocean Blue Highland Cow Amigurumi Free Crochet Pattern
- Cinderella Blue Baby Dress Set Free Crochet Pattern