Dusty Rose Cable Crop Sweater Free Crochet Pattern
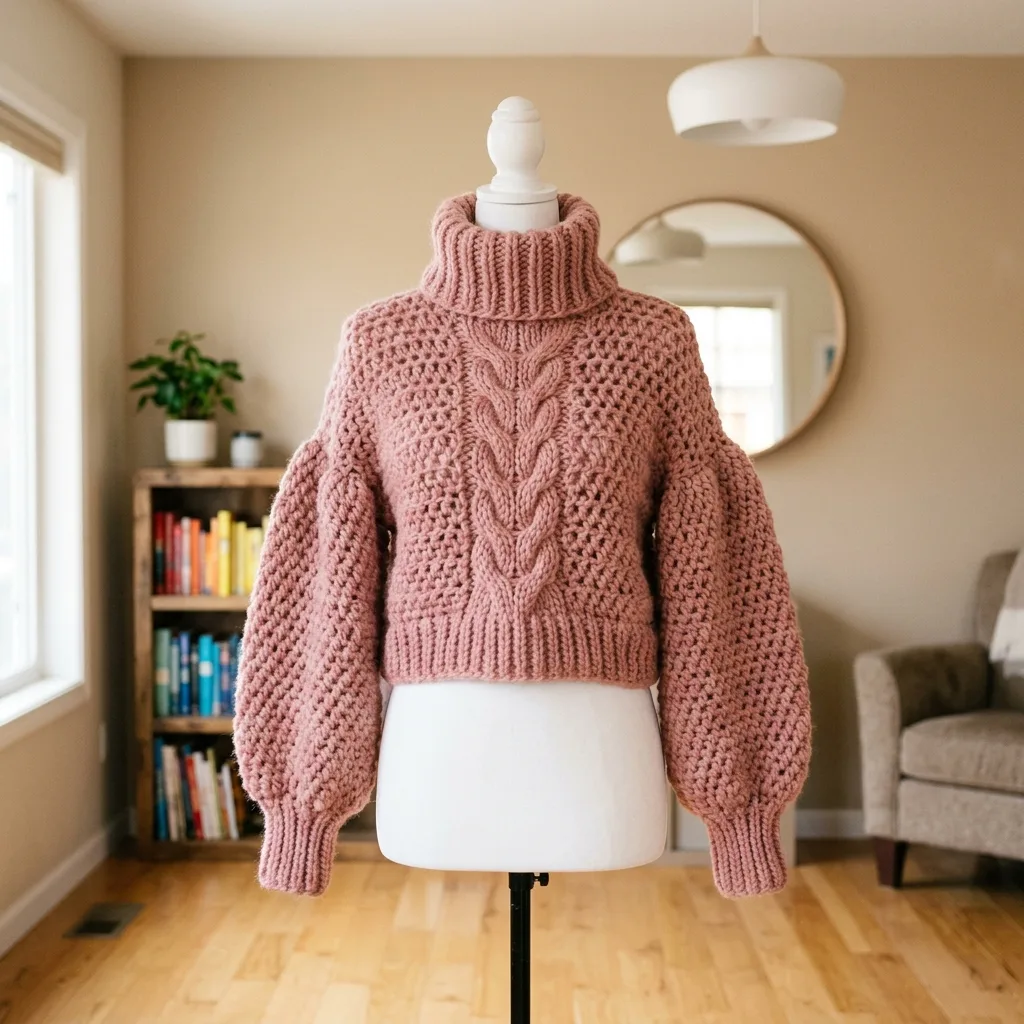
I set out to design a sweater that would look like it came straight from a high-end boutique but could be made at home with your own two hands. The goal was ambitious: dramatic balloon sleeves, a cozy turtleneck, and a stunning cable panel right down the center front. I wanted that perfect cropped silhouette that pairs beautifully with high-waisted jeans.
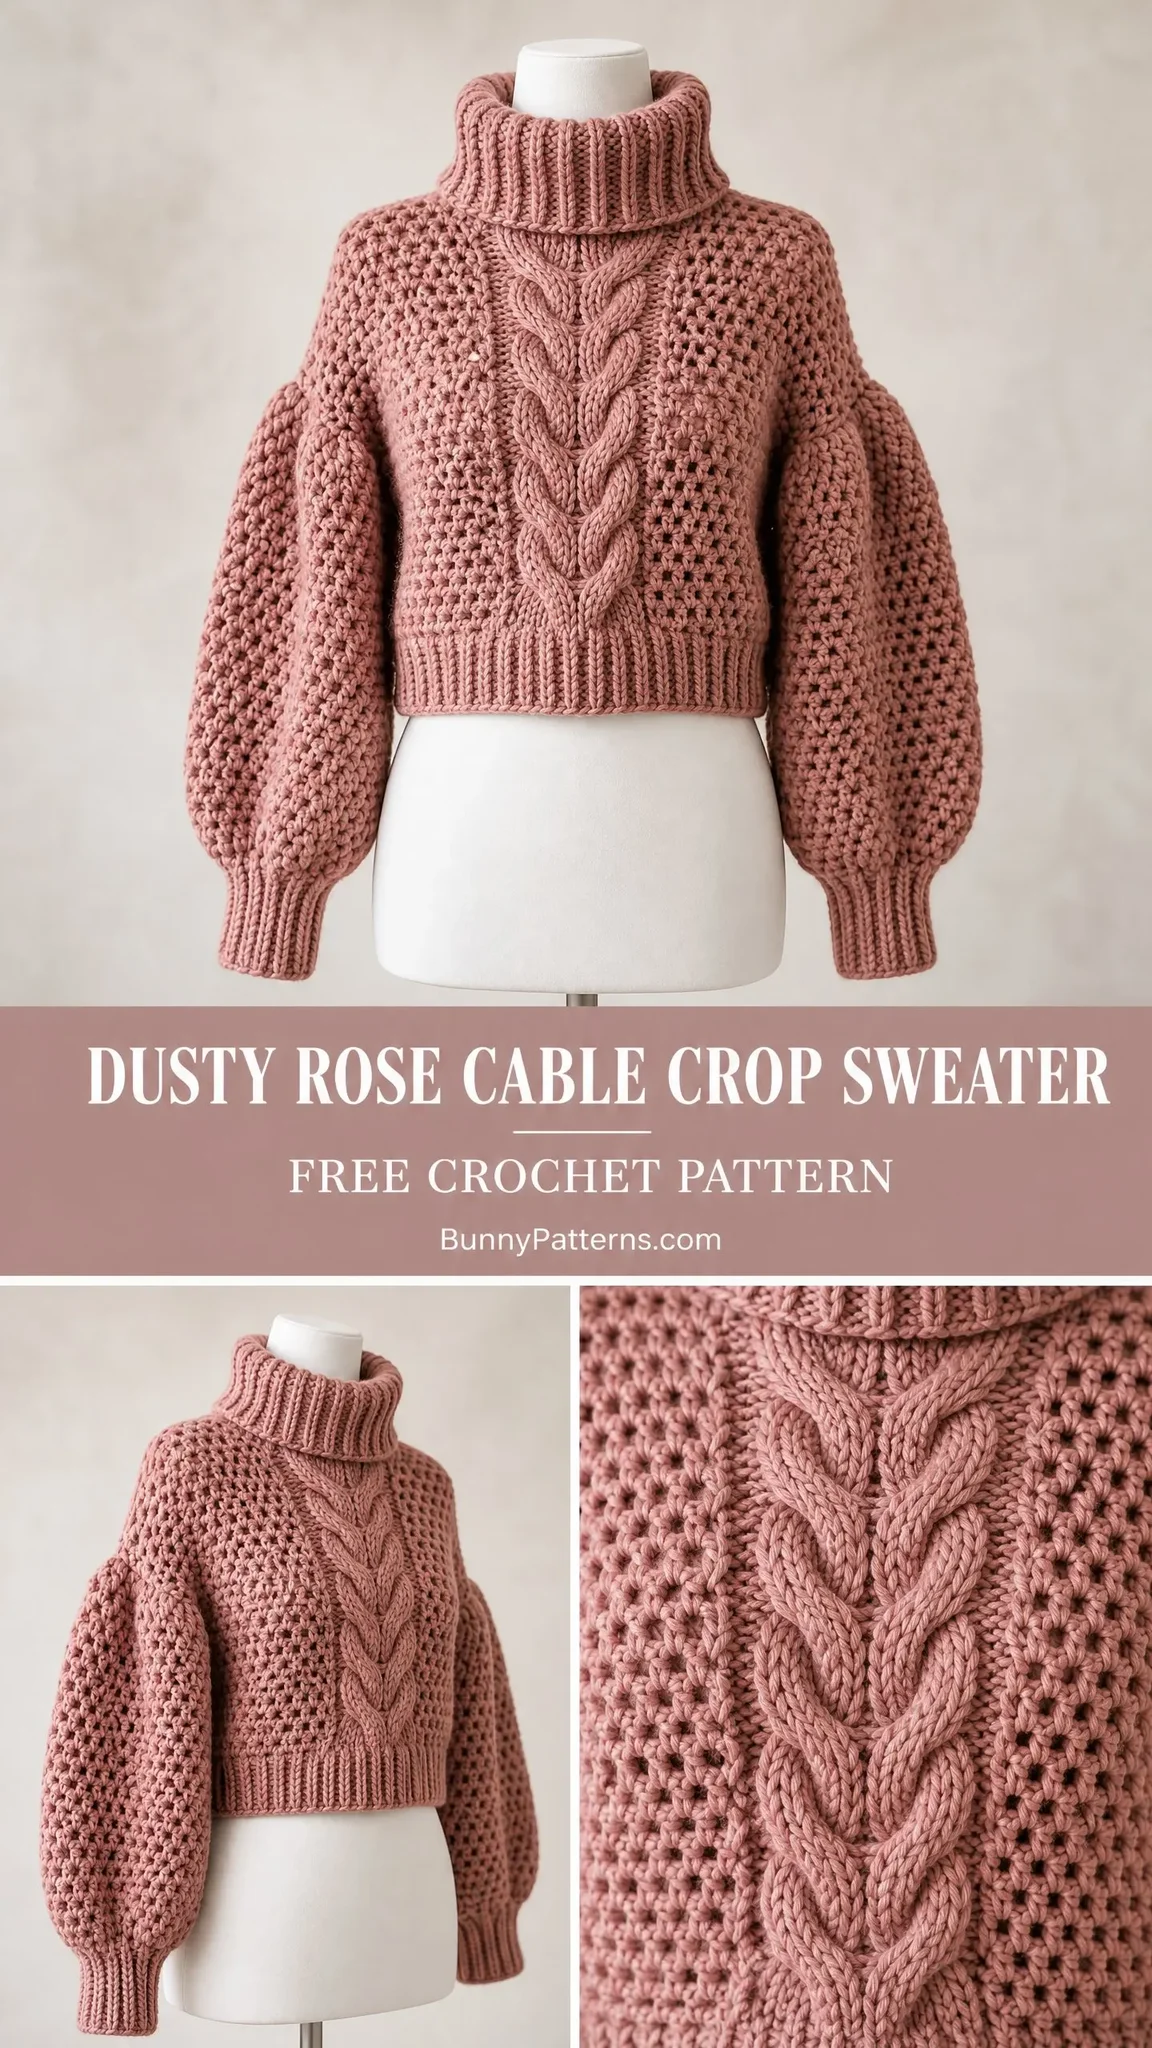
After countless swatches and a few late nights working out the cable mechanics, I finally nailed it. The honeycomb mesh creates this gorgeous open texture that keeps the bulky yarn from feeling too heavy, while the cable panel adds serious visual interest without overwhelming the design.
I am SO pleased with how this turned out. Every time I look at it on the dress form, I get excited all over again. If you have been wanting to level up your garment-making skills, this is the project to do it.
About This Cable Crop Sweater Crochet Pattern
This cropped turtleneck pullover combines several techniques that create a truly stunning finished piece. The body features an open mesh texture with a bold cable panel running vertically down the center front. Those voluminous balloon sleeves taper down to snug ribbed cuffs, and the whole thing is topped off with a cozy folded turtleneck collar.
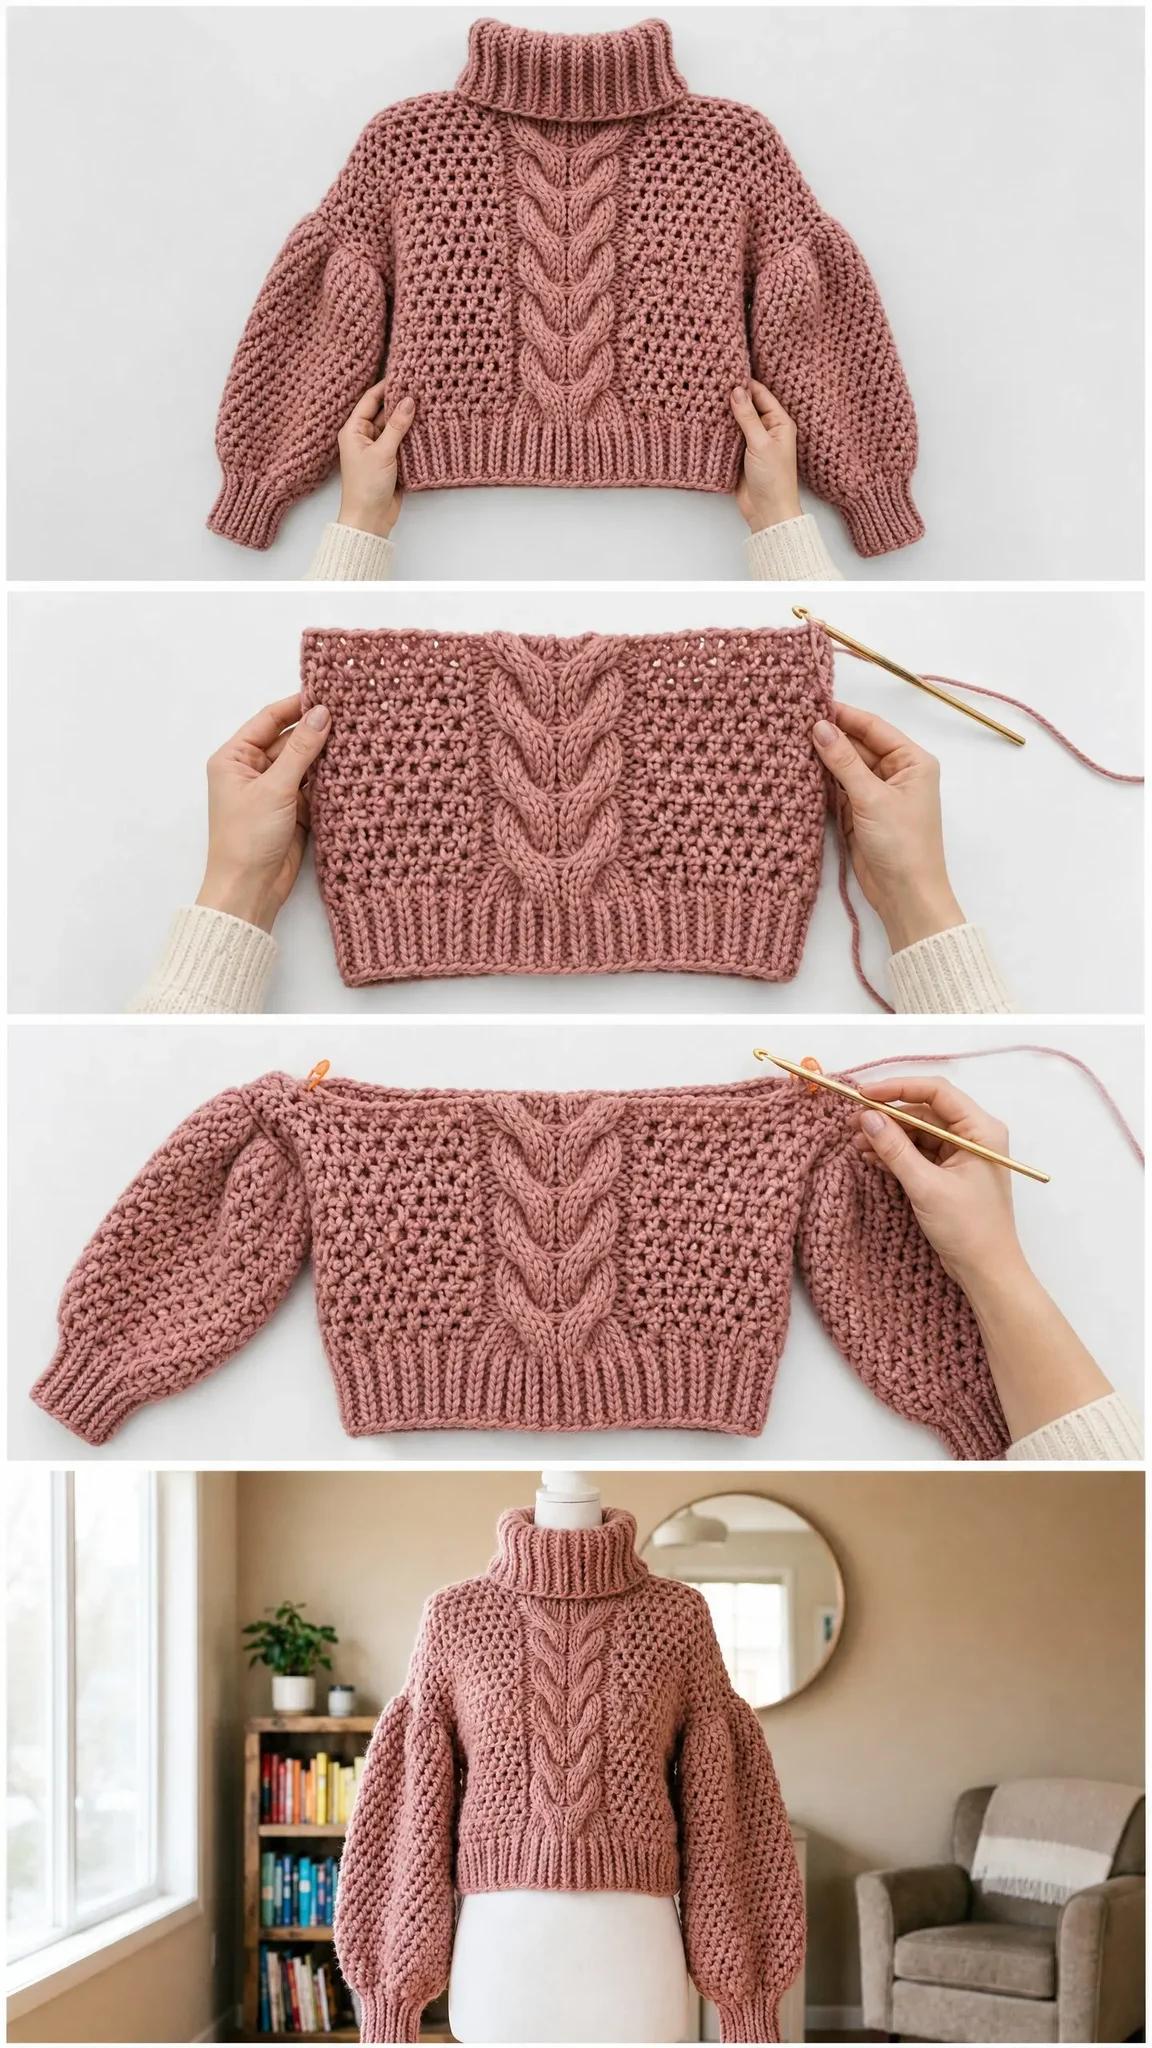
The body is worked flat in two identical panels, then seamed at the sides and shoulders. The sleeves are also worked flat, seamed, and then set into the armholes. Finally, the turtleneck collar is worked in the round after all the seaming is complete.
The defining feature is that centered front cable. It travels from the hem ribbing all the way up to the turtleneck, creating a braided rope appearance that looks like mirrored hearts meeting at the center. The honeycomb mesh flanks both sides of the cable and covers the entire back panel.
The silhouette is cropped to hit at the high hip with a relaxed, boxy fit. Those dramatically oversized sleeves give the sweater a modern, trendy feel while the tapered cuffs keep everything looking polished.
Skill Level
This pattern is rated Advanced Intermediate. You should feel comfortable with front post and back post double crochets for the cable work, maintaining a mesh stitch pattern over multiple rows, reading stitch counts across shaped sections, setting in a sleeve cap, and picking up stitches evenly around a neckline.
If you are a confident beginner who has already tackled post stitches and basic garment construction, you can absolutely handle this. Take your time, read through the entire pattern before starting, and trust the process.
Time Estimate
Plan for approximately 30 to 45 hours of work depending on your speed. This includes all finishing and seaming. I recommend breaking it into manageable sessions rather than trying to power through.
Finished Measurements
This pattern fits a US women’s size Small to Medium, which is a bust measurement of 34 to 38 inches (86 to 97 cm). Here are the finished garment measurements:
This is a generous positive ease garment, meaning it is meant to fit loosely and comfortably. See the Size Customization Tips section at the end for adjustments.
Materials Needed
Yarn
You will need bulky weight yarn (CYCA 5 or heavy bulky), approximately 1,100 to 1,300 yards (1,006 to 1,189 meters) total in dusty rose or antique mauve.
Recommended yarn options:
1. Lion Brand Wool-Ease Thick and Quick in Dusty Pink or Blush. This is super bulky but works beautifully held as a single strand on the N hook for softer drape. At 106 yards per skein, you will need 11 to 12 skeins.
2. Paintbox Yarns Simply Chunky is 100% acrylic with 137 yards per 100g skein. It holds stitch definition really well for the cable. You will need 9 skeins. The Dusty Rose colorway is perfect.
3. We Are Knitters The Wool (Chunky) is a merino wool blend with excellent stitch definition and a beautiful halo. At approximately 87 yards per 100g skein, you will need 13 to 15 skeins.
Substitution Note: Choose a bulky or super bulky yarn that has some elasticity. Wool, wool blends, or quality acrylic all work great. This allows the mesh to bloom and the cable to pop with good definition. Avoid 100% cotton at this weight because it will produce excessive drape and flatten the cable. Always make a gauge swatch before beginning your project.
Hooks
Notions
Gauge
Getting gauge right is essential for a garment. Please take time to swatch before diving in.
With larger hook (N-13 / 9 mm) in Honeycomb Mesh Stitch:
With smaller hook (L-11 / 8 mm) in ribbing:
Adjust your hook size up or down until your swatch matches. Measure after blocking for the most accurate results.
Abbreviations
Let me walk you through all the abbreviations used in this pattern. I will define each one so you know exactly what to do.
Special Stitches and Techniques
Honeycomb Mesh Stitch
This stitch is worked over a multiple of 2 stitches plus 1. It creates that beautiful open texture you see across the body and sleeves.
Row 1 (RS): Ch 3 (counts as dc), dc in next st, (ch 1, sk 1 st, dc in next st) across to last st, dc in last st. Turn.
Row 2 (WS): Ch 1, sc in first dc, (sc in ch-1 sp, sc in next dc) across. Turn.
Row 3 (RS): Ch 3 (counts as dc), dc in next st, (ch 1, sk 1 st, dc in next st) across to last st, dc in last st. Turn.
Repeat Rows 2 and 3 for pattern. The chain-1 spaces on right side rows create the open mesh cells. On wrong side rows, every chain space and dc post receives a single crochet, filling the mesh back to a solid stitch count.
Front Post Double Crochet (FPdc)
Yarn over, insert your hook from front to back to front around the post of the indicated stitch below (not through the top loops). Yarn over and pull up a loop. Then yarn over and pull through 2 loops on hook twice. This stitch sits on the surface of the fabric facing you.
Back Post Double Crochet (BPdc)
Yarn over, insert your hook from back to front to back around the post of the indicated stitch below. Yarn over and pull up a loop. Then yarn over and pull through 2 loops on hook twice. This stitch recedes behind the fabric.
2-Over-2 Front Cable Cross (2/2 FC)
This is worked over 4 stitches. Place the 2 right-side stitches onto a cable needle and hold to the front. Work FPdc around each of the next 2 left-side posts. Then work FPdc around each of the 2 posts held on the cable needle. This crosses the cable to the left, toward center from both sides, creating a braided rope cable when repeated.
2-Over-2 Back Cable Cross (2/2 BC)
Worked over 4 stitches. Place the 2 right-side stitches onto a cable needle and hold to the back. Work FPdc around each of the next 2 left-side posts. Then work FPdc around each of the 2 posts held on the cable needle. This crosses the cable to the right.
Cable Panel
The cable panel consists of 12 stitches total: 2 BPdc border, 4 FPdc cable group, 4 FPdc cable group, 2 BPdc border. The cable cross is worked on right side rows only, every 4th row.
Cable Row Setup (RS): (2 BPdc, 4 FPdc, 4 FPdc, 2 BPdc) over 12 cable sts with no cross yet.
Cable Row 1 (RS): 2 BPdc, 2/2 FC over next 4 sts, 2/2 BC over next 4 sts, 2 BPdc.
Cable Rows 2 to 4: Work each stitch as it presents (FPdc over FPdc, BPdc over BPdc). No cable cross.
Repeat Cable Rows 1 to 4 for the full panel height. This produces that mirrored braid or heart-cable appearance you see in the finished garment.
Ribbing Row
Ch 2 (does not count as stitch), (FPdc around next st, BPdc around next st) across. Turn.
Pattern Notes Before You Begin
1. The body is worked as two flat panels. The front panel includes the cable section at center. The back panel is worked entirely in Honeycomb Mesh.
2. Turning chains: In Honeycomb Mesh rows, ch 3 counts as a dc on RS rows. Ch 1 does not count as a stitch on WS rows. In ribbing sections, ch 2 never counts as a stitch.
3. The cable panel is centered on the front. With a front panel width of 52 stitches, the cable occupies stitches 21 through 32 (12 stitches), with 20 mesh stitches on each side.
4. The 12 cable stitches are always worked as post stitches and never include chain-1 spaces.
5. All pieces should be blocked before seaming.
6. The turtleneck is worked in the round after all seaming is complete.
7. When working the cable cross, the 4 posts being crossed are the FPdc posts of the row below. Always insert your hook around the post of the dc stitch two rows below on the setup row, and around FPdc posts on subsequent cable rows.
Step-by-Step Pattern Instructions
Front Panel Hem Rib
With smaller hook (L-11 / 8 mm), chain 13.
Row 1: Sc in 2nd ch from hook and in each ch across. Turn. (12 sc)
Row 2: Ch 2, (FPdc in next st, BPdc in next st) 6 times. Turn. (12 sts)
Repeat Row 2 until piece measures 52 rib columns wide. This rib is worked sideways, so you are creating a strip. Work 52 rows total of the 12-stitch wide strip.
Understanding the sideways rib: The 12 sc foundation becomes the height of the rib (approximately 4 in / 10 cm when worked on the smaller hook). The 52 rows of rib become the width of the front panel. After 52 rows, do not fasten off.
Rotate work 90 degrees. With larger hook (N-13 / 9 mm), pick up and sc evenly along the long edge of the rib strip: 1 sc per rib row end. (52 sc)
This row of 52 sc becomes the foundation row for the front body mesh and cable panel.
CHECKPOINT: The hem rib should measure approximately 21 in / 53 cm wide and 4 in / 10 cm tall.
Front Panel Body
The front panel body is worked upward from the rib pick-up row. Total working stitches: 52. Cable panel occupies stitches 21 to 32. Mesh occupies stitches 1 to 20 (left side) and stitches 33 to 52 (right side).
Setup Row, Cable Panel Establishment (RS):
Ch 3 (counts as dc), dc in next st, (ch 1, sk 1, dc in next st) 9 times. This works stitches 1 to 20 in mesh.
Then without chaining, work directly into the posts of stitches 21 to 32:
(BPdc in next st, BPdc in next st, FPdc in next st, FPdc in next st, FPdc in next st, FPdc in next st, FPdc in next st, FPdc in next st, BPdc in next st, BPdc in next st). This creates 12 post stitches total over stitches 21 to 32.
Then (dc in next st, ch 1, sk 1) 9 times, dc in last st for right mesh, stitches 33 to 52. Turn. (52 sts)
Row 1 (WS, Mesh Fill and Cable Hold):
Ch 1 (does not count as st), sc in first dc, (sc in ch-1 sp, sc in next dc) 9 times for left mesh (20 sc total).
Then work (BPdc in next BPdc, BPdc in next BPdc, FPdc in next FPdc, FPdc in next FPdc, FPdc in next FPdc, FPdc in next FPdc, FPdc in next FPdc, FPdc in next FPdc, BPdc in next BPdc, BPdc in next BPdc) for the cable section (12 post sts).
Then sc in next dc, (sc in ch-1 sp, sc in next dc) 9 times for right mesh (20 sc). Turn. (52 sts)
On WS rows, the cable is maintained by working post stitches as they present. This keeps the cable raised on the RS.
Row 2 (RS, Cable Cross Row 1):
Ch 3 (counts as dc), dc in next sc, (ch 1, sk 1, dc in next sc) 8 times, dc in next sc for left mesh (20 sts).
Then BPdc in next BPdc, BPdc in next BPdc, work 2/2 FC over next 4 FPdc sts, work 2/2 BC over next 4 FPdc sts, BPdc in next BPdc, BPdc in next BPdc for cable (12 sts).
Then dc in next sc, (ch 1, sk 1, dc in next sc) 8 times, ch 1, sk 1, dc in last sc for right mesh (20 sts). Turn. (52 sts)
Row 3 (WS): Same as Row 1. (52 sts)
Row 4 (RS, Plain Cable Row):
Ch 3, dc in next sc, (ch 1, sk 1, dc) 8 times, dc for left mesh (20 sts).
BPdc, BPdc, FPdc, FPdc, FPdc, FPdc, FPdc, FPdc, BPdc, BPdc for cable (12 sts, no cross).
dc, (ch 1, sk 1, dc) 9 times, dc for right mesh (20 sts). Turn. (52 sts)
Row 5 (WS): Same as Row 1. (52 sts)
Row 6 (RS, Plain Cable Row): Same as Row 4. (52 sts)
Row 7 (WS): Same as Row 1. (52 sts)
Row 8 (RS, Cable Cross Row 2): Same as Row 2, working the cable crosses again. (52 sts)
Continue in established pattern, working cable crosses every 6th RS row (Rows 2, 8, 14, 20, etc.) until front body measures approximately 10 in / 25 cm from top of hem rib. End with a WS row. Do not fasten off.
CHECKPOINT: Front panel body (not including rib) should measure approximately 10 in / 25 cm tall and 21 in / 53 cm wide. You should have worked approximately 20 body rows total.
Front Panel Armhole Shaping
Continue in established mesh and cable pattern.
Armhole Shaping Row 1 (RS): Sl st across first 4 sts, ch 3 (counts as dc), continue in pattern across to last 4 sts, leave last 4 sts unworked. Turn. (44 sts)
Armhole Shaping Row 2 (WS): Ch 1, sc2tog over next 2 sts, sc across mesh, post sts across cable, sc across mesh to last 2 sts, sc2tog. Turn. (42 sts)
Armhole Shaping Row 3 (RS): Ch 3, sk first ch-sp opportunity at edge, work in pattern to last 2 sts, dc2tog. Turn. (40 sts)
Armhole Shaping Row 4 (WS): Sc2tog at beg, work in pattern to last 2 sts, sc2tog. Turn. (38 sts)
Work even in established pattern with no shaping until armhole measures approximately 8 in / 20 cm from first shaping row. End with a WS row. (38 sts)
CHECKPOINT: Front panel with armhole shaping should now measure approximately 18 in / 46 cm tall total. The armhole opening is approximately 8 in / 20 cm deep.
Front Neck Shaping
The neckline is shaped by working each shoulder separately.
Left Shoulder:
Row 1 (RS): Work in pattern across first 12 sts. Turn. Leave remaining 26 sts unworked. (12 sts)
Row 2 (WS): Work in pattern to last 2 sts, sc2tog (neck edge decrease). Turn. (11 sts)
Row 3 (RS): Ch 1, sc2tog at neck edge, work in pattern to end. Turn. (10 sts)
Row 4 (WS): Work in pattern even. Turn. (10 sts)
Fasten off. This is the left shoulder.
Right Shoulder:
Skip center 14 sts (these will become the front neck opening).
Rejoin yarn to 27th stitch from armhole edge on last armhole row.
Row 1 (RS): Work in pattern across last 12 sts. Turn. (12 sts)
Row 2 (WS): Sc2tog at neck edge, work in pattern to end. Turn. (11 sts)
Row 3 (RS): Work in pattern to last 2 sts, sc2tog. Turn. (10 sts)
Row 4 (WS): Work in pattern even. Turn. (10 sts)
Fasten off.
CHECKPOINT: Each shoulder tab should measure approximately 4 in / 10 cm wide and 2 in / 5 cm tall.
Back Panel Hem Rib
With smaller hook, chain 13. Work sideways rib exactly as for Front Panel Hem Rib for 52 rows. Rotate. Pick up 52 sc along long edge with larger hook. (52 sc)
Back Panel Body
The back is worked entirely in Honeycomb Mesh Stitch with no cable panel.
Row 1 (RS): Ch 3 (counts as dc), (ch 1, sk 1, dc in next st) 25 times, dc in last st. Turn. (52 sts)
Row 2 (WS): Ch 1, sc in first dc, (sc in ch-1 sp, sc in next dc) 25 times, sc in top of t-ch. Turn. (52 sc)
Row 3 (RS): Ch 3, (ch 1, sk 1, dc in next sc) 25 times, dc in last sc. Turn. (52 sts)
Repeat Rows 2 and 3 until back body measures approximately 10 in / 25 cm from top of hem rib. End with a WS row.
Back Panel Armhole Shaping
Work exactly as Front Panel Armhole Shaping:
Shaping Row 1 (RS): Sl st 4, ch 3, work in pattern to last 4 sts, leave unworked. Turn. (44 sts)
Shaping Row 2 (WS): Sc2tog at each end. Turn. (42 sts)
Shaping Row 3 (RS): Work decrease at each end. Turn. (40 sts)
Shaping Row 4 (WS): Sc2tog at each end. Turn. (38 sts)
Work even until armhole measures 8 in / 20 cm from shaping. End with WS row. (38 sts)
Back Neck Shaping
Left Shoulder (RS): Work in pattern across first 10 sts. Turn. Work 3 more rows even. Fasten off. (10 sts)
Skip center 18 sts (back neck opening is slightly wider than front for comfortable turtleneck pickup).
Right Shoulder: Rejoin, work across remaining 10 sts. Work 3 more rows even. Fasten off. (10 sts)
Sleeves (Make 2)
The sleeve is worked flat. It begins wide at the upper arm, tapers to the cuff, and has a balloon shape in the upper two-thirds.
Sleeve Hem Rib:
With smaller hook, chain 13.
Row 1: Sc in 2nd ch from hook and each ch across. Turn. (12 sc)
Row 2: Ch 2, (FPdc, BPdc) 6 times. Turn. (12 sts)
Repeat Row 2 for 22 rows total. After Row 22, rotate and pick up 22 sc with larger hook along long edge. (22 sc)
Sleeve Body:
Foundation Row (WS): Ch 1, sc across 22 sts. Turn. (22 sc)
Increase Section:
Row 1 (RS): Ch 1, 2 sc in first st, sc across to last st, 2 sc in last st. Turn. (24 sc)
Row 2 (WS): Ch 1, 2 sc in first st, sc across to last st, 2 sc in last st. Turn. (26 sc)
Row 3 (RS): Ch 1, 2 sc in first st, sc across to last st, 2 sc in last st. Turn. (28 sc)
Row 4 (WS): Ch 1, 2 sc in first st, sc across to last st, 2 sc in last st. Turn. (30 sc)
Row 5 (RS): Ch 1, 2 sc in first st, sc across to last st, 2 sc in last st. Turn. (32 sc)
Row 6 (WS): Ch 1, 2 sc in first st, sc across to last st, 2 sc in last st. Turn. (34 sc)
Row 7 (RS): Ch 1, 2 sc in first st, sc across to last st, 2 sc in last st. Turn. (36 sc)
Row 8 (WS): Ch 1, 2 sc in first st, sc across to last st, 2 sc in last st. Turn. (38 sc)
Row 9 (RS): Ch 1, 2 sc in first st, sc across to last st, 2 sc in last st. Turn. (40 sc)
Row 10 (WS): Ch 1, 2 sc in first st, sc across to last st, 2 sc in last st. Turn. (42 sc)
Row 11 (RS): Ch 1, 2 sc in first st, sc across to last st, 2 sc in last st. Turn. (44 sc)
Row 12 (WS): Ch 1, 2 sc in first st, sc across to last st, 2 sc in last st. Turn. (46 sc)
Switch to Honeycomb Mesh Stitch with larger hook.
Mesh Row 1 (RS): Ch 3, (ch 1, sk 1, dc) 22 times, dc in last st. Turn. (46 sts)
Mesh Row 2 (WS): Ch 1, sc in first dc, (sc in ch-1 sp, sc in next dc) 22 times, sc in top of t-ch. Turn. (46 sc)
Work even in Honeycomb Mesh for 6 more rows (Mesh Rows 3 to 8). (46 sts each row)
Increase Mesh Row (RS): Ch 3, dc in first st (increase at beg), work mesh across to last st, 2 dc in last st (increase at end). Turn. (48 sts)
Mesh Row (WS): Ch 1, sc in each st and ch-sp across. Turn. (48 sc)
Increase Mesh Row (RS): Increase 1 at each end. Turn. (50 sts)
Mesh Row (WS): Sc across. Turn. (50 sc)
Work even in Honeycomb Mesh until sleeve measures approximately 14 in / 36 cm from top of cuff rib.
CHECKPOINT: Sleeve should measure approximately 14 in / 36 cm long and approximately 50 sts wide (20 in / 51 cm wide).
Sleeve Cap Shaping
The cap is worked in sc for cleaner decreases.
Cap Row 1 (RS): Sl st across first 4 sts, ch 1, sc across to last 4 sts, leave unworked. Turn. (42 sc)
Cap Row 2 (WS): Ch 1, sc2tog, sc across to last 2 sts, sc2tog. Turn. (40 sc)
Cap Row 3 (RS): Ch 1, sc2tog, sc across to last 2 sts, sc2tog. Turn. (38 sc)
Cap Row 4 (WS): Ch 1, sc2tog, sc across to last 2 sts, sc2tog. Turn. (36 sc)
Continue decreasing 2 sts per row until cap measures approximately 4 in / 10 cm tall. Fasten off, leaving a long tail for seaming.
Assembly and Finishing
Blocking
Before seaming, block all pieces to the finished measurements. Lay flat on a blocking mat, pin to size, and mist with water. Allow to dry completely.
Seaming
1. Shoulder seams: With RS together, whipstitch or mattress stitch the front and back shoulder pieces together.
2. Side seams: Starting at the hem rib, seam the front and back panels together along the sides, stopping at the armhole shaping.
3. Sleeve seams: Fold each sleeve with RS together and seam from cuff rib to underarm.
4. Set in sleeves: With RS together, pin the sleeve cap into the armhole opening, matching the sleeve seam to the side seam. Ease the cap into the armhole and seam in place.
Turtleneck Collar
With smaller hook, join yarn at one shoulder seam. Work evenly around the neckline, picking up approximately 50 to 54 stitches total.
Round 1: Join with sl st to form a round. Ch 2, (FPdc, BPdc) around. Join.
Repeat Round 1 until collar measures 5 in / 13 cm tall. Fasten off and weave in ends.
Tips for Success
Cable confidence: If cables are new to you, practice the 2/2 FC and 2/2 BC crossings on a small swatch first. Once you get the rhythm, they become second nature.
Stitch markers are your friends: Place markers at the beginning and end of your cable panel. This helps you keep track of where the mesh ends and the cable begins.
Count your stitches: After each row, take a moment to verify your stitch count. Catching a mistake early saves hours of frogging later.
Blocking makes magic: Your finished sweater will look dramatically better after blocking. The mesh will open up, the cables will pop, and everything will even out beautifully.
You Did It!
Thank you so much for choosing this cable crop sweater pattern for your next project. I truly hope you love making it as much as I loved designing it. There is something incredibly satisfying about creating a wearable garment with your own hands.
If you make this sweater, I would absolutely love to see it. Tag me on Instagram or share a photo in my Facebook group. Your makes always brighten my day.
Save this pattern to your Pinterest boards so you can find it when you are ready to cast on, and please leave a comment below if you give it a try. I love hearing how your projects turn out, and your feedback helps other makers decide to take the plunge too. Happy crocheting!
You Might Also Like
- Pink Variegated Monstera Crochet Plant Free Pattern
- Terracotta Rust Textured Clutch Bag Free Crochet Pattern
- Gray Tabby Cat Bow Sweater Free Crochet Pattern
- Dusty Rose Peplum Baby Outfit Free Crochet Pattern