Dusty Rose Belted Crochet Romper Free Crochet Pattern
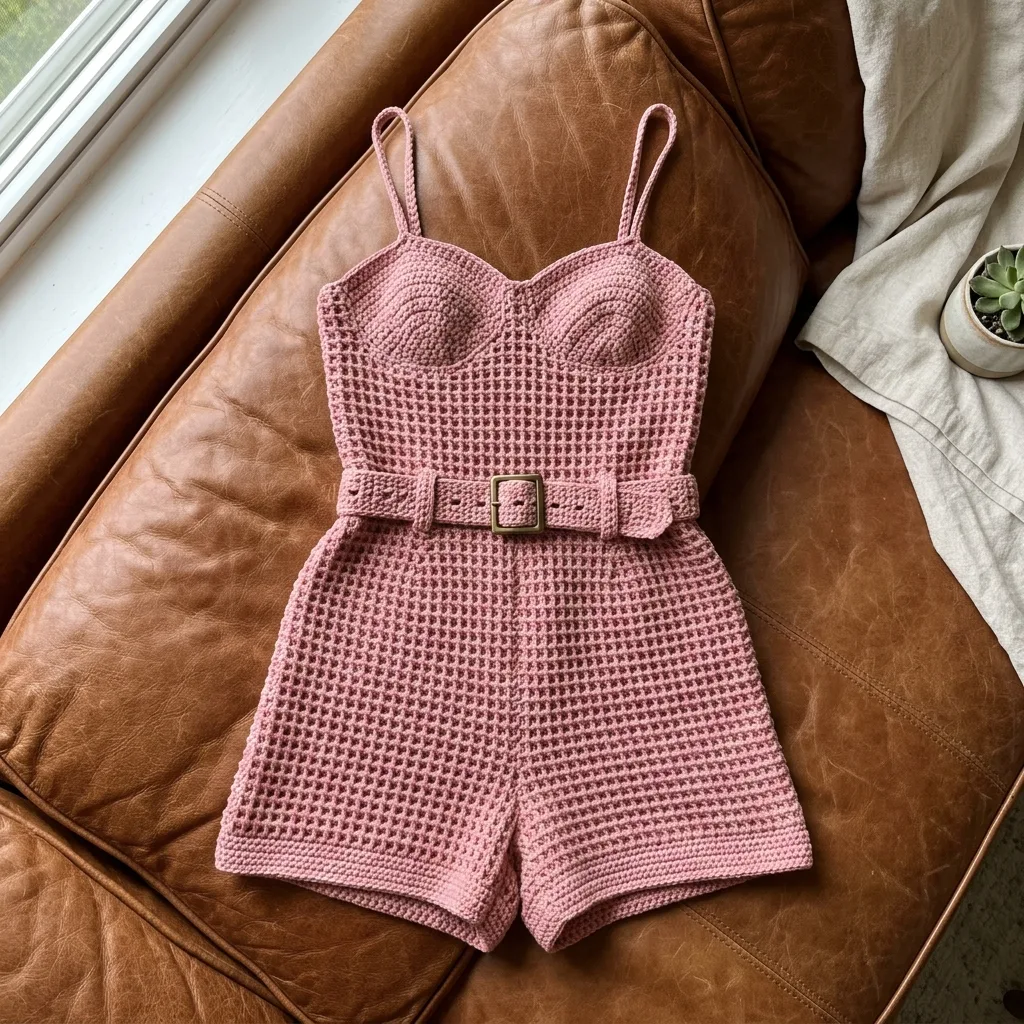
Last summer, I found myself scrolling through vintage fashion photos at two in the morning. You know how it goes. One minute you’re looking for recipe ideas, and the next you’re deep in a rabbit hole of 1950s beach fashion. I kept coming back to those high-waisted rompers with the structured bodices and cinched waists. The kind that looked effortlessly chic but probably cost a fortune. I remember thinking, “I could make that.” Three prototypes and about forty hours of swatching later, this pattern was born.
This dusty rose belted crochet romper has become one of my favorite makes of all time. The structured bustier bodice with molded cup shaping, the textured waffle stitch body, and that satisfying metal belt buckle at the waist. It photographs like a dream and feels like wearing something truly special.
I won’t sugarcoat it. This is an intermediate to advanced project. But if you’ve been crocheting for a while and want to challenge yourself with something genuinely impressive, this is your pattern. Everything is broken down step by step, and I promise the techniques are more approachable than they look.
Why This Crochet Romper Pattern Works
The magic of this design lives in the construction. You’ll work the piece in sections: two bust cups worked in the round, flat bodice panels, shorts worked as a tube, and finally the straps and belt. Each piece is manageable on its own. When you seam them together, the whole garment comes to life.
The waffle stitch creates that beautiful textured grid you see throughout the body and shorts. It’s achieved with a simple two-row repeat using single crochet (sc) and extended single crochet (esc). Once you get the rhythm, it becomes almost meditative.
The dusty rose color in the photos comes from working with a quality cotton yarn. Cotton holds structure beautifully, which is essential for the shaped bust cups and the crisp waffle texture.
Materials You’ll Need
Before you begin, gather everything so you can work uninterrupted.
Yarn: Approximately 900 yards of worsted weight (weight 4) cotton or cotton-blend yarn in dusty rose or antique pink
Hook: US size G-6 / 4.0 mm crochet hook
Notions:
Yarn Recommendations
Lion Brand 24/7 Cotton in Rose works beautifully for this project. You’ll need approximately 5 skeins. The mercerized cotton gives excellent stitch definition and a subtle sheen.
WeCrochet Dishie in Blush is another excellent choice if you prefer a matte finish with more vintage appeal.
Paintbox Yarns Simply DK Cotton held double creates a denser fabric with more structure in the cups if you want extra support.
Avoid acrylic yarns for this pattern. They won’t hold the cup shape and will make the waffle stitch look soft and blobby instead of crisp and structured.
Gauge
18 sc = 4 inches
20 rows = 4 inches
In waffle stitch pattern with US G-6 / 4.0 mm hook after blocking.
Gauge matters enormously for this garment. Even a small difference will throw off the fit of the bodice and shorts. Please swatch before starting.
Bust cup gauge: 5 rounds = approximately 2 inches diameter across the flat top of the cup dome.
Finished Measurements
This pattern produces a size Medium with the following measurements:
Size customization tips are included at the end of the pattern.
Abbreviations and Special Stitches
Let me walk you through every stitch you’ll use. If you’re comfortable with these, you’re ready for this pattern.
beg = beginning
BLO = back loop only (insert your hook under just the back loop of the stitch, leaving the front loop untouched)
ch = chain
esc = extended single crochet
FLO = front loop only
inc = increase (2 sc in same stitch)
MR = magic ring
rnd = round
RS = right side
sc = single crochet
sc2tog = single crochet two together (a decrease)
sk = skip
sl st = slip stitch
st(s) = stitch(es)
WS = wrong side
yo = yarn over
Extended Single Crochet (esc)
This stitch is slightly taller than a regular single crochet and creates the raised grid effect in the waffle pattern.
Insert your hook into the indicated stitch. Yarn over and pull up a loop (2 loops on hook). Yarn over and pull through 1 loop only (2 loops still on hook). Yarn over and pull through both remaining loops.
Think of it as a single crochet with an extra “pull through one” step in the middle.
Waffle Stitch (Worked Flat)
Row 1 (RS): Ch 1, turn. Working in BLO: sc in first st, esc in next st. Repeat (sc, esc) across to last st, sc in last st.
Row 2 (WS): Ch 1, turn. Working in BLO: esc in first st, sc in next st. Repeat (esc, sc) across to last st, esc in last st.
These two rows create the waffle texture. Always work in BLO unless told otherwise.
Waffle Stitch (Worked in the Round)
Rnd 1: Working in BLO: (sc in next st, esc in next st) around.
Rnd 2: Working in BLO: (esc in next st, sc in next st) around.
Do not join at the end of each round. Use a stitch marker to track your starting point.
sc2tog (Single Crochet Decrease)
Insert hook into next stitch, yarn over, pull up a loop (2 loops on hook). Insert hook into following stitch, yarn over, pull up a loop (3 loops on hook). Yarn over and pull through all 3 loops. This counts as 1 stitch.
Pattern Instructions
Section 1: Bust Cups (Make 2)
The cups are worked in continuous rounds from a magic ring. Use a stitch marker to track the beginning of each round.
Rnd 1: Starting in a MR, work 6 sc. Do not join. Place marker. (6 sc)
Rnd 2: 2 sc in each st around. (12 sc)
Rnd 3: (Sc in next st, 2 sc in next st) around. (18 sc)
Rnd 4: (Sc in next 2 sts, 2 sc in next st) around. (24 sc)
Rnd 5: (Sc in next 3 sts, 2 sc in next st) around. (30 sc)
Rnd 6: (Sc in next 4 sts, 2 sc in next st) around. (36 sc)
Rnd 7: (Sc in next 5 sts, 2 sc in next st) around. (42 sc)
Rnd 8: (Sc in next 6 sts, 2 sc in next st) around. (48 sc)
At this point, the cup should measure approximately 4 inches in diameter across its flat surface. If yours is smaller or larger, adjust by removing or adding an increase round before proceeding.
Now begin the shaping decrease rounds to form the dome:
Rnd 9: Working in BLO: (sc in next 6 sts, sc2tog) around. (42 sc)
Rnd 10: Working in BLO: (sc in next 5 sts, sc2tog) around. (36 sc)
Rnd 11: Working in BLO: (sc in next 4 sts, sc2tog) around. (30 sc)
Rnd 12: Working in BLO: (sc in next 3 sts, sc2tog) around. (24 sc)
Rnd 13: Sc in each st around. Do not decrease. (24 sc)
Sl st to next st to close the round. Fasten off, leaving a long tail for sewing. The cup should now form a rounded dome approximately 2 inches deep at center. Make the second cup identical.
Checkpoint: Each finished cup should be approximately 4 inches wide at the base opening and 2 inches deep. The base opening has 24 stitches available for sewing onto the bodice.
Section 2: Bodice Front Panel
The bodice front is worked flat from the bottom hem upward.
Foundation Chain: Ch 79.
Row 1 (RS): Sc in 2nd ch from hook and in each ch across. (78 sc)
Row 2 (WS): Ch 1, turn. Sc in each st across. (78 sc)
Row 3 (RS): Ch 1, turn. Begin waffle stitch in BLO: sc in first st, esc in next st. Rep (sc, esc) across to last 2 sts, sc in last 2 sts. (78 sts)
Row 4 (WS): Ch 1, turn. Working in BLO: esc in first 2 sts, then (sc, esc) across to last st, esc in last st. (78 sts)
Rows 5 to 14: Rep rows 3 and 4 five more times, continuing waffle stitch pattern in BLO. (78 sts)
The bodice now measures approximately 3 inches from the foundation chain. Now begin the waist decrease shaping:
Row 15 (RS): Ch 1, turn. Working in BLO in waffle pattern: sc2tog over first 2 sts, work waffle pattern to last 2 sts, sc2tog. (76 sts)
Row 16 (WS): Ch 1, turn. Work waffle pattern across in BLO. (76 sts)
Row 17 (RS): Ch 1, turn. Sc2tog, work waffle pattern to last 2 sts, sc2tog. (74 sts)
Row 18 (WS): Ch 1, turn. Work waffle pattern across in BLO. (74 sts)
Row 19 (RS): Ch 1, turn. Sc2tog, work waffle pattern to last 2 sts, sc2tog. (72 sts)
Row 20 (WS): Ch 1, turn. Work waffle pattern across in BLO. (72 sts)
Row 21 (RS): Ch 1, turn. Work waffle pattern across with no shaping. (72 sts)
Row 22 (WS): Ch 1, turn. Work waffle pattern across. (72 sts)
Row 23 (RS): Ch 1, turn. Sc in first st, then sc in each st across. (72 sc)
Do not fasten off. Place the live stitches on a holder or length of scrap yarn.
Checkpoint: The bodice front panel should measure approximately 6 inches tall from the cast-on edge to row 23, and approximately 16 inches wide at the top edge after the waist decreases.
Section 3: Bodice Back Panel
Work exactly the same as the Bodice Front Panel, Rows 1 through 23. (72 sc at top edge)
Do not fasten off. Set aside.
Side Seaming: With RS facing, join the front and back panels at the side edges using a flat slip stitch seam or whipstitch through both loops. Seam from the bottom hem upward approximately 8 inches on each side, leaving the top edge open.
After seaming, the bodice tube should measure approximately 32 inches in circumference at the hem and approximately 29 inches in circumference at the top waist edge.
Section 4: Attaching the Bust Cups
Position each cup on the RS of the front bodice panel with the dome pointing outward. Center the cups side by side, with approximately 1.5 inches of space between them at center front. Position them so the base of each cup sits approximately 0.5 inches from the top edge of the bodice.
Using the long sewing tails, whipstitch around the entire 24-stitch base of each cup through the bodice fabric. The cups will sit proud of the fabric surface as three-dimensional domes. Knot securely and weave in ends.
Section 5: Bodice Top Edge Finish
With RS facing, join yarn at one side seam at the top edge of the bodice. Work 1 rnd of sc evenly around the entire top opening, including between the cups, to neaten and stabilize the edge. Sl st to first sc to join.
Stitch count for top edge: approximately 144 sc around the full circumference. Adjust as needed to keep the edge flat and even.
Section 6: Spaghetti Straps (Make 2)
The straps are narrow crocheted cords approximately 12 inches long.
Chain 55.
Row 1: Sc in 2nd ch from hook and in each ch across. (54 sc)
Row 2: Ch 1, turn. Sl st in each st across. (54 sl st)
Fasten off, leaving a 12 inch tail on each end.
Strap attachment: Position each strap on the RS with one end sewn to the front bodice top edge (approximately 3 inches from each side seam) and the other end sewn to the corresponding position on the back bodice top edge. Sew each end securely using the tail and a yarn needle.
To add the loop detail at the strap tops, form a small chain loop of 8 chains at the top of each strap and sl st to close into a small ring.
Section 7: Shorts
The shorts are worked in the round from the waist downward as a separate piece, then attached to the bodice.
Waistband Setup:
Ch 130, sl st to first ch to join, being careful not to twist.
Rnd 1: Ch 1, sc in each ch around, sl st to first sc to join. (130 sc)
Rnd 2: Ch 1, sc in each st around, sl st to first sc to join. (130 sc)
Rnd 3: Ch 1, sc in each st around, sl st to first sc to join. (130 sc)
Shorts Body:
Now begin the waffle stitch in the round, working continuously without joining (use stitch marker at beginning of round).
Rnd 4: Working in BLO: (sc in next st, esc in next st) around. (130 sts)
Rnd 5: Working in BLO: (esc in next st, sc in next st) around. (130 sts)
Rnds 6 to 25: Rep rnds 4 and 5 ten more times, alternating waffle pattern rounds. (130 sts)
Checkpoint: After round 25, the shorts tube should measure approximately 5.5 inches from the top of the waistband.
Hip Increase Rounds:
Rnd 26: Working in BLO in waffle pattern, inc 10 sts evenly spaced (approximately every 13th st). (140 sts)
Rnd 27: Work waffle pattern around with no increases. (140 sts)
Rnd 28: Inc 10 sts evenly spaced in waffle pattern (approximately every 14th st). (150 sts)
Rnd 29: Work waffle pattern around. (150 sts)
Rnd 30: Inc 12 sts evenly spaced in waffle pattern. (162 sts)
Rnd 31: Work waffle pattern around. (162 sts)
Checkpoint: After round 31, the shorts tube should measure approximately 7 inches from the top waistband and approximately 36 inches in circumference at the hip.
Shorts Leg Division:
The tube will now be divided for the crotch. Place a stitch marker at the current beginning of round and another marker 81 sts directly across (the halfway point).
Leg 1 Front:
Sl st across 4 sts at the crotch marker, then work flat in rows across 77 sts for the front of the leg.
Row 32 (RS): Working in BLO in waffle pattern across 77 sts. (77 sts)
Row 33 (WS): Ch 1, turn. Work waffle pattern with sc in last st. (77 sts)
Row 34 (RS): Ch 1, turn. Rep row 32. (77 sts)
Row 35 (WS): Ch 1, turn. Rep row 33. (77 sts)
Fasten off.
Leg 1 Back: Rejoin yarn at the opposite crotch marker. Work rows 32 to 35 across the remaining 77 sts of the back leg half. Fasten off.
Crotch Seam: With RS together, align the inner edges of the front and back leg halves. Seam 4 sts at each crotch point together using whipstitch or sl st seam through both loops.
Leg Hem: With RS facing, join yarn at the leg opening. Work 1 rnd of sc evenly around the leg opening edge. Sl st to join. Fasten off. Repeat for second leg opening.
Section 8: Joining Bodice to Shorts
Place the finished bodice RS out and the finished shorts tube RS out. Align the lower edge of the bodice with the waistband top of the shorts, matching side seams. Using a yarn needle and matching yarn, whipstitch the two pieces together through both loops all the way around.
After joining, the full length from shoulder strap attachment to shorts hem should measure approximately 22 inches.
Section 9: Belt
The belt is worked flat as a narrow strip.
Foundation Chain: Ch 7.
Row 1: Sc in 2nd ch from hook and in each ch across. (6 sc)
Rows 2 to 130: Ch 1, turn. Working in BLO: sc in each st across. (6 sc)
The belt should measure approximately 29 inches after blocking.
Belt End Shaping: At one end of the belt, work sc2tog three times across the 6 sts to taper to a point: sc2tog, sc2tog, sc2tog. (3 sts). Work 1 more row of sc2tog and sc: sc2tog, sc in last st. (2 sts). Sc2tog. (1 st). Fasten off.
Buckle Attachment: At the straight end of the belt, fold approximately 1.5 inches of the end over the center bar of the buckle. Sew the folded end back onto the belt securely.
Belt Keeper: Chain 16 and sl st to join into a ring. Work 2 rnds of sc around the ring. (16 sc per round.) Fasten off. Slide this keeper ring onto the belt.
Belt Loops (Make 4 to 6): Ch 10, sl st to join into a ring. Work 1 rnd of sc around the ring. Fasten off. Sew 2 loops to the front waist seam and 2 loops to the back waist seam, evenly spaced.
Size Customization Tips
To size up: Add stitches to the bodice foundation chain in multiples of 2. Each additional 2 sts adds approximately 0.44 inches to the circumference. Add corresponding stitches to the shorts foundation chain. Add an additional cup increase round for a larger cup.
To size down: Subtract stitches from the bodice foundation chain in multiples of 2. Remove the final increase round from the bust cup for a smaller cup diameter.
To lengthen the shorts inseam: Continue waffle stitch rounds beyond round 35 before working the crotch shaping, adding 2 rounds per approximately 0.4 inches of added length.
To lengthen the bodice: Add pairs of waffle stitch rows (always add in pairs) between rows 14 and 15 before beginning waist shaping.
Finishing and Blocking
Weave in all ends securely, drawing tails through at least 3 to 4 stitches on the WS.
Wet blocking is strongly recommended. Submerge the entire finished romper in cool water for 15 to 20 minutes. Gently press out excess water in a towel without wringing. Lay flat on a blocking mat. Pin the bodice to the stated finished dimensions.
For the bust cups, do not press them flat. Instead, stuff lightly with a clean cloth or foam insert to hold the dome shape as the piece dries. Pin the shorts legs open to the correct leg opening circumference. Allow to dry completely (24 to 48 hours) before removing pins.
Care Instructions
Machine wash cold on gentle cycle in a mesh laundry bag. Lay flat to dry. Do not tumble dry, wring, or iron directly on the textured waffle surface. Store folded flat rather than on a hanger to prevent the cups from distorting.
You Did It!
Thank you so much for choosing this pattern. I know it’s a commitment, but the finished romper is absolutely worth every stitch. When you wear it, you’ll feel like you stepped out of a vintage postcard in the best possible way.
I would love to see your finished romper! Tag me on Instagram or share a photo in my Facebook group. Seeing your makes genuinely brightens my day.
If this pattern inspired you, go ahead and pin it to your crochet board on Pinterest so you can find it when you’re ready to cast on. And if you make it, drop a comment below. I read every single one, and I can’t wait to hear how yours turns out!
You Might Also Like
- Lavender Jellyfish Baby Blanket Free Crochet Pattern
- Boho Rainbow Granny Square Tote Free Crochet Pattern
- Arctic Ice Mermaid Plush Doll Free Crochet Pattern
- Lavender Purple Dreamy Tassel Clutch Free Crochet Pattern