Crochet Sunflower Baby Dress Free Pattern
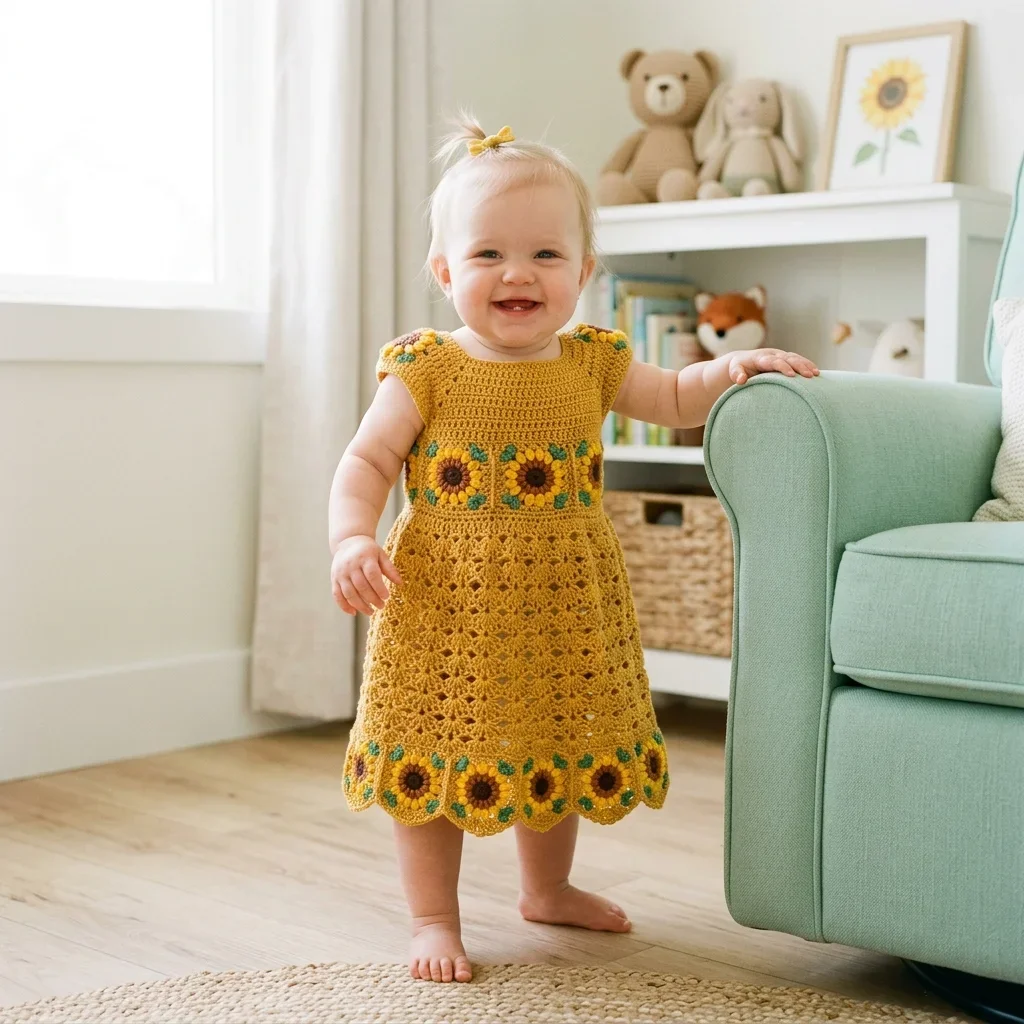
When I sat down to design this little dress, I had a very specific vision in my head. I wanted something heirloom quality that grandparents would swoon over, but also practical enough for everyday wear. I wanted cheerful sunflowers that would make everyone smile, a flattering A-line silhouette, and construction techniques that would actually teach intermediate crocheters something new.
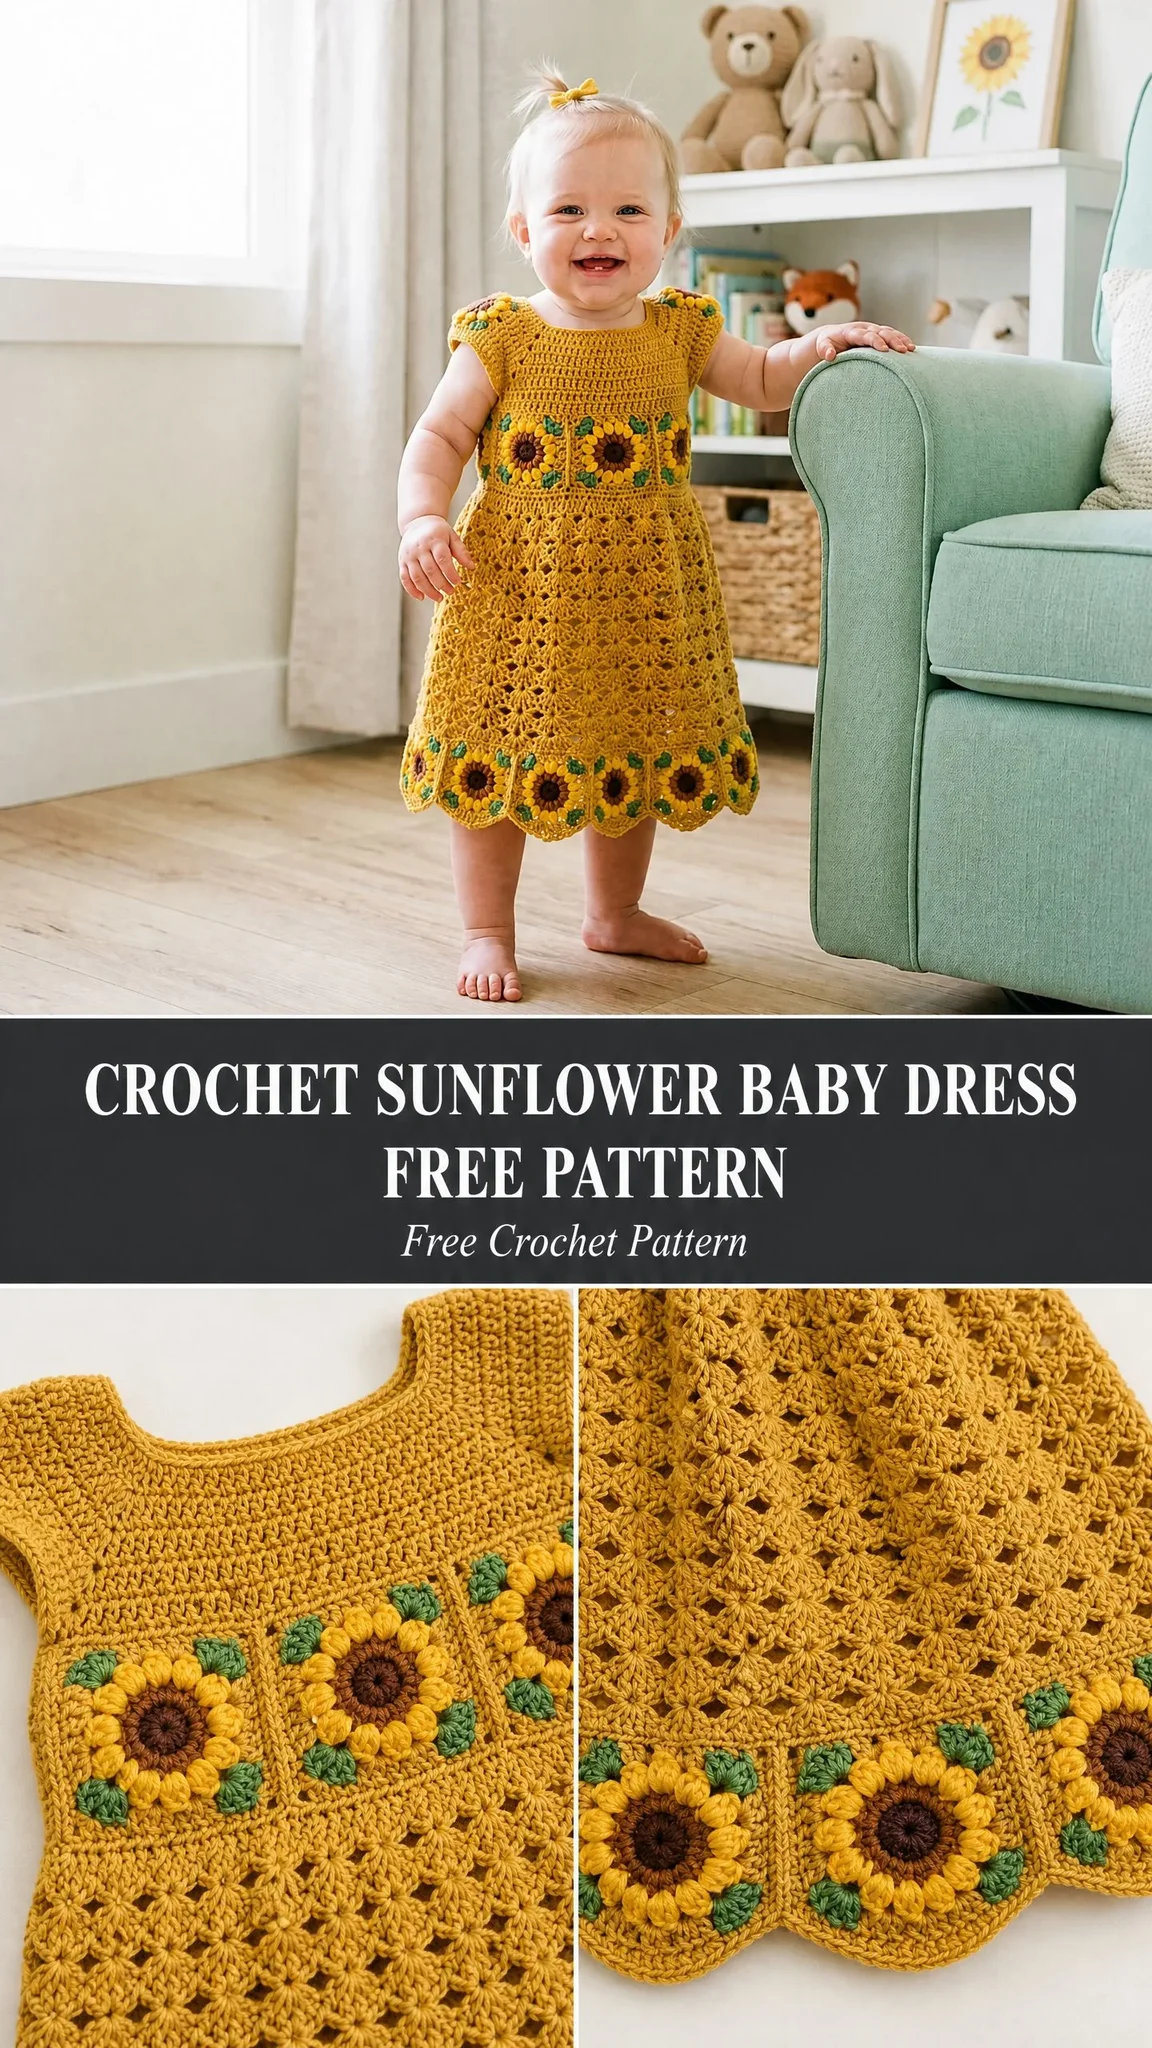
I am SO pleased with how this crochet sunflower baby dress turned out. The golden mustard color practically glows, the lace skirt has gorgeous movement, and those sunflower motifs at the waist and hem create such a stunning focal point.
This is definitely a project that requires some patience and attention to detail, but if you have made at least one garment before, you can absolutely handle this. I have written out every single stitch count and included checkpoints throughout so you always know you are on the right track.
About This Crochet Baby Dress Pattern
This adorable dress is constructed top down in the round, which means you start at the neckline and work your way down to the hem. The yoke is worked flat first to create a button placket at the back, then everything joins into a seamless round from the underarm down.
The real showstopper here is the sunflower granny square motifs. You will make a total of 20 sunflower motifs for this project. Nine go around the waistline to form an accent band, nine more create the hem border, and two sit pretty on the shoulders as little embellishments.
The skirt features an open fan shell lace pattern that gives the dress beautiful drape and movement. Everything finishes with a scalloped edge that makes the hem look professionally designed.
Skill Level: Intermediate to Advanced Intermediate
You need to be comfortable working in the round, reading stitch repeats, constructing granny squares, working clean color changes, and assembling motifs into a garment. The sunflower motifs require familiarity with bobble or cluster stitches. If you are a beginner, I would recommend practicing granny squares and bobbles first before tackling this dress.
Time Estimate: Approximately 18 to 25 hours for an experienced intermediate crocheter, including motif construction and finishing.
Finished Measurements
This pattern is written for size 12 months, which fits approximately 18 to 20 pounds or 8 to 9 kilograms. Here are the finished measurements after light blocking:
I have included sizing tips at the end of the pattern for adjusting to 6 months or 18 months.
Materials Needed
Yarn:
Hook: US size G-6 or 4.0 mm, or whatever size you need to match gauge
Notions:
Yarn Suggestions
Lion Brand Pound of Love in the Mustard colorway works beautifully for this project. It is 100% acrylic, machine washable, soft against baby skin, and widely available.
Paintbox Yarns Simply DK held double also works well. Technically it is DK weight, but when you hold two strands together, it achieves a worsted equivalent gauge with excellent stitch definition for the lace sections. Try the Mustard Yellow colorway.
WeCrochet Brava Worsted is another excellent choice. It is 100% premium acrylic, fully machine washable and dryer safe at low heat. Use Canary for MC, Chocolate for CA, Caution for CB, and Peapod for CC.
Whatever you choose, make sure it is machine washable and safe for sensitive baby skin. Avoid yarns with mohair content because they are difficult to unravel for corrections and can irritate baby eyes.
Gauge
Getting gauge right is critical for this garment. Please swatch, wash, dry, and then measure before beginning.
In single crochet flat: 18 sc by 20 rows equals 4 inches by 4 inches or 10 cm by 10 cm
In fan shell lace pattern: 2 fan repeats (12 stitches) by 4 rows equals 4 inches by 2.5 inches or 10 cm by 6.3 cm
One completed sunflower motif (blocked flat) measures approximately 2 inches or 5 cm in diameter
A gauge that is even slightly off will significantly affect the chest circumference and overall length. Do not skip the swatch!
Abbreviations and Stitch Definitions
Here are all the abbreviations you will encounter in this pattern. I have included plain English definitions so you know exactly what each stitch does.
Special Stitches
These are the special techniques you will use throughout the pattern. Read through them before starting so you feel confident when you encounter them.
Bobble (bo)
Yarn over, insert hook into stitch or space, yarn over and pull up a loop, yarn over and pull through 2 loops. You now have one incomplete double crochet on your hook. Repeat this sequence 4 more times into the same stitch or space, keeping all loops on hook. You should have 6 loops on your hook total. Yarn over and pull through all 6 loops. Pull snugly. One bobble counts as 1 stitch.
Fan Shell
Work (dc, ch 1, dc, ch 1, dc, ch 1, dc, ch 1, dc) all into the same stitch or chain space. This creates a 5 dc fan with ch 1 separating each dc. The fan occupies 6 stitches of the previous row or round when centered. You skip 2 stitches, work the fan into the next stitch, then skip 2 more.
Scallop
Work (sc, hdc, dc, dc, dc, hdc, sc) all into the same stitch or space. This creates a pretty shell shape used at the hem border between sunflower motifs.
Shell (3 dc shell)
Work (dc, dc, dc) all into same stitch or space.
Picot
Ch 3, then slip stitch into the first chain of that ch 3.
V-stitch (V-st)
Work (dc, ch 2, dc) all into the same stitch or chain space.
How to Make the Sunflower Motif
You will make 20 of these sunflowers total, so it is worth getting comfortable with the technique. Each finished motif is approximately 2 inches or 5 cm across after blocking.
Round 1 (center, CA): Make a magic ring or ch 4 and join with sl st to form ring. Ch 1, work 8 sc into ring, join with sl st to first sc. (8 sc)
Round 2 (CA): Ch 1, work 2 sc into each sc around, join with sl st to first sc. (16 sc)
Round 3 (inner petal setup, CB): Join CB into any sc. Ch 1. In each sc around, work 1 sc. Join with sl st to first sc. Fasten off CB temporarily but do not cut. Carry loosely or use a separate length. (16 sc)
Round 4 (petals, CB): Do not turn. Working in front of Round 3, reattach CB to the first sc of Round 2, which is the round below Round 3. Insert your hook under the sc from Round 2. Ch 1. Work the following into each sc of Round 2: (sc, ch 2, sc). Join with sl st. (32 sts, 16 ch 2 loops forming inner ring of petals)
Round 5 (outer petals, CB): Sl st into first ch 2 sp. Ch 1. In each ch 2 sp from Round 4 work (sc, hdc, bo, hdc, sc). Join with sl st to first sc. (16 petals, 80 sts total)
Round 6 (green border, CC): Join CC between any two petals, in the sc that sits between petals. Ch 1. Work sc in same sp, then ch 3, skip the 5 st petal group, sc between next petals. Rep around. (16 ch 3 arches)
Round 7 (CC): Sl st into first ch 3 arch. Ch 1. Work (sc, hdc, dc, hdc, sc) into each ch 3 arch around. Join with sl st to first sc. Fasten off. (16 leaf bumps, 80 sts)
Weave in ends and block each motif flat to exactly 2 inches or 5 cm.
Pattern Notes Before You Begin
Please read these notes before starting. They will save you confusion later.
1. The dress is worked top down. The yoke begins flat in rows to create the back button placket opening, then joins to work in the round from the underarm down.
2. Stitch markers are essential. Mark the four raglan increase points on the yoke and the center front of the bodice and skirt.
3. The waistline band consists of 9 sunflower motifs joined in a ring. The skirt grows downward from this band.
4. The hem border consists of 9 sunflower motifs joined in a ring, with scallops worked between each motif.
5. When working color changes for motifs, always join new color with a slip stitch and fasten off cleanly unless instructed to carry.
6. For rows of sc, ch 1 and turn. The ch 1 does NOT count as a stitch in this pattern. For rows of dc, ch 3 and turn. The ch 3 DOES count as the first dc.
Crochet Sunflower Baby Dress Pattern Instructions
Section 1: Yoke
The yoke is worked flat in rows first to establish the back opening, then joined into a round.
Set up: With MC and hook, ch 55.
Row 1 (RS): Sc into 2nd ch from hook and into each ch across. Turn. (54 sc)
This is the neckline edge. Place stitch markers at positions 10, 19, 36, and 45 counting from the right edge. These four markers designate your raglan points. You now have five sections: right back (9 sts), right sleeve (9 sts), front (17 sts), left sleeve (9 sts), left back (9 sts).
Row 2 (WS): Ch 1, turn. Sc across all 54 sts. (54 sc)
Row 3 (RS, increase row): Ch 1, turn. Sc to 1 st before first marker, (sc, sc) into next st, slip marker up, sc into marker st, (sc, sc) into next st. Continue this pattern at each of the four marker points. Sc to end. (8 increases, 62 sc)
Row 4 (WS): Ch 1, turn. Sc across all sts, slipping markers. (62 sc)
Row 5 (RS, increase row): Rep Row 3 increases at all four markers. (70 sc)
Row 6 (WS): Ch 1, turn. Sc across. (70 sc)
Row 7 (RS, increase row): Rep Row 3 increases. (78 sc)
Row 8 (WS): Sc across. (78 sc)
Row 9 (RS, increase row): Rep Row 3 increases. (86 sc)
Row 10 (WS): Sc across. (86 sc)
Row 11 (RS, increase row): Rep Row 3 increases. (94 sc)
Row 12 (WS): Sc across. (94 sc)
Row 13 (RS, increase row): Rep Row 3 increases. (102 sc)
Row 14 (WS): Sc across. (102 sc)
Checkpoint: Your yoke should measure approximately 3 inches or 7.5 cm tall from the foundation chain and 18 inches or 45.5 cm wide across the last row.
Section 2: Joining the Bodice and Separating Sleeves
Row 15 (RS, separation row): Ch 1, turn. Work across right back 15 sts. Place next 21 sts (right sleeve) onto a stitch holder or scrap yarn. Ch 4 to bridge the underarm. Work across front 29 sts. Place next 21 sts (left sleeve) onto holder. Ch 4 for left underarm bridge. Work across left back 15 sts. (64 sc working sts plus 8 ch sts in underarm bridges equals 72 sts when joined)
Join: Without turning, ch 4 to form the back closing chain. Fold the work so RS faces outward. Join left back edge to right back edge with a sl st, leaving a 1.5 inch or 3.8 cm opening at center back for the button band overlap. Place marker at join.
Round 16: Ch 1 (does not count as st). Sc in each st and each ch around, working 4 sc across each underarm bridge chain. Join with sl st to first sc. (72 sc)
Round 17: Ch 1. Sc in each st around. Join. (72 sc)
Round 18: Ch 1. Sc in each st around. Join. (72 sc)
Section 3: Waistline Sunflower Band
Round 19: Ch 3 (counts as first dc), dc in each st around. Join with sl st to top of ch 3. (72 dc)
Round 20: Ch 3 (counts as dc), dc in each st around. Join. (72 dc)
Now make 9 sunflower motifs using the instructions above. Join them into a ring using the join as you go method on Round 7. When working the last leaf bump of each motif, insert your hook through the corresponding ch 3 arch of the adjacent motif simultaneously and sl st to join.
Sew the completed sunflower band ring to Round 20 of the bodice using MC and yarn needle. Space the 9 motifs evenly, which works out to every 8 stitches of Round 20 aligning with one motif center. Pin all motifs before sewing.
Section 4: Skirt Lace Section
Attach MC to the bottom edge of the sunflower waistband ring.
Round 1 of Skirt (foundation): Join MC with sc into bottom of any motif. Work sc evenly around the lower border of all 9 motifs, placing 8 sc per motif bottom edge. Join with sl st. (72 sc)
Round 2: Ch 3 (counts as dc). Dc in each st around. Join with sl st to top of ch 3. (72 dc)
Round 3 (begin fan lace): Ch 1. Sc in first st. (Skip 2 dc, Fan Shell into next dc, skip 2 dc, sc into next dc) rep around. Join with sl st to first sc. (12 fan shells, 12 anchor sc)
Round 4: Ch 3. Dc into ch 1 sp of first fan, (ch 1, dc) into each ch 1 sp of same fan shell. Ch 2. Dc into anchor sc. Ch 2. (Dc, ch 1, dc, ch 1, dc, ch 1, dc, ch 1, dc) into center ch 1 sp of next fan shell. Ch 2. Dc into anchor sc. Ch 2. Rep around. Join with sl st to top of ch 3. (12 fans with dc columns between, 24 ch 2 sps)
Round 5: Ch 1. Sc in first ch 2 sp. (Fan Shell into center ch 1 sp of fan from previous round, sc into ch 2 sp, sc into dc column, sc into next ch 2 sp) rep around. Join with sl st to first sc. (12 fans plus 36 sc anchor sts)
Round 6: Ch 3 (counts as dc). Working across Round 5, dc into each sc anchor, into each dc of each fan, and into each ch 1 sp of each fan. Join. (144 dc)
Round 7 (second fan tier): Ch 1. Sc in first dc. (Skip 2 dc, Fan Shell into next dc, skip 2 dc, sc into next dc) rep around. Join with sl st to first sc. (24 fan shells, 24 anchor sc)
Round 8: Ch 3. (Dc into ch 1 sps of fan, ch 2 between fans into anchor sc, ch 2) rep around. Join. (24 fans continued)
Round 9: Ch 1. Sc in first ch 2 sp. (Fan Shell into center ch 1 sp of fan, sc into ch 2 sp, sc into dc, sc into ch 2 sp) rep around. Join. (24 fans plus 72 sc)
Round 10 (solid dc reset): Ch 3 (counts as dc). Dc into each st and ch sp around. Join. (288 dc)
Checkpoint: After Round 10, the piece should measure approximately 8 inches or 20 cm from the shoulder.
Section 5: Hem Border and Scallop Edging
Round 11: Ch 1. Sc in each dc around. Join. (288 sc)
Round 12: (Sc in next 14 sc, sc2tog) 18 times. Join. (270 sc)
Make 9 more sunflower motifs and block them. Pin the 9 motifs evenly around the skirt at Round 12, leaving 21 free sc sts between each pair of adjacent motifs. Sew the top border of each motif to Round 12.
Round 13 (hem scallop edging): Attach MC at the bottom edge of any hem motif’s CC border. Ch 1. Sc across bottom of motif (8 sc), then between motifs work: ch 3, skip 2 sts, sc into next st, (ch 3, skip 2, sc) across the 21 free sts to next motif. Rep around all 9 motifs. Join.
Round 14 (scallop shells): Sl st into first ch 3 arch. Ch 1. (Sc, hdc, dc, dc, dc, hdc, sc) into each ch 3 arch around. Between arches adjacent to motif bottoms, work 1 sl st into the motif join. Join with sl st to first sc. Fasten off MC.
Section 6: Sleeve Edging
Place the 21 held sleeve sts back on hook. Attach MC to underarm.
Round 1: Ch 1. Sc across 21 held sleeve sts, then work 4 sc into the underarm bridge chain. Join with sl st. (25 sc)
Round 2: Ch 1. Sc in each st around. Join. (25 sc)
Round 3 (picot edging): Sc in first st. (Picot, sk 1, sc in next st) rep around. Join with sl st. Fasten off.
Repeat for second sleeve.
Section 7: Neckline Edging
Attach MC to right edge of back opening at the neckline.
Row 1 (button band, right side): Ch 1. Work 8 sc evenly down the right back opening edge. Turn. (8 sc)
Row 2: Ch 1. Sc in each of 8 sc. Turn. (8 sc)
Row 3 (buttonholes): Ch 1. Sc in 2 sc. (Ch 2, sk 2, sc in 2 sc) twice. Turn. (2 ch 2 sps formed)
Row 4: Ch 1. Sc in 2 sc. (2 sc into ch 2 sp, sc in 2 sc) twice. Fasten off. (8 sc)
Attach MC to left back opening at bottom edge. Work 4 rows of sc (8 sc each, no buttonholes) as a plain button band. Fasten off.
Neckline round: Attach MC to top right corner of right button band. Ch 1. Work sc evenly along the right band top, across the neckline foundation chain (approximately 54 sc), and down the left band. Work (sc, ch 1, sc) at each corner. Join with sl st to first sc. Work one round of picot edging. Fasten off.
Section 8: Shoulder Sunflower Embellishments
Make 2 additional sunflower motifs. Place one at each shoulder, centered over the raglan yoke line, with the bottom of the motif sitting just at the armhole edge. Sew in place using CC yarn and a yarn needle.
Finishing Your Crochet Baby Dress
Weave in all ends securely using a yarn needle. Bury ends at least 1 inch or 2.5 cm in matching color fabric before trimming.
Sew the two buttons to the left back button band, aligning them with the buttonholes in the right band. Use sewing thread doubled and sew a small fabric scrap or felt circle behind each button on the inside to prevent the buttons from pulling through.
Button placement: First button at 1 inch or 2.5 cm from top of neckline. Second button at 2.5 inches or 6.3 cm from top of neckline.
Blocking
Wet blocking is strongly recommended. Submerge the finished dress in cool water for 20 minutes. Gently squeeze out excess water without wringing. Roll in a dry towel to remove most moisture. Lay flat on a blocking mat or clean dry towels. Use rust proof pins to pin the dress to the finished dimensions. Pin the scallop hem to open the fans fully. Allow to dry completely, 24 to 48 hours.
Care Instructions
Machine wash cold on gentle cycle. Lay flat to dry. Do not tumble dry unless yarn label specifies dryer safe. Do not iron. Do not bleach.
Size Customization Tips
For 6 months (chest 16 inches or 40.5 cm): Reduce starting chain to 49 sts. Work 11 increase rows in the yoke instead of 13. Adjust to 60 dc after joining, using 10 fan repeats.
For 18 months (chest 20 inches or 51 cm): Increase starting chain to 61 sts. Work 15 increase rows in the yoke. After joining, the round should have 84 sc (14 fan repeats).
For length adjustment: Each solid dc round adds approximately 0.5 inches or 1.25 cm. Each fan tier adds approximately 1 inch or 2.5 cm. Add or subtract full fan tiers to adjust total length.
You Did It!
Thank you so much for choosing this pattern. I know it is a labor of love, but the finished dress is absolutely worth every stitch. When you see a little one twirling around in this sunny creation, you will understand why I designed every detail with such care.
I would absolutely love to see your finished dresses! Tag me on Instagram or share in my Facebook group. Seeing your makes is honestly the best part of my job.
If you loved making this crochet sunflower baby dress pattern, save it to your Pinterest boards so you can find it easily for your next project or share it with a friend who would love it too. And please drop a comment below when you finish yours. I read every single one and they make my day!
You Might Also Like
- Sage Green Botanical Granny Tote Free Crochet Pattern
- Ocean Breeze Mesh Cropped Hoodie Free Crochet Pattern
- Blush Pink Romantic Granny Backpack Free Crochet Pattern
- Ocean Blue Seashell Crochet Set Free Pattern