Crochet Mini Santa Hat Pattern (Flat Panel, Free & Easy)
This cozy crochet mini Santa hat pattern is quick, beginner-friendly and completely addictive 🎅✨
You work the hat flat in rows, then seam it into shape, so you don’t have to struggle with tiny rounds. The red part has pretty ribbing, the white brim is thick and squishy, and a tiny pom-pom gives it that classic Santa look.
You can use this crochet mini Santa hat pattern for:
- Christmas tree ornaments
- Garland or bunting decorations
- Cute gift toppers
- Tiny accessories for dolls, toys or amigurumi – it looks extra adorable next to my Free Crochet Christmas Tree Pattern or a mini stocking.
If you’re just starting with small projects, you can warm up with my First Amigurumi – Step-by-Step Guide before you dive into this festive crochet mini Santa hat pattern.
Table of Contents
Pattern Overview
This crochet mini Santa hat pattern is designed to be simple but satisfying:
- Skill level: Confident beginner
- Construction: Flat panel worked in rows, then seamed
- Techniques: Single crochet, back loop only (BLO), gathering/seaming, magic ring
- Time: About 30–60 minutes (depending on yarn)
- Language: US crochet terms
If you need help with the basic stitches used in this mini Santa hat pattern, you can check my tutorials for how to crochet a chain stitch and how to single crochet.
Materials
You can adapt this crochet mini Santa hat pattern to almost any yarn you like. Here’s a simple base:
- Yarn
- Red yarn – main hat
- White yarn – brim & pom-pom
- Worsted weight (size 4) cotton or acrylic for small, neat decorations
- Plush/super bulky yarn for a bigger, fluffy Santa hat
If you’re not sure which yarn will work best for this crochet mini Santa hat pattern, my Yarn Weight, Gauge & Hook Size Guide will help you match your yarn and hook so the hat keeps its shape and isn’t too floppy. For official industry standards on yarn weights, you can also check the Craft Yarn Council yarn standards.
- Hook
- Choose a hook that gives you tight stitches:
- Worsted: 3.0–4.0 mm
- Plush / super bulky: 5.0–6.0 mm
- Choose a hook that gives you tight stitches:
- Other
- Yarn needle
- Scissors
- A tiny bit of stuffing for the pom-pom (optional)
Abbreviations (US Terms)
- MR – magic ring
- ch – chain
- sc – single crochet
- BLO – back loop only
- sl st – slip stitch
- st(s) – stitch(es)
- inc – increase (2 sc in the same st)
- dec – decrease (sc2tog)
The pom-pom in this crochet mini Santa hat pattern starts with a magic ring. If you’re unsure whether to use a magic ring or a little chain circle, I compare both options in Magic Ring vs Chain Circle in Amigurumi.
Note: The hat panel is worked flat in rows. Most stitches are in BLO to create ribbing, but the last stitch of each row is worked through both loops to make a neat, strong edge for seaming.
Crochet Mini Santa Hat Pattern – Step by Step
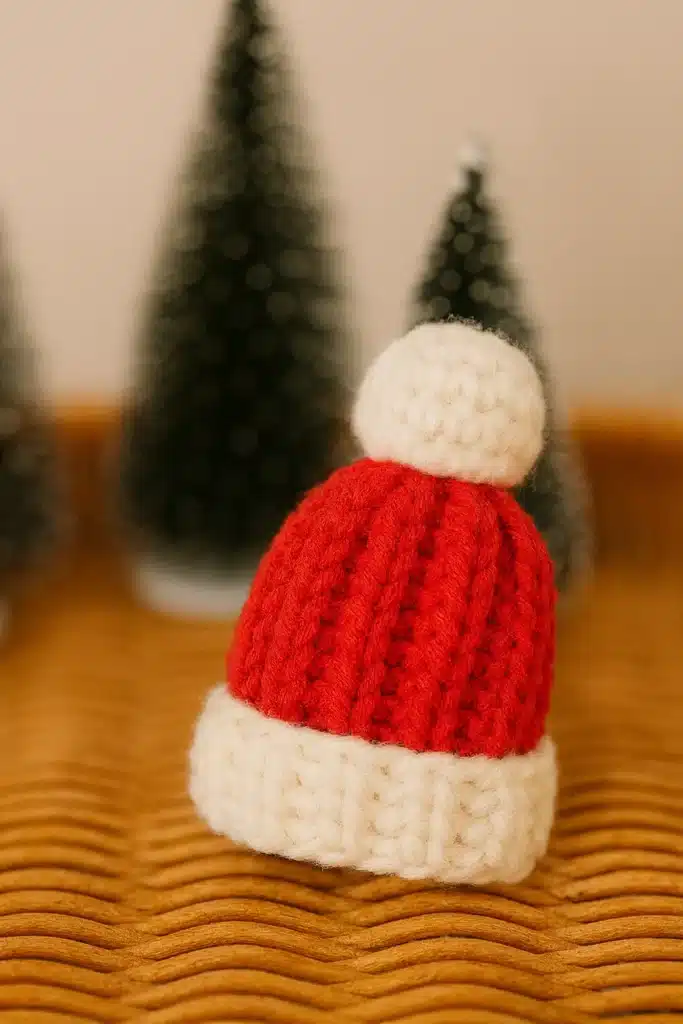
1. Hat Panel (Red)
This is the main part of your crochet mini Santa hat pattern.
With red yarn:
Row 1
Ch 12, sc in 2nd ch from hook and in each ch across.
(11 sts)
Row 2
Ch 1, turn.
Sc in next 10 sts in BLO, sc in last st through both loops.
(11 sts)
Rows 3–16
Repeat Row 2.
(11 sts each row)
Fasten off and leave a long red tail for closing the top and sewing the side.
You should now have a red ribbed rectangle – this flat rectangle is the base shape that makes the crochet mini Santa hat pattern so simple and beginner-friendly.
2. Brim (White)
The white brim is worked along one long side of the red rectangle.
With white yarn:
Turn your work so that one long edge of the red panel is facing up.
Row B1
Join white yarn at the lower corner of a long side.
Ch 1, work 16 sc evenly along the edge.
(16 sts)
Rows B2–B5
Ch 1, turn, sc in each st across.
(16 sts)
Fasten off and leave a white tail for sewing the short side of the brim later.
Now you have:
- A red ribbed rectangle
- A white brim strip attached along one long side
3. Shaping the Hat & Sewing
Now we turn the flat panel into the finished crochet mini Santa hat pattern you see in the photos.
Close the Top of the Hat
- Thread the red tail on a yarn needle.
- On the long red edge opposite the white brim, weave the needle in and out through the row ends/loops all the way across.
- Gently pull the yarn to gather the edge and close the top into a point.
- Secure with a few stitches so the top stays closed.
Sew the Side Seam
- Fold the hat so that the short sides meet, right sides together:
- Red sides together
- White brim folded together
- With the red tail, sew the red side seam from the brim up to the gathered top of the hat.
- With the white tail, sew the short edges of the brim together.
- Turn the hat right side out.
- Fold the white brim upwards toward the outside to form that classic thick Santa brim.
Weave in any extra ends and your flat panel has officially become a 3D crochet mini Santa hat pattern.
4. Pom-Pom (White)
The last touch of this crochet mini Santa hat pattern is a tiny pom-pom ball at the tip of the hat.
With white yarn:
Rnd 1
6 sc in MR. (6)
Rnd 2
Inc in each st around. (12)
Rnd 3
Sc in each st around. (12)
Rnd 4
(dec) × 6. (6)
Lightly stuff if you want it round and squishy, then pull the opening closed with the yarn tail.
Use the tail to sew the pom-pom securely to the very tip of the hat where you gathered the red top.
Weave in the final end and the main part of your crochet mini Santa hat pattern is finished 🎅🎄
How to Use Your Crochet Mini Santa Hat Pattern
Here are some fun ways to use this crochet mini Santa hat pattern:
- Add a hanging loop at the top (before sewing the pom-pom) and use it as a Christmas tree ornament. It looks so cute hung next to my Crochet Mini Christmas Stocking Pattern and Free Crochet Mitten Ornament Pattern.
- Make several hats and string them on a cord for a festive garland.
- Attach the hat to a doll, amigurumi, or plush toy – it fits perfectly with characters like my Free Crochet Santa Claus Gnome Pattern.
- Use it as a gift topper – tie it onto wrapped presents for an extra handmade touch.
For a full Christmas shelf, you can pair this crochet mini Santa hat pattern with the Free Crochet Snowman Pattern, Free Crochet Reindeer Pattern, Free Crochet Gingerbread Man Pattern, and even the Free Grinch Crochet Pattern.
Customization Tips
- Change the size
- For a larger hat, start this crochet mini Santa hat pattern with more chains (e.g., ch 16 instead of 12) and add more rows than 16.
- For a smaller hat, use fewer chains and fewer rows.
- Different yarns
- Worsted yarn makes a small, neat hat that’s great for ornaments.
- Plush or chenille yarn makes a soft, chunky version of the crochet mini Santa hat pattern that looks extra cozy.
- Striped brim or body
- Work the brim in red and white stripes.
- Add a few white rows in the red section for a candy cane effect.
If you want to avoid common problems like holes, loose stitches or lopsided shapes while working this crochet mini Santa hat pattern, you can read my Top 10 Amigurumi Mistakes to Avoid.
FAQ – Crochet Mini Santa Hat Pattern
Is this crochet mini Santa hat pattern beginner-friendly?
Yes. If you know how to do a single crochet, work in BLO, and sew simple seams, you can make this hat. The construction is flat and straightforward. If you’re very new, starting with How to Double Crochet and my beginner guides will help you build confidence.
How can I make the hat stand up better?
Use slightly tighter tension, choose a yarn that holds shape (like cotton or acrylic), and make sure your stitches are firm. For a soft, floppy version of the crochet mini Santa hat pattern, plush yarn is perfect; for a more structured one, stick with regular worsted and a smaller hook.
Can I make this crochet mini Santa hat pattern with plush or super bulky yarn?
Absolutely. Use a larger hook (around 5.0–6.0 mm) and keep the same stitch count to get a bigger, fluffier Santa hat. It looks adorable next to other plush projects like my Free Whale Crochet Pattern.