Crochet Heart Pattern Free: Valentine Heart Plush (Angel + Devil Versions)
If you’ve been searching for a crochet heart pattern free that looks extra cute for Valentine’s Day, this one is for you. Today we’re making a soft Valentine heart plush in two versions: a sweet Angel Heart (with wings) and a mischievous Devil Heart (with horns + tail). It’s quick, beginner-friendly, and perfect as a small gift, bag charm, or desk buddy.
If you’re new to this style of crochet, start with this quick guide on what amigurumi is so everything makes sense right away.
Jump to section
What You’ll Make (2 Versions)
You’ll crochet one plush heart base, then choose your favorite finishing:
- Angel Heart: Heart body + white wings
- Devil Heart: Heart body + black horns + tail
This is a free crochet heart pattern written in US terms and worked in simple rounds with basic shaping.
Materials
- Hook: 1.5 mm
- Yarn: thin yarn (cotton recommended)
- Stuffing
- 2 small safety eyes
- Needle + embroidery thread (white + black)
Not sure how yarn thickness and hook size change the final size? This guide to yarn weight, gauge, and hook sizes makes it super easy to choose.
Abbreviations (US)
- MR = magic ring
- sc = single crochet
- inc = 2 sc in same stitch
- dec = sc2tog
- sl st = slip stitch
- ch = chain
If you’d like the official industry reference, here are standard crochet abbreviations.
Need a refresher on the basics?
- Here’s how to single crochet
- And here’s how to crochet a chain stitch
Pattern Notes (Please read)
- Work in continuous rounds unless the pattern says otherwise.
- Use a stitch marker and learn how to count rounds in crochet (it helps a lot when shaping the point).
- For the cleanest shape, use an invisible decrease whenever you see dec.
- The heart top is made from two bumps, then joined into one round.
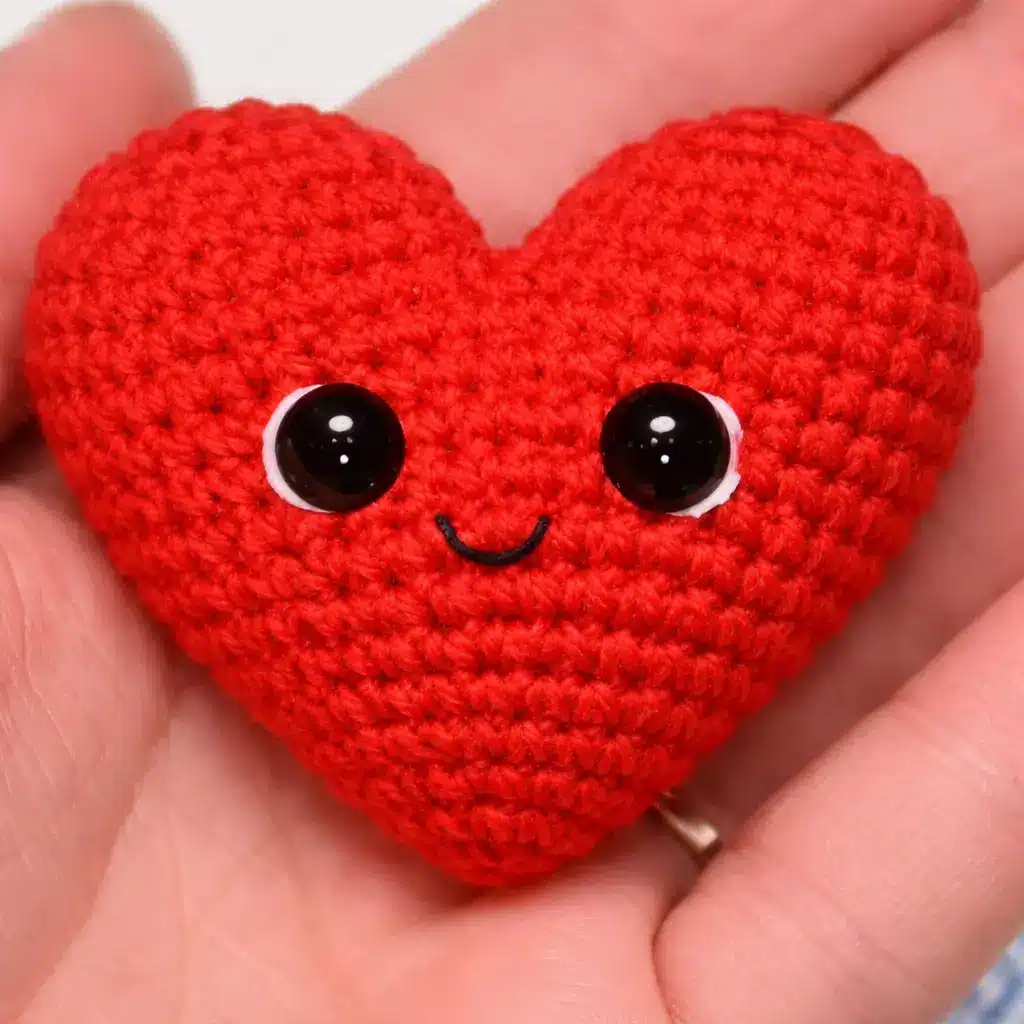
HEART BODY (Red) — Make 1 heart
Now we’ll crochet the main heart crochet pattern base. The top is made from 2 bumps, then we join them and shape the point.
If magic rings are tricky, this quick comparison of magic ring vs chain circle makes the start much easier.
1) Top bump (make 2)
Top Bump #1
R1: MR 6 sc (6)
R2: inc x6 (12)
R3: (sc, inc) x6 (18)
R4: (sc, inc, sc) x6 (24)
R5–R7: sc around (24) for 3 rounds
✅ Fasten off Bump #1.
Top Bump #2
Work the same rounds again:
R1: MR 6 sc (6)
R2: inc x6 (12)
R3: (sc, inc) x6 (18)
R4: (sc, inc, sc) x6 (24)
R5–R7: sc around (24) for 3 rounds
✅ Do NOT fasten off Bump #2. Keep yarn attached.
2) Join the 2 bumps
Hold the two bumps side-by-side with the openings facing down.
From Bump #2 (yarn attached), connect them with 3 joining sl sts through both bumps where they touch (this is only to “tack” them together like the photo).
Now you will crochet around both bumps:
Join Round 1
- sc 21 around Bump #1
- sc 21 around Bump #2
Total: (42)
Join Round 2
sc around (42)
Join Round 3
sc around (42)

✅ Eye placement (exact)
Insert the eyes between Join Round 3 and Join Round 4, with 7 stitches between the eyes.
Tip: If you want the face perfectly centered, place the eyes so they sit slightly forward (not on the very side curve).
3) Shape the point (decreases)
Now we start shrinking to create the classic heart point. For a smoother finish, use invisible decrease.
Join Round 4: (sc 5, dec) x6 (36)
Join Round 5: sc around (36)
Join Round 6: (sc 2, dec, sc 2) x6 (30)
Join Round 7: sc around (30)
Join Round 8: (sc 3, dec) x6 (24)
Join Round 9: sc around (24)
Join Round 10: (sc 2, dec, sc 2) x4 (20)
Join Round 11: (sc 3, dec) x4 (16)
Join Round 12: (sc, dec, sc) x4 (12)
Join Round 13: dec x6 (6)
✅ Stuff firmly, shape the point nicely, then close the opening and fasten off.
4) Face embroidery
- Add tiny white highlights on the eyes (embroidery thread).
- Stitch a small black mouth (simple smile or tiny “u” shape).
ANGEL WINGS (White) — Make 2 wings
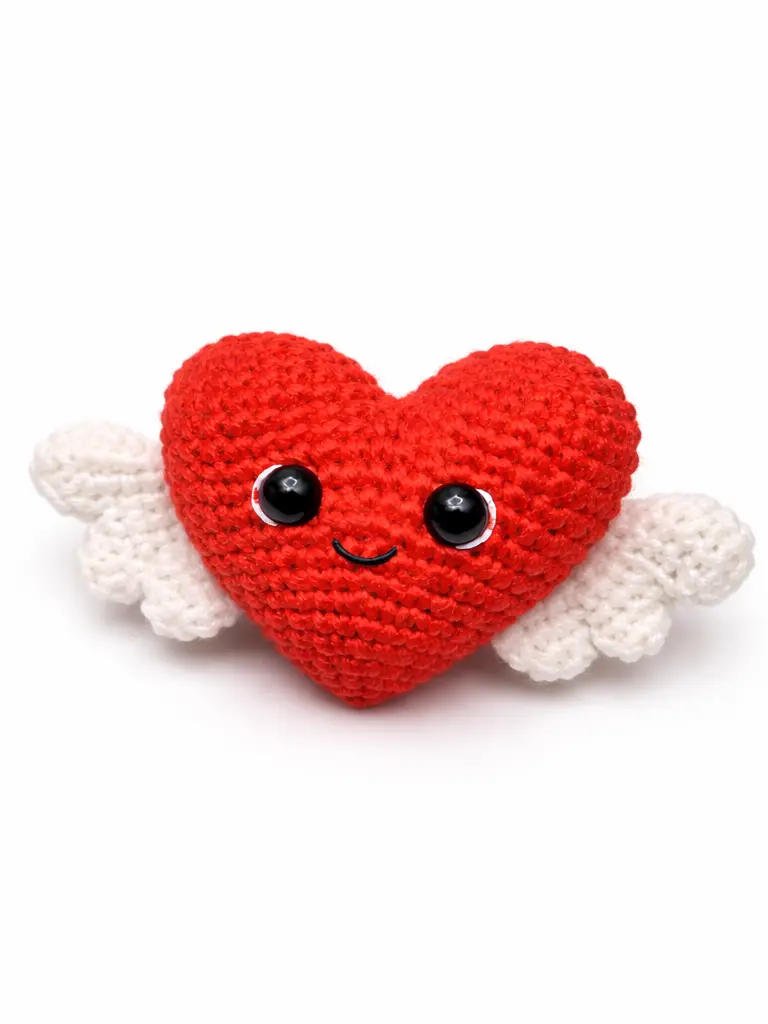
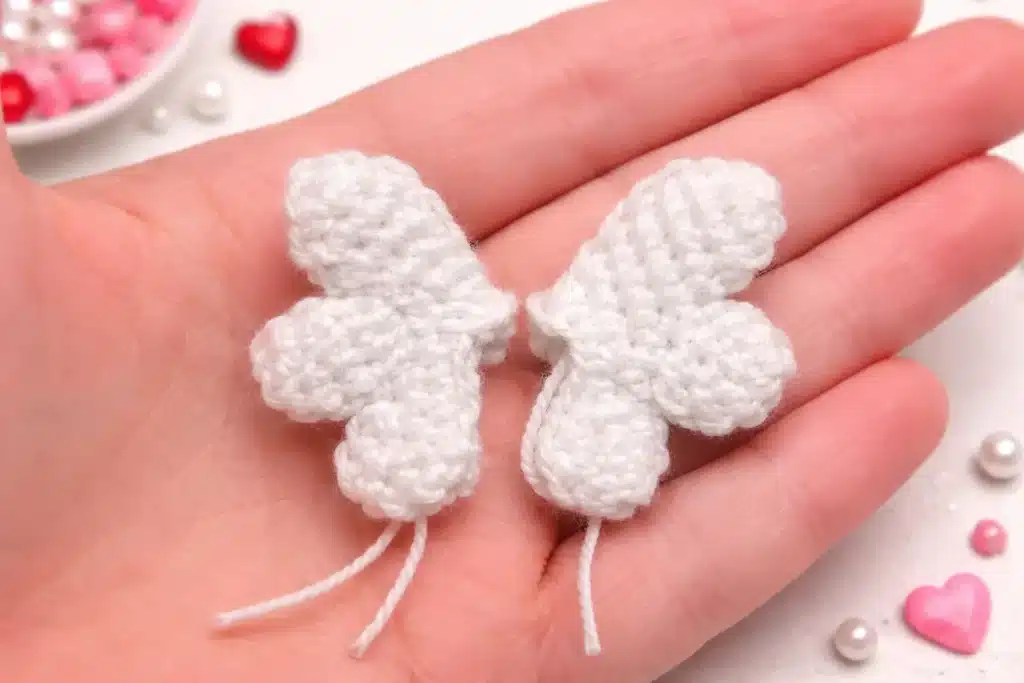
Each angel wing is made from 3 small pieces (two small bumps + one base), then joined together using the yarn from the base piece.
For the neatest attachment (so the wings don’t flop), use this guide on attaching amigurumi limbs evenly.
✅ Wing pieces overview (per wing)
Each wing uses:
- Small A (9 sts)
- Small B (9 sts)
- Base (9 sts, worked for 4 rounds)
You will make:
- 4 small pieces total (2 per wing)
- 2 base pieces total (1 per wing)
1) Small piece (make 4 total)
R1: MR 6 sc (6)
R2: (sc, inc) x3 (9)
✅ Fasten off.
(You’ll use 2 small pieces per wing.)
2) Base piece (make 2 total) — DO NOT fasten off
R1: MR 6 sc (6)
R2: (sc, inc) x3 (9)
R3: sc around (9)
R4: sc around (9)
✅ Keep yarn attached (this yarn will assemble the wing).
3) Assemble ONE wing (use yarn from Base)
You will assemble:
- 1 Small A
- 1 Small B (keep aside until Assembly Round 3)
- 1 Base (yarn attached)
Assembly Round 1 (joins Small A + Base) — (16)
Work 8 stitches on Small A, then 8 stitches on Base:
On Small A: sc 3, dec, sc 4 = 8
On Base: sc 3, dec, sc 4 = 8
Total: 16
📌 Important: you do NOT use all 9 stitches of each piece here.
You only crochet 8, leaving 1 unworked stitch on Small A and 1 unworked stitch on Base (this creates the correct wing curve).
Assembly Round 2 — (13)
R2: sc 2, dec, dec, sc 5, dec, sc 3 (13)
Assembly Round 3 (attach Small B) — (20)
R3: sc 3, then sc 9 around Small B, then return to the main piece and do:
sc 4, dec x2, sc 2 → (20)
Assembly Round 4 — (15)
R4: (sc 2, dec) x5 = 15
sl st to finish (sl st not counted)
✅ Fasten off, leave a long tail for sewing.
4) Sew wings to the heart (placement)
Sew one wing on each side of the heart:
- Place them mid-height, slightly below the top bumps
- Aim for the wing’s center to sit around the Join Rounds 5–7 area (after the 42-stitch section begins shrinking)
- Sew firmly at multiple points so they don’t flop
✅ This matches the photo look.
DEVIL HORNS + DEVIL TAIL (plus placement + final choices)
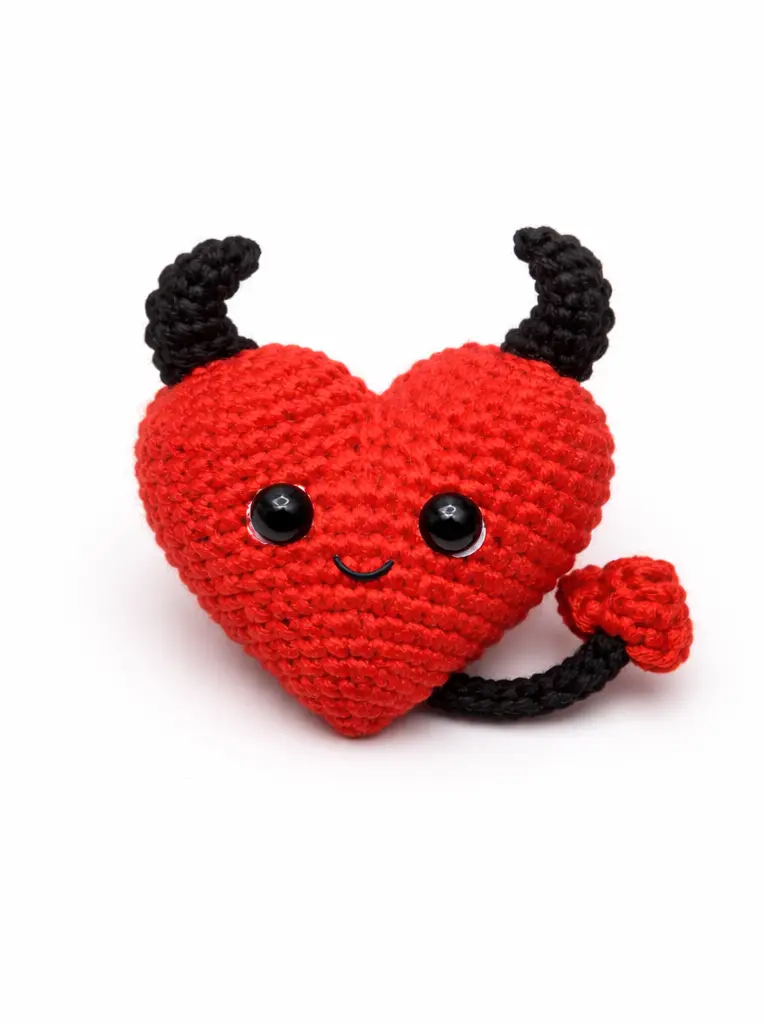
Now we’ll finish the Devil Heart version. You’ll add 2 horns and 1 tail to the heart body.
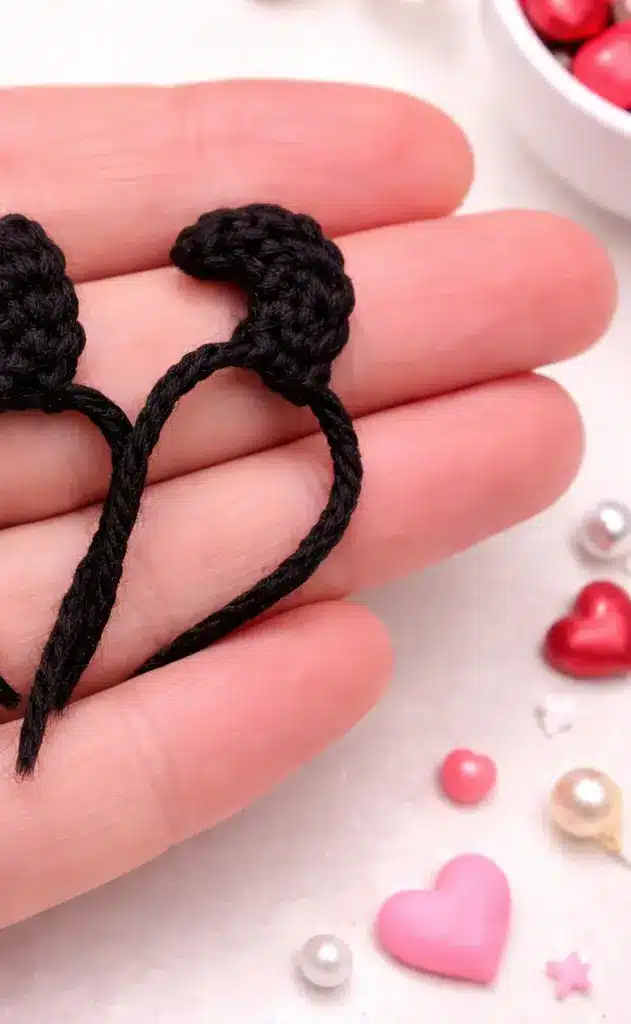
A) DEVIL HORNS (Black) — Make 2 horns
Per devil heart, you need 2 horns.
ch 6
Starting in 2nd ch from hook:
- sl st
- inc (2 sc in same ch)
- sc
- inc (2 sc in same ch)
- sc
✅ You will have 6 sc total (the sl st is not counted).
Fasten off, leave a long tail.
Sew horns (placement)
- Sew one horn on each top side
- Place them near the outer edges of the two bumps
- Angle them slightly outward (cute “devil” look)
B) DEVIL TAIL (Red tip + Black cord) — Make 1 tail
1) Tail tip (Red)
R1: MR 4 sc (4)
R2: (inc, sc) x2 (6)
R3: inc x6 (12)
R4: Fold flat, then sc 6 through both layers to close (6)
✅ Fasten off.
2) Tail cord (Black)
ch 9
Attach to the top of the red tail tip with sl st (center-ish is perfect).
ch 1, turn
sl st 9 back along the chain.
✅ Fasten off, leave a long tail for sewing.
3) Sew tail (placement)
- Sew the tail to the lower back/right side of the heart (like the photo)
- Add a few extra stitches at the cord base so it holds and doesn’t pull loose
Final: Which version are you making?
✅ Angel Heart: Heart body + Wings
✅ Devil Heart: Heart body + Horns + Tail
💖 Making this for Valentine’s Day? Pin this free crochet heart pattern now so it doesn’t get lost! You’ll have the Angel + Devil versions ready whenever you need a quick gift idea.
Size Variations (Tiny / Mini / Small)
One of the easiest ways to resize a heart crochet pattern free like this is by changing yarn thickness and hook size (while keeping the same stitch counts).
✅ Tiny Heart
- Use thinner thread (lace or very fine cotton)
- Use a smaller hook (like 1.0–1.25 mm)
- Stuff lightly so the shape stays crisp
✅ Mini Heart (your current size)
- Keep the pattern exactly as written:
- 1.5 mm hook + thin cotton
✅ Small Plush Heart
- Use thicker yarn (sport/DK or plush yarn)
- Use a larger hook that matches your yarn
- Add more stuffing to keep it rounded
If you want a clear guide for choosing yarn + hook combos, this quick reference on yarn weight, gauge, and hook sizes is super helpful. (Note: this link was already used earlier in the article—so don’t add it again if you’re pasting Part 5 into the same post.)
Finishing Tips (Make it Look Clean)
These small details make the biggest difference:
- Use invisible decreases for the smoothest shaping (especially on Join Rounds 4–13).
- Stuff firmly before Round 13 finishes—this keeps the heart point sharp and cute.
- After inserting eyes, check symmetry: the face should look centered when viewed from the front.
- Embroider tiny white highlights on the eyes for that “alive” look.
- For the wings, sew at multiple points so they sit stable and don’t flop.
Want more adorable “gift-sized” crochet ideas like this? You might also love this fun amigurumi duck keychain pattern (it’s a great beginner-friendly charm project).
And if you’re planning a Valentine gift bundle, this cute avocado keychain pattern pairs perfectly with the heart plush.
FAQs about this crochet heart pattern free
How to crochet a heart for beginners?
This pattern is beginner-friendly because it uses only basic stitches (sc, inc, dec). You start by crocheting two top bumps, join them, then decrease to form the heart point and stuff it.
What’s the easiest crochet heart pattern free?
The easiest version is a simple flat heart, but if you want a plush look, this one stays easy because it’s mostly single crochet rounds with clear decreases.
Where should I place the eyes on a crochet heart plush?
Place the safety eyes between Join Round 3 and Join Round 4, with 7 stitches between them (exact placement from your pattern sheet).
Can I turn this into a mini crochet heart keychain?
Yes! Make it tiny (thinner yarn + smaller hook), then add a small keyring loop at the top between the bumps. You can also attach a jump ring through a strong stitched loop
How do I resize this heart crochet pattern?
Keep the same stitch counts and simply change:
yarn thickness
hook size
stuffing amount
Thicker yarn = bigger plush heart.
That’s it, you’ve got a complete crochet heart pattern free with two adorable Valentine variations! Make a sweet Angel Heart for soft, dreamy vibes, or go bold with the Devil Heart for a playful twist. If you make both, they look amazing as a pair (and they’re perfect for gifts).