12 Crochet Christmas Hair Accessories to Make, Keep or Gift

Looking for crochet Christmas hair accessories that work with clips, ties and headbands? These 12 patterns cover small festive accents, from a holly snap clip to a snowflake comb, as well as a bun cover and a tie-back headband.
Choose by how you want to wear the finished piece. Flat motifs suit clips, while a soft ribbon can be woven into a braid. Each design calls for a different approach to fit and attachment, so check your hair hardware before you begin.
For more ideas that build on this collection, explore crochet hair accessories.
Before You Start
Gather the hair fitting for your chosen design before selecting yarn. Clip widths, comb curves and headband shapes vary, and a motif that looks right on its own may cover a hinge or sit too far from the hair. Hold flat pieces against the fitting as you work, then open and close any clip before securing the attachment.
Cotton can give the holly leaves, tree tiers and poinsettia petals a defined edge. For the braid ribbon or tie-back headband, consider a yarn that feels comfortable against hair and skin. Match the yarn and hook to the pattern, and keep the fabric firm where a small motif needs to hold its shape.
Weave in ends securely and keep stitched details neat on the back, where loose strands could catch in hair. The patterns use US crochet terminology. Read the difficulty label and finishing notes for your chosen accessory before starting, especially if it needs shaping, reinforcement or a fitted wrap.
Crochet terminology: This article uses US crochet terms. Check the abbreviations for each project.
Holly Leaf Snap Clip

This holly snap clip brings a little Christmas colour to an everyday hair accessory without adding much bulk. The pointed leaves sit at an angle, so the motif reads clearly as holly while lying fairly flat against the clip.
The narrow crochet backing gives the leaves a place to sit and holds the design against the clip’s upper arm. Before attaching anything, check where your clip bends and snaps: the leaves need to stay clear of the hinge so the clip can still open and close freely.
The red berries are stitched yarn knots rather than separate beads. They add a small spot of colour at the centre of the leaves without a loose embellishment to attach, making this a practical choice for a handmade Christmas gift.
Holly Leaf Snap Clip
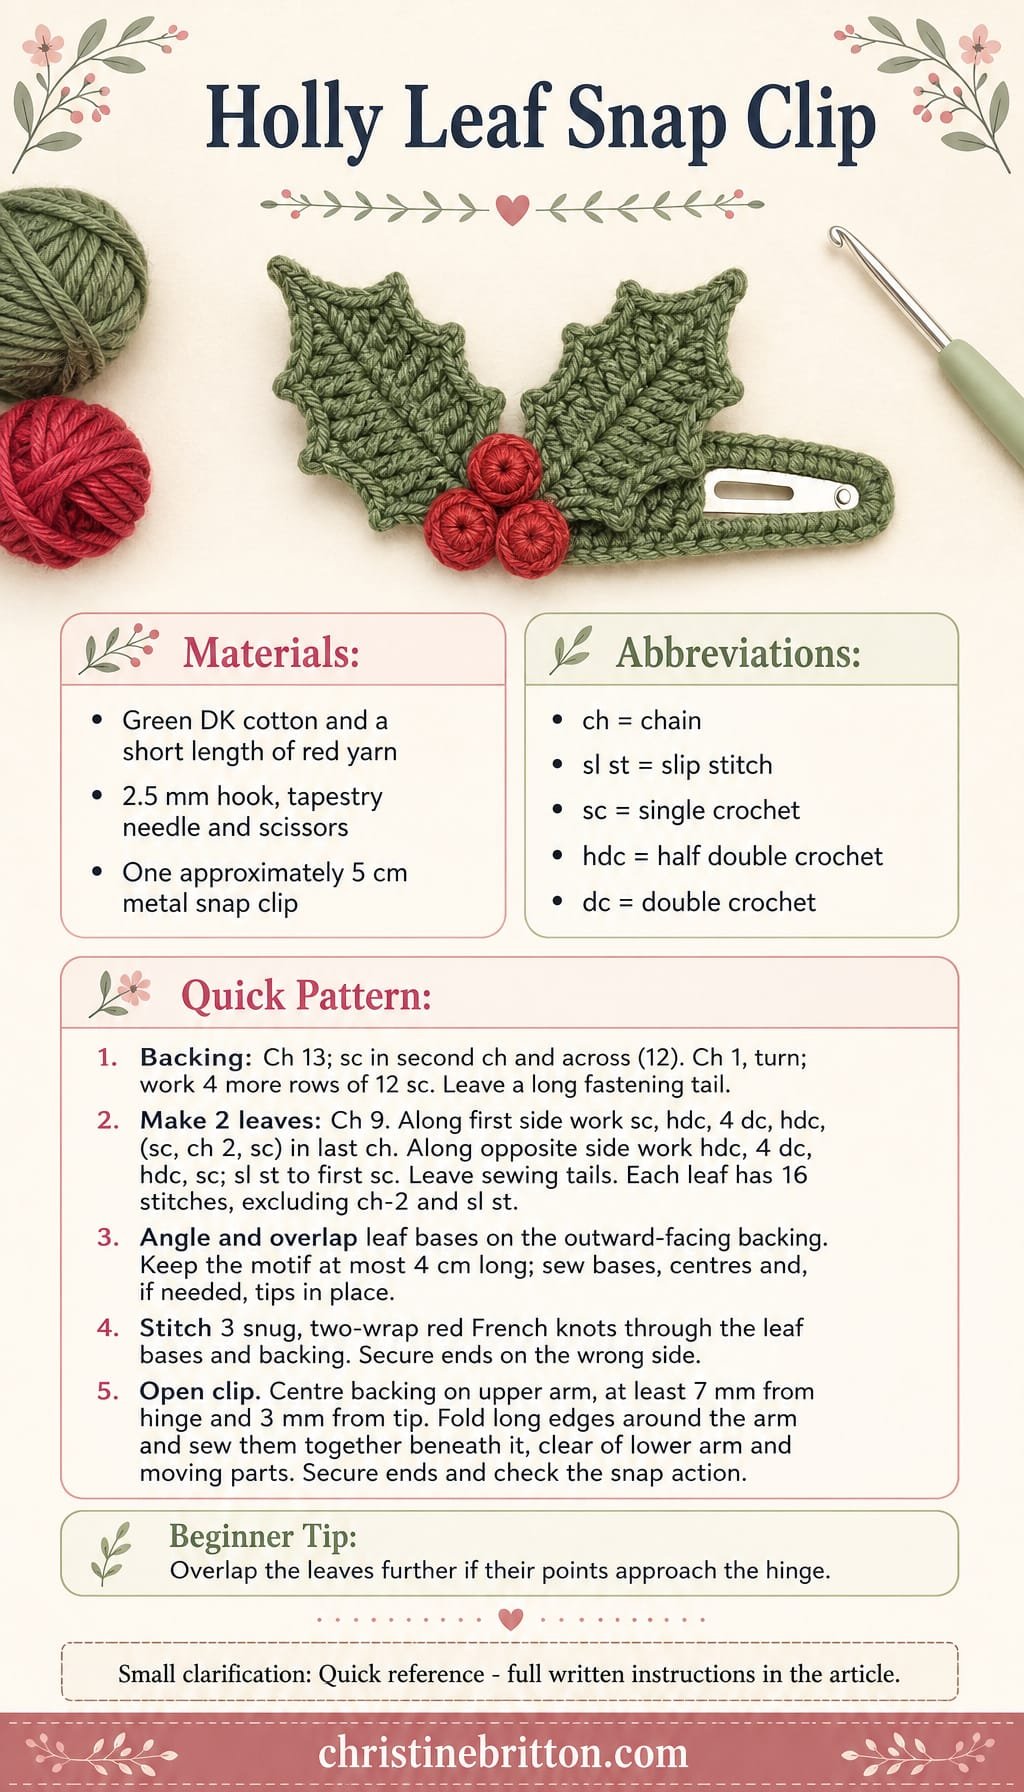
Quick-reference card. Follow the complete written instructions below.
Materials
- Green cotton yarn: A small amount of DK-weight cotton for the leaves and backing.
- Red yarn: A short length for stitched berries; use a thickness that passes through the crochet without stretching it.
- Crochet hook: 2.5 mm, or a size that produces firm stitches.
- Metal snap clip: One approximately 5 cm long, with an upper arm that can be wrapped without covering the hinge.
- Tapestry needle and scissors: For assembling the motif and securing the yarn ends.
Size and Fit
Sample size: for a 5 cm snap clip. The backing is approximately 3.5 cm long; arrange the leaves into a motif no longer than 4 cm. Position it at least 7 mm from the hinge and 3 mm from the tip. Check these clearances on your particular clip before sewing.
Gauge
Aim for firm fabric at approximately 12 single crochet stitches and 5 rows over 3.5 cm by 1.5 cm. Exact gauge is less important than a backing that fits the clip and leaves that clear its hinge.
Abbreviations
US crochet terms.
- ch = chain
- sl st = slip stitch
- sc = single crochet
- hdc = half double crochet
- dc = double crochet
Pattern
- Backing With green, ch 13. Row 1: Sc in the second ch from the hook and in each remaining ch; 12 sc. Rows 2–5: Ch 1, turn, sc in each stitch; 12 sc per row. Fasten off, leaving a long tail for fastening the backing to the clip.
- First leaf With green, ch 9. Working along one side of the foundation chain, sc in the second ch from the hook, hdc in the next ch, dc in each of the next 4 ch, hdc in the next ch, and (sc, ch 2, sc) in the last ch to form the pointed tip. Working back along the opposite side of the foundation chain, hdc in the next ch, dc in each of the next 4 ch, hdc in the next ch, and sc in the final ch. Sl st to the first sc. Fasten off, leaving a sewing tail. There are 16 stitches around the leaf, excluding the tip’s ch-2 and joining sl st.
- Second leaf Make a second leaf exactly as for the first.
- Arrange and attach the leaves Lay the backing flat. Place the leaf bases together near its centre, with their points angled towards opposite ends. Overlap and angle them until the whole motif is no longer than 4 cm. Using the green sewing tails, stitch the bases and a few points along each leaf’s centre line to the outward-facing side of the backing. Add a small stitch near each tip if needed to keep it flat. Do not sew the backing’s long edges together yet.
- Stitch the berries Thread a tapestry needle with red yarn. At the overlapping leaf bases, make three small, closely spaced French knots: bring the yarn up through a leaf and the backing, wrap it twice around the needle, and take the needle back down immediately beside the entry point. Keep each knot snug against the leaf. Secure and weave the red yarn ends into the wrong side of the backing; do not use separate beads.
- Fasten to the clip Open the clip. Centre the backing over the upper metal arm, with the holly facing out and its edges and tips clear of the hinge and clip tip. Fold the backing’s long edges down around that arm. Using the backing tail, sew the long edges together beneath the upper arm to form a close-fitting sleeve. Keep the needle and yarn clear of the lower arm and the clip’s moving parts. Secure the tail, then open and close the clip several times to check that the hinge and snap action remain unobstructed.
Finishing
- Weave in any remaining green ends and trim them close.
- Check that the leaves, berry knots and backing are firmly attached, and that no yarn catches when the clip opens or closes.
Helpful Tips
- If the leaves reach the hinge, overlap their bases further and angle the points inward before stitching; do not force an oversized motif onto the clip.
- Keep the crochet firm and the fastening stitches snug so the backing does not slide along the metal arm.
Tiered Christmas Tree Alligator Clip
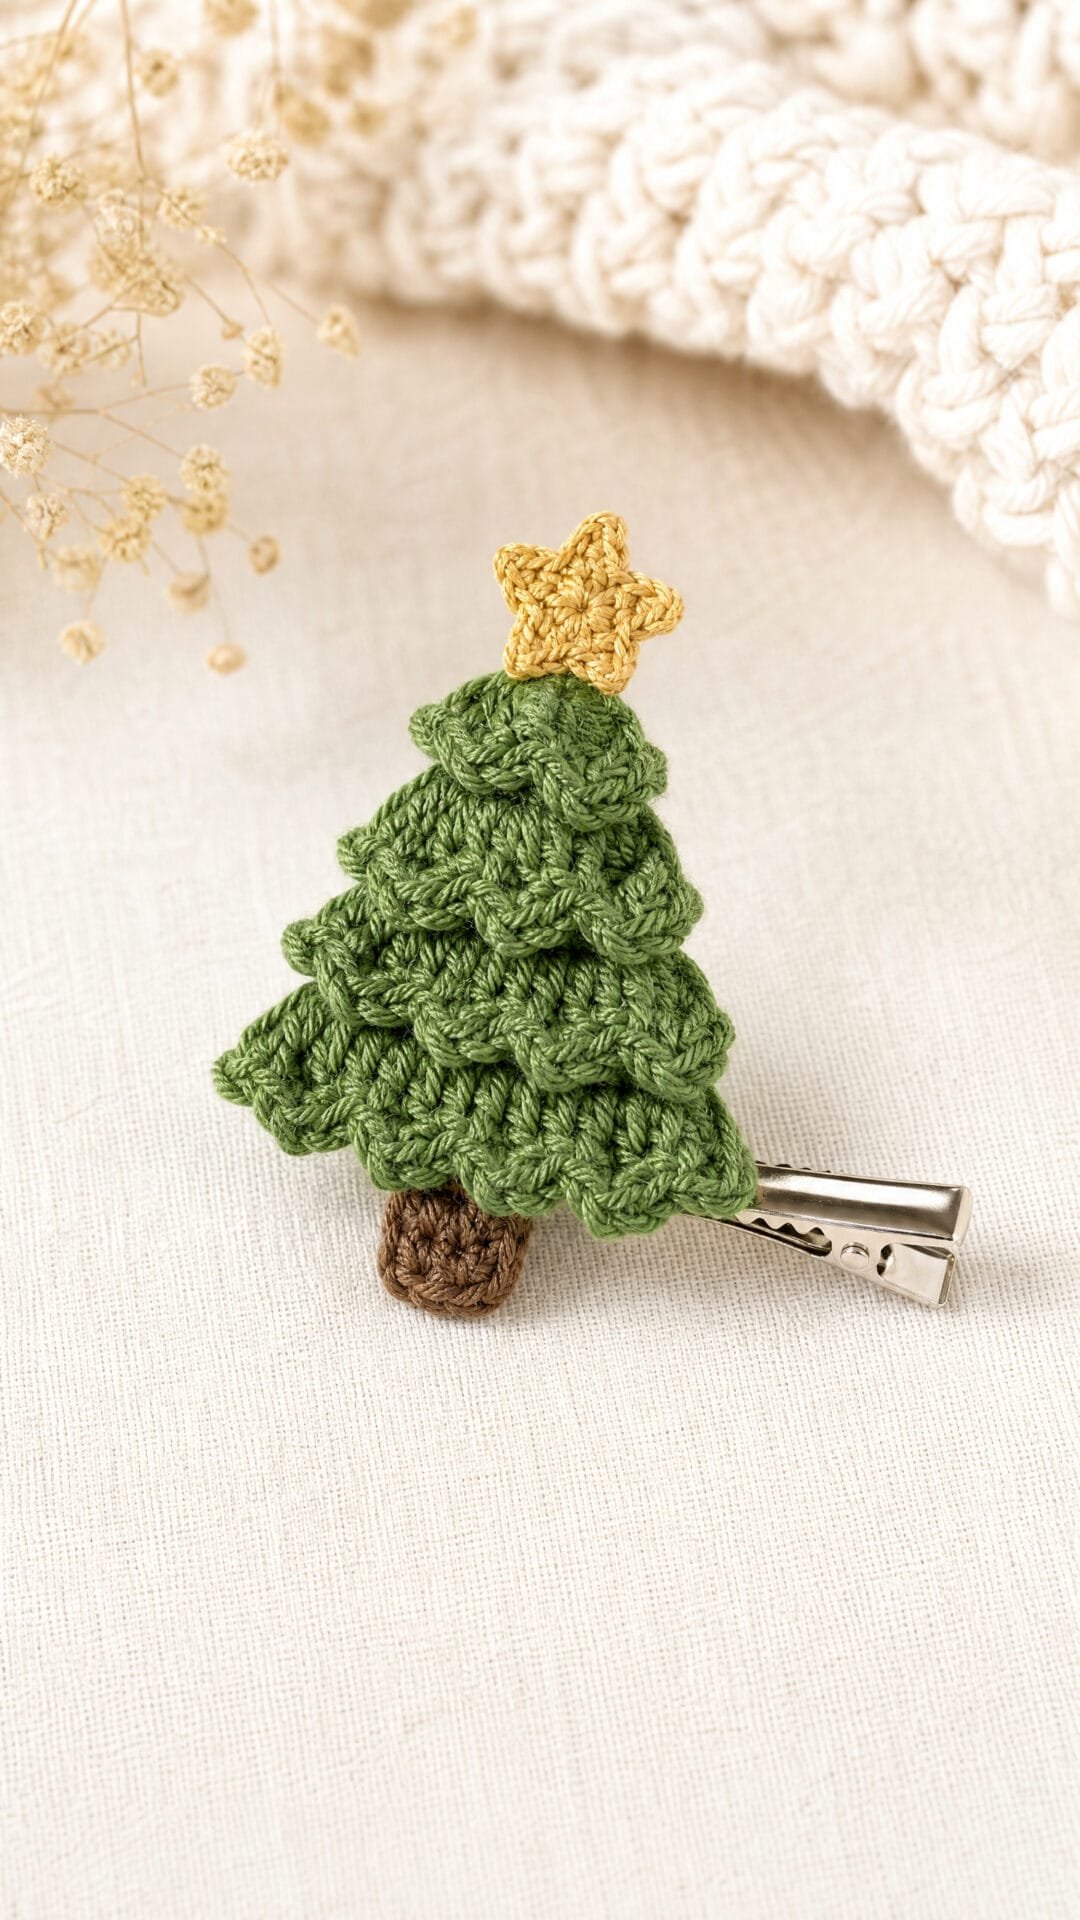
This little Christmas tree has a clear, layered outline without the bulk of stuffing. Its flat tiers give it a festive shape that works well as a hair accessory rather than a miniature ornament.
The visible trunk and stitched gold star add detail while keeping the decoration low-profile. It would make a cheerful addition to a Christmas outfit or a small handmade gift.
Before joining the tree, check how its shape sits over your chosen clip. The finished decoration should cover the sleeve, while the clip’s jaws and spring remain free to move.
Tiered Christmas Tree Alligator Clip

Quick-reference card. Follow the complete written instructions below.
Materials
- Smooth green cotton yarn: Small amount of DK-weight yarn for the tree tiers and clip sleeve.
- Brown cotton yarn: Small amount of DK-weight yarn for the trunk.
- Gold embroidery thread or fine yarn: For a flat stitched star.
- Crochet hook: 3 mm, or a size that gives the stated gauge.
- Alligator clip: Choose one with at least 44 mm of straight upper jaw between its tip and spring. The upper jaw should be no more than approximately 7 mm wide and 2 mm thick.
- Other tools: Yarn needle, embroidery needle, scissors and ruler.
Size and Fit
At the stated gauge, the assembled tree is approximately 5.5 cm wide and 6 cm tall, including the visible trunk. The sleeve is approximately 4 cm long. Before joining the tiers, lay them out over the clip: the widest tier should cover the sleeve, and the sleeve must stop at least 4 mm before the spring. Check that the sleeve can fit around the upper jaw without covering the lower jaw.
Gauge
20 sc and 25 rows = 10 cm in flat sc. Check gauge if using the stated clip dimensions; a larger stitch size will change both the tree and sleeve.
Abbreviations
US crochet terms.
- ch = chain
- sc = single crochet
- st(s) = stitch(es)
- 2 sc in next st = work two single crochet stitches into the next stitch
Pattern
- Before you begin Work the tiers in turned rows. A turning ch 1 does not count as a stitch. Leave a sewing tail on each tier and on the trunk.
- Small green tier Row 1: Ch 2, sc in the second ch from the hook. Turn. (1 st) Row 2: Ch 1, work 3 sc in the st. Turn. (3 sts) Rows 3–4: Ch 1, work 2 sc in the first st, sc in each st across until one st remains, then work 2 sc in the last st. Turn after Row 3. (5 sts after Row 3; 7 sts after Row 4) Fasten off.
- Medium green tier Work Rows 1–4 as for the small tier. Row 5: Ch 1, work 2 sc in the first st, sc in each st across until one st remains, then work 2 sc in the last st. (9 sts) Fasten off.
- Large green tier Work Rows 1–5 as for the medium tier. Row 6: Ch 1, work 2 sc in the first st, sc in each st across until one st remains, then work 2 sc in the last st. (11 sts) Fasten off.
- Brown trunk Ch 4. Row 1: Sc in the second ch from the hook and in each remaining ch. Turn. (3 sts) Rows 2–4: Ch 1, sc in each st across; turn after Rows 2 and 3. (3 sts per row) Fasten off.
- Green clip sleeve Ch 9. Row 1: Sc in the second ch from the hook and in each remaining ch. Turn. (8 sts) Rows 2–5: Ch 1, sc in each st across; turn after Rows 2–4. (8 sts per row) Fasten off. Bring the foundation edge and the edge of Row 5 together, and whipstitch them together across all 8 sts to form a tube with an opening at each short end. The seam will sit underneath the upper jaw.
- Check the layout Lay the medium tier behind the small tier, with its point concealed beneath the centre of the small tier’s bottom row. Lay the large tier behind the medium tier in the same way. Centre the trunk behind the bottom of the large tier so its top two rows are hidden and its bottom two rows show. Place the assembled shape over the clip and sleeve to check the width and position before sewing.
- Stitch the star With gold thread, make five tiny straight stitches radiating from a point near Row 2 of the small tier. Place their outer ends in nearby stitch gaps across Rows 1–3, keeping the whole star on the crocheted fabric. Secure the thread on the back.
- Join the tree Using the sewing tails, stitch the overlapping bottom row of the small tier to the medium tier, then stitch the overlapping bottom row of the medium tier to the large tier. Add a small securing stitch at either side of each overlap. Sew the trunk to the back of the large tier, leaving its bottom two rows visible. Keep the tiers flat.
- Attach the sleeve With the sleeve seam facing down, centre the tree on its upper face. Sew the lower part of the large tier to that face of the sleeve, taking stitches through the sleeve’s upper layer only so the tube remains open. Slide the clip’s upper jaw through the sleeve from the tip. Leave at least 4 mm of bare upper jaw between the sleeve and spring. At each sleeve end, use a few firm thread wraps through the sleeve edge and around the upper jaw only to discourage the sleeve from sliding. Do not catch the lower jaw or spring.
Finishing
- Weave in ends, keeping knots and loose strands away from the clip mechanism.
- Open and close the clip several times to confirm that the jaws and spring move freely.
- Check that the star, tiers, trunk and sleeve are securely stitched before wearing or gifting.
Helpful Tips
- Measure the straight upper jaw before starting: the 4 cm sleeve needs at least 4.4 cm between the tip and spring.
- If your sleeve does not slide over the upper jaw comfortably, remake it with enough rows to wrap that jaw snugly; keep its length short enough to retain the 4 mm spring gap.
- Use small, flat embroidery stitches rather than beads so the decoration does not add bulk.
Candy Cane Bobby Pin

This candy cane gets its shape from a narrow striped crochet strip rather than stuffing or yarn wrapped around the pin. The curved end gives it a recognisable festive outline without the bulk of a miniature ornament.
A flat backing supports the decoration above the bobby pin while leaving its opening clear. A low-profile cane is especially useful here: too much crochet around the pin could catch in hair or make it awkward to slide into place.
Candy Cane Bobby Pin
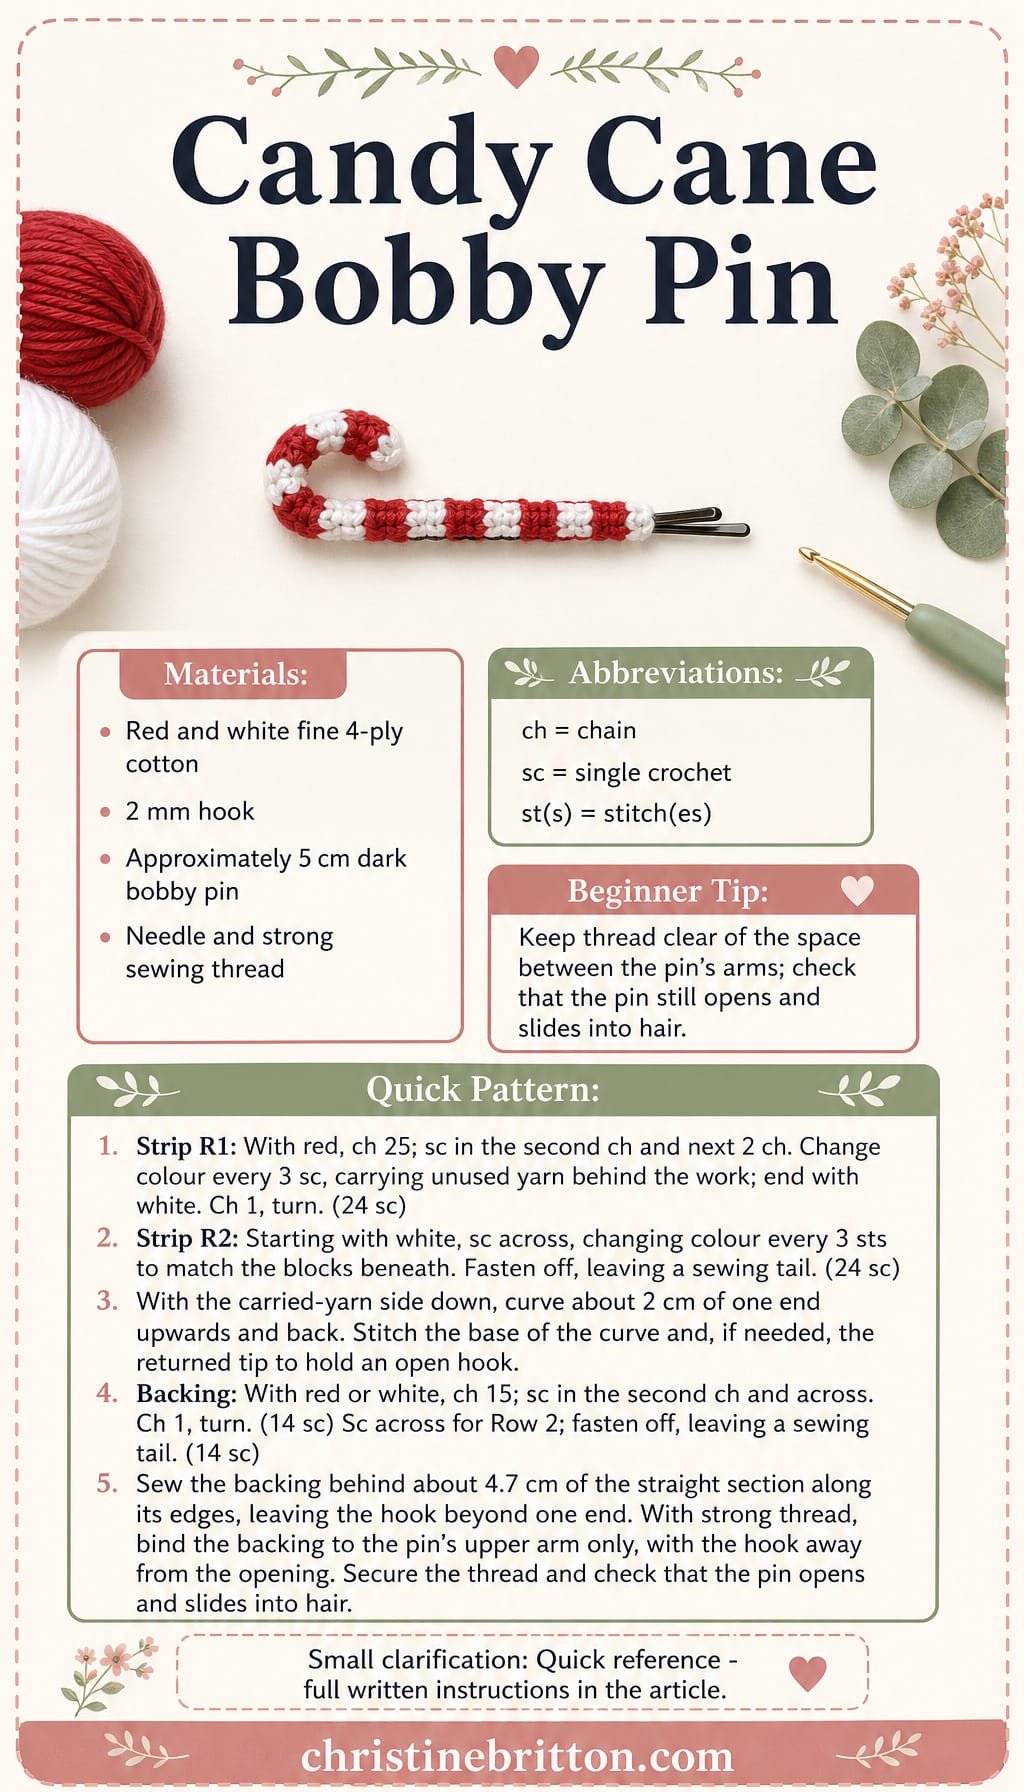
Quick-reference card. Follow the complete written instructions below.
Materials
- Fine cotton yarn: Small amounts of red and white 4-ply cotton
- Crochet hook: 2 mm, or a size that produces a firm fabric
- Bobby pin: One dark metal pin, approximately 5 cm long
- Sewing supplies: Needle, scissors and strong thread in a colour that blends with the backing
Size and Fit
For one approximately 5 cm bobby pin. At the stated gauge, the cane strip is about 8 cm long and the backing about 4.7 cm long. The strip’s end folds back to form the hook; its straight section should extend a little beyond each end of the backing. Check the fit against your pin before sewing.
Gauge
Approximately 30 sc across 10 cm. Exact gauge is not essential, but work firmly so the narrow strip holds its shape.
Abbreviations
US crochet terms.
- ch = chain
- sc = single crochet
- st(s) = stitch(es)
Pattern
- Candy cane strip, Row 1 With red, ch 25. Sc in the second ch from the hook and in the next 2 ch. Change to white for the next 3 sc. Continue changing colour every 3 sc, carrying the unused yarn neatly along the back of the work. You will have eight alternating blocks of 3 sc, beginning with red and ending with white. Ch 1 and turn. (24 sc)
- Candy cane strip, Row 2 Starting with white, sc in the first 3 sts. Change colour every 3 sts across, matching the colour of each block beneath it. Fasten off both colours, leaving a sewing tail. (24 sc)
- Shape the hook Lay the strip with its carried-yarn side facing down. Curve about 2 cm of one end upwards and back towards the straight section, making a rounded candy-cane hook with its tip pointing back along the strip. With small stitches through the fabric, secure the base of the curved section where it meets the straight section. Add a stitch near the returned tip if needed to keep the curve open. Do not pull the hook into a tight loop.
- Backing, Row 1 With red or white, ch 15. Sc in the second ch from the hook and in each remaining ch. Ch 1 and turn. (14 sc)
- Backing, Row 2 Sc in each st across. Fasten off, leaving a sewing tail. (14 sc)
- Attach cane to backing Centre the backing behind approximately 4.7 cm of the cane’s straight section, with the hook projecting beyond one end. Sew the straight section to the backing along its edges. Keep the curved hook free of the backing.
- Mount on bobby pin Place the backing on the straight upper arm of the closed bobby pin, with the cane’s hook curving away from the pin opening. Using strong thread, take small stitches through the backing and around the upper arm at several points along its length. Catch only the upper arm: do not sew the two arms together or run thread across the opening. Secure the thread firmly beneath the backing.
Finishing
- Weave in or trim all yarn ends on the back, keeping them clear of the pin opening.
- Open and close the bobby pin and slide it into hair to check that the backing, stitches and curved hook do not catch or obstruct it.
Helpful Tips
- Keep the decoration close to the width of the upper arm rather than wrapping yarn around both arms of the pin.
- If your strip is too long or short for a different pin, adjust the starting chain by a multiple of 6. Each additional 6 stitches adds one red and one white stripe; keep both rows at the same stitch count.
Santa Hat Barrette

This miniature Santa hat brings a recognisable Christmas touch to a simple barrette without relying on a loose pompom. Its tapered red shape has a securely folded-over tip, while the white brim gives it the familiar Santa-hat outline.
The hat sits on a firm crochet backing, so it can be attached to the barrette’s top plate while leaving the clip mechanism free to work. Barrette sizes vary, and the usable top plate—not the overall clip length—is what matters for a neat fit. This is a small accessory that could be worn for a festive outing or tucked into a handmade gift.
Santa Hat Barrette

Quick-reference card. Follow the complete written instructions below.
Materials
- DK yarn: Small amounts of red and white.
- Crochet hook: 3 mm, or the size needed to obtain the stated gauge.
- Barrette: One with a flat top plate approximately 43–45 mm long. Check the plate length rather than the overall clip length.
- Notions: Yarn needle, scissors and a small amount of adhesive suitable for bonding fabric to metal. If the plate has sewing holes, a needle and strong sewing thread are also useful.
Size and Fit
At the stated gauge, the backing is approximately 43 mm long and the hat is approximately 40 mm wide at its base. Before attaching anything to the barrette, hold the completed hat and backing against its top plate: the backing should sit within the plate, while the brim may extend slightly beyond it. Choose a different barrette if the plate is substantially shorter or longer.
Gauge
13 single crochet stitches and 12 rows = 4 cm in single crochet. Gauge matters here because the backing must fit the barrette plate.
Abbreviations
US crochet terms.
- ch = chain
- sc = single crochet
- sc2tog = single crochet two stitches together; decreases one stitch
- st(s) = stitch(es)
Pattern
- Red hat, Row 1 With red, ch 14. Sc in the second ch from the hook and in each remaining ch. Turn. (13 sts)
- Red hat, Rows 2–11 Ch 1 and turn at the start of each row; the turning ch never counts as a stitch. Row 2: sc2tog, sc in each st until 2 sts remain, sc2tog. (11 sts) Row 3: sc across. (11 sts) Row 4: decrease as for Row 2. (9 sts) Row 5: sc across. (9 sts) Row 6: decrease as for Row 2. (7 sts) Row 7: sc across. (7 sts) Row 8: decrease as for Row 2. (5 sts) Row 9: sc across. (5 sts) Row 10: decrease as for Row 2. (3 sts) Row 11: sc across. (3 sts) Fasten off, leaving a red tail for sewing.
- Fold the hat tip Lay the hat flat with Row 1 at the bottom. Fold Rows 9–11 down and towards one side so the narrow tip rests against the hat near Row 7. Use the red tail to sew the tip firmly in place with several small stitches through both layers. Secure the tail on the back. Do not leave a dangling tip.
- White folded brim With white, ch 14. Row 1: sc in the second ch from the hook and in each remaining ch; turn. (13 sts) Rows 2–4: ch 1, sc across, turn. (13 sts each row) Fasten off, leaving a long tail. Fold the strip lengthwise so it is two rows deep, and place it around the bottom edge of the red hat with two rows showing at the front and two at the back. Sew along both long edges of the folded strip, catching the red hat between them. Secure the short ends.
- Crochet backing With red, ch 15. Row 1: sc in the second ch from the hook and in each remaining ch; turn. (14 sts) Rows 2–3: ch 1, sc across, turn. (14 sts each row) Fasten off, leaving a long tail. The backing should be firm and approximately 43 mm long.
- Assemble and attach Check the finished hat and backing against the barrette before attaching them. Centre the hat’s brim along the backing and sew the brim securely to it, adding a few stitches through the lower red section of the hat. Keep the tapered section flat but above the backing so the hat’s outline remains visible. Following the adhesive maker’s directions, bond the back of the crochet backing to the top plate only. If the plate has sewing holes, add stitches through those holes for extra security. Keep adhesive and stitches clear of the hinge, spring and clasp; leave the barrette closed and undisturbed until the adhesive has fully cured.
Finishing
- Weave in or secure all yarn ends on the back, away from the clasp.
- Open and close the barrette to confirm that the hinge, spring and clasp move freely.
- Check that the folded tip, brim and backing are firmly attached before wearing or gifting.
Helpful Tips
- Check the plate length before starting: an overall barrette length does not tell you how much space is available for the backing.
- If the backing is too long or short, adjust hook size to meet gauge or choose a better-fitting barrette rather than trimming the crochet.
- Keep the white brim even as you fold it; the four-row strip should show two rows on each side of the red base.
Snowflake Hair Comb

A snowflake hair comb brings a small touch of Christmas crochet to a hairstyle without the bulk of a larger decoration. The flat motif sits above the comb’s solid spine, so the teeth remain free to slip into the hair.
A firm, lightly blocked snowflake is well suited to this position: its open outline stays distinct, while a heavily textured motif could add weight and sit awkwardly against the head. A narrow crochet sleeve gives the motif a secure base on the spine, with no loose loops to snag hair.
Snowflake Hair Comb

Quick-reference card. Follow the complete written instructions below.
Materials
- White crochet cotton: Size 10 thread; a small amount for the snowflake and sleeve.
- Crochet hook: Approximately 1.75 mm, or a size that produces firm stitches.
- Hair comb: A small comb with a solid, unbroken spine deep enough to support the motif above its tooth roots.
- Also needed: Tapestry needle, scissors, pins and a flat surface for blocking.
Size and Fit
Size the sleeve to your comb. Measure the circumference around its solid spine and the usable length of that spine, excluding any tapered ends. The sleeve should wrap snugly around the circumference and finish within the usable length. Before attaching the motif, position it so its centre and the bases of two lower arms overlap the sleeve, while its lowest chain point remains at least 2 mm above the tooth roots. If both conditions cannot be met, use a comb with a deeper solid spine or make a smaller motif with finer cotton and hook.
Gauge
Exact gauge is not essential. Work firmly so the snowflake lies flat and the sleeve does not stretch loosely around the spine. Measure the first completed sleeve row against the comb rather than relying on chain length alone.
Abbreviations
US crochet terms.
- ch = chain
- sc = single crochet
- sl st = slip stitch
- sp = space
- st = stitch
Pattern
- Snowflake, round 1 Ch 4 and join with a sl st to form a ring. Ch 1. Work (sc into ring, ch 3) six times. Join with a sl st to the first sc. You have 6 sc and 6 ch-3 spaces.
- Snowflake, round 2 Sl st into the first ch-3 sp. In that space work (sc, ch 3, sc, ch 5, sc, ch 3, sc). Repeat the same sequence in each of the remaining five ch-3 spaces. Join with a sl st to the first sc. You have 24 sc, 12 ch-3 spaces and 6 ch-5 points. Fasten off and weave in the ends.
- Block the motif Dampen the snowflake lightly and pin it flat, opening the six ch-5 points evenly. Let it dry completely. Do not stretch the points so far that the centre puckers or the stitches become loose.
- Sleeve, first row Measure around the solid spine, without including the teeth. Ch enough to approach that circumference, allowing about 1–2 mm less for a snug fit, then ch 1 more for turning. Sc in the second ch from the hook and in each remaining ch. Check this completed row around the spine: it should meet snugly on the back without covering the tooth roots. Undo and adjust the starting chain if needed.
- Sleeve, remaining rows Ch 1, turn and sc in every st. Repeat this row until the rectangle matches the usable length of the solid spine without extending over its tapered ends. Keep the same number of sc in every row. Fasten off, leaving a long tail for closing the sleeve.
- Attach the snowflake Lay the sleeve flat with the face that will show at the front facing up. Centre the blocked snowflake along its length and position it above the spine area. Check against the comb that the lowest point will remain at least 2 mm above the tooth roots. With matching cotton, make short stitches through the motif centre and the bases of two lower arms wherever they overlap the sleeve. Stitch through the crochet fabric, not across open chain spaces; leave the six points free.
- Close around the comb Wrap the sleeve around the solid spine with its two long edges meeting on the back. Use the long tail to whipstitch those edges together closely along their length. Catch only sleeve stitches, not tooth gaps, and draw each stitch snug so no loop stands away from the back. Secure and bury the tail within the sleeve. Check that the sleeve cannot slide onto the teeth.
Finishing
- Check the front and back for loose sewing loops; tighten or replace any stitch that could catch hair.
- Confirm that every tooth, tooth tip and inner gap is clear before wearing the comb.
Helpful Tips
- A firm, lightly blocked chain-space motif keeps its outline more readily than a heavily textured motif, which adds weight and bulk above the spine.
- If the sleeve stretches after handling, shorten it or remake it more firmly rather than pulling it down towards the teeth.
If you’d like to keep building your crochet skills, take a look at Christmas crochet appliqué patterns.
Gift Bow Hair Tie

This little bow brings the look of a wrapped Christmas present to an everyday hair tie. Its flattened loops give it a neat, structured shape, while the contrasting centre adds a festive detail without making the fastening bulky.
The bow sits on a separate crochet tab that encloses the hair tie. This keeps the attachment in the crochet fabric rather than the elastic, so the tie does not need to be pierced. A little movement along the tie is normal.
It is a cheerful way to use small yarn leftovers and makes a practical addition to a handmade Christmas gift. The compact shape also works well when you want a festive accent rather than a large statement bow.
Gift Bow Hair Tie
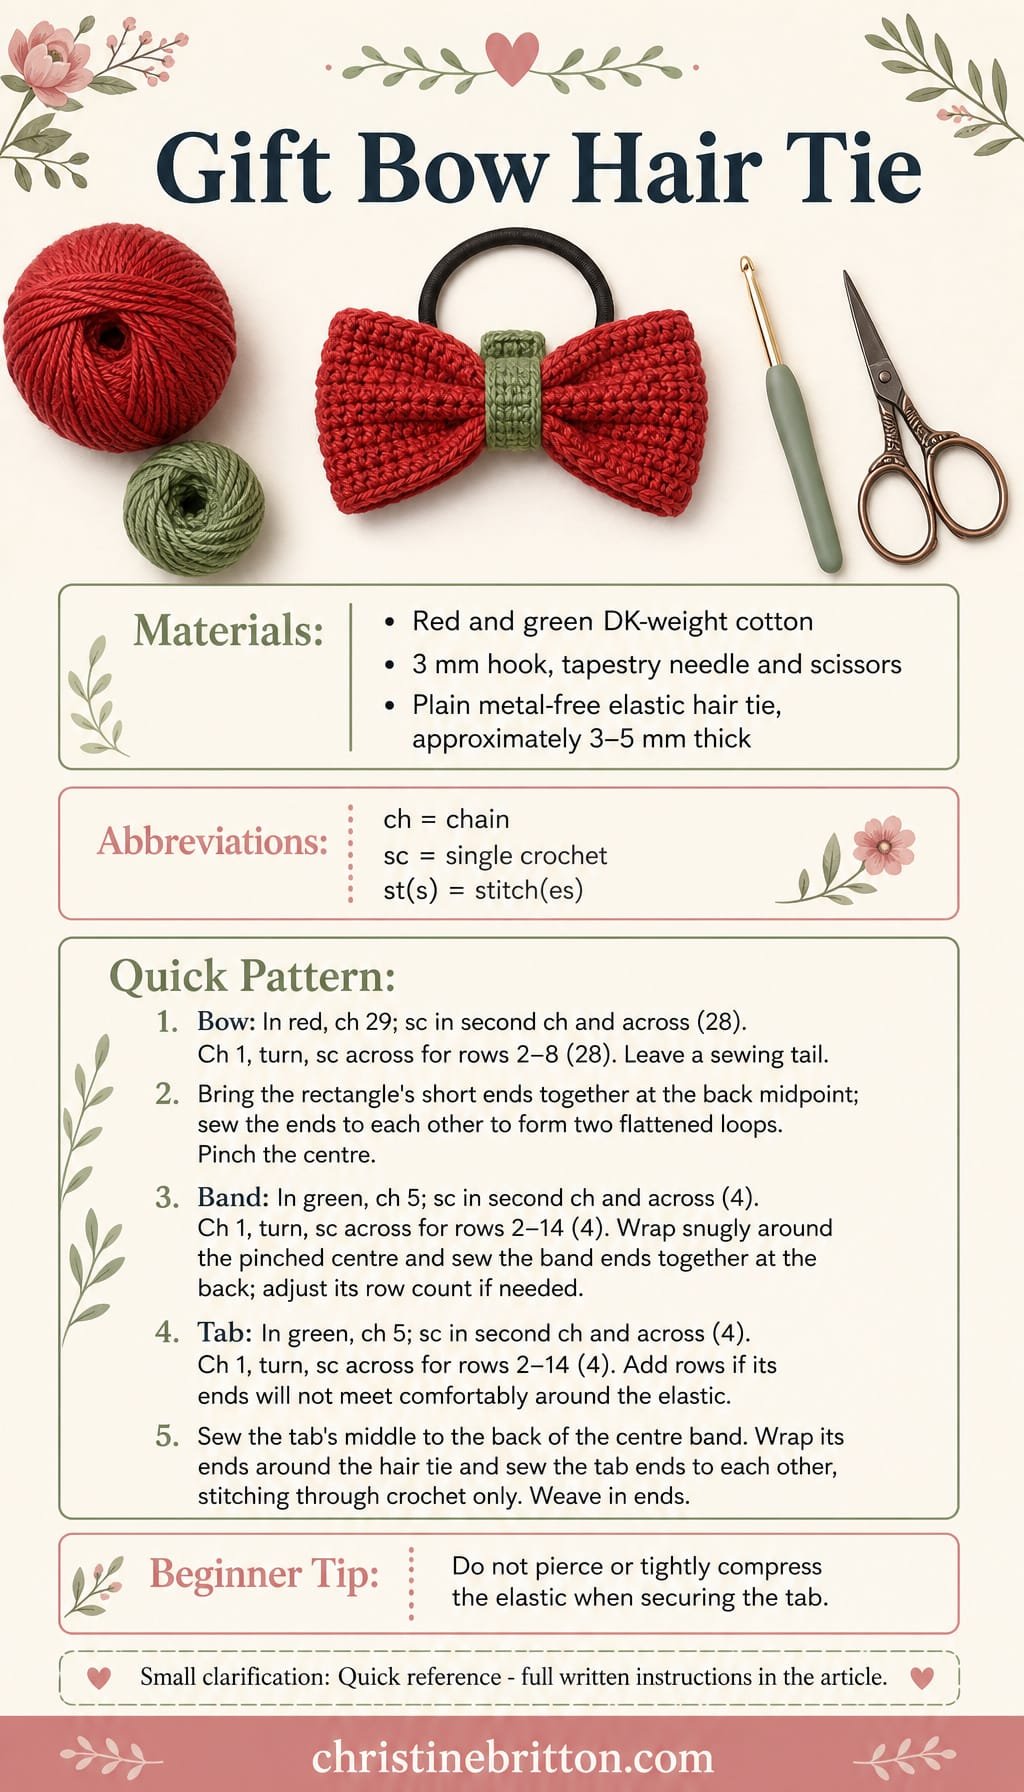
Quick-reference card. Follow the complete written instructions below.
Materials
- Smooth cotton yarn: Small amounts of red and green DK-weight yarn
- Crochet hook: 3 mm, or a size that produces a firm fabric
- Elastic hair tie: One plain, metal-free tie with an elastic approximately 3–5 mm thick
- Tapestry needle and scissors: For joining and weaving in ends
Size and Fit
The sample bow is approximately 5.5 cm wide and 3 cm high before the centre is cinched. The rear tab is sized for an elastic approximately 3–5 mm thick. If the tab ends cannot meet around your tie without stretching, add rows to the tab before fastening off.
Gauge
Approximately 25 sc and 26 rows to 10 cm in firm, unblocked fabric. Exact gauge is not essential; use a hook that makes a dense bow.
Abbreviations
US crochet terms.
- ch = chain
- sc = single crochet
- st(s) = stitch(es)
Pattern
- Red bow rectangle With red, ch 29. Row 1: Sc in the second ch from the hook and in each remaining ch; 28 sc. Rows 2–8: Ch 1, turn, sc in each st; 28 sc. Fasten off, leaving a long sewing tail. The rectangle is approximately 11 cm long and 3 cm high.
- Form the bow loops Lay the rectangle horizontally. Bring both short ends to the midpoint on the back, so the folds form a loop at each side and the short ends meet. Using the red tail, sew the two short ends to each other along their full height. Keep the loops flattened and the seam at the back. Pinch the bow at its centre to shape two even loops.
- Green centre band With green, ch 5. Row 1: Sc in the second ch from the hook and in each remaining ch; 4 sc. Rows 2–14: Ch 1, turn, sc in each st; 4 sc. Fasten off with a long sewing tail. Wrap the strip snugly around the pinched centre, with its ends meeting at the back. Add or undo a row if needed for a snug fit, then sew the strip ends to each other through the crochet fabric only.
- Rear attachment tab With green, ch 5. Row 1: Sc in the second ch from the hook and in each remaining ch; 4 sc. Rows 2–10: Ch 1, turn, sc in each st; 4 sc. Fasten off with a long sewing tail. If necessary, add rows until the tab can wrap around your elastic with its ends meeting without strain.
- Attach the hair tie Sew the middle of the tab to the back of the bow’s centre band, leaving both tab ends free. Place the hair tie against the back of the tab. Bring the free ends around the elastic and sew the tab ends to each other, making a closed crochet loop around the tie. Pass the needle through crochet fabric only: do not pierce, stitch into or tightly compress the elastic. The bow may slide along the tie.
Finishing
- Weave in all ends through the crochet fabric, keeping them clear of the elastic.
- Straighten the two bow loops and check that the centre band and rear tab seams are secure.
Helpful Tips
- Use smooth cotton and firm stitches to help the small loops hold their shape.
- Keep the tab join comfortable around the elastic rather than pulling it tight; the crochet loop holds the bow without weakening the tie.
Christmas Wreath Scrunchie

This Christmas Wreath Scrunchie turns an everyday hair accessory into a small, wearable decoration. The green ruffle gives it a full wreath shape, while the shallow scallops soften the outer edge. A few flat red accents add festive colour without making the scrunchie bulky.
The covered elastic does the stretching, so the crochet around it needs room to move. Guide the hook beneath the whole covered band rather than through its fabric: catching the covering can snag it or interfere with the elastic. The first round should stretch comfortably with the band; if it pulls tight, the scrunchie may be difficult to put in your hair.
Keep the ruffle and red details on the outside of the wreath shape, leaving the inner opening clear. That way, the decoration remains visible without sitting against your hair.
Christmas Wreath Scrunchie
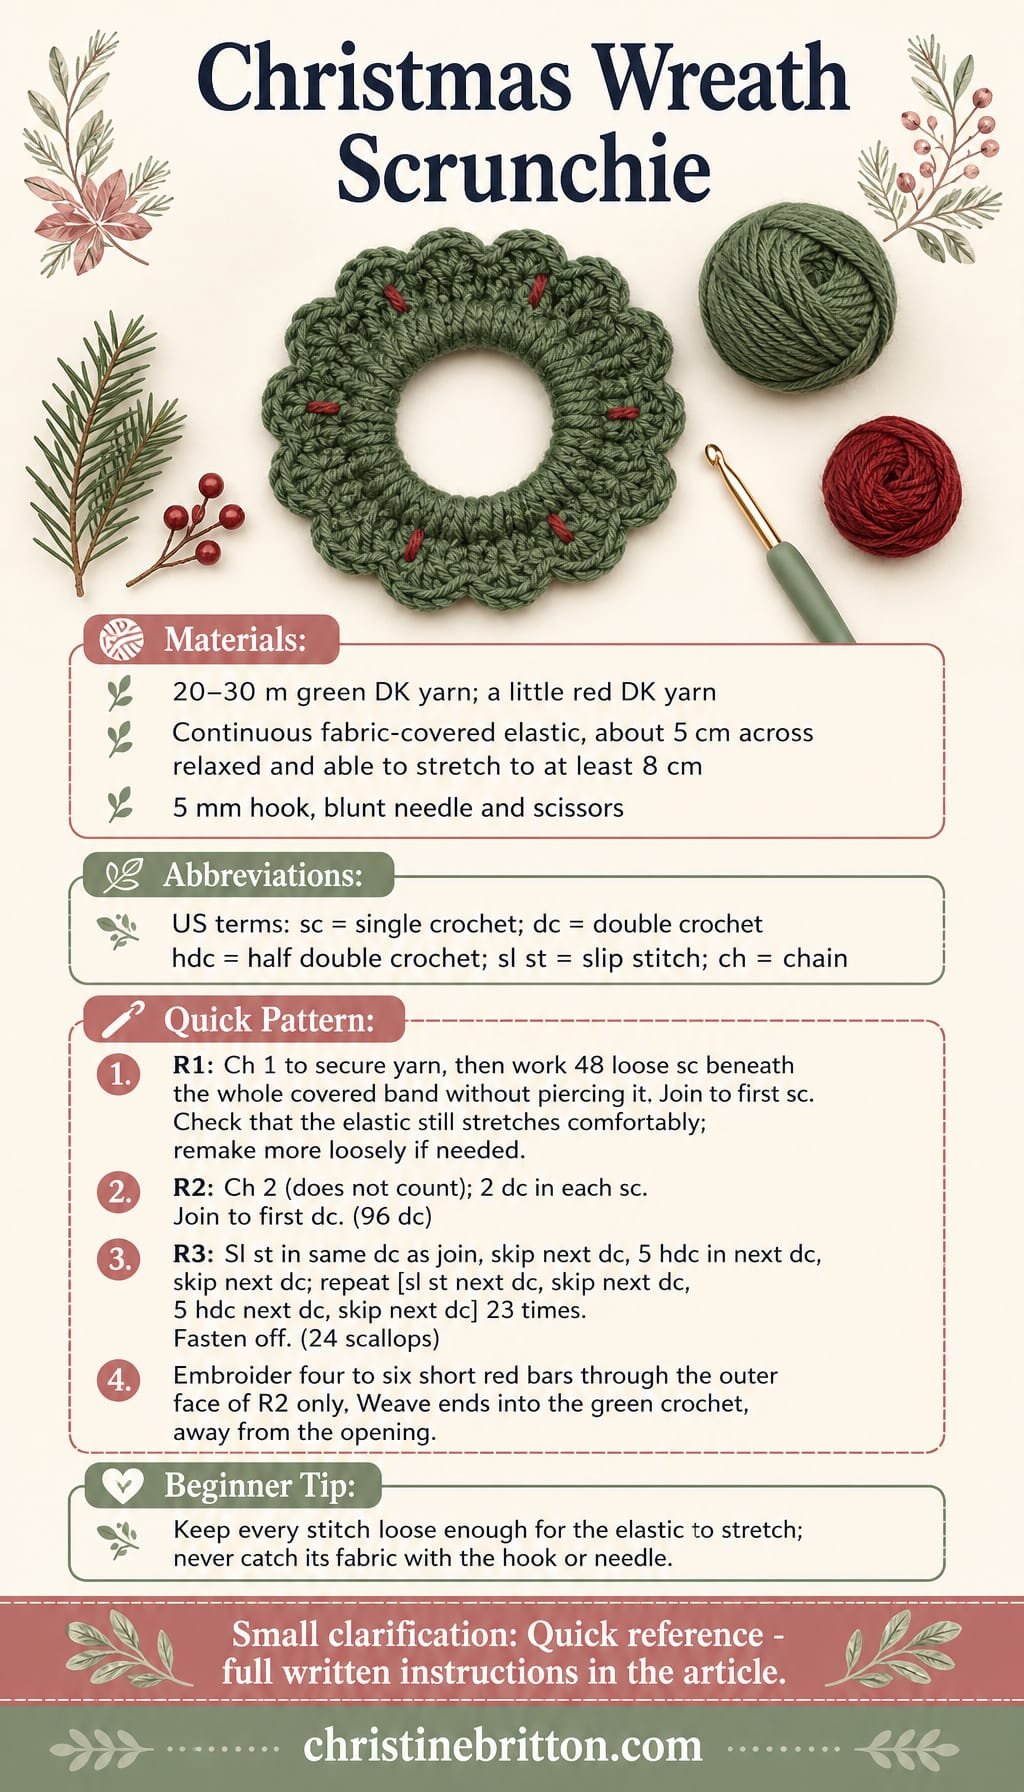
Quick-reference card. Follow the complete written instructions below.
Materials
- Green DK yarn: Approximately 20–30 m.
- Red DK yarn: A small length for embroidered accents.
- Continuous fabric-covered hair elastic: One without a metal join, approximately 5 cm in diameter when relaxed; it should stretch comfortably to at least 8 cm in diameter.
- 5 mm crochet hook: Use a larger hook if needed to keep the first round loose enough to stretch.
- Blunt tapestry needle and scissors: For the red accents and finishing.
Size and Fit
One size, made around the specified elastic. Aim for 48 stitches in the first round. Before continuing, stretch the elastic to the size needed to put it in your hair: the crocheted round must extend with it without pulling tight. If it does not, undo the round and remake it with looser stitches or a larger hook. The elastic supplies the stretch; the crochet must not restrict it.
Gauge
Approximately 16 sc per 10 cm in green yarn with the working hook. Gauge is a guide; the first-round stretch check determines whether the scrunchie will fit comfortably.
Abbreviations
US crochet terms.
- ch = chain
- sc = single crochet
- dc = double crochet
- hdc = half double crochet
- sl st = slip stitch
- st(s) = stitch(es)
Pattern
- Round 1: Cover the elastic Make a slip knot. Pass the hook beneath the whole fabric-covered band, without piercing or catching its covering, and draw up a loop. Ch 1 to secure the yarn; this does not count as a stitch. Work 48 sc around the band, passing the hook beneath the band for each stitch. Slide the stitches along as you work and leave them relaxed rather than cinching them against the elastic. Join with a sl st to the first sc. Check that the covered elastic still stretches comfortably to the size needed to put it in your hair. If the crochet pulls tight, undo this round and work it more loosely or with a larger hook. (48 sc)
- Round 2: Green ruffle Ch 2; this does not count as a stitch. Work 2 dc in each sc around. Join with a sl st to the first dc. Keep this ruffle on the outside of the elastic, not across the inner opening. (96 dc)
- Round 3: Scalloped edge Sl st in the same dc as the join, skip the next dc, work 5 hdc in the next dc, and skip the next dc. Repeat [sl st in the next dc, skip the next dc, 5 hdc in the next dc, skip the next dc] 23 more times. Do not add another joining stitch. Fasten off. (24 scallops: 120 hdc and 24 sl sts)
- Red accents With the red yarn and a blunt needle, embroider four to six small, spaced-apart flat bars on the outer face of Round 2. Catch only the green crochet, not the fabric covering or elastic. Keep the bars and yarn ends away from the inner opening.
Finishing
- Weave all yarn ends into the outer green crochet only, keeping the elastic free to move.
- Spread the ruffle and scallops evenly around the band. Stretch the finished scrunchie once more to confirm that neither the crochet nor the red accents restrict it.
Helpful Tips
- Guide the hook under the entire covered band rather than through its fabric; this helps prevent snagging.
- Do not pull the first-round stitches snug merely to hide the elastic. The fuller second round provides the wreath-like shape.
- If the ruffle shifts towards the centre, ease it back to the outer edge before placing the red accents.
Reindeer Antler Headband

This reindeer antler headband brings a playful Christmas touch to a party outfit or a handmade gift. Its small, branched antlers sit near the crown, creating a recognisable silhouette without the weight or sideways droop of oversized shapes.
Each antler is made from paired flat crochet pieces, giving it more structure than a single layer. A fitted cover provides a tidy place to anchor the bases, while the rigid headband supports the finished shape.
Headbands vary in their curves and thicknesses, so fit the cover to yours rather than relying on a standard size. Check the antler positions while the band is in its natural curved shape, and leave the ends uncovered if covering them would add bulk behind the ears.
Reindeer Antler Headband
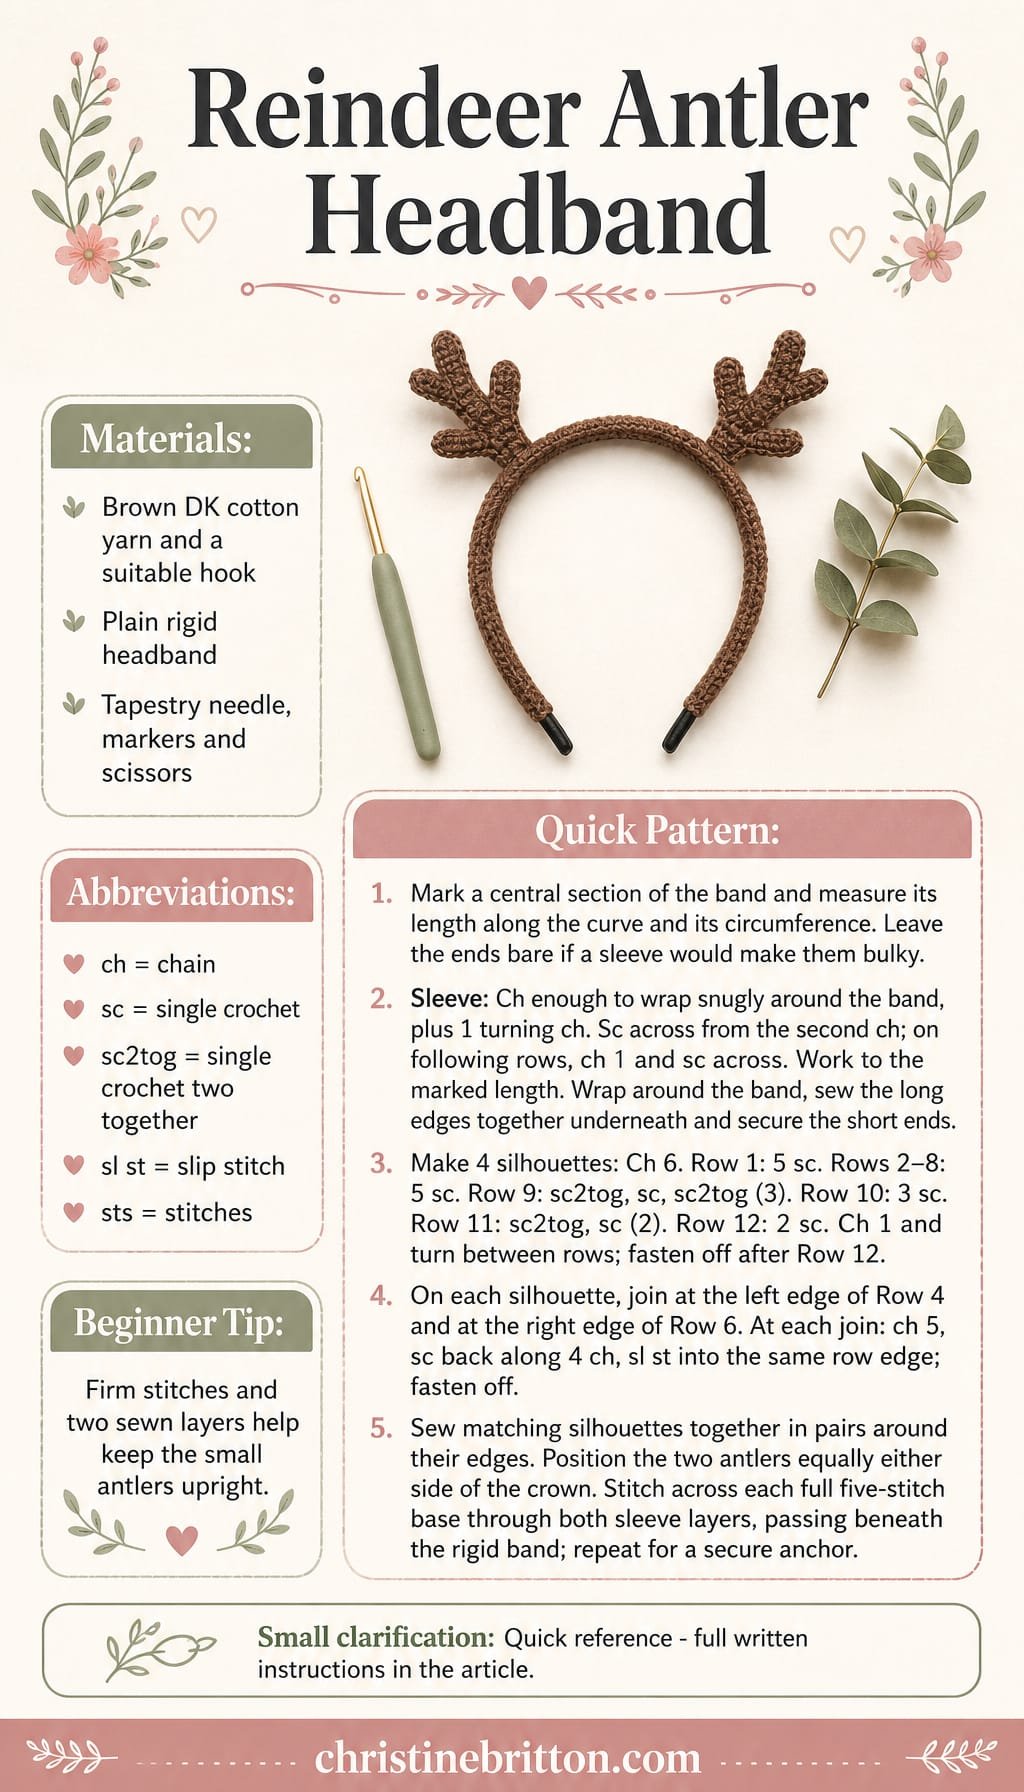
Quick-reference card. Follow the complete written instructions below.
Materials
- Brown cotton yarn: A small amount of DK-weight yarn for the sleeve and antlers
- Crochet hook: A size suited to your yarn that makes a firm fabric
- Plain rigid headband: Choose one with a fairly even width across the section to be covered
- Tapestry needle, stitch markers and scissors: For marking the band, sewing the layers and securing the antlers
Size and Fit
Made to fit your headband. The antler stems are five single crochet stitches wide at the base; their height and branch length depend on your gauge. For the sleeve, mark a central section of the band, leaving its ends bare if covering them would make them bulky. Measure the marked section along the curve and measure around the band at its centre. Adjust the sleeve’s starting chain to wrap snugly around the band, then work enough rows to match the marked length.
Gauge
No fixed gauge is needed. Make firm, closely spaced stitches for the antlers. Check the sleeve against the actual headband as you work; it should wrap snugly without stretching out of shape.
Abbreviations
US crochet terms.
- ch = chain
- sc = single crochet
- sc2tog = single crochet two stitches together
- sl st = slip stitch
- st(s) = stitch(es)
Pattern
- 1. Plan the sleeve Mark the central section of the rigid headband that you want to cover. Keep the marks equally distant from the crown, or top centre, of the band. Measure between them along the curve. Measure around the band within this section to establish the sleeve width.
- 2. Crochet the sleeve Ch enough to reach around the band snugly, without stretching; add 1 ch for turning. Row 1: Sc in the second ch from the hook and in each remaining ch. Turn. Each following row: Ch 1, sc in each st across; turn. Continue until the rectangle reaches the measured length along the band’s curve. Hold it against the band periodically and adjust the number of rows as needed. Fasten off, leaving a long sewing tail.
- 3. Fit the sleeve Wrap the rectangle lengthwise around the marked section of the band, with its long edges meeting on the underside. Sew those edges together along the band. Secure the short ends of the sleeve with a few stitches around its edge so they cannot slide towards the uncovered ends.
- 4. Make four antler silhouettes Make two matching pieces for each antler. For each piece, ch 6. Row 1: Sc in the second ch from the hook and in each remaining ch; turn. Rows 2–8: Ch 1, sc in each of the 5 sts; turn. Row 9: Ch 1, sc2tog, sc in next st, sc2tog; turn. Row 10: Ch 1, sc in each of the 3 sts; turn. Row 11: Ch 1, sc2tog, sc in next st; turn. Row 12: Ch 1, sc in each of the 2 sts. Fasten off. Row 1 is the broad base; Row 12 is the tip.
- 5. Add the branches Keep every silhouette facing the same way, with Row 1 at the bottom. Join yarn to the outer edge of Row 4 on the left side. Ch 5, sc in the second ch from the hook and in each of the next 3 ch, then sl st into the same row edge; fasten off. Repeat at the outer edge of Row 6 on the right side. Add these two branches to all four silhouettes. Each branch has 4 sc and points away from the stem.
- 6. Reinforce the antlers Place two silhouettes together for each antler, matching their bases, tips and branches. Sew around the outer edges with small stitches, including the branch edges. Keep the five-stitch-wide bases open enough to stitch down neatly. Weave in the branch ends, but leave a sewing tail at each antler base.
- 7. Attach the antlers Mark two positions equally spaced to either side of the band’s crown. Hold the antlers upright and check that their branches have room between them; move the marks if needed. Set each five-stitch-wide base across the sleeve at its mark. Using the base tail, stitch along the full width of the base and through both layers of the sleeve, passing beneath the rigid band rather than trying to pierce it. Sew a second pass along the base, then secure the tail within the sleeve. Tug each antler gently to check that its base does not rock.
Finishing
- Weave in all remaining yarn ends.
- Smooth the sleeve so its seam stays underneath and the uncovered ends are even.
- Straighten the antlers by hand. If needed, lightly dampen the silhouettes and let them dry upright before wearing.
Helpful Tips
- Use a smaller hook if the antler fabric feels floppy; firm stitches help the paired layers stand upright.
- Keep the antlers modest in scale and sew across the entire width of each base. A single stitch at the centre will let an antler tilt.
- Position the antlers while the headband is resting in its normal curved shape, not flattened on a table.
For another related project collection, browse crochet scrunchie patterns.
Christmas-Colour Braid Ribbon

A little Christmas colour can sit alongside a hair braid without adding another clip. This soft red, green and cream crochet ribbon gives a simple plait a festive accent, with a bow at the end that can be untied when it is time to take it out.
The design is made to suit the wearer’s braid rather than a fixed hair length. Before making it, estimate how far the ribbon will travel alongside the hair and allow extra length for a comfortable, removable bow. It should sit loosely enough to lift out without tugging.
Smooth yarn helps the ribbon glide through hair, while tidy wrapped ends keep the colours together without dangling fibres. It is a beginner-friendly option for a Christmas outfit or a small handmade gift, especially if the recipient prefers a soft accessory to a hair clip.
Christmas-Colour Braid Ribbon
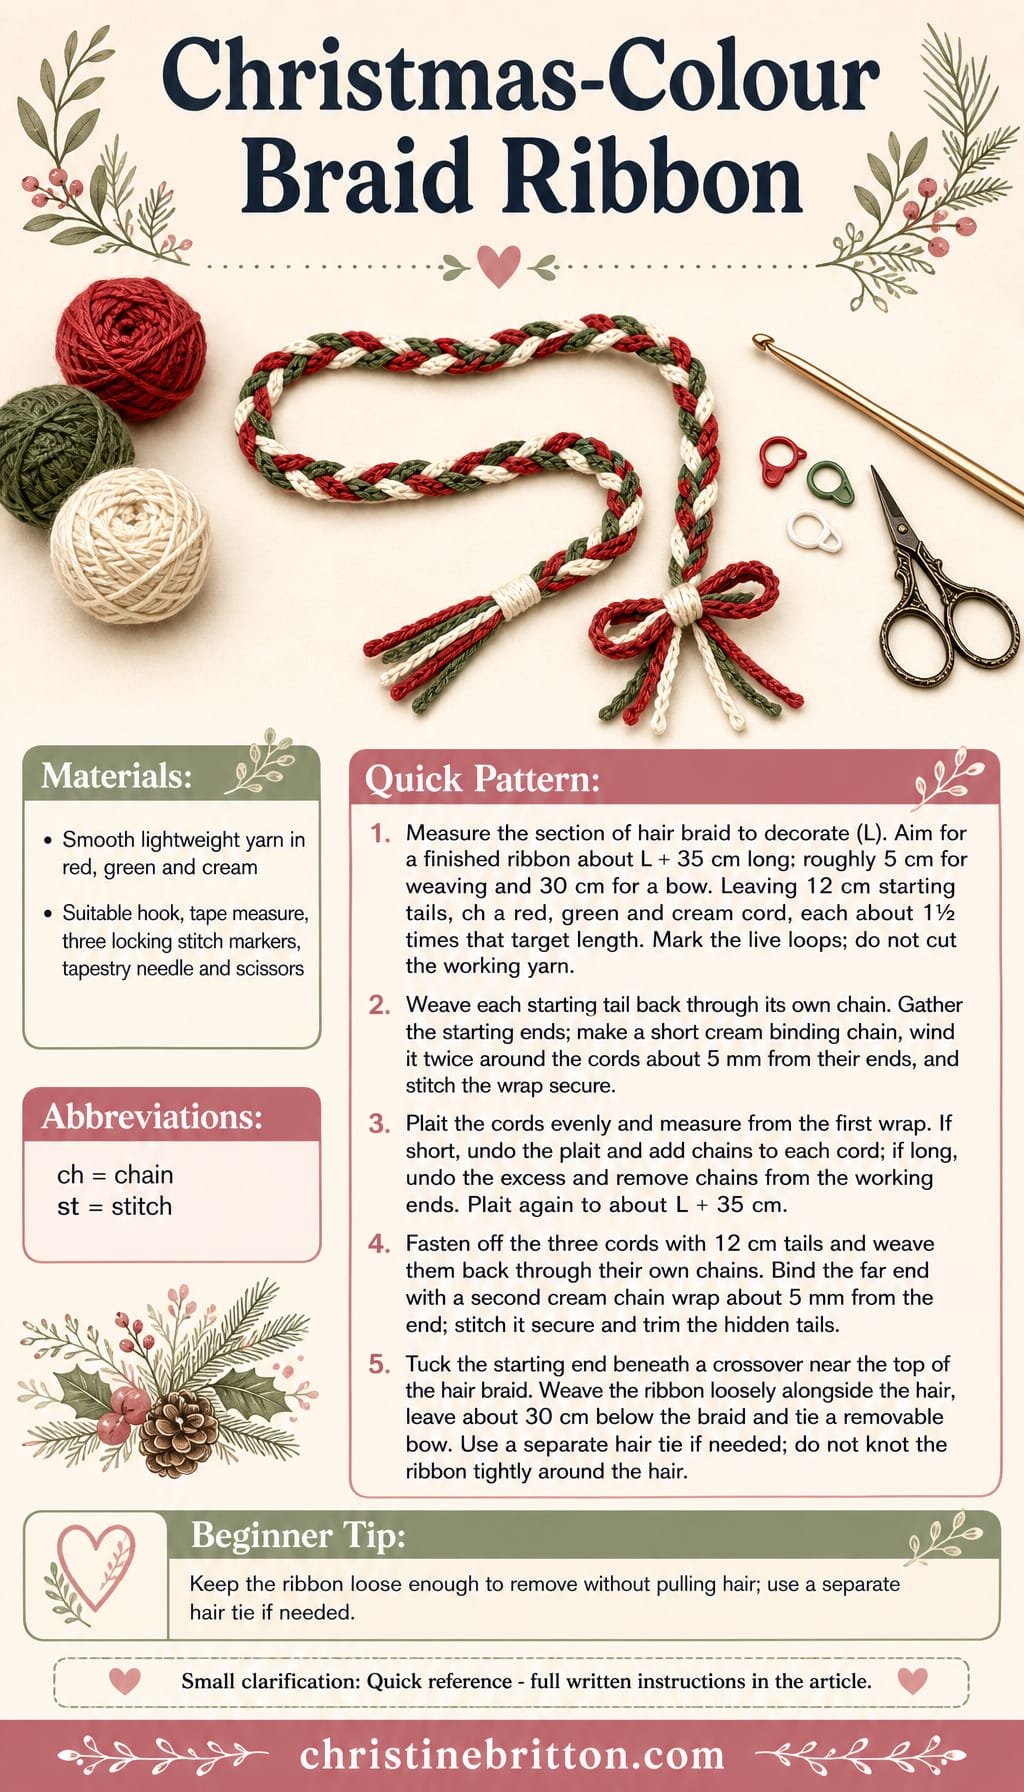
Quick-reference card. Follow the complete written instructions below.
Materials
- Yarn: Small amounts of smooth, lightweight yarn in red, green and cream, all of a similar thickness. Choose yarn that feels comfortable against hair.
- Crochet hook: A size suited to your yarn; use a hook small enough to make chains that hold their shape without feeling stiff.
- Other: Tape measure, three locking stitch markers, tapestry needle and scissors.
Size and Fit
Made to measure. Measure the section of hair braid you want to decorate, from its top to the point where the bow will sit; call this length L. Aim for a finished crochet ribbon about L + 35 cm long: allow roughly 5 cm for weaving through the hair and 30 cm to tie a bow. For example, a 30 cm hair braid needs a ribbon about 65 cm long. The bow allowance can be increased for a larger bow.
Gauge
Exact gauge is not essential. Measure the plaited ribbon rather than relying on a fixed chain count: plaiting shortens the three cords.
Abbreviations
US crochet terms.
- ch = chain
- st = stitch
Pattern
- 1. Make the cords Leaving a 12 cm starting tail, make a red chain about 1½ times your target ribbon length. Leave the working loop open and secure it with a locking stitch marker; do not cut the yarn. Make matching green and cream chains in the same way. These are the three crochet cords. The extra length gives you room to adjust after plaiting.
- 2. Join the starting ends Lay the starting ends together. Thread each starting tail into a tapestry needle and weave it back through several links of its own chain. Make a short binding chain in cream, long enough to circle the three cords twice. Wind it twice around the gathered cords about 5 mm from their starting ends, enclosing the tail ends. Fasten off the binding chain and stitch its ends securely into the wrap with the tapestry needle.
- 3. Plait and check the length Plait the three crochet cords evenly, keeping the marked working loops at the far end. Measure the plait from the first wrap. If it is too short, undo the plait, add chains to each cord and plait again. If it is too long, undo the excess plait, remove chains from each working end and plait again. Stop when the plait measures about L + 35 cm.
- 4. Finish the far end Pull each working yarn through its final loop to fasten off, leaving a 12 cm tail. Weave each tail back through several links of its own cord. Make another short cream binding chain and wind it twice around the three cords about 5 mm from the far end. Fasten off and stitch both ends of the binding chain into the wrap. Once all tails are secure, trim them close to the crochet so no loose fibres dangle.
- 5. Wear the ribbon Tuck the wrapped starting end beneath a crossover near the top of the hair braid. Weave the ribbon loosely alongside the hair through successive crossovers, leaving about 30 cm below the end. Tie that free length in a removable bow. Do not knot the ribbon tightly around the hair; use the wearer’s usual hair tie if the hair braid needs securing.
Finishing
- Check that both crochet wraps are secure and that no yarn tails protrude.
- Ease the plait into shape by hand. Avoid pulling it taut when weaving it through hair.
Helpful Tips
- Smooth yarn is easier to weave through hair than fuzzy yarn and is less likely to leave stray fibres.
- Keep the three cords close in length while adjusting them, so the end wrap sits neatly.
- For a fuller bow, add the extra length to your target before making the cords.
Christmas Pudding Bun Cover

This Christmas pudding bun cover adds a festive touch to a hairstyle you’ve already secured. The brown openwork body sits over the bun, while a small white topping marks its crown.
Measure the bun you plan to wear it over before deciding how many widening rounds to work. Buns vary in shape as well as size, so compare the cover with your bun as it grows rather than relying on a fixed number of rounds.
The adjustable edge helps the cover sit snugly around the bun, but it cannot make up for a body that is too narrow or shallow. It’s a useful distinction when making one as a gift: you’ll need the recipient’s bun measurements, not just their hair length.
Christmas Pudding Bun Cover

Quick-reference card. Follow the complete written instructions below.
Materials
- Yarn: Small amounts of smooth DK yarn in brown and white.
- Crochet hook: 4 mm hook, or a size that makes a flexible mesh with your yarn.
- Notions: Tape measure, stitch marker and yarn needle.
Size and Fit
Made to measure for an adult-sized bun; there is no fixed finished size. Secure the hair in its bun first. Measure its width across the top and its depth from crown to base. Increase until the flat crochet circle is approximately the measured top width, then work even rounds until the cover reaches the bun’s base when tried on. The final cord adjusts the opening; it does not replace checking the cover’s width and depth as you work.
Gauge
No fixed gauge is required. Work a flexible mesh and use the measured bun and in-progress fit to choose the number of rounds. Check the circle flat rather than stretching it to reach the target width.
Abbreviations
US crochet terms.
- ch = chain
- dc = double crochet
- sc = single crochet
- sl st = slip stitch
- sp = space
- rnd = round
Pattern
- Before you begin Measure the finished hair bun as described above. The cover is worked from its white centre outwards. A (dc, ch 2) group means one dc followed by ch 2; each group creates one dc post and one ch-2 sp. Join each mesh rnd with a sl st to the top of its first dc, then sl st into the first ch-2 sp before starting the next mesh rnd. A beginning ch 3 counts as the first dc.
- Rnd 1: white topping With white, make a magic ring. Ch 3, ch 2, then work (dc, ch 2) 7 times into the ring. Pull the ring closed and join. You have 8 dc posts and 8 ch-2 sps.
- Rnd 2: white topping Sl st into the first ch-2 sp. In that sp, work ch 3, ch 2, dc, ch 2. Work (dc, ch 2) twice in each of the remaining 7 sps. Join with brown yarn on the final sl st and fasten off white. You have 16 dc posts and 16 ch-2 sps.
- Increase rounds: brown body Sl st into the first ch-2 sp. For rnd 3, work two (dc, ch 2) groups in the first sp, then one group in the next sp; repeat this two-sp sequence around and join. You have 24 dc posts and 24 ch-2 sps. For each further increase rnd, let r be the number of the rnd just completed. Work one (dc, ch 2) group in each sp, except work two groups in every rth sp, counting from the first sp of the new rnd. Begin the first group with ch 3 in place of dc; join as before. Each increase rnd adds 8 posts and 8 sps. For example, rnd 4 has 32 of each. Continue only until the circle’s flat width is approximately the measured width across the bun.
- Even rounds: depth Sl st into the first ch-2 sp. Ch 3, ch 2 in that sp; work (dc, ch 2) once in each remaining sp and join. Repeat this even rnd, moving into the first sp each time, until the cover reaches the base of the bun when tried on. The number of dc posts and ch-2 sps stays the same as in your last increase rnd.
- Drawstring edge After joining the last even rnd, stay at its first dc; do not move into a sp. Ch 1 (does not count as a stitch), sc in that first dc, ch 2 and skip the following ch-2 sp. Repeat [sc in next dc, ch 2, skip the following ch-2 sp] around. Join to the first sc and fasten off. The edge has one sc and one ch-2 opening for each dc post in the last even rnd.
- Crocheted cord Measure around the finished edge and make a brown cord at least 35 cm longer than that measurement. Ch until the chain is long enough to allow for some shortening as it is worked, then sl st in the second ch from the hook and in each remaining ch. Measure the finished cord; if it is too short, remake it with more chains. Fasten off and weave in its yarn ends.
- Thread and wear Thread the cord through every ch-2 opening of the drawstring edge. Place the cover over the secured bun with the white centre at the crown. Draw the opening in gently, tie the cord securely and tuck its ends away from the hair.
Finishing
- Weave in the white and brown yarn tails without closing the mesh openings.
- Check that the magic ring is closed and that no loose yarn ends can catch in the hair.
Helpful Tips
- If the flat circle has reached the bun’s top width, stop increasing even if the next numbered round is available; add depth with even rounds instead.
- Try the cover on between even rounds. The edge should reach the bun’s base before the cord is tightened.
- Remove the cover before sleeping, and do not pull the cord so tightly that it is uncomfortable.
Poinsettia Claw Clip

This poinsettia sits flat across the closed top of a small claw clip, giving a festive flower plenty of presence without turning the clip into a bulky hair accessory. Its layered, pointed petals frame a small yellow centre.
Firm cotton helps the petal points keep their definition and makes the flower less likely to flop over the edge of the clip. The flower sits on a narrow wrap fitted to the outside of one shell, so the decorative part stays separate from the clip’s moving parts.
Before final attachment, look at the closed clip from the side as well as from above. A petal can look neatly placed from the top yet droop towards the opposite jaw or cover the hinge; the side view makes those problems easier to spot.
Poinsettia Claw Clip

Quick-reference card. Follow the complete written instructions below.
Materials
- Red cotton yarn: A small amount of firm sport-weight cotton for the petals and wrap
- Yellow embroidery thread or fine cotton yarn: A short length for the stitched centre
- Crochet hook: A size that produces firm stitches with your cotton; 2.5 mm is a starting point
- Small claw clip: Choose one approximately 5–6 cm long with a smooth outer upper shell and accessible outer sidewalls above the teeth
- Other supplies: Yarn needle, scissors, clips or pins for positioning, and flexible adhesive suitable for both cotton and the clip’s material
Size and Fit
Make one flower with five outer and five inner petals. Its finished diameter depends on your yarn and tension. Fit the wrap to your clip: it must cross the outside of the upper shell and reach a short distance down each outer sidewall, without reaching the teeth. Choose a clip whose closed top supports the flower without its petals obstructing the hinge or opposite jaw.
Gauge
Exact gauge is not critical. Work firmly so the cotton petals keep their points and the wrap sits flat. Check the wrap against your clip before fastening off.
Abbreviations
US crochet terms.
- ch = chain
- sc = single crochet
- hdc = half double crochet
- dc = double crochet
- sl st = slip stitch
- st = stitch
Pattern
- Outer petal ring With red cotton, make a magic ring. Work 5 sc into the ring, pull it closed and sl st into the first sc. For each of the 5 base sc, ch 7; working back along that chain from the second ch from the hook, work sl st, sc, hdc, dc, hdc, sc. Sl st into the same base sc, then sl st into the next base sc to move on. After the fifth petal, that moving sl st returns to the first base sc. Fasten off, leaving a sewing tail.
- Inner petal ring Make another magic ring with red cotton. Work 5 sc into the ring, pull it closed and sl st into the first sc. For each of the 5 base sc, ch 5; working back along that chain from the second ch from the hook, work sl st, sc, hdc, dc. Sl st into the same base sc, then sl st into the next base sc. After the fifth petal, fasten off with a sewing tail.
- Crochet wrap With red cotton, ch 6. Row 1: sc in the second ch from the hook and in each remaining ch; 5 sc. Row 2: ch 1, turn and sc in each sc; 5 sc. Repeat Row 2 until the strip crosses the outer top of the chosen upper shell at its midpoint and extends a short distance onto both smooth outer sidewalls. Keep the strip narrow along the clip’s length. It must stop above the tooth line on both sides. Fasten off and weave in the ends.
- Layer the flower Place the inner ring over the outer ring, rotating it so its petals sit between the larger petals. Sew the two rings together through their central base stitches. With yellow thread or fine yarn, make six short straight stitches radiating from the centre, then secure the thread on the back. Sew the flower’s central base securely to the middle of the wrap; leave the pointed petals free.
- Check and attach Close the clip and hold the flower and wrap in place on the outside of one upper shell, midway between the hinge and front tip. Look at it from the side: the flower should lie across the top rather than droop into the opposite jaw, and its petals must not cover the hinge. Open and close the clip to confirm that the wrap’s ends stay above the teeth and nothing touches the spring. Only then apply a thin layer of suitable adhesive beneath the wrap on the outer top and smooth outer sidewalls. Press in place without wrapping yarn around the hinge or into the clip. Keep the clip open while the adhesive cures according to its instructions, ensuring no adhesive reaches a moving part.
Finishing
- Once the adhesive has fully cured, open and close the clip several times and check that the wrap is secure and the teeth still grip freely.
- Gently arrange the petal points. If a petal hangs into the mechanism, stitch its base closer to the flower rather than gluing its tip to the clip.
Helpful Tips
- Firm cotton gives the pointed petals more definition than a very soft or fluffy yarn.
- Use only outer surfaces for the wrap and adhesive. If your clip has no clear sidewall space above its teeth, choose a different clip.
- Check the flower from the side before final attachment; a neat top view can conceal a petal that catches when the clip opens.
Christmas Star Tie-Back Headband

This soft tie-back headband offers a comfortable alternative to Christmas hair clips or a rigid band. Its single flat star sits above one temple, bringing a festive detail into view without placing it on the crown.
Fit is best judged on the intended wearer before the ties are made. The band should rest over the head without being pulled taut; checking it at this stage is more reliable than assuming a fixed number of rows will suit everyone. The ties can then be made for the wearer rather than guessed in advance.
Christmas Star Tie-Back Headband

Quick-reference card. Follow the complete written instructions below.
Materials
- Cream DK cotton yarn: Approximately 25 g for the band and ties.
- Gold DK cotton yarn: A small amount for one star.
- Crochet hooks: 3.5 mm for the band and ties; 3 mm for a firm star, or sizes that give the stated fabric.
- Other supplies: Yarn needle, scissors, tape measure and removable stitch marker.
Size and Fit
Made to measure. The 7-sc-wide band runs from just behind one ear, over the top of the head, to just behind the other ear. Try it on before fastening off or making the ties; it should lie comfortably without stretching. For each tie, measure from its band end to the nape and add 20 cm for tying. Work each tie to its own calculated length.
Gauge
Exact row gauge is not required because the band and ties are measured on the intended wearer. Use a firm but flexible fabric that feels comfortable against the head. Do not substitute a chain or row count for the fit check.
Abbreviations
US crochet terms.
- ch = chain
- sc = single crochet
- hdc = half double crochet
- dc = double crochet
- sl st = slip stitch
- st(s) = stitch(es)
Pattern
- Band foundation With cream yarn and the 3.5 mm hook, ch 8. Sc in the second ch from the hook and in each remaining ch; 7 sc. Ch 1 and turn. The turning ch does not count as a stitch.
- Band Sc in each of the 7 sc, ch 1 and turn. Repeat this row until the band reaches from just behind one ear, over the top of the head, to just behind the other ear. Try it on without pulling it taut. Add or remove rows until it lies comfortably, then fasten off.
- Two ties For each tie, measure from its end of the band to the nape and add 20 cm. With cream yarn and the 3.5 mm hook, ch 4. Sc in the second ch from the hook and in each remaining ch; 3 sc. Ch 1 and turn. Sc in each of the 3 sc, ch 1 and turn. Repeat until the tie reaches its calculated length; fasten off. Make a second tie using the measurement from the other end of the band.
- Attach ties Centre one tie across the middle 3 stitches of each short band end. Sew each tie securely to its band end, keeping the join flat. Try on the headband and check that both ties reach the nape with enough length to knot or bow.
- Star centre With gold yarn and the 3 mm hook, make a magic ring. Work 10 sc into the ring, pull it closed and sl st in the first sc to join. Do not fasten off.
- Five star points Working around the 10 sc of the centre, repeat the following five times: sl st in the next sc, ch 5, sl st in the second ch from the hook, sc in the next ch, hdc in the next ch, dc in the last ch, then sl st in the next sc of the centre. For the first repeat, work its first sl st in the same sc used to join the centre. Each repeat uses two centre sc. Fasten off after the fifth point.
- Position the star Put on the headband and mark the place on the band just above one temple. Remove the band and sew the star flat at the mark, stitching around its centre and at the base of each point without gathering the band.
Finishing
- Weave all yarn ends securely into the crochet, including the ends at the tie joins and star. Trim them so no loose yarn can catch in hair.
- Lay the star flat with your fingers and check that the band remains flexible beneath it.
Helpful Tips
- If a magic ring is unfamiliar, ch 2 and work the 10 centre sc into the second ch from the hook instead.
- Check the star position while wearing the band: its distance from an end will depend on where the band sits behind the ear.
- Make the ties longer before fastening off if a fuller bow is wanted.
Frequently Asked Questions
Which crochet Christmas hair accessories are labelled beginner?
The gift bow hair tie and Christmas-colour braid ribbon are labelled beginner. The remaining designs are labelled confident beginner or intermediate.
How do I keep a crochet motif from stopping a clip closing?
Check its position on the clip before sewing. Keep the spring, hinge and moving jaws clear, then open and close the clip again after attaching the motif.
What yarn should I use for a Christmas hair clip?
Follow the chosen pattern’s yarn guidance. For a flat motif, a firm cotton fabric can help leaves, petals or tree tiers keep their outline without adding much bulk.
Can I adjust the braid ribbon or bun cover to fit?
The braid ribbon is made to measure, while the bun cover is shaped to an existing bun and has an adjustable edge. Check fit as directed before finishing either piece.
Final Thoughts
Start with the type of fitting you will use, then choose a design that suits its size and movement. A final check for secure ends, comfortable fit and working hardware will help your Christmas accessory hold up in use.
If you have yarn left after making a clip, explore more Christmas appliqué ideas or crochet hair accessories for another project.