Coral Sunset Pineapple Lace Maxi Free Crochet Pattern
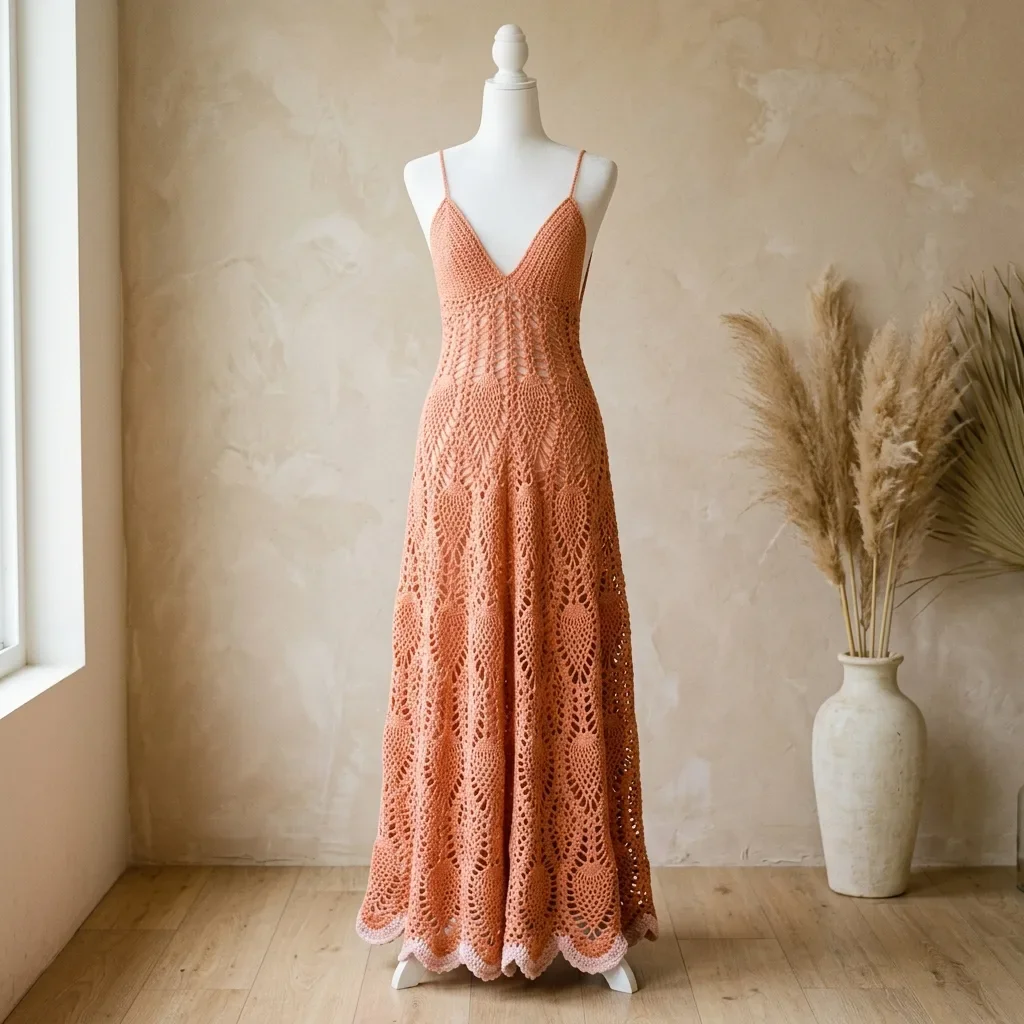
This is a floor-length maxi dress featuring a fitted V-neck bodice and a dramatically flared A-line skirt. The signature design element is cascading pineapple lace that repeats in three graduating tiers. You will need advanced crochet skills, a 2.25 mm hook for the bodice, a 2.75 mm hook for the skirt, and approximately 2,400 to 2,800 yards of fingering weight mercerized cotton.
The bodice uses half double crochet (hdc) worked flat for structure and opacity. The skirt transitions to the round and opens into classic pineapple fans separated by chain space mesh columns. A scalloped shell border finishes the hem.
Expect this project to take 60 to 90 hours. Blocking is essential to open the pineapple lace fully.
Why This Pineapple Lace Maxi Dress Pattern Is Worth Your Time
If you have been crocheting for a while and want to challenge yourself with something truly stunning, this coral sunset pineapple lace maxi is the project. The construction combines fitted garment techniques with classic lace motifs. The result is a dress that looks like it belongs in a boutique window.
The warm terracotta coral color works beautifully for summer events, beach weddings, or any occasion where you want to feel elegant. The single color keeps the focus on the intricate stitch work rather than competing with color changes.
I love how this crochet pattern breaks down a complex garment into manageable sections. You work the bodice flat in two panels, seam them together, then join the skirt and work downward in the round. Each tier of pineapple lace builds on the previous one, so you master the motif before it gets larger and more open.
Materials You Will Need
Yarn: Fingering weight (CYCA 1), 100% mercerized cotton or cotton-linen blend. You will need approximately 2,400 to 2,800 yards in your chosen coral shade.
Yarn Suggestions:
Hooks: US size B-1 / 2.25 mm for the bodice, US size C-2 / 2.75 mm for the skirt lace sections.
Notions:
Substitution note: Choose yarn that is smooth, tightly spun, and not fuzzy. Fuzzy or halo yarns will obscure the pineapple lace openwork. Mercerized cotton is strongly preferred because it holds its blocking shape and has a slight sheen. Avoid yarns with nylon content above 20 percent, as they resist wet blocking.
Finished Measurements
This pattern is written for size Medium.
Gauge
Getting gauge right is critical for a fitted garment like this. Do not proceed without matching gauge.
Bodice gauge (US B-1 / 2.25 mm hook, hdc stitch): 20 hdc x 22 rows = 4 inches / 10 cm square, blocked.
Skirt gauge (US C-2 / 2.75 mm hook, lace pattern): One pineapple lace repeat (14 stitches wide x 12 rows tall) = approximately 2.75 inches / 7 cm wide x 2.5 inches / 6.35 cm tall, blocked.
Adjust hook size up or down as needed. Do not change yarn weight to match gauge.
Abbreviations and Stitch Definitions
Let me walk you through every abbreviation before we begin. Understanding these terms will make the pattern instructions much easier to follow.
Special Stitches for the Pineapple Lace Crochet Pattern
These cluster stitches form the foundation of the pineapple motifs. Practice them on a swatch before starting the skirt.
5-dc-cl (5 Double Crochet Cluster): Yarn over, insert hook into indicated stitch or space, yarn over and pull up a loop, yarn over and pull through 2 loops. You now have one incomplete dc on your hook. Repeat this sequence 4 more times into the same stitch or space. You now have 6 loops on your hook. Yarn over and pull through all 6 loops. One 5-dc-cl made.
3-dc-cl (3 Double Crochet Cluster): Work the same as above, but repeat only 2 more times for a total of 3 incomplete dc. You will have 4 loops on your hook. Yarn over and pull through all 4 loops. One 3-dc-cl made.
Pineapple Fan: This stitch group forms the shell and chain body of each pineapple. The base is worked as (3-dc-cl, ch 2, 3-dc-cl) into a designated chain space. In subsequent rows, the fan expands with dc groups separated by ch-1 spaces, then tapers back with decreasing groups.
Shell Stitch: Work 5 dc into the same stitch or space.
Picot: Chain 3, slip stitch into the first chain of those 3.
Invisible Join: Cut yarn, leaving a 6 inch tail. Thread onto tapestry needle. Insert needle from front to back through both loops of the second stitch of the round. Then insert needle downward through the back loop only of the last stitch made. Pull snug to mimic a stitch. Weave in end.
Pattern Notes Before You Begin
Read these notes carefully. They will save you time and frustration.
1. The bodice is worked flat in two panels (Front and Back), then seamed at the sides with a slip stitch seam on the wrong side.
2. The skirt is worked in the round, beginning at the waist join after bodice panels are seamed. Never turn the skirt. All rounds are worked with the right side facing.
3. Pineapple motifs are separated by 2-chain mesh columns. These columns serve as dividers between repeats.
4. The skirt has three tiers. Tier 1 is closest to the waist with the smallest pineapples. Tier 2 is mid-skirt with one additional chain row in each fan. Tier 3 is the lower skirt and hem with the fullest, most open fans.
5. A turning chain of 2 for hdc rows does NOT count as a stitch. A turning chain of 3 counts as the first dc in lace sections only where noted.
6. Place a locking stitch marker at the beginning of each skirt round and move it up as you work.
7. Block aggressively with water and rust-proof pins. Pin each fan point open to achieve the finished look.
8. Stitch counts in parentheses reflect total working stitch count, not including turning chains.
Bodice Front Panel Instructions
Using US B-1 / 2.25 mm hook and MC, chain 87.
Row 1 (WS): Hdc in third ch from hook (skipped ch does not count as stitch), hdc in each ch across. Turn. (85 hdc)
Row 2 (RS): Ch 2, hdc in each st across. Turn. (85 hdc)
Rows 3 through 8: Rep Row 2. Turn after each row. (85 hdc each row)
V-Neck and Bust Shaping
V-Neck shaping begins at Row 9.
Row 9 (RS): Ch 2, hdc in next 41 sts. Place marker in last st worked. Leave remaining 43 sts unworked. Turn. (41 hdc, right side only)
Complete the right side of the V-neck first, then return to the left side.
Right Side of V-Neck (Rows 9 to 30)
Row 10 (WS): Ch 2, hdc2tog over first 2 sts (neck edge decrease), hdc to end of row. Turn. (40 hdc)
Row 11 (RS): Ch 2, hdc to last 2 sts, hdc2tog. Turn. (39 hdc)
Row 12 (WS): Ch 2, hdc2tog, hdc to end. Turn. (38 hdc)
Row 13 (RS): Ch 2, hdc to last 2 sts, hdc2tog. Turn. (37 hdc)
Row 14 (WS): Ch 2, hdc2tog, hdc to end. Turn. (36 hdc)
Row 15 (RS): Ch 2, hdc to last 2 sts, hdc2tog. Turn. (35 hdc)
Row 16 (WS): Ch 2, hdc2tog, hdc to end. Turn. (34 hdc)
Row 17 (RS): Ch 2, hdc to last 2 sts, hdc2tog. Turn. (33 hdc)
Row 18 (WS): Ch 2, hdc2tog, hdc to end. Turn. (32 hdc)
Row 19 (RS): Ch 2, hdc to last 2 sts, hdc2tog. Turn. (31 hdc)
Row 20 (WS): Ch 2, hdc2tog, hdc to end. Turn. (30 hdc)
Row 21 (RS): Ch 2, hdc across. Turn. (30 hdc) Neck shaping complete, straight section begins.
Rows 22 through 30: Ch 2, hdc across. Turn. (30 hdc each row)
Fasten off. This completes the right front strap/shoulder strip.
Left Side of V-Neck (Rows 9 to 30)
Return to Row 8. With RS facing, skip the center stitch of Row 8 (stitch 43 of 85), and join MC in stitch 44.
Row 9 (RS): Ch 2, hdc in same st and in each remaining st to end. Turn. (42 hdc)
The center stitch is left unworked to form the base of the V-point.
Row 10 (WS): Ch 2, hdc to last 2 sts, hdc2tog (neck edge). Turn. (41 hdc)
Row 11 (RS): Ch 2, hdc2tog (neck edge), hdc to end. Turn. (40 hdc)
Row 12 (WS): Ch 2, hdc to last 2 sts, hdc2tog. Turn. (39 hdc)
Row 13 (RS): Ch 2, hdc2tog, hdc to end. Turn. (38 hdc)
Row 14 (WS): Ch 2, hdc to last 2 sts, hdc2tog. Turn. (37 hdc)
Row 15 (RS): Ch 2, hdc2tog, hdc to end. Turn. (36 hdc)
Row 16 (WS): Ch 2, hdc to last 2 sts, hdc2tog. Turn. (35 hdc)
Row 17 (RS): Ch 2, hdc2tog, hdc to end. Turn. (34 hdc)
Row 18 (WS): Ch 2, hdc to last 2 sts, hdc2tog. Turn. (33 hdc)
Row 19 (RS): Ch 2, hdc2tog, hdc to end. Turn. (32 hdc)
Row 20 (WS): Ch 2, hdc to last 2 sts, hdc2tog. Turn. (31 hdc)
Row 21 (RS): Ch 2, hdc across. Turn. (31 hdc)
The left side retains one extra stitch compared to the right due to the center-stitch skip. On Row 22, decrease one stitch at the beginning to equalize.
Row 22 (WS): Ch 2, hdc2tog, hdc to end. Turn. (30 hdc)
Rows 23 through 30: Ch 2, hdc across. Turn. (30 hdc each row)
Fasten off. This completes the left front strap/shoulder strip.
Checkpoint: After completing both sides of the Bodice Front, your piece should measure approximately 5.5 inches / 14 cm tall at the side edges and have two 30-stitch shoulder strips with the V-neck opening centered.
Bodice Back Panel Instructions
Using US B-1 / 2.25 mm hook and MC, chain 87.
Row 1 (WS): Hdc in third ch from hook, hdc in each ch across. Turn. (85 hdc)
Rows 2 through 24: Ch 2, hdc across. Turn. (85 hdc each row)
Back neck shaping begins at Row 25.
Row 25 (RS): Ch 2, hdc in next 30 sts. Turn, leaving remaining 55 sts unworked. (30 hdc, right back shoulder)
Rows 26 through 30: Ch 2, hdc across. Turn. (30 hdc each row)
Fasten off.
Return to Row 24. With RS facing, skip center 25 sts of Row 24 (back neck opening). Join MC in next st.
Row 25 (RS): Ch 2, hdc across remaining 30 sts. Turn. (30 hdc)
Rows 26 through 30: Ch 2, hdc across. Turn. (30 hdc each row)
Fasten off.
Checkpoint: Both bodice panels should measure approximately 5.5 inches / 14 cm tall at the sides, with matching shoulder strap widths of 30 stitches each.
Seaming the Bodice
Hold front and back panels with wrong sides together and right sides facing out. Using MC and tapestry needle, work a whip stitch or slip stitch seam along the side edges. Join front Row 1 to back Row 1 at the underarm edge, working up to the shoulder. Leave the top 30 rows (approximately 5.5 inches / 14 cm) open at each side as the armhole.
Seam both side edges.
Then join the shoulder strips. Align right front strap (30 sts) to right back shoulder strip (30 sts), wrong sides together. Seam across the top using a flat whip stitch. Repeat for left side.
Spaghetti Straps
The straps are narrow crocheted tubes attached at the front V-point and at the back shoulder tops.
Front-to-back strap (make 2):
With US B-1 / 2.25 mm hook and MC, chain 5.
Row 1: Sc in second ch from hook, sc in each ch across. Turn. (4 sc)
Rows 2 through approximately 55 (or until strap measures 11 inches / 28 cm): Ch 1, sc across. Turn.
Fasten off, leaving a 12 inch tail for sewing.
Sew one end of each strap to the inner shoulder seam at the front, near the peak of the V-neck. Sew the other end to the corresponding point on the back shoulder seam. Try the dress on or measure on a dress form to determine exact strap placement and length before fastening permanently.
Checkpoint: The fully assembled bodice should measure approximately 14 inches / 35.5 cm from the shoulder seam to the lower edge, approximately 17 inches / 43 cm across the bust (half circumference), and approximately 14 inches / 35.5 cm across the back panel.
Waist Band Join and Skirt Setup
Switch to US C-2 / 2.75 mm hook.
With RS of bodice facing and working along the lower edge of the assembled bodice, join MC at the right side seam.
Round 1 (setup, RS facing): Ch 1, work 1 sc in each hdc across the front lower edge, then 1 sc in each hdc across the back lower edge, sl st to first sc to join round. (170 sc)
The bodice lower edge has 85 sts across the front and 85 sts across the back, giving 170 sc total around the waist join.
Round 2 (increase round for skirt setup): Ch 3 (counts as dc here and throughout skirt), dc in same st, dc in next 4 sts, 2 dc in next st; rep from to last 4 sts, dc in each of last 4 sts, sl st to top of beg ch-3. (204 dc)
Round 2b: Ch 1, sc in each dc around, working 2 sc in 3 sts evenly spaced (at the three side and front/back centerpoints). (210 sc) Sl st to join.
Tier 1 Pineapple Setup for the Skirt
Each pineapple repeat equals 14 sts plus 1 ch-2 mesh column, totaling 15 sts. 210 divided by 15 equals 14 repeats exactly. You will have 14 pineapple fans around the skirt.
Round 3 (pineapple base round, RS facing, C-2 hook): Ch 4 (counts as dc + ch 1), sk 1 st, in next st work (3-dc-cl, ch 2, 3-dc-cl) for the pineapple base, ch 1, sk 1 st, dc in next st, ch 1, sk 1 st; rep from around, ending (3-dc-cl, ch 2, 3-dc-cl) in next st, ch 1, sk 1 st, sl st to third ch of beg ch-4. (14 pineapple bases placed)
Tier 1 Skirt Pineapple Lace (Rounds 4 through 12)
Round 4 (fans open): Ch 3 (counts as dc), in ch-2 sp of pineapple base work (dc, ch 1, dc, ch 1, dc, ch 1, dc, ch 1, dc) for 5 dc with ch-1 between each, ch 2, dc in next dc, ch 2; rep from around, sl st to top of beg ch-3.
Round 5: Ch 3, sc in first ch-1 sp of fan, (ch 3, sc in next ch-1 sp) 3 times, ch 3, sc in last ch-1 sp of fan for 4 ch-3 arches over 5 dc fan, ch 2, dc in mesh dc, ch 2; rep from around, sl st to top of beg ch-3.
Round 6: Ch 3, ch 1, (sc in ch-3 arch, ch 3) 3 times, sc in last ch-3 arch, ch 1, ch 2, dc in mesh dc, ch 2; rep from around, sl st to top of beg ch-3. (3 ch-3 arches per fan)
Round 7: Ch 5 (counts as dc + ch 2), sc in ch-3 arch, ch 3, sc in ch-3 arch, ch 3, sc in ch-3 arch, ch 2, dc in mesh dc, ch 2; rep from around, sl st to third ch of beg ch-5. (2 interior arches per fan)
Round 8: Ch 3, in ch-2 sp work (3-dc-cl, ch 2, 3-dc-cl) for pineapple re-base, ch 3, sc in ch-3 arch, ch 3, in next ch-2 sp work (3-dc-cl, ch 2, 3-dc-cl), ch 2, dc in mesh dc, ch 2; rep from around, sl st to top of beg ch-3.
Round 9: Ch 3, ch 2, sc in ch-2 sp of first cluster pair, ch 3, sc in sc arch, ch 3, sc in ch-2 sp of second cluster pair, ch 2, dc in mesh dc, ch 2; rep from around, sl st to top of beg ch-3.
Round 10: Ch 3, ch 2, sk ch-2, sc in next ch-3 arch, ch 3, sc in next ch-3 arch, ch 2, dc in mesh dc, ch 2; rep from around, sl st to top of beg ch-3. (1 arch per fan at crown)
Round 11: Ch 3, ch 3, sc in ch-3 arch (pineapple tip), ch 3, dc in mesh dc, ch 2; rep from around, sl st to top of beg ch-3. (Pineapple tips complete)
Round 12: Ch 3, ch 2, (3-dc-cl, ch 2, 3-dc-cl) in sc tip st, ch 2, dc in mesh dc, ch 2; rep from around, sl st to top of beg ch-3. (New pineapple base formed from each tip, Tier 1 to Tier 2 transition begins)
Checkpoint: After Round 12, your skirt should measure approximately 5 inches / 12.7 cm from the waist join. The 14 pineapple tips should all be visible pointing toward the waist, and the new bases should be ready for Tier 2.
Tier 2 Skirt Increase and Pineapple Lace (Rounds 13 through 24)
At the Tier 1 to Tier 2 transition, increase from 14 to 28 pineapple fans by splitting each mesh column.
Round 13 (Tier 2 split round): Ch 3, in ch-2 sp of new base work (dc, ch 1, dc, ch 1, dc, ch 1, dc, ch 1, dc), ch 2, in mesh dc work (3-dc-cl, ch 2, 3-dc-cl) for new pineapple base in mesh column, ch 2; rep from around, sl st to top of beg ch-3. (28 pineapple elements placed)
Rounds 14 through 24: Work Tier 2 pineapple lace using the Round 4 through Round 11 sequence, applying it to all 28 fans simultaneously.
Continue working the remaining Tier 2 and Tier 3 rounds following the same pineapple pattern structure, increasing at each tier transition as established.
Blocking Your Pineapple Lace Maxi Dress
Blocking is not optional for this project. The pineapple lace will not open properly without aggressive wet blocking.
1. Soak the finished dress in lukewarm water with a small amount of wool wash for 15 to 20 minutes.
2. Gently squeeze out excess water. Do not wring.
3. Roll in a clean towel to remove more moisture.
4. Pin the bodice flat on blocking mats, matching your measurements.
5. Pin each pineapple fan point open, stretching the lace to its full potential.
6. Allow to dry completely before unpinning.
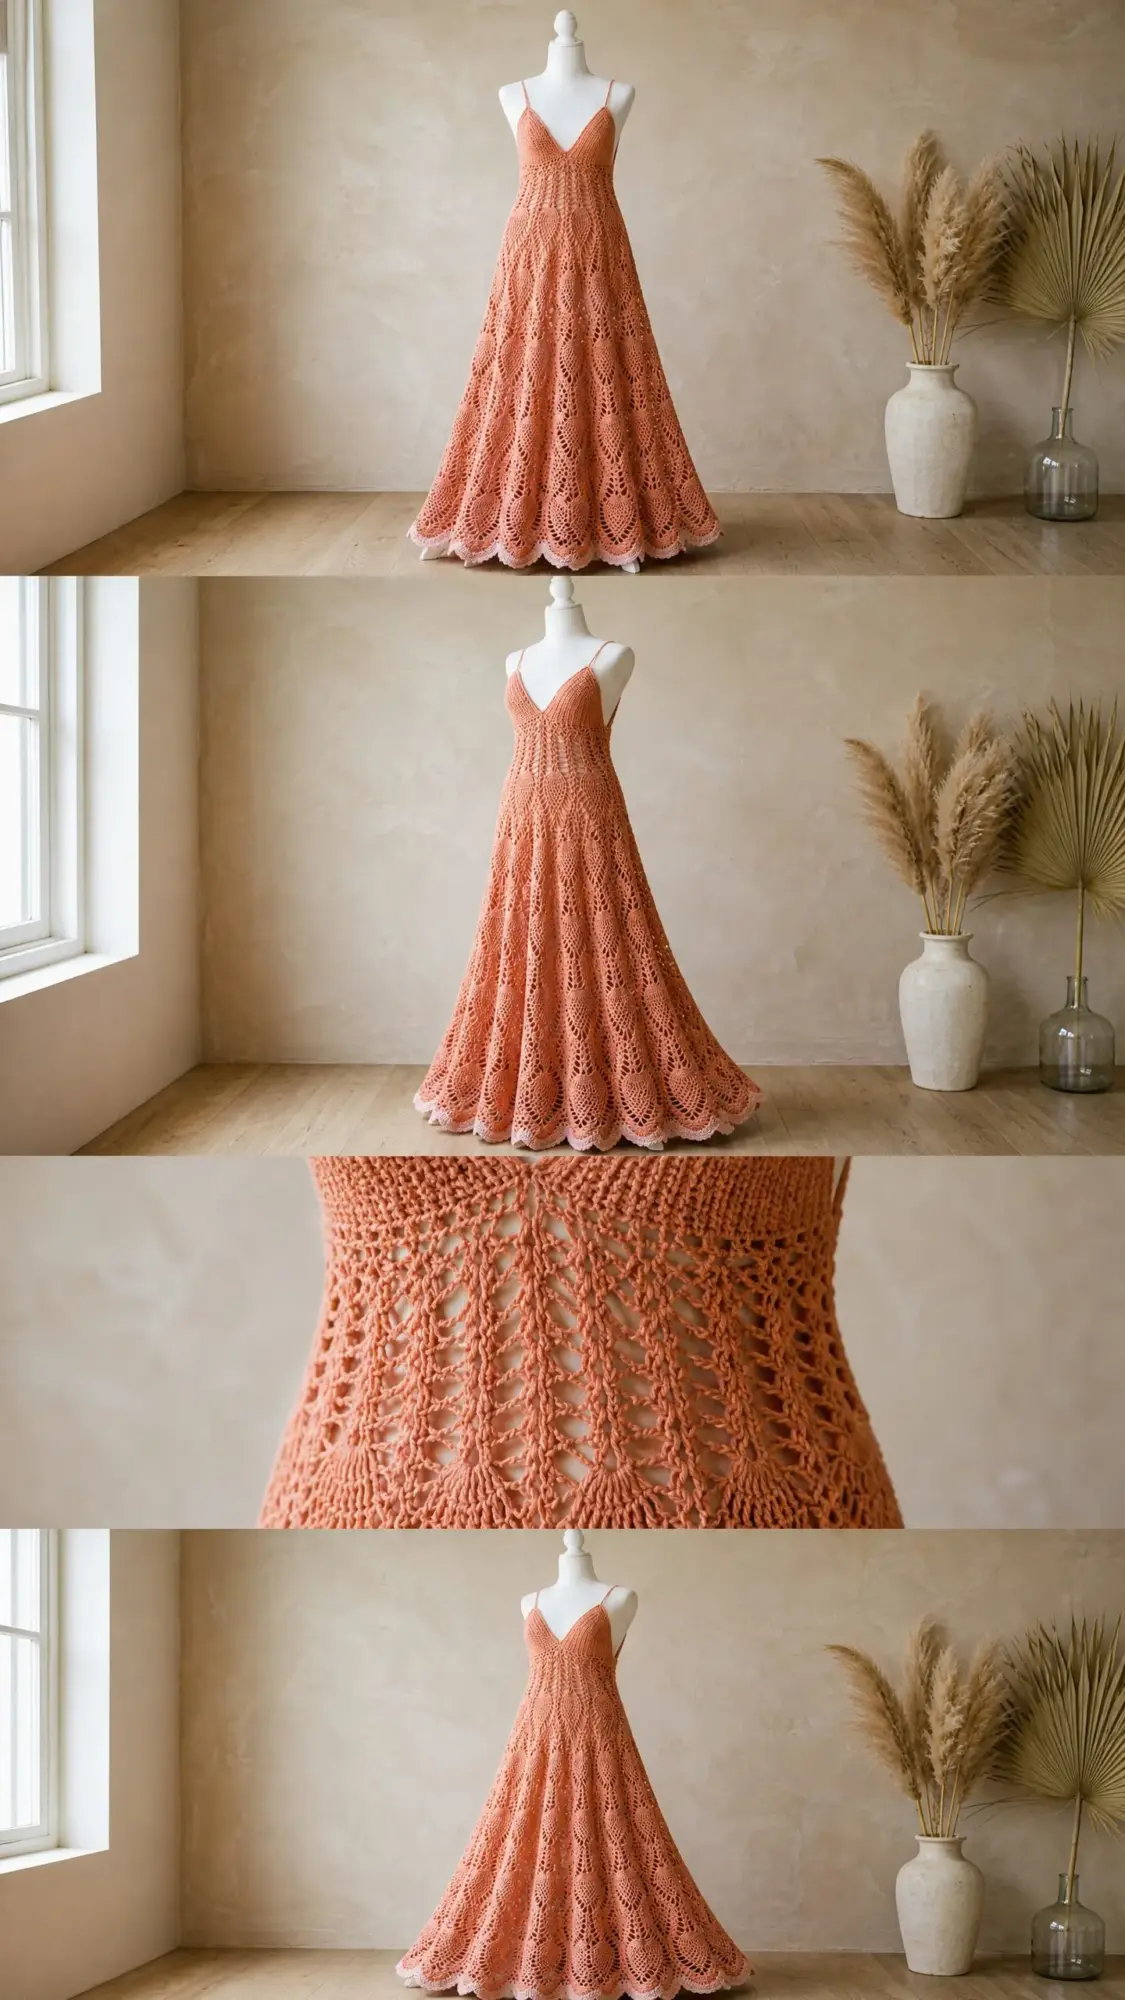
Tips for Success with This Crochet Tutorial
Take breaks. A 60 to 90 hour project requires pacing. Work on the bodice one week, then tackle each tier of the skirt separately.
Count obsessively. Place markers every 10 stitches during setup rounds. This helps catch errors before they compound.
Try it on as you go. Before starting Tier 2, slip the partially finished dress over your head or a dress form to check fit and length.
Keep notes. Write down any modifications you make for future reference or if you want to make another dress in a different size.
This pineapple lace maxi crochet pattern produces a garment you will treasure for years. The combination of fitted bodice construction and cascading lace creates a dress that is both comfortable to wear and stunning to behold. Take your time with each section, trust the process, and enjoy watching the pineapple fans emerge round after round.
Thank you so much for choosing this pattern for your next crochet adventure. I genuinely hope you love making it as much as I loved designing it. If you try this project, I would be thrilled to see your finished dress. Tag me on Instagram or share in our Facebook group.
If you found this coral sunset pineapple lace maxi crochet pattern helpful, please save it to your Pinterest boards so you can find it easily when you are ready to start. And if you make one, drop a comment below. I read every single one and love celebrating your beautiful work with you!
You Might Also Like
- Rainbow Pastel Snake Plushie Free Crochet Pattern
- Dusty Rose Ribbed Ankle Socks Free Crochet Pattern
- Teal Ocean Wave Crochet Robe Free Pattern
- Pastel Rainbow Granny Square Tote Free Crochet Pattern