Coral Sunset Crochet Summer Boots Free Pattern
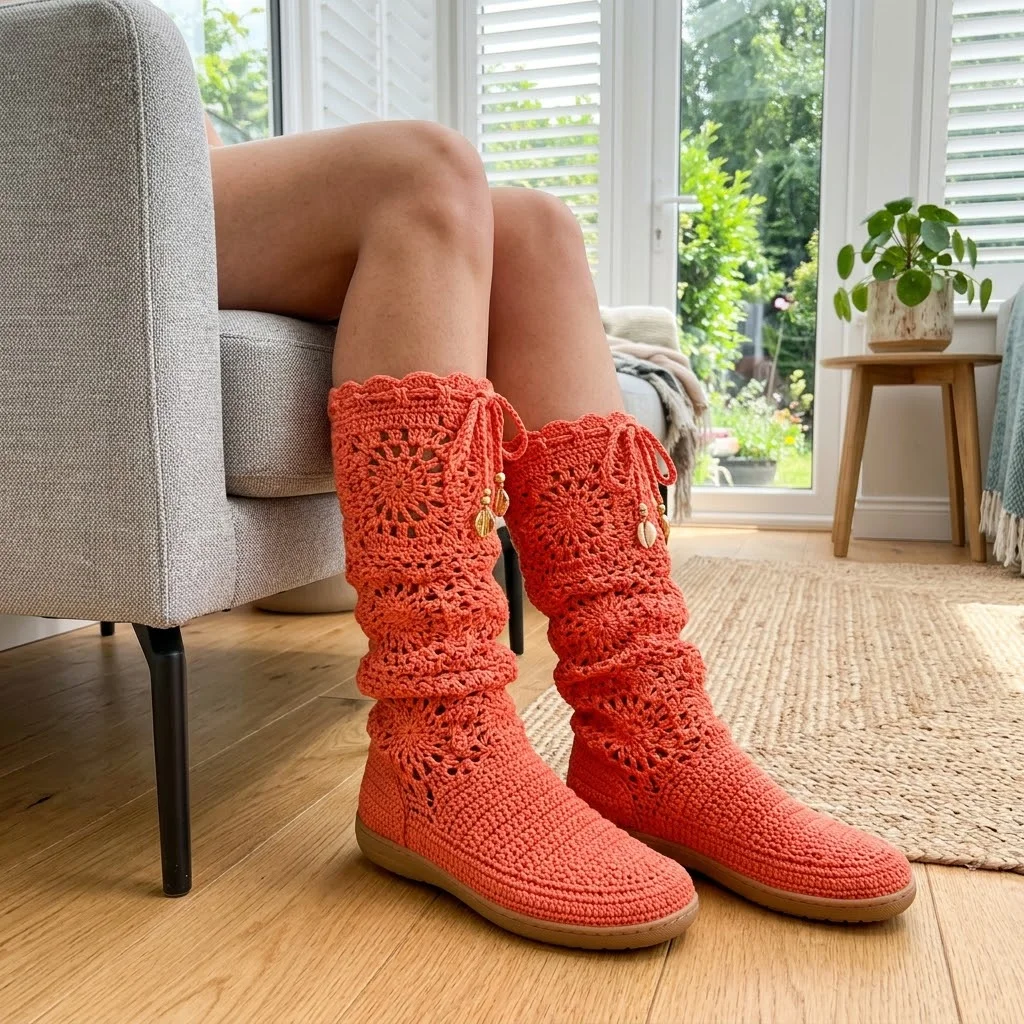
I wanted to design crochet boots that would actually work for warmer weather, and finding that balance took some real experimenting. These needed to feel breezy and light while still looking like proper boots, not just leg warmers attached to slippers. I played with different lace motif placements until I found the right combination of openwork panels and solid sections. The scalloped cuff with those decorative drawstrings and shell charms? That was the finishing touch that brought the whole design together. I am SO pleased with how these turned out, and I cannot wait for you to make your own pair!

Why These Summer Crochet Boots Are Worth Your Time
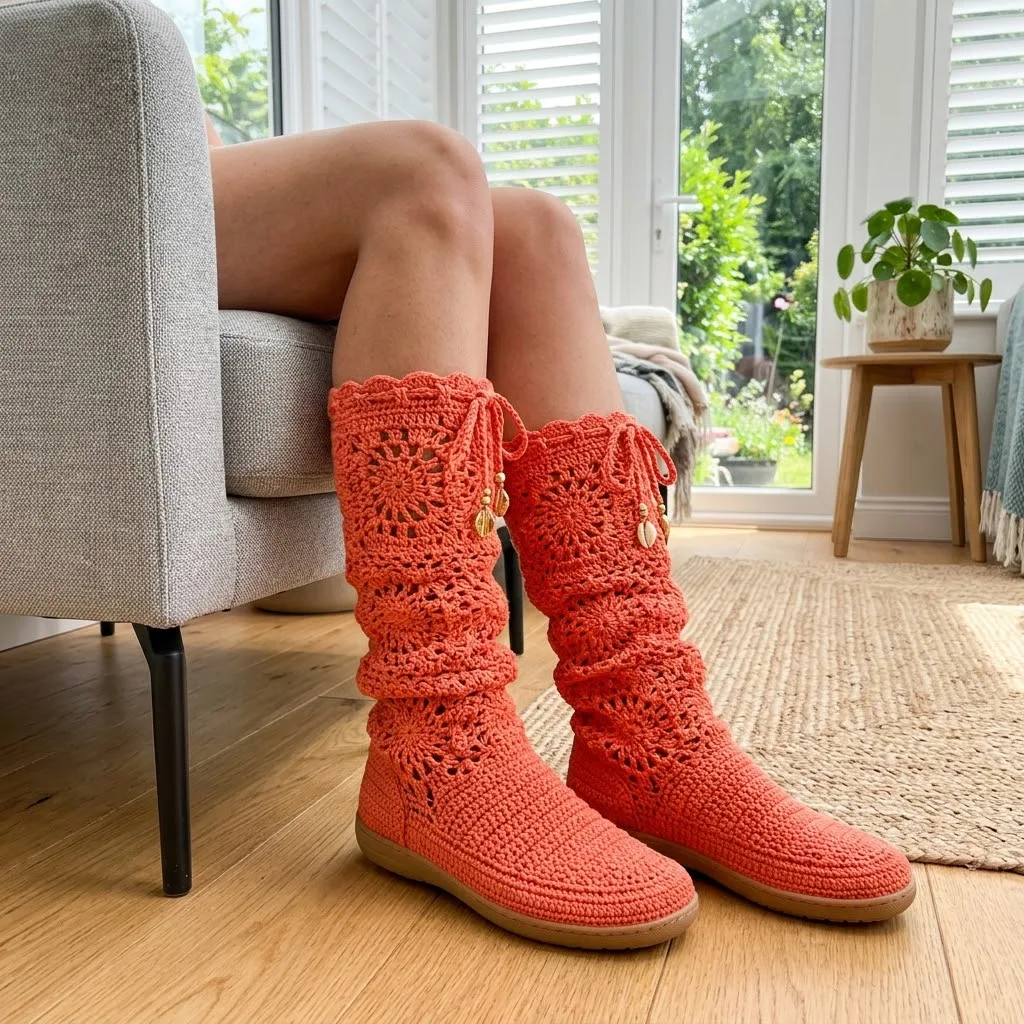
These coral crochet boots combine the structure of real footwear with the breathability of lace. The circular medallion motifs running down the leg shaft create gorgeous visual interest while allowing airflow. Below that, a solid single crochet foot section provides durability where you need it most.
What makes this crochet boot pattern special is the rubber sole base. You will be working directly onto a pre-made sole, which means these boots can actually be worn outside. No more slippery slipper socks that fall apart after one wear.
The slouchy fit through the leg adds a relaxed boho vibe. You can wear them scrunched down or pulled up, depending on your mood and outfit.
Skill Level
Intermediate. You should be comfortable with basic stitches, working in the round, and joining motifs. If you have made doilies or granny squares before, you can absolutely handle this project.
Materials You Will Need
Yarn:
Hook:
Notions:
Gauge
22 stitches and 26 rows = 4 inches in single crochet with 3.5mm hook.
Check your gauge before starting. If your stitches are too loose, your boots will stretch out and lose their shape. Go down a hook size if needed.
Finished Measurements
Abbreviations and Stitch Definitions
Before we dive in, let me explain every stitch you will use:
Ch = Chain. Wrap yarn over hook, pull through loop. This creates the foundation for most crochet work.
Sl st = Slip stitch. Insert hook, yarn over, pull through both loops at once. Used for joining rounds invisibly.
Sc = Single crochet. Insert hook, yarn over, pull up a loop (2 loops on hook), yarn over, pull through both loops. The shortest and densest basic stitch.
Hdc = Half double crochet. Yarn over, insert hook, yarn over, pull up a loop (3 loops on hook), yarn over, pull through all 3 loops. Slightly taller than single crochet.
Dc = Double crochet. Yarn over, insert hook, yarn over, pull up a loop, yarn over, pull through 2 loops, yarn over, pull through remaining 2 loops. Creates a taller, more open fabric.
Tr = Treble crochet (also called triple crochet). Yarn over twice, insert hook, yarn over, pull up a loop, then yarn over and pull through 2 loops three times. Very tall stitch used in lace motifs.
Sk = Skip. Miss the indicated number of stitches.
Sp = Space. The gap created by chains in previous rows.
Shell = Multiple stitches worked into the same stitch or space, creating a fan shape. In this pattern, a shell is typically 5 dc in the same stitch.
Pattern Instructions
Part 1: Attaching Yarn to the Sole
Start with your pre-punched rubber sole. The holes should be evenly spaced around the perimeter.
Round 1: Using your 3.0mm hook, join yarn to any hole at the heel. Work 2 sc into each hole around the entire sole. Join with sl st to first sc.
*The number of stitches will depend on your sole size. A women’s size 7 sole typically has about 60 holes, giving you 120 sc.*
Round 2: Ch 1, sc in each st around. Join with sl st. (120 sc)
Round 3: Ch 1, sc in each st around. Join with sl st. (120 sc)
*Tip: Keep your stitches tight in these foundation rounds. This is what anchors your boot to the sole.*
Part 2: Foot Section
Switch to your 3.5mm hook for the remainder of the project.
Rounds 4 through 8: Ch 1, sc in each st around. Join with sl st. (120 sc)
These rounds create the solid portion that covers your foot. The fabric should be firm but not stiff.
Shaping the Toe:
Round 9: Ch 1, sc in first 50 sts, sc2tog over next 2 sts, sc in next 16 sts, sc2tog, sc in remaining 50 sts. Join. (118 sc)
Sc2tog = Single crochet 2 together (decrease). Insert hook in first stitch, pull up loop, insert hook in next stitch, pull up loop (3 loops on hook), yarn over, pull through all 3.
Round 10: Ch 1, sc in first 49 sts, sc2tog, sc in next 14 sts, sc2tog, sc in remaining 51 sts. Join. (116 sc)
Round 11: Ch 1, sc in each st around. Join. (116 sc)
Rounds 12 through 15: Repeat Round 11.
Part 3: Transition to Lace Shaft
Now comes the fun part. You will transition from solid fabric to the beautiful openwork panels.
Round 16: Ch 3 (counts as first dc), dc in each st around. Join with sl st to top of ch-3. (116 dc)
Round 17: Ch 3, dc in same st, sk 2 sts, *shell (5 dc) in next st, sk 2 sts*, repeat from * around, ending with 3 dc in same st as beginning ch-3. Join. (Approximately 38 shells)
*Do not worry if your stitch count does not divide perfectly. Adjust your skips slightly to make the pattern work around.*
Round 18: Sl st to center dc of first shell, ch 3, 2 dc in same st, ch 1, *5 dc in center dc of next shell, ch 1*, repeat from * around, ending with 2 dc in starting point. Join.
Part 4: Circular Medallion Lace Section
This is where those gorgeous sunburst motifs appear. Each medallion is worked separately, then joined as you go.
First Medallion:
Round 1: Ch 6, sl st to first ch to form a ring.
Round 2: Ch 3, 15 dc into ring. Join with sl st. (16 dc including ch-3)
Round 3: Ch 5 (counts as dc plus ch 2), *dc in next st, ch 2*, repeat around. Join to 3rd ch of ch-5. (16 dc, 16 ch-2 spaces)
Round 4: Sl st into first ch-2 sp, ch 3, 2 dc in same sp, ch 1, *3 dc in next ch-2 sp, ch 1*, repeat around. Join. (16 groups of 3 dc)
Round 5: Ch 4 (counts as dc plus ch 1), dc in same st, *ch 3, sk to center dc of next 3-dc group, (dc, ch 1, dc) in center dc*, repeat around, ending with ch 3. Join to 3rd ch of ch-4.
Round 6: Sl st to ch-1 sp, ch 1, sc in same sp, *5 dc in ch-3 sp (shell), sc in next ch-1 sp*, repeat around. Join. (16 shells around outer edge)
Make 6 medallions total for each boot (12 medallions altogether).
Part 5: Joining Medallions to Boot Shaft
Arrange 3 medallions in a horizontal row. Join them by working sc through the center dc of adjacent shells where they touch.
Attach this row of medallions to your boot shaft:
Working along the bottom edge of the medallion row, join yarn and sc evenly along the edge, attaching to the top round of your boot shaft with sl st every few stitches.
Work one round of sc around the entire circumference to secure the connection.
Repeat this process with the second row of 3 medallions, positioned above the first row with slight overlap.
Part 6: Upper Lace Section
Rounds 1 through 4: Work shell pattern same as Rounds 17 and 18 from the transition section.
Round 5: Ch 1, sc in each dc and ch sp around. Join. (Approximately 120 sc)
Part 7: Scalloped Cuff
Round 1: Ch 1, sc in first st, *sk 2 sts, 5 dc in next st (shell), sk 2 sts, sc in next st*, repeat around. Join.
Round 2: Sl st to center dc of first shell, ch 1, sc in same st, *ch 3, sc in center dc of next shell*, repeat around, ending with ch 3. Join.
Round 3: Ch 1, sc in first sc, *5 dc in ch-3 sp, sc in next sc*, repeat around. Join.
Round 4: Repeat Round 2.
Round 5: Sl st to first ch-3 sp, ch 1, (sc, hdc, 3 dc, hdc, sc) in same sp, *(sc, hdc, 3 dc, hdc, sc) in next ch-3 sp*, repeat around. Join. Fasten off.
This creates the beautiful scalloped edge you see in the finished boots.
Part 8: Drawstring Tie
Row 1: Ch 150 (or desired length, approximately 30 inches).
Row 2: Sl st in 2nd ch from hook and each ch across. Fasten off.
Make 2 drawstrings for each boot (4 total).
Weave one drawstring through the ch-1 spaces in the shell pattern row just below the cuff. Weave the second drawstring through a row below the first, creating that layered tie effect.
Add decorative beads or shell charms to the ends of your drawstrings if desired.
Finishing Your Crochet Summer Boots
Weave in all ends using your yarn needle. Take extra care around the sole attachment area, weaving ends through multiple stitches for security.
Block your boots by stuffing them with plastic bags or tissue paper and spritzing lightly with water. Let dry completely before wearing.
Optional: Apply a thin line of fabric glue where the yarn meets the rubber sole for extra durability.
Tips for Success
Making these boots for someone else? Trace their foot on paper and compare to your sole size before purchasing.
Worried about the medallion joins? Practice joining 2 medallions before committing to all 6. It gets easier after the first one.
Want more coverage? Add a fourth medallion to each row, adjusting the circumference of your boot shaft accordingly.
Cotton yarn stretches when wet. Keep this in mind if you plan to wash your boots. Air dry only, and reshape while damp.
Why Cotton Yarn Makes the Best Summer Crochet Boots
Cotton yarn breathes better than any other fiber for warm weather footwear. It absorbs moisture, which keeps your feet comfortable on hot days. It also holds its shape beautifully, especially important for structured projects like these boots.
Look for a mercerized cotton if you want extra sheen and smoothness. Regular cotton works perfectly well and is often more affordable.
Yarn recommendations:
Any DK weight cotton will work. Just check your gauge before starting.

Styling Your Coral Sunset Boots
These crochet summer boots pair beautifully with casual dresses, denim shorts, or flowy skirts. The coral color pops against neutrals like white, cream, and navy.
Wear them to outdoor festivals, beach boardwalks, farmers markets, or just around the house when you want your feet to feel special.
The slouchy fit means you can adjust the look throughout the day. Push them down for a relaxed vibe, or pull them up for more coverage.
I really hope you love making these boots as much as I loved designing them. They are the kind of project that looks impressively complex but comes together in a straightforward way once you get into the rhythm. If you make a pair, please save this pattern to your Pinterest boards so you can find it again whenever you need it. And I would absolutely love to see your finished boots, so drop a comment below or tag me on Instagram with your photos!
You Might Also Like
- Ocean Blue Chameleon Amigurumi Free Crochet Pattern
- Coral Peach Tie Front Crochet Cardigan Free Pattern
- Terracotta Desert Shell Purse Free Crochet Pattern
- Sage Green Textured Baby Outfit Set Free Crochet Pattern