Coral Poppy Appliqué Knit Sweater Free Crochet Pattern
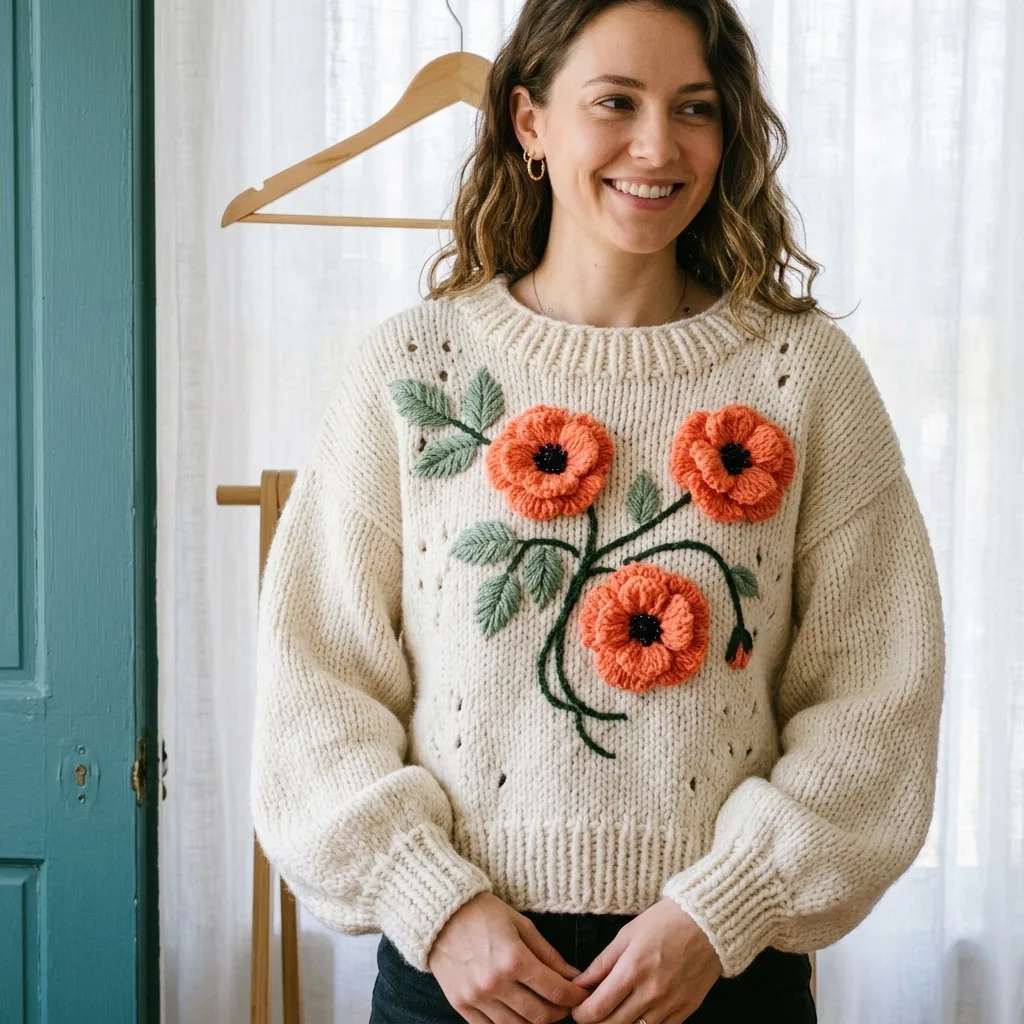
This is hands down one of the MOST impressive sweaters you can crochet, and I am SO excited to share it with you! The dimensional coral poppies absolutely steal the show, but here is the best part. The sweater itself uses simple rectangles and basic stitches. You get that gorgeous faux-knit texture without ever picking up knitting needles. Whether you are making this for yourself or gifting it to someone special, this cozy pullover works up faster than you might think. About 18 to 24 hours of total stitching time will give you a wearable piece of art that looks like it belongs in a boutique window.
Why You Will Love This Crochet Sweater Pattern
This Coral Poppy Appliqué Knit Sweater combines the cozy appeal of a classic pullover with eye-catching floral details that make it truly one of a kind. The sweater body creates a soft, horizontal texture that mimics stockinette knitting. All you need is a simple technique called working in the back loop only.
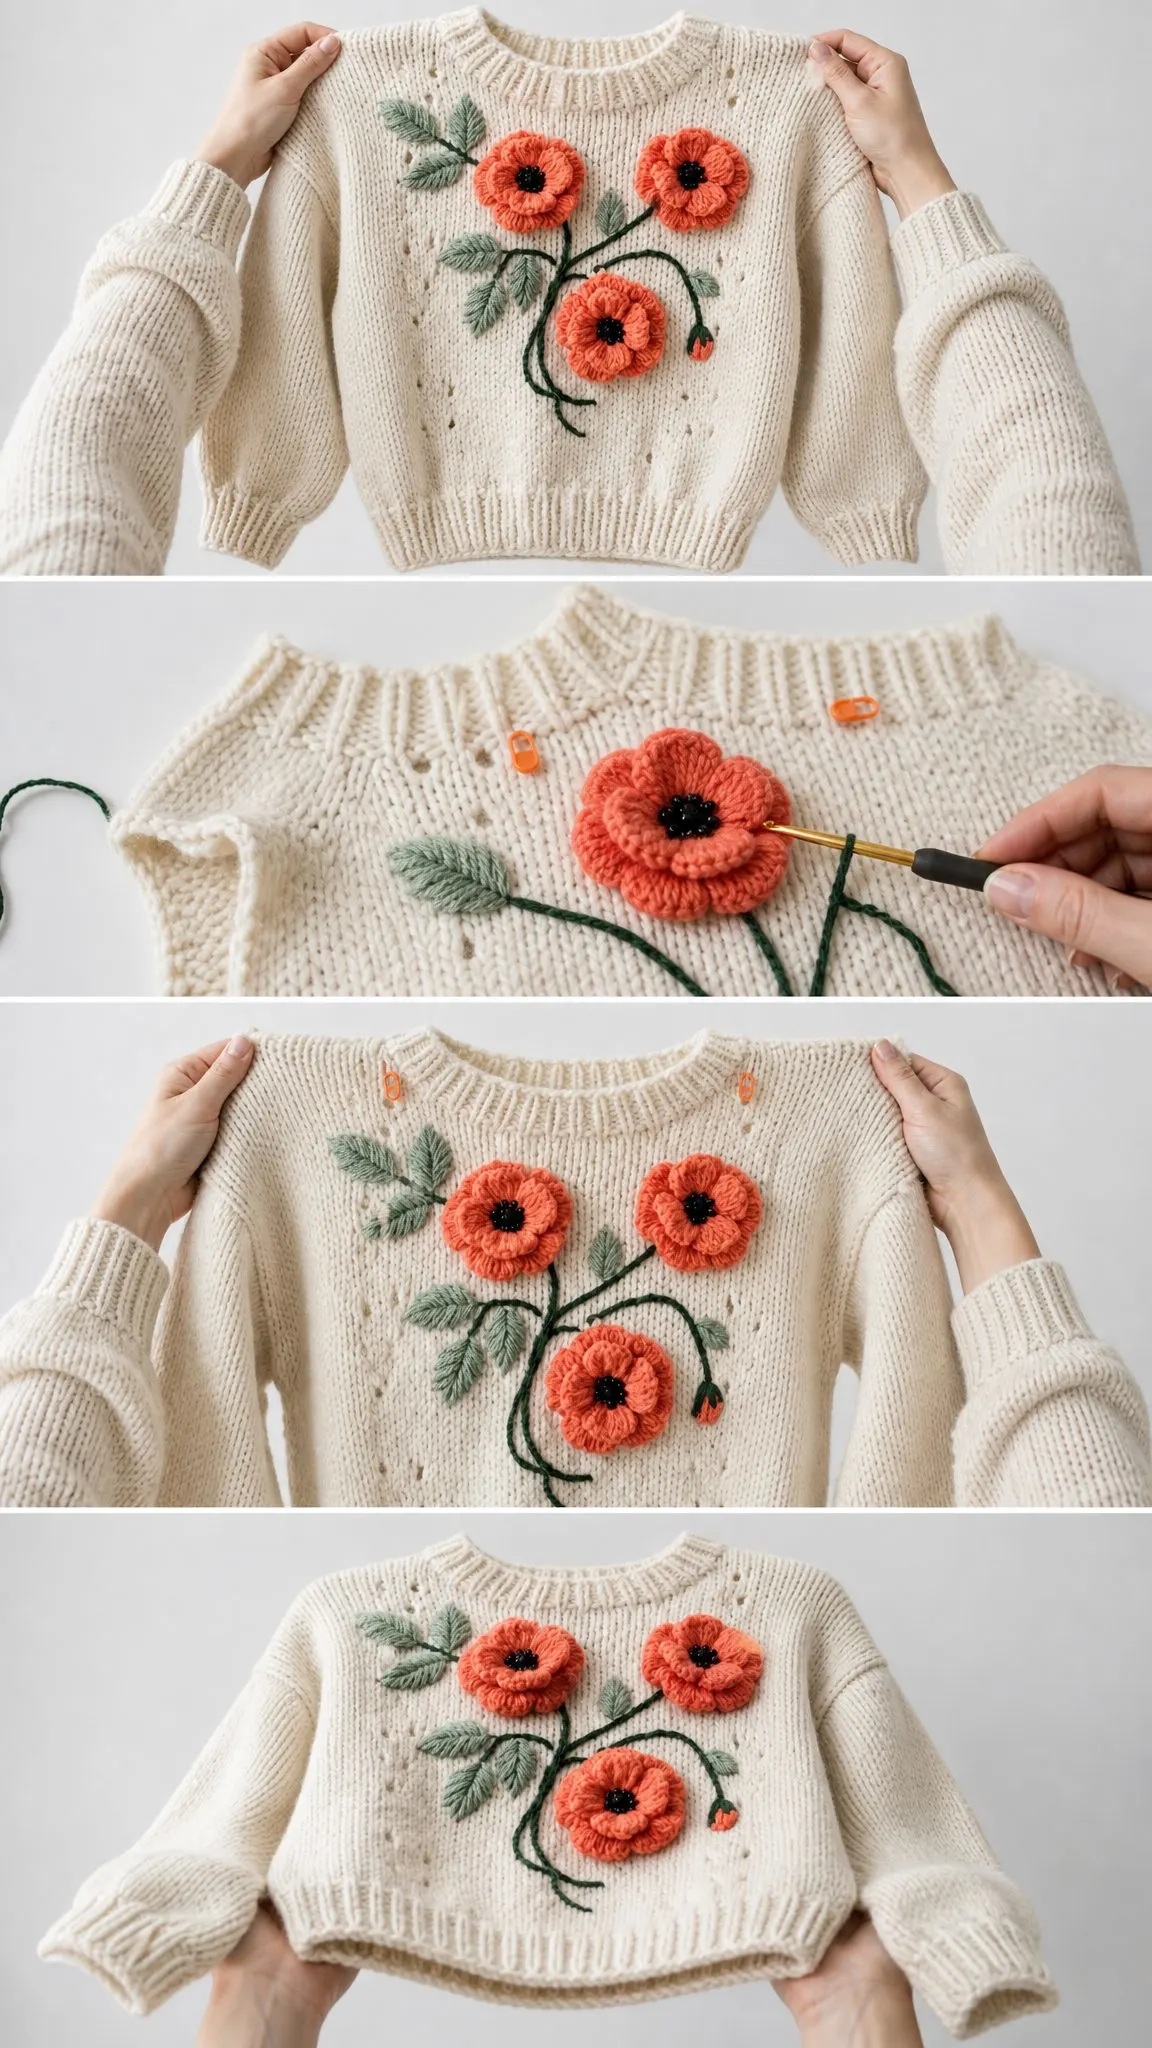
The real magic happens with the appliqués. Three dimensional coral poppies, eight sage green leaves, one sweet little bud, and graceful trailing stems transform a simple cream sweater into a statement piece. These elements are crocheted separately and sewn on after blocking, so you have complete control over the final placement.
Skill level: Intermediate. If you can work single crochet and half double crochet confidently, you are ready for this project. The construction uses straightforward rectangles, but you will also learn surface crochet, dimensional appliqué techniques, seaming, and pick-up ratios along the way.
Finished Measurements
Before you dive in, let me share the finished dimensions so you can plan your project:
This pattern is designed with 6 to 10 inches (15 to 25 cm) of positive ease for a relaxed, cozy fit. If you need to adjust the size, I will explain how in the customization section below.
Materials You Will Need
Gathering your supplies before you start makes the whole process smoother. Here is everything you need for this crochet sweater pattern:
Yarn:
Hooks:
Notions:
Yarn Suggestions
Not sure which yarn to choose? Here are some tested options that work beautifully:
Lion Brand Hue + Me (acrylic/wool bulky) offers a soft halo and cozy loft with good drape for a boxy pullover.
Knit Picks Biggo (superwash merino/nylon bulky) gives you plush stitch definition and a polished handmade finish.
Paintbox Yarns Simply Chunky (acrylic chunky) provides a budget-friendly color range perfect for the coral and sage motifs.
When substituting yarn, choose a soft bulky yarn that matches both stitch and row gauge after blocking. For the appliqués, slightly smoother yarn gives crisper petals and leaves.
Gauge (This Part Really Matters)
I know gauge swatches feel tedious, but they are essential for garments. Please make a swatch before starting.
Sweater fabric: 12 half double crochet (hdc) back loop only (blo) x 10 rows = 4 inches (10 cm) after blocking, using the larger hook.
Ribbing: 12 single crochet (sc) blo rows = 4 inches (10 cm) measured along the rib length.
If your swatch is too small, go up a hook size. Too large? Go down a hook size. Match both stitches and rows before you begin.
Abbreviations and Stitch Definitions
Let me walk you through every stitch abbreviation you will encounter. Understanding these before you start will make the pattern much easier to follow.
Note for UK crocheters: This pattern uses US crochet terms. US sc = UK dc, US hdc = UK htr, US dc = UK tr.
Stitch Guide
Before jumping into the pattern, let me explain each technique you will use.
SC BLO Ribbing
Chain the stated number. Row 1: Single crochet in the second chain from hook and each chain across. Row 2 and onward: Chain 1, turn, single crochet in the back loop only of each stitch. The unused front loops create the raised knit-like ridges that give your ribbing that professional finish.
HDC BLO Fabric
Yarn over, insert hook in the back loop only of the next stitch, yarn over and pull up a loop, yarn over and draw through all 3 loops. Work every row through the back loop only for a soft horizontal faux-knit texture. This is what gives the sweater that gorgeous stockinette appearance.
HDC Increase
Work 2 hdc blo in the same stitch. When shaping sleeves, place increases inside the first and last stitch so the seam edge stays clean.
Surface Chain Stem
With the right side facing, hold yarn at the back. Insert hook from front to back at the marked start point, pull up a loop, then insert hook at the next marked point and pull yarn through the fabric and the loop on the hook. Repeat along the drawn curve. This creates those beautiful trailing stems across the sweater front.
Dimensional Petal
Petals are worked into a foundation round behind the black center. Keep the slip stitches snug and the double crochet stitches relaxed so the petal cups gently rather than ruffling hard.
Sweater Body Instructions
The sweater is constructed as two body panels (front and back), two sleeve panels, then seamed together. You will work the ribbing first, then pick up stitches along the rib edge to create the main fabric.
Back Panel
Hem rib: With cream yarn and the larger hook, chain 9.
Row 1: Single crochet in the second chain from hook and each chain across. (8 sc)
Rows 2 to 66: Chain 1, turn, sc blo across. (8 sc)
Rotate the rib so the long edge is at the top.
Body Row 1: Chain 1, work 66 hdc evenly across the rib edge, placing 1 hdc in the end of each rib row. Turn. (66 hdc)
Rows 2 to 43: Chain 1, turn, hdc blo across. (66 hdc)
Checkpoint: Your back panel should measure about 22 inches (56 cm) wide and 19.7 inches (50 cm) tall before the neckband is added.
Front Panel
Work the hem rib and Body Rows 1 to 35 exactly as you did for the Back Panel. (66 hdc)
Row 36, left shoulder: Chain 1, turn, hdc blo in the first 20 stitches, leave remaining stitches unworked. (20 hdc)
Rows 37 to 43, left shoulder: Chain 1, turn, hdc blo across. (20 hdc) Fasten off.
Row 36, right shoulder: With the right side facing, skip the center 26 stitches, join cream yarn in the next stitch, chain 1, hdc blo in the same stitch and the last 19 stitches. (20 hdc)
Rows 37 to 43, right shoulder: Chain 1, turn, hdc blo across. (20 hdc) Fasten off.
Checkpoint: Your front panel should match the back in width and height. The front neck opening spans 26 stitches, about 8.7 inches (22 cm) across before the collar.
Shoulder Seams
With right sides together, seam 20 stitches at each shoulder. Leave the center back 26 stitches and the shaped front neck open.
Sleeves and Assembly
Sleeves (Make 2)
Cuff rib: With cream yarn and the larger hook, chain 8.
Row 1: Single crochet in the second chain from hook and each chain across. (7 sc)
Rows 2 to 24: Chain 1, turn, sc blo across. (7 sc)
Rotate the rib to work along the long edge.
Sleeve Row 1: Chain 1, work 27 hdc evenly across the rib edge. Turn. (27 hdc)
Now you will gradually increase to shape the sleeve:
Rows 2 to 4: hdc blo across. (27 hdc)
Row 5: Increase 3 evenly: after stitches 6, 13, and 20. (30 hdc)
Rows 6 to 9: hdc blo across. (30 hdc)
Row 10: Increase 3 evenly: after stitches 7, 15, and 23. (33 hdc)
Rows 11 to 14: hdc blo across. (33 hdc)
Row 15: Increase 3 evenly: after stitches 8, 17, and 26. (36 hdc)
Rows 16 to 19: hdc blo across. (36 hdc)
Row 20: Increase 3 evenly: after stitches 9, 18, and 27. (39 hdc)
Rows 21 to 24: hdc blo across. (39 hdc)
Row 25: Increase 3 evenly: after stitches 10, 20, and 30. (42 hdc)
Rows 26 to 29: hdc blo across. (42 hdc)
Row 30: Increase 3 evenly: after stitches 11, 22, and 33. (45 hdc)
Rows 31 to 34: hdc blo across. (45 hdc)
Row 35: Increase 3 evenly: after stitches 11, 23, and 34. (48 hdc)
Rows 36 to 39: hdc blo across. (48 hdc)
Row 40: Increase 3 evenly: after stitches 12, 24, and 36. (51 hdc)
Rows 41 to 44: hdc blo across. (51 hdc)
Row 45: Increase 3 evenly: after stitches 13, 26, and 39. (54 hdc)
Checkpoint: Each sleeve should measure about 18 inches (45.5 cm) long from cuff edge to top and 18 inches (45.5 cm) around at the upper edge before seaming.
Armholes, Sleeve Seams, and Side Seams
Mark 21 rows down from each shoulder on the front and back panels. This creates an armhole depth of about 8.4 inches (21.5 cm).
Fold each sleeve lengthwise and seam from the cuff to the upper edge. Then pin the upper sleeve evenly into the armhole. Seam the sleeve to the body. Finally, sew the side seams from the hem to the underarm.
Neckband
With the right side facing and the larger hook, join cream yarn at the left shoulder.
Round 1: Chain 1, pick up 68 sc around the neck: 26 across the back, 8 down the front-left neck edge, 26 across the front neck, 8 up the front-right neck edge. Join. (68 sc)
Rounds 2 to 5: Chain 2, front post double crochet (fpdc) around the next stitch, back post double crochet (bpdc) around the next stitch; repeat from around, join. (68 sts)
Fasten off after Round 5.
Coral Poppy Appliqués
Now for the fun part! These dimensional flowers bring the whole sweater to life.
Large Poppy (Make 3)
Center, with black yarn and the smaller hook:
Round 1: 5 sc in a magic ring. (5 sc)
Round 2: 2 sc in each stitch around. (10 sc)
Round 3: Single crochet in the next stitch, 2 sc in the next stitch; repeat from around. (15 sc)
Fasten off black.
Petals, with coral yarn: Join to any stitch behind the center.
Round 4: Slip stitch in the next stitch, in the next stitch work (sc, hdc, 5 dc, hdc, sc), slip stitch in the next stitch; repeat from 5 times. (5 petals)
Fasten off, leaving a long tail for sewing.
Texture: With black yarn, add 8 to 10 small straight stitches or French knots over the center. Steam lightly from above without flattening the petals.
Small Bud (Make 1)
With coral yarn, chain 5.
Row 1: Single crochet in the second chain from hook, hdc in the next chain, dc in the next chain, 5 dc in the last chain; working on the opposite side of the chain, dc in the next chain, hdc in the next chain, sc in the last chain. (11 sts)
Fasten off. Wrap the lower edge slightly and tack it into a teardrop bud shape.
Leaf (Make 8)
With sage yarn and the smaller hook, chain 10.
Work into the back bumps: slip stitch in the second chain from hook, sc in the next chain, hdc in the next chain, dc in the next 3 chains, hdc in the next chain, sc in the next chain, 3 sc in the last chain.
Rotate to work along the other side: sc in the next chain, hdc in the next chain, dc in the next 3 chains, hdc in the next chain, sc in the next chain, slip stitch in the last chain. (19 sts around)
Fasten off, leaving a sewing tail.
Leaf shaping tip: For a more pointed leaf, block each leaf with the tip pinned outward and the center vein gently pressed with your fingers while damp.
Stems and Motif Placement
Placement Map
Lay the sweater flat with the front facing up. Pin all your motifs before sewing to make sure you love the arrangement:
Surface Crochet Stems
With deep green yarn and the smaller hook, surface chain a sweeping main stem from the lower-left side of the flower cluster toward the bud. Add a second curved stem crossing the front center and a shorter stem toward the upper-right flower. Keep chains loose enough that the sweater front lies flat. Weave ends to the wrong side.
Sewing Appliqués
Use matching yarn tails and small whipstitches around the back of each flower center and petal base. Leave the outer petal edges slightly dimensional for that beautiful 3D effect. Sew leaves down through the center vein and tack each tip so they do not curl during wear.
Sizing and Customization
Need to adjust the fit? Here are some simple modifications:
To widen the body: Add or remove rib rows in multiples of 2. Each 3 rib rows changes the finished chest by about 2 inches (5 cm) total.
To lengthen the body: Add hdc rows before the armhole.
To adjust sleeves: Add or remove sleeve rows before the final upper sleeve section. Keep both sleeves identical.
Finishing and Care
Blocking
Soak or steam block according to the yarn label. Shape panels to the finished measurements. Block appliqués separately, then sew them on after the sweater is dry. Do not press the flower petals flat.
Ends and Final Shaping
Weave in all ends on the wrong side, following the direction of the stitches for at least 2 inches (5 cm). Try on the sweater and adjust appliqué tacks as needed so the flowers sit smoothly over the chest without pulling.
Care Instructions
Hand wash cool or use the gentlest machine cycle if the yarn label allows. Lay flat to dry. Store folded rather than hung to protect the shoulder shape and flower dimension.
Troubleshooting Common Issues
| Issue | Fix |
|---|---|
| Body is too wide | Remove rib rows in multiples of 2 before working the body |
| Armhole pulls | Open the side seam 1 to 2 rows lower and resew the sleeve evenly |
| Sleeve feels tight | Add 3 more increases by repeating the Row 45 increase spacing, then work even |
| Neckband ripples | Redo Round 1 with 4 to 6 fewer picked-up stitches |
| Neckband pulls | Redo Round 1 with 4 to 6 additional picked-up stitches |
| Flowers droop | Add a few hidden tacking stitches under the petal bases |
Left-Handed Crocheters
Work all row instructions exactly as written. For appliqué placement, mirror the stem direction if your natural surface crochet slants the opposite way. Keep the larger leaf cluster on the wearer’s upper left.
Time Estimate
Plan for about 18 to 24 hours total: 12 to 15 hours for the sweater body and sleeves, 4 to 6 hours for appliqués and embroidery, and 1 to 3 hours for finishing and blocking. This makes a wonderful project to work on over a few weekends.
Thank you so much for choosing this Coral Poppy Appliqué Knit Sweater crochet pattern! I truly hope you enjoy every stitch of this beautiful project. When you finish your sweater, I would absolutely love to see it. Tag me on Instagram or share a photo in my Facebook group so I can admire your gorgeous work!
If this pattern made your creative heart happy, save it to your Pinterest boards so you can find it whenever you are ready to start. And please drop a comment below if you make this sweater. I love hearing how your projects turn out and seeing the color combinations you choose!
You Might Also Like
- Terracotta Desert Shell Purse Free Crochet Pattern
- Sage Green Meadow Crochet Robe Free Pattern
- Lavender Purple Dreamy Peplum Crochet Top Pattern
- Sunset Peach Woven Crochet Clutch Free Pattern