22 Crochet Christmas Cat Patterns for Festive Amigurumi

Looking for a Christmas cat crochet project? These 22 patterns turn familiar festive shapes into cats, from a seated Santa cat to a tree-shaped cat and a kitten in a sleigh.
Some are freestanding figures; others are soft hanging decorations. Browse by shape and skill level, then check how each pattern handles the ears, face and finishing details that make the cat easy to recognise.
For more ideas that build on this collection, explore crochet cat patterns.
Before You Start
The patterns use US crochet terminology. Check the stitch abbreviations before starting, particularly if you usually follow UK patterns, where some familiar stitch names mean different things.
Choose yarn that gives you a firm fabric at the pattern’s suggested hook size. Gaps between stitches can let stuffing show through, while bulky yarn may hide small features such as ears or embroidered faces. If you change yarn weight, expect the finished size to change too.
Think about where the finished cat will go before attaching its details. A standing figure needs a steady base and well-placed tail; a hanging decoration needs a firmly attached loop. Sew hats, scarves and other added parts securely, and keep pieces with small attachments out of reach of young children and pets.
Crochet terminology: This article uses US crochet terms. Check the abbreviations for each project.
Sitting Santa Cat

This sitting Santa cat brings a playful touch to a shelf or Christmas display. Its round head, pear-shaped body and little front paws give it an upright pose, while the curved tail adds character from the side.
The hat has the soft, slightly slouched look of one slipped over the cat’s ears, but it is sewn in place rather than removable. White trim and a pompom make the Santa silhouette easy to recognise without hiding the embroidered face.
For a balanced shape, the lower body needs firm support, while the face should stay more softly filled. Packing the head too tightly can distort the embroidery; a gentler fill helps it remain rounded. As with many round-bottomed crochet figures, choose a stable spot for display rather than relying on it to stand unsupported.
Sitting Santa Cat

Quick-reference card. Follow the complete written instructions below.
Materials
- DK acrylic yarn: Approximately 25 g in a cat colour, 15 g red and 10 g white.
- Crochet hook: 3 mm, or a size that makes a firm fabric with no visible stuffing.
- Toy stuffing: Small amount.
- Embroidery thread or yarn: Black for the eyes and mouth; pink for the nose if desired.
- Other tools: Stitch marker, yarn needle and scissors.
Size and Fit
One size. At the stated gauge, the cat is designed to be approximately 15–17 cm tall to the top of the head; the folded hat may change the overall height. This is a gauge-based estimate, not a measured sample size.
Gauge
Approximately 20 sc and 22 rounds to 10 cm in continuous rounds. Exact gauge is less important than a firm fabric that hides the stuffing.
Abbreviations
US crochet terms.
- ch = chain
- sc = single crochet
- inc = work 2 sc in the same stitch
- dec = single crochet 2 stitches together; an invisible decrease may be used
- rnd = round
- st = stitch
Pattern
- Before you begin Work in continuous rounds unless a piece specifies rows. Mark the first st of each rnd and move the marker up as you work. Make one head, one body, two ears, two paws, one tail, one hat and one pompom. Numbers in brackets are stitch counts at the end of the stated rnd.
- Head With cat-coloured yarn, rnd 1: work 6 sc in a magic ring (6). Rnd 2: inc in each st (12). Rnd 3: (sc 1, inc) 6 times (18). Rnd 4: (sc 2, inc) 6 times (24). Rnd 5: (sc 3, inc) 6 times (30). Rnd 6: (sc 4, inc) 6 times (36). Rnds 7–12: sc in each st (36). Rnd 13: (sc 4, dec) 6 times (30). Rnd 14: (sc 3, dec) 6 times (24). Rnd 15: (sc 2, dec) 6 times (18). Rnd 16: (sc 1, dec) 6 times (12). Rnd 17: dec 6 times (6). Fasten off, draw the yarn through the remaining front loops and close the hole. Before the opening becomes too small, embroider the eyes across rnds 9–10 and a small nose and mouth below them. Keep the embroidery knots inside. Stuff the back and sides evenly, leaving the face softly rounded rather than packed tight.
- Body With cat-coloured yarn, rnd 1: work 6 sc in a magic ring (6). Rnd 2: inc in each st (12). Rnd 3: (sc 1, inc) 6 times (18). Rnd 4: (sc 2, inc) 6 times (24). Rnd 5: (sc 3, inc) 6 times (30). Rnds 6–8: sc in each st (30). Rnd 9: (sc 8, dec) 3 times (27). Rnds 10–11: sc in each st (27). Rnd 12: (sc 7, dec) 3 times (24). Rnd 13: sc in each st (24). Rnd 14: (sc 6, dec) 3 times (21). Rnd 15: sc in each st (21). Rnd 16: (sc 5, dec) 3 times (18). Rnd 17: sc in each st (18). Rnd 18: (sc 1, dec) 6 times (12). Rnd 19: dec 6 times (6). Stuff firmly as you narrow the body, shaping its wider lower half into a level sitting base. Fasten off and close the opening through the remaining front loops.
- Ears: make two With cat-coloured yarn, ch 6. Row 1: sc in the second ch from the hook and each remaining ch (5); ch 1 and turn. Row 2: dec, sc 1, dec (3); ch 1 and turn. Row 3: dec, sc 1 (2); ch 1 and turn. Row 4: dec (1). Fasten off, leaving a long sewing tail. The five-stitch edge is the base of each ear.
- Front paws: make two With cat-coloured yarn, work 6 sc in a magic ring. Work 5 more rnds of 6 sc. Fasten off, leaving a sewing tail. Add only a pinch of stuffing, flatten the open edge and sew it shut. The closed edge attaches to the upper body; the rounded starting end points down.
- Tail With cat-coloured yarn, work 6 sc in a magic ring. Work 13 more rnds of 6 sc. Fasten off, leaving a long sewing tail. Leave the tail unstuffed so it will curve easily.
- Santa hat With red yarn, work 6 sc in a magic ring for rnd 1. Rnd 2: sc in each st (6). Rnd 3: (sc 1, inc) 3 times (9). Rnd 4: sc in each st (9). Rnd 5: (sc 2, inc) 3 times (12). Rnd 6: sc in each st (12). Continue the same sequence, increasing by 3 sts on each odd-numbered rnd: rnd 7 (sc 3, inc) 3 times (15); rnd 9 (sc 4, inc) 3 times (18); rnd 11 (sc 5, inc) 3 times (21); rnd 13 (sc 6, inc) 3 times (24); rnd 15 (sc 7, inc) 3 times (27); rnd 17 (sc 8, inc) 3 times (30); rnd 19 (sc 9, inc) 3 times (33); rnd 21 (sc 10, inc) 3 times (36). On each intervening even-numbered rnd, and on rnd 22, sc in every st. Change to white. Rnds 23–24: sc in every st (36). Fasten off, leaving a long tail for sewing the trim to the head. Do not stuff the hat.
- Pompom With white yarn, rnd 1: work 6 sc in a magic ring (6). Rnd 2: inc in each st (12). Rnds 3–4: sc in each st (12). Rnd 5: dec 6 times (6). Add a little stuffing, fasten off and close the opening, leaving a tail to sew the pompom to the hat tip.
- Assembly Set the head centrally over the narrow top of the body and sew them together through several stitches on each piece. Sew the ear bases to opposite sides of the head across approximately rnds 5–7, leaving their tips upright. Sew the paws to the front of the upper body, with their closed edges around rnds 12–14 and rounded ends pointing towards the wider belly. Sew the tail base to the lower back around body rnds 5–6; curve the tail to one side and tack one or two points along its length to hold that shape. Fit the hat over the crown, with the front of its white trim sitting behind the ears and above the embroidered eyes. Sew the trim to the head around approximately head rnds 6–7, easing it behind the ear bases. Sew on the pompom, then fold the soft hat tip towards one side or the back and secure the fold with a small hidden stitch.
Finishing
- Weave in every end securely and gently flatten the stuffed body base with your hands so the cat sits as steadily as possible.
- Check that the ears, paws, hat, pompom and tail are firmly attached. Display on a stable shelf; the rounded base is not guaranteed to stand without support.
Helpful Tips
- Firm stuffing in the lower body supports the head. Add it gradually so the base stays broad rather than bulging.
- Use less stuffing in the face than in the body; overfilling can pull the embroidery apart and make the cheeks look pointed.
- If the hat feels snug, check the 36-stitch brim and your gauge before sewing. Keep the white trim loose enough to sit around the crown without pulling the ears inward.
Christmas Tree Cat

This Christmas Tree Cat combines the silhouette of a little fir tree with the character of a cat. Its tapered body and layered branches give it a festive shape, while the face and pointed ears keep the cat easy to recognise.
The broad, flat underside is important to the design: a rounded or overfilled bottom would make this decoration less steady when displayed. The branches add texture without hiding the face, and the ears stand clear of the cone’s outline so they remain visible among the greenery.
Christmas Tree Cat

Quick-reference card. Follow the complete written instructions below.
Materials
- DK cotton or cotton-blend yarn: Green for the body, branches, ears and tail; a small amount of brown for the base.
- Embroidery thread: Black for the eyes and mouth, and pink or black for the nose.
- Crochet hook: 3.5 mm, or a size that makes a firm fabric with no gaps for stuffing.
- Other supplies: Toy stuffing, stitch marker, yarn needle and scissors.
Size and Fit
One size. At the stated gauge, the base is approximately 7.5 cm across and the cat is approximately 11–12 cm tall, including the ears.
Gauge
Approximately 20 sc and 22 rounds to 10 cm in firm, unstretched crochet. Gauge is a guide; use a smaller hook if stuffing shows through.
Abbreviations
US crochet terms.
- ch = chain
- sc = single crochet
- hdc = half double crochet
- dc = double crochet
- sl st = slip stitch
- sc2tog = single crochet two stitches together; one decrease
- MR = magic ring
- R = round or row, as indicated
Pattern
- Body set-up With green, ch 48 and join with a sl st to the first ch, taking care not to twist the chain. Work the body upwards in continuous rounds. Do not count the joining sl st as a stitch; mark the first sc of each round.
- Body R1–3 R1: Sc in each ch around (48). R2–3: Sc in each stitch around (48).
- Body R4–9 R4: (Sc in next 6 stitches, sc2tog) 6 times (42). R5–6: Sc around (42). R7: (Sc in next 5 stitches, sc2tog) 6 times (36). R8–9: Sc around (36).
- Body R10–15 R10: (Sc in next 4 stitches, sc2tog) 6 times (30). R11–12: Sc around (30). R13: (Sc in next 3 stitches, sc2tog) 6 times (24). R14–15: Sc around (24).
- Body R16–21 R16: (Sc in next 2 stitches, sc2tog) 6 times (18). R17–18: Sc around (18). R19: (Sc in next stitch, sc2tog) 6 times (12). R20–21: Sc around (12).
- Body R22–23 R22: Sc2tog 6 times (6). R23: Sc around (6). Fasten off, leaving a tail. Thread it through the front loop of each of the 6 remaining stitches and pull closed.
- Flat base With brown, work in continuous rounds. R1: Work 6 sc in an MR (6). R2: Work 2 sc in each stitch (12). R3: (Sc in next stitch, 2 sc in next stitch) 6 times (18). R4: (Sc in next 2 stitches, 2 sc in next stitch) 6 times (24). R5: (Sc in next 3 stitches, 2 sc in next stitch) 6 times (30). R6: (Sc in next 4 stitches, 2 sc in next stitch) 6 times (36). R7: (Sc in next 5 stitches, 2 sc in next stitch) 6 times (42). R8: (Sc in next 6 stitches, 2 sc in next stitch) 6 times (48). Fasten off with a long sewing tail.
- Three branch tiers Make one green band each with a starting chain of 48, 36 and 24. For each band, join its chain into a ring without twisting. Band R1: Sc in each ch around. Band R2: Repeat (sl st in next stitch, sc in next stitch, hdc in next stitch, dc in next stitch) around. The bands have 12, 9 and 6 repeats respectively. Fasten off, leaving a long tail for sewing. Each stitch of R2 is worked into one stitch of R1; do not add extra stitches between repeats.
- Ears Make two in green, working in turned rows. R1: Ch 2; work 2 sc in the second ch from the hook (2). R2: Ch 1, turn; work 2 sc in each stitch (4). R3: Ch 1, turn; work 2 sc in the first stitch, sc in the next 2 stitches, and 2 sc in the last stitch (6). R4: Ch 1, turn; sc across (6). Fasten off with a sewing tail. R1 forms the pointed tip; R4 is the base.
- Tail With green, ch 10. Sc in the second ch from the hook and in each remaining ch (9). Fasten off with a sewing tail.
Finishing
- Choose a front. Sew the starting edge of the 48-stitch branch band around body R3, the 36-stitch band around body R9, and the 24-stitch band around body R15. Position each band so its shaped R2 edge hangs towards the base. Catch only the band’s starting edge as you sew, leaving the little branch tips free.
- Sew the six-stitch base of each ear against the sides of body R17–18, with the pointed tips facing upwards and projecting beyond the cone’s outline. Leave a clear space at the front between them.
- Embroider two eyes on the front across body R18–19, about four stitches apart. Add a small nose near R20 and a short mouth beneath it. Keep the embroidery above the upper branch band.
- Sew one end of the tail to the back around body R3. Curve it upwards and secure a second point near R6 so it remains visible.
- Stuff the cone lightly, keeping the bottom edge broad and level rather than rounded. Place the flat brown base against the opening. Using its sewing tail, sew its 48 outer stitches one-to-one to the 48 unused lower loops of the body’s starting chain. Add a little stuffing before closing the last few stitches, if needed, then weave in all ends.
Helpful Tips
- Count each decrease round before continuing: an extra stitch will make a branch band fit unevenly.
- If a branch band looks twisted when placed on the cone, turn it over before sewing so the shaped edge points downwards.
- Firm stitches and modest stuffing help the flat base support the cat without bulging.
Reindeer Cat

This ginger cat gets its Christmas character from a red nose and small branching antlers rather than a hat. An elongated torso, separate round head and long tail keep the silhouette recognisably feline beneath the reindeer disguise.
The four short legs make this a standing toy, so their placement matters to its appearance as well as its balance. When the feet share the weight evenly, the body looks settled instead of tipping towards one end.
The antlers are lightly filled and wire-free. That keeps them soft to the touch while giving the cat a playful reindeer outline; their small branches remain a detail worth checking if the toy is handled often.
Reindeer Cat

Quick-reference card. Follow the complete written instructions below.
Materials
- Aran-weight acrylic yarn: Ginger for the body, head, legs, ears and tail; small amounts of brown for the antlers and red for the nose.
- Crochet hook: 3.5 mm, or a size that makes a firm fabric with no gaps for stuffing.
- Toy stuffing: For the body, head, legs, nose and antler stems.
- Black embroidery yarn or thread: For the eyes and mouth.
- Other tools: Stitch marker, tapestry needle, pins and scissors.
Size and Fit
One size. Finished dimensions depend on yarn and tension. Before sewing the legs, pin all four in place and check that their feet meet a flat surface evenly.
Gauge
Gauge is not critical. Crochet firmly enough that stuffing does not show between stitches.
Abbreviations
US crochet terms.
- ch = chain
- sc = single crochet
- inc = 2 sc in the same stitch
- dec = single crochet 2 stitches together
- MR = magic ring
- st(s) = stitch(es)
Pattern
- Before you begin Work in continuous rounds unless stated otherwise. Mark the first stitch of each round and move the marker up as you work. Numbers in brackets give the stitch count at the end of a round. Leave long yarn tails on pieces that will be sewn on.
- Elongated oval torso With ginger, ch 7. Round 1: Sc in the second ch from the hook and in each of the next 4 ch, 3 sc in the last ch; working along the other side of the chain, sc in the next 4 ch and 2 sc in the first ch worked (14). Mark the tip with the 3-sc group as the front of the cat. Round 2: Sc 4, inc in each of the next 3 sts, sc 4, inc in each of the next 3 sts (20). Round 3: Sc 4, (inc, sc) 3 times, sc 4, (inc, sc) 3 times (26). Round 4: Sc 4, (inc, sc 2) 3 times, sc 4, (inc, sc 2) 3 times (32). Rounds 5–12: Sc in each st (32). Round 13: Sc 4, (dec, sc 2) 3 times, sc 4, (dec, sc 2) 3 times (26). Round 14: Sc 4, (dec, sc) 3 times, sc 4, (dec, sc) 3 times (20). Round 15: Sc 4, dec 3 times, sc 4, dec 3 times (14). Stuff firmly, keeping the long oval shape. Round 16: Dec 7 times (7). Fasten off and draw the yarn tail through the remaining front loops to close.
- Head With ginger, make an MR. Round 1: 6 sc in the ring (6). Round 2: Inc in each st (12). Round 3: (Sc, inc) 6 times (18). Round 4: (Sc 2, inc) 6 times (24). Round 5: (Sc 3, inc) 6 times (30). Rounds 6–10: Sc in each st (30). Round 11: (Sc 3, dec) 6 times (24). Round 12: (Sc 2, dec) 6 times (18). Round 13: (Sc, dec) 6 times (12). Embroider two small eyes around round 8 on the front, about 6 sts apart. Stuff the head firmly. Round 14: Dec 6 times (6). Fasten off and close through the remaining front loops. The closed end will sit towards the body; the MR end is the top of the head.
- Four legs Make four in ginger. For each leg, make an MR. Round 1: 6 sc in the ring (6). Round 2: Inc in each st (12). Rounds 3–5: Sc in each st (12). Round 6: (Sc, dec) 4 times (8). Stuff each leg firmly at the foot and more lightly at the open end. Fasten off, leaving the 8-st opening unclosed for sewing to the body.
- Two ears Make two in ginger. For each ear, make an MR. Round 1: 4 sc in the ring (4). Round 2: (Sc, inc) 2 times (6). Round 3: (Sc 2, inc) 2 times (8). Round 4: (Sc 3, inc) 2 times (10). Round 5: Sc in each st (10). Do not stuff. Flatten the opening and fasten off, leaving a sewing tail.
- Two branching antlers For each antler, make one stem and one branch in brown. Stem: Make an MR; round 1: 6 sc in the ring (6); rounds 2–5: sc in each st (6). Add only a tiny amount of stuffing to the stem. Fasten off, leaving its base open and a long sewing tail. Branch: Ch 4, then sc in the second ch from the hook and in each remaining ch (3 sc). Fasten off with a sewing tail. Sew one end of the branch securely to the side of its stem near round 4, leaving the other end free. Repeat for the second antler.
- Red nose With red, make an MR. Round 1: 6 sc in the ring (6). Round 2: Inc in each st (12). Round 3: Sc in each st (12). Add a small pinch of stuffing. Fasten off, leaving the opening and a long sewing tail.
- Long tail With ginger, make an MR. Round 1: 6 sc in the ring (6). Rounds 2–12: Sc in each st (6). Leave the narrow tail unstuffed so it can curve. Fasten off, leaving the base open and a long sewing tail.
- Assembly Set the torso on its side so its long axis runs from the marked front tip to the opposite rump tip. Pin two legs beneath the front half and two beneath the rear half, with one leg on each side of the underside in each pair. Space each pair back from its nearest tip. Stand the pinned cat on a flat surface: move the legs until all four feet touch and the body does not rock. Sew around each 8-st leg opening, taking several firm stitches into the torso without pulling the legs inward. Sew the closed, lower part of the head to the upper front of the torso, with its face pointing away from the rump. Sew the ears to opposite sides of the upper head, around head rounds 4–5. Sew the antler bases securely to the top of the head between the ears, around head rounds 2–4, and check that the branches are firmly attached. Sew the stuffed red nose between and slightly below the eyes, closing its opening against the face. Embroider a short mouth below it. Sew the tail base to the upper rump; curve the tail and, if needed, hold the curve with one or two discreet yarn stitches.
Finishing
- Weave in yarn tails securely, taking extra care at the legs, antlers and branches.
- Check the cat on a flat surface once more. If it rocks, adjust the leg seams before hiding their yarn tails.
- Gently shape the head, feet and antlers by hand.
Helpful Tips
- Pin all four legs before sewing any of them. Even spacing matters more for a standing toy than making each leg seam follow exactly the same torso stitches.
- Keep antler stuffing sparse. Soft stems and unstuffed branches are preferable to wire for this toy.
- Use embroidered eyes rather than small detachable pieces if the cat may be handled by a young child.
Snowman Cat

This snowman cat brings a feline twist to a familiar winter silhouette. Its rounded body and smaller head give it the look of a little snow figure, while pointed ears, a stitched face and a curled tail make its cat character clear.
The neck is the important structural detail: the head needs a secure sewn connection to the body so the figure holds together independently of its scarf. The scarf adds colour and draws attention to the stacked shape, but it should sit loosely enough that the neck join remains partly visible.
This is a friendly project for a confident beginner who is comfortable making stuffed shapes and attaching small pieces. Taking time over the head’s position helps keep the face looking forwards and the finished cat balanced.
Snowman Cat
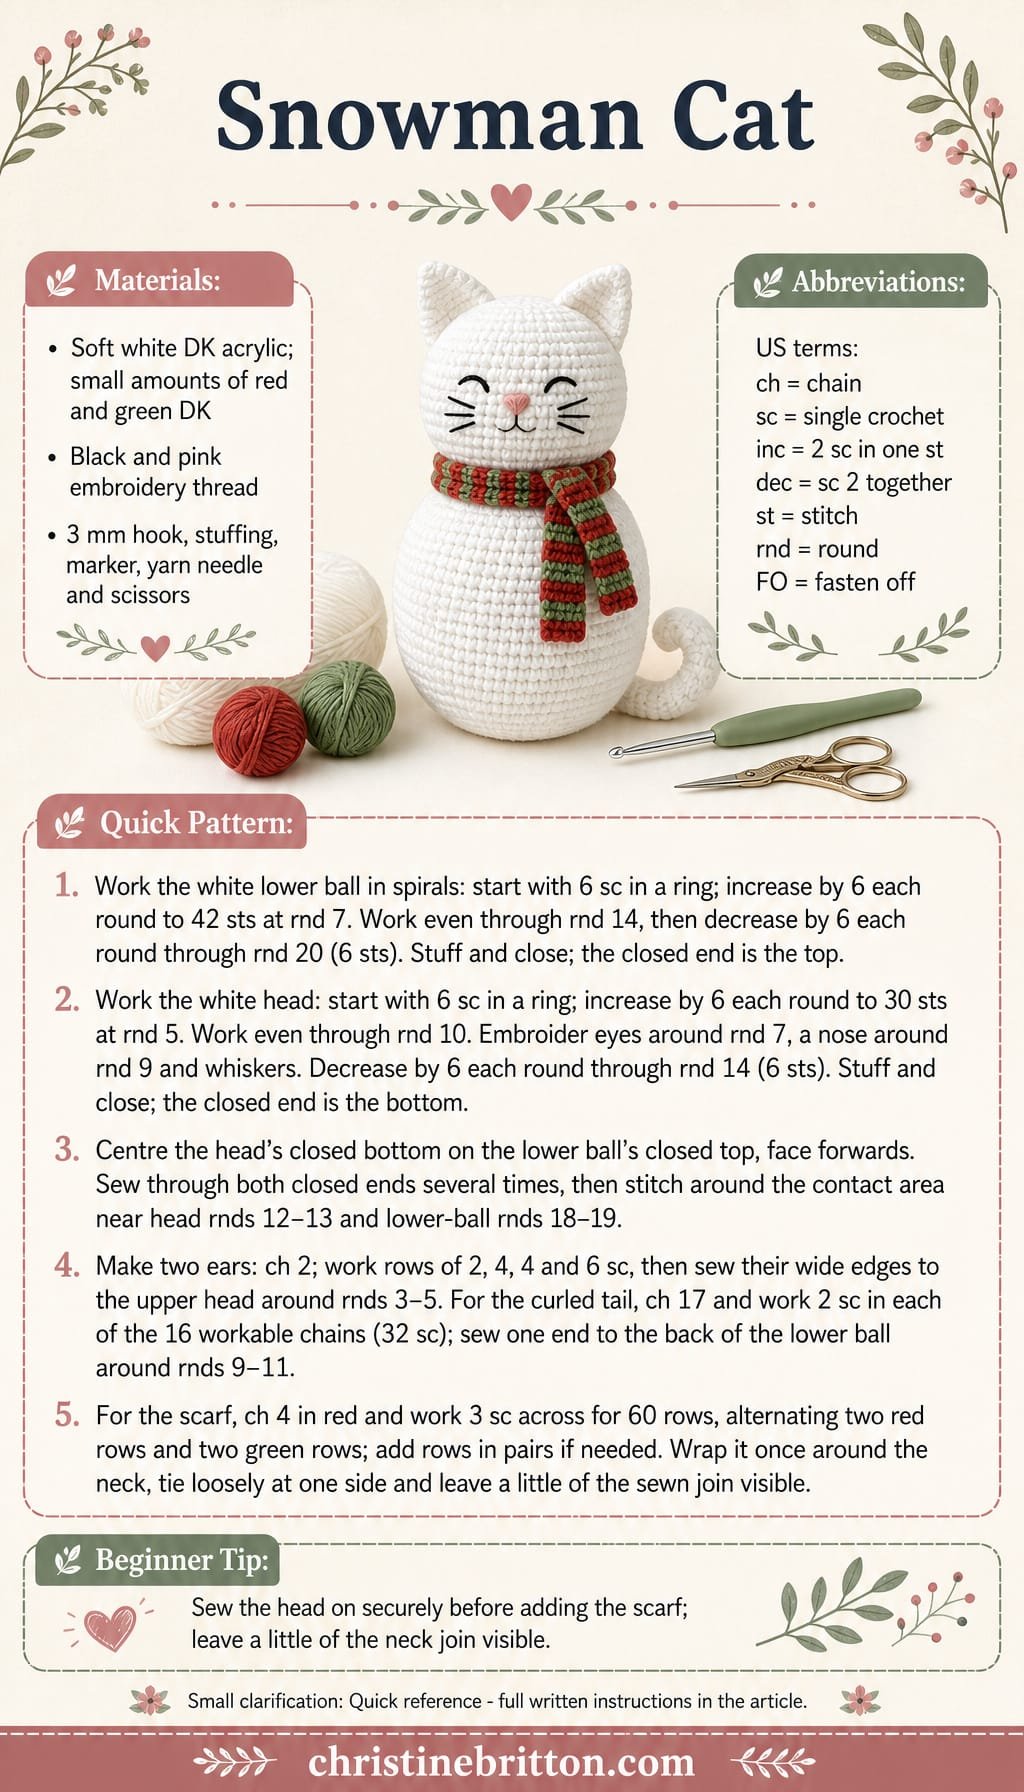
Quick-reference card. Follow the complete written instructions below.
Materials
- Soft white DK acrylic yarn: Enough for the body, head, ears and tail
- Red and green DK yarn: Small amounts for the striped scarf
- Black and pink embroidery thread: For the eyes, whiskers and nose
- 3 mm crochet hook: Or a size that produces a firm fabric
- Toy stuffing, stitch marker, yarn needle and scissors: Use the marker to track the start of each spiral round
Size and Fit
One size. The lower ball reaches 42 stitches around and the head reaches 30 stitches around. Finished dimensions depend on your tension. The 60-row scarf should wrap once around the neck and tie at the side; add rows in pairs if more length is needed.
Gauge
No fixed gauge is required. Work firmly so the stuffing does not show through, and use the same hook and white yarn for both balls.
Abbreviations
US crochet terms.
- ch = chain
- sc = single crochet
- inc = work 2 sc in the same stitch
- dec = single crochet 2 stitches together
- st = stitch
- rnd = round
- FO = fasten off
Pattern
- Before you begin Work the balls in continuous spiral rounds; do not join rounds. Move a marker to the first stitch of each new round. To start either ball, make a magic ring, or ch 2 and work the first round into the second chain from the hook.
- Lower ball, rnds 1–7 With white, rnd 1: 6 sc in the ring (6). Rnd 2: inc in each st (12). Rnd 3: (sc, inc) 6 times (18). Rnd 4: (2 sc, inc) 6 times (24). Rnd 5: (3 sc, inc) 6 times (30). Rnd 6: (4 sc, inc) 6 times (36). Rnd 7: (5 sc, inc) 6 times (42).
- Lower ball, rnds 8–20 Rnds 8–14: sc in each st (42). Rnd 15: (5 sc, dec) 6 times (36). Rnd 16: (4 sc, dec) 6 times (30). Rnd 17: (3 sc, dec) 6 times (24). Rnd 18: (2 sc, dec) 6 times (18). Stuff firmly, keeping the shape round. Rnd 19: (sc, dec) 6 times (12). Rnd 20: dec 6 times (6). FO with a long tail; thread it through the front loops of the remaining stitches and pull closed. This closed end is the top of the lower ball.
- Head, rnds 1–10 With white, rnd 1: 6 sc in the ring (6). Rnd 2: inc in each st (12). Rnd 3: (sc, inc) 6 times (18). Rnd 4: (2 sc, inc) 6 times (24). Rnd 5: (3 sc, inc) 6 times (30). Rnds 6–10: sc in each st (30).
- Embroider the face Choose one side as the front. Before closing the head, embroider two small black eyes around rnd 7, spaced about 6 stitches apart. Add a pink nose around rnd 9 and short black whiskers on either side. Secure the thread ends inside.
- Head, rnds 11–14 Rnd 11: (3 sc, dec) 6 times (24). Rnd 12: (2 sc, dec) 6 times (18). Stuff firmly without obscuring the face. Rnd 13: (sc, dec) 6 times (12). Rnd 14: dec 6 times (6). FO with a long tail; thread it through the front loops of the remaining stitches and pull closed. This closed end is the bottom of the head.
- Join the balls Centre the closed bottom of the head on the closed top of the lower ball, with the face pointing forwards. Using a white yarn tail, sew back and forth through both closed ends several times. Then stitch around their contact area, catching stitches near head rnds 12–13 and lower-ball rnds 18–19. Pull the stitches snugly without flattening the balls. Knot securely and bury the tail; the scarf must not be needed to hold the head on.
- Ears, make two With white, ch 2. Row 1: work 2 sc in the second ch from the hook (2). Row 2: ch 1, turn, inc in each st (4). Row 3: ch 1, turn, sc in each st (4). Row 4: ch 1, turn, inc, 2 sc, inc (6). FO, leaving a sewing tail. Sew the wide, 6-stitch edge of each flat triangle to the upper sides of the head, around rnds 3–5. Keep the points upright.
- Curled tail With white, ch 17. Work 2 sc in the second ch from the hook and in each remaining chain (32 sc). FO, leaving a sewing tail. The extra stitches make the strip curl. Sew one end firmly to the back of the lower ball around rnds 9–11; if desired, tack the other end near the base to hold a tighter curl.
- Striped scarf With red, ch 4. Row 1: sc in the second ch from the hook and in each remaining ch (3). Row 2: ch 1, turn, sc in each st (3). Rows 3–60: ch 1, turn, sc in each st (3), changing colour after every two rows so rows 3–4 are green, rows 5–6 are red, and so on. Change colour on the final yarn-over of the last sc of each even-numbered row, except row 60. Carry the unused yarn neatly along one edge or cut and weave in the ends. FO and weave in the ends. If needed, add rows in pairs, keeping the two-row stripe sequence.
- Dress the cat Wrap the scarf once around the neck join and tie a loose single knot at one side. Position its narrow edge so a little of the sewn join remains visible; do not pull the scarf tight or use it to support the head.
Finishing
- Weave in all remaining ends, checking that the ears, tail and head cannot be pulled loose.
- Gently shape the stuffed balls with your hands and straighten the ear points.
- Adjust the scarf knot so the face and part of the neck join stay visible.
Helpful Tips
- If gaps appear around the stuffing, use a smaller hook rather than packing in less stuffing.
- Pin the head and ears in place before sewing to check that the face points forwards.
- The scarf is decorative: secure the neck with yarn stitches before adding it.
Gingerbread Cat

This gingerbread cat brings a playful biscuit silhouette to the Christmas tree, with pointed ears, outstretched paws and a softly padded shape. Its white icing lines give it the look of a decorated treat, while a hanging loop makes it easy to display.
The cat is formed from two matching panels, with the legs and paws shaped as part of each panel rather than attached separately. That gives the outline its distinctive shape without extra seams at the limbs.
Neat edges matter on a silhouette like this: keeping the panels aligned and the joining edge relaxed helps the paws, shoulders and ears stay clearly defined. Flat embroidery adds the face and icing without the bulk of sewn-on decorations, so the lightly stuffed cat can keep its biscuit-like profile.
Gingerbread Cat Christmas Decoration

Quick-reference card. Follow the complete written instructions below.
Materials
- DK cotton yarn: Small amounts of gingerbread brown and white, plus a little dark yarn for the face
- Crochet hook: 3 mm, or a size that produces a firm fabric
- Polyester stuffing: A small amount
- Tapestry needle and scissors: For embroidery, joining and weaving in ends
Size and Fit
One sample size. Approximately 13 cm tall and 10.5 cm across the outstretched paws at the stated gauge, excluding the hanging loop. This is an approximate size, not a tested finished measurement.
Gauge
Approximately 20 sc and 22 rows to 10 cm in firm, flat fabric. Exact gauge is not critical, but the stitches should be close enough to contain the stuffing.
Abbreviations
US crochet terms.
- ch = chain
- sc = single crochet
- sc2tog = single crochet two stitches together
- sl st = slip stitch
- st(s) = stitch(es)
Pattern
- Before you begin Make two identical brown panels. Work in rows, turning after every row unless told otherwise. A turning ch 1 does not count as a stitch. The legs are made separately at the bottom of each panel, then joined into one piece.
- Legs — make two for each panel For each leg, ch 7. Row 1: Sc in the second ch from the hook and in each remaining ch; 6 sc. Rows 2–4: Ch 1, turn, sc in each st; 6 sc. Fasten off the second leg only. Leave the working yarn attached to the first leg.
- Join the legs and shape the body Row 5: Ch 1, turn, sc across the 6 sts of the first leg, ch 3, then sc across the 6 sts of Row 4 of the second leg, entering from its inner edge. Keep both legs flat and untwisted; 15 sts. Row 6: Ch 1, turn, sc across, working one sc in each of the 3 joining chains; 15 sc. Rows 7–8: Ch 1, turn, sc across; 15 sc. The space below the joining chains remains open between the legs.
- Outstretched paws Row 9: Ch 4, turn, sc in the second ch from the hook and in the next 2 ch, then sc across the 15 body sts; 18 sc. Ch 4 at the end of this row. Row 10: Turn, sc in the second ch from the hook and in the next 2 ch, then sc across the 18 sts; 21 sc. Rows 11–13: Ch 1, turn, sc across; 21 sc. The extensions at both sides form the outstretched paws.
- Shoulders and neck Row 14: Ch 1, turn, sl st in the first 3 sts, sc in the next 15 sts and leave the final 3 sts unworked; 15 active sc. Rows 15–16: Ch 1, turn, sc across the 15 active sc. Row 17: Ch 1, turn, sl st in the first 3 sts, sc in the next 9 sts and leave the final 3 sts unworked; 9 active sc. Row 18: Ch 1, turn, sc across the 9 active sc. Do not work into the slip stitches when turning for the following rows.
- Head Row 19: Ch 4, turn, sc in the second ch from the hook and in the next 2 ch, then sc across the 9 neck sts; 12 sc. Ch 4 at the end of this row. Row 20: Turn, sc in the second ch from the hook and in the next 2 ch, then sc across the 12 sts; 15 sc. Rows 21–25: Ch 1, turn, sc across; 15 sc.
- Pointed ears First ear, Row 26: Ch 1, turn, sc in the first 4 sts of Row 25; leave the remaining 11 sts unworked. Row 27: Ch 1, turn, sc2tog twice; 2 sts. Row 28: Ch 1, turn, sc2tog; 1 st. Fasten off. For the second ear, join brown yarn at the outer edge of the last 4 sts of Row 25. Work its Row 26 as 4 sc towards the centre, leaving the 7 centre stitches of Row 25 exposed between the ears. Repeat Rows 27–28 and fasten off.
- Embroider and prepare the loop Weave in the panel ends. On the front panel, embroider a small face in dark yarn and white icing lines around the forehead, paws and body. Keep the stitches flat rather than adding sewn-on pieces, which could make this lightly stuffed decoration lumpy. With brown yarn, make a chain long enough to form the hanging loop you want. Sew both chain ends securely to the inside of the back panel at the centre between the ears.
- Join the panels Place the panels together with the embroidered face out and all shaped edges aligned. Join brown yarn at an edge and sc through both panel edges around the outline. Space stitches evenly along row ends and chains, adding an extra sc at a sharp corner if needed; do not pull the edge tight. Follow the outline around each leg, including the gap between them, and around both ears, leaving a short opening at the top. Add a little stuffing, keeping the panels mostly flat. Close the opening with sc through both edges, catching the loop ends securely in the top seam, then fasten off.
Finishing
- Weave in the joining end securely and ease the stuffing towards the paws and ears without overfilling them.
- Straighten the corners and embroidered lines gently with your fingers. Check that the hanging loop is firmly attached before hanging the decoration.
Helpful Tips
- The slip stitches at the shoulder and neck move the working position inward; they are not part of the active stitch count on subsequent rows.
- For a neat edge, keep the two panels aligned as you join them and adjust the spacing of the edging stitches at the stepped shoulders rather than forcing a stitch into every visible loop.
- Embroider before joining so the thread ends can be secured on the inside.
Candy Cane Cat

This Candy Cane Cat turns a familiar Christmas sweet into a small amigurumi character. Red-and-white stripes follow the curved body, with a face and ears at the short end and a little tail near the base.
The hook is shaped as the body is crocheted, then discreet stitches along its inner edge help it keep its curve without wire. The result has a rounded, stuffed outline rather than a sharply creased bend.
This is an intermediate project for crocheters comfortable keeping track of colour changes and shaping in continuous rounds. It makes a playful addition to a festive display, especially alongside other Christmas crochet characters.
Candy Cane Cat

Quick-reference card. Follow the complete written instructions below.
Materials
- Smooth DK cotton-blend yarn: Small amounts of red and white for the body; red for the ears and tail.
- Black embroidery thread or yarn: For the eyes, nose and mouth.
- Crochet hook: 3 mm, or a size that makes a firm fabric without gaps when stuffed.
- Toy stuffing: A small amount.
- Notions: Stitch marker, yarn needle and scissors.
Size and Fit
One size. The stuffed tube is approximately 16 cm long measured along its centre before the hook is secured, and approximately 3 cm across. The finished height depends on how firmly the bend is stitched in place.
Gauge
Approximately 22 sc and 24 rounds per 10 cm in firm, stuffed rounds. Exact gauge is not essential; use a fabric tight enough to contain the stuffing.
Abbreviations
US crochet terms.
- ch = chain
- sc = single crochet
- sc2tog = single crochet two stitches together; one decrease
- inc = work 2 sc in the same stitch
- st(s) = stitch(es)
- rnd(s) = round(s)
Pattern
- Before you begin Work the body in continuous rounds and mark the first stitch of each round. Change colour at the start of each specified round, making the final pull-through of the preceding stitch with the new colour. Secure colour-change ends inside the tube without pulling the stripes tight. Stuff as you go, keeping the bend firm but flexible.
- Body base, red Rnd 1: Make a magic ring and work 6 sc into it. (6) Rnd 2: Inc in each st. (12) Rnd 3: [Sc in next st, inc in next st] 6 times. (18) Pull the starting ring closed.
- Straight striped section Rnds 4–21: Sc in each st. (18 each rnd) Work rnds 4–6 in white, 7–9 in red, 10–12 in white, 13–15 in red, 16–18 in white and 19–21 in red.
- Shape the hook Keep the first-stitch marker in place. On each shaping round, the decrease lies on the inner side of the hook and the increase lies opposite it. Rnds 22, 24, 26, 28, 30 and 32: Sc in next 3 sts, sc2tog, sc in next 7 sts, inc in next st, sc in last 5 sts. (18) Rnds 23, 25, 27, 29, 31 and 33: Sc in each st. (18) Work rnds 22–24 in white, 25–27 in red, 28–30 in white and 31–33 in red.
- Cat end and closure Rnds 34–39: Sc in each st. (18 each rnd) Work rnds 34–36 in white and 37–39 in red. Rnd 40, white: [Sc in next st, sc2tog] 6 times. (12) Add the last of the stuffing, leaving the end rounded. Rnd 41, white: Sc2tog 6 times. (6) Fasten off with a tail; thread it through the front loops of the remaining 6 sts and draw closed.
- Ears, make two in red Ch 2. Row 1: Sc in the second ch from the hook. (1) Row 2: Ch 1, turn, inc. (2) Row 3: Ch 1, turn, inc in each st. (4) Row 4: Ch 1, turn, sc in each st. (4) Fasten off, leaving a sewing tail. Row 1 is the tip; row 4 is the base.
- Tail, in red Ch 7. Sc in the second ch from the hook and in each remaining ch. (6 sc) Fasten off, leaving a sewing tail.
- Set the curve and add features Hold the tube with the rnd 1 base pointing down. Bend the upper section towards the side containing the shaping decreases, near stitches 4–5 of each shaping round. With a length of body-coloured yarn, take several small, hidden stitches through the surface loops to bring the inner sides of rnds 21 and 31 together. Make a second set between rnds 24 and 34. Secure the yarn inside the body; pull only enough to hold a clear hook without flattening the tube. Sew the ear bases to opposite sides of the closed cat end around rnds 39–40. Embroider two small eyes across rnd 36 and a nose and short mouth below them on rnds 34–35. Sew one end of the tail near rnd 6 on the outside of the lower stem.
Finishing
- Check that the base and cat end are securely closed and that no stuffing shows through.
- Weave in loose ends, keeping the curve-reinforcing stitches hidden on the inner side.
- Shape the hook gently by hand. Do not add wire.
Helpful Tips
- If the hook springs open, add another small hidden stitch beside each reinforcing point rather than pulling one stitch excessively tight.
- Keep the facial embroidery small so it fits on the short cat end.
Stocking Kitten

This Stocking Kitten turns a miniature Christmas stocking into a cosy perch for a curious cat. The kitten’s head peeks above the contrasting cuff, with little paws resting at the front.
The stocking has a formed heel rather than a straight, bent tube. Short rows create the heel bulge and change the direction of the foot, while the rounded toe gives the other end its familiar stocking shape. Both curves help the silhouette read clearly as a tiny sock.
This is an intermediate decorative project, not a wearable sock. The open top makes room for the kitten, and the embroidered face gives it expression without relying on loose plastic features.
Stocking Kitten

Quick-reference card. Follow the complete written instructions below.
Materials
- Smooth DK acrylic yarn: Small amounts of red for the stocking, cream for the cuff, and a kitten colour of your choice
- 3 mm crochet hook: Or a size that makes a firm fabric
- Toy stuffing: For the head, toe and heel
- Embroidery yarn: Black or dark brown for the eyes and whiskers; pink or another contrasting colour for the nose
- Other supplies: Stitch marker, yarn needle and scissors
Size and Fit
One miniature decoration. At the stated gauge, the stocking opening is approximately 11 cm around. Finished height depends on how the shaped stocking is arranged; this is a decorative item, not a wearable sock.
Gauge
Approximately 22 sc and 24 rounds to 10 cm in firm, unstuffed fabric. Exact gauge is not essential, but keep stitches close enough to contain the stuffing.
Abbreviations
US crochet terms.
- ch = chain
- sc = single crochet
- inc = work 2 sc in the same stitch
- sc2tog = single crochet 2 stitches together
- rnd = round
- MR = magic ring
Pattern
- Before you begin Work stocking and head rounds in a continuous spiral unless instructed otherwise. Mark the first stitch of each round. Leave sewing tails on the separate pieces. The stocking begins at its open top and ends at the toe.
- Stocking leg With red, ch 24 and join with a slip stitch to the first ch without twisting. Rnd 1: Sc once in each ch around (24). Rnds 2–8: Sc in each stitch (24). Keep the unused loops of the starting chain accessible for the cuff.
- Short-row heel The next 12 stitches form the heel; the other 12 remain unworked until the foot begins. Work back and forth in sc, turning at the end of every row. Heel rows 1–6: Work 11, 10, 9, 8, 7 and 6 sc respectively, turning after each row. Heel rows 7–12: Work 7, 8, 9, 10, 11 and 12 sc respectively, turning after rows 7–11 but not after row 12. On each growing row, work the extra stitch beyond the previous row’s turning point. Do not make a turning chain or increase stitches. After row 12, the hook is at the first stitch of the heel section; the next stitch in your current working direction is one of the 12 unworked front stitches.
- Foot and rounded toe Continuing in the direction of heel row 12, work 1 sc in each of the 12 unworked front stitches, then 1 sc in each of the 12 heel stitches. This is foot rnd 1 (24); place the marker at its first stitch. Foot rnds 2–4: Sc around (24). Toe rnd 1: (Sc2tog, sc in next 2 stitches) 6 times (18). Toe rnd 2: Sc around (18). Toe rnd 3: (Sc in next stitch, sc2tog) 6 times (12). Lightly stuff the toe and heel, leaving most of the leg unstuffed for the kitten. Toe rnd 4: Sc2tog 6 times (6). Fasten off, thread the tail through the remaining front loops and pull closed.
- Folded cuff With cream, join yarn to an unused loop of the stocking’s starting chain at the open top. Cuff rnd 1: Work 1 sc in each of the 24 starting chains (24). Cuff rnds 2–4: Sc around (24). Fasten off. Fold the cuff down over the outside of the red leg. Tack its lower edge to the stocking at a few points, taking care not to close the top opening.
- Kitten head With the kitten colour, make an MR. Rnd 1: Work 6 sc in the ring (6). Rnd 2: Inc in each stitch (12). Rnd 3: (Sc, inc) 6 times (18). Rnd 4: (Sc in next 2 stitches, inc) 6 times (24). Rnd 5: (Sc in next 3 stitches, inc) 6 times (30). Rnds 6–8: Sc around (30). Rnd 9: (Sc in next 3 stitches, sc2tog) 6 times (24). Rnd 10: (Sc in next 2 stitches, sc2tog) 6 times (18). Rnd 11: (Sc, sc2tog) 6 times (12). Stuff firmly. Rnd 12: Sc2tog 6 times (6). Fasten off and close the remaining hole with the tail. The closed end is the underside of the head.
- Ears, make two With the kitten colour, ch 2. Row 1: Work 2 sc in the second ch from the hook; ch 1 and turn (2). Row 2: Inc in each stitch; ch 1 and turn (4). Row 3: Sc in each stitch (4). Fasten off, leaving a tail. Sew each four-stitch base to the top of the head, spaced evenly to either side of the face.
- Paws, make two With the kitten colour, make an MR. Rnd 1: Work 6 sc in the ring (6). Rnds 2–3: Sc around (6). Do not stuff. Flatten the open end and work 3 sc through both layers to close it. Fasten off, leaving a sewing tail.
- Face and assembly Embroider two eyes, a small nose and short whiskers on the front of the head, keeping yarn ends securely inside. Nest the closed underside of the head in the stocking opening; its widest part should sit above the cuff. Sew the underside to the inside back and sides of the opening. Sew the flattened ends of the paws to the front of the folded cuff, one on either side of the face, with their rounded ends pointing down over the cuff. Finally, stitch the cuff neatly to the head at the sides and around the paw attachments so the kitten sits securely without closing or distorting the opening.
Finishing
- Weave in all remaining ends.
- Ease stuffing into the heel bulge and curve the foot gently so the heel and toe are both visible.
- For a hanging decoration, attach a short yarn loop securely to the back of the stocking opening.
Helpful Tips
- Count the heel’s worked stitches, not its skipped stitches: the heel uses short rows and does not decrease the stocking’s 24 live stitches.
- When beginning the foot, follow the direction established by the final heel row. The first 12 stitches are the previously unworked front stitches.
- Use embroidery rather than loose plastic features if the decoration may be handled by children. This item is not intended as an infant toy.
Gift Box Cat

The Gift Box Cat is a playful Christmas cat crochet decoration: a little face and ears appear above a wrapped present, while paws peek over the front. Flat ribbon details give it the look of a gift without loose bows or ties.
Unlike a soft pouch, the present gets its shape from firm panels. Neatly aligned seams define the corners and help the stuffed box keep its square outline, so the joins are as important to its appearance as the ribbon.
The cat is meant to look as though it is emerging from the box, rather than sitting loosely on top. A firm attachment inside the opening keeps the head upright, while the paws at the front complete the peeking-out effect.
Gift Box Cat

Quick-reference card. Follow the complete written instructions below.
Materials
- DK cotton yarn: Approximately 25 g in a box colour, 15 g in a cat colour and a small amount in a contrasting ribbon colour.
- Crochet hook: 3 mm, or a size that produces a firm fabric without gaps.
- Other supplies: Toy stuffing, a yarn needle, stitch markers and a small amount of dark embroidery thread or yarn for the face.
Size and Fit
One decorative size. Each panel is approximately 5 cm square, making a cube approximately 5 cm across before the cat and ribbon are added. The cat’s head is approximately 3 cm across. Keep all six panels the same size.
Gauge
Aim for approximately 24 sc and 28 rows over 10 cm in firm fabric. A 12-sc by 14-row panel should be approximately 5 cm square. Check the first panel and change hook size if necessary; exact gauge is less important than firm, matching panels.
Abbreviations
US crochet terms.
- ch = chain
- sc = single crochet
- inc = work 2 sc in the same stitch
- dec = single crochet 2 stitches together
- st(s) = stitch(es)
- RS/WS = right side/wrong side
Pattern
- Six box panels In the box colour, make six alike. Ch 13. Row 1: Sc in the second ch from the hook and in each remaining ch; 12 sc. Rows 2–14: Ch 1, turn, sc in each st; 12 sc. Fasten off, leaving a sewing tail on each panel. The turning ch does not count as a stitch.
- Cat head In the cat colour, work in a continuous spiral and mark the first stitch of each round. Round 1: Work 6 sc in a magic ring; 6. Round 2: Inc in each st; 12. Round 3: (Sc, inc) six times; 18. Round 4: (Sc in next 2 sts, inc) six times; 24. Rounds 5–8: Sc in each st; 24. Round 9: (Sc in next 2 sts, dec) six times; 18. Round 10: (Sc, dec) six times; 12. Embroider the eyes, nose and mouth on the upper front of the head, then stuff it firmly. Round 11: Dec six times; 6. Fasten off and draw the remaining opening closed, leaving a long tail for securing the head.
- Ears Make two in the cat colour. Ch 2. Row 1: Sc in the second ch from the hook; 1. Row 2: Ch 1, turn, inc; 2. Row 3: Ch 1, turn, inc in each st; 4. Fasten off with a sewing tail. Sew the four-stitch base of each ear to the upper sides of the head, with the narrow tip pointing up.
- Paws Make two in the cat colour. Ch 4. Row 1: Sc in the second ch from the hook and in each remaining ch; 3. Rows 2–3: Ch 1, turn, sc in each st; 3. Fasten off with a sewing tail. Set aside until the box is assembled.
- Two flat ribbon strips In the ribbon colour, make two. Ch 3. Row 1: Sc in the second ch from the hook and in the next ch; 2. Rows 2–56: Ch 1, turn, sc in each st; 2. Fasten off. Each strip should be approximately 20 cm long at the stated row gauge, enough to run around four faces of the cube. Adjust the number of straight rows if needed to fit your finished box without pulling it out of shape.
- Assemble the cube Choose four panels for the front, back, left and right sides, with their 12-stitch edges at the top and bottom. With WS together, whipstitch their vertical 14-row edges to form a square tube. Align the corners, then sew a fifth panel to all four bottom edges. The remaining panel is the top: orient it so its two 12-stitch edges meet the front and back panels. Sew it to the front and both sides. Along the back/top seam, sew together stitch pairs 1–3 and 10–12, leaving the central six stitch pairs, 4–9, unsewn. Stuff the cube evenly through this opening, paying particular attention to the corners. Keep the panel seams neatly aligned: the firm fabric and defined corner seams help the present retain its square shape.
- Secure the cat Place the head’s closed six-stitch base in the opening along the back/top seam, with the face towards the front of the box. Its round head and ears sit above the top edge. Using the head tail, stitch the base securely to both edges of the opening, passing through the top panel and back panel as you work. Close any gaps beside the base with small stitches; the head must not pull free when gently lifted. Sew the bottom row of each paw to the outside of the front panel near its top seam, one on either side of the centre. Position the paws so their upper rows project about 0.5–1 cm above the front edge.
- Add the ribbon Lay one strip around the centres of the left, top, right and bottom faces. Lay the second around the front, top, back and bottom faces, offset about 1 cm towards the left side so it crosses the back/top seam away from the cat’s opening. The strips cross on the top and bottom. Sew their ends together beneath the box, then tack the strips flat at corners and crossings. Do not wrap ribbon across the head, paws or opening.
Finishing
- Weave in all remaining ends securely.
- Shape the stuffed corners with your fingers and check that the head is firmly stitched into the closed seam.
- Use embroidered facial features rather than detachable eyes if the decoration may be handled by a child.
Helpful Tips
- Mark the central six stitch pairs on the back/top seam before sewing; leaving only this section open keeps the top panel supported.
- If a ribbon strip is too short or long, change its number of plain rows rather than stretching it around the cube.
- Keep stuffing behind the head’s attachment stitches so fibres do not show at the seam.
If you’d like to keep building your crochet skills, take a look at Christmas amigurumi patterns.
Christmas Pudding Cat

This Christmas pudding cat brings a playful twist to a familiar festive treat. Its rounded shape makes it a cheerful addition to a table display, while the optional hanging version suits a Christmas tree.
The icing should read as a cap draped over the crown, rather than a covering for the whole face. Keeping its front edge below the pointed ears but above the facial features lets the cat’s expression stay clear. The small holly accent adds colour without distracting from that simple silhouette.
Christmas Pudding Cat

Quick-reference card. Follow the complete written instructions below.
Materials
- DK acrylic yarn: Small amounts of pudding-brown and white, plus scraps of black, pink, green and red for embroidery.
- Crochet hook: 3.5 mm, or a size that makes a firm fabric with no gaps for stuffing.
- Toy stuffing: A small handful.
- Other tools: Stitch marker, yarn needle and scissors.
Size and Fit
One size. Approximately 6–7 cm wide, with a little extra height from the ears; finished size varies with yarn and tension. The cap is sewn over the crown rather than stretched around the widest part of the body.
Gauge
Exact gauge is not essential. Crochet tightly enough that the stuffing does not show through.
Abbreviations
US crochet terms.
- ch = chain
- sc = single crochet
- dc = double crochet
- sl st = slip stitch
- inc = work 2 sc in the same stitch
- inv dec = invisible single-crochet decrease over the next 2 stitches
- MR = magic ring
Pattern
- Before you begin Work the body and icing in continuous rounds without joining. Mark the first stitch of each round and move the marker up as you work. Numbers in parentheses are stitch counts.
- Brown body, rounds 1–7 With brown, R1: 6 sc in MR (6). R2: inc in each stitch (12). R3: [sc, inc] 6 times (18). R4: [2 sc, inc] 6 times (24). R5: [3 sc, inc] 6 times (30). R6: [4 sc, inc] 6 times (36). R7: [5 sc, inc] 6 times (42).
- Brown body, rounds 8–14 Sc in each stitch for 7 rounds (42 stitches per round).
- Brown body, rounds 15–20 R15: [5 sc, inv dec] 6 times (36). R16: [4 sc, inv dec] 6 times (30). R17: [3 sc, inv dec] 6 times (24). Begin stuffing firmly, keeping the shape round. R18: [2 sc, inv dec] 6 times (18). R19: [sc, inv dec] 6 times (12). Add a little stuffing if needed. R20: inv dec 6 times (6). Fasten off, thread the tail through the front loops of the remaining 6 stitches, pull the opening closed and hide the tail.
- White icing cap, rounds 1–7 With white, R1: 6 sc in MR (6). R2: inc in each stitch (12). R3: [sc, inc] 6 times (18). R4: [2 sc, inc] 6 times (24). R5: [3 sc, inc] 6 times (30). R6: [4 sc, inc] 6 times (36). R7: sc in each stitch (36).
- White icing cap, scalloped edge R8: [sl st in next stitch, skip next stitch, 5 dc in next stitch, skip next stitch, sl st in each of next 2 stitches] 6 times. This uses all 36 stitches of R7 and makes 6 scallops. Fasten off, leaving a long tail for sewing.
- Ears, make two With brown, work in turned rows. Row 1: ch 2, sc in the second ch from hook (1). Row 2: ch 1, turn, inc (2). Row 3: ch 1, turn, inc in first stitch, sc in next stitch (3). Row 4: ch 1, turn, inc in first stitch, sc in next 2 stitches (4). Row 5: ch 1, turn, inc in first stitch, sc in next 3 stitches (5). Row 6: ch 1, turn, sc in each stitch (5). Fasten off, leaving a long sewing tail. Row 1 is the point; Row 6 is the base.
- Assembly and face Centre the icing cap over the body’s first round, with the scallops falling around body rounds 7–9. Sew it down around its edge; keep the front scallop high enough to leave body rounds 10–13 clear for the face. Sew each ear’s 5-stitch base through the cap and into the body near the front of the crown, with a gap between the ears. Let the pointed ends stand above the icing. Embroider two small black eyes about 5 body stitches apart on round 11. Add a small pink nose between them on round 12 and a short black mouth below it. On one side of the icing, stitch two green leaf shapes and three small red stitches for holly; secure the yarn ends well.
- Optional ornament loop To hang the cat, fold a length of yarn into a loop. Stitch both ends firmly through the icing and into the brown crown several times, then secure and bury the ends in the body. Tug gently to check the attachment before hanging.
Finishing
- Shape the stuffed body gently with your hands and straighten the ear points.
- Check that the face remains visible below the icing and that all embroidered details are secure.
- Use stitched holly details rather than beads, particularly if the cat may be handled by children.
Helpful Tips
- The cap should drape over the crown; do not pull its scalloped edge down across the eyes.
- If stuffing shows between stitches, try a smaller hook before starting again.
Christmas Bell Cat

This Christmas Bell Cat turns a familiar festive shape into a little character: a narrow crown with pointed ears, a widening bell silhouette and an embroidered expression. The bow adds a pop of colour without obscuring the face.
The broad lower edge gets its shape from the crocheted fabric rather than a rigid insert. A closed base and light stuffing support the outline while helping the bottom stay flat, making this a decorative cat that can sit on a shelf or mantelpiece.
Christmas Bell Cat

Quick-reference card. Follow the complete written instructions below.
Materials
- DK cotton-blend yarn: Gold for the body and ears; a small amount of a contrasting colour for the bow.
- Embroidery yarn or stranded cotton: Dark brown or black for the eyes and whiskers, and pink or dark brown for the nose.
- Crochet hook: 3 mm, or a size that produces a firm fabric without gaps.
- Other supplies: Toy stuffing, stitch marker, tapestry needle and scissors.
Size and Fit
One decorative size, approximately 7 cm across the base and 10 cm high including the ears. Dimensions are estimates and will vary with yarn and tension.
Gauge
Aim for a firm fabric with no gaps showing the stuffing. An approximate guide is 22 single crochet stitches and 25 rounds per 10 cm; matching a measured gauge is less important than making a dense fabric.
Abbreviations
US crochet terms.
- ch = chain
- sc = single crochet
- inc = work 2 sc in the same stitch
- st = stitch
- rnd = round
Pattern
- Before you begin Work the body and base in continuous spiral rounds. Mark the first stitch of each round and move the marker up as you work. The increases are spaced evenly around each round.
- Bell body, rnds 1–6 With gold, make a magic ring. Rnd 1: Work 6 sc into the ring; pull closed. (6) Rnd 2: Sc around. (6) Rnd 3: Inc in each st. (12) Rnd 4: Sc around. (12) Rnd 5: (Sc, inc) 6 times. (18) Rnd 6: Sc around. (18)
- Bell body, rnds 7–12 Rnd 7: (2 sc, inc) 6 times. (24) Rnds 8–9: Sc around. (24) Rnd 10: (3 sc, inc) 6 times. (30) Rnds 11–12: Sc around. (30)
- Bell body, rnds 13–18 Rnd 13: (4 sc, inc) 6 times. (36) Rnds 14–15: Sc around. (36) Rnd 16: (5 sc, inc) 6 times. (42) Rnds 17–18: Sc around. (42)
- Bell body, rnds 19–23 Rnd 19: (6 sc, inc) 6 times. (48) Rnds 20–23: Sc around. (48) Fasten off, leaving a long tail for attaching the base. This open edge is the bottom of the bell.
- Flat base With gold, make a magic ring. Rnd 1: Work 6 sc into the ring; pull closed. (6) Rnd 2: Inc in each st. (12) Rnd 3: (Sc, inc) 6 times. (18) Rnd 4: (2 sc, inc) 6 times. (24) Rnd 5: (3 sc, inc) 6 times. (30) Rnd 6: (4 sc, inc) 6 times. (36) Rnd 7: (5 sc, inc) 6 times. (42) Rnd 8: (6 sc, inc) 6 times. (48) Fasten off and weave in this tail.
- Ears, make 2 With gold, ch 2. Row 1: Sc in the second ch from the hook. (1) Row 2: Ch 1, turn; work 2 sc in the st. (2) Row 3: Ch 1, turn; inc in each st. (4) Row 4: Ch 1, turn; sc in each st. (4) Fasten off, leaving a sewing tail. The narrow end is the ear tip.
- Bow With the contrasting yarn, ch 13. Row 1: Sc in the second ch from the hook and each remaining ch. (12) Row 2: Ch 1, turn; sc in each st. (12) Fasten off, leaving a long tail. Pinch the strip at its centre, wrap the tail around the pinch several times and secure it on the back.
- Face and assembly Choose a front centred opposite the body’s round marker. Embroider two small eyes across rnds 12–13, about 5 stitches apart, and a small nose on rnd 15. Add short whiskers to either side. Sew the 4-stitch base of each ear to the upper body, on either side of the front, across approximately rnds 5–7; angle the tips slightly outwards. Sew the bow securely to the front around rnd 18, below the face. Place the base against the open bottom edge and sew one base stitch to each of the 48 body stitches. Add small amounts of stuffing as you sew, including towards the lower sides, but leave the base flat rather than packing it into a dome. Close the seam and weave in the tail.
Finishing
- Check that the base sits level. If it bulges, remove a little stuffing before closing the seam completely.
- Secure all embroidery, ear and bow ends inside the body.
Helpful Tips
- The broad lower rounds create the bell outline; firm stitches, an even 48-to-48 seam and light stuffing help preserve it without cardboard or another rigid insert.
- Use the stitch marker as a reference when centring the face and bow. The marker itself remains at the back.
- For an item that may be handled by a child, embroider the features and secure every attachment carefully; do not add a loose metal bell.
Christmas Star Cat

This Christmas Star Cat combines a softly stuffed star with a cat’s face at its centre. Small ears peep out beside the upper point, giving it a feline look without obscuring the star shape. It makes a cheerful hanging decoration for a tree or festive display.
The shape is made from matching front and back panels, so their outlines need to line up before they are joined. Matching each point and the notch between points helps prevent a twisted silhouette, while light stuffing keeps the points defined rather than rounded. The embroidered expression can be kept simple or given a different character with a change of whiskers or mouth.
Christmas Star Cat

Quick-reference card. Follow the complete written instructions below.
Materials
- DK cotton yarn: Approximately 25–35 g in gold, plus a small amount for the ears if using a second colour.
- Crochet hook: 3 mm, or a size that makes a firm fabric without gaps.
- Embroidery thread or fine yarn: Black for the eyes, nose and whiskers.
- Other supplies: A small amount of polyester stuffing, stitch marker, yarn needle and scissors.
Size and Fit
One size. Approximately 13–15 cm from the top point to the lowest points, excluding the hanging loop; the finished size will vary with gauge and stuffing.
Gauge
Approximately 20 sc and 24 rows per 10 cm in firm, flat sc. Exact gauge is less important than a fabric that holds the stuffing in.
Abbreviations
US crochet terms.
- ch = chain
- sc = single crochet
- inc = work 2 sc in the same stitch
- sc2tog = single crochet 2 stitches together; counts as one stitch
- sl st = slip stitch
- RS / WS = right side / wrong side
Pattern
- Make two centre panels For each panel, make a magic ring in gold. Work in continuous rounds and mark the first stitch. Round 1: 5 sc in the ring (5). Round 2: inc in each stitch (10). Round 3: (sc, inc) 5 times (15). Round 4: (2 sc, inc) 5 times (20). Round 5: (3 sc, inc) 5 times (25). Round 6: (4 sc, inc) 5 times (30). Round 7: (5 sc, inc) 5 times (35). Round 8: (6 sc, inc) 5 times (40). Round 9: (7 sc, inc) 5 times (45). Round 10: (8 sc, inc) 5 times (50). Do not join or turn. Mark the first stitch of Round 10, then identify five consecutive groups of 10 stitches around that round.
- Add five points to each panel Work one point into each 10-stitch group of Round 10. With the RS facing, join gold at the first stitch of a group. Point Row 1: sc in each of the group’s 10 stitches; turn (10). Row 2: ch 1, sc2tog, 6 sc, sc2tog; turn (8). Row 3: ch 1, sc2tog, 4 sc, sc2tog; turn (6). Row 4: ch 1, sc2tog, 2 sc, sc2tog; turn (4). Row 5: ch 1, sc2tog twice; turn (2). Row 6: ch 1, sc2tog (1). Fasten off. The turning ch never counts as a stitch. Join yarn at the first stitch of the next unused 10-stitch group and repeat until each panel has five points. Weave in the point-making ends.
- Make two ears For each ear, ch 5. Row 1: sc in the second ch from the hook and in each remaining ch; turn (4). Row 2: ch 1, sc2tog twice; turn (2). Row 3: ch 1, sc2tog (1). Fasten off, leaving a long tail for sewing.
- Place ears and embroider face Lay one panel RS up with one point at the top; this is the front. Position one ear in each notch beside the top point, between that point and the upper side points. Let each ear tip project beyond its notch. Sew the ear bases securely to the WS of the front panel, leaving the tips visible from the front. Embroider two eyes, a small nose, a mouth and whiskers near the centre of the front. Secure all embroidery ends on the WS.
- Join and stuff Place the panels WS together, with both right sides facing out. Align the top points first, then match each remaining point and the notch between points; do not rotate one panel out of alignment. Whip stitch the outer edges together through both layers, catching the ear bases in the seam but leaving their tips free. Leave an opening along a lower edge. Add small amounts of stuffing, easing it into all five points without distorting them, then sew the opening closed securely.
- Add hanging loop Leaving a 20 cm starting tail, ch 24 in gold. Sl st into the first ch to form a loop and fasten off with another 20 cm tail. Use both tails to sew the loop securely to the top point, passing through both panels several times. Knot securely and bury the ends inside the star.
Finishing
- Check that every point and notch on the front matches the corresponding one on the back before the seam is closed.
- Shape the lightly stuffed points with your fingers and trim any exposed yarn ends.
Helpful Tips
- A smaller hook helps keep the DK cotton firm enough to contain the stuffing.
- Marking the five groups of 10 stitches before starting the points makes it easier to give both panels the same outline.
- Embroidered features avoid small plastic parts on a decoration that might be handled by children.
Christmas Wreath Cat
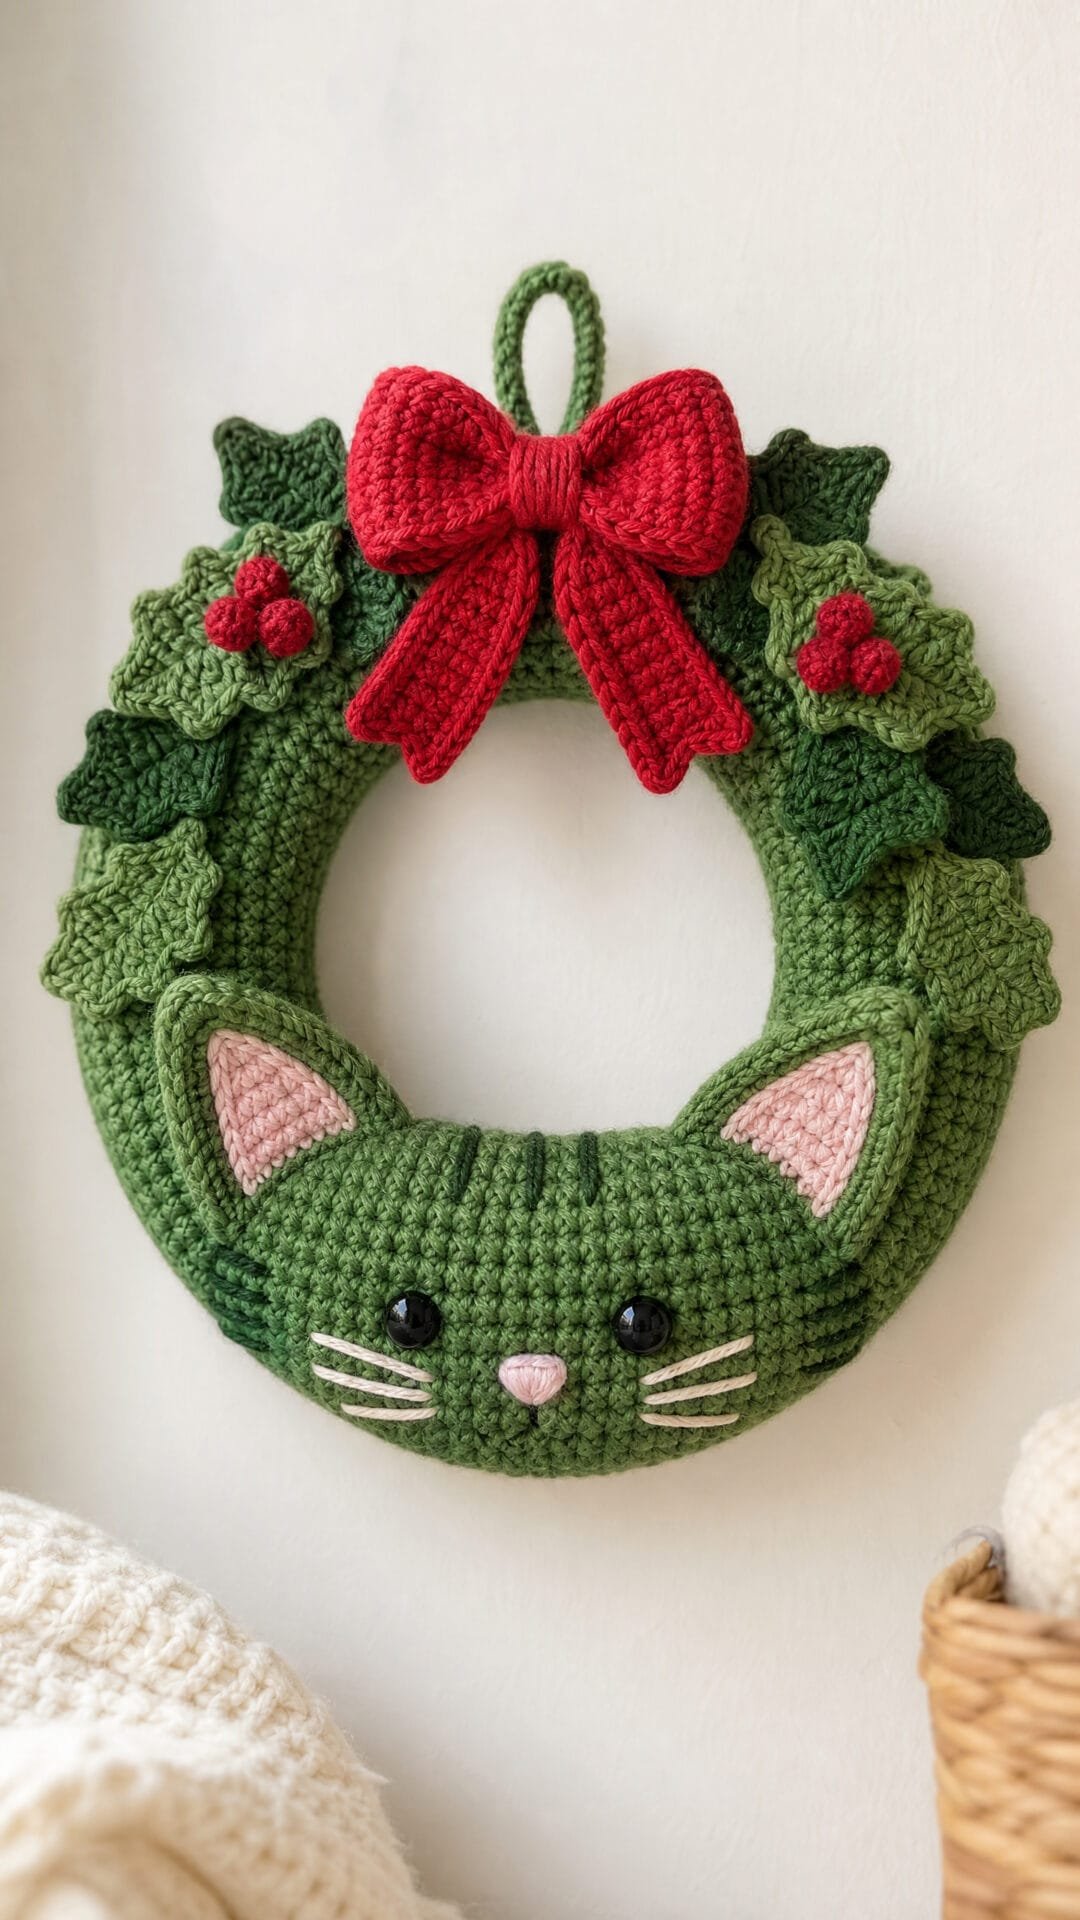
This Christmas Wreath Cat combines a soft, rounded wreath with a little cat’s face, pointed ears and a festive bow. It makes a playful alternative to a traditional wreath for a shelf or seasonal display.
The centre opening is part of the design: it gives the wreath its shape and helps the cat details stand out. Light, even stuffing keeps the ring flexible, while decorations on the outer edge leave the face easy to see.
This is an intermediate project with several small decorative pieces. The full pattern below covers the wreath and its cat details.
Christmas Wreath Cat
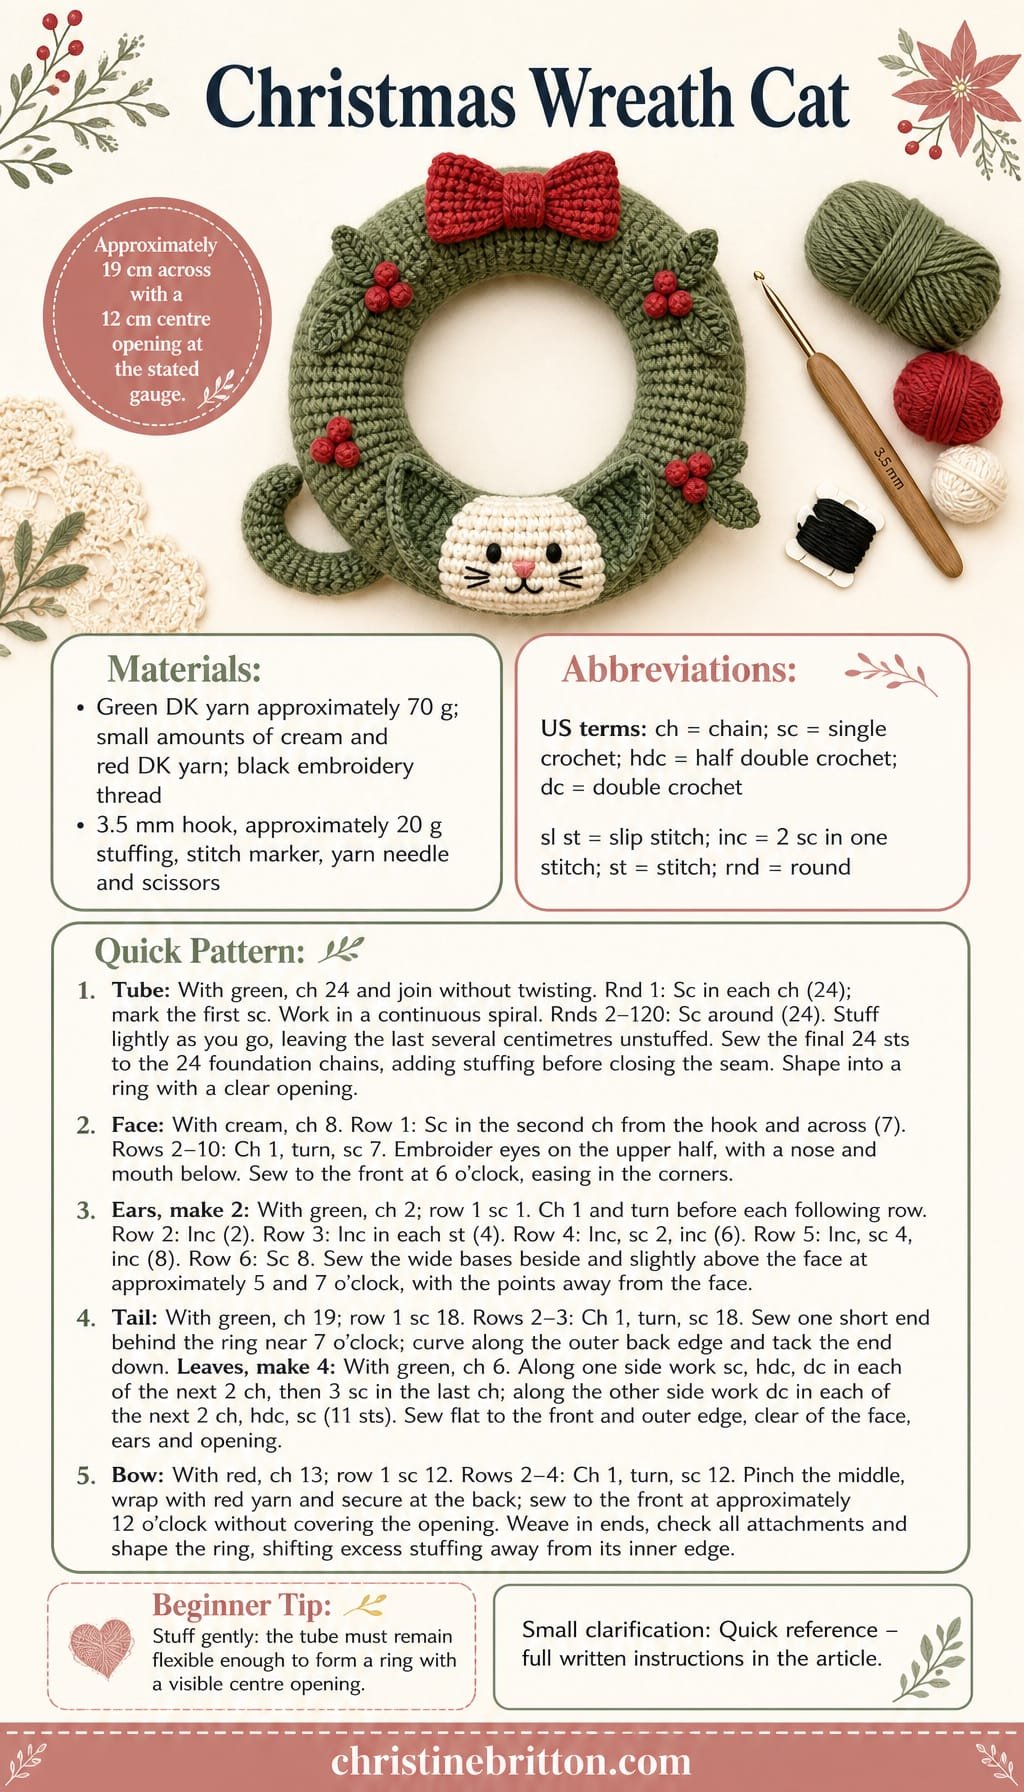
Quick-reference card. Follow the complete written instructions below.
Materials
- Green DK acrylic yarn: Approximately 70 g for the wreath, ears, tail and leaves
- Cream DK yarn: Small amount for the face panel
- Red DK yarn: Small amount for the bow
- Black embroidery thread or yarn: For the stitched face
- Crochet hook: 3.5 mm, or a size that makes a firm fabric
- Polyester stuffing: Approximately 20 g; use lightly
- Notions: Stitch marker, yarn needle and scissors
Size and Fit
One sample size. At the stated gauge, the finished wreath is approximately 19 cm across, with a centre opening approximately 12 cm across. Keep the tube lightly and evenly stuffed so it bends into a ring without closing the opening.
Gauge
Aim for 22 sc and 24 rounds to 10 cm in sc. Gauge affects the finished dimensions; a firm fabric should conceal the stuffing.
Abbreviations
US crochet terms.
- ch = chain
- sc = single crochet
- hdc = half double crochet
- dc = double crochet
- sl st = slip stitch
- inc = work 2 sc in one stitch
- st(s) = stitch(es)
- rnd(s) = round(s)
Pattern
- Wreath tube: foundation With green, ch 24. Without twisting the chain, join to the first ch with a sl st. Leave the foundation edge accessible: it will be sewn to the final round.
- Wreath tube: rnds 1–120 Rnd 1: Sc in each of the 24 chains. Place a marker in the first sc. Work in a continuous spiral from here, moving the marker at the start of each round. Rnds 2–120: Sc in each st (24 sc per rnd). Do not join or turn. Add small amounts of stuffing as the tube grows, keeping it flexible; leave the last several centimetres unstuffed for joining.
- Make the ring Fasten off with a long sewing tail. Bend the tube into a ring without twisting it. Match the 24 stitches of the final round to the 24 chains along the foundation edge and sew them together one to one. Add a little stuffing through the remaining gap if needed, then close the seam. Ease the stuffing away from the centre to maintain a clear opening.
- Face panel With cream, ch 8. Row 1: Sc in the second ch from the hook and each remaining ch (7 sc). Rows 2–10: Ch 1, turn, sc in each st (7 sc). Fasten off with a long tail. Embroider two eyes on the upper half with black thread, then a small nose and mouth below them. Sew the panel to the front of the ring at 6 o’clock, easing in its corners. Keep the facial stitching clear of the leaves.
- Ears: make two With green, ch 2. Row 1: Sc in the second ch from the hook (1 sc). Row 2: Ch 1, turn, inc (2 sc). Row 3: Ch 1, turn, inc in each st (4 sc). Row 4: Ch 1, turn, inc, sc in next 2 sts, inc (6 sc). Row 5: Ch 1, turn, inc, sc in next 4 sts, inc (8 sc). Row 6: Ch 1, turn, sc in each st (8 sc). Fasten off, leaving a sewing tail. Sew each wide base securely to the front of the ring beside and slightly above the face, at approximately 5 and 7 o’clock. Position the points away from the face without pulling the ring into its centre opening.
- Tail With green, ch 19. Row 1: Sc in the second ch from the hook and each remaining ch (18 sc). Rows 2–3: Ch 1, turn, sc in each st (18 sc). Fasten off with a sewing tail. Sew one short end to the back of the ring near 7 o’clock. Curve the strip along the outer back edge and tack its free end in place so it does not cross the opening.
- Leaves: make four With green, ch 6. Working along one side of the chain, sc in the second ch from the hook, hdc in the next ch, dc in each of the next 2 ch, and 3 sc in the last ch. Working back along the other side of the chain, dc in each of the next 2 ch, hdc in the next ch, and sc in the final ch (11 sts). Fasten off with a sewing tail. Sew the leaves flat to the front and outer edge of the wreath, spaced away from the face and ears. Keep their tips out of the centre opening.
- Bow With red, ch 13. Row 1: Sc in the second ch from the hook and each remaining ch (12 sc). Rows 2–4: Ch 1, turn, sc in each st (12 sc). Fasten off. Pinch the strip at its middle and wrap red yarn around the pinch several times; secure the wraps at the back. Sew the bow to the front of the wreath at approximately 12 o’clock, leaving the centre opening unobstructed.
Finishing
- Weave in all ends and check that the tube seam and every appliqué are firmly sewn.
- Gently shape the wreath into an even circle. Shift any excess stuffing away from the inner edge if the opening looks narrow.
Helpful Tips
- Stuff the tube gradually rather than packing it tightly; a rigid tube is harder to join into a neat ring.
- Embroidered features avoid loose plastic eyes, but firmly attached pieces and supervision are still important if the wreath is handled by children.
Nutcracker Cat
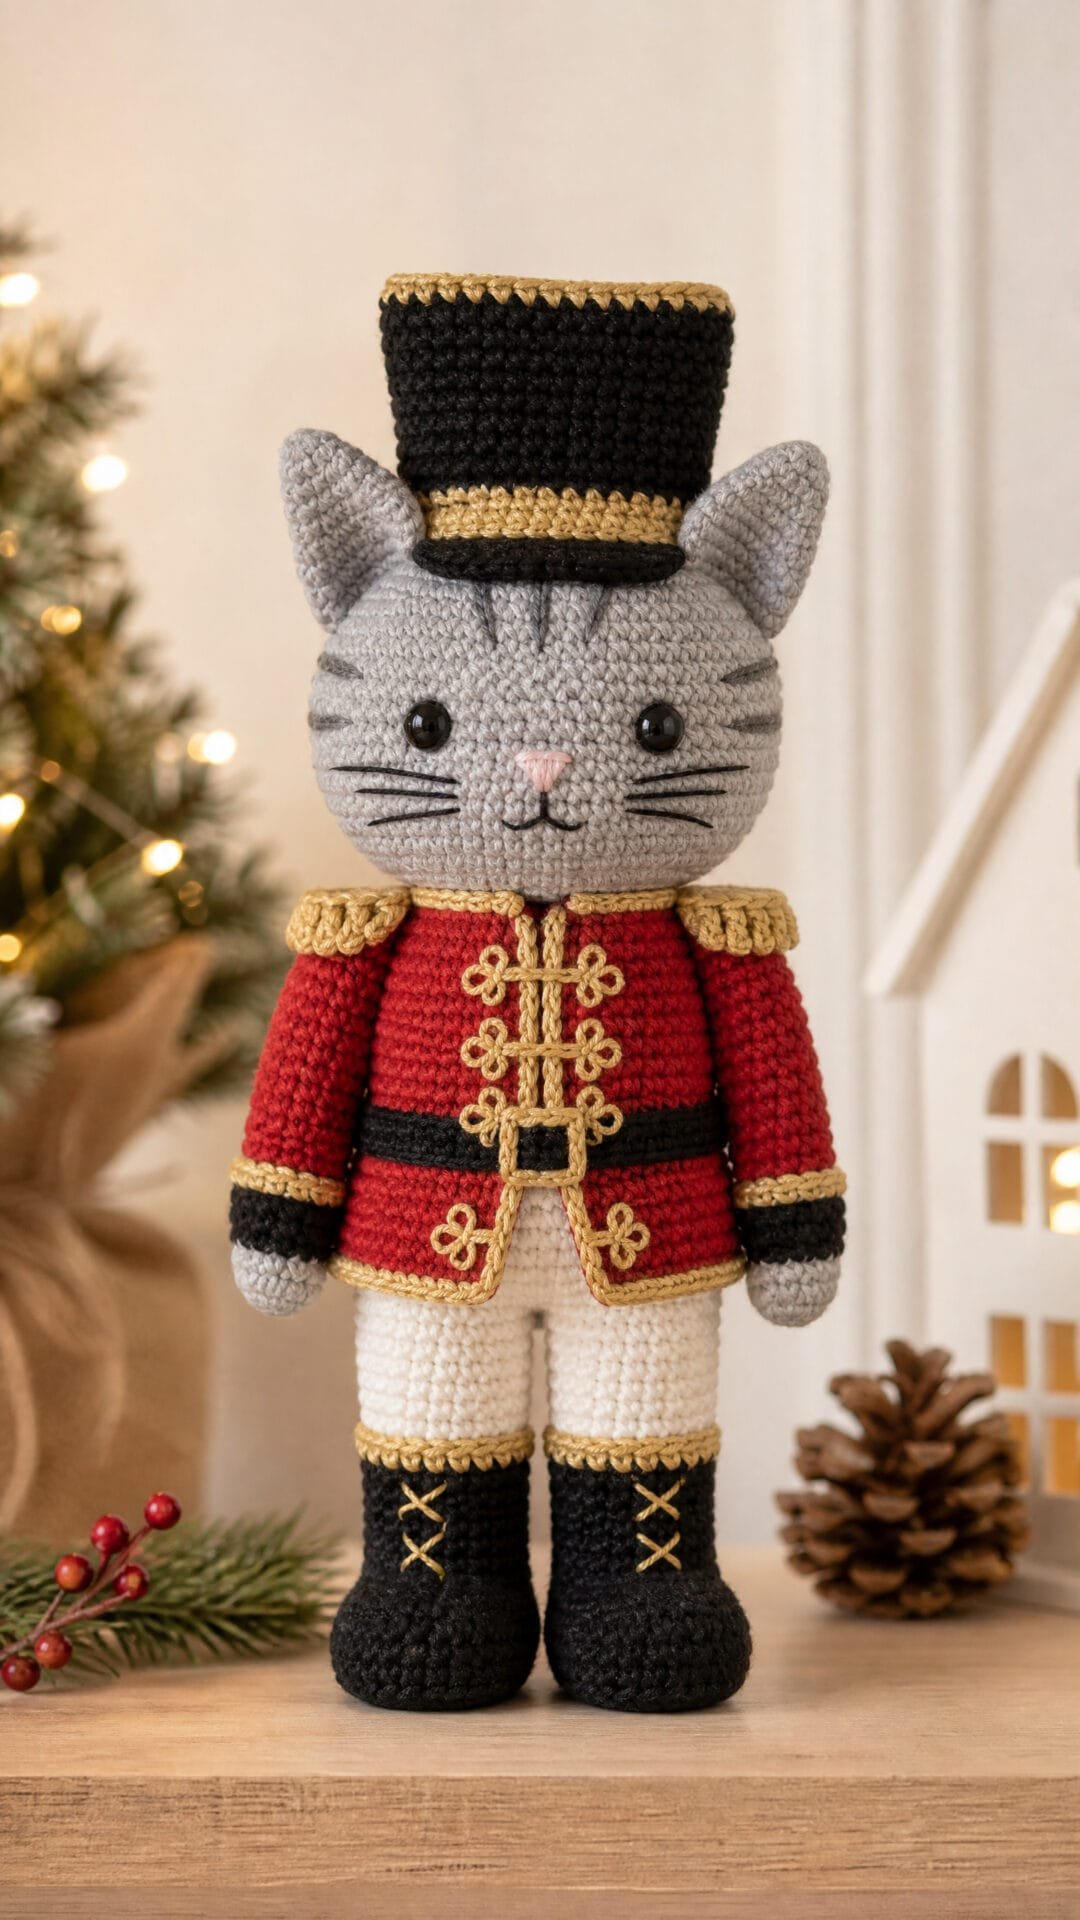
This Christmas cat takes its silhouette from a toy soldier: a straight jacketed body, short boots and a tall, square hat. The hat is made from joined panels, while the ears remain visible beside it, so the character still reads as a cat.
The jacket details are embroidered rather than built up with extra crochet pieces, keeping the front neat. Placement matters here: pinning the arms and checking how they frame the jacket before attaching the head helps keep the face, uniform and hat aligned. The finished character makes a cheerful addition to a festive display.
Nutcracker Cat

Quick-reference card. Follow the complete written instructions below.
Materials
- DK cotton-blend yarn: Approximately 35 g in a main cat colour, 25 g in jacket red, 15 g in hat colour, and small amounts of black for boots and cream for paws.
- Embroidery thread or yarn: Small amounts of black for the face and gold or yellow for jacket details.
- Hook: 3.25 mm, or a size that makes a firm fabric without gaps.
- Other supplies: Toy stuffing, stitch marker, yarn needle and pins.
Size and Fit
One size, approximately 21–23 cm tall including the hat. This is an estimate; yarn, gauge and stuffing will affect the finished height.
Gauge
Aim for a firm fabric, approximately 22 sc and 24 rows or rounds per 10 cm. Exact gauge is less important than keeping the stuffing from showing.
Abbreviations
US crochet terms.
- ch = chain
- dec = single crochet decrease: work two stitches together
- inc = work 2 sc in the same stitch
- MR = magic ring
- rnd = round
- sc = single crochet
- sl st = slip stitch
- st = stitch
Pattern
- Before you begin Work the torso, head, arms and boots in continuous rounds. Mark the first stitch of each round; do not join unless instructed. Stuff firmly enough to hold the upright shape without stretching the stitches. The hat pieces are worked in turned rows.
- Torso With jacket red, make an MR. Rnd 1: 6 sc in ring (6). Rnd 2: inc in each st (12). Rnd 3: (sc, inc) 6 times (18). Rnd 4: (2 sc, inc) 6 times (24). Rnd 5: (3 sc, inc) 6 times (30). Rnds 6–21: sc in each st (30). Rnd 22: (3 sc, dec) 6 times (24). Rnd 23: sc in each st (24). Fasten off, leaving a long tail for attaching the head. Stuff the base and sides evenly, leaving the neck opening accessible.
- Arms — make two Begin at the paw with cream. Rnd 1: 6 sc in an MR (6). Rnd 2: (sc, inc) 3 times (9). Rnd 3: sc in each st (9). Change to jacket red. Rnds 4–10: sc in each st (9). Rnd 11: (sc, dec) 3 times (6). Lightly stuff the paw and lower arm, leaving the top flexible. Flatten the opening and work 3 sc through both layers to close it. Fasten off with a sewing tail.
- Boots — make two With black, make an MR. Rnd 1: 6 sc in ring (6). Rnd 2: inc in each st (12). Rnds 3–4: sc in each st (12). Lightly stuff the closed toe. Flatten the open edge; it should be about 6 stitches wide. Fasten off with a sewing tail. The flattened edge is the back of the boot, not the toe.
- Jacket and limb placement Mark the centre front of the torso. Pin the boots to the lower front, one on either side of this mark, with their toes projecting forwards and slightly below the base. Sew each flattened back edge to approximately torso rnds 3–5. Pin an arm to each side of the torso, with its closed top against approximately rnds 18–20; check that the arms hang evenly. Before permanently attaching the head, embroider two straight gold or yellow jacket lines down the front, one on each side of the centre mark, from approximately rnd 18 to rnd 7. Add three small buttons between the lines at approximately rnds 9, 13 and 17, plus two short diagonal collar lines near rnds 20–21. Keep the embroidery flat. Adjust the pinned arms if needed so they do not cover the lines, then sew the arms securely in place.
- Head With the main cat colour, make an MR. Rnd 1: 6 sc in ring (6). Rnd 2: inc in each st (12). Rnd 3: (sc, inc) 6 times (18). Rnd 4: (2 sc, inc) 6 times (24). Rnd 5: (3 sc, inc) 6 times (30). Rnd 6: (4 sc, inc) 6 times (36). Rnd 7: (5 sc, inc) 6 times (42). Rnds 8–13: sc in each st (42). Rnd 14: (5 sc, dec) 6 times (36). Rnd 15: (4 sc, dec) 6 times (30). Rnd 16: (3 sc, dec) 6 times (24). Rnd 17: (2 sc, dec) 6 times (18). Stuff the head firmly. Rnd 18: (sc, dec) 6 times (12). Rnd 19: dec 6 times (6). Fasten off and draw the final six stitches closed. Embroider eyes on approximately rnd 10, spaced evenly around the marked front centre, with a small nose and mouth around rnd 12.
- Ears — make two With the main cat colour, ch 2. Row 1: sc in second ch from hook (1). Ch 1, turn. Row 2: inc (2). Ch 1, turn. Row 3: inc in each st (4). Ch 1, turn. Row 4: sc in each st (4). Fasten off with a sewing tail. The four-stitch edge is the ear base.
- Hat sides — make four panels With the hat colour, ch 7. Row 1: sc in second ch from hook and in each remaining ch (6). Ch 1, turn. Rows 2–10: sc in each st (6); ch 1 and turn after rows 2–9 only. Fasten off each panel with a sewing tail. The beginning ch 1 of a turned row does not count as a stitch.
- Hat top With the hat colour, ch 7. Row 1: sc in second ch from hook and in each remaining ch (6). Ch 1, turn. Rows 2–6: sc in each st (6); ch 1 and turn after rows 2–5 only. Fasten off with a sewing tail.
- Assemble hat and head Sew the long row edges of the four side panels together, matching all ten rows at each seam, to make a square tube. Sew one six-stitch edge of each panel to a corresponding edge of the six-by-six hat top. Leave the lower edge open; do not stuff the hat. Pin the hat centrally over approximately head rnds 2–4, keeping its lower edge level. Pin an ear on each side of the head at approximately rnds 6–8, with both ear tips visible beside the hat. Move the pins until the face, ears and hat look symmetrical. Sew the ear bases to the head, then sew the open lower edge of the hat to the crown.
- Attach head Check the front of the face against the jacket centre. Tuck the head’s closed lower tip gently into the open torso neck. Match the torso’s 24-stitch rim to the 24-stitch line of head rnd 16 and sew around securely, adding a little stuffing to the neck before closing the last gap if needed. Keep the head upright and the ears clear of the hat.
Finishing
- Weave in ends securely, keeping the base flat enough for the cat to stand with the boots supporting its front.
- Straighten the hat corners and check that no stuffing shows through the torso or head.
Helpful Tips
- Pin the boots, arms, hat and ears before sewing. The arm position affects how much of the embroidered jacket remains visible.
- For sharper hat corners, use small, even joining stitches and avoid pulling the panel seams too tight.
- Embroider the face rather than using removable features if the cat may be handled by a child.
Mitten Kitten

The Mitten Kitten is a cheerful Christmas hanging decoration: a little cat peeks from a puffy red mitten, with its paws framing a striped cuff. It has the charm of festive amigurumi without needing a full cat body.
The mitten’s defined thumb is part of its shaped outline, rather than a separate piece. Light stuffing helps that shape show while leaving space at the opening for the kitten. The visible cuff gives the design a crisp border and makes the cat look tucked in rather than perched on top.
This is a satisfying choice if you enjoy combining flat crochet with small amigurumi pieces. Embroidered features suit the soft, handmade look; although it resembles a toy, the finished piece is intended as a hanging decoration.
Mitten Kitten

Quick-reference card. Follow the complete written instructions below.
Materials
- Soft aran-weight acrylic yarn: Small amounts of red for the mitten and cuff, white for the cuff stripes, and a cat colour for the head and paws.
- Crochet hook: 4 mm, or a size that produces firm stitches without gaps in the stuffed pieces.
- Toy stuffing: A small amount for the mitten and head.
- Embroidery yarn: Dark yarn for the eyes, nose and mouth.
- Other tools: Yarn needle, scissors and a stitch marker.
Size and Fit
One decorative size. At the suggested gauge, approximately 10 cm wide across the mitten body, 12.5 cm including the thumb, and 17 cm tall including the visible head but excluding the hanging loop. Finished dimensions are estimates and will vary with yarn, gauge and stuffing.
Gauge
Aim for approximately 16 sc and 17 rows over 10 cm in flat sc. Exact gauge is not essential, but use a firm fabric that contains the stuffing.
Abbreviations
US crochet terms.
- ch = chain
- sc = single crochet
- sl st = slip stitch
- inc = work 2 sc in one stitch
- dec = single-crochet two stitches together
- RS = right side
Pattern
- Before you begin Make two identical mitten panels, working from the rounded fingertip towards the open cuff. Turn one finished panel over when assembling them so the thumb extensions align. For flat rows, ch 1 and turn at the end of each row unless instructed otherwise; the turning ch does not count as a stitch. Work the head and paws in continuous rounds and mark the first stitch of each round.
- Mitten panels — rows 1–5 With red, ch 9. Row 1: sc in the second ch from the hook and in each remaining ch (8). Row 2: inc, sc 6, inc (10). Row 3: inc, sc 8, inc (12). Row 4: inc, sc 10, inc (14). Row 5: inc, sc 12, inc (16).
- Mitten panels — rows 6–11 Sc across each row (16). At the end of row 11, do not make the usual turning ch. Instead, ch 5 to extend the edge for the thumb, then turn.
- Mitten panels — rows 12–15 Row 12: sc in the second ch from the hook and in the next 3 ch, then sc in all 16 stitches of row 11 (20). Rows 13–15: sc across (20).
- Mitten panels — rows 16–20 Row 16: starting at the thumb edge, sl st in the first 4 stitches, then sc in the remaining 16 stitches (16 active sc). The 4 sl sts close off the thumb extension and are not worked on the next row. Rows 17–20: sc across the 16 active stitches. Fasten off after row 20. Make a second identical panel.
- Seam and stuff Place the panels together with their thumb extensions aligned and the RS facing out. With red, sew through both layers along the foundation edge and the shaped side edges, following the outline around the thumb. Leave the 16-stitch edge of row 20 on each panel open. Add a little stuffing to the hand and thumb without stretching the fabric; keep the upper opening clear for the kitten.
- Striped cuff Join white at a side seam of the open upper edge. Cuff round 1: sc in each of the 16 top stitches on the front panel and 16 on the back panel; join with a sl st to the first sc (32). Change to red. Round 2: ch 1, sc in each stitch; join (32). Change to white. Round 3: repeat round 2 (32). Change to red. Round 4: repeat round 2 (32). The joining sl sts and starting ch 1 do not count as stitches. Keep the cuff opening accessible; do not sew it closed.
- Integrated hanging loop After joining cuff round 4, sl st along the cuff edge to the back-centre stitch. Ch 18 and sl st back into that same back-centre stitch to form a loop. Fasten off and weave the ends securely into the back of the mitten.
- Cat head With the cat colour, make a magic ring. Round 1: 6 sc in the ring (6). Round 2: inc in each stitch (12). Round 3: (sc, inc) 6 times (18). Round 4: (sc 2, inc) 6 times (24). Rounds 5–8: sc in each stitch (24). Embroider the eyes, nose and mouth on the front of the head. Round 9: (sc 2, dec) 6 times (18). Round 10: (sc, dec) 6 times (12). Stuff firmly enough to hold the face shape. Round 11: dec 6 times (6). Fasten off, draw the yarn through the remaining stitches and close the opening.
- Ears Make two with the cat colour. Ch 2. Row 1: work 2 sc in the second ch from the hook (2); ch 1, turn. Row 2: inc in each stitch (4); ch 1, turn. Row 3: inc, sc 2, inc (6). Fasten off, leaving a sewing tail. Sew the 6-stitch edge of each ear to the upper sides of the head, with the narrow points facing up.
- Paws Make two with the cat colour, working in continuous rounds. Round 1: 6 sc in a magic ring (6). Round 2: (sc, inc) 3 times (9). Round 3: sc in each stitch (9). Fasten off, leaving a sewing tail. Flatten each paw; they do not need stuffing.
- Place the kitten Set the head into the cuff opening with roughly its lower third inside the mitten and the face and ears visible above the cuff. Sew the lower back and sides of the head firmly to the inside of the back cuff and the upper mitten panels. Position one paw on each side of the head, with its lower half tucked inside the front cuff and its upper half visible. Sew each paw to the inside of the front cuff and tack its inner edge to the head so it stays in place. Keep the striped cuff visible across the front.
Finishing
- Check that the head, paws and hanging loop are firmly attached.
- Weave in all remaining ends. Gently shape the thumb and cuff by hand.
Helpful Tips
- Make the second panel exactly as written, then flip it over for assembly rather than reversing its row instructions.
- Stuff the mitten lightly: overstuffing can flatten the thumb outline and crowd the cuff opening.
- Embroidered facial features avoid loose plastic parts, but this hanging decoration is not designed or tested as a toy.
Cocoa Mug Cat

This Cocoa Mug Cat brings a cosy twist to Christmas cat crochet: a little cat-faced mug with ears peeping above a cream-coloured top. It is a stuffed ornament for a shelf or festive display, rather than a usable cup.
The flat base helps the mug stand upright, while firm crochet fabric gives its rounded sides a tidy shape. The face sits on the side of the mug, leaving the cream top to suggest a serving of cocoa.
The handle’s folded, seamed construction helps it keep a gentle curve, and secure attachment at both ends helps it stay in place. It remains decorative, though: do not use it to lift the ornament.
Cocoa Mug Cat

Quick-reference card. Follow the complete written instructions below.
Materials
- Aran-weight cotton-blend yarn: Approximately 40–50 m in a mug colour and 10–15 m in cream, plus scraps of dark yarn for the face and optional pink yarn for the ears.
- Crochet hook: 3.5 mm, or a size that produces firm stitches with no visible gaps around the stuffing.
- Other supplies: Toy stuffing, stitch marker, yarn needle and scissors.
Size and Fit
One sample size. At the suggested gauge, the mug is approximately 6.5 cm across and 6.5 cm tall, excluding the ears and handle. These are estimates from the stitch counts; your finished size will depend on your yarn and tension.
Gauge
Suggested gauge: approximately 18 sc and 20 rounds per 10 cm in firm single crochet. An exact match is less important than a fabric dense enough to contain the stuffing.
Abbreviations
US crochet terms.
- ch = chain
- sc = single crochet
- inc = work 2 sc in the same stitch
- BLO = work in the back loop only
- st(s) = stitch(es)
Pattern
- Before you begin Work the mug and cream top in continuous rounds. Place a marker in the first stitch of each round and move it up as you work. Number the 36 stitches of each completed round from the marker when positioning the features.
- Mug base, rounds 1–6 With the mug colour, make a magic ring. Round 1: 6 sc in the ring (6). Round 2: inc in each st (12). Round 3: (sc, inc) 6 times (18). Round 4: (2 sc, inc) 6 times (24). Round 5: (3 sc, inc) 6 times (30). Round 6: (4 sc, inc) 6 times (36).
- Mug sides, rounds 7–19 Round 7: sc BLO in each st (36). This turns the work upwards from the flat base. Rounds 8–19: sc in each st (36). Leave a long tail for sewing on the top. Keep the mug open for the face embroidery.
- Cat face With the mug front facing you, use stitches 18–19 as the centre of the face. Embroider eyes around stitches 15 and 23 on rounds 13–14. Add a small nose around stitch 19 on round 15 and stitch a short mouth below it. Secure all yarn ends inside the mug.
- Cream top, rounds 1–6 With cream yarn, make a separate flat disc. Round 1: 6 sc in a magic ring (6). Round 2: inc in each st (12). Round 3: (sc, inc) 6 times (18). Round 4: (2 sc, inc) 6 times (24). Round 5: (3 sc, inc) 6 times (30). Round 6: (4 sc, inc) 6 times (36). Fasten off.
- Close the mug Stuff the mug so the sides hold their shape without bulging. Place the cream disc over the opening, with its right side facing out. Using the mug-colour tail, sew each of the disc’s 36 edge stitches to a corresponding stitch along round 19 of the mug. Add a little more stuffing before closing the last gap if needed. Secure the tail inside.
- Ears, make two With the mug colour, ch 2. Row 1: sc in the second ch from the hook (1). Row 2: ch 1, turn, inc (2). Row 3: ch 1, turn, inc in each st (4). Row 4: ch 1, turn, sc in each st (4). Fasten off with a long sewing tail. The four-stitch edge of row 4 is the base; row 1 forms the tip. If desired, embroider a small pink triangle on each ear.
- Handle With the mug colour, ch 5. Row 1: sc in the second ch from the hook and in each remaining ch (4). Rows 2–22: ch 1, turn, sc in each st (4). Fasten off, leaving a long tail. Fold the strip lengthwise so it is two stitches wide, then use the tail to whipstitch its long edges together along all 22 rows. Keep the seam snug and the strip gently curved rather than pulling it straight.
- Attach ears and handle Sew the four-stitch base of one ear across the front rim at stitches 11–14 and the other at stitches 23–26, with their tips pointing up. Sew one end of the folded handle securely to the mug’s side around stitches 28–31 of rounds 9–10. Curve it outwards and sew its other end around the same stitches of rounds 17–18. Stitch through both layers at each end several times and keep the long seam facing the mug.
Finishing
- Weave in and secure all remaining ends. Check that the mug stands on its base and that the cream top lies flat.
- Shape the handle into a curve. If the yarn’s care instructions allow it, lightly dampen and leave the handle to dry in position. Its folded, seamed construction helps it hold the curve, but it remains decorative.
- Display as an ornament only. Do not lift the mug by its handle or use it to hold drinks, food or hot items.
Helpful Tips
- If stuffing shows between stitches, use a smaller hook rather than packing the mug more tightly.
- Position both handle ends with pins or spare yarn before sewing; the extra length of the strip should bow out from the side of the mug.
- Embroider the face before stuffing so its ends can be hidden inside.
For another related project collection, browse crochet Christmas ornament patterns.
Christmas Elf Cat

This Christmas elf cat combines a round feline face and visible ears with a tapered green tunic, an elongated striped hat and playful pointed shoes. The hat sits behind the ears, so the cat silhouette remains clear even when its tip bends.
Standing amigurumi needs a little thought about balance. Here, broad, flat-soled shoes give the figure a steady-looking base, while the tail curves down behind the feet to provide a third point of contact. The raised shoe points add elf character without getting in the way of the soles.
This is an intermediate project for crocheters comfortable making and joining small shaped pieces. Before securing them, check how the figure sits on a level surface: the shoes should lie flat and the tail should reach the surface behind them.
Christmas Elf Cat

Quick-reference card. Follow the complete written instructions below.
Materials
- Smooth DK acrylic yarn: Green for the tunic and arms; a cat colour for the head, ears, legs and tail; red for the shoes and hat; cream for the hat stripes and cuffs. Small amounts of each are sufficient.
- Crochet hook: 3 mm, or a size that makes a firm fabric with no gaps for stuffing.
- Toy stuffing: For the head, body, legs, shoes, arms and tail.
- Eyes and embroidery thread: Two 6 mm safety eyes, or black thread for embroidered eyes; a little pink thread for the nose.
- Notions: Stitch marker and blunt yarn needle.
Size and Fit
One size. At the suggested gauge, approximately 24–25 cm tall if the hat is held straight; the height is shorter when its tip bends. The finished size will vary with yarn, hook and stuffing.
Gauge
Approximately 22 single crochet stitches and 26 rounds per 10 cm in firm fabric. Exact gauge is less important than making a dense fabric that holds the stuffing.
Abbreviations
US crochet terms.
- ch = chain
- sc = single crochet
- hdc = half double crochet
- sl st = slip stitch
- inc = 2 sc in the same stitch
- dec = single crochet decrease: work 2 stitches together
- BLO = back loop only
- MR = magic ring
- st(s) = stitch(es)
Pattern
- Before you begin Work the body, head, shoes, legs, arms, tail and hat in continuous rounds unless a row is specified. Mark the first stitch of each round. Numbers in parentheses are stitch counts. Stuff as you go, keeping the shoe soles flat. Make the two legs, shoes, arms and ears alike.
- Green tunic body R1: 6 sc in MR (6). R2: inc in each st (12). R3: (sc, inc) 6 times (18). R4: (2 sc, inc) 6 times (24). R5: (3 sc, inc) 6 times (30). R6: (4 sc, inc) 6 times (36). R7: sc BLO around (36). R8–10: sc around (36). R11: (4 sc, dec) 6 times (30). R12–14: sc around (30). R15: (3 sc, dec) 6 times (24). R16–18: sc around (24). R19: (2 sc, dec) 6 times (18). R20–21: sc around (18). Stuff the flat base and body firmly. Leave the top open with a long yarn tail for sewing.
- Cat head In the cat colour, R1: 6 sc in MR (6). R2: inc around (12). R3: (sc, inc) 6 times (18). R4: (2 sc, inc) 6 times (24). R5: (3 sc, inc) 6 times (30). R6: (4 sc, inc) 6 times (36). R7–12: sc around (36). R13: (4 sc, dec) 6 times (30). R14: (3 sc, dec) 6 times (24). R15: (2 sc, dec) 6 times (18). R16: sc around (18). Before stuffing, place the eyes between R9 and R10, seven stitches apart, centred on the face; secure them according to their instructions. Alternatively, embroider the eyes after assembly. Embroider a small nose below the eyes. Stuff firmly, leave the neck opening unclosed and fasten off.
- Legs, make two In the cat colour, R1: 6 sc in MR (6). R2: (sc, inc) 3 times (9). R3–4: sc around (9). Stuff lightly. Fasten off, leaving the R4 opening and a long tail at that opening. The MR end is the bottom of the leg.
- Broad shoes, make two In red, ch 6. R1: Sc in the second ch from the hook and in the next 3 ch; 3 sc in the final ch. Working along the other side of the chain, sc in the next 3 ch and 2 sc in the last ch (12). Mark the first stitch; the three-stitch end is the toe. R2: Inc in the first st, sc in the next 3 sts, inc in each of the next 3 sts, sc in the next 3 sts, inc in each of the last 2 sts (18). R3: sc BLO around (18). R4: sc around (18). R5: (sc, dec) 6 times (12). R6: (2 sc, dec) 3 times (9). R7: sc around (9). Stuff firmly enough to hold the oval shape without rounding the sole. Leave the R7 opening and a long sewing tail.
- Pointed shoe tips, make two In red, ch 4. Sl st in the second ch from the hook, sc in the next ch and hdc in the last ch. Fasten off with a sewing tail. These small pieces form raised elf-shoe points; the broad crocheted ovals remain the standing soles.
- Arms, make two Begin in cream. R1: 6 sc in MR (6). R2: (sc, inc) 3 times (9). Change to green. R3–8: sc around (9). Stuff only the lower half. Flatten the open end and fasten off with a long sewing tail.
- Cat ears, make two Work in rows in the cat colour. Row 1: Ch 2; work 2 sc in the second ch from the hook (2). Ch 1, turn. Row 2: Inc in each st (4). Ch 1, turn. Row 3: Inc, sc in the next 2 sts, inc (6). Ch 1, turn. Row 4: Inc, sc in the next 4 sts, inc (8). Fasten off with a long tail. The eight-stitch edge is the base of each ear.
- Tail In the cat colour, begin at the tip. R1: 6 sc in MR (6). R2: (sc, inc) 3 times (9). R3–15: sc around (9). Stuff lightly so the tail can curve downwards. Leave the R15 opening and a long sewing tail.
- Long striped hat Begin at the tip in red. Change colour after every two rounds, alternating red and cream; R17–18 are red. R1: 4 sc in MR (4). R2–3: sc around (4). R4: inc around (8). R5–6: sc around (8). R7: (sc, inc) 4 times (12). R8–9: sc around (12). R10: (2 sc, inc) 4 times (16). R11–12: sc around (16). R13: (3 sc, inc) 4 times (20). R14–15: sc around (20). R16: (4 sc, inc) 4 times (24). R17–18: sc around (24). Fasten off with a long tail. Do not stuff the tip; add only a wisp of stuffing near the brim if needed.
Finishing
- Sew each leg’s nine-stitch R4 opening to a shoe’s nine-stitch R7 opening. Keep the oval shoe toes pointing the same way. Sew the MR ends of the legs firmly beneath the flat body base, one on each side, with the shoes level and their toes facing forwards.
- Sew the wide hdc end of each pointed tip to the upper front of a shoe, near R3–4. Turn the narrow end upwards and tack it to the shoe near R5 so it resembles an upturned elf-shoe point without extending below the sole.
- Sew the head’s 18-stitch neck opening to the body’s 18-stitch top opening, matching stitches and centring the face above the shoe toes. Sew the arms to the upper sides of the tunic around body R17–19, with the cuffs hanging down.
- Sew the eight-stitch ear bases to opposite sides of the upper head, around head R3–6, leaving room between them at the back for the hat. Sew the hat brim to the back portion of the crown, behind the ears; let its long tip lean or bend rather than pulling it over the face.
- Sew the open base of the tail to the back of the tunic around body R8–9. Curve it down behind the feet until its tip touches the same surface as both shoe soles. Tack the lower tail to the back of a shoe heel without pulling the tip off the surface. Adjust the three contact points before securing all ends.
Helpful Tips
- Pin the head, legs and tail in place before sewing to check that the face looks forwards and the soles sit flat.
- For a child under three, embroider the eyes instead of using safety eyes; check that all attached pieces are secure.
- If the figure leans, adjust the tail’s curve and the position of the feet before adding more stuffing. Overstuffing can make the oval soles rock.
Christmas Angel Cat

This Christmas angel cat pairs a softly flared, stuffed dress with a round face and pointed ears. Its simple silhouette gives the wings and halo room to stand out, making it a charming addition to a festive display.
The wings are separate, curved panels attached at their narrow ends across the upper back. Their broader edges remain free, so they sweep outwards rather than lying flat against the dress.
The gold yarn halo sits behind the ears and stays flexible without a wire frame. This is an intermediate project suited to crocheters who are comfortable shaping amigurumi pieces and joining them neatly.
Christmas Angel Cat

Quick-reference card. Follow the complete written instructions below.
Materials
- Soft white DK acrylic yarn: Approximately 80 g for the cat, dress and wings
- Gold DK yarn: A small amount for the halo
- Black and pink embroidery yarn: For the eyes, nose and mouth
- 3.5 mm crochet hook: Or a size that produces firm stitches with no gaps when stuffed
- Toy stuffing: Enough to fill the head and dress lightly but firmly
- Other tools: Stitch marker, yarn needle and scissors
Size and Fit
One size. Approximately 16–18 cm tall, excluding the halo, with a skirt about 7–8 cm across when worked near the suggested gauge. Exact size will vary with yarn and tension.
Gauge
Aim for approximately 18 sc and 20 rounds per 10 cm in firm, continuous single crochet. A gap-free fabric matters more than matching the suggested gauge exactly; the dimensions are estimates, not measured sample results.
Abbreviations
US crochet terms.
- ch = chain
- sc = single crochet
- hdc = half double crochet
- dc = double crochet
- sl st = slip stitch
- inc = 2 sc in the same stitch
- dec = invisible single-crochet decrease over 2 stitches
- MR = magic ring
- rnd = round
- st(s) = stitch(es)
Pattern
- Before you begin Work the dress, head and base in continuous rounds unless directed otherwise. Mark the first stitch of each round and move the marker up as you work. Numbers in brackets are stitch counts. Ch 1 at the start of a flat row does not count as a stitch.
- Dress, neck and upper body With white, ch 12 and join with a sl st in the first ch, taking care not to twist the chain. Rnd 1: Ch 1, sc in the same ch as the join and in each remaining ch; do not join subsequent rounds (12). Rnd 2: Sc around (12). Rnd 3: (Sc 1, inc) 6 times (18). Rnds 4–5: Sc around (18). Rnd 6: (Sc 2, inc) 6 times (24). Rnds 7–8: Sc around (24).
- Dress, flared skirt Rnd 9: (Sc 3, inc) 6 times (30). Rnds 10–11: Sc around (30). Rnd 12: (Sc 4, inc) 6 times (36). Rnds 13–14: Sc around (36). Rnd 15: (Sc 5, inc) 6 times (42). Rnds 16–18: Sc around (42). Fasten off, leaving the 12-stitch neck opening unobstructed.
- Flat skirt base With white, begin with an MR. Rnd 1: Work 6 sc into the ring (6). Rnd 2: Inc around (12). Rnd 3: (Sc 1, inc) 6 times (18). Rnd 4: (Sc 2, inc) 6 times (24). Rnd 5: (Sc 3, inc) 6 times (30). Rnd 6: (Sc 4, inc) 6 times (36). Rnd 7: (Sc 5, inc) 6 times (42). Fasten off with a long sewing tail.
- Head With white, begin with an MR. Rnd 1: Work 6 sc into the ring (6). Rnd 2: Inc around (12). Rnd 3: (Sc 1, inc) 6 times (18). Rnd 4: (Sc 2, inc) 6 times (24). Rnd 5: (Sc 3, inc) 6 times (30). Rnd 6: (Sc 4, inc) 6 times (36). Rnds 7–11: Sc around (36). Rnd 12: (Sc 4, dec) 6 times (30). Rnd 13: (Sc 3, dec) 6 times (24). Rnd 14: (Sc 2, dec) 6 times (18). Rnd 15: (Sc 1, dec) 6 times (12). Stuff firmly without stretching the stitches. Fasten off with a long sewing tail; leave the 12-stitch opening unclosed.
- Pointed ears, make two Work each ear flat in white. Row 1: Ch 2, work 2 sc in the second ch from the hook; turn (2). Row 2: Ch 1, sc across; turn (2). Row 3: Ch 1, inc in each st; turn (4). Row 4: Ch 1, sc across; turn (4). Row 5: Ch 1, inc, sc 2, inc; turn (6). Row 6: Ch 1, sc across (6). Fasten off, leaving a tail to sew the six-stitch lower edge to the head.
- Curved wings, make two Work each wing flat in white. Row 1: Ch 2, work 2 sc in the second ch from the hook; turn (2). Row 2: Ch 1, inc in each st; turn (4). Row 3: Ch 1, inc, sc 2, inc; turn (6). Row 4: Ch 1, sc across; turn (6). Row 5: Ch 1, inc, sc 4, inc; turn (8). Row 6: Ch 1, sc across; turn (8). Row 7: Ch 1, sc 2, hdc 2, dc 2, work 2 dc in each of the last 2 sts; turn (10). Row 8: Ch 1, sc across (10). Fasten off with a long sewing tail. The narrow starting rows form the attachment end; the wider edge curves outwards.
- Flexible yarn halo With gold, ch 24 and join with a sl st in the first ch without twisting. Ch 1, sc in the same ch as the join and in each remaining ch (24). Join with a sl st in the first sc and fasten off. The crocheted ring needs no wire or stiffening.
Finishing
- Embroider two small eyes on the front of the head between rounds 9 and 10, approximately six stitches apart. Add a pink nose and a short mouth beneath them. Secure and hide the yarn ends inside the head.
- Sew the six-stitch lower edge of each ear to the upper sides of the head, around rounds 3–5. Position the ears before stitching so both points face upwards.
- Lightly stuff the dress, keeping the hem broad and the neck opening clear. Match the 42 stitches of the base to the 42 stitches of dress round 18 and sew them together all the way round. Add the last of the stuffing before closing the seam; keep the base reasonably flat.
- Match the head’s 12-stitch opening to the dress’s 12-stitch neck opening. Sew stitch to stitch around the openings, drawing the seam snug so the head sits securely above the dress.
- Turn the wings in opposite directions so their wider ends sweep outwards and downwards. On the upper back of the dress, place their narrow starting rows close together, one on each side of the centre, around dress rounds 5–9. Sew those narrow ends and their adjacent edges firmly to the dress; leave the wider curved portions free.
- Place the halo just behind the ear points. Use short lengths of gold yarn to stitch the ring to the backs of both ears and to the upper back of the head. Keep the stitches short enough to hold it in place without pulling the ring rigid or flat. Weave in all ends securely.
Helpful Tips
- If stuffing shows through the stitches, use a smaller hook or less stuffing.
- Pin the wings before sewing to check that they mirror each other when viewed from the back.
- For a decoration intended for a young child, embroider facial details rather than using detachable eyes, and secure every attachment carefully.
Ice-Skater Cat

This ice-skater cat brings a little winter character to a Christmas display. Its seated pose and forward-pointing skates give it the look of a cat ready to glide, while the striped scarf adds a cheerful splash of colour.
The skate blades are flat crocheted shapes rather than upright runners. They suggest skates without introducing rigid edges or asking narrow pieces to carry the cat’s weight. The broad seated base provides the main support, with the tail resting behind as an extra point of contact, so there is no need for wire.
This is a decorative amigurumi rather than a toy that stands on its skates. The position of the skates and tail matters more to the finished pose than making the blades prominent.
Ice-Skater Cat

Quick-reference card. Follow the complete written instructions below.
Materials
- Smooth DK acrylic yarn: Cat colour, a contrasting boot colour, a blade colour and two scarf colours
- Crochet hook: 3 mm, or a size that makes firm stitches with no visible gaps
- Toy stuffing: A small amount for the head, body, legs and tail
- Other tools: Stitch marker, yarn needle, scissors and embroidery yarn for the face
Size and Fit
One small seated cat made with DK yarn. Finished size varies with tension. The flat body base and two skates should touch the surface, with the tail resting behind the cat as an additional support.
Gauge
Exact gauge is not essential. Use a firm fabric that holds stuffing securely; do not rely on a stated finished measurement.
Abbreviations
US crochet terms.
- ch = chain
- sc = single crochet
- inc = work 2 sc in one stitch
- dec = single-crochet 2 stitches together; an invisible decrease works well
- MR = magic ring
- st(s) = stitch(es)
Pattern
- Before you begin Work the head, body, legs, boots and tail in continuous rounds. Mark the first stitch of each round and move the marker up as you work. Make two legs, two boots, two blades and two ears.
- Head With cat colour, round 1: 6 sc in an MR (6). Round 2: inc in each st (12). Round 3: (1 sc, inc) 6 times (18). Round 4: (2 sc, inc) 6 times (24). Round 5: (3 sc, inc) 6 times (30). Round 6: (4 sc, inc) 6 times (36). Rounds 7–11: sc in each st (36). Round 12: (4 sc, dec) 6 times (30). Round 13: (3 sc, dec) 6 times (24). Embroider eyes between rounds 9 and 10, about 6 stitches apart, and a small nose on round 11. Round 14: (2 sc, dec) 6 times (18). Round 15: (1 sc, dec) 6 times (12). Stuff firmly. Round 16: dec 6 times (6). Fasten off and draw the remaining opening closed.
- Body With cat colour, round 1: 6 sc in an MR (6). Round 2: inc in each st (12). Round 3: (1 sc, inc) 6 times (18). Round 4: (2 sc, inc) 6 times (24). Round 5: (3 sc, inc) 6 times (30). Rounds 6–9: sc in each st (30). Round 10: (3 sc, dec) 6 times (24). Round 11: sc in each st (24). Round 12: (2 sc, dec) 6 times (18). Round 13: sc in each st (18). Fasten off, leaving a long sewing tail. Stuff, keeping the round-1 base broad and flat rather than domed.
- Legs Make two with cat colour. Round 1: 6 sc in an MR (6). Round 2: inc in each st (12). Rounds 3–6: sc in each st (12). Fasten off, leaving a sewing tail at the open end. Stuff lightly so the legs remain straight; the closed round-1 end is the toe.
- Boots Make two with boot colour. Round 1: 6 sc in an MR (6). Round 2: inc in each st (12). Rounds 3–5: sc in each st (12). Fasten off, leaving a sewing tail. Slide each boot over a leg’s closed toe, with both round-1 tips aligned. Sew the boot’s open edge to the leg around leg round 4, leaving the rest of the leg visible.
- Flat skate blades Make two with blade colour. Ch 5; sc in the second ch from the hook and in each remaining ch (4 sc). Fasten off with a sewing tail. Lay one strip lengthways against the underside of each boot, pointing from toe towards heel. Sew through the strip and boot along the full strip so it lies flat, not upright. These are decorative blade shapes, not weight-bearing runners.
- Tail With cat colour, round 1: 6 sc in an MR (6). Rounds 2–12: sc in each st (6). Stuff very lightly or leave unstuffed so the tail can bend. Fasten off with a long sewing tail.
- Ears Make two with cat colour, working in turned rows. Row 1: ch 2, sc in the second ch from the hook (1). Row 2: ch 1, turn, inc (2). Row 3: ch 1, turn, inc in each st (4). Row 4: ch 1, turn, sc in each st (4). Fasten off with a sewing tail. The four-stitch edge is the base.
- Striped scarf With scarf colour A, ch 45. Row 1: sc in the second ch from the hook and in each ch across (44). Fasten off A. Row 2: join colour B at the edge, ch 1, turn, sc across (44); fasten off B. Row 3: join A, ch 1, turn, sc across (44); fasten off A. Row 4: join B, ch 1, turn, sc across (44). Fasten off and weave in the ends. Each row forms one lengthwise stripe.
- Assembly Sew the body’s open 18-stitch edge to the underside of the head, placing it around head rounds 13–14 and adding stuffing before closing the seam. Sew the ear bases to opposite sides of the upper head around rounds 4–6. Position the legs side by side on the lower front of the body, around body rounds 4–7. Sew their open ends securely to the body, keeping the skates parallel and pointing forwards. Sew the tail’s open end to the lower back of the body around rounds 3–5. Bend the tail behind the cat and tack a short length of it to the back of the body so its free length rests on the same surface as the body and skates. Check the seated position before securing the final tacks. Wrap the scarf once around the neck and tie its ends loosely at the front.
Finishing
- Weave in all ends and secure any embroidery ends inside the head.
- Set the cat on a level surface. Adjust the tail tacks if needed so the body base, skates and tail rest naturally without propping the cat up by its head.
- Keep the blade strips stitched flat to the soles. Wire or rigid blades would make this seated decoration harder to balance.
Helpful Tips
- Leave the leg stuffing light enough to sew their open ends flat against the body.
- Pin both skates in place before sewing so their toes point in the same direction.
- For an item intended for a young child, embroider every facial detail and secure the scarf so it cannot be removed.
Pinecone Cat

This pinecone cat brings a woodland twist to Christmas crochet. Its rounded body gives the separate scales a firm base, while the pointed ears and small face make the cat recognisable beneath its textured coat.
The scales look most like a pinecone when their placement is staggered rather than lined up in vertical columns. Work visually from the lower layers upwards, allowing each loose edge to remain visible instead of letting the next layer cover it completely.
The upper front needs a little breathing room: keeping the scales away from the face lets the embroidered features stand out. A curved tail adds a final cat-like detail without competing with the layered texture.
Pinecone Cat

Quick-reference card. Follow the complete written instructions below.
Materials
- Brown DK cotton-blend yarn: Approximately 35–45 g for the core, scales, ears and tail.
- Dark embroidery thread: For the eyes, nose and mouth.
- Crochet hook: 3 mm, or a size that makes a firm fabric with no visible stuffing.
- Other supplies: Small amount of toy stuffing, stitch marker, yarn needle and scissors.
Size and Fit
One sample size, approximately 10–12 cm tall including the ears. The finished size will vary with yarn and tension.
Gauge
Exact gauge is not essential. Work tightly enough that the stuffing does not show through the core.
Abbreviations
US crochet terms.
- MR = magic ring
- sc = single crochet
- inc = 2 sc in the same stitch
- dec = single crochet decrease over 2 stitches
- ch = chain
- st(s) = stitch(es)
- R = round or row, as indicated
Pattern
- Core: set-up Work the core in continuous rounds from the bottom upwards. Place the beginning-of-round marker at the back and move it up each round. Keep this position as your reference when attaching the scales and face.
- Core: R1–R8 R1: 6 sc in MR (6). R2: inc in each st (12). R3: [sc, inc] 6 times (18). R4: [sc in next 2 sts, inc] 6 times (24). R5: [sc in next 3 sts, inc] 6 times (30). R6: [sc in next 4 sts, inc] 6 times (36). R7: [sc in next 5 sts, inc] 6 times (42). R8: [sc in next 6 sts, inc] 6 times (48).
- Core: R9–R16 Sc in each st for 8 rounds (48 sts per round).
- Core: R17–R25 R17: [sc in next 6 sts, dec] 6 times (42). R18: sc in each st (42). R19: [sc in next 5 sts, dec] 6 times (36). R20: sc in each st (36). R21: [sc in next 4 sts, dec] 6 times (30). R22: [sc in next 3 sts, dec] 6 times (24). R23: [sc in next 2 sts, dec] 6 times (18). Stuff firmly, shaping the wider end into a rounded base. R24: [sc, dec] 6 times (12). R25: dec 6 times (6). Fasten off and draw the yarn end through the remaining stitches to close.
- Scales: make 35 Work each scale flat. Ch 5. Row 1: sc in the second ch from the hook and in each remaining ch (4). Row 2: ch 1, turn, inc, sc in next 2 sts, inc (6). Row 3: ch 1, turn, sc in each st (6). Fasten off, leaving a long tail at the wide edge for sewing. The foundation-chain edge is the narrow top; the wide Row 3 edge hangs loose.
- Attach scale rows Count stitches in each core round from the back marker, with stitch 1 immediately after the marker. Pin the scales first. Sew each narrow foundation edge flat against its designated round, using the long tail to catch both top corners and the middle. Do not sew down the wide edge. Work from the bottom row upwards, with every scale hanging towards the base: on R5, attach 6 scales starting at stitches 2, 7, 12, 17, 22 and 27; on R8, attach 8 starting at 1, 7, 13, 19, 25, 31, 37 and 43; on R11, attach 8 starting at 4, 10, 16, 22, 28, 34, 40 and 46; on R14, attach 8 starting at 1, 7, 13, 19, 25, 31, 37 and 43. On R17, attach the final 5 starting at stitches 1, 7, 31, 36 and 41. A scale may cross the back marker; count its four narrow-edge stitches around the round. Keep R17 stitches 15–30 clear at the front. Angle each upper row gently over the row below without covering the lower wide edges.
- Ears: make 2 Work in continuous rounds. R1: 4 sc in MR (4). R2: sc in each st (4). R3: [sc, inc] twice (6). R4: [sc in next 2 sts, inc] twice (8). Fasten off with a sewing tail. Do not stuff. Flatten each ear so its opening forms a four-stitch-wide base.
- Face and ears With the back marker as reference, place two small embroidered eyes around stitches 14 and 23 of core R19. Embroider a tiny nose between stitches 18 and 19 of R20, then add a short mouth below it. Keep the embroidery within the clear upper-front area. Sew the flattened ear bases to the upper front around R22, one spanning approximately stitches 5–8 and the other 17–20. Check their position against the face before securing them.
- Tail Work in continuous rounds: R1: 6 sc in MR (6). R2–R8: sc in each st (6 per round). Fasten off with a long sewing tail. Leave unstuffed or add only a wisp of stuffing. Sew the open end to the back-left side of the core around R9, between nearby scales. Curve the tail upwards and secure its tip with a small hidden stitch near R13. Move the tip slightly if needed so it remains visible beside the scales.
Finishing
- Weave in all ends, checking that each scale is secure at its narrow edge but free at the bottom.
- Gently lift any lower scale edges caught beneath an upper row. Shape the ears and curved tail with your fingers.
Helpful Tips
- Pin one complete scale row before sewing it; this makes the staggered spacing easier to judge.
- The round numbers rise from the base. Scale tops are sewn to the stated round and their loose edges point towards lower-numbered rounds.
- Use embroidered facial features rather than loose embellishments if the cat may be handled by a child.
Snowflake Cat

This Christmas cat crochet ornament brings a little character to a classic snowflake shape. A round cat face sits at the centre, with ears framing the upper arm and softly padded arms radiating outwards.
The arms are a prominent part of the design, so keeping them the same length helps the snowflake look balanced when it hangs. Light padding gives them shape without making the ornament bulky.
The hanging point needs particular care: it should be supported by the central join rather than relying on the tip of one arm alone. With its embroidered face, this is a decorative piece rather than a toy.
Snowflake Cat Crochet Ornament

Quick-reference card. Follow the complete written instructions below.
Materials
- DK cotton yarn: Pale blue for the discs, arms and ears; a small amount of dark yarn for the face.
- Crochet hook: 3 mm, or a size that makes a firm fabric.
- Toy stuffing: A small amount for the six arms.
- Tools: Yarn needle, stitch marker and scissors.
Size and Fit
One ornament. Make two 24-stitch discs and six identical seven-round arms. Finished diameter depends on yarn and tension; keep the arms equal in length so the snowflake sits evenly.
Gauge
Exact gauge is not essential. Use the same hook for every piece and work tightly enough that stuffing does not show.
Abbreviations
US crochet terms.
- ch = chain
- sc = single crochet
- inc = work 2 sc in the same stitch
- st(s) = stitch(es)
- MR = magic ring
Pattern
- Before you begin Work disc and arm rounds in a continuous spiral; do not join or turn. Mark the first stitch of each round. Make all six arms with the same yarn, hook and round count.
- Centre discs — make 2 Round 1: Work 6 sc in an MR (6). Round 2: Inc in each st around (12). Round 3: (Sc in next st, inc in next st) 6 times (18). Round 4: (Sc in next 2 sts, inc in next st) 6 times (24). Fasten off each disc, leaving a long sewing tail on one. Designate one disc as the front.
- Padded arms — make 6 Round 1: Work 6 sc in an MR (6). Round 2: (Sc in next 2 sts, inc in next st) twice (8). Rounds 3–7: Sc in each st around (8 per round). Add a little stuffing, concentrating it towards the closed tip and leaving the open end flat. Do not add rounds to individual arms. Fasten off and flatten each eight-stitch opening into a four-stitch-wide base; leave a tail for securing it.
- Ears — make 2 Ch 2. Row 1: Work 2 sc in the second ch from hook (2). Row 2: Ch 1, turn, inc in each st (4). Row 3: Ch 1, turn, sc across (4). Fasten off, leaving a sewing tail. The two-stitch row is the tip; the four-stitch row is the base.
- Face and ears On the right side of the front disc, embroider two eyes, a small nose and a mouth. Keep the features within Round 3 so they will not be caught in the outer seam. Sew the four-stitch ear bases to the upper left and upper right of the front disc, with their tips pointing outward. Place them on either side of the space reserved for the upper arm; keep their bases inside the disc’s outer round.
- Join the snowflake Divide each disc’s 24 outer stitches into six consecutive groups of four. The first group is the upper arm, between the ears. Lay the back disc wrong side up. Place one flattened arm opening over each group, with its closed tip pointing away from the centre. Lay the front disc on top, right side up, matching its stitch groups to the back disc. Using the long disc tail, sew around the perimeter through each pair of matching disc stitches and both layers of the arm opening between them. Catch all four stitches across each arm base. At the end of every group, check that the next arm points outward and that no base has shifted; secure the seam when all six groups are joined.
- Reinforced hanging loop Cut a 40 cm length of pale blue yarn and fold it in half. With a yarn needle, draw the folded end under two stitches at the closed tip of the upper arm to form a loop about 5 cm long. Knot the two loose ends together snugly against the arm beneath the loop. Run each loose end down a different side of the arm, make two small securing stitches into the disc seam, then weave in the ends. Do not rely on the tip stitches alone to carry the ornament’s weight.
Finishing
- Check that every arm base is enclosed by the disc seam and that all six tips are evenly spaced.
- Gently shape the stuffed arms with your fingers and weave in any remaining ends.
Helpful Tips
- Stuff each arm lightly: a flat opening is easier to sandwich securely between the discs.
- If the arms begin to twist as you sew, stop and straighten them before securing the next four-stitch group.
- Embroidered features avoid hard parts on an ornament that may be handled by children; this is a decoration, not a toy.
Christmas Cracker Cat

This Christmas Cracker Cat brings together the familiar striped shape of a festive cracker and the character of a little amigurumi cat. Its embroidered face sits on the central barrel, with upright ears above and a tail beneath, making it a playful soft decoration for a Christmas display.
The cracker shape comes from a stuffed barrel that narrows towards each end, with flared collars fitted over the necks. The barrel ends are securely closed to keep the stuffing contained; the collars remain open at their outer edges for the decorative cracker silhouette.
Although it looks like a Christmas cracker, this one is not made to pull apart. Handle it as a soft decoration, particularly around the narrow necks and attached details.
Christmas Cracker Cat

Quick-reference card. Follow the complete written instructions below.
Materials
- DK cotton yarn: Small amounts of cream for the barrel and ears, red for stripes, and green for the flared ends
- Embroidery yarn: Black for the eyes, nose and mouth; a small amount of cream or red for the tail
- Crochet hook: 3.5 mm, or a size that makes a firm fabric without visible stuffing
- Other supplies: Toy stuffing, stitch marker, yarn needle and scissors
Size and Fit
One size. At the stated gauge, the stuffed barrel is approximately 9 cm long and 4 cm across; the flared collars extend the overall length to approximately 12–13 cm. Dimensions are estimates based on stitch and round counts, not a measured sample.
Gauge
Approximately 25 sc and 28 rounds per 10 cm in continuous rounds. A firm fabric matters more than matching this gauge exactly.
Abbreviations
US crochet terms.
- ch = chain
- sc = single crochet
- inc = work 2 sc in the same stitch
- dec = single crochet 2 stitches together, preferably using an invisible decrease
- rnd = round
- st = stitch
Pattern
- Before you begin Work the barrel, collars and tail in continuous rounds without joining unless instructed otherwise. Mark the first stitch of each round. Stuff firmly enough to support the shape, but not so firmly that the stitches spread. The barrel’s two 6-stitch tips will be closed before the decorative collars are attached.
- Barrel, rnds 1–6 With cream, make a magic ring. Rnd 1: Work 6 sc into the ring; pull it tightly closed. Rnd 2: Inc in each st (12). Rnd 3: (Sc 1, inc) 6 times (18). Rnd 4: (Sc 2, inc) 6 times (24). Rnd 5: (Sc 3, inc) 6 times (30). Rnd 6: Sc in each st (30).
- Barrel stripes and centre, rnds 7–21 Rnds 7–8: Change to red and sc in each st (30 per rnd). Rnds 9–19: Change to cream and sc in each st (30 per rnd). Rnds 20–21: Change to red and sc in each st (30 per rnd). Secure colour-change ends on the inside. Choose a side of the barrel as the front and mark its upper edge for ear placement.
- Embroider the face Before closing the barrel, embroider two small black eyes on the front, centred at approximately rnds 12 and 17. Place a small triangular nose between them around rnds 14–15, with a short mouth below it on the front-facing curve. Keep knots and yarn ends inside the barrel. Avoid beads or detachable eyes on a decoration that a child might handle.
- Barrel, rnds 22–25 Change to cream. Rnd 22: (Sc 3, dec) 6 times (24). Rnd 23: (Sc 2, dec) 6 times (18). Rnd 24: (Sc 1, dec) 6 times (12). Stuff the barrel now, working a little stuffing into each narrow end. Rnd 25: Dec 6 times (6). Fasten off with a long tail. Thread the tail through the front loop of each of the 6 remaining stitches, pull closed and sew through the tip again to secure it. Check that the magic-ring tip is tightly closed too. The 12-stitch rounds 2 and 24 remain accessible for attaching the collars.
- Flared collars, make 2 With green, ch 12 and join with a slip stitch to form a ring, taking care not to twist the chain. Work in continuous rounds. Rnd 1: Sc in each ch (12). Rnd 2: (Sc 1, inc) 6 times (18). Rnd 3: (Sc 2, inc) 6 times (24). Rnd 4: (Sc 3, inc) 6 times (30). Rnd 5: Sc in each st (30). Fasten off, leaving a long sewing tail at the 12-stitch edge or attaching a fresh length of green yarn there. Leave the 30-stitch outer edge open.
- Attach the collars Slip a collar’s 12-stitch opening over each closed barrel tip. With green yarn, whipstitch each stitch of the collar’s rnd 1 to a corresponding stitch around barrel rnd 2 at one end and barrel rnd 24 at the other. Sew through the stitches rather than into the stuffing, and secure the yarn ends. The barrel tips seal the stuffing; the collars flare outwards and do not need to be gathered shut.
- Ears, make 2 With cream, ch 2. Row 1: Sc in the second ch from the hook (1); ch 1 and turn. Row 2: Inc (2); ch 1 and turn. Row 3: Inc, sc 1 (3); ch 1 and turn. Row 4: Inc, sc 1, inc (5). Fasten off with a sewing tail. Sew the 5-stitch base of one ear across the top-facing stitches at approximately barrel rnd 9 and the other at approximately rnd 19. Keep both tips upright and the ears on the same side of the barrel.
- Tail With cream or red, make a magic ring. Rnd 1: Work 6 sc into the ring and pull closed. Rnds 2–9: Sc in each st (6 per rnd). Fasten off with a sewing tail, leaving the final 6-stitch edge open. Sew that edge securely to the underside of the barrel across approximately rnds 18–20, opposite the ears. The narrow tail does not need stuffing.
Finishing
- Weave in and secure all remaining ends, taking particular care at the closed barrel tips, collar seams, ears and tail.
- Shape the open flares with your fingers. This is a soft decoration, not a functional cracker; do not pull its ends.
Helpful Tips
- If stuffing shows through the barrel, use a smaller hook rather than adding more stuffing.
- Mark the top of the barrel before embroidering so the face, ears and tail are aligned.
- The collars are open at their outer edges, but neither opening leads into the stuffed barrel.
Sleigh Kitten

This Christmas cat crochet project makes a charming little display scene: a seated kitten tucked into a red sleigh, with raised sides and a taller front. It is a more involved make than a simple cat ornament, but the separate pieces make the construction easy to understand.
The sleigh’s firm base gives the kitten a place to sit, while the surrounding walls help keep it upright. The front rises above the sides and narrows towards the top, creating a gently shaped outline without a separate frame.
The runners complete the sleigh’s silhouette, but they are stitched-on details rather than a structural stand. Display the piece resting on its base, especially if it will be moved or handled.
Sleigh Kitten

Quick-reference card. Follow the complete written instructions below.
Materials
- Aran-weight cotton-blend yarn: Approximately 25 g red for the sleigh, 15 g cat colour and 10 g brown or another contrasting colour for the runners.
- Crochet hook: 4 mm, or a size that produces firm stitches without gaps.
- Other supplies: Small amount of toy stuffing, embroidery yarn for the face, stitch marker, yarn needle and scissors.
Size and Fit
One sample size. The oval base is approximately 9 cm long and 3.5 cm wide at the stated gauge. The finished sleigh is approximately 4 cm high at its front. The seated kitten is approximately 5 cm high. These are calculated guides, not tested finished measurements.
Gauge
Approximately 16 sc and 18 rounds per 10 cm in firm single crochet. Exact gauge is less important than making a dense fabric; check that the kitten’s 12-stitch-wide body fits inside your finished sleigh.
Abbreviations
US crochet terms.
- ch = chain
- sc = single crochet
- inc = work 2 sc in one stitch
- dec = single crochet 2 stitches together
- BLO = back loop only
- MR = magic ring
- rnd = round
Pattern
- Before you begin Work the oval and kitten pieces in continuous rounds unless a row is specified. Place a marker in the first stitch of each round and move it up as you work. Do not join or turn the rounds.
- Sleigh base, rnd 1 With red, ch 12. Sc in the second ch from the hook and in each of the next 9 ch; work 3 sc in the last ch. Continue along the opposite side of the foundation chain: sc in the next 9 ch, then work 2 sc in the same ch that holds your first sc. 24 sc.
- Sleigh base, rnd 2 Inc in the first stitch, sc in the next 9 stitches, inc in each of the next 3 stitches, sc in the next 9 stitches, then inc in each of the last 2 stitches. 30 sc.
- Sleigh base, rnd 3 Inc in the first stitch, sc in the next stitch, sc in the next 9 stitches, work (inc, sc) 3 times, sc in the next 9 stitches, then work (inc, sc) 2 times. 36 sc.
- Sleigh walls, rnds 4–7 Rnd 4: Working BLO, sc in every stitch. 36 sc. Rnds 5–7: Working through both loops, sc in every stitch. 36 sc per rnd. Fasten off after rnd 7. The BLO round makes a firm fold between the base and the upright walls.
- Higher curved front, rows 8–10 Hold the sleigh with the beginning of rnd 7 at the rear. Count along rnd 7 from that point, skipping the first 10 stitches. Join red yarn in the next stitch, which is stitch 11. Row 8: Sc in stitch 11 and the following 12 stitches; leave the rest of the round unworked. 13 sc. Ch 1 and turn. Row 9: Dec, sc in the next 9 stitches, dec. 11 sc. Ch 1 and turn. Row 10: Dec, sc in the next 7 stitches, dec. 9 sc. Fasten off. The narrowing rows lift the middle of the front while leaving its sides lower.
- Kitten body With cat-colour yarn, rnd 1: Work 6 sc in an MR. Rnd 2: Inc in each stitch. 12 sc. Rnds 3–7: Sc in every stitch. 12 sc per rnd. Rnd 8: Work (sc in the next 2 stitches, dec) 3 times. 9 sc. Lightly stuff the body. Rnd 9: Sc in every stitch. 9 sc. Fasten off, leaving a long tail for attaching the head.
- Kitten head With cat-colour yarn, rnd 1: Work 6 sc in an MR. Rnd 2: Inc in each stitch. 12 sc. Rnd 3: Work (sc, inc) 6 times. 18 sc. Rnds 4–7: Sc in every stitch. 18 sc per rnd. Embroider the eyes, nose and mouth now, keeping all thread ends inside the head. Rnd 8: Work (sc, dec) 6 times. 12 sc. Stuff lightly. Rnd 9: Dec 6 times. 6 sc. Fasten off and draw the remaining opening closed.
- Ears and tail Make 2 ears in cat-colour yarn. For each ear, work 3 sc in an MR for rnd 1; inc in each stitch for rnd 2 (6 sc); sc in every stitch for rnd 3 (6 sc). Fasten off, leaving a sewing tail. Do not stuff; flatten each ear. For the tail, ch 9, then sc in the second ch from the hook and in each remaining ch. 8 sc. Fasten off, leaving a sewing tail.
- Doubled runners With runner-colour yarn, make 4 matching flat strips. For each strip, ch 14. Row 1: Sc in the second ch from the hook and in each remaining ch. 13 sc. Ch 1 and turn. Row 2: Sc in every stitch. 13 sc. Fasten off. Place 2 strips together for each runner and sew their edges together with matching yarn. Do not stuff.
Finishing
- Sew the head securely to the body’s 9-stitch top opening. Sew the flattened ears to opposite sides of the upper head, with their narrow ends pointing upwards. Sew one end of the tail to the lower back of the body and curve the free end to one side.
- Place the kitten inside the sleigh with its face towards the higher front. Sew the bottom of its body firmly to the oval base through several stitches; add a few discreet stitches between the body and the inner walls if needed to keep it upright.
- Turn the sleigh over. Position the two doubled runners lengthways beneath opposite long sides of the oval, approximately one base stitch in from the outer edge. Sew each runner to the underside along its upper long edge. If desired, secure its front tip slightly higher on the outside of the front wall for a turned-up look.
- Weave in all ends. Display the sleigh resting on its base: the stitched-on runners are decorative and must not be relied upon to support or suspend the kitten.
Helpful Tips
- Keep the oval and walls firm so they support the seated kitten without wire or cardboard.
- Use embroidered facial features rather than small detachable parts if the display may be handled by children. This is a decorative project, not a tested toy.
- If your kitten body feels tight inside the walls, use a slightly smaller hook for the kitten while keeping the sleigh hook unchanged.
Frequently Asked Questions
Which Christmas cat crochet patterns should I try first?
The Sitting Santa Cat, Snowman Cat and Christmas Pudding Cat are marked confident beginner. If you are comfortable shaping pieces and sewing them together, choose the one whose finishing details appeal to you.
Are these Christmas cat patterns ornaments or toys?
The collection includes both freestanding amigurumi and hanging decorations. The star, mitten and cracker cats are decoration shapes; none should be treated as a pet toy.
What yarn works well for small cat faces?
A smooth yarn helps ears, shaping and facial details show clearly. Aim for stitches firm enough to hold the stuffing, and use embroidered features where the pattern calls for them.
How do I help a standing crochet cat stay upright?
Stuff the base evenly without distorting its shape, then check the position of any supporting tail before fastening it off. The tree and bell cats also rely on their shaped bases.
Final Thoughts
Choose a cat by how you plan to display it, then give its joins and face as much attention as its festive accessories. Those finishing choices help a soft decoration keep its shape and its character.
For more seasonal stitching, explore other Christmas amigurumi and crochet ornaments after you have picked your cat.