Blush Pink Bunny Ear Hooded Coat Free Crochet Pattern
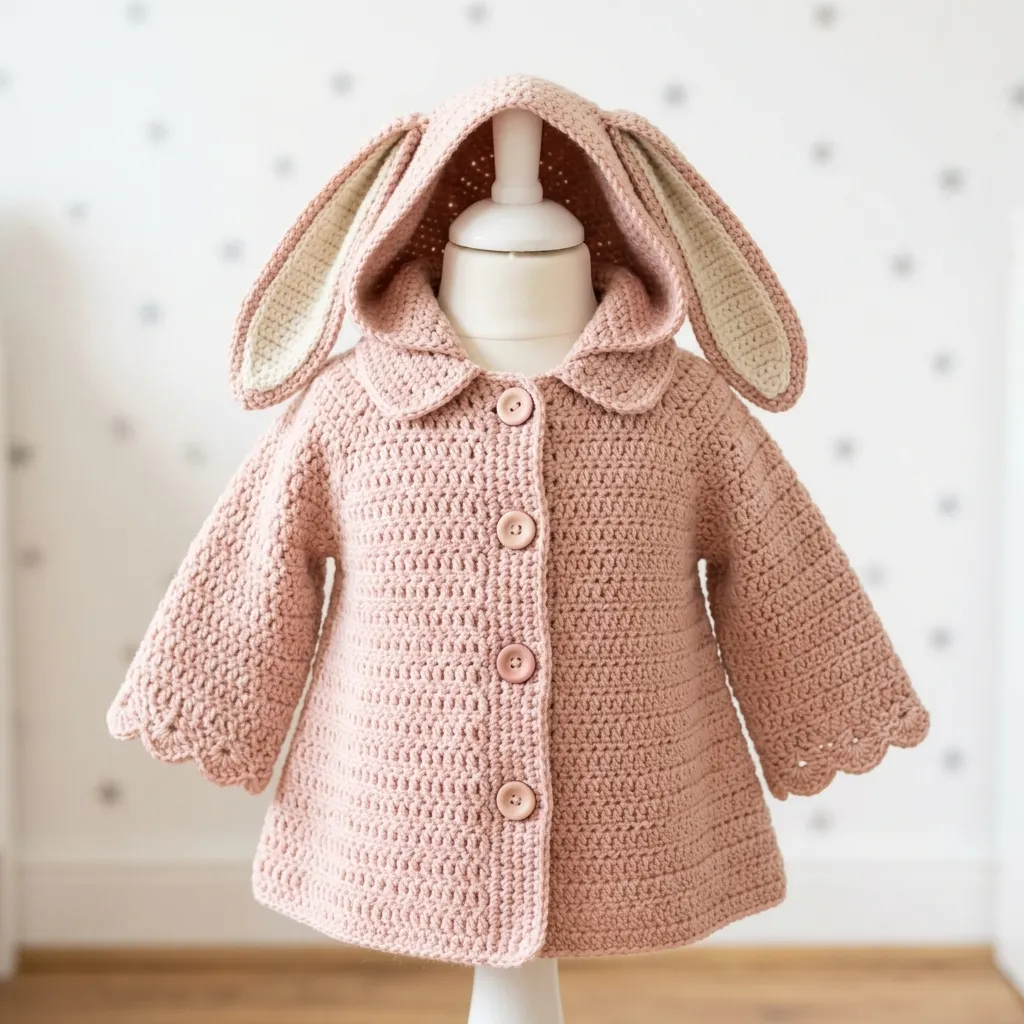
I don’t know about you, but I have a soft spot for children’s clothing that makes me audibly gasp. You know the kind. The pieces that are almost too cute to be real, the ones that make you want to learn crochet just so you can make them.
This bunny ear hooded coat is exactly that kind of project. It combines cozy warmth with the most adorable floppy ears you’ve ever seen, and the best part is that it’s far more achievable than it looks.
If you’ve been searching for a show-stopping handmade gift or a special something for the little one in your life, you just found it. Grab your favorite blush pink yarn and let’s make some magic happen.
About This Crochet Pattern
This charming A-line coat features everything you could want in a statement piece for toddlers. We’re talking a structured hood with two large floppy bunny ears, a sweet peter pan collar, four front button closures, and delicate scalloped edges along the sleeves and hem.
The body uses half double crochet (hdc) to create a dense, warm fabric with beautiful drape. Don’t worry if that sounds intimidating. If you can work basic stitches in rows and rounds, you can absolutely make this coat.
Skill level: Intermediate. You should be comfortable working in rows and rounds, seaming pieces together, and picking up stitches along edges. If you’ve completed at least two garments before, you’ll find this project straightforward.
Time estimate: Approximately 20 to 30 hours for the smallest size. Larger sizes add roughly 3 to 5 hours each.
Finished Measurements
This coat is designed with 2 inches of positive ease for comfortable layering.
Size 12 to 18 months:
Size 2T:
Size 3T:
Size 4T:
Throughout this crochet tutorial, the base number refers to size 12 to 18 months. Numbers for larger sizes follow in parentheses in the format (2T, 3T, 4T) wherever they differ.
Materials Needed
Yarn A (main color, blush pink): Worsted weight, approximately 650 (750, 875, 1000) yards
Yarn B (contrast, cream): Worsted weight, approximately 80 (90, 100, 115) yards
Crochet hooks:
Notions:
Yarn Suggestions
Lion Brand Pound of Love works beautifully here. It’s 100 percent acrylic, machine washable, and one skein covers most sizes for the main color. You might need a partial second skein for sizes 3T and 4T.
Paintbox Yarns Simply DK held double is another excellent option. When held double, it behaves as worsted weight and gives gorgeous stitch definition.
For natural fiber lovers, Drops Karisma (100 percent superwash wool) provides wonderful warmth and drape. Just note it requires hand washing.
Any worsted weight yarn that achieves gauge will work. For a children’s garment, always confirm your yarn is hypoallergenic or test wash before starting.
Gauge
With the J-10 / 6.0 mm hook in half double crochet:
14 hdc x 10 rows = 4 inches
Gauge matters here. Please make a 5-inch square swatch, wash and block it as you will the finished garment, and adjust your hook size if needed. Being even one stitch off per 4 inches can result in a finished coat that’s more than 1.5 inches too large or too small across the chest.
Abbreviations and Stitch Definitions
ch: chain. Wrap yarn over hook, pull through loop on hook.
sl st: slip stitch. Insert hook, yarn over, pull through stitch and loop on hook in one motion.
sc: single crochet. Insert hook in stitch, yarn over, pull up a loop (2 loops on hook), yarn over, pull through both loops.
hdc: half double crochet. Yarn over, insert hook in stitch, yarn over, pull up a loop (3 loops on hook), yarn over, pull through all 3 loops.
dc: double crochet. Yarn over, insert hook in stitch, yarn over, pull up a loop (3 loops on hook), yarn over, pull through 2 loops, yarn over, pull through remaining 2 loops.
sk: skip
st(s): stitch(es)
RS: right side
WS: wrong side
inc: increase. Work 2 hdc in the same stitch.
hdc2tog: half double crochet two together (decrease). Insert hook in next stitch, yarn over, pull up loop, insert hook in following stitch, yarn over, pull up loop, yarn over, draw through all 5 loops on hook.
Pattern Notes Before You Begin
The coat is constructed in this order: back panel, two front panels, shoulder seams, sleeves in the round, hood, bunny ears, collar, button bands, scallop edging, and final finishing.
Important: All turning chains count as nothing throughout this pattern. Always chain 2 to turn for hdc rows, but this chain is not worked into and does not count as a stitch.
The coat body is worked flat in rows. Sleeves are worked in joined rounds from the armhole downward.
Block your finished pieces before seaming. This sets the stitch definition and makes seaming significantly cleaner.
Step by Step Instructions
Back Panel
Foundation: With J-10 hook and Yarn A, ch 41 (45, 49, 53).
Row 1 (WS): Hdc in the 3rd ch from hook (the skipped 2 ch do not count as a st), hdc in each ch across. Turn. 40 (44, 48, 52) hdc
Row 2 (RS): Ch 2, hdc in each st across. Turn. 40 (44, 48, 52) hdc
Rows 3 through 6: Repeat Row 2. Turn after each row. 40 (44, 48, 52) hdc
These first 6 rows establish your hem width. Now you’ll begin the A-line shaping with gradual decreases.
Row 7 (decrease row): Ch 2, hdc2tog over first 2 sts, hdc in each st to last 2 sts, hdc2tog over last 2 sts. Turn. 38 (42, 46, 50) hdc
Rows 8 through 10: Ch 2, hdc in each st across. Turn. 38 (42, 46, 50) hdc
Row 11 (decrease row): Ch 2, hdc2tog, hdc across to last 2 sts, hdc2tog. Turn. 36 (40, 44, 48) hdc
Rows 12 through 14: Ch 2, hdc in each st across. Turn. 36 (40, 44, 48) hdc
Row 15 (decrease row): Ch 2, hdc2tog, hdc across to last 2 sts, hdc2tog. Turn. 34 (38, 42, 46) hdc
Rows 16 through 18: Ch 2, hdc in each st across. Turn. 34 (38, 42, 46) hdc
Row 19 (decrease row): Ch 2, hdc2tog, hdc across to last 2 sts, hdc2tog. Turn. 32 (36, 40, 44) hdc
Rows 20 through 22: Ch 2, hdc in each st across. Turn. 32 (36, 40, 44) hdc
Row 23 (decrease row): Ch 2, hdc2tog, hdc across to last 2 sts, hdc2tog. Turn. 30 (34, 38, 42) hdc
Rows 24 through 26: Ch 2, hdc in each st across. Turn. 30 (34, 38, 42) hdc
Checkpoint: After Row 26, your back panel should measure approximately 10.5 inches tall for size 12 to 18 months.
Armhole Shaping
Row 27 (armhole bind-off, RS): Sl st across first 3 sts, ch 2, hdc in each st to last 3 sts, leave last 3 sts unworked. Turn. 24 (28, 32, 36) hdc
Row 28: Ch 2, hdc2tog, hdc across to last 2 sts, hdc2tog. Turn. 22 (26, 30, 34) hdc
Row 29: Ch 2, hdc2tog, hdc across to last 2 sts, hdc2tog. Turn. 20 (24, 28, 32) hdc
Rows 30 through 36: Ch 2, hdc in each st across. Turn. 20 (24, 28, 32) hdc
Back Neck Shaping
Row 37 (neck shaping): Ch 2, hdc in first 6 (7, 8, 9) sts only. Turn, leaving remaining sts unworked. 6 (7, 8, 9) hdc (right shoulder)
Row 38: Ch 2, hdc2tog, hdc across. Turn. 5 (6, 7, 8) hdc
Row 39: Ch 2, hdc in each st across. Fasten off. 5 (6, 7, 8) hdc
Right shoulder complete. Count 8 (10, 12, 14) sts for the back neck center and leave these unworked. Rejoin yarn to the remaining 6 (7, 8, 9) sts for the left shoulder.
Row 37L: Ch 2, hdc across to last 2 sts, hdc2tog. Turn. 5 (6, 7, 8) hdc
Row 38L: Ch 2, hdc in each st across. Fasten off. 5 (6, 7, 8) hdc
Right Front Panel
Foundation: With J-10 hook and Yarn A, ch 21 (23, 25, 27).
Row 1 (WS): Hdc in 3rd ch from hook, hdc in each ch across. Turn. 20 (22, 24, 26) hdc
Row 2 (RS): Ch 2, hdc in each st across. Turn. 20 (22, 24, 26) hdc
Rows 3 through 6: Ch 2, hdc in each st across. Turn. 20 (22, 24, 26) hdc
Row 7 (decrease row): Ch 2, hdc2tog, hdc across to end. Turn. 19 (21, 23, 25) hdc
Rows 8 through 10: Ch 2, hdc across. Turn. 19 (21, 23, 25) hdc
Row 11 (decrease row): Ch 2, hdc2tog, hdc across. Turn. 18 (20, 22, 24) hdc
Rows 12 through 14: Ch 2, hdc across. Turn. 18 (20, 22, 24) hdc
Row 15 (decrease row): Ch 2, hdc2tog, hdc across. Turn. 17 (19, 21, 23) hdc
Rows 16 through 18: Ch 2, hdc across. Turn. 17 (19, 21, 23) hdc
Row 19 (decrease row): Ch 2, hdc2tog, hdc across. Turn. 16 (18, 20, 22) hdc
Rows 20 through 22: Ch 2, hdc across. Turn. 16 (18, 20, 22) hdc
Row 23 (decrease row): Ch 2, hdc2tog, hdc across. Turn. 15 (17, 19, 21) hdc
Rows 24 through 26: Ch 2, hdc across. Turn. 15 (17, 19, 21) hdc
Row 27 (armhole shaping): Sl st across first 3 sts, ch 2, hdc across to end. Turn. 12 (14, 16, 18) hdc
Row 28: Ch 2, hdc across to last 2 sts, hdc2tog. Turn. 11 (13, 15, 17) hdc
Row 29: Ch 2, hdc across to last 2 sts, hdc2tog. Turn. 10 (12, 14, 16) hdc
Rows 30 through 36: Ch 2, hdc across. Turn. 10 (12, 14, 16) hdc
Row 37 (neck shaping): Ch 2, hdc across first 5 (6, 7, 8) sts only. Turn, leaving remaining sts unworked. 5 (6, 7, 8) hdc
Row 38: Ch 2, hdc across. Turn. 5 (6, 7, 8) hdc
Row 39: Ch 2, hdc across. Fasten off. 5 (6, 7, 8) hdc
Left Front Panel
This is a mirror image of the right front. All side-seam decreases occur at the end of RS rows.
Foundation: With J-10 hook and Yarn A, ch 21 (23, 25, 27).
Row 1 (WS): Hdc in 3rd ch from hook, hdc in each ch across. Turn. 20 (22, 24, 26) hdc
Rows 2 through 6: Ch 2, hdc across. Turn. 20 (22, 24, 26) hdc
Row 7 (decrease row): Ch 2, hdc across to last 2 sts, hdc2tog. Turn. 19 (21, 23, 25) hdc
Continue following the same decrease pattern as the right front, but with decreases at the opposite edge. Work through Row 39 to complete the left front shoulder at 5 (6, 7, 8) hdc.
Seaming Shoulders
With your yarn needle and Yarn A, use mattress stitch or whip stitch to seam the front shoulders to the back shoulders. Place right sides together. Join 5 (6, 7, 8) sts on each side. Fasten off and weave in ends.
Sleeves (Make 2)
The sleeves are worked in the round from the armhole down. This is easier than it sounds, I promise.
With J-10 hook and Yarn A, RS facing, join yarn at the base of the armhole.
Pickup Round: Work 1 hdc in each st along the bound-off base (3 sts), work 1 hdc per row end along the armhole edge up to the shoulder (approximately 13 hdc), work 1 hdc per row end down the other side (13 hdc), then 3 hdc along the bound-off base again. Join with sl st to first hdc. 32 (34, 36, 38) hdc
Rounds 1 through 3: Ch 2, hdc in each st around. Join. 32 (34, 36, 38) hdc
Round 4 (decrease round): Ch 2, hdc2tog, hdc around to last 2 sts, hdc2tog. Join. 30 (32, 34, 36) hdc
Rounds 5 through 7: Ch 2, hdc around. Join. 30 (32, 34, 36) hdc
Continue decreasing every 4th round until you have 24 (26, 28, 30) hdc remaining.
For size 12 to 18 months, the sleeve is now the correct length. For size 2T, work 2 additional plain rounds. For size 3T, work 4 additional rounds. For size 4T, work 6 additional rounds.
Scallop Edging
This beautiful finishing touch gives the coat its polished look.
For the sleeve cuffs: Join with sl st, ch 1, sc in first st, (sk 2 sts, 5 dc in next st, sk 2 sts, sc in next st) around, sl st to first sc. Fasten off.
For the hem: With I-9 hook and Yarn A, join to the bottom right corner of the right front hem. Ch 1, sc in same st, (sk 2 sts, 5 dc in next st, sk 2 sts, sc in next st) across entire hem. Fasten off.
Hood Construction
The hood is worked flat in rows, then seamed at the top and back.
With J-10 hook and Yarn A, RS facing, starting at the right front neckline edge, pick up and sc evenly around the entire neckline for a total of 22 (24, 26, 28) sc. Do not join.
Hood Row 1 (WS): Ch 2, hdc in each st across. Turn. 22 (24, 26, 28) hdc
Hood Rows 2 through 4: Ch 2, hdc across. Turn. 22 (24, 26, 28) hdc
Hood Row 5 (increase row): Ch 2, 2 hdc in first st, hdc across to last st, 2 hdc in last st. Turn. 24 (26, 28, 30) hdc
Hood Rows 6 through 8: Ch 2, hdc across. Turn. 24 (26, 28, 30) hdc
Hood Row 9 (increase): Ch 2, 2 hdc in first st, hdc across to last st, 2 hdc in last st. Turn. 26 (28, 30, 32) hdc
Continue working the hood, increasing every 4th row, until the hood measures approximately 13 (14, 15, 16) inches from the neckline pickup. Fold the hood in half and seam the top edge closed.
Bunny Ears (Make 2)
Each ear has an outer piece (blush pink) and an inner piece (cream).
Outer Ear: With J-10 hook and Yarn A, ch 10. Work in rows of hdc, increasing at the base and decreasing at the tip to create the ear shape. The finished ear should measure approximately 6 inches long.
Inner Ear: With I-9 hook and Yarn B, work a slightly smaller piece following the same shaping.
Place the inner ear on top of the outer ear, wrong sides together, and whip stitch around the edges. Attach securely to the top of the hood.
Finishing
Sew buttons evenly spaced along the left front band. Create buttonholes on the right front band by working (ch 2, sk 2) at button positions.
Weave in all remaining ends. Block the finished coat gently with steam or wet blocking to set the stitches and smooth the scalloped edges.
Tips for Success
Take your time with the hood. This is the trickiest part of the construction. Pin it in place before seaming to make sure the fit is right.
Block before seaming whenever possible. Your pieces will be easier to work with and your seams will look much cleaner.
Use stitch markers liberally. Mark your decrease rows, your armhole positions, and your ear placements as you go.
Try the coat on your little one (or a similarly-sized stuffed animal) as you work. This helps catch sizing issues early.
You Did It!
This blush pink bunny ear hooded coat is such a rewarding project to complete. Every time that little one puts it on, you’ll feel a burst of pride knowing you made something so special with your own hands.
Thank you so much for choosing this crochet pattern for your next project. I truly hope you love the finished piece as much as I loved designing it. If you make one, I would absolutely love to see it! Tag me on Instagram or share a photo in our Facebook group.
If this pattern made you smile, consider saving it to your Pinterest boards so you can find it easily later. And please drop a comment below if you make this coat. I read every single one and it genuinely makes my day to see your beautiful creations come to life!
You Might Also Like
- Blush Pink Tassel Tote Free Crochet Pattern
- Dusty Rose Puff Flower Tote Free Crochet Pattern
- Mustard Yellow Sunshine Slipper Boots Free Crochet Pattern
- Pastel Rainbow Flower Granny Square Tote Free Crochet Pattern