Blueberry Dream Cropped Cardigan Free Crochet Pattern
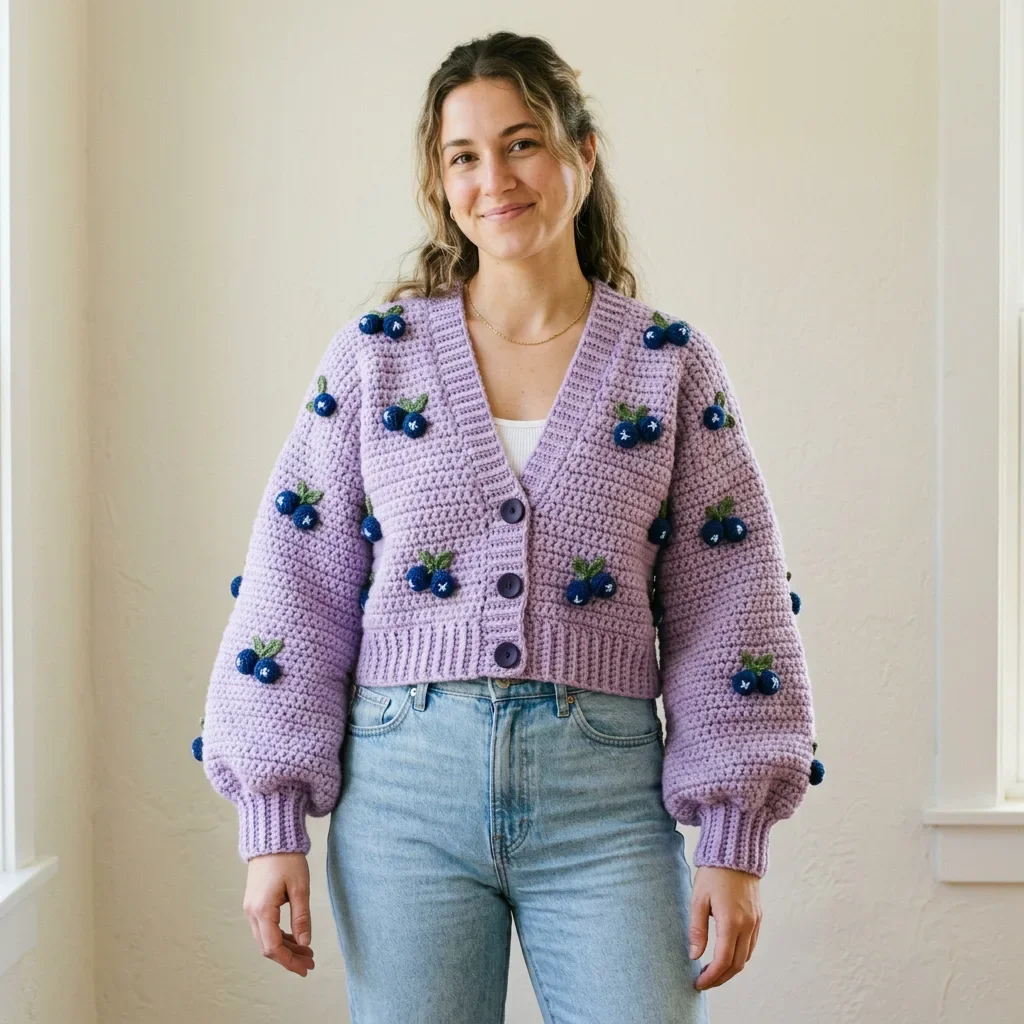
I don’t know about you, but I have been absolutely obsessed with fruit-themed fashion lately. Those adorable strawberry sweaters and cherry cardigans popping up everywhere? Total heart eyes. But blueberries don’t get nearly enough love, and honestly, they deserve their moment.
This cropped cardigan combines everything I want in a statement piece. Soft lavender yarn, chunky cozy texture, balloon sleeves that make me feel like a main character, and the cutest little three-dimensional blueberry clusters scattered across the whole thing. It’s whimsical without being over the top.
The best part? You don’t need to be an expert to make this. If you can work half double crochet in rows and follow some basic shaping, you’ve got this. The blueberries are made separately and sewn on at the end, so there’s no stressful colorwork to navigate while you’re building the main pieces.
Why You’ll Love This Cropped Cardigan Crochet Pattern
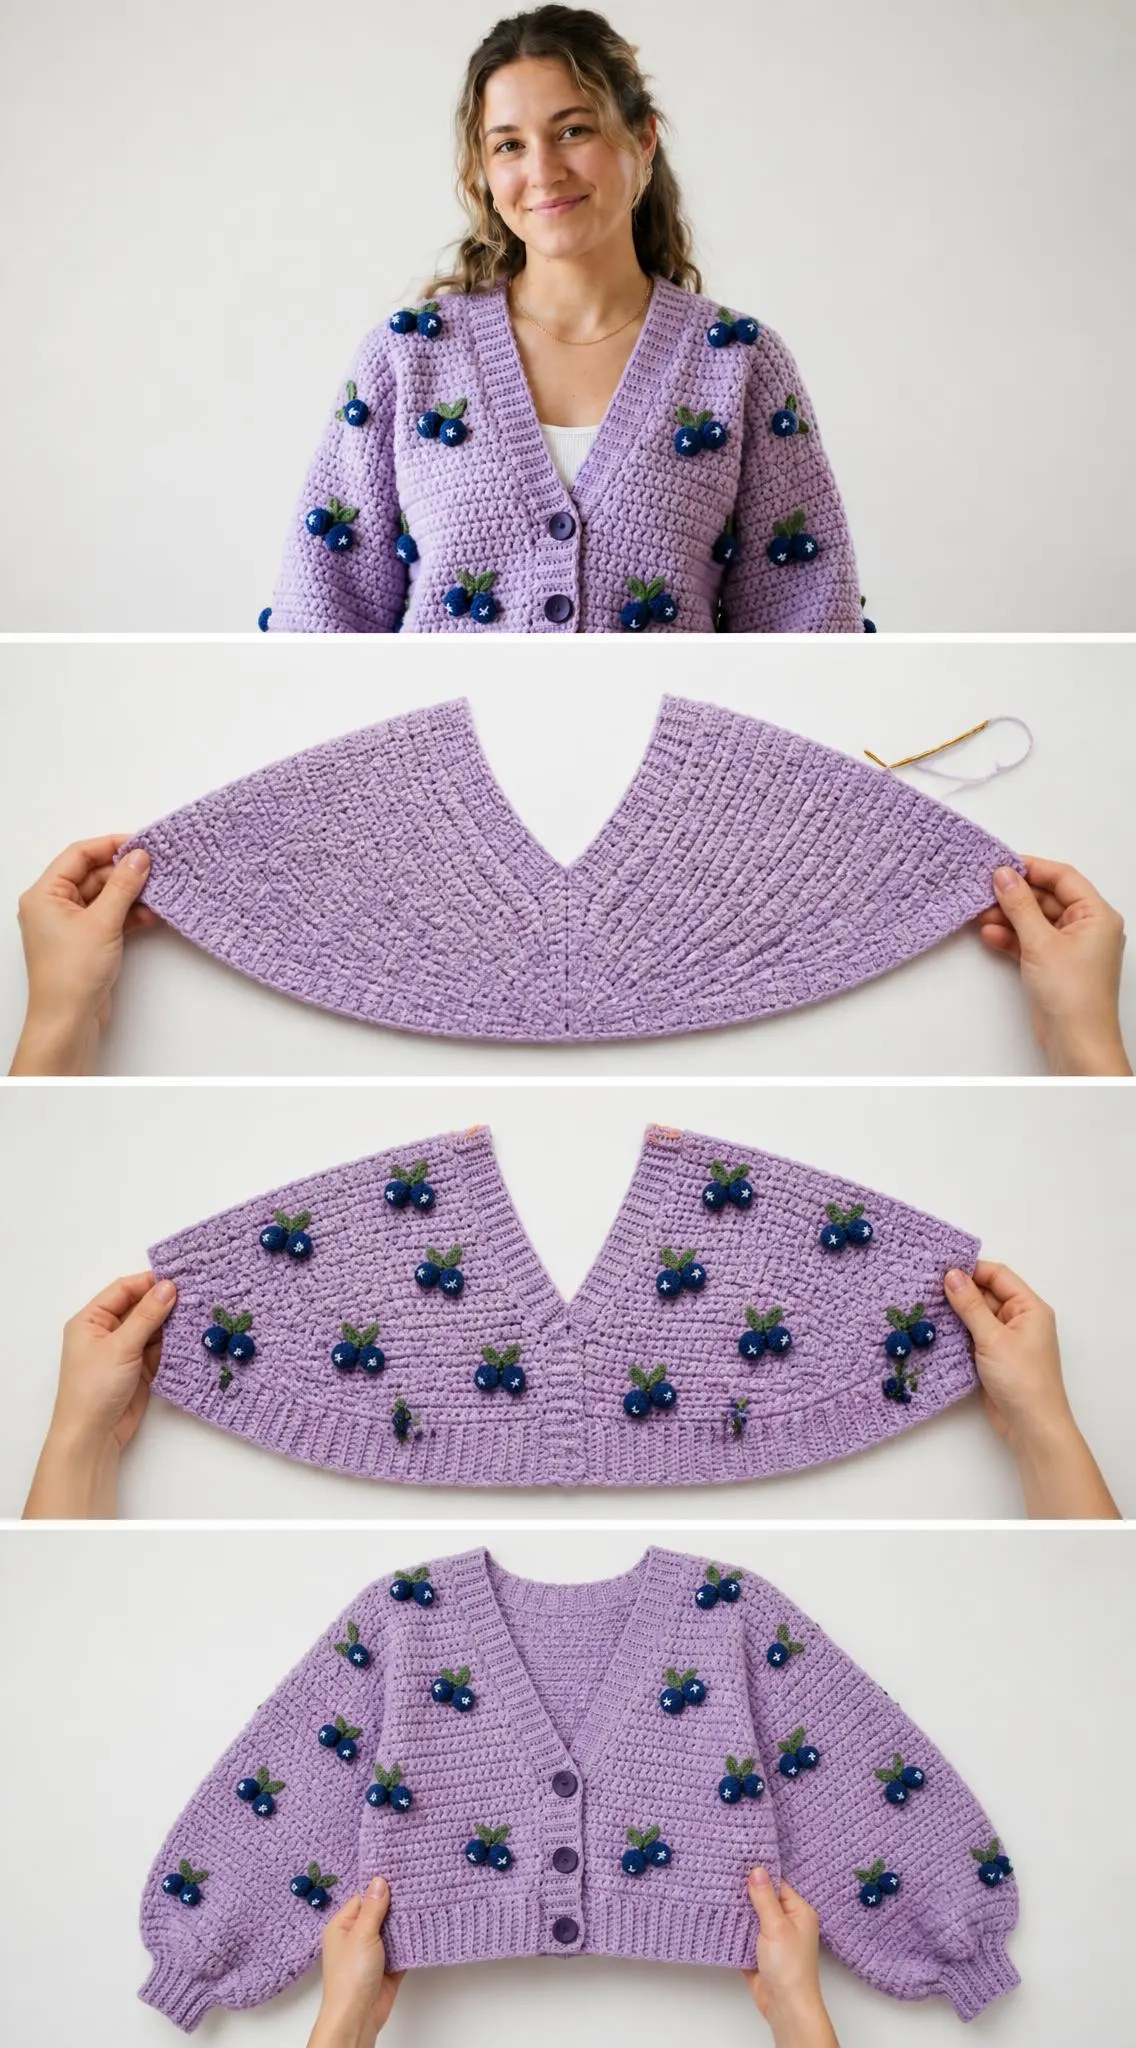
This cardigan hits all the right notes for a satisfying make. The construction is straightforward since you’ll work flat pieces for the back, two fronts, and two sleeves, then seam everything together. No complicated top-down yoke calculations or confusing seamless construction here.
The balloon sleeves give this piece serious visual interest. They start snug at the ribbed cuff, expand dramatically through the upper arm, then taper back in at the sleeve cap. When you slip this cardigan on, those sleeves billow beautifully while the fitted cuffs keep everything in place.
And those blueberries! Each little cluster features two or three stuffed bobble berries in deep navy blue, complete with green leaves and a tiny white embroidered star on top. They’re like little jewelry for your sweater. You’ll make them separately using a smaller hook, stuff them lightly, and sew them on wherever you like once the cardigan is finished.
Skill Level and Time Commitment
I’m rating this pattern as intermediate. You should feel comfortable with half double crochet (hdc) worked in rows, basic increases and decreases, ribbing, and seaming flat pieces together. The blueberry clusters use amigurumi-style techniques, working small rounds and stuffing as you go.
If you’ve never done shaping before, don’t panic. The V-neck decreases and armhole shaping are clearly written row by row, and you’ll only be decreasing one stitch at a time. Take it slow, use stitch markers generously, and you’ll be fine.
Time estimate: Plan for 25 to 40 hours for a size Medium, depending on your pace. The blueberry clusters add another 6 to 8 hours on top of that. This isn’t a weekend project, but it’s absolutely worth the investment.
Materials You’ll Need
Yarn
Main Color (MC) in Lavender: You’ll need chunky weight yarn, also called number 5 bulky weight. The yardage varies by size:
Contrast Color 1 (CC1) in Navy Blue: Worsted weight yarn, number 4 medium weight, approximately 80 yards (73 meters) for all sizes. This is only for the blueberry bobbles.
Contrast Color 2 (CC2) in Green: Worsted weight yarn, number 4 medium weight, approximately 20 yards (18 meters) for all sizes. This is only for the leaves.
Yarn suggestions: Paintbox Yarns Simply Chunky in Dusty Lavender works beautifully. You’ll need about 5 skeins for size Medium. Lion Brand Pound of Love in a pastel purple or WeCrochet Brava Bulky are also excellent choices. Avoid fluffy or hairy yarns like mohair blends since the blueberry texture will disappear against a fuzzy background.
Hooks
Notions
Gauge
Getting gauge right matters for a fitted garment like this. With Hook A and MC in half double crochet:
13 hdc x 9 rows = 4 inches x 4 inches (10 cm x 10 cm) after blocking
Make a swatch at least 20 stitches wide and 14 rows tall. Block it before measuring. If you’re getting more stitches per inch, go up a hook size. Fewer stitches? Go down a hook size. Being off by even half a stitch per inch changes your finished bust measurement by 2 to 3 inches.
Finished Measurements
| Size | Bust | Length |
|---|---|---|
| XS | 34 in / 86 cm | 15 in / 38 cm |
| S | 37 in / 94 cm | 15.5 in / 39 cm |
| M | 40 in / 102 cm | 16 in / 41 cm |
| L | 43 in / 109 cm | 16.5 in / 42 cm |
| XL | 46 in / 117 cm | 17 in / 43 cm |
| 2XL | 49 in / 124 cm | 17.5 in / 44 cm |
All sizes include 4 to 6 inches of positive ease for a relaxed, boxy fit. Sleeve length from cuff to underarm is 18 inches for all sizes.
Abbreviations
Before we dive into the step by step instructions, let’s cover the abbreviations you’ll see throughout this crochet tutorial:
Pattern Notes
1. The cardigan is worked in flat pieces: one back panel, two front panels, and two sleeves. All pieces are seamed using slip stitch.
2. All turning chains in hdc sections count as a stitch. Begin each hdc row by chaining 2 and turning. The turning ch-2 counts as the first hdc of that row. The last hdc of each row is worked into the top of the turning ch-2 from the previous row.
3. Sizes are listed in order: XS (S, M, L, XL, 2XL). When only one number is given, it applies to all sizes.
4. The blueberry clusters are made separately and sewn on after all finishing is complete.
How to Crochet the Blueberry Dream Cardigan
Back Panel
Foundation Ribbing:
Chain 12 for the ribbing strip (all sizes).
Ribbing Row 1 (RS): Hdc in 3rd ch from hook and in each ch across. Turn. (10 hdc)
Ribbing Row 2: Ch 2, hdc in BLO across. Turn. (10 hdc)
Repeat Ribbing Row 2 until the ribbing strip measures:
Do not fasten off. Rotate the ribbing strip 90 degrees to work across the long edge.
Main Back Body:
Row 1 (RS pickup row): Ch 2, work hdc evenly along the long edge of the ribbing strip. Stitch counts:
Row 2 (WS): Ch 2, turn, hdc in next st and in each st across, hdc in top of t-ch. (56, 61, 65, 70, 74, 79 sts)
Repeat Row 2 (working straight, no shaping) until the back body measures:
from the top edge of the ribbing strip.
Armhole Shaping:
Armhole Setup Row 1 (RS): Sl st across first 4 (4, 4, 5, 5, 5) sts, ch 2, hdc in each st across to last 4 (4, 4, 5, 5, 5) sts, leave remaining sts unworked. Turn. (48, 53, 57, 60, 64, 69 sts)
Armhole Decrease Row 1 (WS): Ch 2, dec over next 2 sts, hdc across to last 3 sts (before t-ch), dec, hdc in t-ch. Turn. (46, 51, 55, 58, 62, 67 sts)
Armhole Decrease Row 2 (RS): Ch 2, dec over next 2 sts, hdc across to last 3 sts, dec, hdc in t-ch. Turn. (44, 49, 53, 56, 60, 65 sts)
Armhole Decrease Row 3 (WS): Ch 2, dec over next 2 sts, hdc across to last 3 sts, dec, hdc in t-ch. Turn. (42, 47, 51, 54, 58, 63 sts)
Armhole Decrease Row 4 (RS, sizes L, XL, 2XL only): Ch 2, dec over next 2 sts, hdc across to last 3 sts, dec, hdc in t-ch. Turn. (52, 56, 61 sts)
After armhole shaping, stitch counts are:
Work straight in hdc until the armhole depth measures:
Fasten off. Mark the center of the top edge for reference.
Right Front Panel
Foundation Ribbing:
Chain 12.
Work ribbing rows (hdc BLO) exactly as for the back, until the strip measures:
Main Right Front Body:
Rotate 90 degrees and pick up along the long edge.
Row 1 (RS pickup): Ch 2, hdc evenly across. Stitch counts:
Row 2 (WS): Ch 2, turn, hdc across. (same count)
Work straight until body measures the same as the back body before armhole shaping.
V-Neck and Armhole Shaping:
Both shapings begin at the same time. The V-neck decreases one stitch at the neck edge every RS row.
Right Front Armhole and Neck Setup Row (RS): Sl st across first 4 (4, 4, 5, 5, 5) sts (armhole inset), ch 2, hdc across to last 2 sts before t-ch, dec (neck dec), hdc in t-ch. Turn. (23, 26, 28, 30, 32, 34 sts)
Right Front Armhole Dec Row 1 (WS): Ch 2, hdc across to last 3 sts, dec, hdc in t-ch. Turn. (22, 25, 27, 29, 31, 33 sts)
Right Front Armhole and Neck Dec Row 2 (RS): Ch 2, dec, hdc across to last 3 sts, dec, hdc in t-ch. Turn. (20, 23, 25, 27, 29, 31 sts)
Right Front Armhole Dec Row 3 (WS): Ch 2, hdc across to last 3 sts, dec, hdc in t-ch. Turn. (19, 22, 24, 26, 28, 30 sts)
Right Front Neck Only Dec Row 4 (RS):
Continue working neck decreases every RS row until only shoulder stitches remain:
Work straight until armhole depth matches the back. Fasten off.
Left Front Panel
Work identically to the right front panel, but mirror the shaping. The armhole inset is at the end of the RS row and the neck decrease is at the beginning of the RS row.
Left Front Armhole and Neck Setup Row (RS): Ch 2, dec (neck dec), hdc across to last 4 (4, 4, 5, 5, 5) sts, leave remaining sts unworked (armhole inset). Turn. (23, 26, 28, 30, 32, 34 sts)
Continue mirroring all shaping with decreases swapped to opposite edges. Fasten off when measurements match the right front.
Sleeves (Make 2)
Cuff Ribbing:
Chain 12.
Ribbing Row 1 (RS): Hdc in 3rd ch from hook and in each ch across. Turn. (10 hdc)
Ribbing Row 2: Ch 2, hdc in BLO across. Turn. (10 hdc)
Repeat Ribbing Row 2 until the cuff strip measures 9 in / 23 cm (all sizes).
Rotate and pick up along the long edge.
Sleeve Body:
Row 1 (RS pickup): Ch 2, hdc evenly across the long edge of the cuff. All sizes: (29 hdc)
Row 2 (WS): Ch 2, hdc across. (29 sts)
Increase Rows: Increase 1 st at each end on every RS row:
Row 3 (RS): Ch 2, inc, hdc to last 2 sts, inc, hdc in t-ch. (31 sts)
Row 4 (WS): Ch 2, hdc across. (31 sts)
Continue this pattern, increasing on every RS row:
Work straight (no more increases) for 4 more rows, ending at Row 34 with 57 sts.
Sleeve Cap Shaping:
Sleeve Cap Row 1 (RS): Sl st across first 4 (4, 4, 5, 5, 5) sts, ch 2, hdc across to last 4 (4, 4, 5, 5, 5) sts, leave rem sts unworked. Turn. (49, 49, 49, 47, 47, 47 sts)
Sleeve Cap Row 2 (WS): Ch 2, dec, hdc to last 3 sts, dec, hdc in t-ch. Turn. (47 sts)
Continue decreasing 2 stitches every row until you reach 15 sts (XS, S, M) or 13 sts (L, XL, 2XL).
Fasten off, leaving an 18 inch tail for seaming.
Assembly
Step 1, Shoulder Seams: Hold back and right front right sides together. Align shoulder edges. Using slip stitch seam and MC, seam the right shoulder. Repeat for left front and left shoulder.
Step 2, Sleeve Insertion: Pin the center of the sleeve cap to the shoulder seam. Pin the underarm corners of the sleeve cap to the corners of the armhole inset. Ease the sleeve cap into the armhole opening evenly. Slip stitch seam around the full armhole. Repeat for second sleeve.
Step 3, Side and Underarm Seams: Fold the cardigan right sides together. Slip stitch seam from the hem ribbing up to the armhole corner, then continue down the sleeve underarm to the cuff ribbing. Repeat for the other side.
Button Band and Neckline Trim
With RS facing and MC, attach yarn at the lower right corner of the right front just above the hem ribbing. Work hdc in BLO up the right front edge, across the back neck, and down the left front edge to create a continuous ribbed band.
Space four buttonholes evenly on the right front band. Work buttonholes by chaining 2 and skipping 2 stitches where each button will go.
Sew buttons to the left front band opposite the buttonholes.
Blueberry Clusters
Each cluster features 2 to 3 small stuffed berries with leaves. Using Hook B and CC1, work each berry as a small amigurumi ball. Start with a magic ring, work single crochet increases to form a sphere, stuff lightly with fiberfill, then decrease to close.
Using Hook C and CC2, chain 6 and work single crochet back along the chain to create each leaf. Attach 2 leaves to each cluster.
Using white embroidery floss, stitch a small 5-pointed star on top of each berry.
Arrange clusters across the body and sleeves as shown in the reference image, spacing them evenly. Sew securely in place.
Finishing Touches
Weave in all ends. Block the finished cardigan by soaking it in cool water, gently squeezing out excess moisture in a towel, and laying flat to dry. This evens out your stitches and helps the garment relax into its final shape.
The ribbed hem, cuffs, and button band should stay nice and stretchy after blocking. If you find your ribbing is too loose, you may have worked too tightly on the pickup rows. This is easy to fix on future projects by using a slightly larger hook just for the pickup row.
Tips for Success with This Cropped Cardigan Crochet Pattern
Check your gauge. I know I keep saying it, but this is a fitted garment. Ten minutes making a swatch saves hours of heartbreak later.
Use stitch markers generously. Mark the first stitch of every row, mark where your decreases go, mark the center of your back panel. Future you will be grateful.
Try it on as you go. After assembling the body (before sleeves), slip it on and check the fit. It’s much easier to adjust now than after the sleeves are attached.
Take breaks during seaming. Seaming is the least exciting part of any project. Do a little at a time so you don’t rush and end up with puckered seams.
Customize your blueberry placement. The reference shows clusters scattered evenly, but you can concentrate them more at the bottom, create a diagonal line, or place them however makes you happy.
Thank you so much for choosing this pattern for your next project! I genuinely can’t wait to see your finished cardigans. Those little blueberry clusters make me smile every single time. If you make one, please tag me on Instagram or share it in our Facebook group. I love seeing your color choices and how you make each pattern your own.
If this blueberry cardigan is calling your name, go ahead and save this page to your Pinterest boards so you can find it when you’re ready to cast on. And drop a comment below when you finish yours. I’d love to hear how it went and see photos of your beautiful work!
You Might Also Like
- Coral Sunset Lacy Tank Top Free Crochet Pattern
- Pastel Pink Dragon Amigurumi Plush Free Crochet Pattern
- Lavender Wildflower Crochet Crown Free Crochet Pattern
- Ocean Blue Granny Square Baby Dress Free Crochet Pattern