Free Grim Reaper Crochet Pattern for Halloween
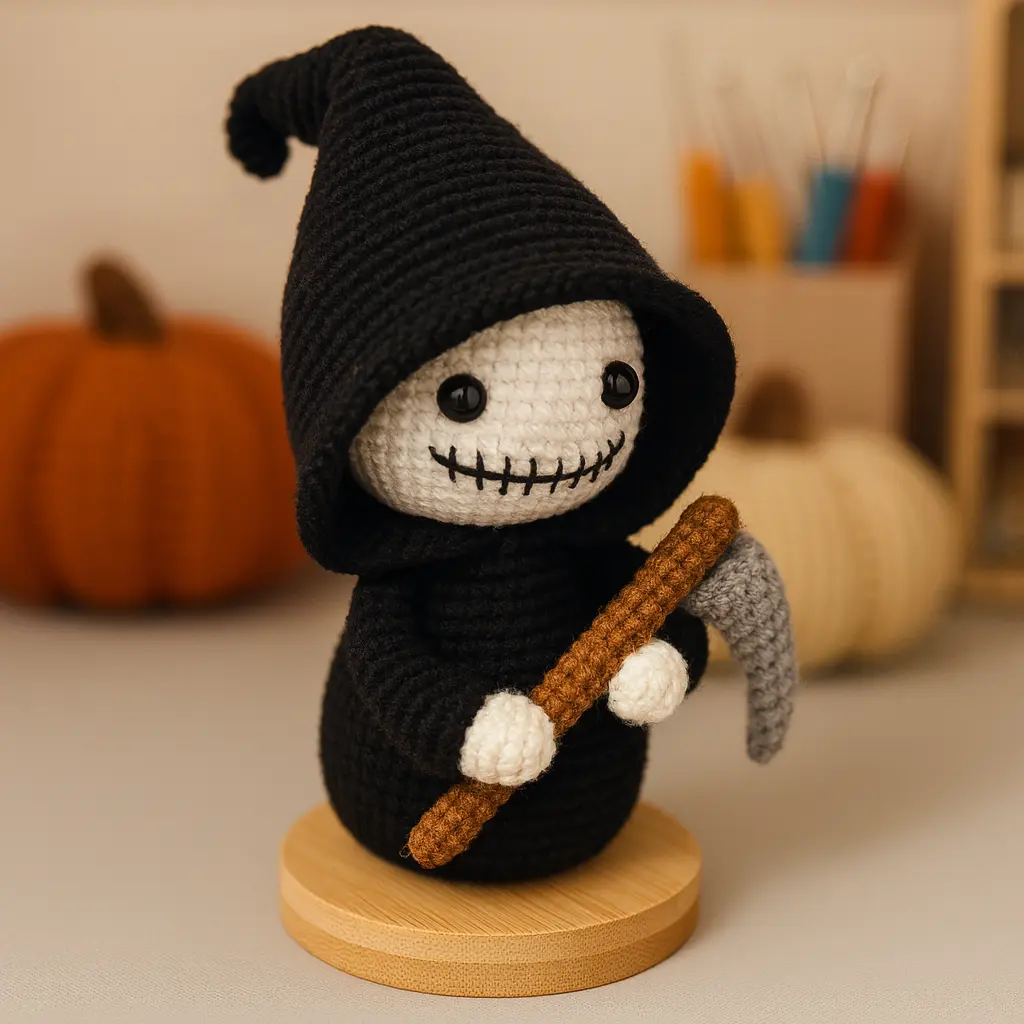
Looking for a spooky-cute project for Halloween? This free Grim Reaper crochet pattern walks you through making a hooded amigurumi Reaper complete with a curved scythe, stitched expression, and flowing black robe.
The pattern is worked mainly in continuous rounds using simple amigurumi techniques such as single crochet, increases, decreases, and front- and back-loop stitches. You can make the standard plush version for Halloween décor or use lighter yarn and a smaller hook to create a more compact version.
The finished Grim Reaper measures approximately 12–16 cm (4.7–6.3 in) depending on your yarn, hook, and tension.
New to amigurumi? Start with the First Amigurumi Step-By-Step Guide. If stitch names confuse you, keep this US vs UK Crochet Terms Conversion Chart handy. For neat stitch tracking, try these tips to Count Rounds in Crochet. Curious why the hood and scythe are iconic? See the cultural background in the Grim Reaper entry.
Jump to section
Materials & Tools (Beginner-Friendly)
- Yarn (DK or worsted): black, white, brown, gray
- Safety eyes: 6–8 mm
- Hook: 2.5–3.5 mm (tight fabric; pick to match your yarn) see the Yarn Weight, Gauge & Hook Size Guide
- Notions: fiberfill, yarn needle, stitch marker, small wooden base (optional)
- Technique helpers: Magic Ring (MR) refresher: Magic Ring vs Chain Circle
Work in a spiral unless noted. Use a stitch marker and stuff firmly for smooth shaping. This grim reaper crochet pattern benefits from firm stuffing for a clean skull shape and crisp hood edge, great for Halloween amigurumi displays.
Abbreviations (US Terms)
- MR = magic ring ·
- sc = single crochet ·
- inc = 2 sc in same st ·
- dec = invisible decrease ·
- FLO/BLO = front/back loop only
If you prefer a refresher on how patterns are written, skim How to Read an Amigurumi Pattern
Gauge & Finished Size
- Gauge: not critical for this project. The most important thing is creating a firm amigurumi fabric without visible gaps.
- Standard Grim Reaper: approximately 12–16 cm (4.7–6.3 in) tall.
- Smaller version: using sport or lightweight DK yarn with a smaller hook will produce a more compact Reaper. The exact finished size will depend on your yarn, hook, and tension.
Crochet Grim Reaper Free Pattern — Standard Size
Head (white) — R1–R26
- R1: MR 6 (6)
- R2: inc ×6 (12)
- R3: (sc, inc) ×6 (18)
- R4: (2 sc, inc) ×6 (24)
- R5: (3 sc, inc) ×6 (30)
- R6: (4 sc, inc) ×6 (36)
- R7: (5 sc, inc) ×6 (42)
- R8–R10: sc around (42)
- R11: (6 sc, inc) ×6 (48)
- R12–R16: sc around (48)
- 👉Place 6–8 mm safety eyes between Rounds 10 and 11, approximately 8–9 stitches apart. Check that the face is centered before securing the washers.
- R17: (6 sc, dec) ×6 (42)
- R18–R20: sc around (42)
- R21: (5 sc, dec) ×6 (36)
- R22: (4 sc, dec) ×6 (30)
- R23: (3 sc, dec) ×6 (24)
- R24: (2 sc, dec) ×6 (18)
- R25: (sc, dec) ×6 (12)
- R26: dec ×6 (6)
- FO, close.
Tip: for neat shaping, use the Invisible Decrease Crochet technique when working dec, it keeps this grim reaper crochet pattern skull smooth for Halloween photos.
Body (black) — R1–R24
- R1: MR 6 (6)
- R2: inc ×6 (12)
- R3: (sc, inc) ×6 (18)
- R4: (2 sc, inc) ×6 (24)
- R5: (3 sc, inc) ×6 (30)
- R6: (4 sc, inc) ×6 (36)
- R7: (5 sc, inc) ×6 (42)
- R8: (6 sc, inc) ×6 (48)
- R9: FLO sc around (48) — forms the robe “layer” ridge.
- R10–R12: sc around (48)
- R13: (22 sc, dec) ×2 (46)
- R14: (21 sc, dec) ×2 (44)
- R15: (20 sc, dec) ×2 (42)
- R16: (19 sc, dec) ×2 (40)
- R17: (18 sc, dec) ×2 (38)
- R18: (17 sc, dec) ×2 (36)
- R19: (16 sc, dec) ×2 (34)
- R20: (15 sc, dec) ×2 (32)
- R21: (14 sc, dec) ×2 (30)
- R22: (13 sc, dec) ×2 (28)
- R23: (12 sc, dec) ×2 (26)
- R24: (11 sc, dec) ×2 (24)
- FO, stuff, leave a long tail to sew.
Arms ×2 (start white, then black) — R1–R17
- R1: MR 5 (5)
- R2: inc ×5 (10)
- R3–R5: sc (10)
- R6: change to black, sc (10)
- R7–R8: sc (10)
- R9: BLO sc (10) — wrist ridge
- R10–R16: sc (10)
- R17: dec ×5 (5)
- FO; close. Lightly stuff the hand only.
You’ll attach them later, see Attach Amigurumi Limbs Evenly for clean placement.This keeps the grim reaper crochet pattern silhouette tidy for Halloween displays.
Scythe Handle (brown) — R1–R22
- R1: MR 6 (6)
- R2–R22: sc (6)
- FO; wire optional; leave tails for sewing.
Scythe Blade (gray) — R1–R14
- R1: MR 6 (6)
- R2: sc (6)
- R3: 5 sc, inc (7)
- R4: sc (7)
- R5: 6 sc, inc (8)
- R6: sc (8)
- R7: 7 sc, inc (9)
- R8: sc (9)
- R9: 8 sc, inc (10)
- R10–R11: sc (10)
- R12: 9 sc, inc (11)
- R13–R14: sc (11)
- FO with a long tail; stuff very lightly and curve. Sew to handle end/side.
Hood (black) — R1–R37
- R1: MR 6 (6)
- R2: sc (6)
- R3: (sc, inc) ×3 (9)
- R4–R5: sc (9)
- R6: 2 sc, inc ×2, 5 sc (11)
- R7: sc (11)
- R8: 3 sc, inc ×2, 6 sc (13)
- R9: 4 sc, inc ×2, 7 sc (15)
- R10: 5 sc, inc ×2, 8 sc (17)
- R11: 6 sc, inc ×2, 9 sc (19)
- R12: 7 sc, inc ×2, 10 sc (21)
- R13: 8 sc, inc ×2, 11 sc (23)
- R14: 9 sc, inc ×2, 12 sc (25)
- R15: 10 sc, inc ×4, 11 sc (29)
- R16: 13 sc, inc ×2, 14 sc (31)
- R17: 13 sc, inc ×4, 14 sc (35)
- R18: 16 sc, inc ×2, 17 sc (37)
- R19: 17 sc, inc ×4, 16 sc (41)
- R20: 20 sc, inc ×2, 19 sc (43)
- R21: 21 sc, inc ×2, 20 sc (45)
- R22: 22 sc, inc ×2, 21 sc (47)
- R23: 23 sc, inc ×2, 22 sc (49)
- R24: sc (49)
- R25: 24 sc, inc ×2, 23 sc (51)
- R26–R27: sc (51)
- R28: 25 sc, inc ×2, 24 sc (53)
- R29–R30: sc (53)
- R31: 26 sc, inc ×2, 25 sc (55)
- R32–R33: sc (55)
- R34: 27 sc, inc ×2, 26 sc (57)
- R35: sc (57)
- R36: 9 sc, inc, 9 sc, inc, 17 sc, inc, 9 sc, inc, 9 sc (61)
- R37: sc (61)
- FO with a long tail.
Fitting: Put the hood on the head first and sew the hood to the head opening. Then sew the head (with hood on) to the body, the hood overlaps slightly. The point can be bent/soft-shaped for that classic Halloween grim reaper crochet pattern vibe.
Assembly & Finishing
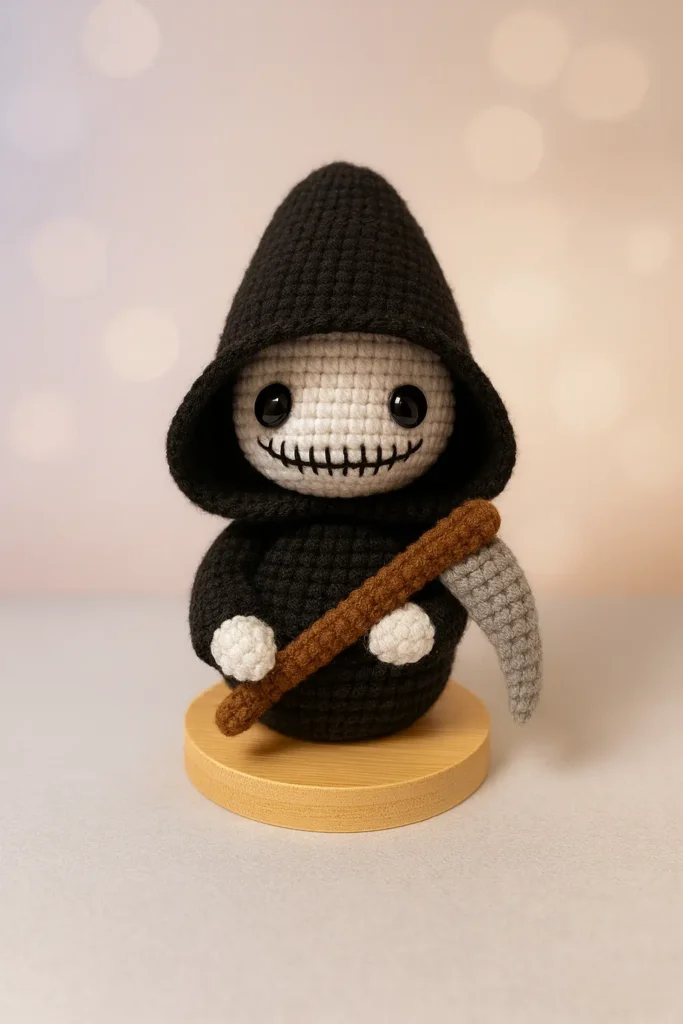
- 1. Fit the Hood to the Head: Insert the completed head through the large circular opening of the hood. Adjust the hood until the face is centered and evenly framed. Pin the hood edge around the sides of the face and beneath the chin, then secure it to the head with small hidden stitches. Do not close or gather the hood opening.
- 2. Attach the Head to the Body: Stuff the body but leave the top open. With the hood already fitted to the head, center the head over the body opening. Lift the lower hood edge slightly and sew the open top of the body securely to the bottom of the head. Add a little more stuffing before completing the seam if needed.
- 3. Arrange the Hood: Pull the lower part of the hood down over the neck seam so that it overlaps the upper body and hides the join. Secure it at the back and sides with a few hidden stitches if necessary. Gently bend and shape the hood tip into a soft point.
- 4. Attach the Arms: Position the arms evenly on the upper sides of the body, just below the hood. Pin both arms first to check that they are symmetrical, then sew through the side loops of each arm for a neat and secure join.
- 5. Assemble the Scythe: Sew the blade firmly to the end or upper side of the handle. A slim piece of craft wire may be inserted into the handle before closing it for extra support. Curve the blade gently into shape.
- 6. Position the Scythe: Place the scythe across the hands and adjust it until it rests naturally. Secure the handle to the hands with two or three small stitches.
- 7. Add a Base — Optional: For a standing display, stitch or glue the Grim Reaper securely to a small wooden disk.
- 8. Finish: Weave in and hide all remaining yarn tails. Lightly steam-block the lower robe edge if needed, taking care not to press the acrylic yarn directly. Adjust the stuffing and shape the hood, head, and body with your hands for the final look.
Tip for clean results: skim Top 10 Amigurumi Mistakes to Avoid once to double-check tension, stuffing, and seam alignment. This keeps your grim reaper crochet pattern looking crisp for Halloween photos.
Mini/Keychain Version (Chibi Reaper)
You can get a perfect mini without rewriting the pattern:
- Yarn & hook: Switch to DK (or even sport) with a 2.5–3.0 mm hook. Keep the same rounds; the piece naturally scales down to ~7–9 cm.
- Stuffing: Use lighter stuffing—too much will widen the hood and stiffen the cloak.
- Safety eyes: 6 mm works best on the mini; still place between R10–R11 of the head.
- Keychain hardware: After assembling, stitch a small jump ring inside the hood point or the head’s crown. Add a split ring/keychain. For durability, pass the yarn tail through 3–4 times before weaving in.
- Travel-safe scythe: If gifting to kids, embroider the blade shape instead of stuffing a separate blade.
(Advanced quick-shrink option: to make an extra tiny charm, you can remove one “sc around” repeat row from the Head and Body sections, but keep the increase/dec math intact.)
This keeps your Halloween amigurumi set cohesive while the grim reaper crochet pattern stays beginner-friendly.
Customization Ideas
Make your Grim Reaper fit your own Halloween style:
- Cute Reaper: add embroidered pink cheeks and a small stitched smile.
- Spooky Reaper: use dark gray for the scythe and embroider small cracks on the skull.
- Glow version: add glow-in-the-dark yarn around the scythe blade or hood edge.
- Hanging decoration: add a strong black yarn loop to the top of the hood.
- Halloween display: place the finished Reaper beside crocheted pumpkins, ghosts, or black cats.
For an especially clean finish, lightly shape the hood with your hands after assembly and keep the scythe blade only very lightly stuffed.
Frequently Asked Questions about grim reaper crochet pattern
Is this grim reaper crochet pattern free?
Yes. The complete pattern, including the head, body, arms, hood, scythe, assembly instructions, and customization ideas, is available on this page.
What yarn is best for a crochet Grim Reaper?
DK or worsted-weight cotton, acrylic, or a cotton-acrylic blend works well. Use a hook slightly smaller than you might normally use for the yarn so the stuffing does not show between the stitches.
How long does it take grim reaper crochet pattern?
Mini/keychain: 60–90 minutes. Standard plush: 2–3 hours depending on your pace and photo-stops—perfect for a last-minute Halloween crochet project
Is the grim reaper crochet pattern beginner-friendly?
Yes—only MR, sc, inc, dec, and occasional FLO/BLO. Place a stitch marker and stuff firmly for smooth shaping.
Where exactly do the eyes go?
Place 6–8 mm eyes between R10–R11, about 8–9 stitches apart. Embroider a simple stitched mouth to taste.
Why doesn’t my hood drape properly?
First make sure the head is not overstuffed. Place the hood over the finished head, center the face opening, and pin it in several places before sewing. After assembly, gently shape the pointed end of the hood with your fingers.
How can I make the scythe blade curve?
Stuff the blade only very lightly and shape it gradually while sewing it to the handle. For a display piece, a thin piece of craft wire inside the handle can provide additional support.
Can I sell finished Grim Reaper amigurumi made from this pattern?
You may sell handmade finished pieces in small quantities. Please credit as the pattern source rather than reproducing or redistributing the written pattern.
More Free Halloween Crochet Patterns
Building a spooky amigurumi collection? Try these free Halloween patterns next:
- Crochet Ghost Pattern — a quick spooky-cute companion for your Grim Reaper.
- Black Cat Crochet Pattern — perfect for a classic Halloween display.
- Pumpkin Witch Crochet Pattern — combine pumpkins and witchy details in one amigurumi.
- Free Crochet Pumpkin Pattern — an easy seasonal decoration to place beside the Reaper.
- Candy Corn Crochet Pattern — a colorful and quick Halloween project.
- Mini Bear Pumpkin Toast Crochet Pattern — a sweeter option for your Halloween crochet collection.
Pattern Summary Card
| Item | Details |
|---|---|
| Skill Level | Confident beginner |
| Stitches Used | MR, sc, inc (2 sc in 1 st), invisible dec, FLO/BLO |
| Hook | 2.5–3.5 mm (tight fabric) |
| Yarn | DK or worsted: black, white, brown, gray |
| Safety Eyes | 6–8 mm (head R10–R11, 8–9 sts apart) |
| Sizes | Standard ≈ 12–16 cm; Mini/Keychain ≈ 7–9 cm |
| Time | Mini: 60–90 min; Standard: 2–3 h |
| Construction | Head, body, arms, scythe (handle + blade), hood; sew and shape |
| Notes | Work in a spiral; stuff firmly; body R9 FLO creates robe ridge; blade lightly stuffed/curved; hood tip can be bent. Ideal grim reaper crochet pattern for Halloween gifts and decor. |
Spooky-creepy and beginner-friendly—this grim reaper crochet pattern is perfect for Halloween! 🎃🧶
Pin it for later → Grim Reaper Crochet Pattern — Free • 2 Sizes + Keychain 📌