Free Pumpkin Witch Crochet Pattern for Halloween
Looking for a cute Halloween amigurumi project? This free pumpkin witch crochet pattern combines a plump crochet pumpkin with a tiny witch hat, yarn hair, and a sweet spooky-season face.
The pattern includes the pumpkin body, hair, witch hat, assembly instructions, and a smaller version that can be turned into a keychain or bag charm. Most of the project uses basic amigurumi stitches, so it is a fun choice for confident beginners.
Use classic orange and black for a traditional Halloween look, or try purple, green, cream, or pastel colors for a softer witchy style.
This little pumpkin witch is perfect for Halloween decorations, handmade gifts, desk décor, keychains, or a spooky-cute amigurumi collection.
Skill level: Beginner-friendly
Finished size: ~10–12 cm (4–4.7 in) with 2.25 mm hook
Time: 2–3 hours (standard), 60–90 min (mini keychain)
New to amigurumi? Start with the First Amigurumi Step-by-Step Guide before beginning the pattern.
Jump to section
Materials & Tools
DK or light-worsted yarn
- Orange — pumpkin body
- Black — witch hat
- Brown, black, or another color — hair
- Small amount of green or brown — pumpkin stem, optional
- Optional contrast color for the witch-hat band
- Crochet hook: approximately 2.5–3.0 mm, or a size that creates a tight amigurumi fabric
- Polyester fiberfill
- Yarn needle
- Stitch marker
- Scissors
- Black embroidery thread for the facial details
- Pink embroidery thread or blush for the cheeks, optional
- Keychain clasp and jump ring for the mini version, optional
For a smaller Pumpkin Witch or keychain, use sport or fingering-weight yarn with a smaller hook.
For help choosing yarn and hook combinations, see the Yarn Weight, Gauge & Hook Size Guide.
Abbreviations (US)
- MR = magic ring
- ch = chain
- sc = single crochet
- hdc = half double crochet
- dc = double crochet
- inc = increase, 2 sc in the same stitch
- dec = invisible decrease
- dc inc = 2 dc in the same stitch
- sl st = slip stitch
- st(s) = stitch(es)
- FLO = front loop only
- BLO = back loop only
- FO = fasten off
(Crocheting from UK sources? Keep this handy: US vs UK crochet terms conversion chart.)
For standard US crochet abbreviations and terminology, see the Craft Yarn Council Crochet Abbreviations Master List.
pumpkin witch crochet pattern
Head (skin color)
Start with a magic ring. If MR gives you trouble, use the alternative start here: magic ring vs. chain circle.
- R1: MR, 6 sc (6)
- R2: inc ×6 (12)
- R3: (sc, inc) ×6 (18)
- R4: (sc, inc, sc) ×6 (24)
- R5: (3 sc, inc) ×6 (30)
- R6–R11: sc around (30)
- R12: (3 sc, dec) ×6 (24)
- R13: (sc, dec, sc) ×6 (18)
- R14: (sc, dec) ×6 (12)
Finish: Stuff firmly (top and cheeks), fasten off leaving a long tail for closing/sewing.
Eye placement: Insert safety eyes between R8–R9, spaced 6–7 sts apart. Add a tiny stitch of pink thread for cheeks and embroider a small smile if you like.
Pro tips
- Keep a marker at the first stitch of each round and count out loud or use a tally counter. If you lose track, this guide helps: count rounds in crochet.
- For invisible joins later, leave the tail long enough to close the top neatly when attaching.
Pumpkin Body (orange)
Work in a continuous spiral. A stitch marker is your best friend here.
- R1: MR, 6 sc (6)
- R2: inc ×6 (12)
- R3: (sc, inc) ×6 (18)
- R4: (sc, inc, sc) ×6 (24)
- R5: (3 sc, inc) ×6 (30)
- R6: (2 sc, inc, 2 sc) ×6 (36)
- R7: (5 sc, inc) ×6 (42)
- R8: (3 sc, inc, 3 sc) ×6 (48)
- R9–R12: sc around (48)
- R13: (3 sc, dec, 3 sc) ×6 (42)
- R14: (5 sc, dec) ×6 (36)
- R15: (2 sc, dec, 2 sc) ×6 (30)
- R16: (3 sc, dec) ×6 (24)
- R17: (sc, dec, sc) ×6 (18)
- R18: (sc, dec) ×6 (12)
- R19: dec ×6 (6)
Finish: Fasten off. Stuff firmly but evenly.
Shape the pumpkin ribs (8 segments):
Thread a long strand of orange on a yarn needle. Starting at the center top, pass the needle straight down through the pumpkin and out the center bottom. Pull snug to create the first groove. Bring the yarn up the outside and repeat this top-to-bottom wrap 8 times around, spacing the grooves evenly (like slicing a pie). Knot securely at the bottom and bury the tail.
Face: Embroider eyes/mouth or add safety eyes for a cute witch pumpkin crochet look.
Troubleshooting & pro tips
- Seeing small holes where you decreased? Use the invisible decrease method for neater shaping.
- Keep your stitch counts accurate; if you drift, recount rounds before decreasing heavily.
Hair (beige) — curly “ch + sc” strands
Make a small cap, then add strands around the edge. Work continuously and anchor each strand with a sl st into the next base stitch.
Hair cap:
- R1: MR, 6 sc (6)
- R2: inc ×6 (12)
- R3: (sc, inc) ×6 (18)
- R4: (sc, inc, sc) ×6 (24)
Strands (S) :
Hair placement note: The hair cap has 24 stitches, but only 19 hair strands are worked. Leave the remaining 5 stitches unworked at the center back of the cap. This creates a small gap behind the head where the hair does not need to be as full and helps the witch hat sit more neatly.
- S1–S2: ch 17, turn; starting in 2nd ch from hook sc 16, sl st to next base st.
- S3–S7: ch 16; back in 2nd ch: sl st 5, sc 10, sl st to next base st.
- S8–S11 (curly bangs): ch 11; back in 2nd ch: sl st 1, sc 2, hdc 2, dc 1, hdc 2, sc 2, sl st to next base st.
- S12: ch 11; back in 2nd ch: sl st 1, sc 2, dc 1, hdc 2, sc 2, sl st to next base st.
- S13–S17: ch 16; back in 2nd ch: sl st 5, sc 10, sl st to next base st.
- S18–S19: ch 17; back in 2nd ch: sc 16, sl st to next base st.
Before sewing the hair cap in place, position the 5-stitch gap at the back of the Pumpkin Witch and arrange the strands evenly around the sides and front.
Hair Finishing
Arrange the longer strands toward the sides and back of the face. Pin the hair cap in position before sewing so the strands frame the face evenly.
Sew the cap securely to the head with small hidden stitches, then adjust the strands with your fingers before attaching the witch hat.
Witch Hat — cone + band + FLO brim
Work in the round; note the color band on R10. Keep tension even so the cone stands upright.
- R1 (black): MR, 3 sc (3)
- R2: sc, inc, sc (4)
- R3: sc, dc-inc ×2, sc (6)
- R4: inc, (dc, dc-inc) ×2, inc (10)
- R5: 4 sc, 2 dc, 4 sc (10)
- R6: 4 sc, dc inc ×2, 4 sc (12)
- R7: (sc, inc) ×6 (18)
- R8: sc around (18)
- R9 (change to orange): (sc, inc, sc) ×6 (24)
- R10: sc around (24) ← hat band
- R11 (change back to black, FLO): (3 sc, inc) ×6 (30) ← start brim
- R12 (FLO): (inc, 4 sc) ×6 (36)
- Fasten off and weave in ends. Optionally stitch a tiny bell or bead to the tip.
Pro tips
- To avoid a visible jog at color changes on R9–R11, use a no-jog color swap (carry tail to the inside and tighten after the first stitch). See changing colors in amigurumi.
- Want a wider brim? Add one or two extra increase rounds after R12, keeping increases evenly spaced (e.g., (inc, 5 sc) ×6 → 42).
- If your cone leans, add one extra even round before R9 or lightly steam-shape.
Assembly
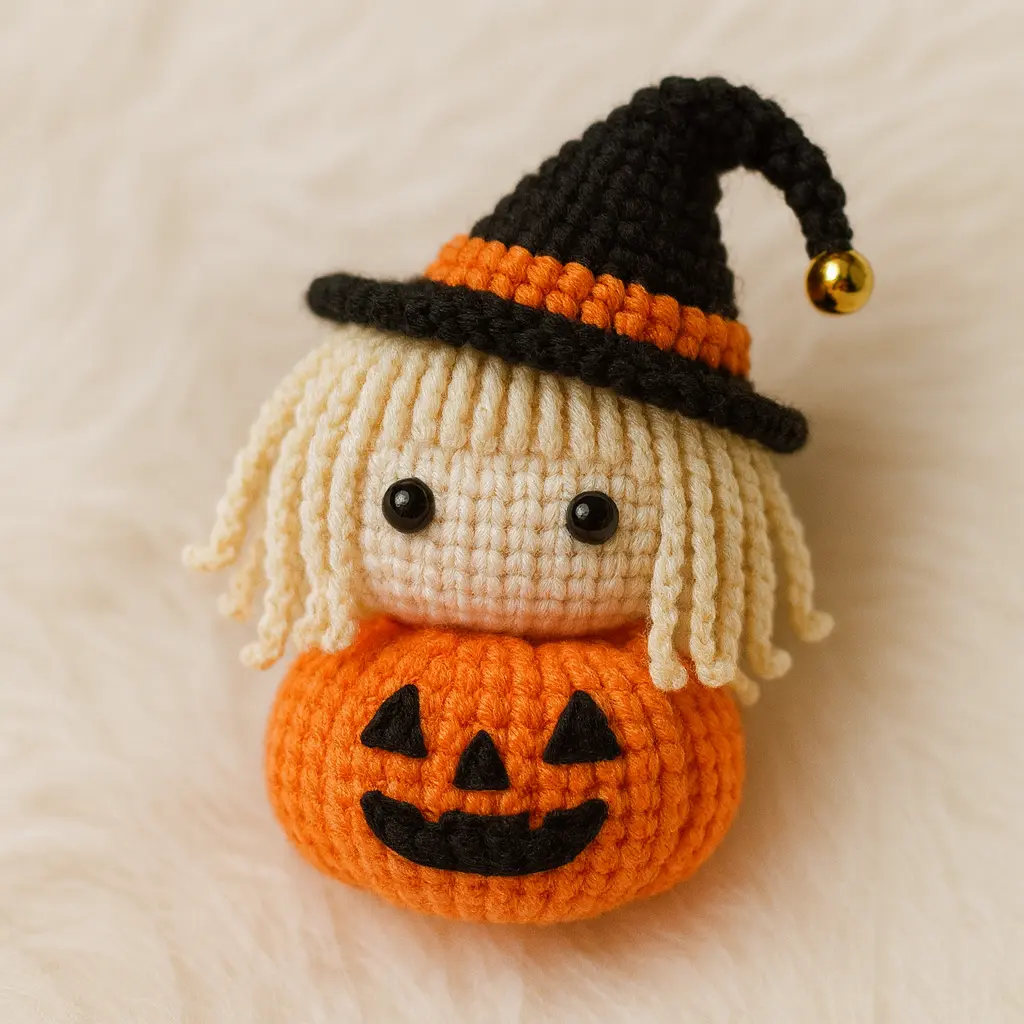
- Shape the Pumpkin: Stuff the pumpkin evenly and adjust the sides with your fingers so the body stays round and balanced.
- Add the Face: Position the eyes and mouth before attaching the hair. Check the face from the front to make sure it is centered. Add optional pink blush to the cheeks.
- Attach the Hair: Place the hair cap over the top of the pumpkin with the 5-stitch gap centered at the back. Arrange the strands around the sides and front of the face, pin the cap in place, then sew it securely with small hidden stitches.
- Attach the Witch Hat: Position the hat over the hair at a slight angle for a playful witchy look. Pin it first, then sew around the lower edge of the hat. Add a few extra stitches at the back if needed to keep it stable.
- Add Optional Details: Add a contrasting hat band, embroidered facial details, or other small Halloween accents if desired.
- For a Keychain: Sew a strong yarn loop through several stitches at the top of the pumpkin, underneath or beside the witch hat. Reinforce the loop several times before attaching the jump ring and keychain clasp.
- Finish: Weave in all remaining yarn tails and check that the hair and hat are firmly attached. Gently reshape the pumpkin, hair, and hat with your fingers.
Variations (quick mods for your pumpkin witch crochet)
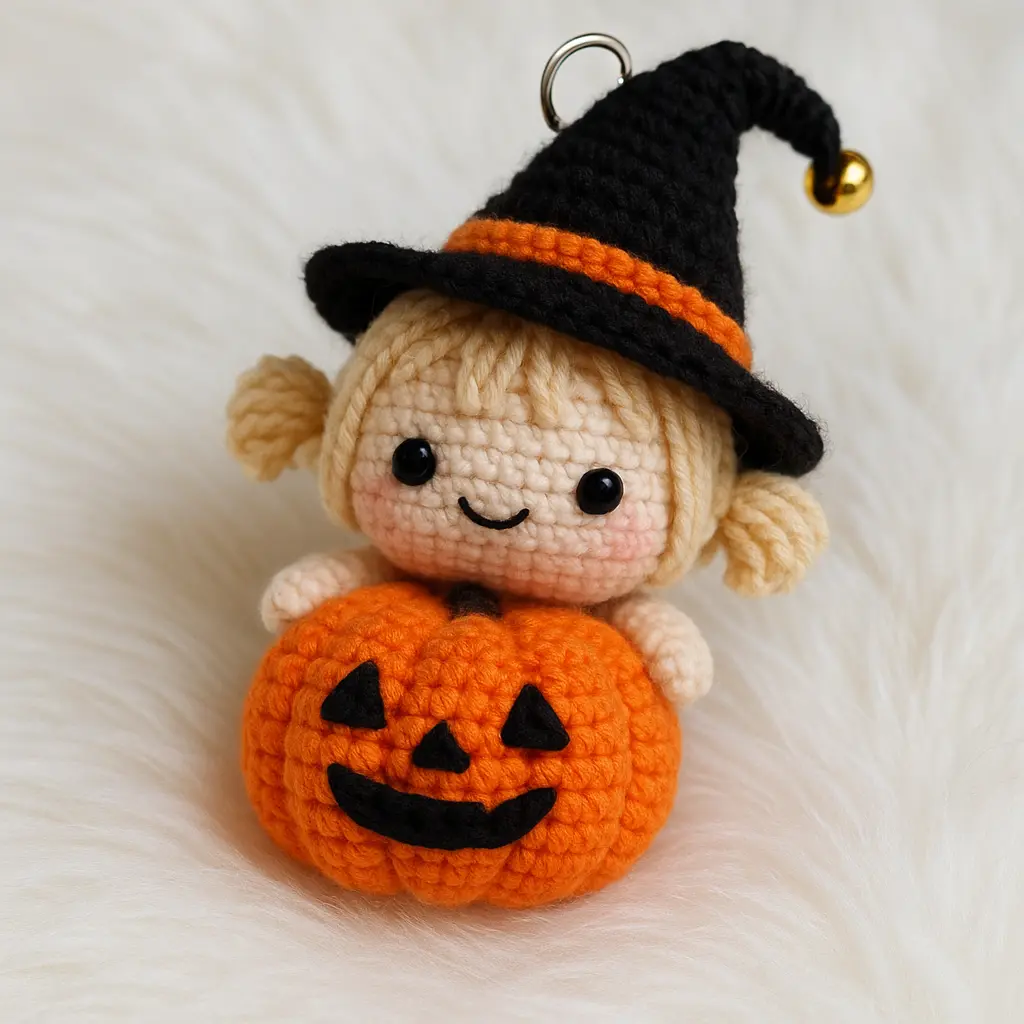
1) Mini Keychain (fast gift)
For a smaller Pumpkin Witch, use sport or fingering-weight yarn with approximately a 2.0–2.25 mm hook.
You can also shorten the pumpkin body slightly while keeping the original shaping:
- Work the pattern normally through R8 [48].
- Instead of working all four plain rounds, work only R9–R10: sc around. [48]
- Then continue directly with the standard decrease round that follows the 48-stitch section.
Finish the hair, face, and witch hat as written.
For a keychain, sew a reinforced yarn loop through several stitches at the top center of the pumpkin, underneath or beside the witch hat, then attach a jump ring and keychain clasp.
Keep the stuffing slightly lighter than in the standard version so the finished piece stays compact.
2) Striped Hat Band
- Keep R10 in orange as written (band), but swap to purple/green for a bolder Halloween accent.
- For a wider band, add 1 even round in the band color before R11.
3) No-Sew Build
- Leave the pumpkin top slightly open, insert head, and ladder-stitch the opening closed around the neck. This traps the head without separately sewing it on.
4) Spooky Face Options
- Kawaii: safety eyes + tiny smile.
- Witchy: embroidered lashes, brows, or a tiny fang for playful “witch pumpkin crochet” vibes.
- Glowing eyes: use neon yarn dots or reflective thread.
Love this? Pin this Pumpkin Witch Crochet so you can find it later! 🧶📌
More Free Halloween Crochet Patterns
If you enjoyed this Pumpkin Witch, continue your Halloween amigurumi collection with:
- Crochet Ghost Pattern — 4 spooky-cute ghost variations.
- Grim Reaper Crochet Pattern — a hooded Reaper with a crochet scythe.
- Black Cat Crochet Pattern for Halloween — a classic witchy companion.
- Free Crochet Pumpkin Pattern — a simple fall and Halloween decoration.
- Candy Corn Crochet Pattern — a quick seasonal project.
- Mini Bear Pumpkin Toast Crochet Pattern — a sweeter Halloween make.
Pumpkin Witch Crochet Pattern FAQ
Is this pumpkin witch crochet pattern beginner-friendly?
Yes. The pattern mainly uses basic amigurumi stitches such as single crochet, increases, decreases, and simple assembly. The hair and witch hat add a little extra detail, so it is best for beginners who already know the basics.
What yarn works best for the Pumpkin Witch?
DK or light-worsted yarn works well for the standard version. Use a smaller hook than you normally would for the yarn so the fabric stays tight and the stuffing does not show.
Can I make a mini Pumpkin Witch keychain?
Yes. Use sport or fingering-weight yarn with a smaller hook. You can also shorten the plain 48-stitch section of the pumpkin body before continuing with the decrease rounds.
How much should I stuff the pumpkin?
Stuff it firmly enough to hold a rounded pumpkin shape, but avoid overstuffing. Too much stuffing can make the body lose its soft pumpkin look.
Do I need to stuff the witch hat?
No. The hat can stay unstuffed for a soft, floppy look. If you want a firmer point, add only a small amount of stuffing near the tip.
Can I change the Halloween colors?
Absolutely. Orange and black are classic, but purple, green, cream, pastel orange, or even pink can create a softer or more playful witchy look.
Can I sell finished Pumpkin Witch amigurumi made from this pattern?
You may sell handmade finished pieces in small quantities. Please credit as the pattern source and do not reproduce or redistribute the written pattern.
Happy Halloween Crocheting!
This free pumpkin witch crochet pattern is a fun way to combine two Halloween favorites in one spooky-cute amigurumi project.
Make the standard version for seasonal décor, scale it down for a keychain, or customize the hair and hat colors to create your own little witch.
Pair it with a crochet ghost, black cat, Grim Reaper, or pumpkin for a complete handmade Halloween collection.