Crochet Ant Easy Amigurumi Keychain (Free Pattern)
Hi friend— here! Today we’re making a Crochet Ant Easy Amigurumi Keychain that’s teeny-tiny, quick to finish, and ridiculously cute with its asymmetric eyes and fluttery wings. It’s the kind of pocket-sized buddy that looks adorable on backpacks, pencil cases, and key rings—and yes, it’s beginner-friendly as long as you keep your stitches snug.
In this tutorial you’ll get the full written pattern (body, head, eyes, wings, antennae), assembly tips, and a secure keychain attachment method. We’ll also tuck a video tutorial a little later in the post after the pattern sections so you can crochet along at your pace without scrolling back and forth.
If this is your very first toy, peek at my quick starter first: First Amigurumi Step-by-Step Guide. It covers tight fabric, stitch markers, stuffing without lumps, and all those tiny “aha!” details that make small amigurumi like this ant come out neat.
What you’ll love about this pattern:
- Works up in about an hour (two if you like snack breaks).
- Uses small scraps of black and white (plus a pop of color if you want a warm-toned head).
- Customizable: wired or soft antennae, safety eyes or crocheted pupils, classic or pastel colorways.
Ready to crochet your Crochet Ant Easy Amigurumi Keychain? Let’s gather supplies next!
Jump to section
Materials & Tools for the Crochet Ant Easy Amigurumi Keychain
Here’s everything you’ll need to make your Crochet Ant Easy Amigurumi Keychain neat, sturdy, and gift-ready:
- Yarn (Worsted/Aran #4): Black (B), White (W), optional Yellow if you want a warmer-toned head
- Hook: 2.5 mm (tight, gap-free stitches)
- Safety eyes (optional): 8–10 mm (I like 10–12 mm for the big eye and 8–10 mm for the small)
- Fiberfill: Small handful
- Notions: Yarn needle, stitch marker, scissors
- Antennae options:
- Thin craft wire + a dab of glue (for bendy tips), or
- Just yarn chains (kid-safe, no wire)
- Keychain hardware: Split ring + short chain + jump ring
- Finishing touches: Soft blush/pastel for cheeks
Helpful reads before you start:
- Choosing the right hook & yarn size → Yarn Weight, Gauge & Hook Size Guide
- Switching colors cleanly for the body stripe → Changing Colors in Amigurumi
’s tip: For tiny toys like this Crochet Ant Easy Amigurumi Keychain, tighter fabric makes all the difference. If you see stuffing peeking through, drop your hook size by 0.25–0.5 mm or tug your magic ring tail extra snug.
Abbreviations (US Terms)
MR — magic ring
sc — single crochet
hdc — half double crochet
dc — double crochet
inc — increase (2 sc in the same stitch)
dec — decrease (sc2tog)
sl st — slip stitch
ch — chain
FO — fasten off
Work in a spiral unless stated.
Not sure about term differences? Peek at US vs UK Crochet Terms Conversion Chart before you start your Crochet Ant Easy Amigurumi Keychain.
Size, Gauge & Skill Level
- Skill level: Beginner-friendly (tight single crochet + simple shaping).
- Finished size (with 2.5 mm hook & #4 yarn): head ≈ 4.5–5 cm wide; total height ≈ 8–9.5 cm (varies by tension).
- Gauge: Not critical for amigurumi—aim for a dense, no-gap fabric so stuffing doesn’t peek through. If you see holes, tighten tension or try a smaller hook.
Tension tips for a neat Crochet Ant Easy Amigurumi Keychain:
- Place a marker in the first stitch of every round and move it up; this keeps counts honest.
- Give the magic ring tail a strong pull and lock it with a tiny backstitch on the wrong side.
- Keep increases/decreases snug to avoid “laddering.”
Helpful read: How to Count Rounds in Crochet
Crochet Ant Body (with White Stripe)
Creates a tiny teardrop body with a crisp white stripe in the center. Keep your tension snug so your Crochet Ant Easy Amigurumi Keychain stays firm and round.
- R1 (B): MR 4 (4)
- R2 (B): inc ×4 (8)
- R3 (W): (sc, inc) ×4 (12)
- R4 (B): sc around (12)
- R5 (W): (sc, dec) ×4 (8)
- R6 (B): sc around (8) — stuff lightly, FO a long tail for sewing.
Color-change tip (clean stripe): On the last pull-through of the stitch before the change, yarn over with the new color so the next stitch starts perfectly white. Full walkthrough here → Changing Colors in Amigurumi
Magic ring refresher: If your MR loosens, try the chain-circle alternative and lock the tail with a tiny backstitch on the wrong side → Magic Ring vs Chain Circle in Amigurumi
Neat shaping: Use the invisible decrease in R5 for smoother sides (still counts as a “dec”) → Invisible Decrease Crochet
Crochet Ant Head
This head stays small and round so your Crochet Ant Easy Amigurumi Keychain looks super cute next to the tiny teardrop body.
- R1: MR 6 (6)
- R2: inc ×6 (12)
- R3: (sc, inc) ×6 (18)
- R4: (2 sc, inc) ×6 (24)
- R5: (3 sc, inc) ×6 (30)
- R6–R7: sc around (30)
- R8: (3 sc, dec) ×6 (24)
- R9: sc around (24)
- R10: (2 sc, dec) ×6 (18)
- R11: sc around (18) — start stuffing (firm but not bulging)
- R12: (sc, dec) ×6 (12)
- R13: dec ×6 (6)
- R14: Close the hole, FO.
’s neat-head tips (worth it for black yarn):
- Keep a stitch marker in the first stitch every round so counts don’t drift.
- If you see “ladders” on decreases, switch to the invisible decrease (still counts as “dec”)
- Stuff in layers as you go (R9–R12) to avoid lumpy cheeks.
- Tug the MR tail firmly and lock on the inside with a tiny backstitch so it never reopens.
Asymmetric Eyes (Big + Small)
Give your Crochet Ant Easy Amigurumi Keychain that playful, cartoony look with one large white eye and one tiny eye that overlaps slightly.
Big Eye (White)
- R1: MR 6 (6)
- R2: inc ×6 (12)
sl st, FO with a long tail for sewing.
Small Eye (White, tiny disc)
- R1: MR 6 (6)
sl st, FO with a long tail.
Pupils / Hardware
- Safety eye in big eye: 10–12 mm
- Safety eye in small eye: 8–10 mm
- Or crochet a tiny black pupil: ch 2, 4–6 sc in 2nd ch, sl st, FO.
Placement & Expression
- Place both eyes between R4–R9 of the head.
- Overlap the small eye slightly under the big one by ~1–2 sts.
- Angle the posts/pupils toward each other for a cute cross-eyed expression.
Sewing Finish
- For a bold outline, whipstitch with black, catching the front loop of the white eye edge.
- For an invisible edge, sew with white and take tiny bites into the head.
Safety note: For kids under 3, skip safety eyes and wire parts use sewn or crocheted pupils instead. See the American Academy of Pediatrics’ toy safety guidance on age-appropriate toys (HealthyChildren.org).
Wings (Make 2)
These tiny wings give your Crochet Ant Easy Amigurumi Keychain its sweet, fluttery vibe. We’ll use a one-side chain method so they’re crisp and flat.
Standard size (recommended)
- ch 7
- Work into the back bumps for a clean edge:
- hdc in 2nd ch from hook
- dc in next 2 ch
- hdc in next ch
- sc in next ch
- sl st in last ch
- FO with a long tail, flatten the shape.
Sizing options
- Smaller wing: ch 6, then hdc → dc → hdc → sc → sl st.
- Larger wing: ch 8, add one extra dc in the middle before tapering back down.
Sewing placement
- Position both wings on the upper back of the body, slightly angled downward as if mid-flutter.
- Stitch through both layers of the flattened wing so it stays crisp and doesn’t curl.
Antennae (Wire or Soft, Kid-Safe)
Two cute options for your Crochet Ant Easy Amigurumi Keychain choose what fits the recipient.
Option A — Wire-Wrapped (bendy & poseable)
- Cut two short pieces of thin craft wire (≈ 6–7 cm each).
- Wrap each wire with black yarn/thread; dab a tiny bit of glue on both tips to seal. Let dry.
- Use your yarn needle to pre-poke holes 5–6 stitches apart on the front/top of the head.
- Insert wrapped wire ends; stitch around the entry points to anchor.
- Gently curl the tips.
Option B — Soft Yarn (no wire, toddler-friendly)
- ch 12–14 (match both lengths).
- sl st back along the chain; FO, leaving a sewing tail.
- Sew the flat ends to the top/front of the head, 5–6 sts apart.
- Nudge the tips into a slight curl with your fingers.
Neat finish tip: Hide knots inside the head. Take two or three small securing stitches around each base so antennae don’t swivel with wear.
Assembly
Time to bring your Crochet Ant Easy Amigurumi Keychain to life.
- Join body to head
- Center the teardrop body under the head.
- Whipstitch the body’s 8-st opening to the underside/front of the head. Keep stitches small and even so the join is invisible.
- Lightly shape with your fingers.
- Add the eyes (big, then small)
- Sew the big white eye first, then overlap the small disc slightly under the big one by ~1–2 sts.
- Insert safety eyes (or sew crocheted pupils). Angle pupils slightly inward for a cute cross-eyed look.
- For a bold cartoon outline, whipstitch with black catching the front loop of the white edge. For invisible finish, sew with white.
- Attach wings
- Sew both wings to the upper back, tilted a touch downward so they look like they’re mid-flutter.
- Add antennae
- Place the pair 5–6 sts apart on the front/top of the head.
- Wire option: anchor bases with a couple of locking stitches.
- Soft option: stitch the chain bases flat so they don’t twist.
- Face details
- Embroider a tiny smile with white.
- Brush on soft blush for cheeks.
Handy technique for neat joins: Attach Amigurumi Limbs Evenly
Make It a Keychain (Secure & Durable)
Make your Crochet Ant Easy Amigurumi Keychain ready for backpacks and bag zippers.
- Create a hidden yarn loop
- Thread a strong strand of yarn through the top-center of the head (between stitches, not splitting yarn).
- Tie a small, tight loop; bury knots inside the head.
- Add hardware
- Use a jump ring to connect the yarn loop → short chain → split ring.
- Press jump ring fully closed so it won’t snag fibers.
- Tug test
- Give the chain a gentle pull. If there’s movement, add a second pass of securing stitches through the loop.
For toddlers, skip safety eyes and wire; use the soft antennae and sewn/crocheted pupils only.
Video Tutorial — Crochet Ant Easy Amigurumi Keychain
Prefer to watch after reading the pattern? Here’s the full step-by-step video—pause at each step while you crochet.
Customization Ideas
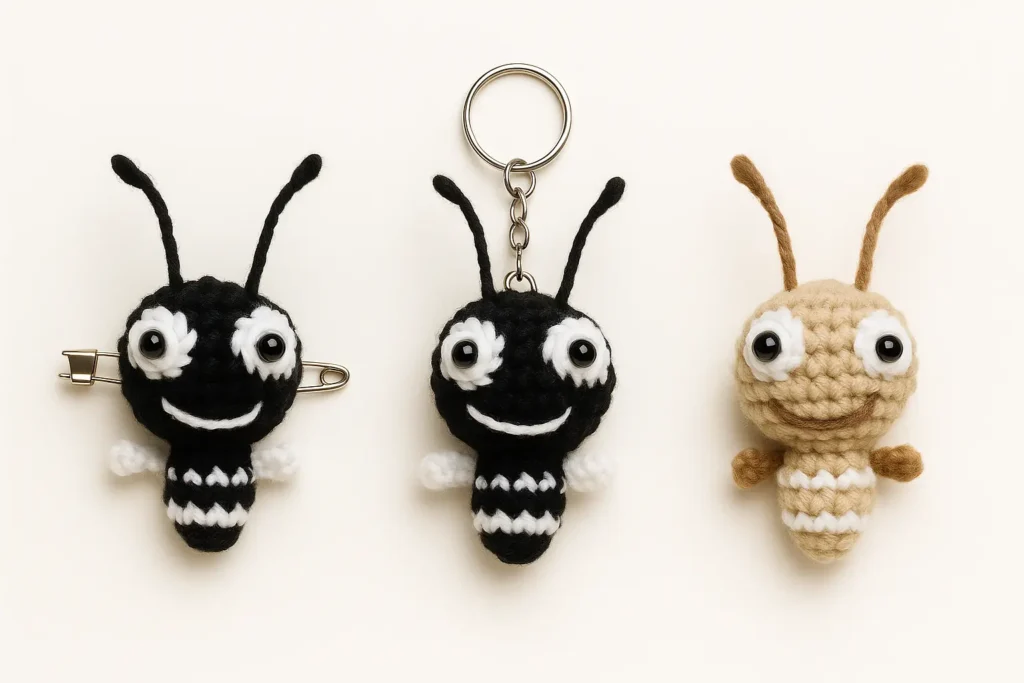
Make your Crochet Ant Easy Amigurumi Keychain match your vibe:
- Colorways: classic black/white, warm black/yellow head, pastel pink/white for kawaii.
- Expressions: sleepy eyes (embroidered arcs), a wink (one embroidered “V”), tiny eyebrows.
- Wings: shimmer yarn or a light silver thread carried along for sparkle.
- Mini charm: switch to sport/#2 yarn with the same 2.5 mm hook for an ultra-tiny ant.
- No-wire build: use the soft chain antennae for toddler-safe gifts.
Troubleshooting
- Stuffing shows through: your fabric isn’t dense enough, relax tension but keep stitches snug, or try a 2.25–2.5 mm hook.
- Head looks lumpy: add stuffing in thin layers as you close rounds R9–R12; roll the piece between palms to smooth.
- Eyes look uneven: re-pin before sewing small eye overlaps under big eye by ~1–2 sts, both between R4–R9.
- Color jog on the stripe: change color on the last pull-through of the prior stitch so the next stitch starts clean.
- Antennae twist: add two anchoring stitches at each base; for wire, seal tips with a tiny glue dot.
Care & Safety
- Care: Hand wash cold, reshape, air dry. Avoid heat (can deform safety eyes and wire).
- Small parts: For kids under 3, use embroidered or crocheted eyes and the soft antennae method.
- Reference: See general toy small-parts safety guidance (e.g., consumer safety pages) for age-appropriate advice.
FAQs — Crochet Ant Easy Amigurumi Keychain
Can I use cotton yarn?
Yes—cotton gives crisp stitch definition and a clean look on the eyes and wings.
What safety eyes work best?
Use 10–12 mm for the big eye and 8–10 mm for the small eye, or crochet tiny black pupils.
My magic ring opens later—how do I stop that?
Pull the tail very snug, then secure it on the inside with a tiny backstitch across the ring.
How do I make a smooth color change for the stripe?
Complete the last pull-through of the previous stitch with the new color so the next stitch starts clean.
Can I turn this into a phone charm?
Yes—use lighter yarn (sport/#2) and keep the 2.5 mm hook. Resize eyes accordingly.
Are wire antennae safe for kids?
They’re decorative; for toddlers, choose the soft chain antennae and sewn/crocheted eyes.
How do I attach keychain hardware securely?
Create a hidden yarn loop through the head, then connect jump ring → short chain → split ring. Do a gentle tug test and add a second securing pass if needed.
Related Free Patterns (You’ll Love These Too)
- Crochet Bee Pattern
- Crochet Frog Keychain — Free Pattern
- Amigurumi Duck Pattern Free (Keychain)
- Mini Potted Puff Flower
- Crochet Macaron
- Ice Cream Cone Crochet Pattern