Pastel Rainbow Bear Ear Hat Free Crochet Pattern
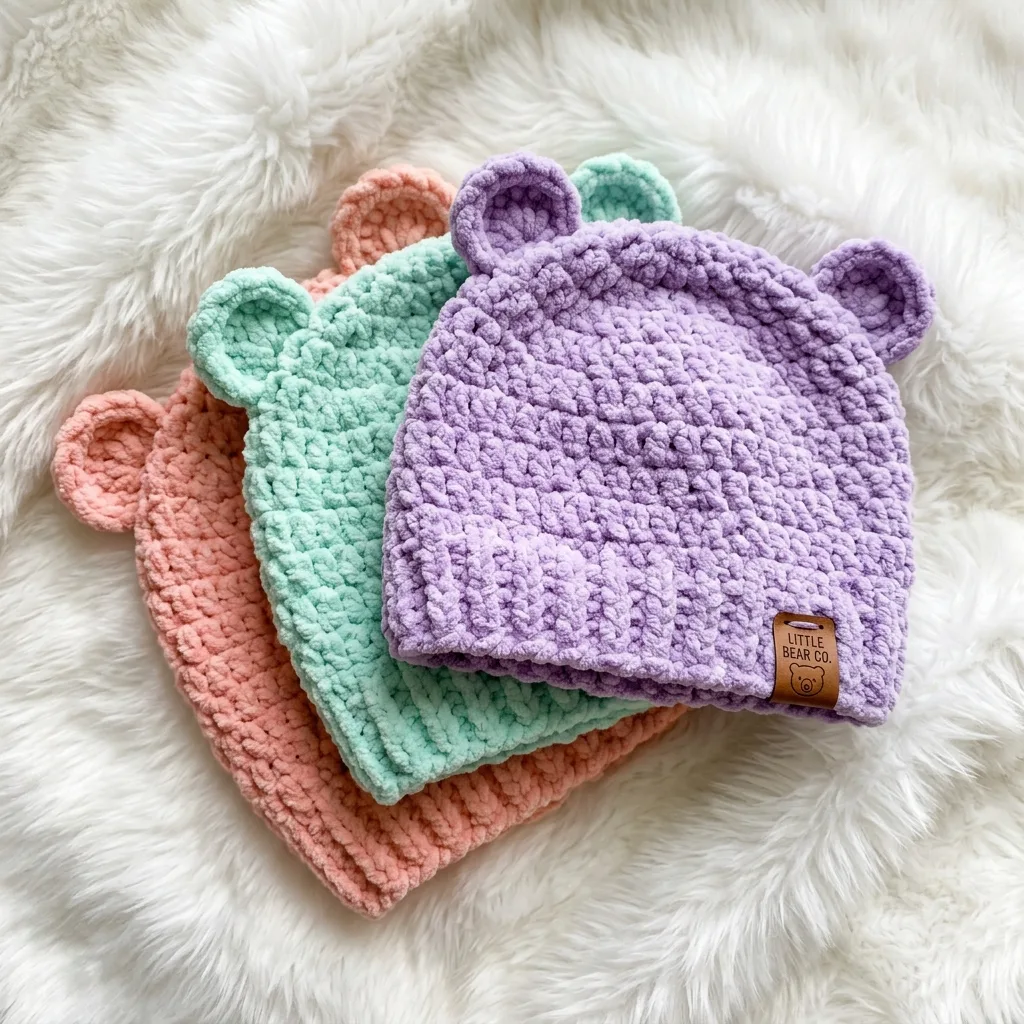
I’ve been on the hunt for the perfect baby hat pattern for months now. You know the kind. Soft, squishy, ridiculously cute, and quick enough to whip up before a baby shower. This bear ear beanie checks every single box.
When I spotted this design from Little Bear Co., I knew I had to share it with you. The chunky chenille yarn creates that irresistible cloud-like texture, and those little rounded ears? Absolutely adorable. Plus, it comes in three sizes from newborn to toddler, so you can make one for every little one in your life.
Whether you’re building your gift stash or treating yourself to a satisfying weekend project, this crochet pattern delivers. Let me walk you through everything you need to know to make your own.
Why You’ll Love This Bear Ear Hat Crochet Pattern
This isn’t your average baby beanie. The construction is clever and the finished result looks far more impressive than the skill level required.
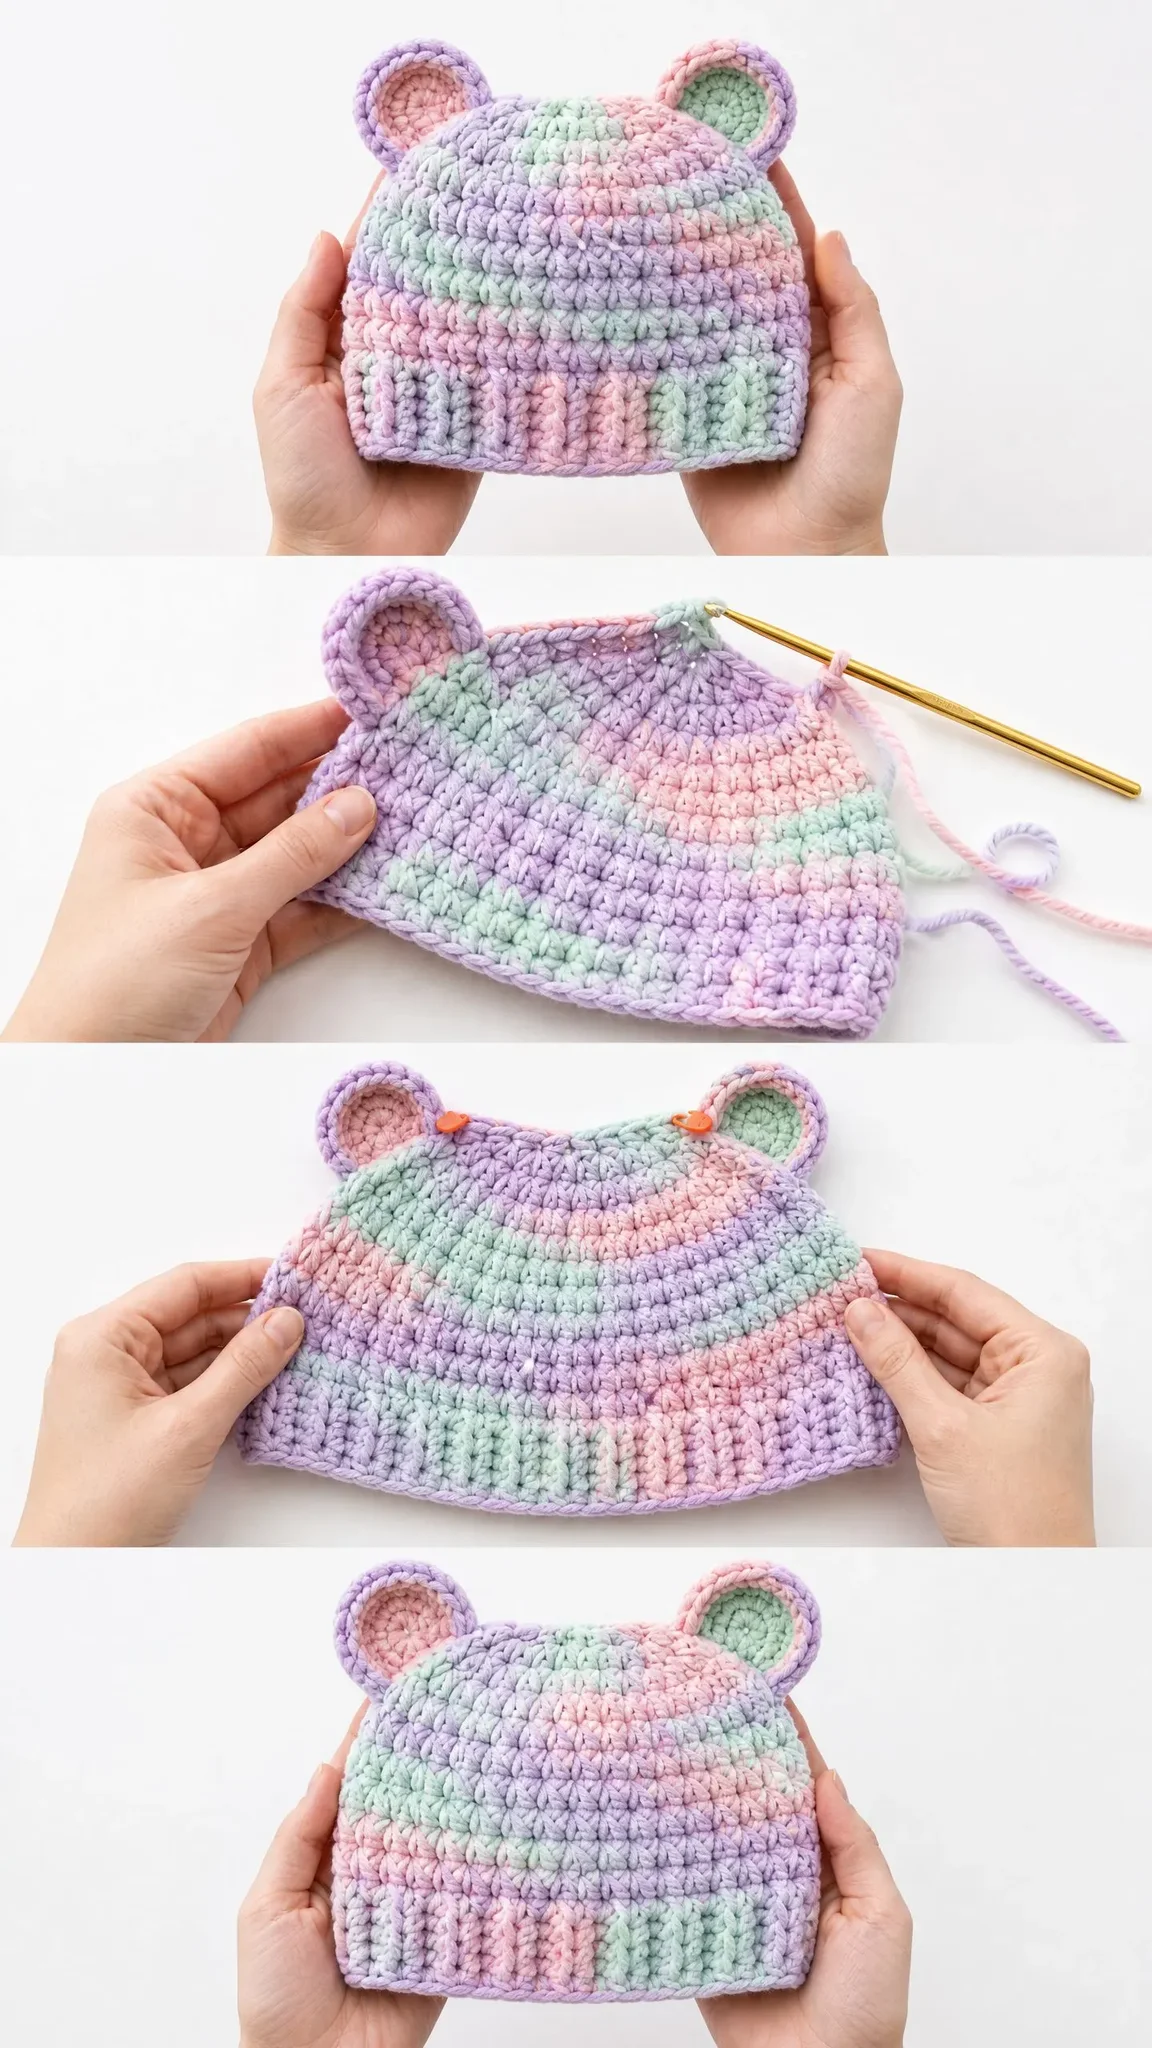
The hat starts with a sideways ribbed brim worked flat, which creates that stretchy, cozy cuff you see folded up at the bottom. Then you pick up stitches along the edge and work the body in the round using simple half double crochet (hdc) stitches. The crown shaping uses basic decreases, and the bear ears are worked separately before being sewn on.
The magic really comes from the yarn choice. That plush, velvety texture you see in the photos? That’s chenille yarn doing its thing. It turns a straightforward stitch pattern into something that looks boutique-worthy.
Skill Level
I’d call this pattern easy to intermediate. If you’re comfortable working in the round, doing basic ribbing, and sewing pieces together, you’ve got this.
The trickiest parts are the sideways ribbed brim, which involves working in the back loop only, and attaching the ears neatly. Neither is difficult, just unfamiliar if you haven’t done them before. I’ll explain everything step by step.
Time estimate: About 3 to 5 hours for experienced crocheters. Allow up to 7 hours if you’re newer to working in the round or if this is your first ribbed hat project.
Finished Sizes
This pattern includes three sizes:
Newborn (0-3 months): Head circumference approximately 13 to 14 inches, hat height approximately 6 inches excluding ears.
Baby (3-6 months): Head circumference approximately 14 to 15 inches, hat height approximately 6.5 inches excluding ears.
Toddler (6-18 months): Head circumference approximately 16 to 17 inches, hat height approximately 7 inches excluding ears.
Throughout the instructions, I’ll write it like this: Newborn (Baby, Toddler). So if you see “36 (40, 44) sts,” the first number is for newborn, second for baby, third for toddler.
Materials You’ll Need
Yarn: Approximately 80 (100, 130) yards of bulky weight (weight 6) chenille or velvet-style yarn for the main hat. You’ll also need about 15 yards of a contrasting pastel for the inner ears, or just use the same main color throughout.
Hook: US Size K-10.5 / 6.5 mm crochet hook.
Notions: Yarn needle for seaming and weaving ends, stitch marker, scissors.
Yarn Suggestions
The squishy texture in the photos comes from using chenille or velvet yarn. Here are some great options:
1. Bernat Baby Blanket Yarn (100% polyester, bulky weight 6). This is the classic choice for this exact look. One skein makes multiple hats.
2. Lion Brand Pound of Love (bulky weight version). Soft and machine washable, perfect for baby items.
3. Paintbox Yarns Simply Chunky (chunky weight 5-6). Comes in beautiful pastel colorways.
Important: Standard worsted weight acrylic won’t give you that bumpy, plush texture. Stick with chenille or velvet yarn to match the look in the photos. Always swatch to check your gauge.
Gauge
11 hdc x 8 rounds = 4 inches in half double crochet worked in the round with a US K-10.5 hook.
Brim Ribbing Gauge: 8 blo-sc x 10 rows = 2 inches wide x 4 inches tall.
Gauge matters a lot for baby hats. Even being off by one stitch per inch can change your finished size by over an inch. Make a swatch, measure it, and adjust your hook size if needed.
Abbreviations and Stitch Definitions
Let me define every stitch and abbreviation you’ll encounter:
ch (chain): The foundation stitch. Yarn over, pull through the loop on your hook.
sc (single crochet): Insert hook into stitch, yarn over, pull up a loop (2 loops on hook), yarn over, pull through both loops. One of the most basic stitches.
blo-sc (back loop only single crochet): Work a regular single crochet, but insert your hook under only the back loop of the stitch, which is the loop farthest from you. This creates a ribbed, stretchy texture.
hdc (half double crochet): Yarn over, insert hook into stitch, yarn over, pull up a loop (3 loops on hook), yarn over, pull through all 3 loops.
hdc2tog (half double crochet two together): This is a decrease stitch. Yarn over, insert hook into first stitch, yarn over, pull up a loop (3 loops). Yarn over, insert hook into next stitch, yarn over, pull up a loop (5 loops). Yarn over and pull through all 5 loops. Counts as one stitch.
sc2tog (single crochet two together): Another decrease. Insert hook into first stitch, yarn over, pull up a loop (2 loops). Insert hook into next stitch, yarn over, pull up a loop (3 loops). Yarn over and pull through all 3 loops.
sl st (slip stitch): Insert hook into stitch, yarn over, pull through both the stitch and the loop on your hook in one motion. Used to join rounds.
st(s): Stitch(es).
rnd: Round.
MC: Main color.
CC: Contrasting color (for the inner ear accent).
Magic Ring: Make a loop with your yarn, crossing the working end over the tail. Insert hook into the loop, yarn over, pull up a loop, chain as directed, then work your stitches into the ring over the tail. Pull the tail to close the center hole tight.
Pattern Notes Before You Begin
A few things to keep in mind:
The brim is worked flat in rows, then seamed into a tube. You’ll rotate it 90 degrees and pick up stitches along the long edge to start the body.
The body is worked in continuous rounds. Use a stitch marker in the first stitch of each round and move it up as you go.
The ears are worked separately, then sewn on. Each ear has an outer cup and an optional inner circle for the two-tone look.
Don’t turn at the end of body rounds unless I tell you to. Keep the right side facing you the whole time.
Step by Step Instructions
Part 1: The Ribbed Brim
The brim creates that stretchy, folded cuff at the bottom of the hat. You’ll work it sideways in rows, then seam it into a ring.
With MC, ch 8 (8, 9).
Row 1: Sc in 2nd ch from hook and in each ch across. Turn. 7 (7, 8) sc.
Row 2: Ch 1, blo-sc in each st across. Turn. 7 (7, 8) blo-sc.
Repeat Row 2 until your strip measures 12 (13.5, 15.5) inches from the beginning. This should be approximately:
The strip should stretch comfortably around the intended head with slight negative ease, meaning it’s a tiny bit smaller than the actual head circumference so it fits snugly.
After the final row, don’t fasten off.
Seam the Brim: Fold your strip so the first row and last row are aligned with right sides together. Slip stitch through both layers across the short edge to join. Fasten off and weave in ends.
You now have a ribbed tube! It should measure 12 (13.5, 15.5) inches around and about 2.5 (2.5, 2.75) inches wide.
Part 2: The Hat Body
Pick Up Round: With right side facing, join MC with a slip stitch to any row-end stitch along one long edge of the brim. Ch 1 (this doesn’t count as a stitch). Work 1 sc into the end of each row evenly around the top edge. Place a stitch marker in the first stitch. 36 (40, 44) sc.
Slip stitch to join to the first sc. Don’t turn.
Rnd 1: Ch 1, hdc in same st as join, hdc in each remaining st around. Sl st to join to first hdc. 36 (40, 44) hdc.
Rnds 2-7: Ch 1, hdc in same st as join, hdc in each st around. Sl st to join. 36 (40, 44) hdc.
Rnd 8 (Baby and Toddler only): Ch 1, hdc in same st as join, hdc in each st around. Sl st to join. 40 (44) hdc.
Rnd 9 (Toddler only): Ch 1, hdc in same st as join, hdc in each st around. Sl st to join. 44 hdc.
Before starting the crown, your hat body (not including the brim) should measure about 3.5 (4, 4.5) inches tall.
Crown Shaping
Now we’ll decrease to close the top of the hat.
Shaping Rnd 1:
Shaping Rnd 2:
Shaping Rnd 3:
All sizes now have 18 hdc.
Shaping Rnd 4 (all sizes): (hdc in next 1 st, hdc2tog) 6 times. Sl st to join. 12 hdc.
Shaping Rnd 5 (all sizes): (hdc2tog) 6 times. Sl st to join. 6 hdc.
Fasten off, leaving a 10-inch tail. Thread the tail onto your yarn needle, draw through all 6 remaining stitches, pull firmly to close the hole. Knot securely on the inside and weave in the end.
Part 3: Bear Ears (Make 2)
Each ear has two layers for that cute two-tone look. If you want solid color ears, just skip the inner ear section.
Outer Ear (make 2 in MC)
Make a magic ring.
Rnd 1: Ch 1, 6 sc into ring, pull ring closed. Sl st to join to first sc. 6 sc.
Rnd 2: Ch 1, 2 sc in each st around. Sl st to join. 12 sc.
Rnd 3: Ch 1, (sc in next 1 st, 2 sc in next st) 6 times. Sl st to join. 18 sc.
Rnd 4: Ch 1, sc in each st around. Sl st to join. 18 sc.
Don’t fasten off. Fold the circle slightly so it forms a rounded cup shape. Slip stitch through both layers across about 6 stitches at the base to pinch the bottom closed and create that three-dimensional ear shape. Fasten off, leaving a 12-inch tail for sewing.
Inner Ear (make 2 in CC or MC)
Make a magic ring.
Rnd 1: Ch 1, 6 sc into ring, pull ring closed. Sl st to join. 6 sc.
Rnd 2: Ch 1, 2 sc in each st around. Sl st to join. 12 sc.
Fasten off, leaving a 6-inch tail.
Assemble the Ears
Place the inner ear circle on the front face of the outer ear cup, centering it. Use the contrasting color tail to whipstitch the inner circle to the outer ear around its edge. Stitch only through the back of the outer ear so your stitches stay hidden. Weave in the tail.
Each finished ear should measure about 1.5 to 2 inches across.
Attaching the Ears to the Hat
Position each ear on the crown area of the hat, symmetrically on either side. Looking at the hat from above, place each ear about 1.5 to 2 inches from the center top, angled outward at roughly the 11 o’clock and 1 o’clock positions.
The pinched base of each ear should sit flush against the hat. Using your long MC tail, whipstitch the base of the ear firmly to the hat crown, working all the way around the base opening. Go around twice for extra security. Knot and weave in all ends on the inside.
Both ears should stand upright and feel firmly attached when you give them a gentle tug.
Size Customization Tips
Want to make this bear ear hat for an older toddler or child? Add 2 to 4 extra foundation chain stitches on the brim, work 4 to 6 additional rows before seaming, and adjust your pickup stitch count to a number divisible by 6 for clean crown shaping.
Need a longer hat for extra ear coverage? Just add 1 to 2 additional plain hdc rounds after Round 7 before you start decreasing.
Finishing and Care
Weave in all your ends securely on the wrong side, knotting them before weaving to prevent unraveling in the wash.
Blocking is optional for chenille yarn. If your hat feels uneven, spritz it lightly with water, reshape gently by hand, and let it air dry flat. Don’t steam block chenille or velvet yarns since heat can damage that lovely plush texture.
Care instructions: Turn inside out before washing. Machine wash on gentle with cold water. Lay flat to dry. Skip the high heat dryer and iron.
If you want that professional touch, add a small leather tag at the brim like in the photos!
You Did It!
I really hope you love making this bear ear hat crochet pattern as much as I do. There’s something so satisfying about finishing a project that’s both quick and absolutely adorable. These make the sweetest baby shower gifts, and they work up fast enough to make a whole rainbow stack in different pastel colors.
Thank you so much for choosing this pattern for your next project. If you make one, I would absolutely love to see it! Tag me on Instagram or share a photo in my Facebook group. Seeing your finished hats genuinely makes my day.
If this pattern caught your eye, go ahead and save it to your Pinterest boards so you can find it when you’re ready to start. And if you make one of these sweet little bear hats, please drop a comment below. I love hearing which colors you chose and seeing how your projects turn out!
You Might Also Like
- Ivory Cream Lace Baby Dress Free Crochet Pattern
- Ivory Pearl Bridal Lace Choker Free Crochet Pattern
- Midnight Navy Elegant Braided Clutch Free Crochet Pattern
- Strawberry Fields Granny Square Tote Free Crochet Pattern