Lavender Bunny Baby Dress Set Free Crochet Pattern
Last spring, my best friend called me in a mild panic. Her sister’s baby shower was in three weeks, and she wanted to give something handmade. Something special. Something that would make everyone at the party ask, “Where did you get that?” I grabbed my hook that same evening, sketched out some ideas on a napkin, and this little bunny dress set was born.
That original dress went home with the happiest soon-to-be aunt I’ve ever seen. Since then, I’ve made this set four more times for different babies, tweaking the sizing and perfecting the bunny face along the way. Every single time, it gets the same reaction. People cannot believe it’s crocheted.
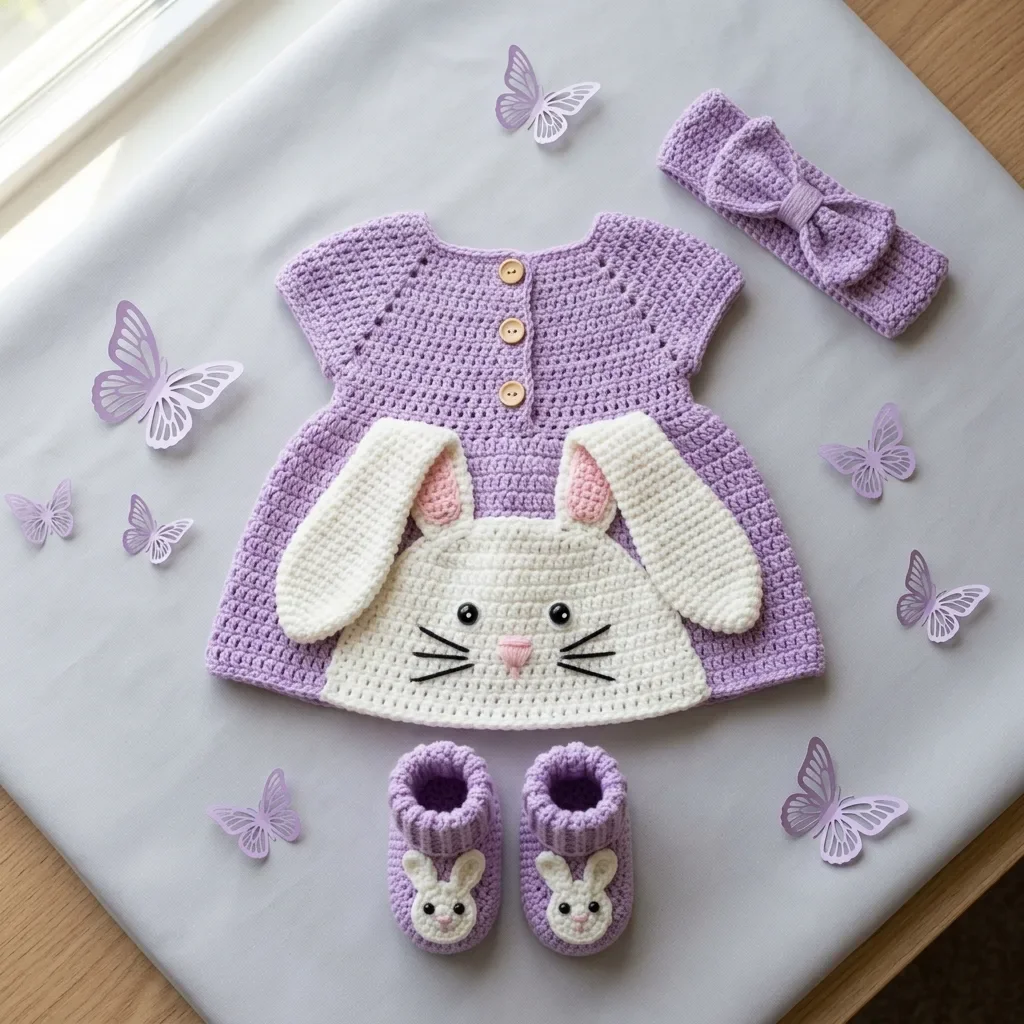
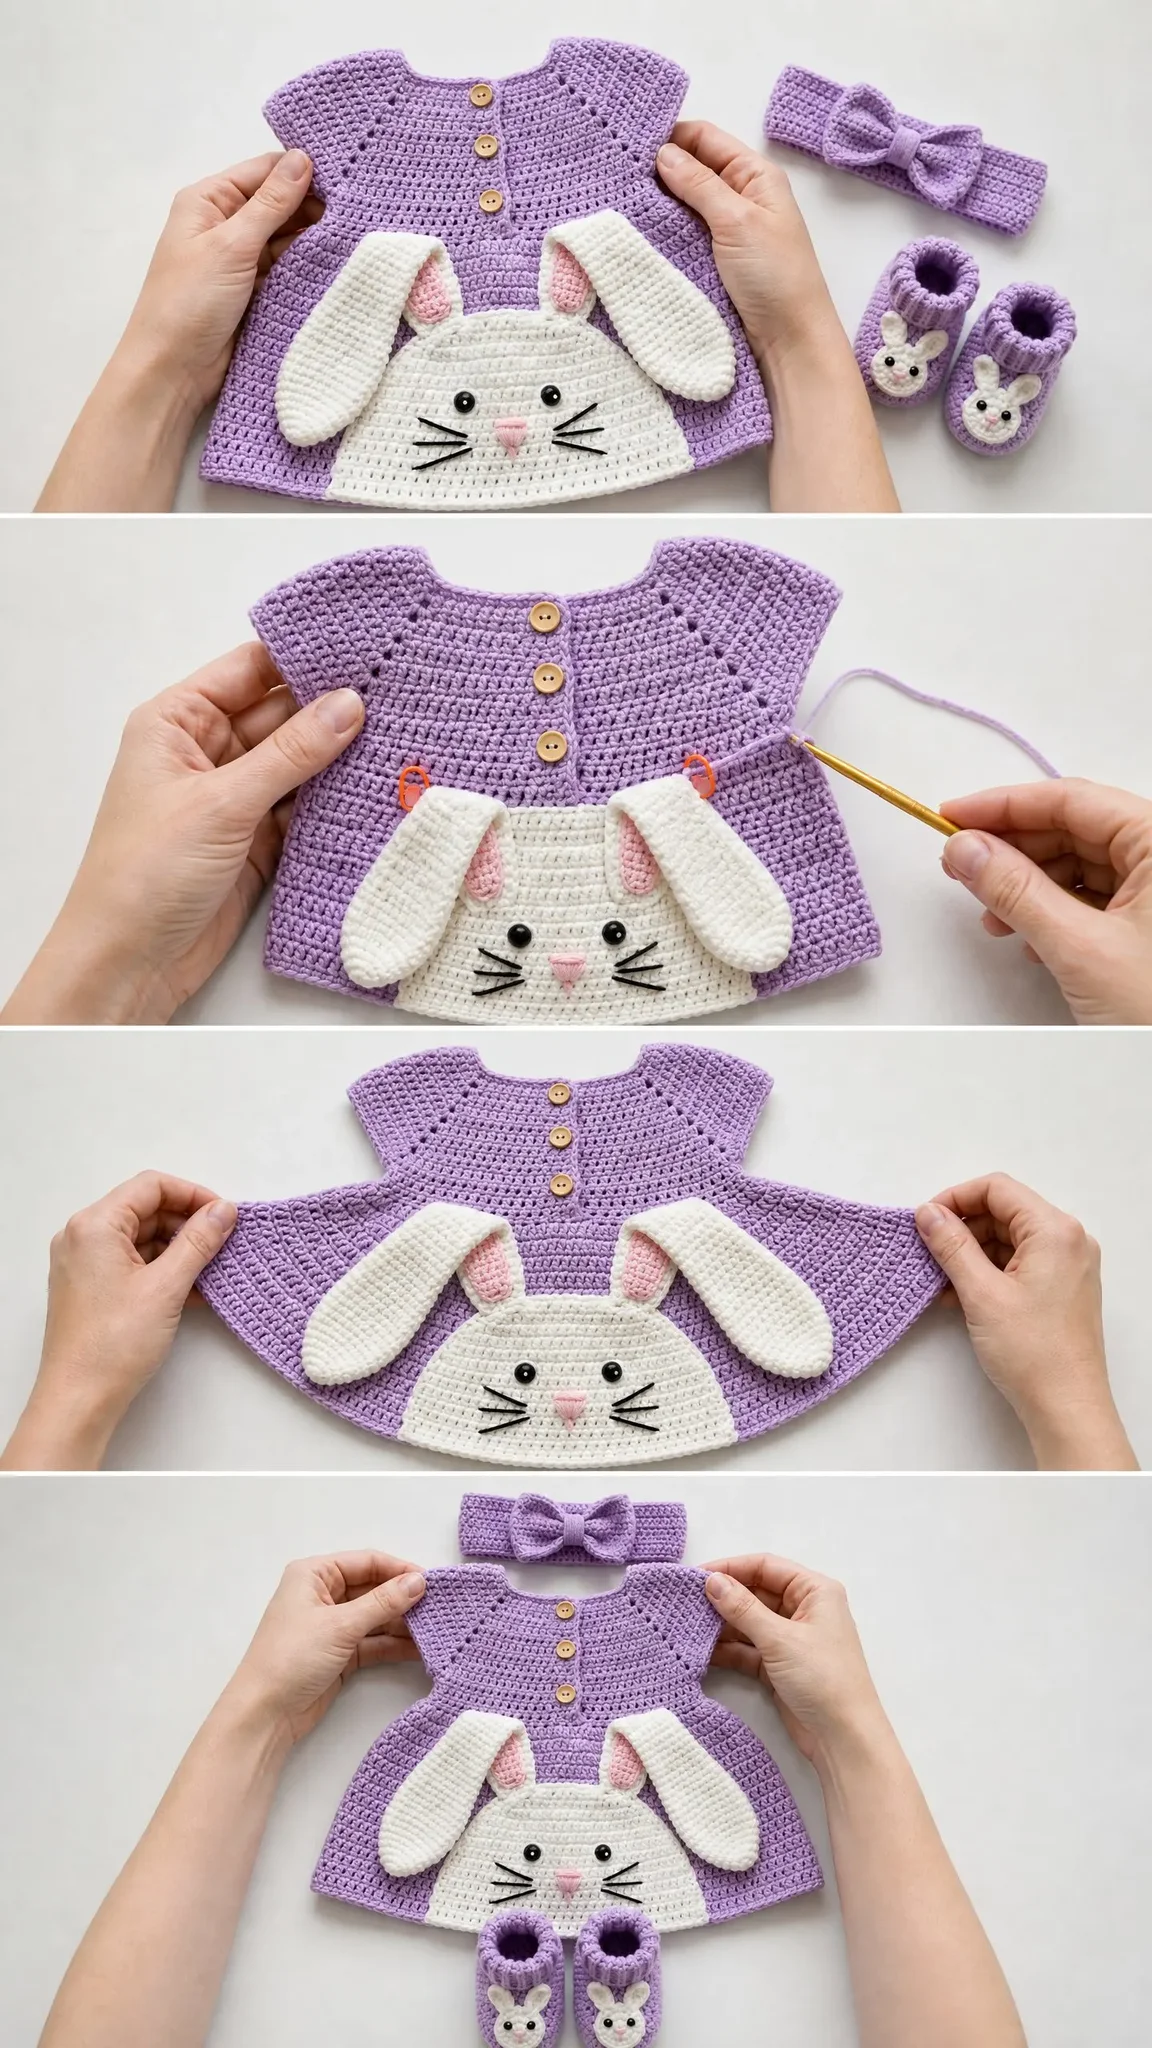
This pattern includes everything you need to make the complete layette: an A-line dress with a sweet bunny applique on the front, matching booties with tiny bunny faces, and a bow headband to tie it all together. The construction uses mostly single crochet, so if you’re comfortable with basic stitches and ready to try something with a few more pieces, you’re going to love this project.
Why This Crochet Pattern Works So Well
The genius of this baby dress set is in the construction. The dress is worked top-down, which means you can try it on as you go (if you have a baby nearby to fit) and adjust the length easily. The raglan yoke creates those nice diagonal lines at the shoulders that look professional and polished.
The bunny panel is made separately and sewn on, which sounds like extra work but actually makes the whole thing easier. You’re not trying to do colorwork while shaping the dress. You just make a cute oval bunny face, add the ears, attach it to the finished dress, and suddenly you have the most adorable baby outfit anyone has ever seen.
Single crochet (sc) is the main stitch throughout, which creates a dense fabric that’s perfect for baby clothes. Dense fabric means warmth, durability, and no little fingers poking through holes.
Skill Level
This pattern is rated intermediate. The stitches themselves are simple, but you’ll be working raglan shaping, joining rounds, separating for armholes, and assembling multiple pieces. If you’ve made a basic baby sweater or worked in the round before, you’re ready for this.
Beginners who feel comfortable with increases, decreases, and changing colors can absolutely tackle this project. Just take it one section at a time, and don’t rush.
Finished Sizes
Size A (0-3 months):
Size B (3-6 months):
Size C (6-12 months):
Throughout the pattern, instructions are written as Size A (B, C). When only one number appears, it applies to all sizes.
Time to Complete
Plan for about 10 to 14 hours total. The dress takes 7 to 9 hours, the booties need 2 to 3 hours, and the headband comes together in 1 to 2 hours. This is a perfect weekend project if you’re a focused crocheter, or a lovely week-long project if you work in shorter sessions.
Materials Needed
Yarn
You’ll need DK weight yarn (also called Light 3) in four colors:
Yarn suggestions:
Choose machine washable yarn for baby items. Avoid wool unless you’re certain about allergies.
Hooks
Notions
Gauge
Getting gauge right matters for baby clothes. Too loose and the dress will be huge. Too tight and it won’t fit.
For the dress (E/4 hook): 18 sc x 20 rows = 4 inches square, blocked
For booties and headband (D/3 hook): 20 sc x 22 rows = 4 inches square, blocked
Make a swatch, wet block it lightly, and measure. If you have more stitches per 4 inches, go up a hook size. Fewer stitches? Go down a hook size.
Abbreviations and Stitch Definitions
Let me walk you through every abbreviation you’ll encounter:
Special Techniques
Invisible Single Crochet Decrease
This creates a much neater decrease than the standard method. Insert your hook into the front loop only of the next stitch, then into the front loop only of the following stitch. Yarn over and pull through both front loops. Yarn over and pull through the remaining 2 loops. The result lies flat and nearly disappears on the right side.
Raglan Increase Point
At each raglan marker, you’ll add 2 stitches. Work to 1 stitch before the marker, increase in that stitch, slip the marker, increase in the next stitch, then continue. This happens at all 4 raglan points, adding 8 stitches total per increase round.
Pattern Notes Before You Begin
1. The yoke is worked flat (back and forth in rows) to create the button placket opening at center front.
2. Once the yoke is complete, you’ll join into the round for the skirt.
3. The ch 1 at the beginning of rounds does NOT count as a stitch.
4. Use locking stitch markers at raglan points and move them up each row.
5. The bunny panel is made separately and sewn on. Insert safety eyes before closing the panel.
6. All joined rounds begin with ch 1 and end with a slip stitch to the first sc.
Dress Instructions
Section 1: Neckline and Yoke (Worked Flat)
The yoke has 5 sections: Left Front, Left Sleeve, Back, Right Sleeve, Right Front. Markers sit between each section.
Starting stitch distribution:
Foundation:
With MC and E/4 hook, ch 31 (37, 43).
Setup Row (WS):
Sc in 2nd ch from hook and in each ch across. Place raglan markers dividing the row into 5 sections. (30, 36, 42 sc)
Row 1, Raglan Increase Row (RS):
Ch 1, turn. Sc across to 1 st before first marker, inc in next st, sm, inc in next st. Repeat this increase sequence at each marker. Sc to end. (38, 44, 50 sc)
Row 2 (WS):
Ch 1, turn. Sc in each st across. (38, 44, 50 sc)
Row 3, Raglan Increase Row (RS):
Ch 1, turn. Repeat Row 1 increases. (46, 52, 58 sc)
Row 4 (WS):
Ch 1, turn. Sc in each st across. (46, 52, 58 sc)
Row 5, Raglan Increase Row (RS):
Ch 1, turn. Repeat Row 1 increases. (54, 60, 66 sc)
Row 6 (WS):
Ch 1, turn. Sc in each st across. (54, 60, 66 sc)
Row 7, Raglan Increase Row (RS):
Ch 1, turn. Repeat Row 1 increases. (62, 68, 74 sc)
Row 8 (WS):
Ch 1, turn. Sc in each st across. (62, 68, 74 sc)
Row 9, Raglan Increase Row (RS):
Ch 1, turn. Repeat Row 1 increases. (70, 76, 82 sc)
Row 10 (WS):
Ch 1, turn. Sc in each st across. (70, 76, 82 sc)
Size A: Skip to Section 2.
Sizes B and C only:
Row 11, Raglan Increase Row (RS):
Ch 1, turn. Repeat Row 1 increases. (84, 90 sc)
Row 12 (WS):
Ch 1, turn. Sc in each st across. (84, 90 sc)
Size B: Skip to Section 2.
Size C only:
Row 13, Raglan Increase Row (RS):
Ch 1, turn. Repeat Row 1 increases. (98 sc)
Row 14 (WS):
Ch 1, turn. Sc in each st across. (98 sc)
Checkpoint: Your flat yoke piece should measure approximately 2.5 (3, 3.5) inches from foundation chain to last row.
Section 2: Divide for Armholes and Join Body
Dividing Row (RS):
Ch 1, turn. Sc across Left Front stitches to marker (10, 12, 14 sts). Remove marker. Ch 2 (underarm). Skip all Left Sleeve stitches (14, 17, 20 sts). Remove marker. Sc across Back stitches (22, 26, 30 sts). Ch 2 (second underarm). Skip all Right Sleeve stitches (14, 17, 20 sts). Remove marker. Sc across Right Front stitches (10, 12, 14 sts).
Do not turn. Fold work so front edges meet at center front. Sl st into first sc of Left Front to join into round.
Body stitch count: (46, 54, 62 sts)
Section 3: Dress Body and Skirt (Worked in the Round)
Round 1:
Ch 1. Sc evenly around, working 2 sc into each ch-2 underarm space. Join with sl st. (46, 54, 62 sc)
Rounds 2-3:
Ch 1. Sc in each st around. Join with sl st. (46, 54, 62 sc)
Round 4, Increase Round:
Ch 1. Work increases evenly spaced.
Rounds 5-6:
Ch 1. Sc in each st around. Join with sl st. (50, 60, 68 sc)
Round 7, Increase Round:
Ch 1.
Rounds 8-9:
Ch 1. Sc in each st around. Join with sl st. (54, 66, 74 sc)
Round 10, Increase Round:
Ch 1.
Rounds 11-12:
Ch 1. Sc in each st around. Join with sl st. (60, 72, 82 sc)
Round 13, Increase Round:
Ch 1.
Rounds 14-15:
Ch 1. Sc in each st around. Join with sl st. (66, 80, 90 sc)
Round 16, Increase Round:
Ch 1.
Round 17:
Ch 1. Sc in each st around. Join with sl st. (72, 88, 100 sc)
Remaining Plain Rounds:
Checkpoint: Skirt should measure approximately 5.5 (6.5, 7.5) inches from underarm.
Skirt Hem Border
Border Round 1:
Ch 1. Sc in each st around. Join with sl st. (72, 88, 100 sc)
Border Round 2:
Ch 1. (Sc in next 2 sts, hdc in next st, sc in next 2 sts) rep around, adjusting at end as needed. Join with sl st. (72, 88, 100 sts)
Border Round 3:
Ch 1. Sc in each st around. Join with sl st. Fasten off. Weave in ends. (72, 88, 100 sc)
Section 4: Neckline and Placket Border
With RS facing, join MC at bottom right corner of center front placket opening.
Border Round:
Ch 1. Sc evenly up right placket edge (about 10-14 sc). Sc across neckline foundation chain (30, 36, 42 sc). Sc down left placket edge. Do not join. Turn.
Work 1 row of sc across entire border.
Button Loop Row:
Work up right placket edge. At first button position (0.5 inch from neckline), ch 2, sk 1 sc, continue. Repeat for 2nd button (centered) and 3rd button (0.5 inch from bottom). Continue in sc to end. Fasten off.
Sew 3 buttons to opposite placket edge, aligned with button loops.
Section 5: Sleeve Finishing
Join MC at underarm center. Sc evenly around armhole opening. Join with sl st. Fasten off. Repeat for second armhole.
Bunny Panel Instructions
Bunny Body
With CC1 and E/4 hook, ch 12 (14, 16).
Round 1:
Sc in 2nd ch from hook, sc in next 9 (11, 13) chs, 3 sc in last ch. Working along opposite side of foundation chain, sc in next 10 (12, 14) sts, 2 sc in first ch. Join with sl st. (24, 28, 32 sc)
Round 2:
Ch 1. Inc in first st, sc in next 10 (12, 14) sts, inc in next 2 sts, sc in next 10 (12, 14) sts, inc in last st. Join. (28, 32, 36 sc)
Round 3:
Ch 1. Inc in first st, sc in next 12 (14, 16) sts, inc in next 2 sts, sc in next 12 (14, 16) sts, inc in last st. Join. (32, 36, 40 sc)
Round 4:
Ch 1. Sc in each st around. Join. (32, 36, 40 sc)
Round 5:
Ch 1. Inc in first st, sc in next 14 (16, 18) sts, inc in next 2 sts, sc in next 14 (16, 18) sts, inc in last st. Join. (36, 40, 44 sc)
Round 6:
Ch 1. Sc in each st around. Join. (36, 40, 44 sc)
Round 7:
Ch 1. Inc in first st, sc in next 16 (18, 20) sts, inc in next 2 sts, sc in next 16 (18, 20) sts, inc in last st. Join. (40, 44, 48 sc)
Round 8:
Ch 1. Sc in each st around. Join. (40, 44, 48 sc)
Insert 6 mm safety eyes in upper third of oval, about 1 inch apart.
Round 9:
Ch 1. Sc in each st around. Join. Fasten off, leaving 24-inch tail. (40, 44, 48 sc)
Bunny Ears (Make 2)
Outer Ear (CC1):
Ch 9.
Rows 1-8:
Sc in 2nd ch from hook, sc across. Ch 1, turn. Sc in each st. (8 sc each row)
Row 9:
Ch 1, turn. Inv-dec, sc in next 4 sts, inv-dec. (6 sc)
Row 10:
Ch 1, turn. Sc in each st. (6 sc)
Row 11:
Ch 1, turn. Inv-dec, sc in next 2 sts, inv-dec. (4 sc)
Row 12:
Ch 1, turn. Sc in each st. (4 sc)
Row 13:
Ch 1, turn. (Inv-dec) x 2. (2 sc)
Row 14:
Ch 1, turn. Inv-dec. (1 sc) Fasten off.
Inner Ear (CC2):
Ch 5.
Rows 1-6:
Sc in 2nd ch from hook, sc across. Ch 1, turn. Sc in each st. (4 sc each row)
Row 7:
Ch 1, turn. Inv-dec x 2. (2 sc)
Row 8:
Ch 1, turn. Inv-dec. (1 sc) Fasten off.
Whip stitch inner ear centered on outer ear. Make 2 complete ears.
Assembly
Embroider triangular nose with CC2 below eyes. Embroider 3 whiskers on each side with CC3. Sew ears to top of bunny panel, angled outward. Sew completed panel to center front of dress skirt.
Tips for Success
Take breaks. This is not a one-sitting project, and that’s okay. The dress can feel overwhelming if you try to power through.
Count your stitches. Especially during raglan increases. Losing a stitch early compounds into bigger problems later.
Block before assembly. A light wet block on the dress body helps everything lie flat before you attach the bunny panel.
Safety eyes go in before closing. Once you fasten off the bunny panel, you cannot add the eyes. Mark their positions, insert them, lock the backs, then finish the final round.
The booties and headband instructions continue in the same style. They follow the same clear format with step-by-step rounds and stitch counts.
Final Thoughts on This Crochet Tutorial
This lavender bunny baby dress set is the kind of project that makes people think you’ve been crocheting for decades. The truth is, it’s just smart construction and a really cute design. Every piece is straightforward on its own. When you put them together, you get something genuinely show-stopping.
Whether you’re making this for your own little one, a friend’s baby shower, or just because you saw the picture and had to try it, I hope you love the process as much as the finished set. Take your time with the bunny face. Those little ears make the whole thing.
If this pattern inspires you, I’d love for you to save it to your Pinterest boards so you can find it when you’re ready to start. And please, leave a comment below if you make this set. Seeing your finished projects is honestly the best part of sharing patterns.
You Might Also Like
- Sunset Ombre Floral Square Poncho Free Crochet Pattern
- Sage Green Botanical Lace Maxi Skirt Free Crochet Pattern
- Sage Green Granny Square Hobo Bag Free Crochet Pattern
- Sunflower Granny Square Hobo Bag Free Crochet Pattern