Rose Garden Pink Hooded Coat Free Crochet Pattern
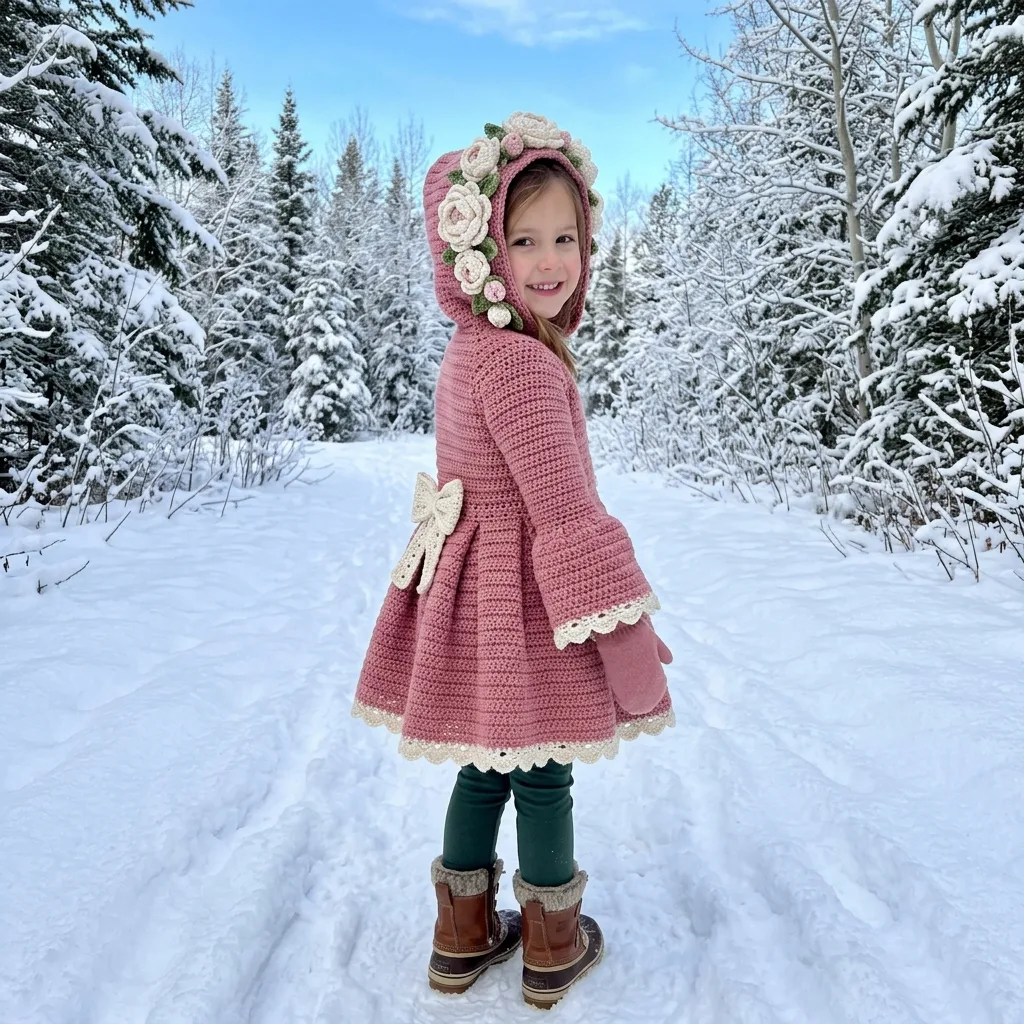
I don’t know about you, but I have a serious weakness for handmade children’s clothing that looks like it belongs in a storybook. There’s something about a little one bundled up in a coat you made with your own hands that hits different than anything store-bought ever could.
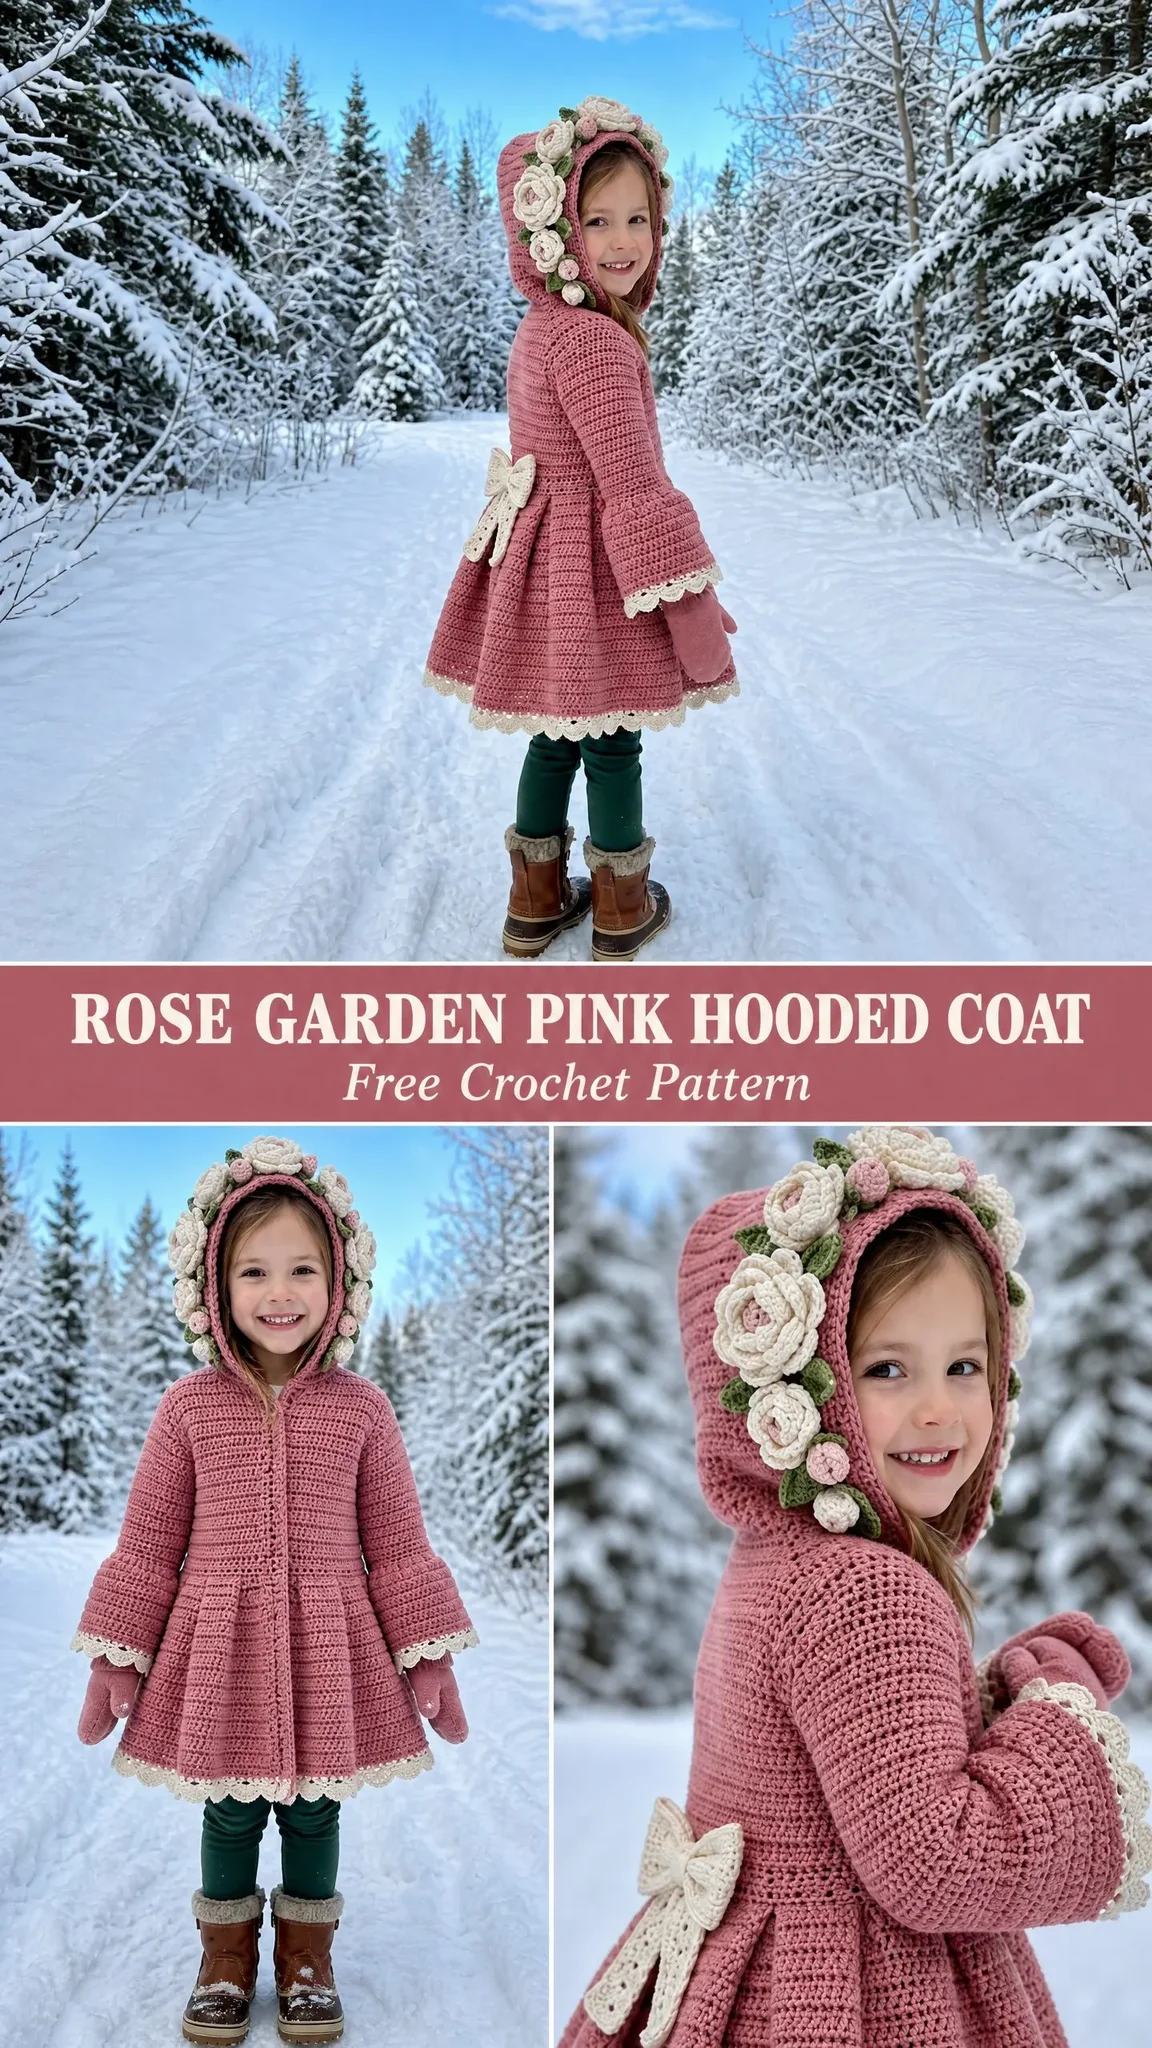
This Rose Garden Pink Hooded Coat is exactly the kind of project that made me fall in love with crochet in the first place. It’s an heirloom piece, the kind of coat that gets passed down, photographed a hundred times, and talked about at family gatherings for years. The dusty rose color, the cream lace trim, those gorgeous crocheted roses cascading down the hood. It’s a showstopper, plain and simple.
And here’s the thing. Despite how impressive it looks, this coat is built almost entirely on single crochet. If you can work a single crochet, you can make this coat. The rest is just patience, a little seaming, and some fun decorative elements that come together like magic at the end.
Why This Hooded Coat Pattern Is Worth Your Time
Let me be honest with you. This is not a weekend project. With an estimated 40 to 60 hours of work, this coat is a labor of love. But every single hour shows in the finished piece. The dense single crochet fabric creates a warm, structured coat that holds its shape beautifully. The flared A-line skirt gives it that classic silhouette. And those crocheted roses? They transform the hood into something genuinely special.
This pattern is written for size 4T, fitting approximately 3 to 4 year olds. The finished measurements include a 24 inch chest circumference, 20 inch length from back neck to hem, 11 inch sleeve length, and an 8 inch hood height. I’ve included sizing tips at the end if you need to adjust up or down.
The skill level sits at advanced beginner to intermediate. If you’ve completed at least one garment project before, you’ll be comfortable here. The techniques include working flat pieces, seaming, basic shaping, and creating small embellishments. Nothing too tricky, just a variety of skills that come together into one gorgeous finished piece.
Materials You’ll Need for This Crochet Coat Pattern
Gathering your materials before you start will save you headaches later. Here’s everything you’ll need:
Yarn Requirements:
Yarn Suggestions:
Lion Brand Pound of Love works beautifully for this project. It’s machine washable, soft against children’s skin, and holds stitch definition well. Paintbox Yarns Simply DK used at a slightly tighter gauge on a G hook gives a refined, matte finish. For a more premium option, Cascade 220 Superwash provides excellent drape and warmth with the bonus of being machine washable on gentle.
Whatever you choose, avoid fuzzy or heavily textured yarns. You want clean stitch definition for that structured look.
Hooks:
Notions:
Gauge for Your Crochet Coat
20 single crochet stitches x 24 rows = 4 inches, measured over single crochet, blocked.
I cannot stress this enough. Gauge matters here. A difference of even one stitch per inch will significantly affect the finished size, and a coat that doesn’t fit is just a very elaborate decoration. Work a swatch of at least 6 inches square, wash and block it the way you plan to care for the finished coat, then measure carefully before starting.
Abbreviations and Stitch Definitions
Let me walk you through every abbreviation you’ll encounter. I’m using US crochet terms throughout.
Single crochet (sc): Insert hook into stitch, yarn over and pull up a loop (2 loops on hook), yarn over and pull through both loops. This is your bread and butter stitch for this entire coat.
Half double crochet (hdc): Yarn over, insert hook into stitch, yarn over and pull up a loop (3 loops on hook), yarn over and pull through all three loops. Slightly taller than single crochet.
Double crochet (dc): Yarn over, insert hook into stitch, yarn over and pull up a loop (3 loops on hook), yarn over and pull through 2 loops (2 loops remain), yarn over and pull through remaining 2 loops. Used primarily in the lace edging.
Chain (ch): Yarn over and pull through the loop on your hook. Creates the foundation for most pieces.
Slip stitch (sl st): Insert hook into stitch, yarn over and pull through both the stitch and the loop on your hook in one motion. Used for joining and moving across stitches without adding height.
Increase (inc): Work 2 single crochet stitches into the same stitch. This adds one stitch to your count.
Single crochet two together (sc2tog): Insert hook into first stitch and pull up a loop, insert hook into next stitch and pull up a loop (3 loops on hook), yarn over and pull through all 3 loops. This decreases your stitch count by one.
Additional abbreviations:
Special Stitches and Techniques
Before diving into the main pattern, let’s cover the special elements that make this coat so beautiful.
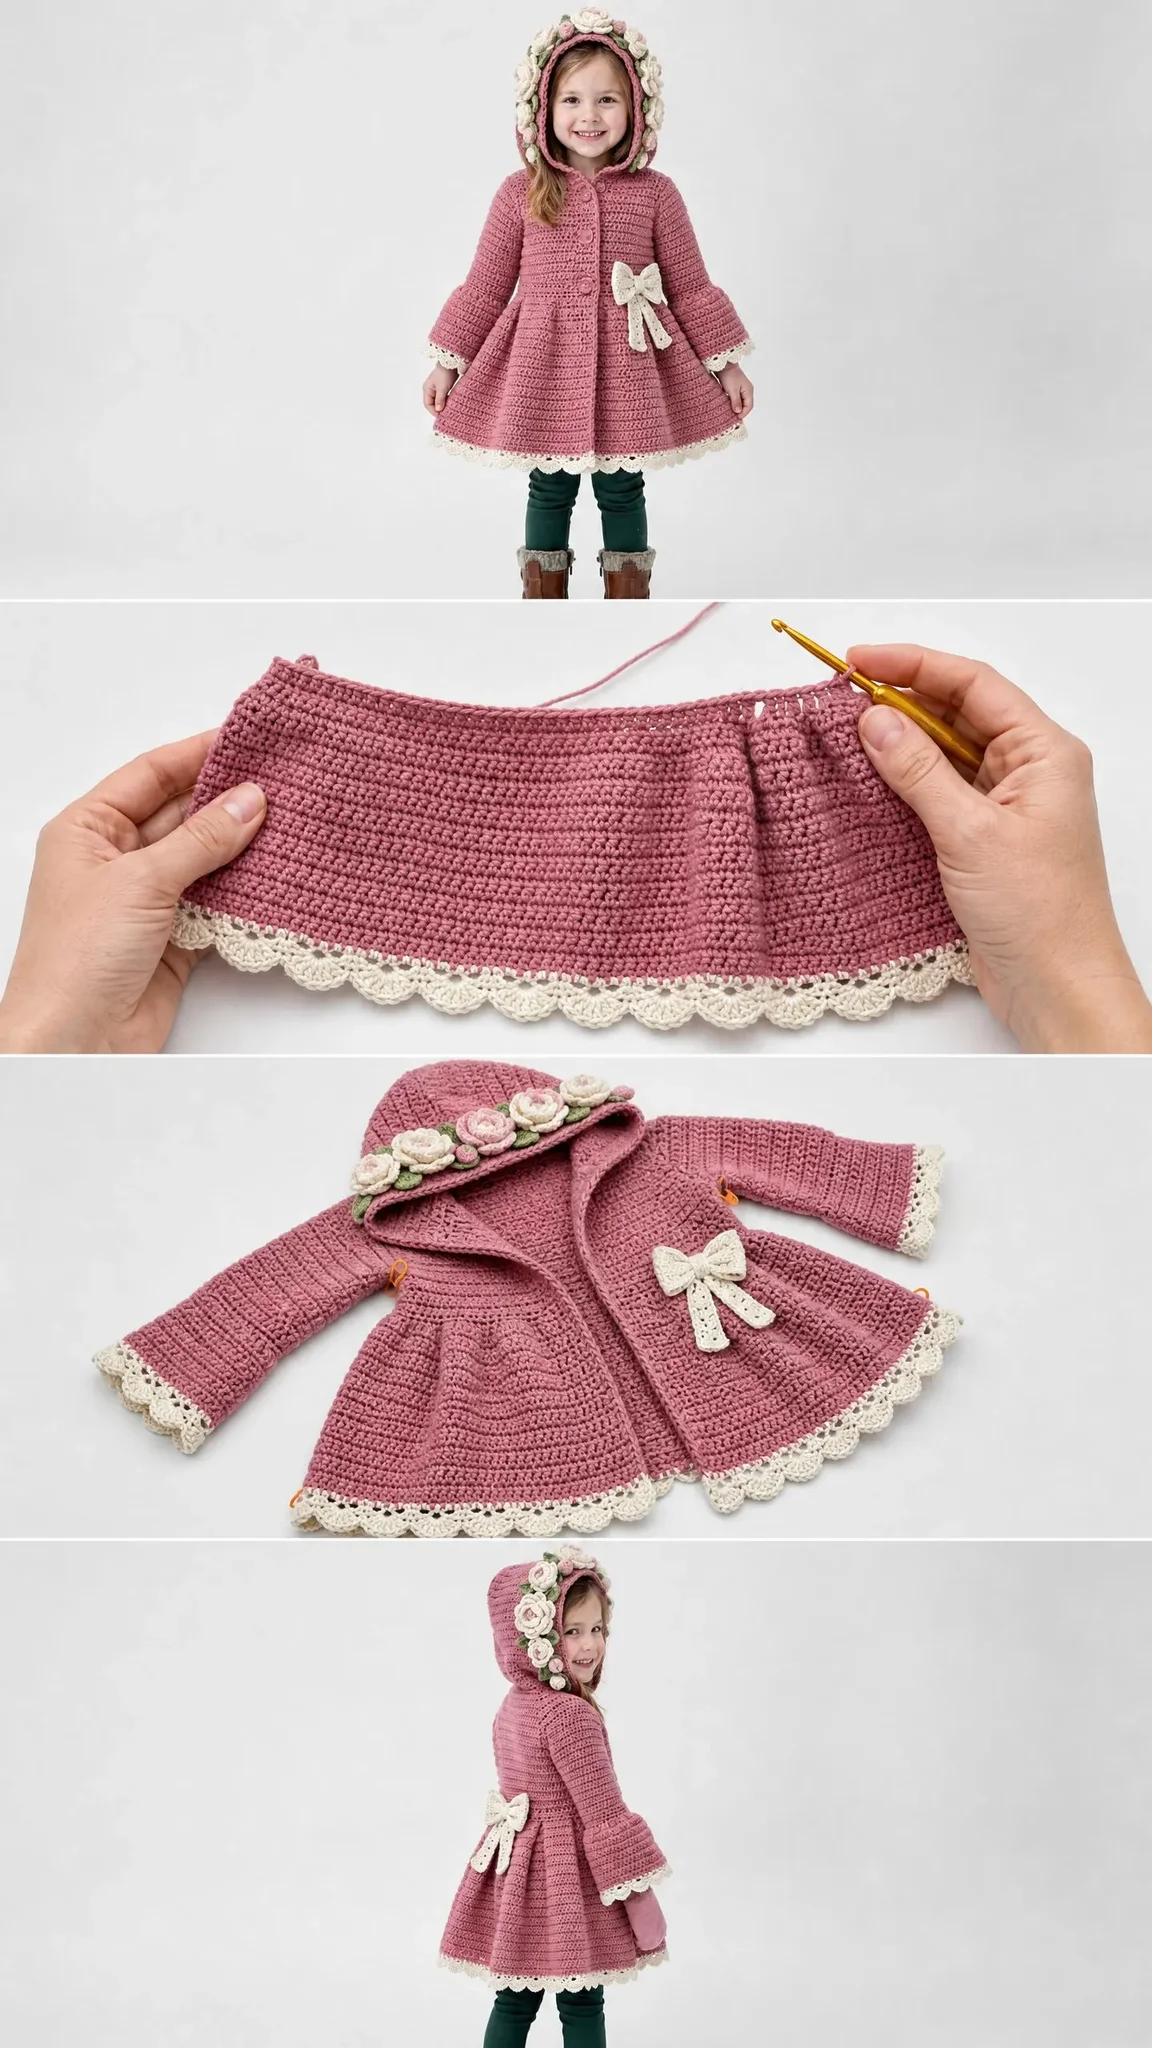
Lace Edging
This creates the delicate scalloped trim you see along the hem, cuffs, and pocket tops.
Row 1 (Lattice Row): Join CA with a slip stitch at the right-hand edge. Chain 3 (counts as first double crochet), skip 1 stitch, double crochet in next stitch. Continue across in pattern: chain 1, skip 1 stitch, double crochet in next stitch. At the end of the row, chain 3, turn.
Row 2: Work 1 double crochet in first chain-1 space, chain 1, double crochet in next chain-1 space across. Fasten off.
Row 3 (Scallop Row): Join CA in first chain-1 space. Work (slip stitch, chain 3, 2 double crochet, chain 3, slip stitch) in each chain-1 space across. Fasten off.
This three-row sequence produces that lovely scalloped picot edge.
Crocheted Rose
These dimensional flowers are what make the hood so stunning. Use your F-5 / 3.75 mm hook.
Make 7 in CA (cream) and 4 in CC (light blush pink).
Step 1: Chain 36.
Step 2: Starting in 2nd chain from hook, work 1 single crochet in each of first 6 chains. (6 sc)
Step 3: Work 1 half double crochet in each of next 6 chains. (6 hdc)
Step 4: Work 1 double crochet in each of next 12 chains. (12 dc)
Step 5: Work 1 half double crochet in each of next 6 chains. (6 hdc)
Step 6: Work 1 single crochet in each of last 5 chains. (5 sc)
Step 7: Fasten off, leaving a 12 inch tail.
Step 8: Starting at the single crochet end, roll the strip tightly into a coil. The taller stitches form the outer petals while the shorter stitches form the center bud.
Step 9: Use the tail to whip stitch through the base of the coil several times to secure. Your finished rose should be approximately 1 inch in diameter.
For Large Roses (make 2 in CA): Chain 48 instead and increase the double crochet section to 18 dc. This creates a rose approximately 1.5 inches in diameter for the hood center.
For Smaller Buds (CC roses): You can reduce the starting chain to 30 for slightly smaller blooms.
Leaf
Make 18 in CB (sage green). Use your F-5 / 3.75 mm hook.
Step 1: Chain 8.
Step 2: Starting in 2nd chain from hook: single crochet in 1st chain, half double crochet in 2nd chain, double crochet in 3rd and 4th chains, half double crochet in 5th chain, single crochet in 6th chain, 3 single crochet in last chain (this forms the tip of the leaf).
Step 3: Working back along the opposite side of the foundation chain: single crochet in next chain, half double crochet in next chain, double crochet in next 2 chains, half double crochet in next chain, single crochet in last chain.
Step 4: Slip stitch to join at base of leaf.
Step 5: Fasten off, leaving a 6 inch tail for sewing. Each leaf is approximately 1 inch long.
Bow
Make 1 in CA (cream).
Step 1: Chain 21. Work 1 single crochet in 2nd chain from hook and each chain across. (20 sc)
Step 2: Chain 1, turn. Work 1 single crochet in each stitch across for 10 more rows. (20 sc per row)
Step 3: Fasten off. This creates a rectangle approximately 4 inches by 1.5 inches.
Step 4: Make a second identical rectangle.
Step 5: Place the two rectangles together and sew around three sides. Stuff lightly with yarn scraps if desired, then close the fourth side.
Step 6: Pinch the center tightly and wrap with CA yarn several times to cinch. Secure with a knot.
Step 7: Make a small center band: chain 11, single crochet in 2nd chain from hook and each chain across (10 sc). Work 2 rows. Fasten off. Wrap around the center of the bow and sew in place.
Your finished bow measures approximately 3.5 inches wide.
Pattern Instructions
Important Pattern Notes
Before you begin, please read these notes carefully:
1. The coat is constructed in pieces: Back Body, Right Front, Left Front, two Sleeves, and Hood. All pieces are blocked before seaming.
2. The A-line skirt flare is achieved by regular increases beginning at the waist position.
3. All increases and decreases are worked 1 stitch in from the edge to keep clean seam edges.
4. Turning chains in this pattern do NOT count as a stitch. Chain 1, turn begins every row. Always insert your hook into the first stitch.
5. The right side (RS) is the smooth, V-stitch face of the single crochet fabric.
6. Button loops are worked on the left front band (buttons on right, loops on left for a girl’s coat).
Section 1: Back Body
The back is worked flat from the top down.
Foundation: With MC and G-6 hook, chain 63.
Row 1 (WS): Single crochet in 2nd chain from hook and each chain across. Chain 1, turn. (62 sc)
Row 2 (RS): Single crochet in each stitch across. Chain 1, turn. (62 sc)
Rows 3 through 4: Repeat Row 2. (62 sc)
These first 4 rows form the upper back yoke and shoulder area.
Row 5 (Armhole Increase, RS): Single crochet in first stitch, increase in next stitch, single crochet to last 2 stitches, increase in next stitch, single crochet in last stitch. Chain 1, turn. (64 sc)
Row 6: Single crochet across. Chain 1, turn. (64 sc)
Row 7: Single crochet in first stitch, increase in next stitch, single crochet to last 2 stitches, increase in next stitch, single crochet in last stitch. Chain 1, turn. (66 sc)
Row 8: Single crochet across. Chain 1, turn. (66 sc)
Row 9: Single crochet in first stitch, increase in next stitch, single crochet to last 2 stitches, increase in next stitch, single crochet in last stitch. Chain 1, turn. (68 sc)
Row 10: Single crochet across. Chain 1, turn. (68 sc)
Row 11: Single crochet in first stitch, increase in next stitch, single crochet to last 2 stitches, increase in next stitch, single crochet in last stitch. Chain 1, turn. (70 sc)
Row 12: Single crochet across. Chain 1, turn. (70 sc)
Rows 13 through 18: Single crochet across each row without shaping. Chain 1, turn after each row. (70 sc)
Checkpoint: After Row 18, the back piece should measure approximately 3 inches tall from the foundation chain edge. The width should measure approximately 14 inches.
Row 19 (Waist Transition): Single crochet across. Chain 1, turn. (70 sc)
This row marks the beginning of the skirt flare. Work increase rows as follows, with 2 plain rows between each increase row.
Row 20 (Increase Row): Single crochet in first 5 stitches, increase in next stitch, (single crochet in next 10 stitches, increase in next stitch) 5 times, single crochet in last 6 stitches. Chain 1, turn. (76 sc)
Rows 21 through 22: Single crochet across. Chain 1, turn. (76 sc)
Row 23 (Increase Row): Single crochet in first 5 stitches, increase in next stitch, (single crochet in next 11 stitches, increase in next stitch) 5 times, single crochet in last 6 stitches. Chain 1, turn. (82 sc)
Rows 24 through 25: Single crochet across. Chain 1, turn. (82 sc)
Row 26 (Increase Row): Single crochet in first 6 stitches, increase in next stitch, (single crochet in next 12 stitches, increase in next stitch) 5 times, single crochet in last 5 stitches. Chain 1, turn. (88 sc)
Rows 27 through 28: Single crochet across. Chain 1, turn. (88 sc)
Row 29 (Increase Row): Single crochet in first 6 stitches, increase in next stitch, (single crochet in next 13 stitches, increase in next stitch) 5 times, single crochet in last 5 stitches. Chain 1, turn. (94 sc)
Rows 30 through 31: Single crochet across. Chain 1, turn. (94 sc)
Row 32 (Increase Row): Single crochet in first 6 stitches, increase in next stitch, (single crochet in next 14 stitches, increase in next stitch) 5 times, single crochet in last 6 stitches. Chain 1, turn. (100 sc)
Rows 33 through 34: Single crochet across. Chain 1, turn. (100 sc)
Row 35 (Increase Row): Single crochet in first 7 stitches, increase in next stitch, (single crochet in next 15 stitches, increase in next stitch) 5 times, single crochet in last 6 stitches. Chain 1, turn. (106 sc)
Rows 36 through 48: Single crochet across each row without shaping. Chain 1, turn after each row. (106 sc)
Fasten off MC.
Checkpoint: The back piece should now measure approximately 20 inches from the top edge to the last row. The width at the bottom should be approximately 21 inches.
Section 2: Right Front Body
Foundation: With MC and G-6 hook, chain 33.
Row 1 (WS): Single crochet in 2nd chain from hook and each chain across. Chain 1, turn. (32 sc)
Row 2 (RS): Single crochet across. Chain 1, turn. (32 sc)
Rows 3 through 4: Single crochet across. Chain 1, turn. (32 sc)
Row 5 (Armhole Increase, RS): Single crochet in first stitch, increase in next stitch, single crochet to end. Chain 1, turn. (33 sc)
Row 6: Single crochet across. Chain 1, turn. (33 sc)
Row 7: Single crochet in first stitch, increase in next stitch, single crochet to end. Chain 1, turn. (34 sc)
Row 8: Single crochet across. Chain 1, turn. (34 sc)
Row 9: Single crochet in first stitch, increase in next stitch, single crochet to end. Chain 1, turn. (35 sc)
Row 10: Single crochet across. Chain 1, turn. (35 sc)
Row 11: Single crochet in first stitch, increase in next stitch, single crochet to end. Chain 1, turn. (36 sc)
Row 12: Single crochet across. Chain 1, turn. (36 sc)
Rows 13 through 18: Single crochet across. Chain 1, turn. (36 sc)
The increase side corresponds to the side seam. The straight edge is the center front button band edge.
Row 19: Single crochet across. Chain 1, turn. (36 sc)
Row 20 (Increase Row): Single crochet in first 5 stitches, increase in next stitch, (single crochet in next 10 stitches, increase in next stitch) 2 times, single crochet in last 5 stitches. Chain 1, turn. (39 sc)
Rows 21 through 22: Single crochet across. Chain 1, turn. (39 sc)
Row 23 (Increase Row): Single crochet in first 5 stitches, increase in next stitch, (single crochet in next 11 stitches, increase in next stitch) 2 times, single crochet in last 5 stitches. Chain 1, turn. (42 sc)
Rows 24 through 25: Single crochet across. Chain 1, turn. (42 sc)
Row 26 (Increase Row): Single crochet in first 6 stitches, increase in next stitch, (single crochet in next 12 stitches, increase in next stitch) 2 times, single crochet in last 5 stitches. Chain 1, turn. (45 sc)
Rows 27 through 28: Single crochet across. Chain 1, turn. (45 sc)
Row 29 (Increase Row): Single crochet in first 6 stitches, increase in next stitch, (single crochet in next 13 stitches, increase in next stitch) 2 times, single crochet in last 5 stitches. Chain 1, turn. (48 sc)
Rows 30 through 31: Single crochet across. Chain 1, turn. (48 sc)
Row 32 (Increase Row): Single crochet in first 6 stitches, increase in next stitch, (single crochet in next 14 stitches, increase in next stitch) 2 times, single crochet in last 6 stitches. Chain 1, turn. (51 sc)
Rows 33 through 34: Single crochet across. Chain 1, turn. (51 sc)
Row 35 (Increase Row): Single crochet in first 7 stitches, increase in next stitch, (single crochet in next 15 stitches, increase in next stitch) 2 times, single crochet in last 6 stitches. Chain 1, turn. (54 sc)
Rows 36 through 48: Single crochet across. Chain 1, turn. (54 sc)
Fasten off MC.
Section 3: Left Front Body
Work exactly as Right Front Body but mirror the armhole increases to the opposite edge:
Rows 5, 7, 9, 11 (Armhole Increase, RS): Single crochet to last 2 stitches, increase in next stitch, single crochet in last stitch. (33, 34, 35, 36 sc)
All skirt increase rows are the same as Right Front Body. The skirt shaping is not mirrored. Both fronts increase symmetrically in the body of the fabric. (Final count: 54 sc)
Fasten off MC.
Section 4: Sleeves (Make 2)
The sleeves are worked flat from the top down with increases along both edges.
Foundation: With MC and G-6 hook, chain 45.
Row 1 (WS): Single crochet in 2nd chain from hook and each chain across. Chain 1, turn. (44 sc)
Row 2 (RS): Single crochet across. Chain 1, turn. (44 sc)
Rows 3 through 6: Single crochet across. Chain 1, turn. (44 sc)
Row 7 (Increase Row): Single crochet in first stitch, increase in next stitch, single crochet to last 2 stitches, increase in next stitch, single crochet in last stitch. Chain 1, turn. (46 sc)
Rows 8 through 10: Single crochet across. Chain 1, turn. (46 sc)
Row 11 (Increase Row): Single crochet in first stitch, increase in next stitch, single crochet to last 2 stitches, increase in next stitch, single crochet in last stitch. Chain 1, turn. (48 sc)
Rows 12 through 14: Single crochet across. Chain 1, turn. (48 sc)
Row 15 (Increase Row): Single crochet in first stitch, increase in next stitch, single crochet to last 2 stitches, increase in next stitch, single crochet in last stitch. Chain 1, turn. (50 sc)
Rows 16 through 18: Single crochet across. Chain 1, turn. (50 sc)
Row 19 (Increase Row): Single crochet in first stitch, increase in next stitch, single crochet to last 2 stitches, increase in next stitch, single crochet in last stitch. Chain 1, turn. (52 sc)
Rows 20 through 22: Single crochet across. Chain 1, turn. (52 sc)
Row 23 (Increase Row): Single crochet in first stitch, increase in next stitch, single crochet to last 2 stitches, increase in next stitch, single crochet in last stitch. Chain 1, turn. (54 sc)
Rows 24 through 26: Single crochet across. Chain 1, turn. (54 sc)
Row 27 (Increase Row): Single crochet in first stitch, increase in next stitch, single crochet to last 2 stitches, increase in next stitch, single crochet in last stitch. Chain 1, turn. (56 sc)
Rows 28 through 55: Single crochet across each row. Chain 1, turn. (56 sc)
Cuff Flare Rows:
Row 56 (Increase Row): Single crochet in first 3 stitches, increase in next stitch, (single crochet in next 6 stitches, increase in next stitch) 7 times, single crochet in last 3 stitches. Chain 1, turn. (64 sc)
Row 57: Single crochet across. Chain 1, turn. (64 sc)
Row 58 (Increase Row): Single crochet in first 3 stitches, increase in next stitch, (single crochet in next 7 stitches, increase in next stitch) 7 times, single crochet in last 3 stitches. Chain 1, turn. (72 sc)
Rows 59 through 60: Single crochet across. Chain 1, turn. (72 sc)
Fasten off MC.
Checkpoint: The sleeve should measure approximately 10.5 inches in length and approximately 11 inches wide at the cuff edge. The top armhole edge should be approximately 8.75 inches wide.
Apply Lace Edging to Cuff: Work the 3-row lace trim along the cuff edge using CA. Fasten off and weave in ends.
Sleeve Seam: Fold sleeve in half lengthwise, right sides together. Whip stitch or slip stitch the long side edges together to form a tube. Leave the top edge open for setting in.
Section 5: Pockets (Make 2)
Foundation: With MC and G-6 hook, chain 21.
Row 1 (WS): Single crochet in 2nd chain from hook and each chain across. Chain 1, turn. (20 sc)
Rows 2 through 14: Single crochet across. Chain 1, turn. (20 sc)
Fasten off MC, leaving a 16 inch tail for sewing.
Pocket Lace Edge: Apply 2-row lace trim (lattice row plus scallop row) along the top edge of the pocket using CA. Fasten off.
Set pockets aside until finishing.
Section 6: Hood
The hood is worked flat as a large rectangle, then the top edge is seamed to form the crown.
Foundation: With MC and G-6 hook, chain 83.
Row 1 (WS): Single crochet in 2nd chain from hook and each chain across. Chain 1, turn. (82 sc)
Rows 2 through 40: Single crochet across. Chain 1, turn. (82 sc)
Fasten off, leaving a 30 inch tail.
Hood Assembly: Fold the rectangle in half so that the two short edges (82 stitch wide edges) align. This creates a folded piece 40 rows tall and 41 rows wide. Seam the top folded edge together using the tail and a yarn needle. Mattress stitch or whip stitch through both layers across all 82 stitches. This seam becomes the center back crown of the hood.
Hood Face Opening Edge: The front face opening runs along the two long side edges (40 row tall edges). Using CA, join at the bottom right corner of this opening. Work 1 single crochet per row edge up the right side and 1 single crochet per row down the left side. (40 sc + 40 sc = 80 sc along face opening)
Lace Trim on Hood Face Opening: Apply the 3-row lace trim along this picked-up edge using CA. Fasten off.
Rose and Leaf Embellishment for Hood: Arrange 2 large CA roses, 5 standard CA roses, 4 CC roses, and approximately 12 to 14 CB leaves along the hood face opening edge, from the right lower corner sweeping up and across the top of the opening. Pin in position before sewing. Leaves should tuck behind and around roses naturally. Sew each element securely with a yarn needle.
Checkpoint: The assembled hood should measure approximately 8 inches from the face opening to the crown seam, and approximately 10 inches across the opening.
Section 7: Button Band and Loop Band
Right Front Button Band (buttons attached here):
With MC, right side facing, join yarn at the bottom right corner of the right front piece. Work 1 single crochet per row edge up the entire front edge of the right front (approximately 48 sc for 48 rows). Work 2 more rows of single crochet back and forth across this band (chain 1, turn each time). Fasten off. Mark placement of 5 buttons evenly spaced from 0.5 inch below the top edge to 2 inches above the bottom of the bodice portion.
Left Front Loop Band (buttonholes here):
With MC, right side facing, join yarn at the top left corner of the left front. Work 1 single crochet per row edge down the left front edge (approximately 48 sc). Chain 1, turn.
Row 2 (Buttonhole Row): Work in single crochet across, working (chain 2, skip 2 stitches) at each button marker position. (5 chain-2 spaces created)
Row 3: Single crochet across, working 2 single crochet into each chain-2 space to close the buttonholes. (48 sc)
Fasten off.
Section 8: Seaming and Assembly
Step 1: Shoulder Seams. Place back piece right sides together with right front piece, aligning top 4-row shoulder edges. The right front shoulder section spans 32 stitches at the top. Seam 14 stitches from the side edge inward for the right shoulder. Repeat for left front. The center 34 stitches of the back top edge remain open as the back neck opening, which will be covered by the hood.
Step 2: Side Seams. With right sides together, align the side edges of the back and fronts. Seam from the bottom of the armhole shaping (Row 11 position) down to the hem, leaving the upper 11 rows open as the armhole opening on each side.
Step 3: Set in Sleeves. With right sides together, insert the sleeve tube into the armhole opening. The top open edge of the sleeve (44 sc wide) aligns with the armhole opening perimeter. Pin and whip stitch around the armhole, easing the sleeve into the opening evenly. Repeat for second sleeve.
Step 4: Attach Hood. Place the hood along the back neck opening and front edges, with the face opening facing forward. The bottom raw edge of the hood spans the back neck (34 stitches) and extends slightly onto each front neck edge. Pin in place and whip stitch securely all the way around the neck attachment edge.
Step 5: Attach Pockets. Center each pocket on the right and left front skirt panels, approximately 2 inches above the hemline and 1 inch from the side seam. Whip stitch along the sides and bottom of each pocket, leaving the lace-trimmed top open.
Step 6: Hem Lace Edging. Join CA at the bottom right corner of the assembled coat. Work 3-row lace trim around the entire bottom hem, joining at the end of each lattice row and working in rounds or rows as is comfortable. Fasten off and weave in ends.
Step 7: Attach Bow. Center the completed bow on the back of the coat approximately 2 inches above the waist line (around Row 18
You Might Also Like
- Pastel Rainbow Flower Granny Square Tote Free Crochet Pattern
- Ocean Wave Granny Tote Bag Free Crochet Pattern
- Sage Green Granny Square Hobo Bag Free Crochet Pattern
- Pastel Rainbow Shell Stitch Bodysuit Free Pattern