Dusty Rose Fairy Bell Sleeve Top Free Crochet Pattern
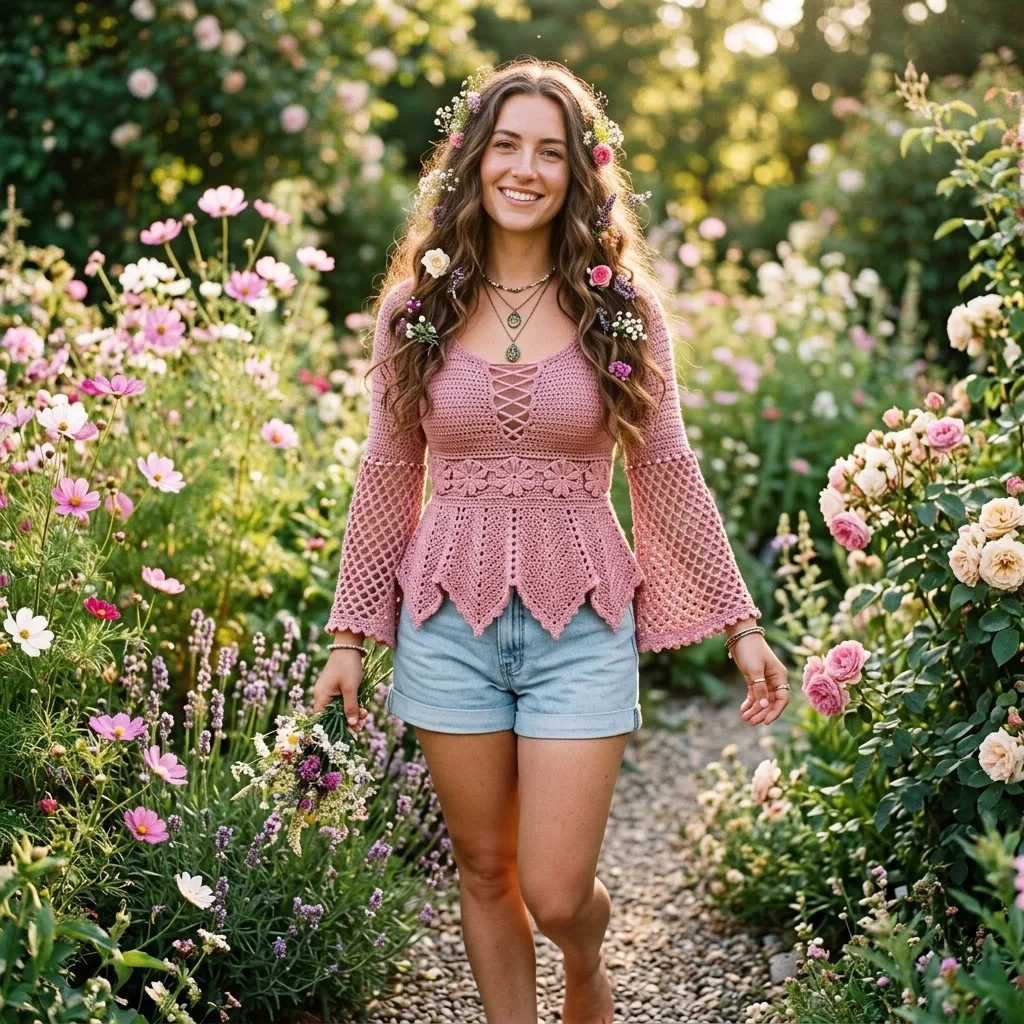
A handmade top that actually fits well and looks like something from a boutique? That is exactly what this pattern delivers. Whether you want a statement piece for summer festivals, a romantic date night layer, or simply a project that showcases your crochet skills, this fitted peplum top with dramatic bell sleeves checks every box.
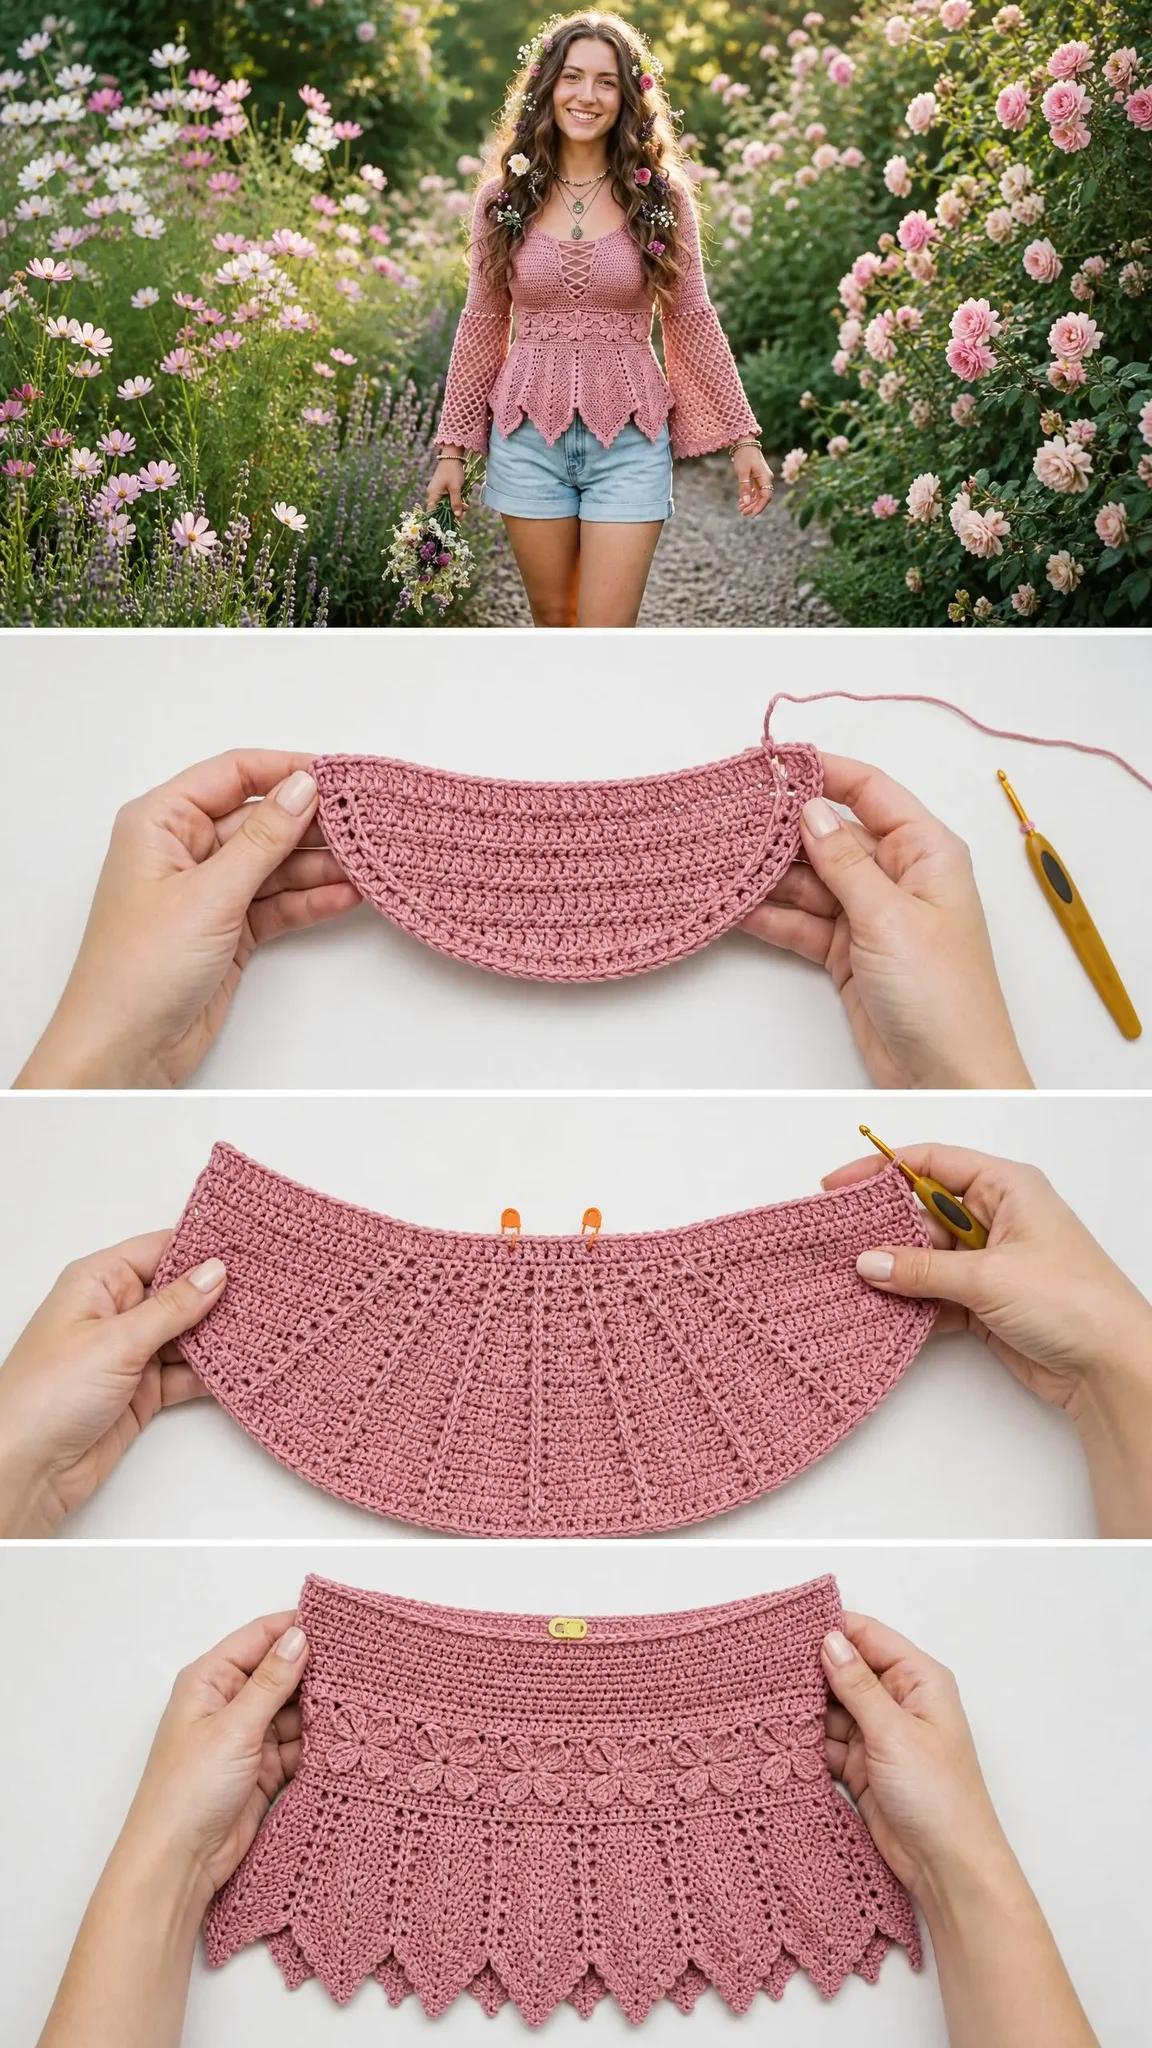
The construction uses half double crochet for a smooth fitted bodice, diamond mesh for airy sleeves and peplum, sweet daisy motifs at the waist, and a pointed scallop border that gives the hem and cuffs that fairy tale finish. This is an intermediate to advanced project, so you will want to be comfortable with garment shaping and reading stitch counts before diving in.
The lace-up neckline detail adds vintage charm without complicated techniques. You simply leave a gap in the center front and thread a cord through the natural chain spaces. Practical and pretty, all in one.
Why You Will Love This Crochet Pattern
This top combines several eye-catching elements into one cohesive design. The fitted bodice hugs your shape with about 2 inches of negative ease, while the peplum flares out below the waist for a flattering silhouette. Those bell sleeves? They start fitted at the upper arm and gradually expand into a dramatic flare with matching scalloped edges.
The waist band features individually crocheted daisy motifs that you whipstitch together into a decorative strip. This breaks up the solid bodice and the open peplum mesh beautifully. Every element works together.
You will work the bodice in three flat pieces, seam them at the shoulders and sides, add the daisy motif strip, then work the peplum in joined rounds. The sleeves are worked flat from the armhole down and seamed along the underarm. Blocking each piece before final assembly makes everything come together smoothly.
Materials You Will Need
Yarn: DK weight (CYCA 3), smooth mercerized cotton or cotton-acrylic blend
Amount: 1,050 (1,150, 1,250) yards / 960 (1,052, 1,143) meters
Color: Dusty Rose or Mauve Pink (single colorway throughout)
Hooks:
Additional Materials:
Recommended Yarn Options
Paintbox Yarns Cotton DK: 100% cotton, 137 yards / 125 meters per 50 g skein. Choose shade “Blush Pink” or “Rose Wine.” Requires 8 (9, 10) skeins.
Lion Brand 24/7 Cotton in “Rose”: 100% mercerized cotton, 186 yards / 170 meters per 100 g ball. Excellent drape and washability. Requires 6 (7, 7) balls.
Drops Safran DK: 100% Egyptian cotton, 175 yards / 160 meters per 50 g skein. Choose shade “Old Rose.” Requires 6 (7, 8) skeins.
Choose a smooth DK weight yarn with clear stitch definition and good drape. Avoid fuzzy or halo fibers because they will obscure the lace pattern and motif details. Cotton or cotton blends block flat beautifully and maintain those crisp scallop points.
Finished Sizes
This pattern is written for size Small with instructions in parentheses for Medium and Large.
This top is designed for approximately 2 inches / 5 cm of negative ease through the bodice. Choose your size based on your actual bust measurement minus 2 inches.
Gauge
With E-4 / 3.5 mm hook in half double crochet:
19 stitches and 14 rows = 4 in / 10 cm (square, blocked)
With F-5 / 3.75 mm hook in diamond mesh pattern:
One diamond repeat (6 stitches wide) = 1.25 in / 3.2 cm wide
2 rows of mesh = 1 in / 2.5 cm tall
Gauge is mandatory for a well-fitting garment. Please swatch and adjust hook size as needed before beginning. I cannot stress this enough for fitted garments.
Abbreviations
Special Stitches and Techniques
Diamond Mesh Stitch
This creates the open lattice pattern for the peplum and sleeves. Each diamond unit spans 6 stitches wide.
Row A (RS): Ch 4 (counts as dc plus ch 1), turn. Skip first 2 sts. (Dc in next st, ch 2, skip 2 sts, dc in next st, ch 1, skip 1 st) across to last st. Dc in last st.
Row B (WS): Ch 5 (counts as dc plus ch 2), turn. Skip first ch-1 sp. (Dc in next dc, ch 2, dc in next dc, ch 2) across. Dc in 3rd ch of turning ch.
Row C (RS): Ch 3 (counts as dc), turn. Dc in first ch-2 sp. (Ch 2, dc in next dc, ch 2, 2 dc in next ch-2 sp) across to final ch-2 sp. Ch 2, dc in 3rd ch of turning ch.
Repeat Rows B and C for pattern.
Daisy Motif
These sweet little flower circles decorate the waist band.
Foundation ring: Ch 6, sl st to first ch to form ring.
Rnd 1: Ch 1. Work 12 sc into ring. Sl st to first sc. (12 sc)
Rnd 2: Ch 5 (counts as dc plus ch 2). (Dc in next sc, ch 2) 11 times. Sl st to 3rd ch of beg ch-5. (12 dc, 12 ch-2 sps)
Rnd 3: Sl st into first ch-2 sp. Ch 1. (Sc, hdc, 3 dc, hdc, sc) into each ch-2 sp around. Sl st to first sc. (12 petals)
Fasten off leaving a 12-in / 30.5-cm tail for seaming.
Make 9 motifs for Small, 10 for Medium, 11 for Large. Each motif measures approximately 2 in / 5 cm in diameter when blocked.
Pointed Scallop Border
This creates the dramatic pointed edges at the hem and cuffs. Work over a multiple of 10 stitches plus 1.
Row 1 (RS, set-up): With larger hook, attach yarn. Ch 1. Sc evenly across edge. Turn.
Row 2 (WS): Ch 1. Sc in each st across. Turn.
Row 3 (RS, scallop): Ch 1. Sc in first st. (Skip 4 sts, 9 dc in next st, skip 4 sts, sc in next st) across. Do not turn. Fasten off.
The tall shell of 9 dc worked into a single stitch creates those beautiful pointed peaks.
Step by Step Pattern Instructions
Back Bodice
Foundation chain: With E-4 hook, ch 83 (93, 103).
Row 1 (WS): Hdc in 3rd ch from hook and in each ch across. Turn. (81, 91, 101 hdc)
Row 2 (RS): Ch 2 (counts as hdc). Hdc in each st across. Turn. (81, 91, 101 hdc)
Rows 3 through 6: Rep Row 2. Turn. (81, 91, 101 hdc)
Armhole Shaping
Row 7 (RS): Sl st across first 7 sts. Ch 2. Hdc in each st to last 7 sts. Leave remaining 7 sts unworked. Turn. (67, 77, 87 hdc)
Row 8: Ch 2. Hdc2tog. Hdc to last 2 sts. Hdc2tog. Turn. (65, 75, 85 hdc)
Row 9: Ch 2. Hdc2tog. Hdc to last 2 sts. Hdc2tog. Turn. (63, 73, 83 hdc)
Row 10: Ch 2. Hdc2tog. Hdc to last 2 sts. Hdc2tog. Turn. (61, 71, 81 hdc)
Row 11: Ch 2. Hdc in each st across. Turn. (61, 71, 81 hdc)
Rows 12 through 28: Rep Row 11. (61, 71, 81 hdc)
Rows 29 through 40: Ch 2. Hdc in each st across. Turn. (61, 71, 81 hdc)
Waist Shaping
Row 41 (RS): Ch 2. (Hdc in next 9 sts, hdc2tog) 5 (6, 7) times. Hdc in remaining 6 (5, 4) sts. Turn. (56, 65, 74 hdc)
Row 42: Ch 2. Hdc in each st across. Turn. (56, 65, 74 hdc)
Row 43: Ch 2. (Hdc in next 8 sts, hdc2tog) 5 (6, 7) times. Hdc in remaining 6 (5, 4) sts. Turn. (51, 59, 67 hdc)
Row 44: Ch 2. Hdc in each st across. Turn. (51, 59, 67 hdc)
Row 45: Ch 2. (Hdc in next 7 sts, hdc2tog) 5 (6, 7) times. Hdc in remaining 6 (5, 4) sts. Turn. (46, 53, 60 hdc)
Row 46: Ch 2. Hdc in each st across. Turn. (46, 53, 60 hdc)
Checkpoint: After Row 46 the back panel from shoulder to current row measures approximately 13 (13.5, 14) in / 33 (34.5, 35.5) cm. The stitch count should be 46 (53, 60). Fasten off. Set aside.
Front Right Bodice
Foundation chain: With E-4 hook, ch 45 (50, 55).
Row 1 (WS): Hdc in 3rd ch from hook and in each ch across. Turn. (43, 48, 53 hdc)
Row 2 (RS): Ch 2. Hdc in each st to last 2 sts. Hdc2tog (neck edge decrease). Turn. (42, 47, 52 hdc)
Row 3 (WS): Ch 2. Hdc2tog (neck edge decrease). Hdc in each st across. Turn. (41, 46, 51 hdc)
Rows 4 through 6: Alternate neck-edge decrease every RS row. Turn.
Armhole Shaping (Right Side Edge)
Row 7 (RS): Sl st across first 7 sts. Ch 2. Hdc to last 2 sts. Hdc2tog (neck edge). Turn. (31, 36, 41 hdc)
Row 8 (WS): Ch 2. Hdc2tog (neck). Hdc to last 2 sts. Hdc2tog (armhole). Turn. (29, 34, 39 hdc)
Row 9 (RS): Ch 2. Hdc2tog (armhole). Hdc to last 2 sts. Hdc2tog (neck). Turn. (27, 32, 37 hdc)
Row 10 (WS): Ch 2. Hdc2tog (neck). Hdc to last 2 sts. Hdc2tog (armhole). Turn. (25, 30, 35 hdc)
Row 11 (RS): Ch 2. Hdc in each st to last 2 sts. Hdc2tog (neck). Turn. (24, 29, 34 hdc)
Row 12 (WS): Ch 2. Hdc2tog (neck). Hdc in each st across. Turn. (23, 28, 33 hdc)
Rows 13 through 18: Continue neck decreases every RS row only.
Rows 19 through 40: Work even, no more neck shaping. Ch 2. Hdc in each st across. Turn. (20, 25, 30 hdc)
Waist Shaping
Row 41 (RS): Ch 2. (Hdc in next 9 sts, hdc2tog) 1 (2, 2) times. Hdc in remaining sts. Turn. (19, 23, 28 hdc)
Row 42: Ch 2. Hdc in each st across. Turn. (19, 23, 28 hdc)
Row 43: Ch 2. (Hdc in next 8 sts, hdc2tog) 1 (2, 2) times. Hdc in remaining sts. Turn. (18, 21, 26 hdc)
Row 44: Ch 2. Hdc in each st across. Turn. (18, 21, 26 hdc)
Row 45: Ch 2. (Hdc in next 7 sts, hdc2tog) 1 (2, 2) times. Hdc in remaining sts. Turn. (17, 19, 24 hdc)
Row 46: Ch 2. Hdc in each st across. Turn. (17, 19, 24 hdc)
Fasten off. Set aside.
Front Left Bodice
Work exactly as Front Right Bodice but reverse all shaping. Place neck decreases at the beginning of RS rows. Place armhole shaping at the right side of the panel. All stitch counts will be identical to Front Right at every row.
After Row 46: (17, 19, 24 hdc). Fasten off. Set aside.
Assembling the Bodice
Shoulder Seams: Align Front Right and Back right shoulder edges. With yarn needle, whipstitch through back loops only for a clean seam. Repeat for Front Left and Back left shoulders.
Side Seams: With RS together, align front panels and back panel along side edges from armhole to waist. Using mattress stitch or whipstitch, seam both sides leaving armhole openings unsewn.
Checkpoint: After seaming the bodice should measure approximately 13 (13.5, 14) in / 33 (34.5, 35.5) cm from shoulder to lower edge.
Neckline Edging
With E-4 hook, attach yarn at right shoulder seam along back neckline.
Rnd 1: Ch 1. Sc evenly around entire neckline (back scoop plus both front V-edges). Work approximately 1 sc per hdc row along the straight neckline sides and 1 sc per st across the back. Do not work along the center front gap. Sl st to first sc to join. (Approximately 64, 70, 76 sc around)
Rnd 2: Ch 1. Sc in each sc around. Sl st to join. Fasten off.
Lace-Up Eyelets: Thread the 1.5-yard cord starting at the bottom of the V and criss-crossing upward through the natural gaps along each center front edge. End with a bow at the neckline top.
Waist Band Daisy Motif Strip
Make 9 (10, 11) Daisy Motifs as described above. Block each motif to 2 in / 5 cm diameter.
Arrange motifs in a horizontal strip. Whipstitch motifs side by side through adjacent petal tips until the strip equals the full circumference of the assembled bodice at the waist.
Attach motif strip to the lower edge of the assembled bodice by aligning the top petal tips with the last row of the bodice and whipstitching through back loops.
Peplum
Use F-5 / 3.75 mm hook throughout peplum.
Set-Up Round: Attach yarn at any side seam point at the bottom of the daisy motif strip. Ch 3 (counts as dc). Work dc evenly around, working into the bottom petal tips and spaces between motifs. Work 91 (101, 111) dc evenly around. Sl st to top of beg ch-3 to join. (91, 101, 111 dc)
Peplum Increase Round 1: Ch 3. Dc in same st. (Dc in next 4 sts, 2 dc in next st) 18 (20, 22) times. Sl st to top of ch-3. (109, 121, 133 dc)
Adjust slightly to achieve 111 (123, 135) stitches for diamond mesh.
Peplum Diamond Mesh Section
Rnd 1 (RS): Ch 4 (counts as dc plus ch 1). Skip 2 sts. (Dc in next st, ch 2, skip 2 sts, dc in next st, ch 1, skip 1 st) around. Sl st to 3rd ch of beg ch-4.
Rnd 2: Ch 5 (counts as dc plus ch 2). (Dc in next dc, ch 2) around. Sl st to 3rd ch of beg ch-5.
Rnd 3: Ch 3 (counts as dc). Dc in first ch-2 sp. (Ch 2, dc in next dc, ch 2, 2 dc in next ch-2 sp) around. Sl st to top of ch-3.
Rnds 4 through 7: Rep Rnds 2 and 3 alternately.
Peplum Scallop Border
Foundation Sc Rnd: Ch 1. Sc evenly into the top of each dc and into each ch-sp around. Target: 121 (131, 141) sc. Sl st to first sc.
Scallop Rnd 1 (WS): Ch 1. Sc in first st. (Skip 4 sts, 9 dc in next st, skip 4 sts, sc in next st) 12 (13, 14) times. Sl st to first sc. Fasten off.
Bell Sleeves (Make 2)
Use E-4 hook for upper sleeve, F-5 for bell flare and cuff.
Armhole Pick-Up: With RS facing and E-4 hook, attach yarn at base of armhole. Ch 1. Sc evenly around armhole opening. Work 62 (68, 74) sc around armhole. Do not join; work back and forth in rows. (62, 68, 74 sc)
Row 1 (WS): Ch 2 (counts as hdc). Hdc in each sc across. Turn. (62, 68, 74 hdc)
Row 2 (RS): Ch 2. Hdc2tog. Hdc to last 2 sts. Hdc2tog. Turn. (60, 66, 72 hdc)
Row 3: Ch 2. Hdc in each st across. Turn. (60, 66, 72 hdc)
Row 4: Ch 2. Hdc2tog. Hdc to last 2 sts. Hdc2tog. Turn. (58, 64, 70 hdc)
Row 5: Ch 2. Hdc in each st across. Turn. (58, 64, 70 hdc)
Row 6: Ch 2. Hdc2tog. Hdc to last 2 sts. Hdc2tog. Turn. (56, 62, 68 hdc)
Rows 7 through 14: Ch 2. Hdc in each st across. Turn. (56, 62, 68 hdc)
Bell Flare (Switch to F-5 Hook)
Row 15 (RS): Ch 3 (counts as dc). 2 dc in next st. (Dc in next 3 sts, 2 dc in next st) 13 (14, 15) times. Dc in remaining sts. Turn. Adjust to reach 69 (75, 81) dc for mesh repeat.
Rows 16 through 28: Work diamond mesh flat pattern as described in Special Stitches.
Bell Flare Expansion
Row 29: Ch 3. 2 dc in first ch-2 sp. (Dc in dc, 2 dc in next ch-2 sp, dc in dc, 2 dc in ch-2 sp) across. Dc in tch. Turn. (Approximately 103, 111, 121 dc)
Row 30: Ch 1. Sc in each dc across. Turn. Adjust to nearest multiple of 10 plus 1.
Scallop Cuff Border
Scallop Row 1 (WS): Ch 1. Sc in first st. (Skip 4 sts, 9 dc in next st, skip 4 sts, sc in next st) 10 (11, 12) times. Fasten off.
Seam Sleeve: With RS together, fold sleeve along length. Whipstitch the underarm seam from armhole to cuff scallop edge.
Finishing and Blocking
Block all pieces before final assembly for best results. Wet block or steam block your cotton yarn, pinning out those scallop points so they hold their shape. Let everything dry completely before wearing.
Weave in all ends securely. Take your time with this step because the mesh sections can show loose ends.
Pattern Notes and Tips
This is an intermediate to advanced crochet tutorial that will take approximately 40 to 60 hours depending on your experience level. Take your time with the shaping rows, and count your stitches regularly.
The front bodice is worked in two halves to create the lace-up opening. Do not be intimidated by this construction. It simply means you are making two smaller pieces instead of one larger one.
When only one number appears in the instructions, it applies to all sizes. Numbers in parentheses follow the pattern: Small (Medium, Large).
Making This Top Your Own
While the pattern calls for dusty rose, this design would look stunning in cream, sage green, or even black for a more dramatic look. The diamond mesh and scallop details show up beautifully in any solid color. I would avoid variegated yarns because they can muddy the stitch definition.
If you want shorter sleeves, simply stop the mesh section earlier and add the scallop border at your desired length. Three-quarter length sleeves would be lovely for transitional weather.
I hope this dusty rose fairy bell sleeve top crochet pattern becomes a treasured piece in your handmade wardrobe. This is the kind of project that makes you feel proud every time you wear it.
If this pattern caught your eye, save it to your Pinterest boards so you can find it when you are ready to cast on. And please leave a comment below if you make one. I would absolutely love to see your finished tops and hear how the project went for you!
You Might Also Like
- Dusty Rose Puff Flower Tote Free Crochet Pattern
- Lavender Jellyfish Baby Blanket Free Crochet Pattern
- Warm Autumn Terracotta Shoulder Bag Free Crochet Pattern
- Cherry Blossom Pink Flower Crochet Bracelet Pattern