Sunset Ombre Mesh Halter Top Free Crochet Pattern
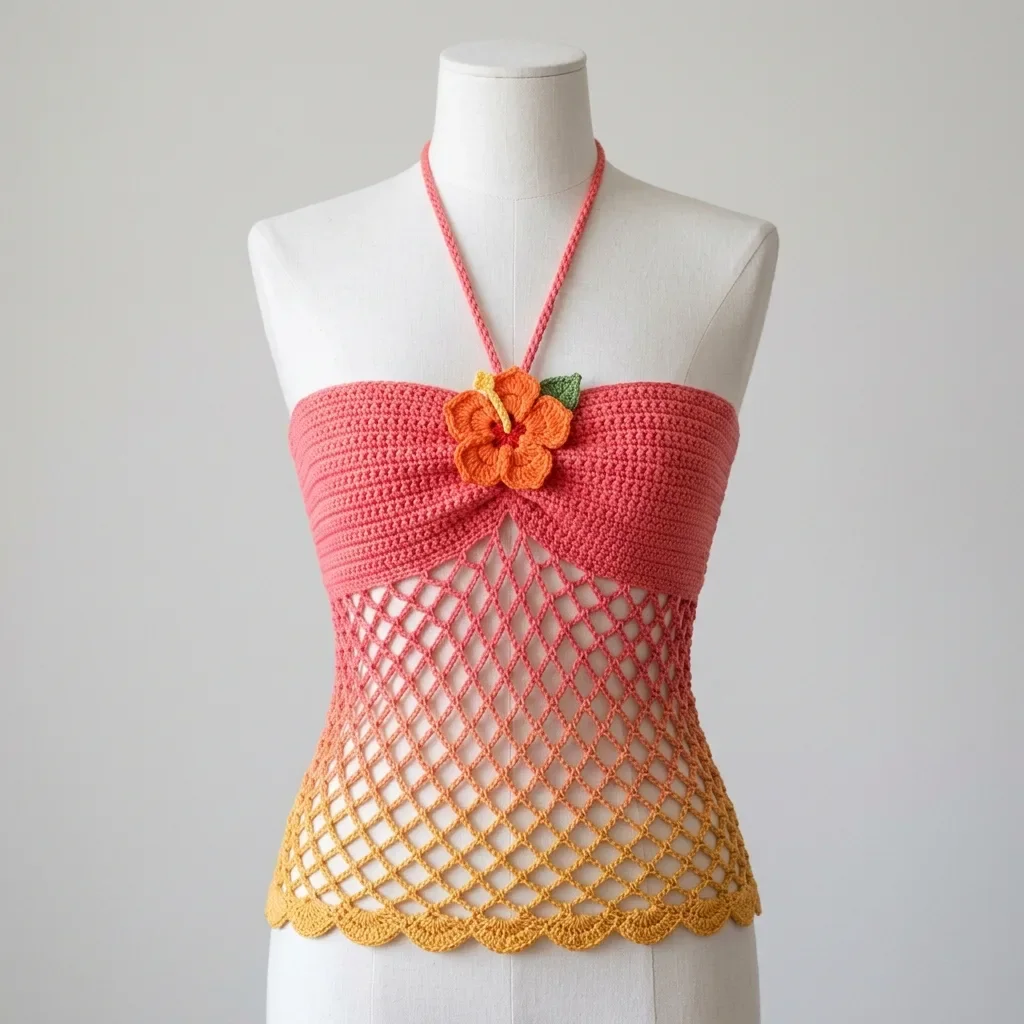
This halter top combines a solid double crochet bodice band with an open diamond mesh skirt section. The sunset ombre gradient shifts from coral-pink at the top through orange and down to golden yellow at the hem. A crocheted hibiscus flower sits at the center bust, and the whole piece finishes with a scallop border.
You will work this top from the top of the bodice downward, keeping everything in the round. The construction is straightforward once you get the rhythm of the mesh pattern. If you have worked basic stitches in the round and feel comfortable with chain spaces, you can absolutely make this.
The skill level is intermediate. You will need comfort with joining colors smoothly, maintaining consistent tension across open mesh work, and constructing a layered flower. Total time runs between 14 to 20 hours depending on your pace.
About This Crochet Pattern
This halter top works beautifully as a beach cover-up or festival piece. The bodice band provides structure while the airy mesh body drapes over a swimsuit or bralette underneath. The diamond mesh opens up considerably after blocking, giving you that breezy, summery look you see in the finished piece.
The color transitions happen naturally as you work downward. You will start with coral-pink for the bodice and upper mesh, shift to orange for a few rounds, then finish in golden yellow for the lower mesh and scallop hem. The effect mimics a sunset gradient without any complicated colorwork techniques.
Construction is simple. You work a tube for the bodice, transition to mesh, add the scallop border, then attach the halter ties and flower as finishing touches. No complicated shaping. No turning. Just steady rounds all the way down.
Finished Size
Size Small/Medium as written:
I have included size customization tips at the end of the pattern for Large/Extra-Large and Extra-Small/Small adjustments.
Materials Needed
Yarn:
Yarn Weight: DK weight (CYCA 3). The mesh opens up considerably, so DK gives the drape you see in the finished piece without the fabric being too heavy or too open.
Yarn Suggestions:
Lion Brand Comfy Cotton Blend works wonderfully here. It has beautiful drape and a slight sheen that enhances the ombre gradient. You will need 1 skein Coral, 1 skein Orange, and 1 skein Mustard.
Paintbox Yarns Simply DK is an affordable option that holds its color well and washes easily. Purchase 2 skeins Coral, 1 skein Orange, 1 skein Buttercup Yellow.
Substitution Note: Choose any DK weight yarn with at least 30% natural fiber for best drape. Avoid yarns with too much elasticity as this will cause the mesh diamonds to close up.
Hooks:
Notions:
Gauge
18 single crochet (sc) x 22 rows = 4 inches / 10 cm in single crochet, worked in the round with Yarn A on US E-4 / 3.5 mm hook, blocked.
For the mesh section: 3 diamond repeats = approximately 3.25 inches / 8.25 cm in width; 3 rows of diamonds = approximately 2.5 inches / 6.35 cm in height.
Gauge is critical for fit. Adjust hook size as needed to match gauge before beginning. A larger hook will produce a looser, more open mesh. A smaller hook will tighten the mesh and reduce dimensions.
Abbreviations (US Terms)
Special Stitches and Techniques
Mesh Diamond Row (worked in the round)
This is the foundational repeat for the skirt section. Each diamond forms from a chain-3 arch, a single crochet into the center of the arch below, and another chain-3 arch on the other side.
Setup: After the last solid round, you will transition to: sc into first st, ch 3, sk 3 sts, sc into next st, ch 3, sk 3 sts, repeat to end of round, sl st to first sc to join.
Subsequent mesh rounds: sc into center of first ch-3 arch below, ch 3, sc into center of next ch-3 arch below, ch 3, repeat to end, sl st to first sc.
The sc that sits at the center of each arch is the anchor point for the row above. Always insert your hook into the arch space, not into a specific stitch within the arch.
Scallop Stitch (for hem border)
Work as follows into each ch-3 arch of the final mesh round: sl st into arch, ch 1, 5 dc into same arch, ch 1, sl st into same arch. Each scallop sits in one ch-3 arch and contains 5 dc with ch-1 at each side.
Pattern Notes Before You Begin
1. The top works from the top of the bodice band downward. The band is worked in the round from a foundation chain that is joined. The mesh body continues downward from the band.
2. Color transitions: Yarn A covers the entire bodice band and approximately the first 4 rounds of mesh. Yarn B covers the next 2 to 3 rounds of mesh as a transition. Yarn C finishes the lower mesh rounds and the scallop hem. Cutting and rejoining gives cleaner results than carrying yarn.
3. The bodice band is worked in BLO (back loop only) for the first half of its height to create a slight ridge and structure. The second half is worked through both loops for additional density.
4. The halter neck ties are two separate crocheted cords attached after completion. They are not worked into the foundation chain.
5. Right side of work faces outward throughout. When working in the round, do not turn unless specifically instructed.
6. The finished bodice band is intentionally snug before blocking. Wet blocking will open the mesh and allow the band to relax to its true finished dimensions.
Crochet Pattern Instructions
Section 1: Bodice Band
Foundation: With Yarn A and US E-4 hook, ch 136. Without twisting, sl st to first ch to form a ring. Place marker in first stitch.
The foundation chain of 136 produces 136 working stitches when you sc into each ch. This gives a circumference of approximately 30 inches / 76 cm at gauge.
Rnd 1: Ch 1 (does not count as st here or throughout bodice), sc into each ch around, sl st to first sc to join. (136 sc)
Rnd 2: Ch 1, sc into BLO of each st around, sl st to first sc. (136 sc)
Rnd 3: Ch 1, sc into BLO of each st around, sl st to first sc. (136 sc)
Rnd 4: Ch 1, sc into BLO of each st around, sl st to first sc. (136 sc)
Rnd 5: Ch 1, sc into BLO of each st around, sl st to first sc. (136 sc)
Rnd 6: Ch 1, sc into BLO of each st around, sl st to first sc. (136 sc)
Rnd 7: Ch 1, sc into both loops of each st around, sl st to first sc. (136 sc)
Rnd 8: Ch 1, sc into both loops of each st around, sl st to first sc. (136 sc)
Rnd 9: Ch 1, sc into both loops of each st around, sl st to first sc. (136 sc)
Rnd 10: Ch 1, sc into both loops of each st around, sl st to first sc. (136 sc)
Rnd 11: Ch 1, sc into both loops of each st around, sl st to first sc. (136 sc)
Rnd 12: Ch 1, sc into both loops of each st around, sl st to first sc. (136 sc)
CHECKPOINT 1: After Rnd 12, the bodice band should measure approximately 6 inches / 15 cm in height and 30 inches / 76 cm in circumference. The upper edge (foundation chain) is the top of the top. The open edge you are currently working is the bottom of the band where the mesh begins.
Section 2: Mesh Body Transition Row
The mesh requires a multiple of 4 stitches. 136 is divisible by 4 (136 / 4 = 34 repeats), so no adjustment is needed.
Rnd 13 (Mesh Setup Rnd, still Yarn A): Ch 1, sc into first st, ch 3, sk 3 sts, (sc into next st, ch 3, sk 3 sts) 33 times, sl st to first sc to join. (34 sc, 34 ch-3 arches)
Section 3: Mesh Body in Yarn A
Rnd 14: Sl st into first ch-3 arch, ch 1, sc into same arch, ch 3, (sc into next ch-3 arch, ch 3) 33 times, sl st to first sc. (34 sc, 34 ch-3 arches)
Rnd 15: Sl st into first ch-3 arch, ch 1, sc into same arch, ch 3, (sc into next ch-3 arch, ch 3) 33 times, sl st to first sc. (34 sc, 34 ch-3 arches)
Rnd 16: Sl st into first ch-3 arch, ch 1, sc into same arch, ch 3, (sc into next ch-3 arch, ch 3) 33 times, sl st to first sc. (34 sc, 34 ch-3 arches)
Rnd 17: Sl st into first ch-3 arch, ch 1, sc into same arch, ch 3, (sc into next ch-3 arch, ch 3) 33 times, sl st to first sc. (34 sc, 34 ch-3 arches)
Section 4: Mesh Body Color Transition to Yarn B
At the end of Rnd 17, fasten off Yarn A or drop it to the inside of the work. Join Yarn B with a sl st into the first ch-3 arch.
Rnd 18 (Yarn B): Ch 1, sc into first arch, ch 3, (sc into next arch, ch 3) 33 times, sl st to first sc. (34 sc, 34 ch-3 arches)
Rnd 19 (Yarn B): Sl st into first arch, ch 1, sc into same arch, ch 3, (sc into next arch, ch 3) 33 times, sl st to first sc. (34 sc, 34 ch-3 arches)
Rnd 20 (Yarn B): Sl st into first arch, ch 1, sc into same arch, ch 3, (sc into next arch, ch 3) 33 times, sl st to first sc. (34 sc, 34 ch-3 arches)
CHECKPOINT 2: After Rnd 20, the mesh body should measure approximately 6.5 inches / 16.5 cm from the bottom of the bodice band. The color should be transitioning from coral-pink to orange. Total piece length from top of band to here should be approximately 12.5 inches / 32 cm.
Section 5: Mesh Body Transition to Yarn C
At the end of Rnd 20, fasten off Yarn B. Join Yarn C with a sl st into the first ch-3 arch.
Rnd 21 (Yarn C): Ch 1, sc into first arch, ch 3, (sc into next arch, ch 3) 33 times, sl st to first sc. (34 sc, 34 ch-3 arches)
Rnd 22 (Yarn C): Sl st into first arch, ch 1, sc into same arch, ch 3, (sc into next arch, ch 3) 33 times, sl st to first sc. (34 sc, 34 ch-3 arches)
Rnd 23 (Yarn C): Sl st into first arch, ch 1, sc into same arch, ch 3, (sc into next arch, ch 3) 33 times, sl st to first sc. (34 sc, 34 ch-3 arches)
Rnd 24 (Yarn C): Sl st into first arch, ch 1, sc into same arch, ch 3, (sc into next arch, ch 3) 33 times, sl st to first sc. (34 sc, 34 ch-3 arches)
Rnd 25 (Yarn C): Sl st into first arch, ch 1, sc into same arch, ch 3, (sc into next arch, ch 3) 33 times, sl st to first sc. (34 sc, 34 ch-3 arches)
CHECKPOINT 3: After Rnd 25, the total mesh section should measure approximately 11 inches / 28 cm from the base of the bodice band. Total piece length from top of band to here is approximately 17 inches / 43 cm. The golden yellow color should dominate the lower section.
Section 6: Scallop Hem
The scallop hem is worked directly into the ch-3 arches of Rnd 25. Continue with Yarn C and the US E-4 hook.
Rnd 26: (Sl st into first ch-3 arch, ch 1, 5 dc into same arch, ch 1) 34 times, sl st to first sl st to join. (34 scallops; 170 dc total plus 34 ch-1 on each side of each scallop)
Fasten off Yarn C. Weave in end.
CHECKPOINT 4: After Rnd 26, the hem scallops should create a decorative wavy edge all the way around. Each arch from Rnd 25 contains exactly one scallop of 5 dc. Total piece length from top to hem point of scallop: approximately 18 inches / 46 cm.
Section 7: Halter Neck Ties
The neck ties are crocheted cords attached to the upper front-left and upper front-right corners of the bodice band at the foundation chain edge.
Identify the front center of the bodice band. The center 60 stitches of the foundation chain edge form the front, and the remaining 76 stitches form the back. Place markers at stitch 38 from center-left and stitch 38 from center-right to define the front panel corners where ties will attach.
Left Halter Tie:
Join Yarn A with a sl st to the upper-left corner st of the front bodice band (at foundation chain edge, left side).
Ch 80 (this forms the tie that wraps around the neck; adjust length if needed for personal preference).
Sl st back along the chain from hook to the bodice: sl st into 2nd ch from hook and into each ch across (79 sl sts).
Sl st into same attachment stitch on bodice. Fasten off. Weave in end.
Right Halter Tie:
Join Yarn A with a sl st to the upper-right corner st of the front bodice band.
Ch 80.
Sl st into 2nd ch from hook and each ch across (79 sl sts).
Sl st into same attachment stitch on bodice. Fasten off. Weave in end.
The two ties cross at the back of the neck and tie together. Alternatively they can be joined at center back with a bow.
Back Tie:
With Yarn A, ch 130 (or length needed to wrap around the back of the wearer and tie in front). This cord is not sewn to the bodice. It is threaded through the mesh of the lower bodice band at the last row of solid sc (Rnd 12) at the back section, entering from the right back side and exiting from the left back side, then tied in front at the wearer’s sides or front to cinch fit. Fasten off and weave ends.
Section 8: Hibiscus Flower Embellishment
Flower:
Start with Yarn B. Magic ring. Ch 1.
Rnd 1: 5 sc into magic ring, sl st to first sc to join. (5 sc)
Rnd 2: Ch 1, (sc, ch 3, 3 dc into 3rd ch from hook, ch 1, sc) all into first sc, rep from ( ) into each rem 4 sc, sl st to base of first sc. (5 petals)
Fasten off Yarn B. Attach Yarn C at center of magic ring.
Rnd 3 (second layer of petals, worked behind first layer): Working into the BLO of Rnd 1 sc stitches, (sc, ch 4, 4 dc into 4th ch from hook, ch 1, sc) into each of the 5 sc of Rnd 1. (5 larger petals behind)
Fasten off Yarn C. Weave ends.
Leaf:
With Yarn D, ch 8. Sl st into 2nd ch from hook, sc into next, hdc into next, dc into next 2, hdc into next, sc into last, ch 1, working back along the other side of the chain: sc, hdc, dc 2, hdc, sc, sl st to base. Fasten off. Weave ends.
Assembly:
Position the flower at the center front of the bodice band, just below where the two neck ties emerge, approximately 1 inch / 2.5 cm down from the top edge of the band.
Layer the Yarn C back petals behind the Yarn B front petals. Tuck the leaf behind and slightly to the upper right of the flower so it peeks out.
Using a yarn needle and a length of Yarn B, sew through the center magic ring of the flower and through the bodice band several times to secure firmly. Sew through the base of the leaf and through the band as well. The flower should lie flat against the band and not rotate when the top is worn.
Size Customization Tips
To size up to Large/Extra-Large (bust 38 to 42 inches / 97 to 107 cm):
Replace the foundation ch of 136 with ch 160. This is divisible by 4 (160 / 4 = 40 repeats). Add approximately 2 extra rounds to the bodice band (14 rounds total) to keep proportions. The mesh section stitch count becomes 40 sc and 40 ch-3 arches per round. Scallop hem will have 40 scallops. Add one additional mesh round (14 total mesh rounds) to maintain proportional length. Yarn requirements increase by approximately 20%.
To size down to Extra-Small/Small (bust 28 to 30 inches / 71 to 76 cm):
Replace foundation ch with ch 112. This is divisible by 4 (112 / 4 = 28 repeats). Reduce bodice band to 10 rounds. Mesh section will have 28 sc and 28 ch-3 arches per round. Scallop hem will have 28 scallops. You may reduce mesh length by 2 rounds if a shorter crop length is preferred.
For length adjustment only: Each additional mesh round adds approximately 0.83 inches / 2.1 cm to the total length. Add or remove mesh rounds evenly from the Yarn A or Yarn B sections to preserve the color gradient proportions.
Finishing and Blocking
Weave in all ends securely on the wrong side of the garment. Ends within the mesh section should be woven through at least 4 to 6 adjacent chain arches and then trimmed. Do not leave them dangling, as they will pull through the open mesh.
Wet blocking: Soak the finished top in cool water for 20 minutes. Gently press out excess water in a towel. Do not wring. Lay flat on a blocking mat or clean dry towel. Pin the bodice band to its full circumference of 30 inches using rust-proof pins along the top and bottom edges of the band. Pin each diamond of the mesh section open by placing pins at the sc junctions and gently stretching each diamond to its full shape. Allow to dry completely before removing pins, at least 24 hours. Blocking will open the mesh significantly and set the drape of the garment.
Care Instructions
Hand wash in cool water with gentle detergent. Do not wring or twist. Lay flat to dry. Do not tumble dry. Do not iron directly on the mesh section. Store folded, not hung, to prevent the mesh from stretching out of shape over time. If the garment is worn in chlorinated water or salt water, rinse immediately in cool fresh water and lay flat to dry.
Final Thoughts on This Sunset Ombre Halter Top Crochet Pattern
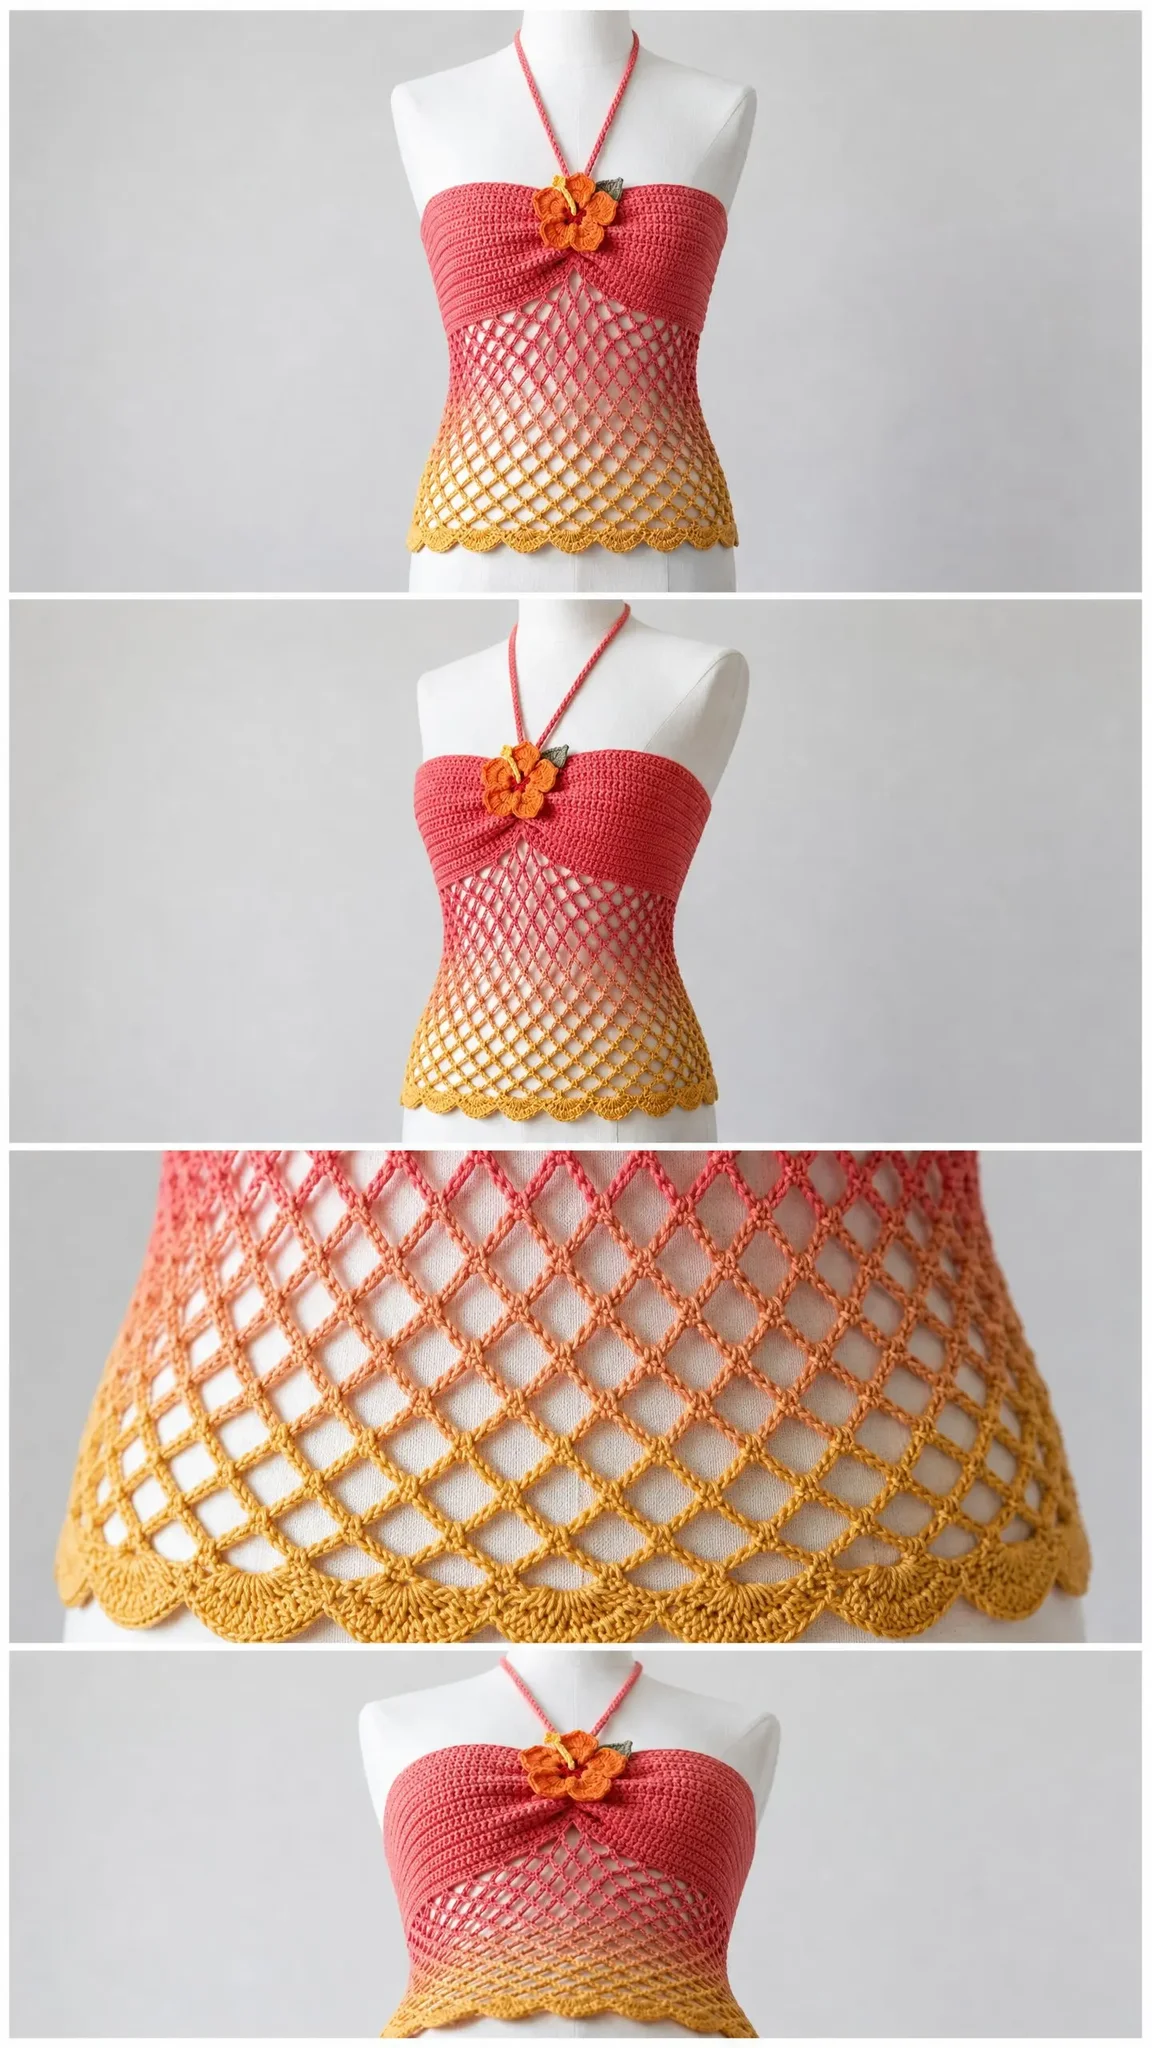
I hope this sunset ombre mesh halter top crochet pattern brings some sunshine to your summer wardrobe. The gradient effect is so satisfying to watch develop as you work your way down, and that little hibiscus flower adds the perfect tropical finishing touch. Take your time with the mesh section, trust your gauge swatch, and do not skip blocking. It really does make all the difference in how the diamonds open up.
Thank you so much for choosing this pattern. I would absolutely love to see your finished tops! Tag me on Instagram or share a photo in my Facebook group. Seeing your color combinations and styling choices is genuinely one of the best parts of sharing patterns.
If you loved this project, go ahead and save it to your Pinterest boards so you can find it easily when summer rolls around again. And if you make one, please drop a comment below. I read every single one, and hearing about your crochet adventures makes my day.
You Might Also Like
- Dusty Rose Floral Crochet Summer Boots Free Pattern
- Sunset Gradient Grid Tote Free Crochet Pattern
- Sky Blue Dragon Amigurumi Plush Free Crochet Pattern
- Crimson Valentine Rose Crochet Dress Free Crochet Pattern