Sunset Gradient Fairy Dress Free Crochet Pattern
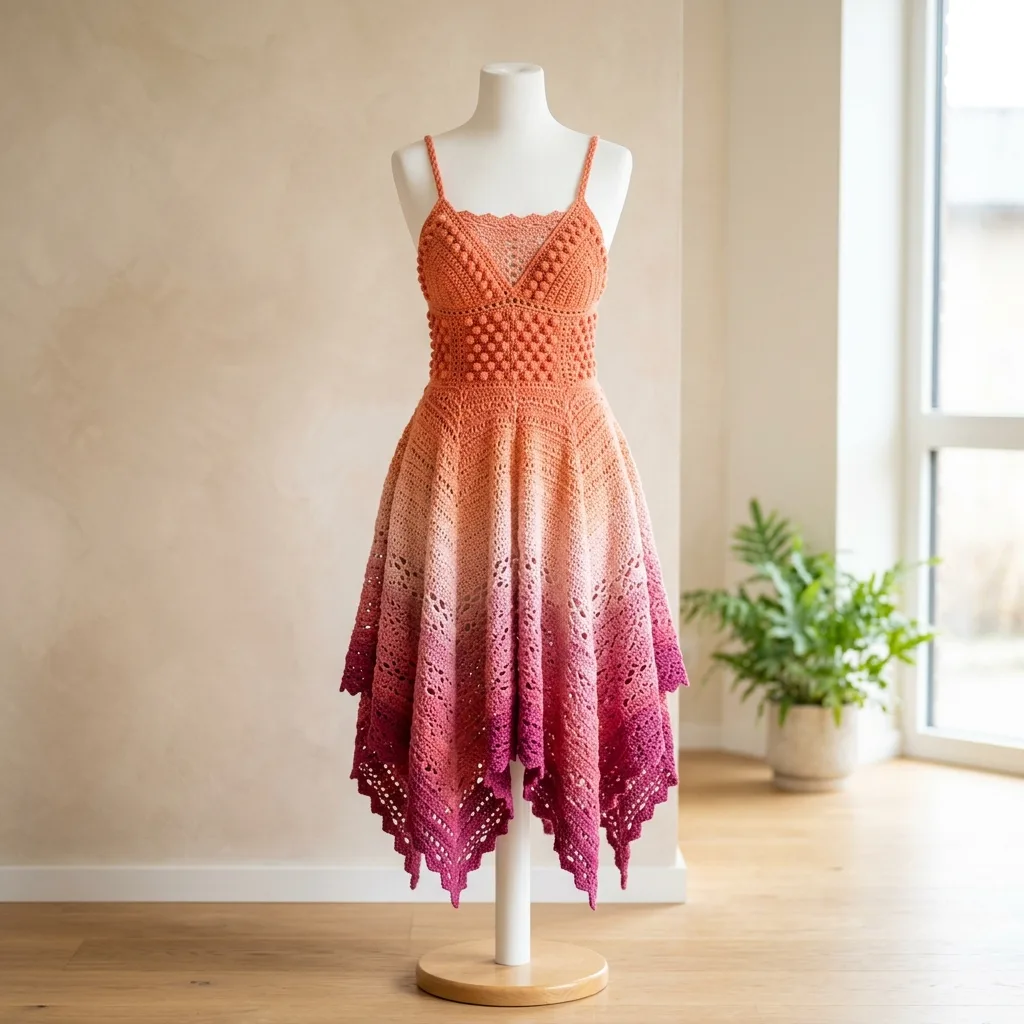
I don’t know about you, but I have been searching for the perfect statement dress pattern for what feels like forever. Something that looks absolutely stunning but actually comes together in a logical way. Something that makes people stop and ask, “Wait, you made that?”
Well, this is that dress. The kind that looks like it belongs in a boutique window but lives in your closet because you crocheted it yourself.
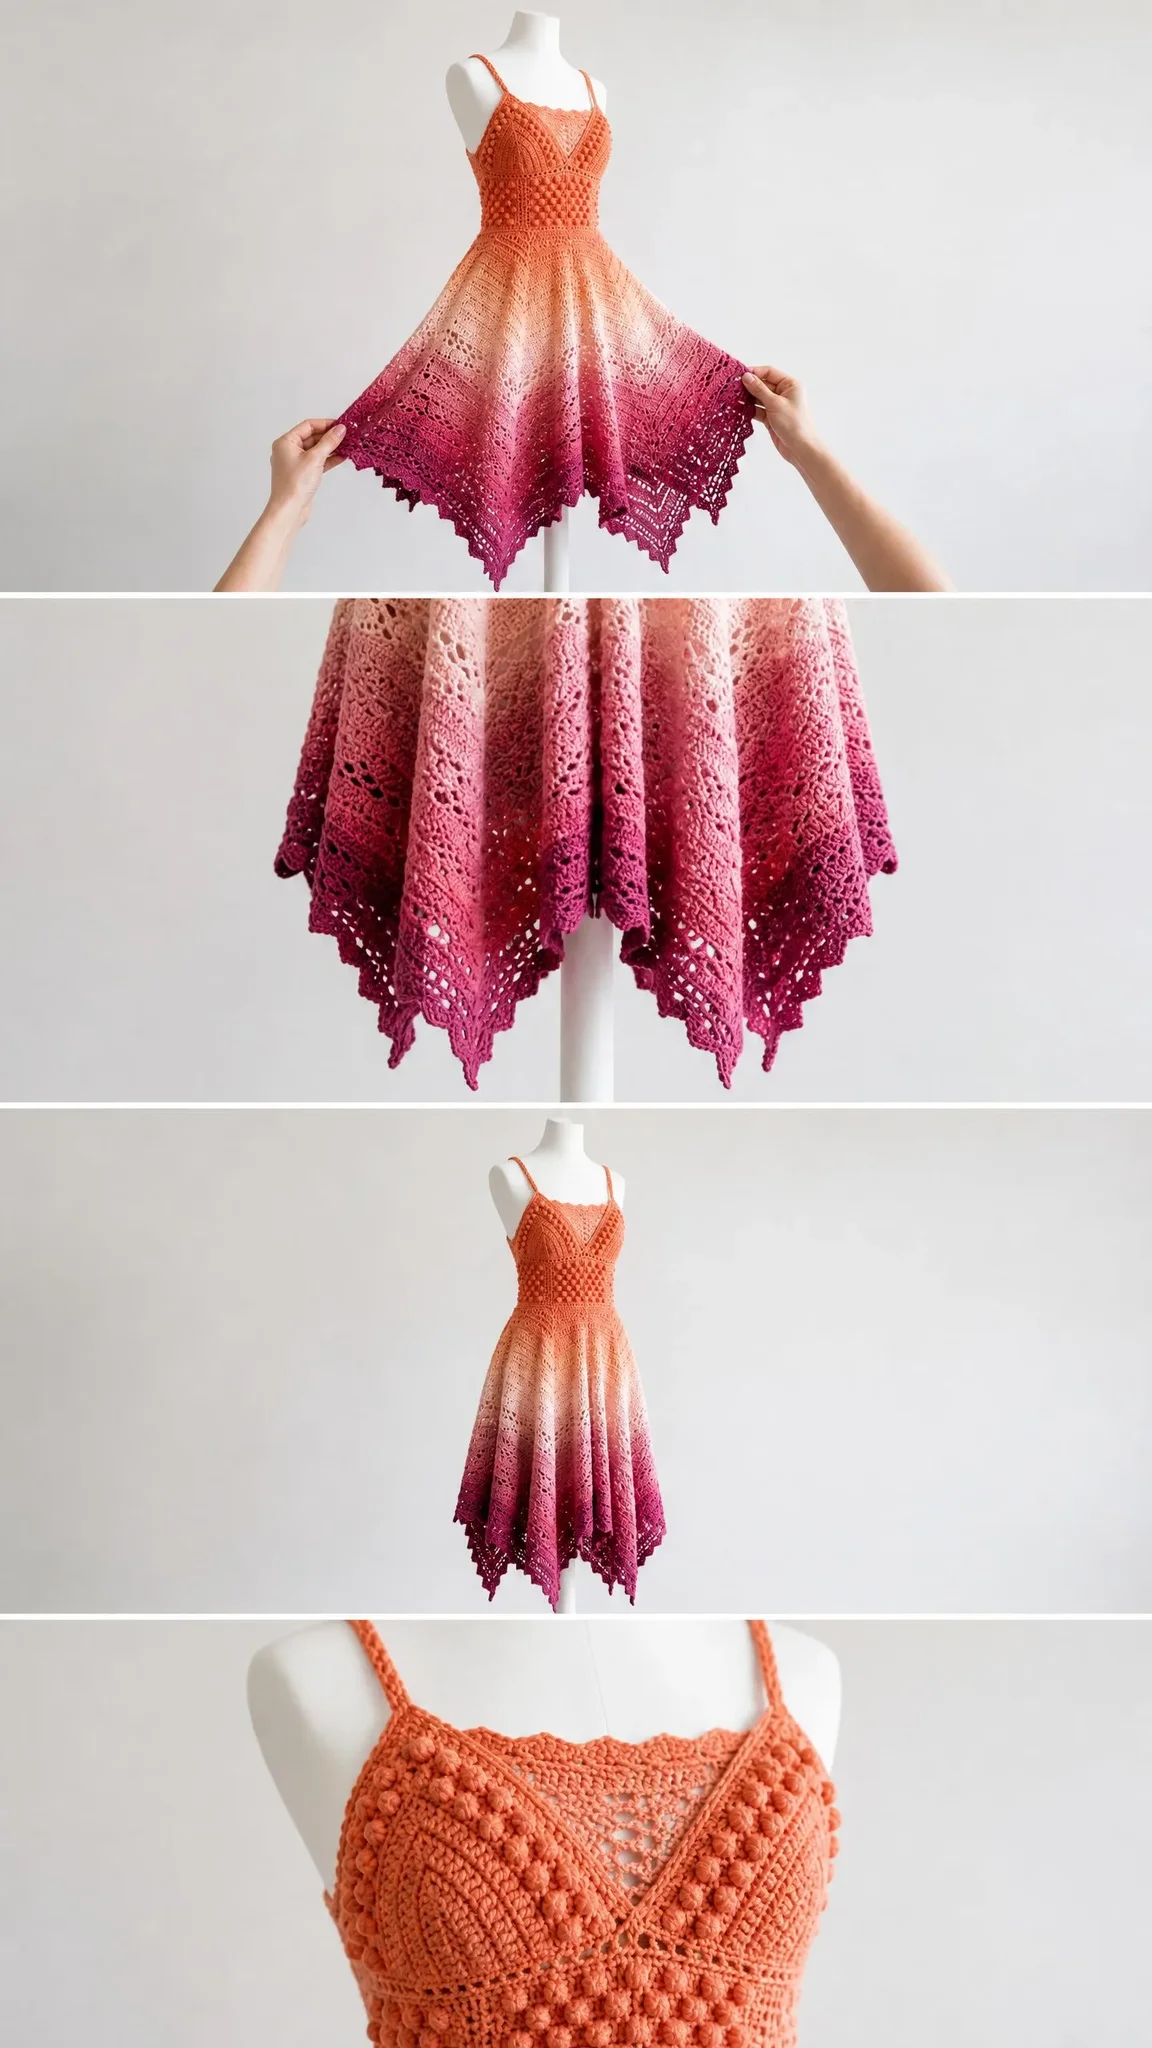
This Sunset Gradient Fairy Dress combines everything I love about ambitious crochet projects. A fitted bodice with gorgeous bobble texture, a flowing lace skirt that moves like a dream, and that dramatic handkerchief hem that makes you feel like you could twirl through a meadow at golden hour. The ombre color flow from deep coral-orange through peach and blush down to rich magenta-fuchsia at the hem? Absolutely breathtaking when the light catches it.
About This Crochet Dress Pattern
This dress is constructed top-down in the round, which means you start with the straps and bodice, then work your way down through an increasingly dramatic skirt. The bodice features a V-neck front with a textured bobble stitch panel that adds visual interest and structure. The back panel uses a subtle spike stitch diamond texture for a sophisticated finish.
Once you join the front and back panels at the side seams, the magic really begins. The skirt starts at the natural waist and fans outward using increase rounds worked in a gorgeous chevron lace pattern. The hem features six separate triangular panels that create those beautiful pointed edges, giving the dress its fairy-tale silhouette.
Skill level: Advanced. This pattern requires comfort with working in the round, flat panel shaping, bobble stitches (five double crochets closed together), multi-row lace repeats, seaming bodice panels, managing gradient color transitions, and executing a complex handkerchief hem. If you have completed three to four complex garment projects, you are ready for this challenge.
Time estimate: Approximately 80 to 120 hours depending on your speed, yarn choices, and size. The skirt lace panels are the most time-intensive portion, but they are also the most satisfying to watch grow.
Finished Measurements
This crochet pattern is written for size Small/Medium, which corresponds to US size 4/6. Here are your finished measurements:
Size customization tips are provided at the end of the pattern for those who need adjustments.
Materials Needed
Yarn: Approximately 1,400 yards (1,280 m) total of fingering weight yarn, also called sock weight or lace-heavy. You will use this as a single strand throughout. You need yarn in four gradient colors or one gradient cake that transitions through these zones:
Hook: US size E-4 / 3.5 mm crochet hook, or size needed to obtain gauge
Notions:
Yarn Suggestions
Option 1: Malabrigo Sock (100% superwash merino wool, 440 yards per 100 g skein). Purchase one skein each of Sunset, Lettuce, Damask Rose, and Fucsia colorways, or look for a gradient set. This yarn has a beautiful sheen and blocks exquisitely, which is essential for the lace skirt panels to open up correctly.
Option 2: Schoppel-Wolle Zauberball (75% wool, 25% nylon, 459 yards per 100 g ball). One or two gradient balls that transition through warm coral to fuchsia tones will work beautifully and eliminate most color-change management. The nylon content adds durability for a wearable garment.
Option 3: Cascade Heritage Silk (85% superwash merino, 15% mulberry silk, 437 yards per 100 g skein). The silk content gives this yarn a fluid drape ideal for the skirt. Purchase four coordinating colorways in the gradient range described above.
Substitution note: Any fingering or sock weight yarn that achieves gauge may be substituted. Choose a yarn with good stitch definition for the bobble bodice and good blocking capacity for the lace skirt. Avoid very fuzzy or halo yarns, which will obscure the lace pattern.
Gauge
24 stitches and 28 rows = 4 inches (10 cm) in single crochet, blocked.
16 stitches and 8 rows = 4 inches (10 cm) in the lace chevron pattern (Rows 1 to 4 of lace repeat), blocked.
Gauge is mandatory for this garment. Even small deviations will significantly affect fit. Work a swatch of at least 6 inches (15 cm) square in both single crochet and in the lace pattern. Wet block and measure before beginning. I cannot stress this enough. Take the time now and save yourself heartache later.
Abbreviations and Stitch Definitions
Before we dive in, let me walk you through every stitch and abbreviation you will encounter. I am defining each one in plain English so there is no confusion.
Special Stitches
Bobble (bo): Work 5 double crochet stitches into the same stitch, leaving the last loop of each on the hook. You will have 6 loops on your hook total. Yarn over and draw through all 6 loops to close. One bobble made. These create that beautiful textured pattern on the bodice.
Picot: Chain 3, slip stitch into the first chain of the chain-3. One picot made.
V-stitch (V-st): Work (dc, ch 2, dc) into the same stitch or space. One V-stitch made.
Shell: Work (dc, ch 1, dc, ch 1, dc) into the same stitch or space. One shell made.
Fan Stitch (fan): Work (dc, ch 1, dc, ch 1, dc, ch 1, dc, ch 1, dc) into the same stitch or space. One 5-dc fan made. These create the beautiful openwork in the skirt.
Scallop Edge: Slip stitch into next stitch, work (sc, hdc, 3 dc, hdc, sc) into same stitch, skip 2 stitches. One scallop made.
Spike Single Crochet (spike-sc): Insert hook into the stitch 2 rows below the current row (not the current row), yarn over, draw up a long loop to the height of the current row, yarn over, draw through both loops. One spike-sc made. This creates subtle texture on the back bodice.
Pattern Notes Before You Begin
A few important things to keep in mind as you work through this crochet tutorial:
1. The dress is worked in Color A for the straps and bodice through the waist. Color transitions begin in the upper skirt and graduate to Color D at the hem.
2. When changing colors, work to the last yarn over of the final stitch in the current color, then draw the new color through to complete the stitch. Cut the old color, leaving a 6-inch tail. Weave ends as you go.
3. If using a gradient yarn cake, simply begin the cake and allow colors to transition naturally.
4. The bodice is worked flat in two panels (front and back) and then joined at the underarms to work in the round.
5. Turning chains in single crochet rows count as zero stitches and are not included in stitch counts.
6. Turning chains in double crochet rows count as the first double crochet and are included in stitch counts.
7. Stitch counts given at the end of each row or round appear in parentheses.
8. The handkerchief hem is created by working 6 separate triangular panels downward from the lower skirt edge.
9. Block vigorously. This dress will grow significantly in length when blocked and the lace will open dramatically. Blocking is not optional for the finished look.
10. All lace pattern rounds are worked with RS facing.
Step by Step Instructions
Section 1: Straps (Make 2)
Using Color A, make a foundation chain.
Chain 101.
Row 1: Sc in 2nd ch from hook and in each ch across. Turn. (100 sc)
Row 2: Ch 1, sc in each st across. Turn. (100 sc)
Row 3: Ch 1, sc in each st across. Turn. (100 sc)
Fasten off, leaving a long tail for seaming. Set straps aside.
Section 2: Front Bodice Panel
The front bodice is worked flat, beginning at the center front neckline base and worked outward and downward.
Using Color A, chain 3.
Foundation Row: Work 6 sc into 2nd ch from hook (or work a magic ring, 6 sc). Do not join. Turn. (6 sc)
Row 1 (RS): Ch 1, 2 sc in first st, sc in next 4 sts, 2 sc in last st. Turn. (8 sc)
Row 2 (WS): Ch 1, sc in each st across. Turn. (8 sc)
Row 3 (RS): Ch 1, 2 sc in first st, sc across to last st, 2 sc in last st. Turn. (10 sc)
Row 4 (WS): Ch 1, sc in each st across. Turn. (10 sc)
Row 5 (RS): Ch 1, 2 sc in first st, sc across to last st, 2 sc in last st. Turn. (12 sc)
Row 6 (WS): Ch 1, sc in each st across. Turn. (12 sc)
Row 7 (RS): Ch 1, 2 sc in first st, sc across to last st, 2 sc in last st. Turn. (14 sc)
Row 8 (WS): Ch 1, sc in each st across. Turn. (14 sc)
Row 9 (RS): Ch 1, 2 sc in first st, sc across to last st, 2 sc in last st. Turn. (16 sc)
Row 10 (WS): Ch 1, sc in each st across. Turn. (16 sc)
Row 11 (RS): Ch 1, 2 sc in first st, sc across to last st, 2 sc in last st. Turn. (18 sc)
Row 12 (WS): Ch 1, sc in each st across. Turn. (18 sc)
Now begin the bobble panel across the center of the front bodice. The bobble section spans the center 10 stitches with 4 sc on each side edge.
Row 13 (RS, Bobble Row): Ch 1, sc in first 4 sts, (bo in next st, sc in next st) 5 times, sc in last 4 sts. Turn. (18 sts total, with bobbles counting as 1 stitch each)
Row 14 (WS): Ch 1, sc in each st across. Turn. (18 sc)
Row 15 (RS, Bobble Row): Ch 1, sc in first 4 sts, sc in first bobble, (bo in next sc, sc in next bobble) 4 times, bo in next sc, sc in last 4 sts. Turn. (18 sts)
Row 16 (WS): Ch 1, sc in each st across. Turn. (18 sc)
Rows 17 to 28: Rep Rows 13 to 16 three more times, continuing the bobble checkerboard pattern. (18 sc after each WS row)
At the end of Row 28, the front bodice panel measures approximately 4 inches (10 cm) tall at center. The bobble section is complete.
Now work the empire waist band of the bodice:
Row 29 (RS): Ch 1, sc in each st across. Turn. (18 sc)
Row 30 (WS): Ch 1, sc in each st across. Turn. (18 sc)
Row 31 (RS): Ch 1, sc in each st across. Turn. (18 sc)
Row 32 (WS): Ch 1, sc in each st across. Turn. (18 sc)
Row 33 (RS): Ch 1, sc in each st across. Turn. (18 sc)
Row 34 (WS): Ch 1, sc in each st across. Turn. (18 sc)
Now work side expansions for the front bodice width:
Row 35 (RS): Ch 1, 2 sc in first st, sc across to last st, 2 sc in last st. Turn. (20 sc)
Row 36 (WS): Ch 1, sc in each st across. Turn. (20 sc)
Row 37 (RS): Ch 1, 2 sc in first st, sc across to last st, 2 sc in last st. Turn. (22 sc)
Row 38 (WS): Ch 1, sc in each st across. Turn. (22 sc)
Row 39 (RS): Ch 1, 2 sc in first st, sc across to last st, 2 sc in last st. Turn. (24 sc)
Row 40 (WS): Ch 1, sc in each st across. Turn. (24 sc)
Row 41 (RS): Ch 1, 2 sc in first st, sc across to last st, 2 sc in last st. Turn. (26 sc)
Row 42 (WS): Ch 1, sc in each st across. Turn. (26 sc)
Row 43 (RS): Ch 1, 2 sc in first st, sc across to last st, 2 sc in last st. Turn. (28 sc)
Row 44 (WS): Ch 1, sc in each st across. Turn. (28 sc)
Row 45 (RS): Ch 1, 2 sc in first st, sc across to last st, 2 sc in last st. Turn. (30 sc)
Row 46 (WS): Ch 1, sc in each st across. Turn. (30 sc)
Row 47 (RS): Ch 1, 2 sc in first st, sc across to last st, 2 sc in last st. Turn. (32 sc)
Row 48 (WS): Ch 1, sc in each st across. Turn. (32 sc)
Row 49 (RS): Ch 1, 2 sc in first st, sc across to last st, 2 sc in last st. Turn. (34 sc)
Row 50 (WS): Ch 1, sc in each st across. Turn. (34 sc)
Row 51 (RS): Ch 1, 2 sc in first st, sc across to last st, 2 sc in last st. Turn. (36 sc)
Row 52 (WS): Ch 1, sc in each st across. Turn. (36 sc)
Row 53 (RS): Ch 1, 2 sc in first st, sc across to last st, 2 sc in last st. Turn. (38 sc)
Row 54 (WS): Ch 1, sc in each st across. Turn. (38 sc)
Row 55 (RS): Ch 1, 2 sc in first st, sc across to last st, 2 sc in last st. Turn. (40 sc)
Row 56 (WS): Ch 1, sc in each st across. Turn. (40 sc)
Fasten off. Front bodice panel complete. Set aside.
Checkpoint: After the front bodice panel is complete, the piece should measure approximately 8 inches (20 cm) tall from foundation to lower edge, and approximately 6.5 inches (16.5 cm) wide at the widest lower point. Wet block lightly and measure before proceeding.
Section 3: Back Bodice Panel
The back bodice is simpler, worked straight with a slight texture and the same width.
Using Color A, chain 41 (40 working stitches).
Row 1 (RS): Sc in 2nd ch from hook and in each ch across. Turn. (40 sc)
Rows 2 to 8: Ch 1, sc in each st across. Turn. (40 sc)
Row 9 (RS, Texture Row): Ch 1, sc in first 3 sts, then work (spike-sc in next st, sc in next 3 sts) 9 times, spike-sc in next st. Turn. (40 sts)
Row 10 (WS): Ch 1, sc in each st across. Turn. (40 sc)
Row 11 (RS): Ch 1, sc in each st across. Turn. (40 sc)
Row 12 (WS): Ch 1, sc in each st across. Turn. (40 sc)
Row 13 (RS, Texture Row): Ch 1, sc in first st, (spike-sc in next st, sc in next 3 sts) 9 times, spike-sc in next st, sc in last 2 sts. Turn. (40 sts)
This offsets the spike-sc by 2 stitches from the previous texture row, creating a diamond texture.
Row 14 (WS): Ch 1, sc in each st across. Turn. (40 sc)
Rows 15 to 56: Continue alternating plain sc rows and texture rows every 4 rows, maintaining 40 stitches throughout. End after a WS row. (40 sc)
The back bodice should match the front bodice in height, approximately 8 inches (20 cm).
Fasten off. Back bodice panel complete.
Section 4: Neckline Shaping and Strap Attachment
Return to the front bodice panel. With RS facing, attach Color A at the upper right corner of the front panel (the corner at the V-neck).
Scallop Row: (Sl st into next edge st, work (sc, hdc, 3 dc, hdc, sc) into same edge st, skip 2 edge sts) across upper neckline edge. Fasten off.
Strap placement: Position one strap at approximately 3 inches (7.5 cm) from each side of the center front V. Using the long tail from each strap, sew securely to the WS of the upper front neckline edge. Repeat on back panel, positioning straps to match, approximately 2 inches (5 cm) from each side of the center back.
Section 5: Joining for Working in the Round
With RS facing both panels facing outward and WS together at sides, use Color A and a seaming slip stitch to join the side seams from the underarm to the lower bodice edge. Leave the underarm open for approximately 1 inch (2.5 cm) at the top to allow arm movement.
Join front and back at both side seams. You now have a joined tube with 40 sts on front and 40 sts on back.
Using Color A, join yarn at the right side seam with a sl st to begin working in the round at the lower bodice edge.
Section 6: Waist Band Rounds
Rnd 1: Ch 1, sc in each st around, working into the bottom edge stitches of both front and back panels. Join with sl st to first sc. (80 sc)
Rnd 2: Ch 1, sc in each st around. Join. (80 sc)
Rnd 3: Ch 1, sc in each st around. Join. (80 sc)
Rnd 4: Ch 1, sc in each st around. Join. (80 sc)
Section 7: Upper Skirt Expansion
The skirt begins expanding here. Begin transitioning to Color B in this section.
Rnd 5: Ch 1, (sc in next 9 sts, 2 sc in next st) 8 times. Join. (88 sc)
Rnd 6: Ch 1, sc in each st around. Join. (88 sc)
Rnd 7: Ch 1, (sc in next 10 sts, 2 sc in next st) 8 times. Join. (96 sc)
Rnd 8: Ch 1, sc in each st around. Join. (96 sc)
Rnd 9: Ch 1, (sc in next 11 sts, 2 sc in next st) 8 times. Join. (104 sc)
Rnd 10: Ch 1, sc in each st around. Join. (104 sc)
Rnd 11: Ch 1, (sc in next 12 sts, 2 sc in next st) 8 times. Join. (112 sc)
Rnd 12: Ch 1, sc in each st around. Join. (112 sc)
Rnd 13: Ch 1, (sc in next 13 sts, 2 sc in next st) 8 times. Join. (120 sc)
Rnd 14: Ch 1, sc in each st around. Join. (120 sc)
Rnd 15: Ch 1, (sc in next 14 sts, 2 sc in next st) 8 times. Join. (128 sc)
Rnd 16: Ch 1, sc in each st around. Join. (128 sc)
Rnd 17: Ch 1, (sc in next 15 sts, 2 sc in next st) 8 times. Join. (136 sc)
Rnd 18: Ch 1, sc in each st around. Join. (136 sc)
Rnd 19: Ch 1, (sc in next 16 sts, 2 sc in next st) 8 times. Join. (144 sc)
Rnd 20: Ch 1, sc in each st around. Join. (144 sc)
Note: 144 divided by 12 equals 12. This is the stitch count needed to begin the 12-stitch lace chevron repeat.
Section 8: Lace Chevron Skirt
The lace chevron pattern is worked over a 12-stitch repeat. With 144 stitches, you have 12 complete repeats around. Transition through Color B to Color C, then Color D as you work down the skirt.
Rnd 21 (Round A): Ch 3 (counts as first dc), dc in next 2 sts, ch 2, skip next 2 sts, dc in next 3 sts, ch 2, skip next 2 sts, (dc in next 3 sts, ch 2, skip next 2 sts, dc in next 3 sts, ch 2, skip next 2 sts) 11 times. Join with sl st to top of ch-3. (96 dc, 24 ch-2 sps)
Rnd 22 (Round B): Sl st into top of ch-3 to reposition. Ch 1, sc in first ch-2 sp, ch 3, skip 3 dc, V-st in center of next ch-2 sp, ch 3, (sc in next ch-2 sp, ch 3, V-st in next ch-2 sp, ch 3) 11 times. Join. (12 sc, 12 V-sts, 24 ch-3 sps)
Rnd 23 (Round C): Sl st to V-st ch-2 sp, ch 3, (2 dc, ch 1, 3 dc) in same sp (shell over V-st ch-2 sp), ch 2, sc in next sc, ch 2, (shell in next V-st ch-2 sp, ch 2, sc in next sc, ch 2) 11 times. Join. (12 shells, 12 sc, 24 ch-2 sps)
Rnd 24 (Round D): Sl st to center ch-1 sp of first shell, ch 3, (dc, ch 1, dc, ch 1, dc, ch 1, dc, ch 1, dc) in same sp (fan, 5 dc), ch 3, sc in next sc, ch 3, (fan in center ch-1 sp of next shell, ch 3, sc in next sc, ch 3) 11 times. Join. (12 fans x 5 dc = 60 dc, 12 sc, 24 ch-3 sps)
Transition Rnd: Ch 1, (sc in each of 5 fan dc, 3 sc in ch-3 sp, sc in sc, 3 sc in ch-3 sp) 12 times. Join. (120 sc)
Continue working lace set repeats, following the 4-round pattern and transition rounds, until the skirt reaches the desired length. Work additional lace sets to create the handkerchief hem panels.
Finishing
Weave in all ends securely using your tapestry needle. Take your time with this step.
Blocking: Wet block your finished dress by soaking it in lukewarm water for 15 to 20 minutes. Gently squeeze out excess water (do not wring) and lay flat on blocking mats. Pin out the lace sections and handkerchief points to open up the pattern. Allow to dry completely before removing pins. This step transforms your dress from “nice” to “stunning.”
If desired, thread elastic through the waistband rounds to add gentle support and structure.
Tips for Success
Take breaks. This is a marathon, not a sprint. The skirt lace panels take the longest, so pace yourself.
Count your stitches regularly, especially during the expansion rounds. One missed increase can throw off your entire lace pattern repeat.
Try on the bodice after seaming and before starting the skirt. Make adjustments now rather than later.
Use stitch markers liberally. Mark the beginning of each round and the start of each 12-stitch repeat in the lace section.
Share Your Makes
Thank you so much for choosing this pattern for your next project. I genuinely cannot wait to see your finished dresses. There is something incredibly special about watching a gradient unfold through hours of careful stitching, and I know your version is going to be absolutely gorgeous.
If you loved making this Sunset Gradient Fairy Dress, save this pattern to your Pinterest boards so you can find it again easily. And please, drop a comment below when you finish yours. I would love to see your color choices and hear how the project went for you. Happy crocheting!
You Might Also Like
- Ocean Blue Floral Lace Top Free Crochet Pattern
- Terracotta Rust Textured Clutch Bag Free Crochet Pattern
- Lavender Wildflower Crochet Crown Free Crochet Pattern
- Blush Pink Tiered Baby Dress Free Crochet Pattern