Pastel Bunny Spring Skirt Free Crochet Pattern
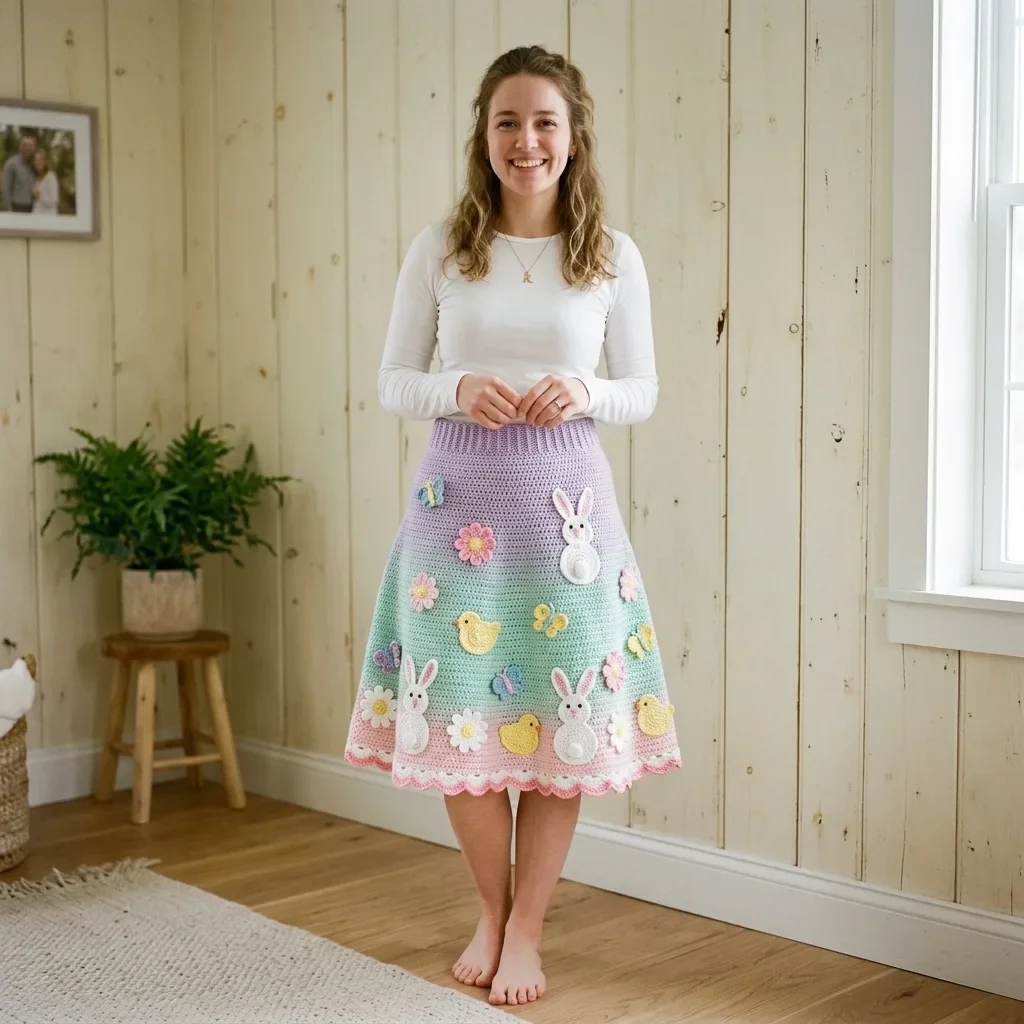
Looking for a statement piece that celebrates the season while keeping you comfortable? This pastel bunny spring skirt crochet pattern delivers exactly that. The A-line silhouette flatters every body type, and the gradient colorway moving from soft lavender through mint green to blush pink creates a stunning visual effect that turns heads at Easter brunch or spring garden parties.
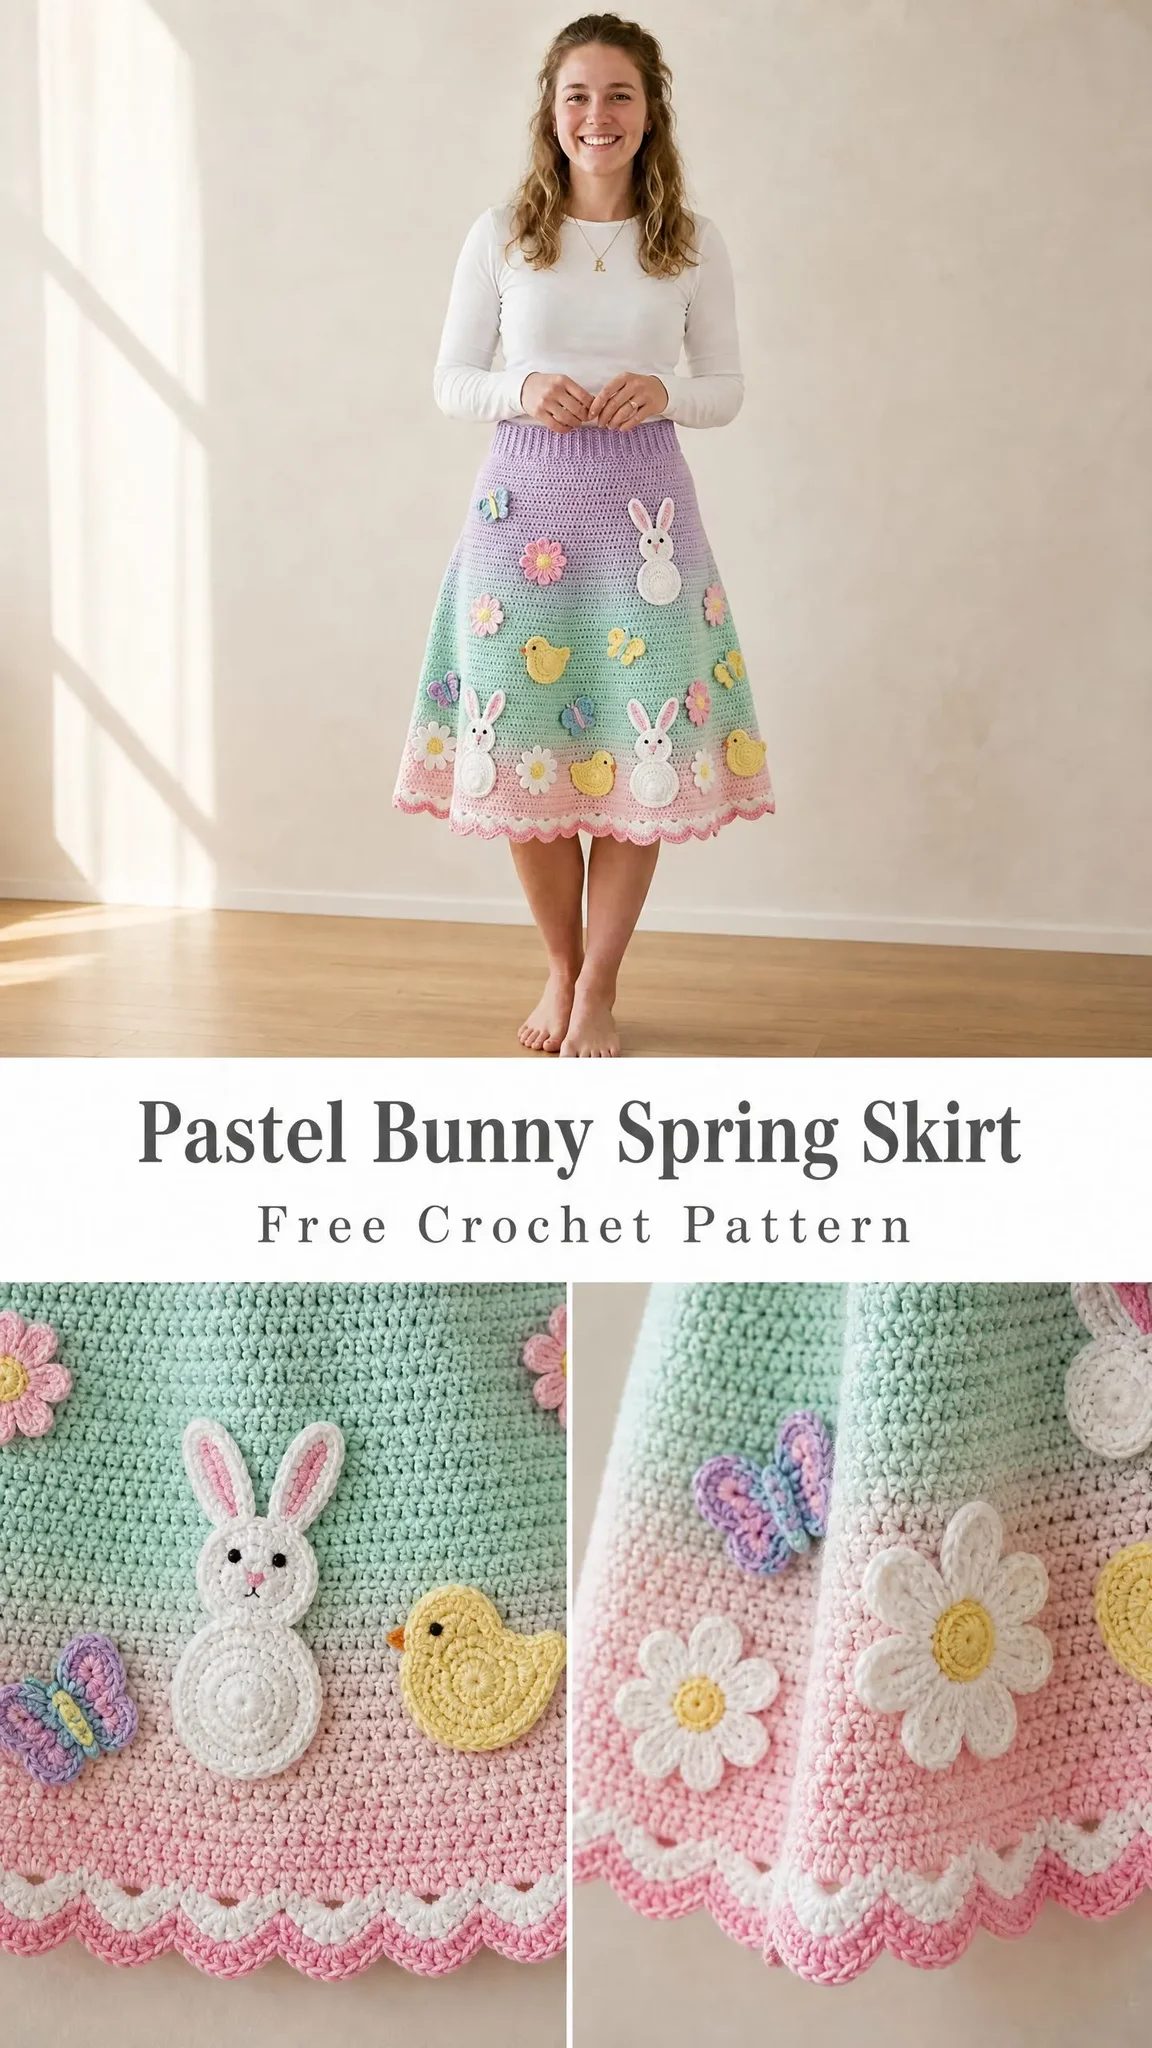
The skirt uses simple single crochet stitches for the main body, making it approachable for confident intermediate crocheters. You will learn gradient color blending, work adorable dimensional appliques, and finish with a delicate scallop hem border. The whole project takes roughly 25 to 35 hours, which makes it perfect for a satisfying multi-week project.
Whether you are making this for yourself or as a handmade gift for someone who loves whimsical wearable art, this crochet tutorial walks you through every step. The bunnies, baby chicks, butterflies, and daisies transform a simple skirt into a conversation starter.
Why You Will Love This Crochet Pattern
This skirt sits at your natural waist and falls to approximately mid-knee length. The fitted ribbed waistband provides structure and comfort without the need for buttons or zippers. The seamless construction means no seaming the body pieces together at the end.
The gradient color technique creates that beautiful watercolor effect you see in the finished piece. I walk you through exactly which rounds to change colors so you get smooth transitions rather than harsh lines.
The appliques are my favorite part. Each little bunny, chick, butterfly, and daisy gets crocheted separately then sewn on after blocking. This means you can customize the placement to your liking and add more or fewer motifs based on your preference.
Skill Level
This pattern is rated intermediate. The main body stitch is straightforward single crochet (sc) worked in continuous rounds, but you need comfort with several techniques.
You should already know how to work in continuous rounds without joining, manage yarn color changes, crochet small applique motifs, and seam pieces neatly to a curved surface. A determined beginner can absolutely complete the body with patience, but the appliques and color blending work best with some prior experience.
Finished Measurements
Size Small: waist 26 to 28 inches (66 to 71 cm), hip 36 to 38 inches (91.5 to 96.5 cm), length 22 inches (56 cm)
Size Medium: waist 30 to 32 inches (76 to 81 cm), hip 40 to 42 inches (101.5 to 106.5 cm), length 22.5 inches (57 cm)
Size Large: waist 34 to 36 inches (86.5 to 91.5 cm), hip 44 to 46 inches (112 to 117 cm), length 23 inches (58.5 cm)
Size XL: waist 38 to 40 inches (96.5 to 101.5 cm), hip 48 to 50 inches (122 to 127 cm), length 23.5 inches (59.5 cm)
All instructions are written for Size Small, with Medium, Large, and XL changes in parentheses in the format: Small (Medium, Large, XL).
Materials Needed
Yarn
Yarn A, Soft Lavender: approximately 280 (320, 360, 400) yards / 256 (293, 329, 366) meters of DK weight yarn
Yarn B, Mint Green: approximately 350 (400, 450, 500) yards / 320 (366, 411, 457) meters of DK weight yarn
Yarn C, Blush Pink: approximately 180 (200, 230, 260) yards / 165 (183, 210, 238) meters of DK weight yarn
Yarn D, White: approximately 120 yards / 110 meters for appliques and hem border
Yarn E, Yellow: approximately 60 yards / 55 meters for chick and daisy center appliques
Yarn F, Pale Blue: approximately 40 yards / 37 meters for butterfly appliques
Recommended Yarn Brands
Paintbox Yarns Simply DK (100% acrylic, 137 yards / 125 m per 50 g ball) comes in accurate pastel shades and washes beautifully for a frequently worn seasonal garment.
Lion Brand Feels Like Butta DK (100% polyester microfiber, 230 yards / 210 m per 100 g skein) offers ultra-soft drape that suits the A-line silhouette.
Scheepjes Catona DK weight (mercerized cotton, 125 yards / 115 m per 50 g ball) gives excellent stitch definition for those who prefer natural fiber.
Use any DK weight yarn that achieves gauge. Avoid fuzzy or boucle yarns because stitch definition matters for clean applique attachment.
Tools
Gauge
With F-5 / 3.75 mm hook in single crochet worked in the round:
18 stitches = 4 inches / 10 cm
20 rounds = 4 inches / 10 cm
Waistband ribbing gauge with E-4 / 3.5 mm hook:
20 stitches x 24 rows = 4 inches x 4 inches / 10 cm x 10 cm in back-loop-only single crochet ribbing
Gauge is critical for fit. Even one stitch difference per 4 inches significantly changes the waist and hip measurements. Swatch and adjust hook size before beginning.
Abbreviations
blo = back loop only (inserting hook into just the back loop of the stitch)
ch = chain
ch-sp = chain space
dc = double crochet (yarn over, insert hook, pull up loop, yarn over and pull through 2 loops twice)
hdc = half double crochet
inc = increase (2 single crochet worked into the same stitch)
MR = magic ring (adjustable starting loop)
pm = place marker
rem = remaining
rep = repeat
rnd = round
sc = single crochet (insert hook, pull up loop, yarn over and pull through both loops)
sc2tog = single crochet two together (a decrease that joins 2 stitches into 1)
sk = skip
sl st = slip stitch
st(s) = stitch(es)
yo = yarn over
Special Techniques
Back-Loop-Only Single Crochet (blo sc)
Insert your hook into just the back loop of the stitch, which is the loop farthest from you when the right side faces up. Yarn over, pull up a loop. Yarn over, pull through both loops on hook. This creates the stretchy ribbing texture for the waistband.
Invisible Join
After the last stitch of a round, cut yarn leaving a 6-inch tail. Thread the tail on your tapestry needle. Insert the needle under both loops of the first stitch of that same round from front to back. Insert the needle down through the center of the last stitch of the round. Pull snug to form a stitch that matches the others. This hides the color-change jog in gradient rounds.
Picot-Scallop Border Stitch
This decorative border creates the pretty scalloped hem. Work it over 3 stitches: slip stitch into next stitch, chain 3, slip stitch into first chain of that chain-3 (picot formed), chain 2, work 4 dc into next stitch (fan made), chain 2, slip stitch into following stitch.
Step by Step Instructions
Waistband Ribbing
Using Yarn A and E-4 / 3.5 mm hook, the waistband is worked flat in rows then seamed into a tube.
Chain: Size Small: Chain 16. Size Medium: Chain 18. Size Large: Chain 20. Size XL: Chain 22.
Row 1 (WS): Sc in second ch from hook and in each ch across. Turn. Small: (15 sc). Medium: (17 sc). Large: (19 sc). XL: (21 sc).
Row 2 (RS): Ch 1. Blo sc in each st across. Turn. (same count as row 1)
Repeat Row 2 only until ribbing measures:
Fold the ribbing so the two short ends meet with right sides together. Seam the short ends together with a slip stitch seam or whipstitch. This forms your waistband tube.
Do not fasten off. Rotate the tube so the long unworked edge faces up.
Checkpoint: The completed waistband tube should measure your waist circumference in length and approximately 3 inches / 7.5 cm wide.
Skirt Body Setup Round
Switch to F-5 / 3.75 mm hook.
Working along the long open edge of the waistband, join Yarn A with a standing sc.
Work evenly along the row-end edges: Size Small: 117 sc evenly around. (117 sc) Size Medium: 135 sc evenly around. (135 sc) Size Large: 153 sc evenly around. (153 sc) Size XL: 171 sc evenly around. (171 sc)
Work 1 sc into each row-end around the top of the waistband tube.
Place a stitch marker in the first stitch. Do not join. Work in continuous rounds.
Skirt Body Increases (Rounds 1 to 20)
The skirt increases from waist to hip over the first 20 rounds, adding 4 stitches every 4 rounds.
Rnds 1 to 3: Sc in each st around. (117 sc) [Medium: 135, Large: 153, XL: 171]
Rnd 4: [Sc in next 28 sts, inc in next st] 4 times, sc in rem 5 sts. (121 sc) [Medium: sc in next 32 sts, inc in next st, rep 4 times, sc in rem 7 sts. (139 sc)] [Large: sc in next 37 sts, inc in next st, rep 4 times, sc in rem 5 sts. (157 sc)] [XL: sc in next 41 sts, inc in next st, rep 4 times, sc in rem 7 sts. (175 sc)]
Rnds 5 to 7: Sc in each st around.
Rnd 8: [Sc in next 29 sts, inc in next st] 4 times, sc in rem 5 sts. (125 sc) [Medium: (143 sc)] [Large: (161 sc)] [XL: (179 sc)]
Rnds 9 to 11: Sc in each st around.
Rnd 12: [Sc in next 30 sts, inc in next st] 4 times, sc in rem 5 sts. (129 sc) [Medium: (147 sc)] [Large: (165 sc)] [XL: (183 sc)]
Rnds 13 to 15: Sc in each st around.
Rnd 16: [Sc in next 31 sts, inc in next st] 4 times, sc in rem 5 sts. (133 sc) [Medium: (151 sc)] [Large: (169 sc)] [XL: (187 sc)]
Rnds 17 to 19: Sc in each st around.
Rnd 20: [Sc in next 32 sts, inc in next st] 4 times, sc in rem 5 sts. (137 sc) [Medium: (155 sc)] [Large: (173 sc)] [XL: (191 sc)]
Checkpoint: After Round 20, the skirt should measure approximately 4 inches / 10 cm from the base of the waistband.
Additional Hip Shaping (Rounds 21 to 36)
Continue the same increase pattern.
Rnds 21 to 23: Sc in each st around.
Rnd 24: [Sc in next 33 sts, inc in next st] 4 times, sc in rem 5 sts. (141 sc) [Medium: (159 sc)] [Large: (177 sc)] [XL: (195 sc)]
Rnds 25 to 27: Sc in each st around.
Rnd 28: [Sc in next 34 sts, inc in next st] 4 times, sc in rem 5 sts. (145 sc) [Medium: (163 sc)] [Large: (181 sc)] [XL: (199 sc)]
Rnds 29 to 31: Sc in each st around.
Rnd 32: [Sc in next 35 sts, inc in next st] 4 times, sc in rem 5 sts. (149 sc) [Medium: (167 sc)] [Large: (185 sc)] [XL: (203 sc)]
Rnds 33 to 35: Sc in each st around.
Rnd 36: [Sc in next 36 sts, inc in next st] 4 times, sc in rem 5 sts. (153 sc) [Medium: (171 sc)] [Large: (189 sc)] [XL: (207 sc)]
Checkpoint: After Round 36, the skirt should measure approximately 7 inches / 18 cm from the waistband base.
Straight Body Section
No more increases. Work even in sc.
Size Small: Work even for Rounds 37 to 86 (50 rounds). (153 sc each round)
Size Medium: Work even for Rounds 37 to 88 (52 rounds). (171 sc each round)
Size Large: Work even for Rounds 37 to 90 (54 rounds). (189 sc each round)
Size XL: Work even for Rounds 37 to 92 (56 rounds). (207 sc each round)
Color Change Gradient Schedule
Rounds 1 to 10: Yarn A only (lavender)
Rounds 11 to 16: Transition Yarn A to Yarn B. Work the first half of each round with one color, join the second color at midpoint for the second half. Alternate which color leads each round for a blended effect.
Rounds 17 to 55: Yarn B only (mint green)
Rounds 56 to 62: Transition Yarn B to Yarn C using the same alternating method.
Rounds 63 to end: Yarn C only (blush pink)
Hem Border
Border Round 1: Join Yarn D (white) with a standing sc. Sc in each st around. (153 sc) [Medium: 171, Large: 189, XL: 207]
Border Round 2: Join Yarn C (blush pink) with a standing sc. Sc in each st around.
Border Round 3 (Picot-Scallop): With Yarn D (white), join with sl st to first st. Work the picot-scallop repeat: sl st into next st, ch 3, sl st into first ch (picot made), ch 2, work 4 dc into next st (fan made), ch 2, sl st into following st.
Repeat 51 (57, 63, 69) times around. Join with sl st. Fasten off. Weave in ends.
Applique Instructions
Bunny Applique (make 4 for Small/Medium, 5 for Large/XL)
Head:
Rnd 1: With Yarn D, MR. Work 6 sc into MR. (6 sc)
Rnd 2: Inc in each st around. (12 sc)
Rnd 3: [Sc in next st, inc in next st] 6 times. (18 sc)
Rnd 4: [Sc in next 2 sts, inc in next st] 6 times. (24 sc)
Sl st to join, fasten off for flat applique.
Ears (make 2 per bunny):
Rnd 1: With Yarn D, MR, 4 sc into ring. (4 sc)
Rnd 2: Inc in each st. (8 sc)
Rnds 3 to 5: Sc in each st around. (8 sc each round)
Rnd 6: [Sc2tog] 4 times. (4 sc)
Flatten and close.
Inner ear (make 2 per bunny):
With Yarn C, MR, 4 sc. Work 1 more round of sc (4 sc). Fasten off. Sew inner ear onto white ear.
Body:
Rnd 1: With Yarn D, MR. Work 6 sc. (6 sc)
Rnd 2: Inc in each st. (12 sc)
Rnd 3: [Sc in next st, inc in next st] 6 times. (18 sc)
Rnd 4: [Sc in next 2 sts, inc in next st] 6 times. (24 sc)
Rnd 5: [Sc in next 3 sts, inc in next st] 6 times. (30 sc)
Rnd 6: Sc in each st around. (30 sc)
Sl st to join. Fasten off.
Tail: With Yarn D, MR, 6 sc, sl st to join. Work one more round of 6 sc. Pull ring tight. Fasten off.
Assembly: Sew ears to head. Sew head to top of body. Sew tail to back. Embroider French knot eyes and a small V-stitch nose.
Baby Chick Applique (make 4 for Small/Medium, 5 for Large/XL)
Body:
Rnd 1: With Yarn E, MR. Work 6 sc. (6 sc)
Rnd 2: Inc in each st. (12 sc)
Rnd 3: [Sc, inc] 6 times. (18 sc)
Rnd 4: [Sc in next 2 sts, inc] 6 times. (24 sc)
Sl st to join. Fasten off.
Add small orange beak detail and embroider eyes using the same technique as the bunny.
Finishing Your Pastel Bunny Spring Skirt
Block the skirt body before attaching appliques. Lay flat on blocking mats, pin to measurements, and mist with water. Let dry completely.
Arrange your appliques on the skirt using the reference images as a guide. Space the bunnies, chicks, butterflies, and daisies evenly around the body, concentrating more toward the hem area. Pin in place and step back to check the arrangement before sewing.
Use a tapestry needle and matching yarn to whipstitch each applique securely to the skirt body. Weave in all remaining ends.

Care Instructions
Hand wash or machine wash on delicate cycle in cold water. Lay flat to dry to maintain the shape. Store folded rather than hanging to prevent stretching.
Thank you so much for choosing this pattern for your next crochet project. I truly hope this pastel bunny spring skirt brings you joy both in the making and the wearing. If you create one, I would absolutely love to see it. Tag me on Instagram or share a photo in my Facebook group.
If you found this crochet pattern helpful, consider saving it to your Pinterest boards so you can find it easily when you are ready to start. And please drop a comment below to let me know if you make one. I read every single comment and love seeing your finished projects!
You Might Also Like
- Daisy Meadow Crochet Tote Free Pattern
- Pastel Rainbow Granny Square Purse Free Crochet Pattern
- Blush Pink Round Chain Bag Free Crochet Pattern
- Pastel Rainbow Flower Granny Square Tote Free Crochet Pattern