Lavender Garden Crochet Shorts Free Crochet Pattern
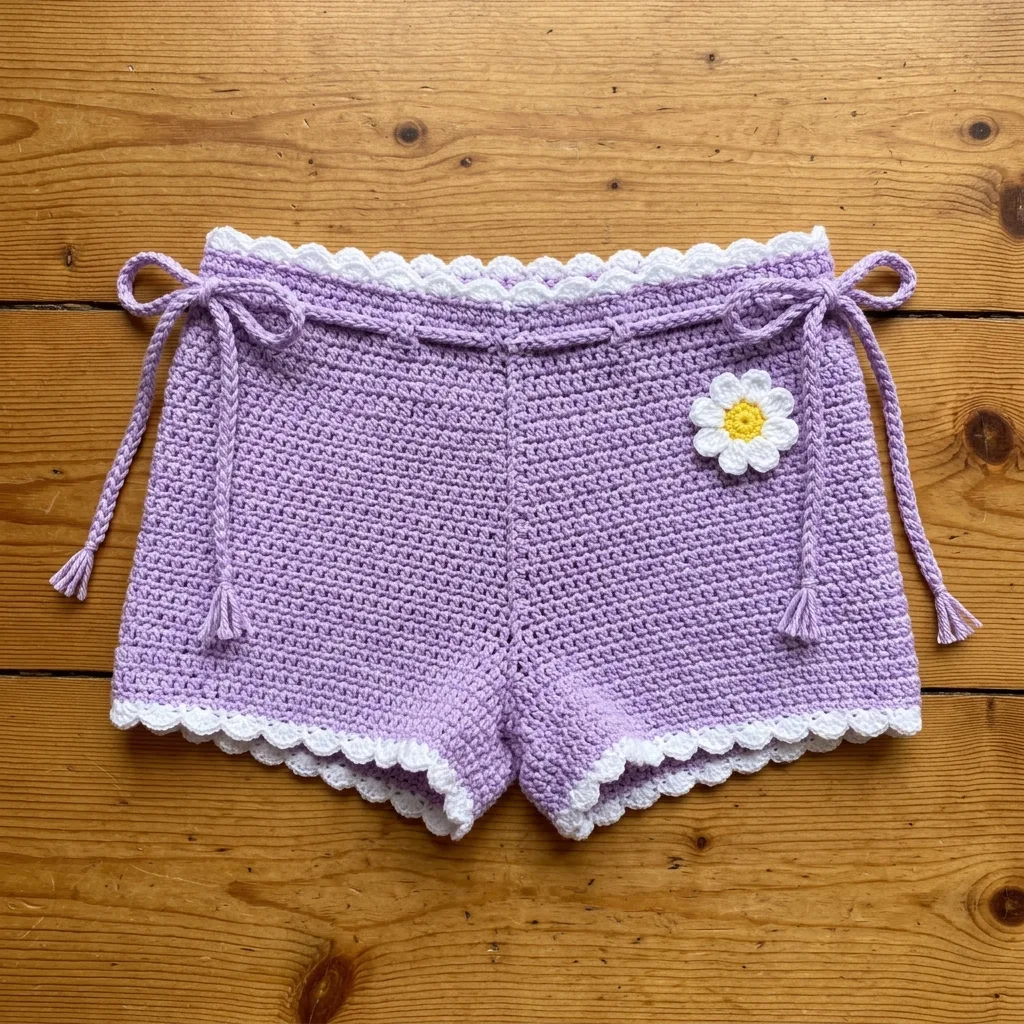
Go dig through your yarn stash right now. I know you have that pretty lavender skein you have been saving for something special. This is the project.
These crochet shorts combine flat panel construction with some satisfying shaping at the legs, a separate waistband with drawstring eyelets, and the prettiest picot scallop edging in white. The daisy applique on the front is the perfect finishing touch. This is an intermediate level project, so you should be comfortable with seaming, following row by row shaping instructions, and working decorative edging before you dive in.
The construction is really interesting. You work two identical flat panels from the waistband down, shape the leg openings with decreases, seam everything together, then add a folded waistband and all that gorgeous edging. Expect to spend around 12 to 18 hours on a size Medium. Worth every minute.
Why You Will Love This Crochet Pattern
These shorts have that dreamy cottagecore aesthetic that looks incredible styled with a simple tank or cropped tee. The dense single crochet (sc) fabric gives them real structure, so they hold their shape beautifully instead of stretching out. The braided ties with tassels at each hip add movement and visual interest. And that daisy? Chef’s kiss.
The fit is relaxed with a slightly boxy silhouette and minimal ease. They sit at a low to mid rise, which makes them comfortable for warm weather wear. The drawstring waistband lets you adjust the fit by several inches either way.
Skill Level
This is an intermediate crochet pattern. The stitch work itself is simple, just single crochet rows worked flat. But the construction involves several techniques that take this beyond beginner territory.
You will be working flat panels with inseam shaping. You will seam those panels at the sides and crotch. You will make a separate waistband with an eyelet row and attach it to the shorts. You will add decorative edging around the legs and waistband. And you will crochet a cute little daisy applique and sew it on.
If you have made a garment before, you will be fine. If this is your first garment, just take it slow and trust the process.
Finished Sizes
The pattern is written for size Small with Medium, Large, and Extra Large in parentheses. When you see only one number, it applies to all sizes.
Size Small: waist 26 to 28 in, hip 34 to 36 in, rise 9 in, inseam 2.5 in, total length 11.5 in
Size Medium: waist 30 to 32 in, hip 38 to 40 in, rise 9.5 in, inseam 3 in, total length 12.5 in
Size Large: waist 34 to 36 in, hip 42 to 44 in, rise 10 in, inseam 3 in, total length 13 in
Size Extra Large: waist 38 to 40 in, hip 46 to 48 in, rise 10.5 in, inseam 3.5 in, total length 13.5 in
The finished garment has approximately 2 inches of positive ease at the hip.
Materials
Yarn A (main color): approximately 300 (350, 420, 490) yards of DK weight yarn in lavender or light purple
Yarn B (contrast color): approximately 80 (90, 100, 115) yards of DK weight yarn in white
Crochet hook: US size E-4 / 3.5 mm or size needed to obtain gauge
Additional supplies: tapestry needle, at least 4 stitch markers, scissors, blocking mat and rust-proof pins
Yarn Suggestions
Paintbox Yarns Simply DK in Wisteria Purple and Pure White works beautifully. It has excellent stitch definition, a wide color range, and it is machine washable.
Lion Brand Comfy Cotton Blend in Lilac and Snow gives you a soft breathable hand that is perfect for warm weather. The cotton content adds just enough weight for nice drape.
Drops Safran in colorway 19 Lavender and 01 Off White is a smooth matte cotton with excellent stitch clarity and structure.
Avoid yarns with excessive halo or boucle texture. You want to see that pretty scallop edging and daisy detail clearly.
Gauge
20 sc x 24 rows = 4 in x 4 in worked flat in single crochet with Yarn A and US size E-4 / 3.5 mm hook, after blocking.
Gauge is mandatory here. This is a fitted garment. Every stitch off per 4 inches will result in approximately 1 to 2 inches of difference across the full hip width. Please swatch, block your swatch, and measure before you start.
Abbreviations
ch: chain, wrap yarn over hook and pull through the loop on your hook
sc: single crochet, insert hook into stitch, yarn over and pull up a loop (2 loops on hook), yarn over and pull through both loops
sc2tog: single crochet 2 together (decrease), insert hook into first stitch, yarn over and pull up a loop, insert hook into next stitch, yarn over and pull up a loop (3 loops on hook), yarn over and pull through all 3 loops
sl st: slip stitch, insert hook into stitch, yarn over and pull through stitch and loop on hook in one motion
dc: double crochet, yarn over, insert hook into stitch, yarn over and pull up a loop, yarn over and pull through 2 loops, yarn over and pull through remaining 2 loops
hdc: half double crochet, yarn over, insert hook into stitch, yarn over and pull up a loop (3 loops on hook), yarn over and pull through all 3 loops
ch-sp: chain space
sk: skip
st(s): stitch(es)
RS: right side
WS: wrong side
rem: remaining
rep: repeat
Special Stitches
Picot Scallop Edging
This creates the beautiful white decorative border on the legs and waistband.
Step 1: Join Yarn B with a sl st to the first stitch of the edge.
Step 2: Ch 1, sc in the same stitch.
Step 3: Skip 2 stitches, then work 5 dc into the next stitch to form a shell.
Step 4: Skip 2 stitches, sc in the next stitch.
Step 5: Ch 3, sl st back into the top of the sc just made. This forms the picot.
Step 6: Skip 2 stitches, work 5 dc into the next stitch.
Step 7: Repeat Steps 4 through 6 across the edge, ending with a sc in the final stitch. Fasten off.
The repeat requires a stitch count divisible by 6. Adjust your pick-up count if needed.
Braided Tie (Make 4)
Step 1: Cut 9 strands of Yarn A each measuring 20 inches.
Step 2: Align strands and fold in half to create a loop.
Step 3: Attach the loop to the eyelet position by pulling the folded end through the eyelet, then pulling the loose ends through the loop and tightening.
Step 4: Divide the 18 working strands into three groups of 6 strands each.
Step 5: Braid the three groups together for approximately 7 inches.
Step 6: Tie an overhand knot to secure the braid.
Step 7: Trim ends evenly to about 1.5 inches below the knot to form a tassel. Untwist the cut strands for a fluffy tassel effect.
Daisy Applique
The daisy is worked in a magic ring.
Round 1: Using Yarn B, make a magic ring, ch 1, work 10 sc into the ring, join with sl st to first sc. (10 sc)
Round 2: Switch to yellow yarn. Ch 1, 2 sc in each st around, join with sl st to first sc. Fasten off yellow. (20 sc)
If you do not have yellow yarn, embroider the center with yellow using straight stitches after completing Round 1 in white.
Petals: Join Yarn B with sl st to any st of Round 1. Work (sl st in first st, sc in next st, hdc in next st, 5 dc in next st, hdc in next st, sc in next st, sl st in next st) repeat until you have worked all 10 sts and returned to start. Adjust petal spacing so 5 petals are evenly distributed, working each petal over 2 sts of Round 1.
Fasten off, leaving a 12 inch tail for attaching.
Pattern Notes
The shorts are made of two identical flat panels, front and back. Each panel is worked from the waistband edge downward.
Ch 1 at the beginning of each sc row does NOT count as a stitch throughout this pattern.
The smooth V side of the single crochet fabric is the RS. Place a marker on the RS after Row 1 to track orientation.
Check your stitch count at the end of every row, especially during leg shaping.
Crochet Pattern Instructions
Front Panel
Make 1.
Foundation Chain: Using Yarn A, ch 90 (100, 110, 122).
Row 1 (WS): Sc in 2nd ch from hook and in each ch across. Ch 1, turn. (89, 99, 109, 121 sc)
Rows 2 through 6: Sc in each st across. Ch 1, turn. (89, 99, 109, 121 sc)
Row 7 (eyelet placement row): Sc in first 4 (5, 6, 7) sts. Ch 2, sk 2 sts, sc in next st, sc in each st to last 7 (8, 9, 10) sts. Ch 2, sk 2 sts, sc in each of the last 4 (5, 6, 7) sts. Ch 1, turn. (89, 99, 109, 121 sts including ch-2 sps counted as 2 sts each)
Rows 8 through 12: Sc in each st and ch-sp across. Ch 1, turn. In Row 8, work 2 sc into each ch-2 sp from Row 7 to restore full stitch count. (89, 99, 109, 121 sc)
Continue working in sc until panel measures 8 (8.5, 9, 9.5) inches from foundation chain. This is approximately rows 1 through 48 (51, 54, 57). End having completed a RS row.
Leg Shaping (Front Panel)
Row 1 of shaping: Sl st across first 5 (6, 6, 7) sts. Ch 1, sc in same st as last sl st, sc in each st to last 5 (6, 6, 7) sts. Leave rem sts unworked. Ch 1, turn. (79, 87, 97, 107 sc)
Row 2 of shaping: Sc2tog over first 2 sts, sc in each st to last 2 sts, sc2tog. Ch 1, turn. (77, 85, 95, 105 sc)
Row 3 of shaping: Sc2tog over first 2 sts, sc in each st to last 2 sts, sc2tog. Ch 1, turn. (75, 83, 93, 103 sc)
Row 4 of shaping: Sc2tog over first 2 sts, sc in each st to last 2 sts, sc2tog. Ch 1, turn. (73, 81, 91, 101 sc)
Row 5 of shaping: Sc2tog over first 2 sts, sc in each st to last 2 sts, sc2tog. Ch 1, turn. (71, 79, 89, 99 sc)
Row 6 of shaping: Sc in each st across. Ch 1, turn. (71, 79, 89, 99 sc)
Row 7 of shaping: Sc2tog over first 2 sts, sc in each st to last 2 sts, sc2tog. Ch 1, turn. (69, 77, 87, 97 sc)
Row 8 of shaping: Sc in each st across. Fasten off and weave in end. (69, 77, 87, 97 sc)
Back Panel
Make 1 following all Front Panel instructions exactly. The back panel is identical to the front.
Assembling the Panels
Step 1: Hold one panel with RS facing you. Place the second panel beside it with RS facing you.
Step 2: With WS together (RS facing outward), align the side edges of both panels.
Step 3: Using Yarn A and a tapestry needle, whip stitch or sl st seam along each side edge from the waistband top down to the first row of leg shaping. Do not seam the leg shaping sections. Seam both left and right sides.
Step 4: Align the bottom shaped edges of both panels. Seam along the crotch curve from one leg opening edge, under the crotch, and out to the other leg opening edge.
Step 5: Turn the shorts right side out.
Waistband
Using Yarn A, ch 172 (192, 216, 242).
Row 1: Sc in 2nd ch from hook and in each ch across. Ch 1, turn. (171, 191, 215, 241 sc)
Rows 2 and 3: Sc in each st across. Ch 1, turn. (171, 191, 215, 241 sc)
Row 4 (folding ridge): Work a row of sl st in both loops of each st across. Ch 1, turn. (171, 191, 215, 241 sl sts)
Rows 5 and 6: Sc in each st across. Ch 1, turn. (171, 191, 215, 241 sc)
Row 7 (eyelet row): Sc in first 8 (9, 10, 12) sts. (Ch 2, sk 2 sts, sc in next st) across to last 8 (9, 10, 12) sts. Sc in each rem st. Ch 1, turn. (171, 191, 215, 241 sts including ch-sps)
Row 8: Sc in each st and ch-sp across (work 2 sc into each ch-2 sp). Ch 1, turn. (171, 191, 215, 241 sc)
Row 9: Sc in each st across. Fasten off, leaving a tail of at least 24 inches for attaching.
Attaching the Waistband
Fold the waistband strip in half lengthwise along the sl st fold ridge from Row 4, with WS together. Place the waistband around the top of the assembled shorts, sandwiching the shorts top edge between both faces of the waistband. Slip stitch or whip stitch both edges of the waistband to the inside and outside of the shorts top edge.
Leg Edging
Work the picot scallop edging in Yarn B around each leg opening.
Round 1: Join Yarn B with sl st to any st at the base of one leg opening. Ch 1, sc evenly around, adjusting to reach 66 (72, 78, 84) sc. Join with sl st to first sc.
Round 2: Work the picot scallop edging around the full leg opening. (11, 12, 13, 14 repeats)
Repeat for the second leg opening.
Waistband Top Edging
Work the picot scallop edging in Yarn B around the top edge of the waistband. Pick up approximately 168 (192, 216, 240) sts. (28, 32, 36, 40 repeats)
Ties and Daisy
Attach 4 braided ties, one at each side seam eyelet. Two ties emerge on each side.
Sew the daisy applique to the front right panel, approximately 2 inches below the waistband, centered between the side seam and leg opening.
Finishing and Blocking
Weave in all remaining ends securely. Handwash in cool water with gentle soap. Press out excess water by rolling in a clean towel. Lay flat on a blocking mat, stretch gently to measurements, and pin in place. Allow to dry completely.
Care Instructions
Machine wash on a gentle cycle in cool water if yarn label permits. Lay flat to dry. Do not tumble dry, wring, or iron directly.
Thank you so much for choosing this crochet pattern for your next project. I really hope you love making these shorts as much as I loved designing them. If you make a pair, I would absolutely love to see them! Tag me on Instagram or share a photo in my Facebook group.
Save this pattern to your Pinterest boards so you can find it when you are ready to start. And please drop a comment below if you make these cuties. I read every single one and it truly makes my day to see your finished projects.
You Might Also Like
- Rainbow Pastel Snake Plushie Free Crochet Pattern
- Blush Pink Tassel Tote Free Crochet Pattern
- Lavender Mini Backpack Free Crochet Pattern
- Watermelon Slice Couple Amigurumi Free Crochet Pattern