Ocean Wave Butterfly Halter Top Free Crochet Pattern
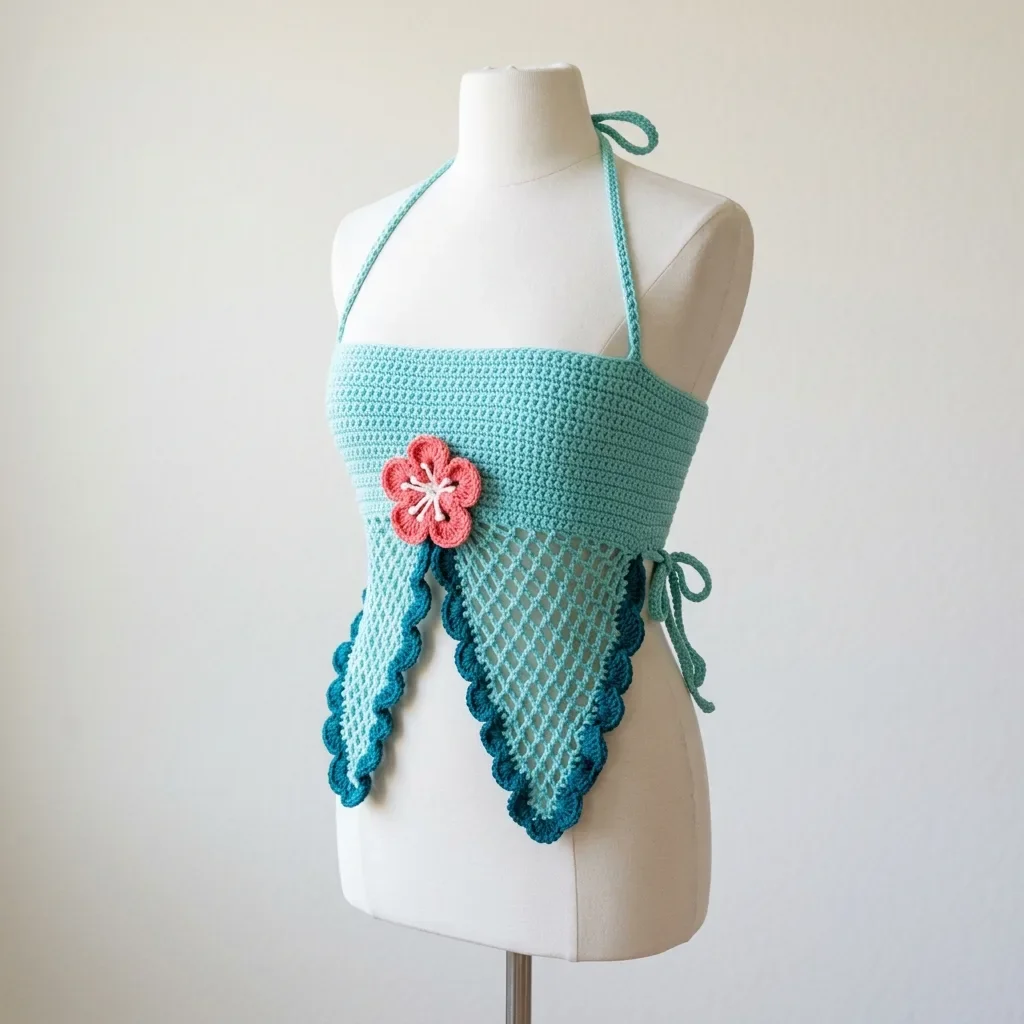
Looking for a stunning summer top that works up beautifully for beach days, festivals, or warm weather outings? This Ocean Wave Butterfly Halter Top delivers exactly that. The design features a solid double crochet (dc) bodice band, two open mesh triangular front panels with contrasting scallop borders, and a sweet coral flower applique that adds the perfect pop of color.
The construction uses stitches you probably already know. Double crochet forms the bodice. A simple mesh pattern creates those gorgeous lattice panels. Shell stitches edge everything in a deeper teal. If you can work basic stitches and follow a mesh grid, you can absolutely make this top.
This pattern makes an incredible gift for the boho lover in your life. It also works wonderfully as a treat for yourself. The adjustable lace-up back and side ties mean you can customize the fit perfectly. Let me walk you through every step of this crochet tutorial so you can create your own stunning halter top.
About This Crochet Pattern
The Ocean Wave Butterfly Halter Top combines several techniques into one cohesive, wearable piece. You will work the bodice flat as a rectangle, then seam it into a tube. The triangular mesh panels are created separately and attached to the front. A contrasting scallop border frames each panel beautifully. Finally, a five-petal flower applique adds that charming finishing touch.
This is an intermediate level project. The bodice itself is straightforward double crochet rows with no shaping. However, the diagonal mesh panels require understanding increases and stitch placement within a grid. The scallop edging involves shell stitches worked into mesh spaces. The flower uses individual petal shaping techniques.
Estimated time: 14 to 20 hours for an experienced intermediate crocheter, including all components and finishing.
Finished Measurements
This pattern is written for size Small/Medium with the following dimensions:
Size customization tips are included at the end of the pattern.
Materials Needed
Yarn:
Yarn Suggestions:
1. Lion Brand 24/7 Cotton in Aqua and Teal. This mercerized cotton holds stitch definition beautifully, comes in many colors, and has excellent drape for warm weather tops. Machine washable too.
2. Paintbox Yarns Simply DK in Spearmint Green and Sailor Blue. Smooth, tightly spun, 100% cotton that produces crisp mesh stitches.
3. Drops Safran in color 17 (light aqua) and color 50 (petrol blue). A fine cotton DK with slight sheen and excellent stitch definition.
Substitution note: Any smooth DK or light worsted cotton will work. Avoid fuzzy or textured yarns as they will obscure the mesh pattern. Always check gauge before beginning.
Hooks:
Notions:
Gauge
18 double crochet stitches and 10 rows = 4 inches / 10 cm, worked flat in rows using US E-4 / 3.5 mm hook.
Mesh panel gauge: 4 mesh repeats (each repeat = 1 dc, ch 1) and 8 rows = 4 inches / 10 cm.
Take time to check your gauge. This is a fitted garment. Adjust hook size as needed and do not skip the gauge swatch.
Abbreviations (US Terms)
Special Stitches
Shell Stitch (for scallop edging)
Work 5 double crochet stitches all into the same stitch or chain space. This creates a fan or shell shape forming the scallop border along each panel edge.
Picot (optional)
After working the 3rd dc of a shell, chain 3, slip stitch into the top of the dc just made, then continue with remaining 2 dc. This adds a small decorative loop at each scallop peak. The pictured garment uses a clean shell without picot, so this is optional.
Mesh Stitch (for triangular panels)
Each mesh repeat consists of 1 dc, chain 1, skip 1. At the end of the row, work 1 dc into the last stitch. To work into an existing mesh row, place each dc into the dc of the row below and each chain 1 into the chain space below.
Lace-Up Loop (for back closure)
Chain 8, slip stitch into the same stitch at the base of the chain to form a loop standing away from the fabric. These loops are worked along both back edges and a separate chain cord threads through them for the corset closure.
Flower Petal (for applique)
Join yarn into the flower center ring. Chain 3 (counts as first dc), work 2 dc into the same space, chain 2, slip stitch back into the same space. This forms one petal. Move to the next space and repeat for each petal.
Pattern Notes
1. The bodice band is worked as a flat rectangle, then the short ends are joined to form a tube before adding halter neck ties.
2. The two triangular mesh panels are worked separately as flat triangles, starting at the top wide edge and decreasing toward the point. They attach at their top edge to the front lower edge of the bodice.
3. The scallop border in Yarn B is applied around the two slanted side edges and bottom point of each triangle after panels are complete and attached. The top edge (where it meets the bodice) is not edged in contrast color.
4. Halter ties are long chains in Yarn A, attached at top front corners of the bodice and tied behind the neck.
5. The lace-up back closure uses chain loops along both back edges with a separate chain cord threading through them.
6. Side ties at each side seam provide additional fit adjustment.
7. The flower applique is sewn onto the left front panel after blocking.
8. Turn at the end of every row unless otherwise stated.
9. Turning chain of 3 counts as first dc throughout the bodice.
10. Stitch counts in parentheses reflect total working stitches, not including the turning chain unless noted.
Step by Step Instructions
Section 1: Bodice Band
The bodice is a rectangle worked flat, then seamed to form a tube. It uses solid double crochet throughout.
Using Yarn A and US E-4 hook, chain 137.
Row 1 (RS): Dc in 4th ch from hook (first 3 ch count as dc), dc in each ch across. Turn. (135 dc)
Row 2: Ch 3 (counts as dc), dc in each st across. Turn. (135 dc)
Rows 3 through 15: Ch 3, dc in each st across. Turn. (135 dc)
Do not turn after Row 15. Do not fasten off.
Checkpoint: After completing Row 15, the bodice band should measure approximately 6 inches / 15 cm tall and 30 inches / 76 cm wide. Lay it flat and measure before proceeding.
Back Lace-Up Loops
Before seaming, designate one short end as the back opening.
Along the left back short edge (working up the side of rows):
Join Yarn A at the bottom-left corner of the short edge. Work sc evenly along the edge, placing 1 sc per row end. You will have 15 sc. Turn.
Next row: Ch 1, sc in first sc. (Ch 8, sk 2 sc, sc in next sc) 4 times, sc in last 2 sc. Turn. (5 sc, 4 ch-8 loops)
Next row: Ch 1, sc in each sc and 8 sc into each ch-8 loop across. Fasten off.
Along the right back short edge:
Join Yarn A at the top-right corner of the short edge. Work sc evenly down the edge, 1 sc per row end. (15 sc) Turn.
Next row: Ch 1, sc in first 2 sc. (Ch 8, sk 2 sc, sc in next sc) 4 times, sc in last sc. Turn.
Next row: Ch 1, sc in each sc and 8 sc into each ch-8 loop across. Fasten off.
Seaming the Bodice
The bodice band forms a tube by joining its two short side edges (left side seam and right side seam). Use slip stitch or mattress stitch to seam both short edges together, leaving the tube open at top and bottom.
Join Yarn A at the top back center edge. Work 1 round of sc around the top edge for a clean finish. Fasten off. Repeat around the bottom edge.
Back lace-up detail: Thread a length of Yarn A on a yarn needle. Using a running stitch, create a criss-cross lacing pattern down the back center of the bodice over approximately 8 stitches wide and the full 15-row height. Pull yarn through existing stitches at regular intervals to replicate the corset lacing.
Halter Neck Ties
Join Yarn A at the top-front-left corner of the bodice (approximately stitch 10 from the left side seam on the front).
Chain 120. Fasten off and weave in end.
Join Yarn A at the top-front-right corner of the bodice (approximately stitch 10 from the right side seam on the front).
Chain 120. Fasten off and weave in end.
These ties cross at the neck and tie behind the neck or at the nape.
Side Ties
At each side seam, join Yarn A and chain 20. Sl st back into the seam to anchor. Fasten off. These short ties wrap around the body for additional fit adjustment.
Section 2: Triangular Mesh Panels (Make 2)
Each triangular panel begins at the wide top edge and decreases toward a center point. Both panels are worked identically.
Using Yarn A and US E-4 hook, chain 45.
Row 1 (RS): Dc in 4th ch from hook (ch 3 = first dc), dc in each ch across. Turn. (43 dc)
Row 2 (begin mesh, WS): Ch 4 (counts as dc, ch 1), sk first 2 dc, dc in next dc, (ch 1, sk 1 dc, dc in next dc) 20 times. Turn. (22 dc, 21 ch-1 spaces, 21 mesh units)
Continue working in mesh pattern, decreasing as described in the pattern notes to form the triangular shape. Each decrease row removes one mesh unit at each end until reaching the point.
Section 3: Scallop Border
Using Yarn B and working along the slanted edges and bottom point of each triangle panel:
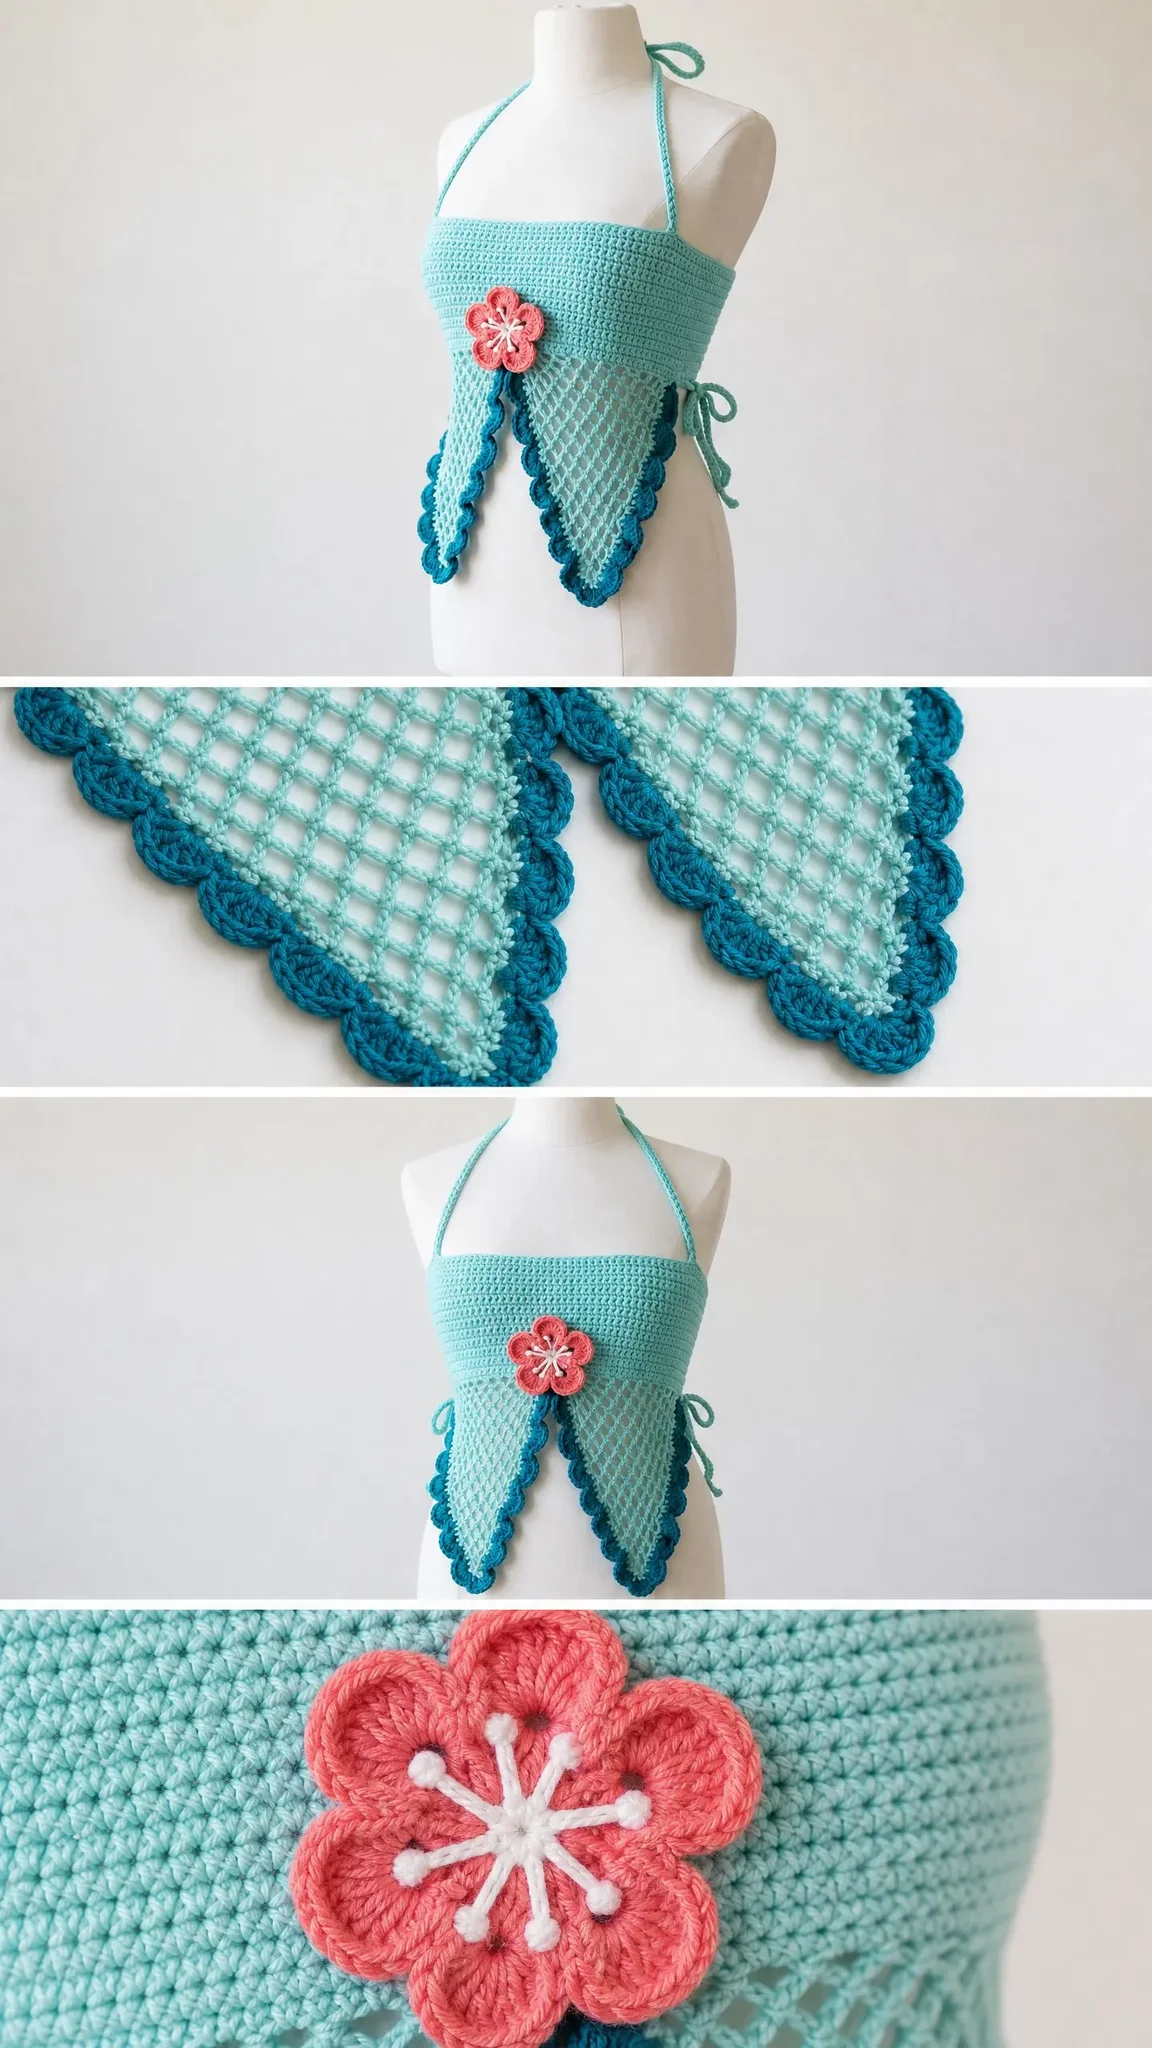
Join Yarn B at the top corner of one slanted edge. Work shell stitches (5 dc into same space) evenly spaced along the edge, placing shells into the row ends and mesh spaces. Continue around the bottom point and up the other slanted side. Fasten off.
Repeat for the second panel.
Section 4: Flower Applique
Flower Center:
Using Yarn C and US D-3 hook, ch 4. Sl st to first ch to form a ring.
Round 1: Ch 1, work 10 sc into ring. Sl st to first sc to join.
Round 2 (petals): For each petal, ch 3, 2 dc into same st, ch 2, sl st into same st. Skip 1 sc, sl st into next sc. Repeat around to create 5 petals.
Flower Center Detail:
Using Yarn D, embroider small straight stitches radiating from the center of the flower.
Finishing
1. Weave in all ends securely.
2. Block the bodice and panels by pinning to measurements and lightly steaming or wet blocking.
3. Attach the triangular panels to the front lower edge of the bodice using yarn needle and Yarn A, positioning them as shown in the reference images.
4. Sew the flower applique onto the left front panel at the transition between bodice and mesh.
Tips for Success
For the mesh panels: Count your stitches carefully at the end of each row. Mesh patterns can drift if you miss a chain space or work into the wrong spot.
For even scallops: Plan your shell placement before you begin. Count how many shells will fit along each edge and space them evenly.
For the flower: Use the smaller hook size to keep the petals firm and dimensional. Block the flower separately before attaching.
For fit adjustments: The lace-up back and side ties offer significant adjustability. You can also add or subtract bodice rows to change the band height.
I hope you love making this Ocean Wave Butterfly Halter Top as much as I enjoyed writing out these instructions. The combination of solid bodice, airy mesh, and that gorgeous teal scallop border creates something truly special for your summer wardrobe.
If you found this crochet pattern helpful, please save it to your Pinterest boards so you can find it easily when you are ready to start. And I would absolutely love to see your finished tops! Drop a comment below or tag me on Instagram when you make yours. Happy crocheting!
You Might Also Like
- Warm Autumn Terracotta Shoulder Bag Free Crochet Pattern
- Lavender Dreams Book Sleeve Free Crochet Pattern
- Lavender Butterfly Bathroom Set Free Crochet Pattern
- Dusty Rose Granny Square Summer Dress Free Crochet Pattern