Sage Green Lacy Crochet Jumpsuit Free Crochet Pattern
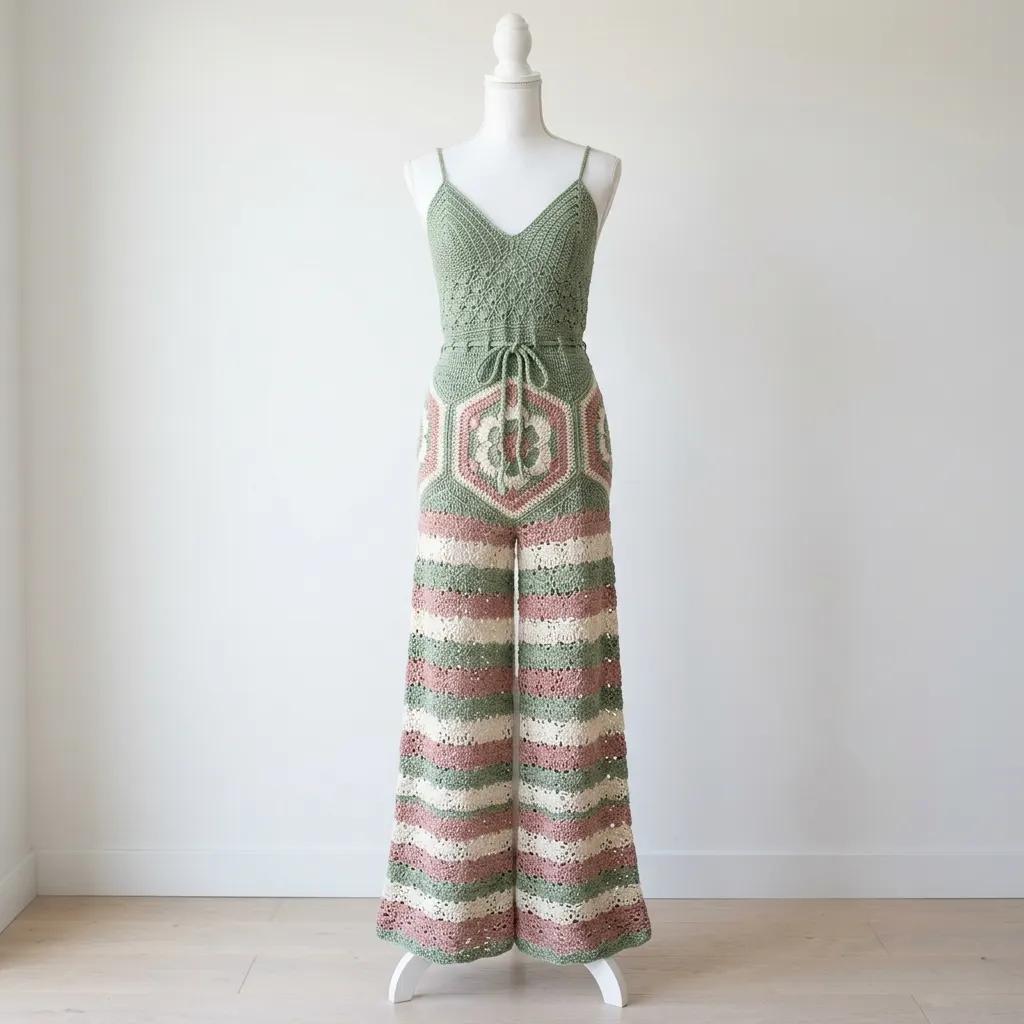
I’ve been searching for the perfect statement piece to add to my handmade wardrobe, and this sage green lacy crochet jumpsuit is exactly what I had in mind. After looking through countless patterns, this one stood out for its stunning combination of fitted bodice, African Flower hexagon motifs, and those gorgeous wide-leg palazzo pants.
This is genuinely one of the most beautiful garment patterns I’ve come across. The way it blends delicate lace stitchwork with bold geometric hexagons creates something truly special.
If you’re ready to challenge yourself with an impressive wearable project, grab your hooks and let’s dive in together.
About This Crochet Jumpsuit Pattern
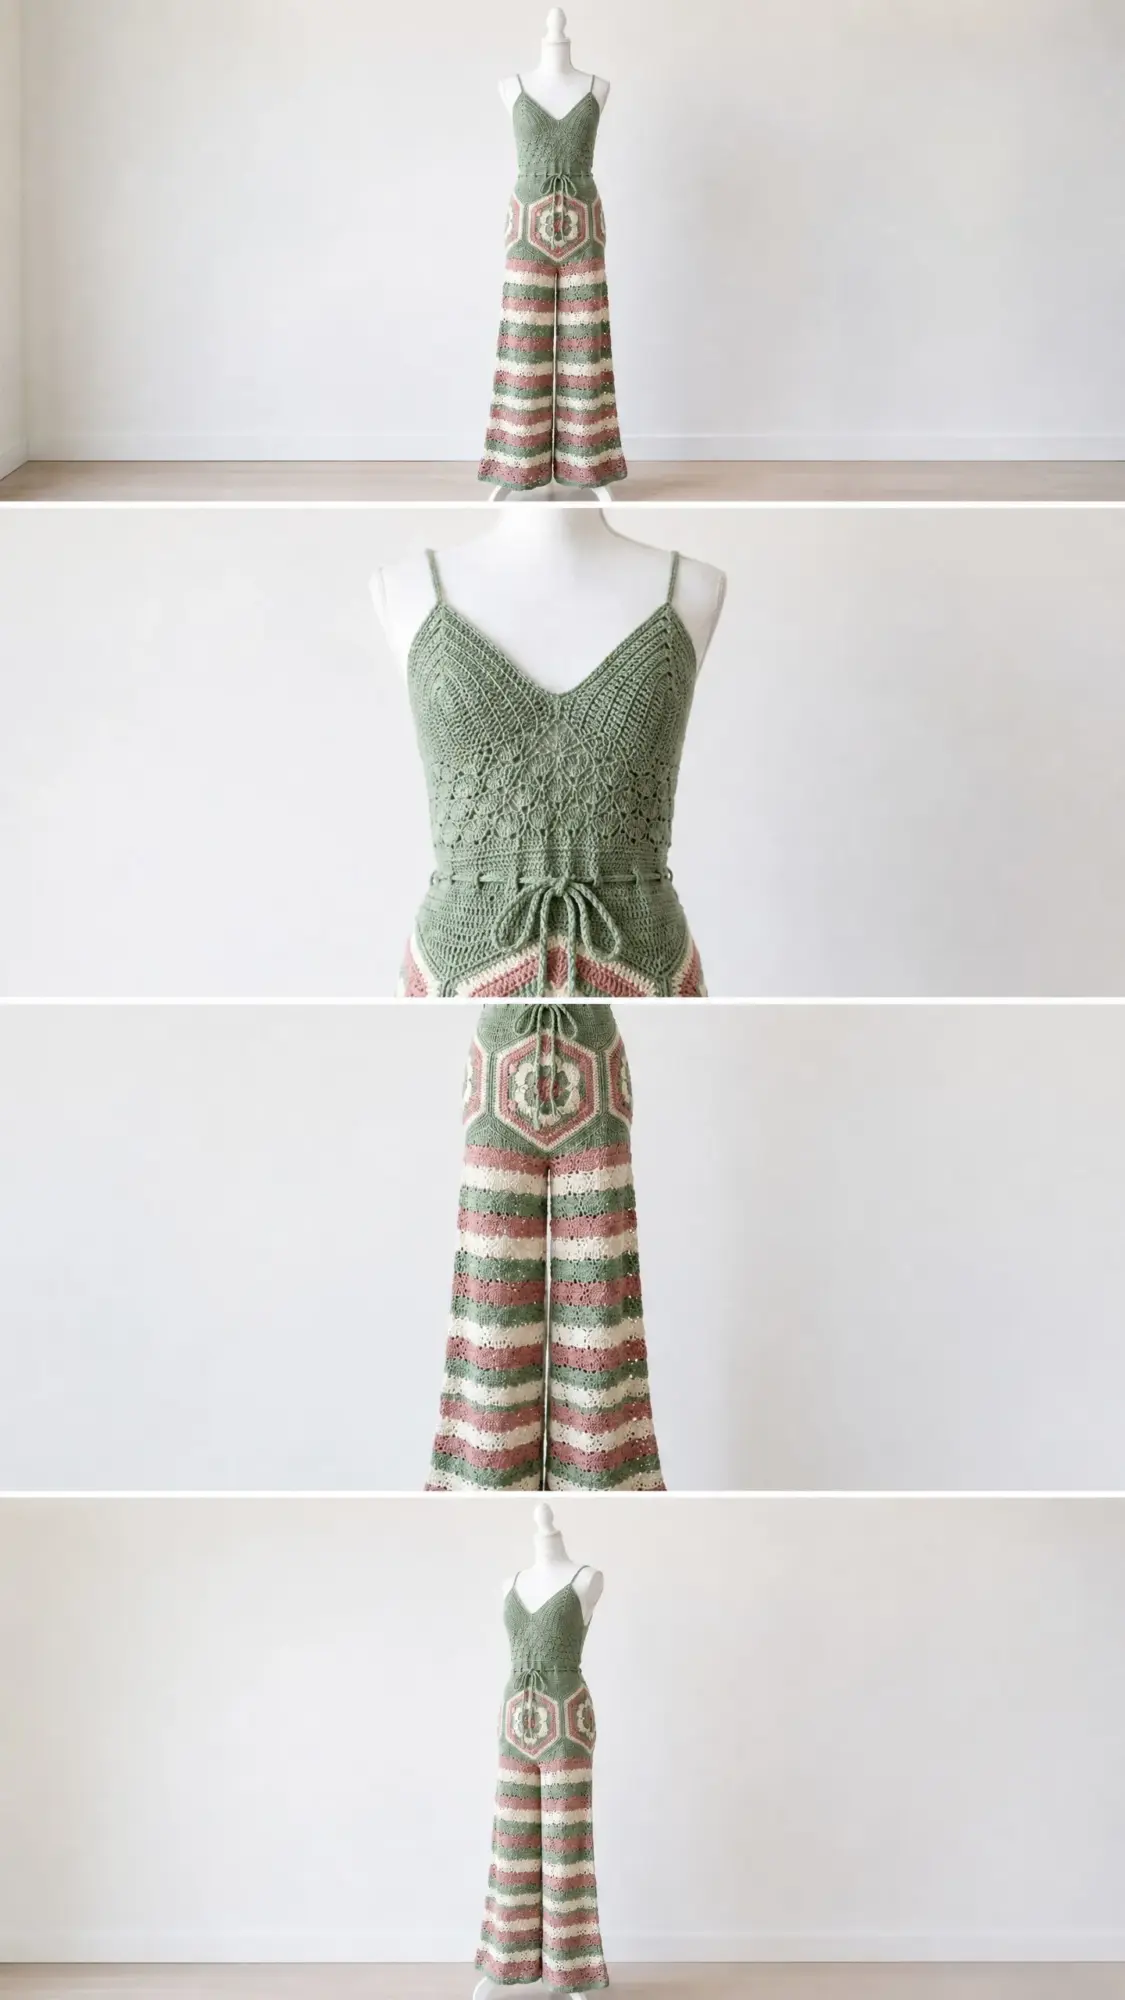
This full-length, one-piece crochet jumpsuit is constructed in three main sections that are seamed together. You’ll create a fitted spaghetti-strap bodice worked flat in a textured lace stitch, wide-leg palazzo pants featuring large African Flower hexagon motifs at the hip yoke, and horizontal chevron lace stripes throughout the legs. A coordinating waist tie cinches everything together beautifully.
The color palette uses sage green, dusty rose, and natural cream for a soft, romantic vibe that works perfectly for summer events, beach vacations, or anytime you want to feel like a bohemian goddess.
The overall silhouette is fitted through the torso with dramatically flared, floor-length legs. You’ll have a low V-neckline at the front and back, held up by thin spaghetti straps. This is a pull-on garment with no zipper or button closure needed.
Skill Level
This pattern is rated Advanced Intermediate. You’ll need familiarity with working in the round, reading lace stitch patterns, constructing African Flower hexagon motifs, seaming crochet pieces, working increases and decreases for garment shaping, and managing multiple yarn colors.
Don’t let that intimidate you though. If you’ve made a few garments before and feel comfortable following detailed instructions, you can absolutely do this. The pattern breaks everything down step by step, and I’ll walk you through the trickier bits.
Gauge swatching is mandatory for a wearable fit. I know, I know. Nobody loves swatching. But trust me on this one. Differences of even half a stitch per inch will result in significant fit variance over the full length of the piece.
Time Estimate
Plan for approximately 60 to 90 hours for a size Small/Medium depending on your working speed. The hexagon motifs are the most time-intensive element. Allow additional time for blocking, seaming, and assembly.
This is definitely a project to savor over several weeks or months. Pour yourself a cup of tea, put on your favorite show, and enjoy the journey.
Finished Measurements
Size Small (US 4-6): Bust 34 in / 86.5 cm, Waist 27 in / 68.5 cm, Hip 36 in / 91.5 cm, Total Length (shoulder to hem) 58 in / 147.5 cm, Inseam 28 in / 71 cm, Leg opening at hem 22 in / 56 cm per leg
Size Medium (US 8-10): Bust 36 in / 91.5 cm, Waist 29 in / 73.5 cm, Hip 38 in / 96.5 cm, Total Length 59 in / 150 cm, Inseam 28.5 in / 72.5 cm, Leg opening at hem 23 in / 58.5 cm per leg
Size Large (US 12-14): Bust 38 in / 96.5 cm, Waist 31 in / 78.5 cm, Hip 40 in / 101.5 cm, Total Length 60 in / 152.5 cm, Inseam 29 in / 73.5 cm, Leg opening at hem 24 in / 61 cm per leg
Instructions are written for Size Small with Size Medium and Size Large in parentheses throughout. Where only one number appears, it applies to all sizes.
Materials Needed
Yarn
Color A (Sage Green): approximately 800 (900, 1000) yards / 732 (823, 915) meters, DK weight, plant fiber blend recommended
Color B (Dusty Rose): approximately 600 (700, 800) yards / 549 (640, 732) meters, DK weight
Color C (Natural Cream): approximately 500 (600, 700) yards / 457 (549, 640) meters, DK weight
Total yarn requirement: approximately 1900 (2200, 2500) yards / 1738 (2012, 2287) meters combined
Yarn Suggestions
Lion Brand 24/7 Cotton in Sage, Rose, and Ecru works beautifully. It’s 100 percent mercerized cotton at 186 yards / 170 meters per 3.5 oz / 100 g skein. This yarn produces excellent stitch definition for lace patterns, is machine washable, and has the smooth drape appropriate for this silhouette.
Paintbox Yarns Cotton DK in Grass Green, Tea Rose, and Champagne White is another great option at 137 yards / 125 meters per 1.76 oz / 50 g ball.
WeCrochet Comfy DK offers slight elasticity that aids in garment fit while maintaining smooth drape. It’s 75 percent pima cotton, 25 percent acrylic at 230 yards / 210 meters per 3.5 oz / 100 g skein.
Choose a DK weight yarn with minimal halo or texture so lace and hexagon stitch detail remains visible. Avoid wool or high-wool blends unless you prefer a warmer garment. Always substitute by yardage, not by skein count.
Tools
Gauge
Bodice (E-4 hook, 3.5 mm): 22 stitches and 24 rows = 4 in / 10 cm in single crochet after blocking
Bodice Lace Stitch: 1 lace repeat (6 stitches) = approximately 1.1 in / 2.8 cm, 1 lace pattern row = approximately 0.35 in / 0.9 cm
Pants Leg Chevron Lace (F-5 hook, 3.75 mm): 18 stitches and 10 rows = 4 in / 10 cm in chevron lace pattern after blocking
African Flower Hexagon (F-5 hook, 3.75 mm): 1 completed 6-round hexagon = 6.5 in / 16.5 cm point to point, 5.6 in / 14.25 cm flat side to flat side
Swatch in the round for the hexagons and flat for the bodice. Block your swatches before measuring.
Abbreviations
Special Stitches
Picot: Chain 3, slip stitch into the first chain made. This creates a small decorative loop used at the neckline edge.
Shell: Work (2 dc, ch 2, 2 dc) all into the same stitch or chain space. This creates a fan-shaped cluster used in the bodice lace panel.
V-Stitch (V-st): Work (dc, ch 1, dc) all into the same stitch or chain space. Creates an open V shape used in the bodice construction.
Bobble Stitch: Yarn over, insert hook into stitch, pull up a loop, yarn over, pull through 2 loops (incomplete dc). Repeat this process 4 more times in the same stitch (5 incomplete dc total in same stitch). Yarn over and pull through all 6 loops on hook. Used as center of African Flower hexagon.
Pattern Notes Before You Begin
1. The jumpsuit is constructed in this order: Front Bodice Panel (worked flat), Back Bodice Panel (worked flat), Bodice Assembly (seamed at sides, straps attached), African Flower Hexagon Yoke Panels (6 hexagons for front hip, 6 hexagons for back hip), Pants Legs (each leg worked flat then seamed, attached to hexagon yoke), Waist Assembly (bodice joined to hexagon yoke), Waist Tie, and final finishing.
2. The bodice is worked flat (back and forth in rows). The lace pattern at center front creates the V-neck shaping organically through increases at the lace panel sides.
3. The African Flower hexagons are worked in rounds outward from a center ring. Six hexagons are seamed together to form a flat panel across the front hip. Six more form the back hip panel.
4. Each pants leg is worked flat in chevron lace stripes. The legs begin at the widest point at the hem and decrease gradually to fit the yoke circumference.
5. Color changes for the chevron stripes follow this sequence repeating throughout both legs: 2 rows Color B (Dusty Rose), 2 rows Color C (Cream), 2 rows Color A (Sage Green). When changing colors at the beginning of a row, complete the last yarn-over of the previous row with the new color.
6. All stitch counts in parentheses at end of rows reflect the total working stitch count in that row.
7. Blocking is essential. This garment will not lie correctly or measure accurately without thorough wet blocking.
8. All measurements given are after blocking.
Section 1: Front Bodice Panel Instructions
The front bodice is worked flat in rows from the bottom edge upward. It is shaped with waist shaping (decreases then increases) and V-neck shaping near the top.
Foundation: Using Color A and E-4 hook, chain 97 (103, 109).
Row 1 (WS): Sc in 2nd ch from hook and in each ch across. Turn. (96, 102, 108 sc)
Row 2 (RS): Ch 1, sc in each st across. Turn. (96, 102, 108 sc)
Row 3: Ch 1, sc in each st across. Turn. (96, 102, 108 sc)
Row 4 (Establish Lace Pattern): Ch 1, sc in first st, (ch 3, sk 2 sts, sc in next st) across, ending sc in last st. Turn. (32, 34, 36 ch-3 sps plus 2 edge sc)
Row 5: Ch 5 (counts as dc, ch 2), sc in first ch-3 sp, (ch 3, sc in next ch-3 sp) across to last sp, ch 2, dc in last sc. Turn.
Row 6: Ch 1, sc in first dc, (3 sc in each ch-3 sp, sc in each sc) across, 3 sc in final ch-2 sp, sc in 3rd ch of t-ch. Turn. (96, 102, 108 sc)
Rows 7 through 9: Ch 1, sc in each st across. Turn. (96, 102, 108 sc)
Row 10 (First Waist Decrease Row): Ch 1, sc2tog, sc in each st across to last 2 sts, sc2tog. Turn. (94, 100, 106 sc)
Row 11: Ch 1, sc in each st across. Turn. (94, 100, 106 sc)
Row 12: Ch 1, sc2tog, sc in each st across to last 2 sts, sc2tog. Turn. (92, 98, 104 sc)
Row 13: Ch 1, sc in each st across. Turn. (92, 98, 104 sc)
Row 14 (Establish Lace Repeat 2): Ch 1, sc in first st, (ch 3, sk 2 sts, sc in next st) across. Turn. (30, 32, 34 ch-3 sps)
Row 15: Ch 5, sc in first ch-3 sp, (ch 3, sc in next ch-3 sp) across to last sp, ch 2, dc in last sc. Turn.
Row 16: Ch 1, sc in first dc, (3 sc in each ch-3 sp, sc in each sc) across, 3 sc in final ch-2 sp, sc in 3rd ch of t-ch. Turn. (92, 98, 104 sc)
Row 17: Ch 1, sc2tog, sc in each st across to last 2 sts, sc2tog. Turn. (90, 96, 102 sc)
Row 18: Ch 1, sc in each st across. Turn. (90, 96, 102 sc)
Row 19: Ch 1, sc2tog, sc in each st across to last 2 sts, sc2tog. Turn. (88, 94, 100 sc)
Row 20: Ch 1, sc in each st across. Turn. (88, 94, 100 sc)
After Row 20, this is the narrowest waist point. The piece should measure approximately 16 in / 40.5 cm wide and 3.25 in / 8.25 cm tall at this point before blocking.
Rows 21 through 22: Ch 1, sc in each st across. Turn. (88, 94, 100 sc)
Row 23 (Waist Increase Row): Ch 1, 2 sc in first st, sc in each st across to last st, 2 sc in last st. Turn. (90, 96, 102 sc)
Row 24: Ch 1, sc in each st across. Turn. (90, 96, 102 sc)
Row 25 (Establish Lace Repeat 3): Ch 1, sc in first st, (ch 3, sk 2 sts, sc in next st) across. Turn.
Row 26: Ch 5, sc in first ch-3 sp, (ch 3, sc in next ch-3 sp) across, ch 2, dc in last sc. Turn.
Row 27: Ch 1, sc in first dc, (3 sc in each ch-3 sp, sc in each sc) across, 3 sc in final ch-2 sp, sc in 3rd ch of t-ch. Turn. (90, 96, 102 sc)
Row 28: Ch 1, 2 sc in first st, sc in each st across to last st, 2 sc in last st. Turn. (92, 98, 104 sc)
Row 29: Ch 1, sc in each st across. Turn. (92, 98, 104 sc)
Row 30: Ch 1, 2 sc in first st, sc in each st across to last st, 2 sc in last st. Turn. (94, 100, 106 sc)
Row 31: Ch 1, sc in each st across. Turn. (94, 100, 106 sc)
Row 32: Ch 1, 2 sc in first st, sc in each st across to last st, 2 sc in last st. Turn. (96, 102, 108 sc)
Row 33: Ch 1, sc in each st across. Turn. (96, 102, 108 sc)
After Row 33, the piece has returned to the original hip/bust width. Total height approximately 6 in / 15.25 cm.
Rows 34 through 37: Ch 1, sc in each st across. Turn. (96, 102, 108 sc)
Row 38 (Establish Lace Repeat 4): Ch 1, sc in first st, (ch 3, sk 2 sts, sc in next st) across. Turn.
Row 39: Ch 5, sc in first ch-3 sp, (ch 3, sc in next ch-3 sp) across, ch 2, dc in last sc. Turn.
Row 40: Ch 1, sc in first dc, (3 sc in each ch-3 sp, sc in each sc) across, 3 sc in final ch-2 sp, sc in 3rd ch of t-ch. Turn. (96, 102, 108 sc)
Rows 41 through 43: Ch 1, sc in each st across. Turn. (96, 102, 108 sc)
V-Neck Shaping (Front Bodice)
Row 44 (Begin V Split): Ch 1, sc in first 48 (51, 54) sts. Turn. Leave remaining 48 (51, 54) sts on hold for right bodice panel.
You will now work the left bodice panel only.
Left Bodice Panel
Row 45: Ch 1, sc2tog (neck edge decrease), sc in each st across to end. Turn. (47, 50, 53 sc)
Row 46: Ch 1, sc in each st across to last 2 sts, sc2tog. Turn. (46, 49, 52 sc)
Row 47: Ch 1, sc2tog, sc in each st across. Turn. (45, 48, 51 sc)
Row 48: Ch 1, sc in each st across to last 2 sts, sc2tog. Turn. (44, 47, 50 sc)
Row 49: Ch 1, sc2tog, sc in each st across. Turn. (43, 46, 49 sc)
Rows 50 through 56: Work even in sc. Turn each row. (43, 46, 49 sc)
At end of Row 56, fasten off. Leave a tail for seaming the shoulder strap.
Right Bodice Panel
Rejoin Color A with RS facing in the 49th (52nd, 55th) stitch from the right edge (the center stitch is left unworked to form the V base).
Row 44R: Ch 1, sc in each st across to end. Turn. (48, 51, 54 sc)
Row 45R: Ch 1, sc in each st across to last 2 sts, sc2tog. Turn. (47, 50, 53 sc)
Row 46R: Ch 1, sc2tog, sc in each st across. Turn. (46, 49, 52 sc)
Row 47R: Ch 1, sc in each st across to last 2 sts, sc2tog. Turn. (45, 48, 51 sc)
Row 48R: Ch 1, sc2tog, sc in each st across. Turn. (44, 47, 50 sc)
Row 49R: Ch 1, sc in each st across to last 2 sts, sc2tog. Turn. (43, 46, 49 sc)
Rows 50R through 56R: Work even in sc. Turn each row. (43, 46, 49 sc)
At end of Row 56R, fasten off.
Checkpoint: After completing the front bodice, the piece should measure approximately 10 in / 25.5 cm tall at center. Each shoulder strap panel should be approximately 7.75 (8.25, 8.75) in / 19.75 (21, 22.25) cm wide.
Section 2: Back Bodice Panel Instructions
Work Foundation through Row 43 exactly as written for Front Bodice Panel. (96, 102, 108 sc after Row 43)
Row 44 Back (Begin Back V): Ch 1, sc in first 48 (51, 54) sts. Turn.
Left Back Panel
Rows 45 through 50: Work exactly as Left Bodice Panel rows 45 through 50. (43, 46, 49 sc after Row 50)
Rows 51 through 56: Work even in sc. (43, 46, 49 sc)
Fasten off.
Right Back Panel
Rejoin and work exactly as Right Bodice Panel Rows 44R through 56R. (43, 46, 49 sc after Row 56R)
Fasten off.
Section 3: Bodice Assembly
Lay front and back panels with wrong sides facing. Using Color A and tapestry needle, whipstitch side seams together along the full length from bottom edge up to Row 43. Leave approximately 7 in / 18 cm opening at each armhole.
The armhole opening for Size Small should be approximately 7 in / 18 cm along the vertical edge. For Size Medium, 7.5 in / 19 cm. For Size Large, 8 in / 20.5 cm.
Spaghetti Straps (Make 2)
Using Color A and E-4 hook, chain 80 (84, 88) for a starting strap length. Adjust as needed for fit.
Row 1: Sc in 2nd ch from hook, sc in each ch across. Turn. (79, 83, 87 sc)
Row 2: Ch 1, sc in each st across. Fasten off. (79, 83, 87 sc)
Using tapestry needle and Color A yarn, sew one end of each strap to the top corner of the front left and front right shoulder panels. Sew opposite ends to corresponding back shoulder panels. Try on or use a dress form to adjust strap length before permanently securing.
Section 4: African Flower Hexagon Motifs
You will make 12 hexagons total: 6 for the front hip yoke and 6 for the back hip yoke.
Colors per hexagon:
Hexagon Motif (Make 12)
Round 1 (Color B): Magic ring, ch 2 (counts as hdc), 11 hdc in ring, sl st to top of ch-2 to join. (12 hdc) Fasten off Color B.
Round 2 (Color C): Join Color C in any st, ch 1, sc in same st, ch 1, (sc in next st, ch 1) around, sl st to first sc to join. (12 sc, 12 ch-1 sps) Fasten off Color C.
Round 3 (Color B): Join Color B in any ch-1 sp, ch 3 (counts as dc), 4 dc in same sp (first petal made), sc in next sc, (5 dc in next ch-1 sp, sc in next sc) around, sl st to top of ch-3 to join. (6 petals of 5 dc each, 6 sc between petals) Fasten off Color B.
Round 4 (Color C): Join Color C in center dc of any petal, ch 1, sc in same st, ch 3, (sc in center dc of next petal, ch 3) around, sl st to first sc to join. (6 sc, 6 ch-3 sps) Fasten off Color C.
Round 5 (Color A): Join Color A in any ch-3 sp, ch 3 (counts as dc), 4 dc in same sp, ch 1, (5 dc in next ch-3 sp, ch 1) around, sl st to top of ch-3 to join. (6 groups of 5 dc, 6 ch-1 sps) Fasten off Color A.
Round 6 (Color A): Join Color A in first dc of any 5-dc group, ch 1, sc in same st, sc in next 4 dc, (sc, ch 2, sc) in ch-1 sp (corner made), sc in next 5 dc, (sc, ch 2, sc) in ch-1 sp, repeat around all 6 corners, sl st to first sc to join. (5 sc per flat side, ch-2 corner sp at each of 6 corners = 60 sc total, 6 corner ch-2 sps) Fasten off Color A.
Block all 12 hexagons before assembling. Each hexagon should measure 6.5 in / 16.5 cm from point to point.
Hexagon Yoke Assembly
Front Hip Yoke: Arrange 6 hexagons in a brick/offset arrangement with 3 hexagons across the top row and 3 across the bottom row. Using Color A and slip stitch flat join method (wrong sides held together), seam along shared flat sides.
Back Hip Yoke: Assemble identically using remaining 6 hexagons.
Join Front and Back Yoke at Side Seams: With wrong sides together, seam 2 in / 5 cm at each side edge, leaving the lower portion open to attach pants legs.
Section 5: Pants Legs (Make 2)
Each pants leg is worked flat in chevron lace stripes and seamed along the inseam. The legs are worked from the hem upward.
For Size Small: 193 stitches at hem
For Size Medium: 205 stitches at hem
For Size Large: 217 stitches at hem
Using Color B and F-5 hook, chain 194 (206, 218).
Foundation Row (WS): Sc in 2nd ch from hook, sc in each ch across. Turn. (193, 205, 217 sc)
Color sequence: 2 rows Color B, 2 rows Color C, 2 rows Color A. Repeat throughout.
Row 1 (RS, Color B, Chevron Setup): Ch 1, sc in first st, (sk 2 sts, 5 dc in next st, sk 2 sts, sc in next st, ch 2, sc in next st) across, ending with sk 2 sts, 5 dc in next st, sk 2 sts, sc in last st. Turn.
Continue working the chevron lace pattern, following the color sequence and decreasing gradually according to the pattern until the leg opening fits the yoke circumference. Seam each leg along the inseam, then attach to the hexagon yoke.
Final Assembly
Join the bodice to the hexagon yoke at the waist using Color A and a slip stitch seam. Create the waist tie by chaining approximately 200 stitches with Color A, working 1 row of single crochet, and threading through the waist join.
Block the entire finished jumpsuit thoroughly. This step is absolutely essential for the proper drape and fit of your garment.
Finishing Tips
Weave in all ends securely using your tapestry needle. For a garment this size, you’ll have quite a few ends to manage, so take your time and do it properly.
When blocking, lay the jumpsuit flat on blocking mats and pin out each section to the correct measurements. Spritz with water and allow to dry completely before wearing.
The straps can be adjusted after assembly if needed. Simply unpick the seam, adjust the length, and resew.
I really hope you love making this gorgeous crochet jumpsuit as much as I loved putting this pattern together for you. It’s a labor of love, but the finished result is absolutely worth every stitch. If you make one, please save this pattern to your Pinterest boards so you can find it again easily, and I would absolutely love to see your finished jumpsuits in the comments below. Happy crocheting!
You Might Also Like
- Midnight Navy Elegant Braided Clutch Free Crochet Pattern
- Dusty Rose Vine Crochet Midi Dress Free Pattern
- Coral Reef Fish Crochet Beach Tote Free Pattern
- Dusty Rose Floral Crochet Summer Boots Free Pattern