Pastel Rainbow Granny Square Hoodie Free Crochet Pattern
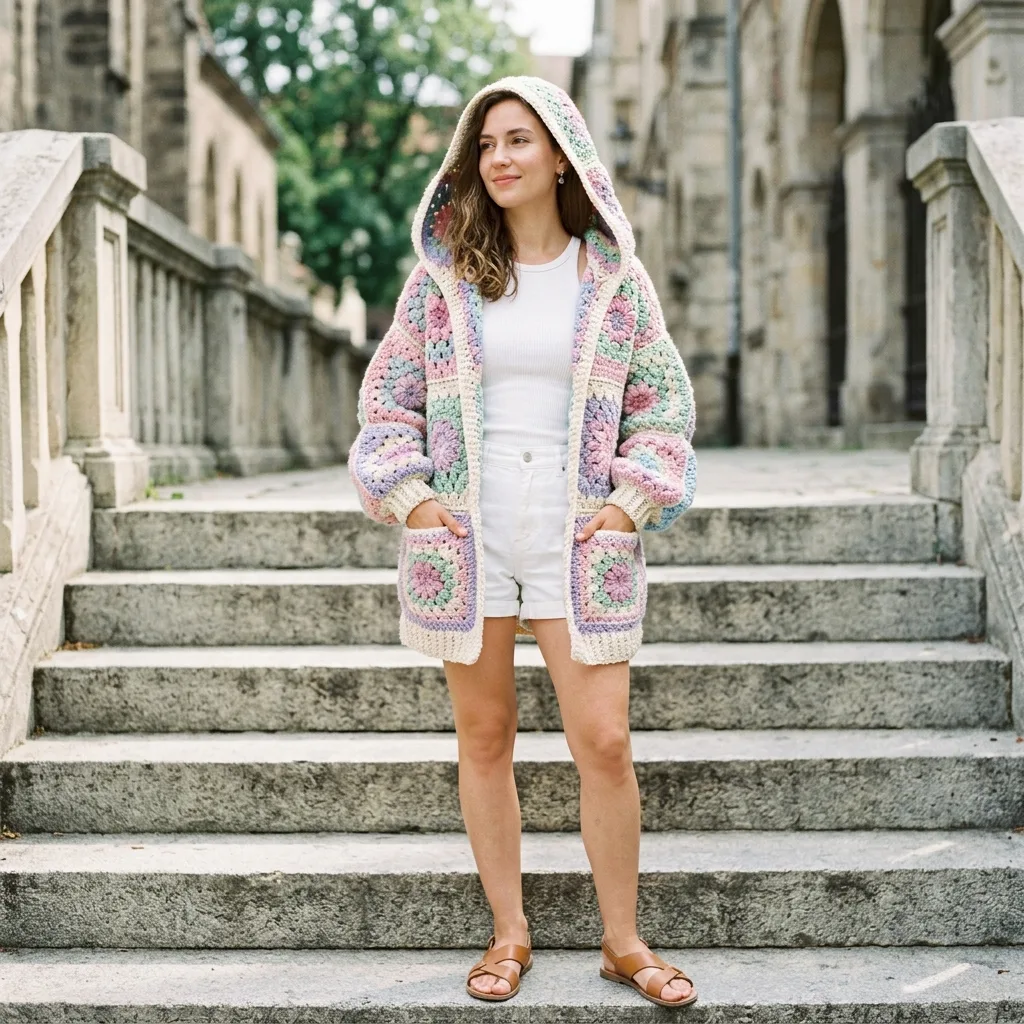
I have been dreaming about designing the perfect granny square cardigan for ages. You know the kind. Cozy enough for crisp mornings, pretty enough to wear out, and constructed in a way that actually makes sense when you sit down to build it. I wanted something oversized with that effortless boho vibe, featuring soft pastels that blend together like a spring garden.
When I finally sat down to map this hoodie out, I made some specific choices. The squares needed to be classic five-round grannies because they are satisfying to make and create beautiful lace texture. The color palette had to feel soft and dreamy without being babyish. And the construction had to be straightforward even though the finished piece looks complex.
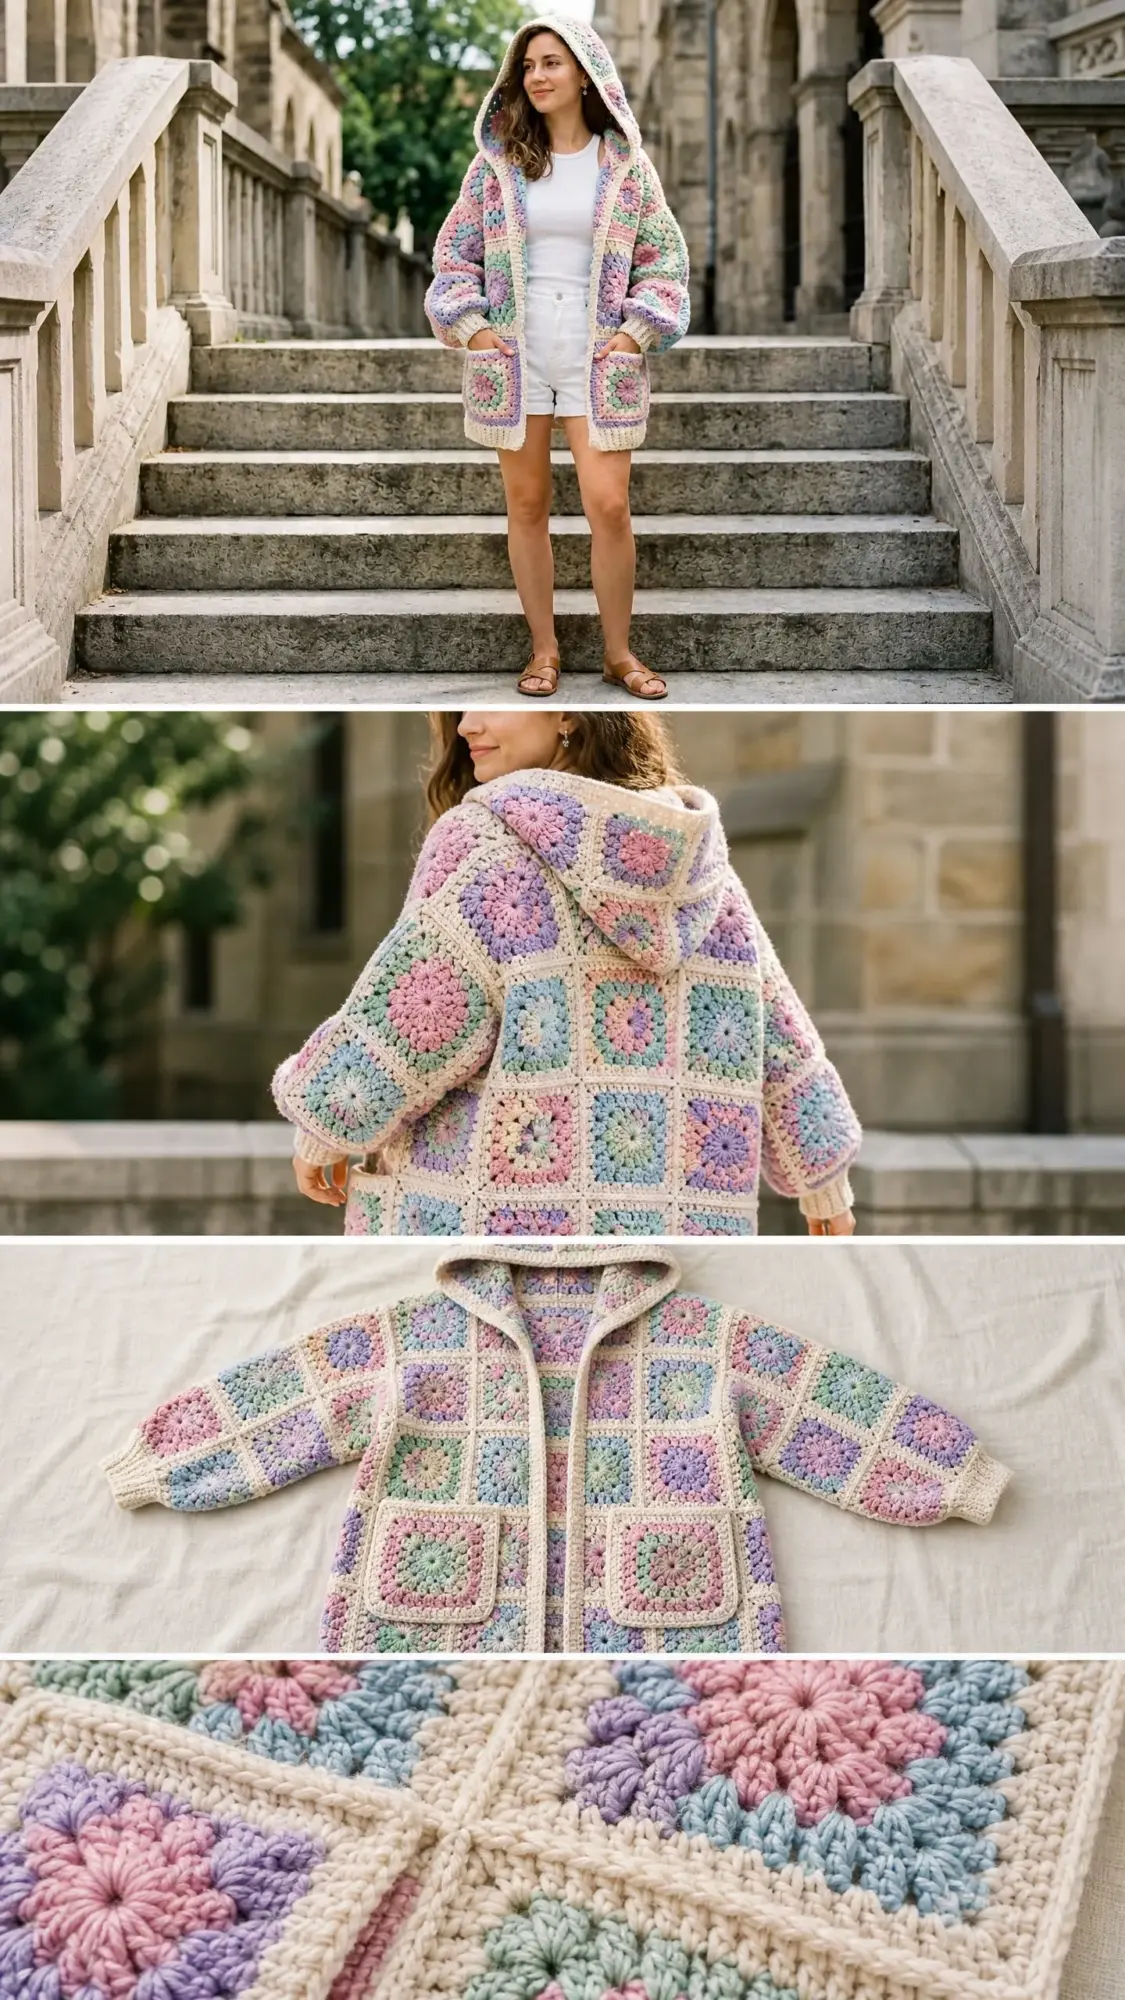
I am SO pleased with how this turned out. The pastel rainbow granny square hoodie has everything I hoped for. Big patch pockets, a generous hood, ribbed cuffs and hem for a polished finish, and that gorgeous patchwork effect that makes granny squares so special. Let me walk you through exactly how to make your own.
About This Crochet Pattern
This cozy oversized hoodie cardigan is built entirely from classic granny squares. You will make 84 squares total, then sew them together into panels that become the back, two fronts, two sleeves, and a large rectangular hood. The construction sounds like a lot, but each individual square works up quickly, and the assembly is logical once you understand the layout.
The finished garment features an open front with no closures, which gives it that relaxed cardigan feel. Ribbed cuffs and a ribbed hem add stretch and structure where you need it. A cream single crochet border runs along both front edges and around the hood opening, tying everything together beautifully. And those two patch pockets on the front panels? Functional and adorable.
The color palette uses soft pink, lavender, mint green, baby blue, and cream throughout. Each granny square contains a rotating combination of pastel colors radiating from the center, with cream always used as the final round. This unifies all the squares before joining and creates that cohesive look you see in the photos.
Skill Level
This pattern is intermediate level. The individual granny square is completely beginner friendly. If you can chain, double crochet, and work in the round, you can make these squares. The intermediate rating comes from the garment construction itself.
You will need to understand how to seam multiple motifs into shaped panels. Setting in a sleeve requires some patience. Working ribbing and picking up stitches for a border are techniques you will use. If you have never joined granny squares before, I recommend practicing on a small project first, like a scarf or bag.
That said, do not let this intimidate you. The construction order is clearly laid out, and if you take it step by step, you will end up with a stunning wearable piece.
Time Estimate
Plan for approximately 80 to 120 hours depending on your working speed. Granny square construction alone accounts for roughly 60 to 80 hours since you are making 84 of them. The assembly, ribbing, and finishing take the remaining time.
This is definitely a project to work on over several weeks or months. I like to think of granny square projects as portable meditation. Pop a few squares in your bag and work on them during lunch breaks, while watching shows, or during long car rides as a passenger.
Finished Measurements
This pattern is written for size Medium with the following finished measurements:
This garment is intentionally oversized. A size Medium as written fits a 34 to 38 inch bust with 8 to 10 inches of positive ease. Size customization tips appear at the end of this pattern.
Materials You Will Need
Yarn: Worsted weight, approximately 2,800 yards / 2,560 meters total
Break it down by color:
Hook: US size J / 6.0 mm (adjust as needed to meet gauge)
Notions:
Yarn Suggestions
Option 1: Lion Brand Pound of Love (100% acrylic, 1,020 yards per skein, worsted weight). This yarn offers excellent stitch definition, is machine washable, widely available in the pastel shades required, and very economical for a yardage-heavy project like this one.
Option 2: Paintbox Yarns Simply DK used double-stranded (100% acrylic, 137 yards per 50g ball). When doubled, DK weight gives a soft worsted gauge. This produces an especially soft drape while remaining machine washable, and the color range for pastels is fantastic.
Option 3: WeCrochet Mighty Stitch Worsted (80% acrylic, 20% superwash wool, 208 yards per 100g skein). The wool content gives beautiful stitch bloom and warmth. Still machine washable on gentle cycle with superior drape for a garment.
Choose any smooth worsted weight yarn that achieves the stated gauge. Avoid highly textured, thick-and-thin, or novelty yarns since the granny square lace structure will be obscured. Consistent plied yarns photograph and join most cleanly.
Gauge
One completed granny square (5 rounds as written) = 5 inches x 5 inches / 12.7 cm x 12.7 cm after light blocking.
10 sc x 12 rows = 4 inches / 10 cm in single crochet ribbing using Color A.
Gauge is mandatory for this garment. Each finished square must measure exactly 5 inches for the panel stitch counts and finished dimensions to work correctly. Adjust your hook size up or down until your square matches. Do not skip this step.
Abbreviations
Special Stitches and Techniques
Granny Cluster (3-dc cluster)
This is the building block of every granny square. Yarn over, insert hook into indicated chain space or stitch, yarn over and pull up a loop, yarn over and pull through 2 loops on hook. That is one double crochet started but not finished. Without completing it, yarn over, insert hook into the same chain space, yarn over and pull up a loop, yarn over and pull through 2 loops. Do this one more time in the same space. Now yarn over and pull through all 4 loops on hook. One granny cluster complete. The cluster always sits in the same chain space and counts as a single unit.
Corner Shell
Work one granny cluster, chain 2, then work another granny cluster all into the same corner chain-2 space. This creates the characteristic granny square corner, and the chain-2 space counts as the corner space for the following round.
Side Cluster
Work one granny cluster into the indicated chain-1 space along a square side. Each chain-1 space between clusters along a side receives one cluster per round added.
Flat Slip Stitch Seam
Hold two squares with wrong sides together. Insert hook through the outermost loop only of both squares simultaneously, draw up the working yarn, and pull through the loop on hook. Continue across, working one slip stitch per stitch or cluster top. This creates a visible raised seam on the right side which is part of the design aesthetic.
Ribbing Stitch (worked flat)
Foundation: chain the number stated. Row 1: single crochet into second chain from hook and each chain across. Turn. Row 2 onward: chain 1, single crochet in the back loop only of each stitch across. Turn. Repeat Row 2 for pattern. The back-loop-only single crochet creates a stretchy, ribbed texture.
Pattern Notes Before You Begin
1. Each granny square is worked in joined rounds. Join each round with a slip stitch to the top of the first cluster. Begin each round with chain 3 (counts as first double crochet) unless otherwise noted.
2. Color sequence within squares: Work rounds 1 and 2 in a pastel color (B, C, D, or E), round 3 in a different pastel, round 4 in yet another pastel or the same, and round 5 always in Color A (cream). Vary the pastels freely to create the gradient patchwork effect shown. No two adjacent squares need to be identical.
3. All panels are assembled with flat slip stitch seams. You can also join as you go on round 5 of each square if you prefer that method.
4. The border along the center front edges and around the hood opening is worked in Color A as a single crochet edging after the full garment is assembled.
5. Pocket squares are single granny squares whipstitched to the lower front panels after all assembly and borders are complete.
6. The hood is a rectangle of granny squares folded in half along its length and seamed along the top. It is then attached around the neckline opening.
7. The chain 1 at the start of ribbing rows does NOT count as a stitch. Stitch counts for ribbing rows exclude the turning chain-1.
8. Fasten off and weave in ends after every color change within the squares. There will be many ends. Weave ends in the direction of the round worked for the neatest result.
Granny Square Instructions
Make 84 squares total.
Panel distribution:
With first pastel color (your choice from B, C, D, or E), make a magic ring.
Round 1: Ch 3 (counts as first dc here and throughout granny square rounds), work 2 dc into ring, ch 2, (3 dc into ring, ch 2) 3 times, join with sl st to top of beginning ch-3. Fasten off. (4 clusters, 4 ch-2 corner spaces)
Round 2: Join same or different pastel color with sl st into any corner ch-2 sp. Ch 3, work 2 dc into same corner sp, ch 2, 3 dc into same corner sp (corner made), ch 1, (work corner in next corner sp, ch 1) 3 times, join with sl st to top of ch-3. Fasten off. (8 clusters total: 2 clusters per corner x 4 corners; 4 ch-1 spaces along sides)
Round 3: Join same or new pastel color into any corner ch-2 sp. Ch 3, 2 dc into same sp, ch 2, 3 dc into same sp (corner), ch 1, 3 dc into next ch-1 side sp (side cluster), ch 1, (corner in next corner sp, ch 1, side cluster in next ch-1 sp, ch 1) 3 times, join with sl st to top of ch-3. Fasten off. (12 clusters total: 2 per corner x 4 corners + 1 per side x 4 sides; 4 corner ch-2 spaces, 8 ch-1 spaces)
Round 4: Join same or new pastel color into any corner ch-2 sp. Ch 3, 2 dc into same sp, ch 2, 3 dc into same sp (corner), (ch 1, side cluster in next ch-1 sp) twice, ch 1, (corner in next corner sp, (ch 1, side cluster in next ch-1 sp) twice, ch 1) 3 times, join with sl st to top of ch-3. Fasten off. (16 clusters total: 2 per corner x 4 corners + 2 per side x 4 sides; 4 corner ch-2 spaces, 12 ch-1 spaces)
Round 5: Join Color A (cream) into any corner ch-2 sp. Ch 3, 2 dc into same sp, ch 2, 3 dc into same sp (corner), (ch 1, side cluster in next ch-1 sp) 3 times, ch 1, (corner in next corner sp, (ch 1, side cluster in next ch-1 sp) 3 times, ch 1) 3 times, join with sl st to top of ch-3. Fasten off Color A. (20 clusters total: 2 per corner x 4 corners + 3 per side x 4 sides; 4 corner ch-2 spaces, 16 ch-1 spaces)
Completed square has 5 clusters along each side edge (counting corner clusters) and measures 5 inches x 5 inches after blocking.
Make 84 squares varying pastel color combinations in rounds 1 through 4. Always finish round 5 with Color A.
Checkpoint
After completing all 84 squares, block each one to 5 inches x 5 inches. Pin to measurements and mist with water, or steam block. Allow to dry fully before seaming. This step is essential to ensure all squares match before assembly.
Panel Assembly
Seaming method: Hold two squares with wrong sides together. Using Color A and a tapestry needle, whipstitch through the outermost loops of both squares along one edge, working approximately 8 joining points per side edge. Alternatively, use a hook and slip stitch seam through both outer loops.
Back Panel
Arrange 20 squares in a grid 5 squares wide by 4 squares tall. Join squares into rows of 5 first (seam 4 vertical seams per row). Then join the 4 rows together (seam 3 horizontal seams). Back panel measures approximately 25 inches wide x 20 inches tall.
Left Front Panel
Arrange 10 squares 2 wide by 5 tall. Seam 1 vertical seam per row, then seam 4 horizontal seams. Left front panel measures approximately 10 inches wide x 25 inches tall.
Right Front Panel
Same as left front panel. Right front panel measures approximately 10 inches wide x 25 inches tall.
Note on length: The back panel (20 inches) is shorter than the front panels (25 inches). The front panels extend below the back hem level to create a longer front length appearance. When joining at shoulders, align the top edges. The extra 5 inches on the fronts fall below the back hem.
Sleeve Panels (Make 2)
Each sleeve: 16 squares arranged 2 wide by 8 tall. Seam 1 vertical seam per row across 8 rows, then seam 7 horizontal seams. Sleeve panel measures approximately 10 inches wide x 40 inches long.
The 2 x 8 square panel is 10 inches wide x 40 inches long. Fold in half across the width (bringing the 10 inch wide ends together), creating a 10 inch wide x 20 inch tall loop. Seam one 10 inch edge (this becomes the underarm seam). The sleeve tube is now 10 inches circumference x 20 inches long. The open 10 inch edge at top is the sleeve cap edge. The other open 10 inch edge at bottom is the cuff opening before ribbing.
Hood Panel
Arrange 10 squares 5 wide by 2 tall. Seam 4 vertical seams and 1 horizontal seam. Hood panel measures approximately 25 inches wide x 10 inches tall.
The hood is folded in half widthwise (bringing the two 10 inch ends together) to form a 12.5 inch wide x 10 inch tall rectangle. Seam along the folded top edge (the 12.5 inch seam) to close the top of the hood. Do not seam the 25 inch opening edge yet.
Garment Assembly
Step 1: Shoulder Seams
Place back panel right side up. Place right front panel right side down on top of right shoulder area, aligning top edges. The right shoulder span is 2 squares (10 inches) from the right armhole edge. Seam the top 2-square-width of the right front to the top-right 2 squares of the back panel. Repeat for left front. Leave the center 1 square (5 inches) of the back top open as the back neckline.
Step 2: Armhole Creation
The armhole opening on each side is 2 squares tall (10 inches). After seaming shoulders, the side seams below the armhole begin 10 inches down from the shoulder seam. Pin markers 10 inches down from shoulder on both back and front panels on each side.
Step 3: Side Seams
Seam the side of back panel to the side of front panel from the hem upward, stopping at the armhole marker. This creates a 10 inch armhole opening on each side. Repeat for both sides.
Step 4: Sleeve Attachment
The armhole opening on the body is approximately 20 inches in circumference (10 inch opening x 2 sides). The sleeve cap circumference is 10 inches. Ease the sleeve cap into the armhole opening, distributing any fullness evenly. Seam with slip stitch or whipstitch. Repeat for second sleeve.
Step 5: Hood Attachment
The neckline opening circumference: back neckline is 5 inches, plus left front neckline drop is approximately 5 inches, plus right front neckline drop is 5 inches. Total neckline circumference is approximately 15 inches. The hood opening edge is 25 inches. This excess creates the hood ease and drape.
Pin the center of the hood opening edge to the center back neckline. Distribute the hood edge around the neckline, folding small pleats at the shoulder seam points to ease in the extra width. Seam with right side of hood facing right side of garment, working slip stitch through both layers.
Hem Ribbing
With Color A, ch 9.
Row 1: Sc in 2nd ch from hook and each ch across. Turn. (8 sc)
Row 2: Ch 1, sc in BLO of each sc across. Turn. (8 sc)
Repeat Row 2 until ribbing measures 46 inches (the full circumference of the hem: back 25 inches + left front 10 inches + right front 10 inches + seam allowance 1 inch). Fasten off.
Seam the short ends of the ribbing together to form a loop. Pin the ribbing loop to the hem edge of the garment with right side of ribbing facing right side of garment hem, slightly stretching the ribbing to match. Seam with slip stitch or whipstitch.
Cuff Ribbing (Make 2)
With Color A, ch 9.
Row 1: Sc in 2nd ch from hook and each ch across. Turn. (8 sc)
Row 2: Ch 1, sc in BLO of each sc across. Turn. (8 sc)
Repeat Row 2 until cuff ribbing measures 8 inches (cuff circumference). Fasten off.
Seam short ends together. Attach to sleeve cuff opening in same manner as hem ribbing, right side to right side. Make second cuff to match.
Checkpoint
With ribbing attached, sleeve length from shoulder seam to cuff edge should measure approximately 20 inches. Body length from shoulder seam to hem bottom should measure approximately 30 inches with ribbing.
Center Front and Hood Border
With right side facing and Color A, begin at the lower right hem edge.
Round 1: Working up the right front edge, around the hood, and down the left front edge, work 1 sc in each ch-1 sp and cluster top along the front edges, and 1 sc per stitch around the hood opening, placing 3 sc in each outer corner. Place markers at the two lower hem corners and the two top corners where front meets hood. When you reach the bottom left hem corner, sl st to the first sc. Do not turn.
Round 2: Ch 1, sc in each sc around, working 3 sc into each marked outer corner. Join with sl st to first sc. Fasten off Color A.
Weave in all border ends.
Pocket Squares (Make 2)
Each pocket is one completed granny square following the standard 5-round granny square instructions. Make 2 squares in your preferred pastel arrangement with Color A final round.
Block each pocket square to 5 inches x 5 inches.
Placement: On each front panel, center the pocket square approximately 4 inches up from the bottom hem edge and centered horizontally on the front panel. Whipstitch three sides of the pocket square to the front panel (left side, right side, and bottom edge), leaving the top edge open to function as a pocket opening.
Attach one pocket to each front panel.
Finishing and Blocking
Weave in all remaining yarn ends securely.
Wet blocking: Submerge the finished garment in cool water and gently squeeze out excess water (do not wring). Lay flat on blocking mats or clean towels. Pin to finished measurements: bust 46 inches, length 28 inches from shoulder, sleeve length 20 inches. Allow to dry completely (24 to 48 hours).
Steam blocking alternative: Using a garment steamer, hover over each seam and square, pressing with your hand after steaming while the fabric is warm. Do not press the iron directly onto the yarn.
Seam inspection: After blocking, check all seams under light. Reinforce any weak or gapping joins with a tapestry needle and Color A.
Size Customization Tips
To increase size by one size: Make each panel 1 column of squares wider. For the back, go from 5 to 6 squares wide (adding 5 inches to the back width). For each front, go from 2 to 3 squares wide (adding 5 inches per front). Total added bust circumference: approximately 15 inches.
To decrease size: Remove one column of squares from the back (5 squares to 4 squares wide) for a narrower fit.
To lengthen the body: Add one row of squares to the back and front panels. Each row adds 5 inches of length.
To lengthen sleeves: Add one or two rows of squares to the sleeve panel before folding.
For a larger hood: Make the hood panel 5 wide by 3 tall instead of 5 wide by 2 tall, giving a deeper hood.
Do not change the hook size to resize the garment. Instead, add or remove squares. Changing hook size changes gauge, which changes all dimensions simultaneously.
Care Instructions
Machine wash cold on gentle cycle if using acrylic or superwash wool yarn. Lay flat to dry. Do not tumble dry, as heat will distort the square structure. Do not dry clean. Do not iron directly. Steam only if needed. Store folded flat or rolled, not hung, to prevent stretching under its own weight.
If using non-superwash wool, hand wash only in cool water with wool wash. Roll in a towel to remove water, then block flat to dry.
You Did It!
Thank you so much for choosing this pattern for your next big project. I know making 84 granny squares is a commitment, but the finished hoodie is absolutely worth every stitch. There is something deeply satisfying about watching all those colorful squares come together into a wearable piece of art.
If you make this pastel rainbow granny square hoodie, I would absolutely love to see it. Tag me on Instagram or share your finished piece in my Facebook group. Seeing your creations is genuinely the best part of designing patterns.
Save this crochet pattern to your Pinterest boards so you can find it when you are ready to start. And if you make one, please drop a comment below. I read every single one, and I love hearing which color combinations you chose!
You Might Also Like
- Sage Green Ribbed Flared Dress Free Crochet Pattern
- Lavender Ombre Crochet Backpack Free Crochet Pattern
- Ocean Wave Candy Bolster Pillow Free Crochet Pattern
- Ocean Blue Ombre Crochet Backpack Free Crochet Pattern