Dusty Rose Openwork Draped Poncho Free Crochet Pattern
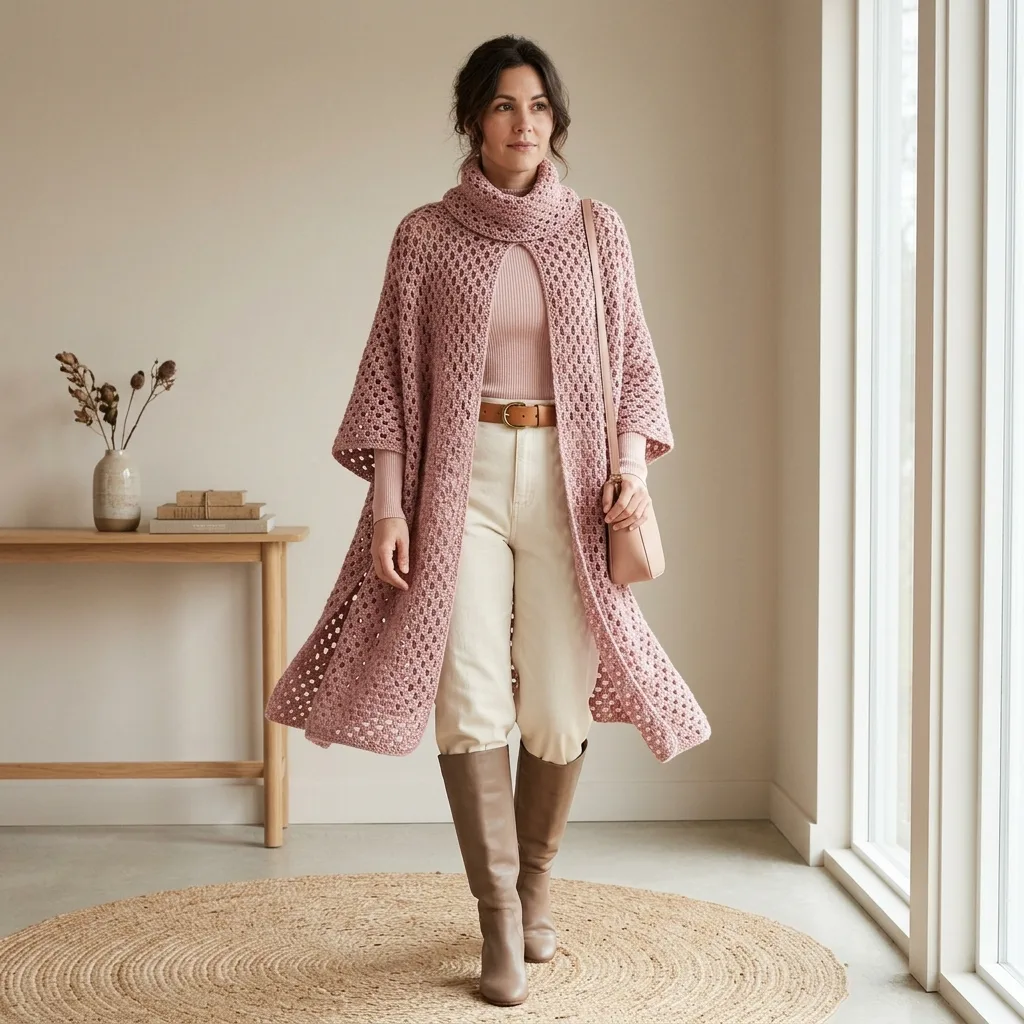
I call this one “The Rosemary.” I found the original sketch tucked inside an old notebook from years ago, right next to a coffee-stained grocery list and some very ambitious New Year’s resolutions I never kept.
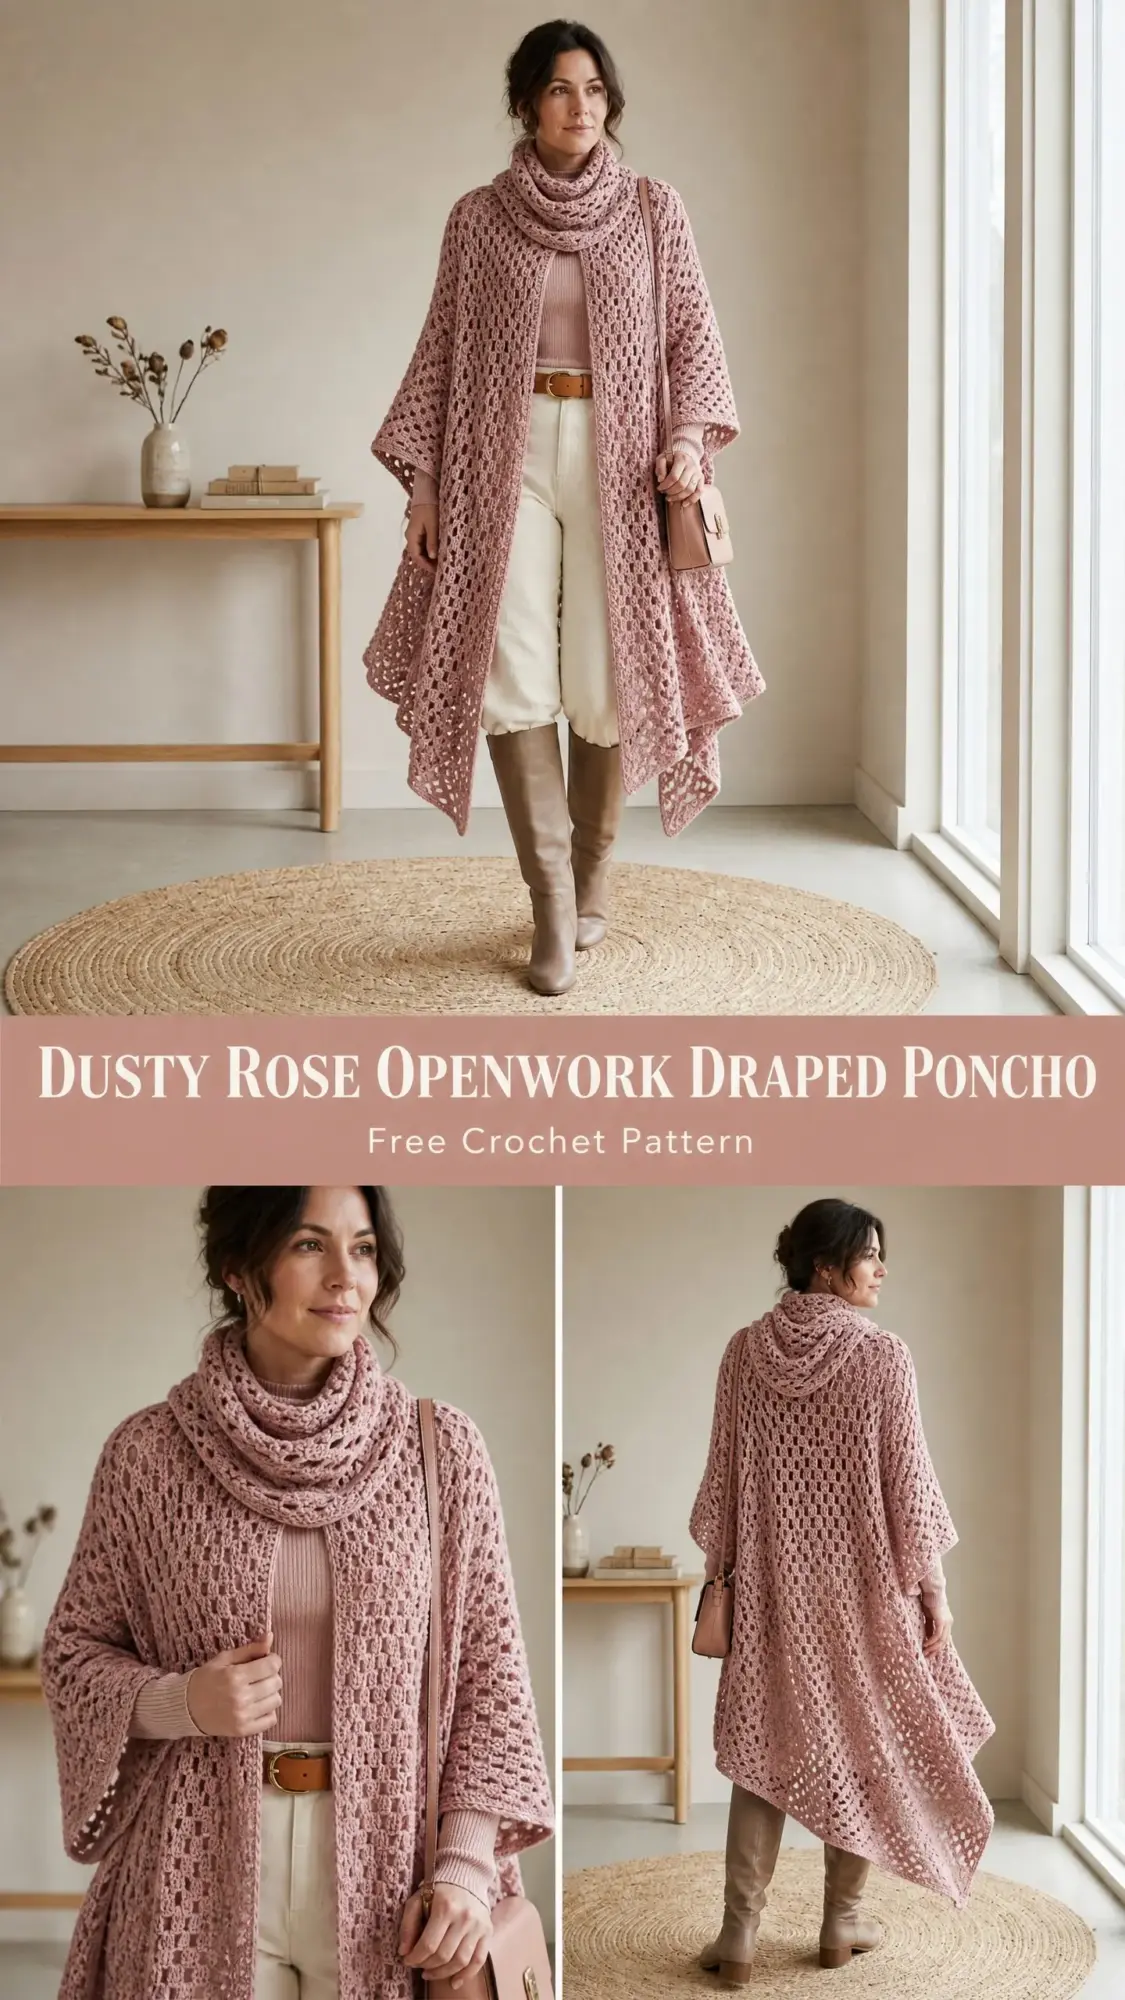
Back then, I wanted to create a poncho that felt like wearing a hug. Something dramatic enough to turn heads but cozy enough for Sunday morning errands. I wanted lace that looked intricate but followed a simple rhythm once you got going.
It took me a while to finally sit down and write out the full pattern, but here it is. The Rosemary Poncho is everything I dreamed about in that notebook, and I think you are going to love making it as much as I loved designing it.
About This Dusty Rose Draped Poncho Crochet Pattern
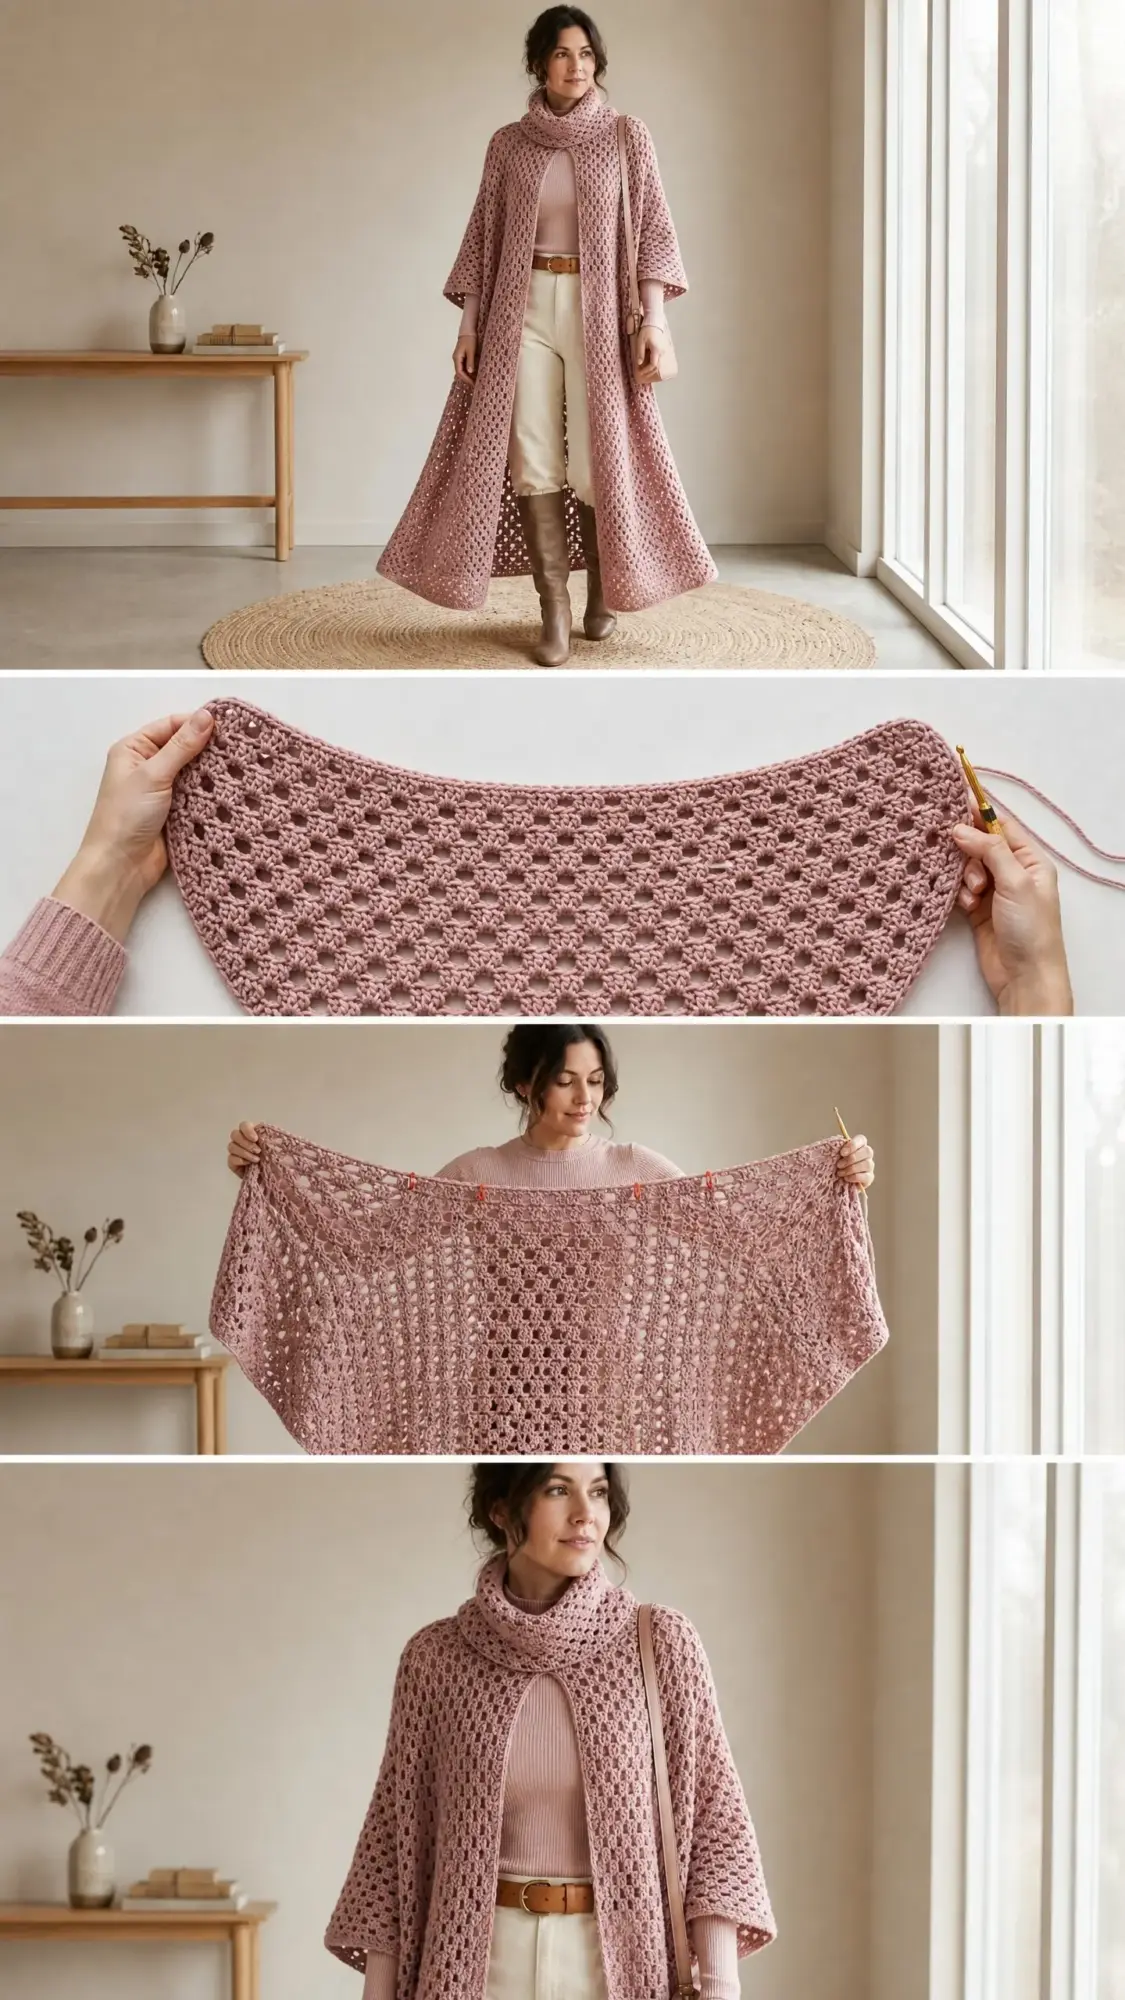
This gorgeous openwork poncho drapes beautifully from the shoulders to mid-calf length. The construction is simpler than it looks. You will crochet two large rectangular panels, seam them at the shoulders, and attach a long cowl-scarf that wraps around your neck and cascades down the front.
The shell-and-mesh lace pattern creates a honeycomb effect with open squares framed by small shell clusters. It looks delicate and airy but works up in a steady, predictable rhythm. Once you complete the first few rows, your hands will remember the pattern and you can crochet while watching your favorite show.
The silhouette is intentionally oversized and flattering on many body types. The panels are wider at the hem than at the shoulder, which is achieved through a gentle decrease schedule along the side edges. This tapering gives the poncho a graceful A-line shape.
Skill Level
Intermediate. The construction itself is straightforward since you are essentially making two rectangles and seaming them together. However, the lace repeat requires attention to shell placement within the mesh, and the side tapering calls for careful decrease execution.
If you have crocheted basic garments before and feel comfortable with double crochet (dc) and chain stitches (ch), you can absolutely tackle this project. I will walk you through every step.
Time Estimate
Plan for approximately 20 to 28 hours of total crochet time. This includes both panels, the cowl-scarf, finishing, and blocking. Break it into sessions and enjoy the process.
Finished Measurements
Main Poncho (each panel, after blocking):
Cowl-Scarf:
Total garment circumference at bust: approximately 56 inches / 142 cm (28 inches per panel at shoulder level). This accommodates sizes S through 3X depending on how much drape you prefer.
Materials You Will Need
Yarn: Approximately 1,800 yards / 1,645 meters of worsted-weight yarn (Category 4). Choose a smooth yarn with a slight halo or a plied wool-acrylic blend for the best drape.
Hook: US Size J-10 / 6.0 mm, or whatever size you need to achieve gauge.
Notions:
Recommended Yarn Options
Option 1: Lion Brand Yarn Heartland (100% Acrylic, 251 yards per 5 oz skein). You will need approximately 8 skeins. Try color “Great Smoky Mountains” or a similar dusty mauve. This yarn is machine washable and produces clean stitch definition.
Option 2: Paintbox Yarns Simply DK held double (100% Acrylic, 137 yards per 50g ball). Holding two strands together brings it to worsted weight. You will need approximately 16 balls.
Option 3: Malabrigo Rios (100% Superwash Merino Wool, 210 yards per 100g skein). You will need approximately 9 skeins in colorway “Dusty Baby Pink” or “English Rose.” This is the luxury option with beautiful drape.
Avoid very fuzzy or boucle yarns because the lace pattern openings will be obscured.
Gauge
After blocking: 14 stitches and 8 rows = 4 inches / 10 cm in the Openwork Shell Mesh Pattern.
More precisely, one complete 6-stitch repeat measures approximately 1.7 inches / 4.3 cm wide. Ten rows of the repeat measure approximately 5 inches / 12.7 cm tall.
Gauge matters here. Even a quarter-stitch difference over 4 inches will shift your panel width by several inches across the full 36-inch width. Please swatch before you begin.
Abbreviations
Let me explain each abbreviation with a plain-English definition so you know exactly what to do:
Special Stitches for This Crochet Tutorial
Shell Stitch (shell)
Work 5 dc all into the same stitch or space. This creates a fan-shaped cluster. Insert your hook, complete one dc, then repeat four more times in the exact same spot.
V-Stitch (V-st)
Work (dc, ch 1, dc) all into the same stitch or space. This creates two double crochets separated by a chain-1 space, forming a V shape.
Mesh Unit
Work (ch 1, sk 1 st, dc into next st) or (dc into ch-sp, ch 1, sk, dc into next ch-sp). This creates the open-grid background between shells.
Beginning Shell (beg-shell)
At the start of a shell row, work ch 3 (counts as first dc), then 4 dc into the same space. This equals one full shell.
Half Shell Decrease (half-shell-dec)
Work 3 dc (instead of 5 dc) into the same stitch or space at the beginning or end of a shell row. This reduces width by approximately one-half shell unit per edge.
Important Pattern Notes Before You Begin
1. The poncho is worked flat in two identical rectangular panels. Each panel is worked from the hem upward.
2. The lace pattern repeat is a multiple of 6 stitches plus 2. Your foundation chain must respect this multiple.
3. Side tapering is achieved by working half-shell decreases at both edges every 10 rows, starting after the first 20 rows.
4. The turning chain at the start of every row counts as the first dc and is treated as a stitch in all counts.
5. Always place your hook into chain spaces (ch-sp) rather than into individual chain stitches when working into the previous row’s structure.
6. Block before seaming. Pinning out to the finished measurements will open the lace significantly and is essential for achieving the pictured drape.
Step-by-Step Instructions: Panel (Make 2)
Foundation
The panel begins at the hem, which is the widest part (36 inches after blocking).
Chain 129.
Row 1 (RS): Ch 3 (counts as dc here and throughout), dc into 4th ch from hook and into each ch across.
Row 1 stitch count: 127 dc
This first row is a plain dc foundation row. It is not part of the visible lace pattern but provides a solid base edge for the hem.
Row 2 (WS): Ch 3, turn. Dc in next dc. Ch 1, sk 1 dc, dc in next dc. Rep from to last dc, dc in last dc.
Row 2 stitch count: 65 dc
Row 3 (RS): Ch 3, turn. Work shell (5 dc) into next ch-sp, ch 1, sk next dc, dc into next ch-sp, ch 1, sk next dc. Rep from across, ending dc into last dc.
Row 3 stitch count: 122 dc
The repeat is [shell into ch-sp, ch 1, dc into ch-sp, ch 1]. Each repeat consumes 6 units from Row 2. You will work 20 complete repeats, plus an edge dc at each end.
Row 4 (WS): Ch 3, turn. Dc into next dc. Ch 1, sk next dc, dc into next dc, ch 1, sk next dc, dc into next dc, ch 1, dc into next dc, ch 1, sk next dc, dc into next dc. Rep from across to last st, dc in last dc.
Row 4 stitch count: 65 dc
This row creates a mesh above the shells, setting up the staggered shell placement for Row 5.
Row 5 (RS): Ch 3, turn. Dc in next dc. Ch 1, sk next dc. Shell into next ch-sp, ch 1, sk next dc, dc into next ch-sp, ch 1, sk next dc. Rep from across, ending dc in last dc.
Row 5 stitch count: 122 dc
Row 6 (WS): Rep Row 4. 65 dc
Row 7 (RS): Rep Row 3. 122 dc
Row 8 (WS): Rep Row 4. 65 dc
Row 9 (RS): Rep Row 5. 122 dc
Row 10 (WS): Rep Row 4. 65 dc
Checkpoint 1
After Row 10, your panel should measure approximately 5 inches from the bottom of Row 2. The fabric should show 4 complete horizontal bands of shells alternating in a staggered brick formation.
Rows 11 Through 20
Continue repeating the pattern sequence. Alternate between the Row 3 shell alignment and the Row 5 shell alignment, with mesh rows between.
Checkpoint 2
After Row 20, the panel should measure approximately 10 inches tall and 36 inches wide (pre-blocking, approximately 32 inches).
Begin Side Tapering
Now the fun part. The tapering creates that beautiful A-line silhouette. You will replace the full 5-dc shell at each outer edge with a 3-dc half-shell, removing 2 dc from each side edge on shell rows.
Execute the decrease on every 10th row (Rows 21, 31, 41, 51, 61, and 71).
Row 21 (RS, Taper Row 1): Ch 3, turn. Work 3 dc (half-shell) into first ch-sp instead of full shell. Continue pattern across. At the final ch-sp before the last dc, work 3 dc (half-shell) instead of full shell. Dc into last dc.
Row 21 stitch count: 118 dc
Row 22 (WS): Ch 3, turn. Dc into next dc. Ch 1, sk next dc, dc into next dc. Rep from adjusting to fit the 118-dc row. End dc in last dc.
Row 22 stitch count: 61 dc
Rows 23 Through 30: Continue the shell-mesh alternation with the narrowed stitch count.
Checkpoint 3
After Row 30, the panel should measure approximately 15 inches tall and 34 inches wide.
Row 31 (RS, Taper Row 2): Work half-shells at each edge as in Row 21.
Row 31 stitch count: 114 dc
Row 32 (WS): Mesh row adjusted to 114 dc.
Row 32 stitch count: 59 dc
Rows 33 Through 40: Continue pattern.
Row 41 (RS, Taper Row 3): Work half-shells at each edge.
Row 41 stitch count: 110 dc
Row 42 (WS): Adjusted mesh row.
Row 42 stitch count: 57 dc
Rows 43 Through 50: Continue pattern.
Checkpoint 4
After Row 50, the panel should measure approximately 25 inches tall and 32 inches wide.
Row 51 (RS, Taper Row 4): Work half-shells at each edge.
Row 51 stitch count: 106 dc
Row 52 (WS): Adjusted mesh row.
Row 52 stitch count: 55 dc
Rows 53 Through 60: Continue pattern.
Row 61 (RS, Taper Row 5): Work half-shells at each edge.
Row 61 stitch count: 102 dc
Row 62 (WS): Adjusted mesh row.
Row 62 stitch count: 53 dc
Rows 63 Through 70: Continue pattern.
Row 71 (RS, Taper Row 6): Work half-shells at each edge.
Row 71 stitch count: 98 dc
Row 72 (WS): Adjusted mesh row.
Row 72 stitch count: 51 dc
Rows 73 Through 80: Continue pattern without further decreases.
Checkpoint 5
After Row 80, your panel should measure approximately 40 inches from top of the hem row to the working edge, and approximately 28 inches wide. This is the shoulder edge.
Panel Border
Work one row of sc evenly around all four edges of the panel to stabilize for seaming.
Join with sl st. Fasten off. Weave in ends.
Make a second identical panel. Label each panel at the shoulder edge with a stitch marker before seaming.
Assembly
Shoulder Seam
Lay both panels flat with right sides facing up. Align the two shoulder edges (the 98-sc / 28-inch edges).
Shoulder seam length: 12 inches on each side of center back. You will seam a 12-inch section at each end, leaving a central 4-inch neck opening between the two seamed sections.
Seaming method: Hold panels with right sides together. Using yarn and a tapestry needle, work a whipstitch or mattress stitch through both layers. Seam from the far left edge for 12 inches, fasten off. Reattach at the right end and seam from the right edge inward for 12 inches.
When the joined panels are placed on the body, the front panel hangs open, the back panel hangs as the closed back, and the side openings serve as arm openings.
Cowl-Scarf Instructions
The cowl-scarf wraps around your neckline and drapes beautifully down the front.
Foundation
Chain 255.
Row 1: Ch 3, turn. Dc into 4th ch from hook and each ch across.
Row 1 stitch count: 254 dc
Row 2: Ch 3, turn. Dc in next dc. Ch 1, sk 1 dc, dc in next dc. Rep from to last dc, dc in last dc.
Row 2 stitch count: 128 dc
Row 3: Ch 3, turn. Dc in next dc. Ch 1. Shell into next ch-sp, ch 1, dc into next ch-sp, ch 1. Rep from 41 times (42 repeats total), dc in last dc.
Row 3 stitch count: 254 dc
Row 4: Ch 3, turn. Rep Row 2 mesh structure, working dc above the 2nd and 4th dc of each shell and in each ch-sp between shells.
Row 4 stitch count: 128 dc
Row 5: Rep Row 3 with staggered shell placement. 254 dc
Rows 6 through 15: Continue alternating mesh and shell rows as established.
Row 16: Ch 3, turn. Dc in each dc and in each ch-sp across (working dc into every ch-1 space to close the mesh for the final row).
Row 16 stitch count: 254 dc
Fasten off leaving a 24-inch tail for seaming.
Scarf Assembly
Fold the scarf in half lengthwise so the long edges meet. Using the long tail and a tapestry needle, whipstitch the two long edges together along approximately two-thirds of the length (approximately 48 inches), leaving the remaining one-third (approximately 24 inches) open.
This creates a partial tube. The closed section wraps around the back of your neck, and the open section fans out as the draped front portion.
Attaching the Scarf to the Poncho
Center the seamed section of the scarf at the center back neck seam. Using yarn and a tapestry needle, whipstitch the top edge of the closed scarf tube to the interior of the neck opening. Work around the full 4-inch neck opening and extend approximately 1 inch onto each shoulder seam. The scarf should hang freely at the front.
Size Customization Tips
For a smaller fit (XS-S): Reduce the foundation chain by 12 stitches (2 full repeats) per panel. This narrows the hem to approximately 33 inches. Begin tapering at Row 15 instead of Row 20.
For a larger fit (4X-5X): Add 12 stitches (2 full repeats) per panel. This widens the hem to approximately 39 inches. You will need approximately 200 additional yards of yarn.
For a shorter length: Each 10 rows equals approximately 5 inches of length. Remove rows in groups of 2 to preserve the stitch pattern integrity.
For a longer length: Add rows in groups of 2 before beginning the taper section.
Blocking and Finishing
Weave in all ends securely, leaving at least a 4-inch tail tucked under multiple stitches.
Wet Blocking Method (Recommended)
1. Submerge the panels and scarf in cool water with a small amount of gentle wool wash.
2. Gently press out excess water without wringing or twisting.
3. Roll in a clean dry towel and press firmly.
4. Lay panels flat on blocking mats.
5. Pin each panel to finished dimensions: 36 inches wide at hem, 28 inches wide at shoulder, 40 inches tall.
6. Pin the cowl-scarf to 72 inches long and 8 inches wide.
7. Allow to dry completely (24 to 48 hours).
Steam Blocking (For Acrylic Yarns)
Hold a steam iron approximately 1 inch above the fabric surface. Do not touch the iron to the yarn. Move slowly across the full surface. Pin to finished dimensions while still warm.
Care Instructions
For wool or wool-blend yarns: Hand wash in cool water with gentle wool wash. Lay flat to dry. Do not machine wash or tumble dry.
For acrylic yarns: Machine wash on a gentle cycle in cool water. Do not tumble dry on high heat. Lay flat to dry.
Store flat or loosely rolled. Avoid hanging, as the weight of the open lace fabric may cause stretching at the shoulder seam over time.
Thank you so much for choosing The Rosemary for your next project. I really hope you enjoy every stitch of this poncho as much as I enjoyed designing it. If you make one, I would absolutely love to see it. Tag me on Instagram or share a photo on Facebook.
If this pattern is calling your name but you are not quite ready to start today, go ahead and pin it to your favorite Pinterest board so you can find it when you are ready. And please drop a comment below if you make this poncho or have any questions along the way. I love hearing from you!
You Might Also Like
- Wildflower Meadow Crochet Pot Free Crochet Pattern
- Lavender Sunflower Granny Square Tote Free Crochet Pattern
- Cinderella Blue Baby Dress Set Free Crochet Pattern
- Lavender Peony Bloom Crochet Dress Free Crochet Pattern