Autumn Fox Lace Crochet Sweater Free Pattern
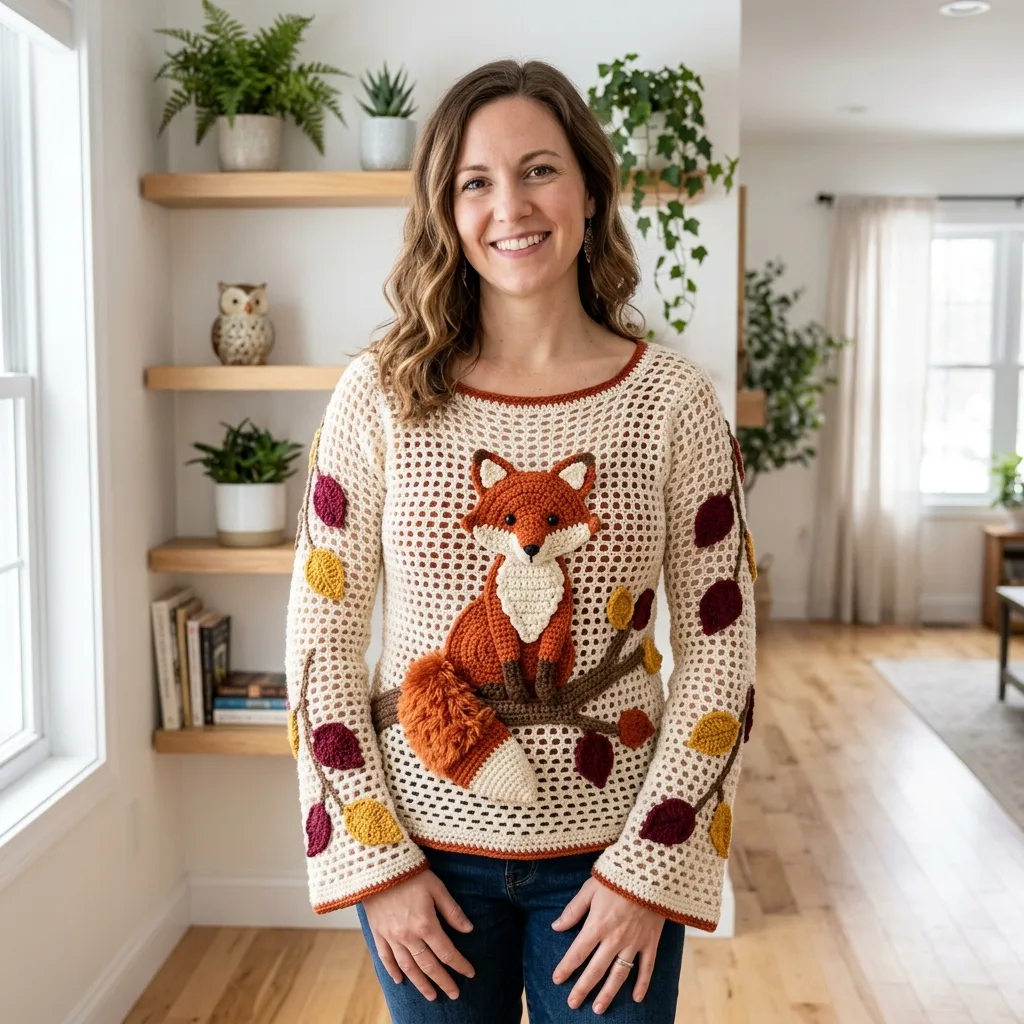
I’ve been on the hunt for the perfect fall sweater pattern for ages. You know the type. Something cozy but not heavy, artistic but still wearable, and absolutely unlike anything you’d find in a store. This autumn fox lace crochet sweater is exactly what I was looking for, and I’m thrilled to share it with you today.
This pullover combines an airy filet mesh body with a dimensional crocheted fox sitting sweetly on a branch, surrounded by scattered autumn leaves in rich burgundy, gold, and rust tones. The construction is more approachable than it looks. You work the body and sleeves flat in separate pieces, seam them together, then add all the adorable applique elements at the end.
If you’ve been wanting to try something beyond basic scarves and blankets, this crochet pattern offers the perfect next step. The mesh stitch is just a simple two stitch repeat that becomes almost meditative once you get going. The real magic happens when you build that sweet little fox and watch your sweater transform into wearable art.
Why This Crochet Sweater Pattern Works
The beauty of this design lies in its construction method. Instead of trying to work complicated colorwork into the body, you create a clean cream colored mesh base and then add all the decorative elements separately. This means you can focus on getting your gauge right for the body, then take your time perfecting each little leaf and building your fox friend without any pressure.
The filet mesh creates an open, breathable fabric that’s perfect for layering during those crisp autumn days. It drapes beautifully and has just enough structure to show off the dimensional appliques without looking stiff or bulky.
The relaxed fit features a wide round neckline, gentle drop shoulders, and sleeves that flare slightly at the cuff. This silhouette is forgiving and comfortable on many body types.
Skill Level
This pattern falls in the advanced beginner to intermediate range. If you’re comfortable with basic crochet stitches, simple shaping, and you don’t mind learning a few new techniques like surface slip stitch and loop stitch, you’ll do just fine here.
The body mesh uses one simple repeat that you’ll memorize after a few rows. The complexity comes from constructing and attaching the dimensional fox and leaf appliques. True beginners should build some applique skills on a simpler project first, but if you’ve made amigurumi or sewn pieces together before, you’re ready.
Time Estimate
Let me be honest with you about timing so you can plan accordingly.
Body and sleeves: 20 to 25 hours
All appliques (fox, branch, leaves): 12 to 16 hours
Finishing, blocking, and seaming: 4 to 6 hours
Total estimated time: 36 to 47 hours
This is definitely a project to work on over several weeks rather than a weekend warrior piece. But every hour is worth it when you slip on that finished sweater.
Finished Sizes
The pattern is written for size Medium with numbers for other sizes in parentheses in this order: XS (S, M, L, XL).
Chest circumference (garment): 38 (40, 44, 48, 52) inches / 96.5 (101.5, 112, 122, 132) cm
Body length from underarm to hem: 15 (15.5, 16, 16.5, 17) inches / 38 (39.5, 40.5, 42, 43) cm
Total length from shoulder to hem: 24 (24.5, 25, 25.5, 26) inches / 61 (62, 63.5, 65, 66) cm
Sleeve length from underarm to cuff: 18 (18, 18.5, 18.5, 19) inches / 45.5 (45.5, 47, 47, 48.5) cm
Upper arm circumference: 14 (15, 16, 17.5, 19) inches / 35.5 (38, 40.5, 44.5, 48.5) cm
Neckline width: 10 (10, 11, 11, 12) inches / 25.5 (25.5, 28, 28, 30.5) cm
Materials Needed
Yarn
Main Color (MC): Cream or natural off white, worsted weight (CYCA 4), approximately 900 (950, 1050, 1150, 1250) yards / 823 (869, 960, 1052, 1143) meters
Color A (CA): Burnt orange/rust, worsted weight, approximately 80 yards / 73 meters (for borders and fox base)
Color B (CB): Deep rust/terracotta, worsted weight, approximately 120 yards / 110 meters (for fox body)
Color C (CC): Cream white, worsted weight, approximately 40 yards / 37 meters (for fox chest and face markings)
Color D (CD): Golden yellow, worsted weight, approximately 60 yards / 55 meters (for gold leaves)
Color E (CE): Burgundy/wine, worsted weight, approximately 60 yards / 55 meters (for burgundy leaves)
Color F (CF): Medium brown, worsted weight, approximately 50 yards / 46 meters (for branch)
Color G (CG): Additional rust/orange for fluffy tail loops, worsted weight, approximately 40 yards / 37 meters (can use CB)
Recommended Yarn Brands
Lion Brand Pound of Love offers excellent stitch definition for the mesh, is machine washable, and takes blocking well with steam.
Cascade 220 Superwash provides a luxurious hand with beautiful stitch definition and drapes beautifully in the mesh structure.
Choose any worsted weight yarn that achieves gauge. A smooth, plied yarn shows the mesh structure most clearly. Avoid fuzzy or fluffy yarns for the main body as they obscure the open mesh grid.
Tools
Hook: US size J-10 / 6.0 mm for body mesh
Hook: US size I-9 / 5.5 mm for borders and appliques
Tapestry needle (blunt tip, large eye)
Stitch markers, at least 6
Safety eyes (black, 6 mm), 2 (optional, embroidery substitution instructions provided)
Polyester fiberfill for fox body padding
Blocking mats and pins
Gauge
With J-10 / 6.0 mm hook and MC, in Filet Mesh pattern:
14 mesh squares = 4 inches / 10 cm (measured horizontally)
8 mesh rows = 4 inches / 10 cm (measured vertically)
Gauge swatch instructions: Chain 34. Row 1: Single crochet (sc) in 2nd chain (ch) from hook, (ch 1, skip 1 ch, sc in next ch) across, turn. (17 sc, 16 ch-1 spaces) Continue in Filet Mesh pattern for 20 rows. Block swatch before measuring.
Taking time to check gauge is essential for garment patterns. Going up a hook size loosens the fabric while going down tightens it.
Abbreviations
beg: beginning
BLO: back loop only
ch: chain
ch-sp: chain space
dc: double crochet (yarn over, insert hook, pull up loop, yarn over, pull through 2 loops, yarn over, pull through remaining 2 loops)
FM: Filet Mesh
hdc: half double crochet
MC: main color (cream)
RS: right side
sc: single crochet (insert hook, pull up loop, yarn over, pull through both loops)
sc2tog: single crochet two together (insert hook in first stitch, pull up loop, insert hook in next stitch, pull up loop, yarn over, pull through all 3 loops on hook)
sk: skip
sl st: slip stitch
sp(s): space(s)
st(s): stitch(es)
WS: wrong side
yo: yarn over
Special Stitches for This Crochet Tutorial
Filet Mesh Stitch (FM)
This is the foundation of your entire sweater body and sleeves.
Row 1 (foundation row, RS): Starting after the foundation chain, sc in 2nd ch from hook, (ch 1, sk 1 ch, sc in next ch) across to end, turn.
Row 2 onward: Ch 1, turn, sc in first sc, (ch 1, sk ch-1 sp, sc in next sc) across. Turn.
Each mesh square consists of 1 sc and 1 ch-1 space. The stitch counts at the end of rows refer to the number of sc stitches only. The number of ch-1 spaces is always one fewer than the number of sc stitches.
Loop Stitch (for fox tail)
Insert hook into stitch, wrap yarn over index finger of non-hook hand to create a loop of approximately 1 inch / 2.5 cm, insert hook under both strands of the loop, draw up yarn from behind the loop, yarn over and pull through all loops on hook. The created loop hangs on the RS of the work. Push all loops to the RS as you work. This stitch is worked on WS rows so loops fall to RS.
Surface Slip Stitch (SSS) for branch
With RS facing, insert hook through both layers of the fabric at the marked point, draw up a loop of CF, (insert hook into next mesh intersection along the branch path, draw up a loop, pull through loop on hook) along the branch path. This creates a raised cord on the surface of the fabric.
Large Oval Leaf
Ch 8.
Row 1: Sc in 2nd ch from hook, hdc in next ch, dc in next 3 ch, hdc in next ch, 3 sc in last ch (tip), rotate, now working along underside of foundation chain: hdc in next ch, dc in next 3 ch, hdc in next ch, sc in next ch, sl st in first sc to close. (18 sts around the leaf)
Fasten off leaving 12 inch tail for sewing.
Size Chart Reference (Foundation Chains)
XS: Back and Front each start with ch 133 (67 sc after Row 1). Each sleeve starts with ch 63 (32 sc after Row 1).
S: Back and Front each start with ch 141 (71 sc after Row 1). Each sleeve starts with ch 67 (34 sc after Row 1).
M: Back and Front each start with ch 153 (77 sc after Row 1). Each sleeve starts with ch 73 (37 sc after Row 1).
L: Back and Front each start with ch 167 (84 sc after Row 1). Each sleeve starts with ch 79 (40 sc after Row 1).
XL: Back and Front each start with ch 181 (91 sc after Row 1). Each sleeve starts with ch 85 (43 sc after Row 1).
Instructions below are written for size M with other sizes in parentheses: XS (S, M, L, XL).
Step by Step Instructions: Back Panel
With MC and J-10 hook, chain 153 (133, 153, 167, 181).
Row 1 (RS): Sc in 2nd ch from hook, (ch 1, sk 1 ch, sc in next ch) across, turn. (77 sc)
Row 2: Ch 1, sc in first sc, (ch 1, sk ch-1 sp, sc in next sc) across, turn. (77 sc)
Rows 3 through 32: Rep Row 2. (77 sc each row)
Checkpoint: After Row 32, the piece should measure approximately 16 inches / 40.5 cm tall and 22 inches / 56 cm wide.
Do not fasten off. Continue to the alternate back neckline approach below.
Back Neckline (Simpler Method): After Row 32, fasten off and leave the full width top edge as is. When seaming, leave the center 10 inches / 25.5 cm of the top edge open for neckline. Seam only the outer 6 inches / 15 cm on each shoulder.
Step by Step Instructions: Front Panel
With MC and J-10 hook, chain 153 (133, 153, 167, 181).
Row 1 (RS): Sc in 2nd ch from hook, (ch 1, sk 1 ch, sc in next ch) across, turn. (77 sc)
Rows 2 through 25: Rep Row 2 of Back pattern. (77 sc each row)
The fox applique will be positioned on the front panel after completion, so no colorwork is needed in the body mesh.
Checkpoint after Row 25: Front panel should measure approximately 12.5 inches / 32 cm tall.
Front Neckline Shaping
Row 26: Work in FM pattern across first 28 sc, turn. (28 sc, right shoulder section begun)
Row 27: Ch 1, sc in first sc, (ch 1, sk ch-1 sp, sc in next sc) across to last 2 sc, sc2tog over last 2 sc (neckline decrease), turn. (27 sc)
Row 28: Ch 1, sc in first sc, ch 1, sk next st, continue in FM across to end, turn. (27 sc)
Row 29: Work in FM across to last 2 sc, sc2tog, turn. (26 sc)
Row 30: Work in FM across, turn. (26 sc)
Row 31: Work in FM across to last 2 sc, sc2tog, turn. (25 sc)
Row 32: Work in FM across, turn. (25 sc)
Fasten off. This is the right shoulder.
Left Shoulder Shaping
Return to Row 25, skip the center 21 sc for neckline opening, rejoin MC at the 50th sc of Row 25.
Row 26L: Join MC at 50th sc of Row 25. Ch 1, sc2tog over first 2 sc (neckline edge decrease), work in FM across remaining 27 sc, turn. (27 sc)
Row 27L: Work in FM across, turn. (27 sc)
Row 28L: Sc2tog at neck edge, work in FM across, turn. (26 sc)
Row 29L: Work in FM across, turn. (26 sc)
Row 30L: Sc2tog at neck edge, work in FM across, turn. (25 sc)
Row 31L: Work in FM across, turn. (25 sc)
Row 32L: Work in FM across, fasten off. (25 sc)
Step by Step Instructions: Sleeves (Make 2)
With MC and J-10 hook, chain 63 (63, 73, 79, 85).
Row 1 (RS): Sc in 2nd ch from hook, (ch 1, sk 1 ch, sc in next ch) across, turn. (32, 32, 37, 40, 43 sc)
For size M, begin with 37 sc. The sleeve is shaped with gradual increases on both sides every 6 rows.
Sleeve increase row: Ch 1, 2 sc in first sc (increase at beginning edge), work in FM across to last sc, 2 sc in last sc (increase at end edge), turn.
Rows 2 through 6: Work in FM across. (37 sc)
Row 7 (increase row): 2 sc in first sc, FM across to last sc, 2 sc in last sc. (39 sc)
Rows 8 through 12: FM across. (39 sc)
Row 13 (increase row): 2 sc in first sc, FM across to last sc, 2 sc in last sc. (41 sc)
Rows 14 through 18: FM across. (41 sc)
Row 19 (increase row): 2 sc in first sc, FM across to last sc, 2 sc in last sc. (43 sc)
Rows 20 through 24: FM across. (43 sc)
Row 25 (increase row): 2 sc in first sc, FM across to last sc, 2 sc in last sc. (45 sc)
Rows 26 through 30: FM across. (45 sc)
Row 31 (increase row): 2 sc in first sc, FM across to last sc, 2 sc in last sc. (47 sc)
Rows 32 through 37: FM across. (47 sc)
Checkpoint after Row 36: Sleeve should measure approximately 18 inches / 45.5 cm long and approximately 13.5 inches / 34 cm wide at the top edge.
Fasten off. Weave in ends. Make second sleeve to match.
Border Instructions
Cuff Borders (Make 2)
With CA (burnt orange) and I-9 hook, RS facing, join yarn at the bottom corner of the sleeve foundation chain edge.
Row 1: Ch 1, work 32 sc evenly across the foundation chain edge of the sleeve, turn. (32 sc)
Rows 2 through 5: Ch 1, BLO sc in each sc across, turn. (32 sc each row)
Fasten off CA. Weave in ends.
Hem Border (Body Back and Front)
With CA and I-9 hook, RS facing, join at bottom corner of the back foundation chain.
Row 1: Ch 1, work 77 sc across foundation chain edge of back, turn. (77 sc)
Rows 2 through 5: Ch 1, BLO sc in each sc across, turn. (77 sc each row)
Fasten off. Repeat for front panel.
Neckline Border
After seaming shoulders, with CA and I-9 hook, RS facing, join at one shoulder seam.
Round 1: Ch 1, sc evenly around neckline opening: across back neck (approximately 35 sc), down left front neck slope (approximately 12 sc), across front center neck (approximately 21 sc), up right front neck slope (approximately 12 sc), sl st to first sc to join. (approximately 80 sc total)
Rounds 2 and 3: Ch 1, BLO sc in each sc around, sl st to join. (80 sc)
Fasten off. Weave in ends.
Finishing: Seaming the Sweater
Step 1, Shoulder seams: Hold back and front panels with WS together, aligning top edges. Using MC and a tapestry needle, seam 6 inches / 15 cm in from each outer top corner using mattress stitch or sl st seam. Leave the center open for the neckline.
Step 2, Sleeve attachment: With sweater flat, measure 8 inches / 20.5 cm down from each shoulder seam along the side edges of the front and back panels. Pin or mark this point. Sew sleeve top edge to body side edges using mattress stitch, RS together, then turn RS out.
Step 3, Side and sleeve seams: Beginning at the cuff, seam the sleeve underarm seam from cuff to underarm. Continue seaming the body side seam from underarm to hem. Repeat for second sleeve and body side.
Branch Surface Decoration
With CF (medium brown) and I-9 hook, using the Surface Slip Stitch technique, work a branch line on the front panel.
The branch begins at approximately Row 10, starting 3 inches / 7.5 cm from the right side edge. It runs diagonally upward left for approximately 6 inches / 15 cm, then splits into a smaller upper branch and continues as a slight downward curve. The fox will sit on the main branch, covering the intersection point.
Mark the branch path with locking stitch markers before working SSS. For added dimension, work a second row of SSS directly beside the first row along each branch segment.
Fox Applique Instructions
The fox is constructed in these pieces: Body/Torso, Head, two Ears, Tail, and tiny details. All pieces are worked with the I-9 hook.
Fox Body/Torso
With CB (deep rust) and I-9 hook, make a magic ring.
Round 1: 6 sc into ring, sl st to join. (6 sc)
Round 2: Ch 1, 2 sc in each sc around, sl st to join. (12 sc)
Round 3: Ch 1, (sc in next sc, 2 sc in next sc) 6 times, sl st to join. (18 sc)
Round 4: Ch 1, (sc in next 2 sc, 2 sc in next sc) 6 times, sl st to join. (24 sc)
Round 5: Ch 1, (sc in next 3 sc, 2 sc in next sc) 6 times, sl st to join. (30 sc)
Round 6: Ch 1, sc in each sc around, sl st to join. (30 sc)
Round 7: Ch 1, (sc in next 4 sc, 2 sc in next sc) 6 times, sl st to join. (36 sc)
Rounds 8 through 11: Ch 1, sc in each sc around, sl st to join. (36 sc each round)
Round 12: Ch 1, (sc in next 4 sc, sc2tog) 6 times, sl st to join. (30 sc)
Round 13: Ch 1, (sc in next 3 sc, sc2tog) 6 times, sl st to join. (24 sc)
Stuff lightly with fiberfill.
Round 14: Ch 1, (sc in next 2 sc, sc2tog) 6 times, sl st to join. (18 sc)
With CC (cream white), continue chest patch by working across the center 9 stitches of the front facing section only.
Row 2: sc2tog, sc in 5 sc, sc2tog. (7 sc)
Row 3: sc2tog, sc in 3 sc, sc2tog. (5 sc)
Row 4: sc2tog, sc in 1 sc, sc2tog. (3 sc)
Fasten off CC. Rejoin CB, complete sc around remaining open round and close.
Fox Head
With CB and I-9 hook, make a magic ring.
Round 1: 6 sc into ring, sl st to join. (6 sc)
Round 2: Ch 1, 2 sc in each sc around, sl st to join. (12 sc)
Round 3: Ch 1, (sc in next sc, 2 sc in next sc) 6 times, sl st to join. (18 sc)
Round 4: Ch 1, (sc in next 2 sc, 2 sc in next sc) 6 times, sl st to join. (24 sc)
Continue shaping head, adding face details in CC (cream for cheeks and muzzle), attaching safety eyes or embroidering eyes, and creating the pointed ears separately before sewing to head.
Final Assembly Tips
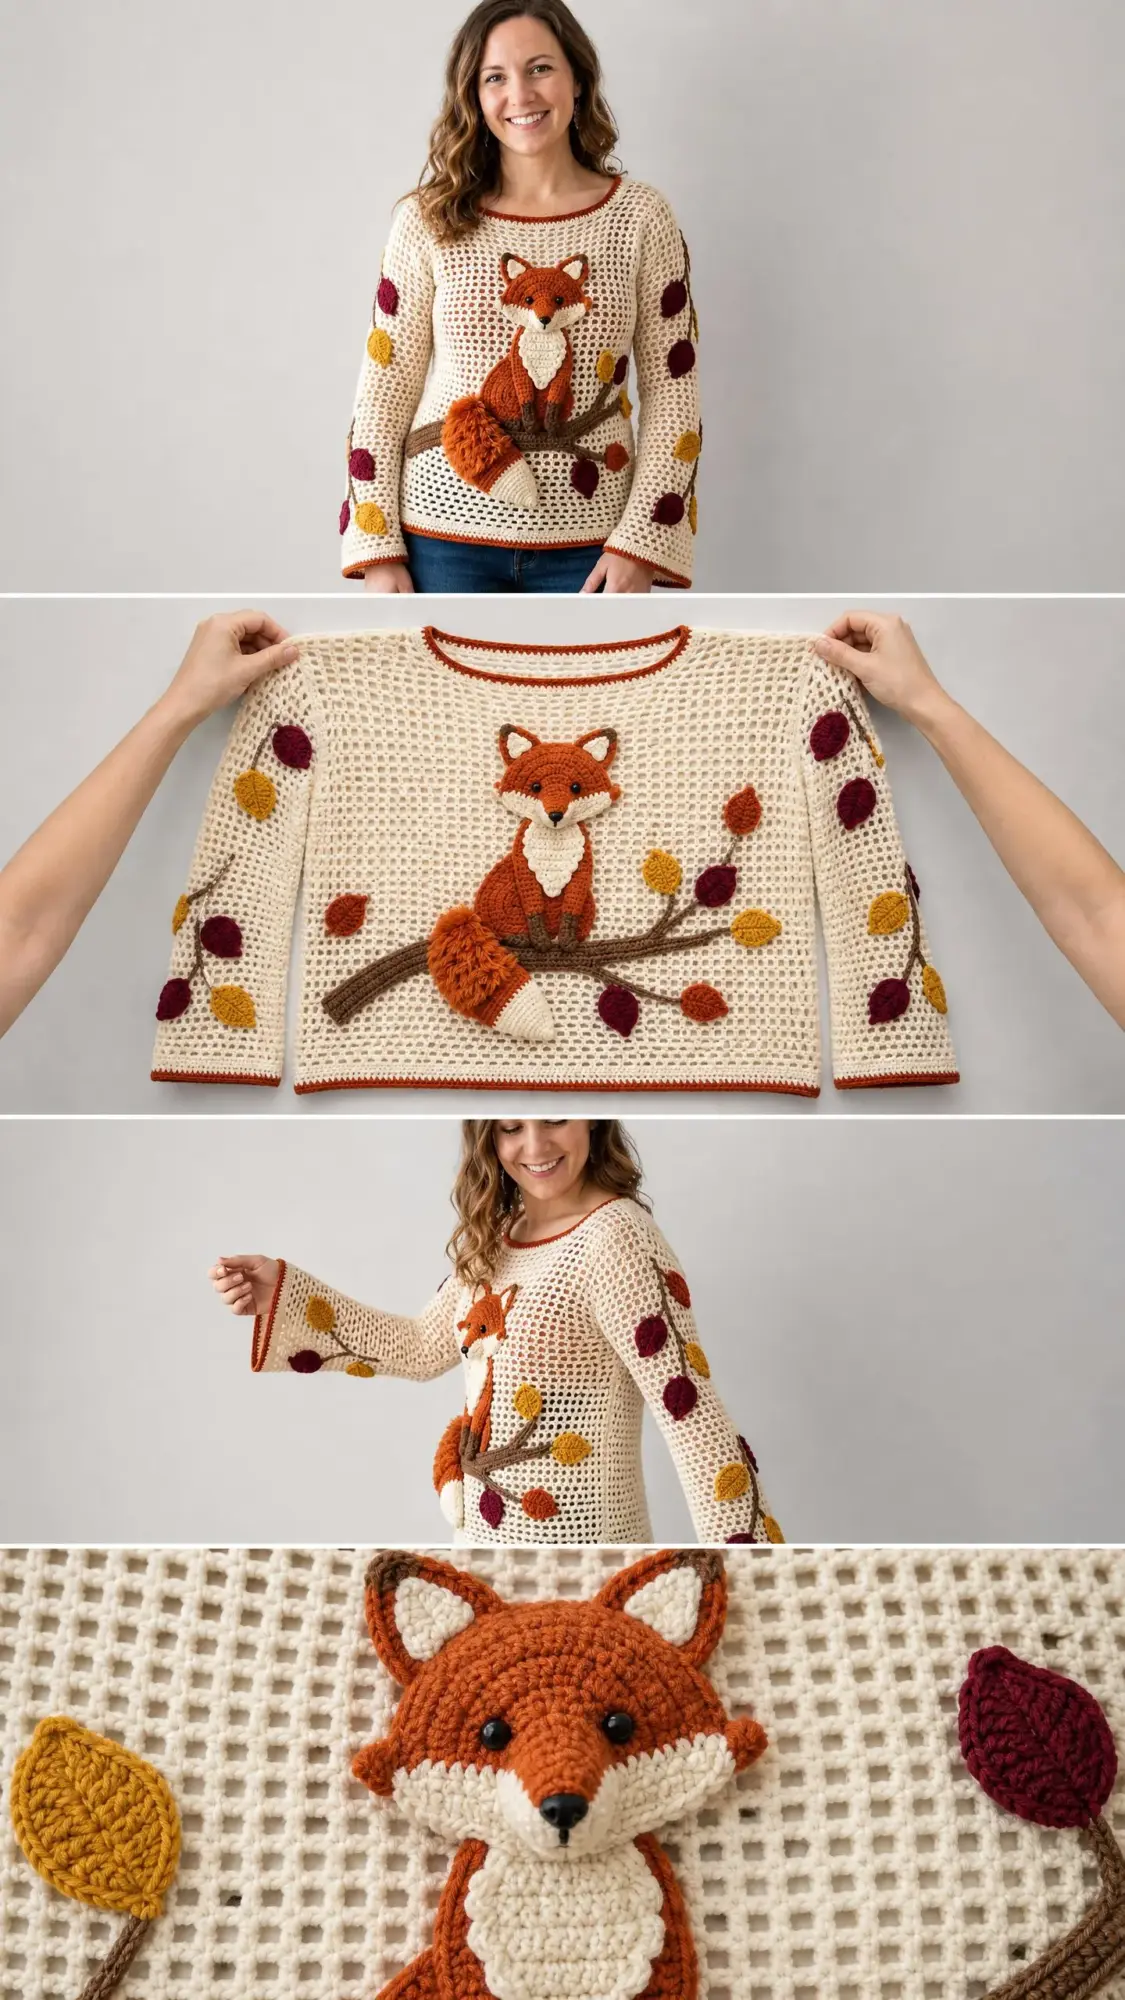
After blocking all pieces, arrange the fox on the branch in the center of your sweater front. Pin everything in place before sewing. Take your time with placement because this is the focal point of your entire garment.
Scatter the autumn leaves across both sleeves and the lower body, varying the colors between burgundy, gold, and additional rust tones. Refer to your reference images for inspiration on placement. The leaves look most natural when positioned at different angles.
The fluffy loop stitch tail is the finishing touch that brings your fox to life. Make sure those loops are pushed firmly to the right side and fluffed out after attaching.
Pattern Notes to Remember
The sweater is worked in pieces: Back, Front, and two Sleeves. All pieces are crocheted flat, blocked, then seamed.
The neckline is shaped on the Front piece only. The Back has a straight top edge.
Drop shoulder construction means there is no armhole shaping on the body or sleeve caps. This simplifies construction and creates that relaxed, oversized silhouette.
Block all pieces before seaming. This makes a significant difference in how your finished sweater looks and fits.
Weave in all ends before beginning applique placement. Trust me on this one.
Thank you so much for choosing this autumn fox crochet sweater pattern for your next project. I truly hope you love making it as much as I loved designing it. If you have any questions along the way, drop them in the comments below.
This project makes such a wonderful conversation piece and a truly unique addition to your fall wardrobe. If you’re not quite ready to start today, save this pattern to your Pinterest boards so you can find it easily when the mood strikes. And please, when you finish your sweater, come back and leave a comment or tag me on social media. I would absolutely love to see your fox sitting on that branch!
You Might Also Like
- Coral Sunset Gradient Chain Purse Free Crochet Pattern
- Pink Ombre Snake Plant Amigurumi Free Crochet Pattern
- Sage Green Daisy Crochet Dress Free Crochet Pattern
- Sage Green Meadow Crochet Robe Free Pattern