Dusty Rose Pineapple Lace Halter Free Crochet Pattern
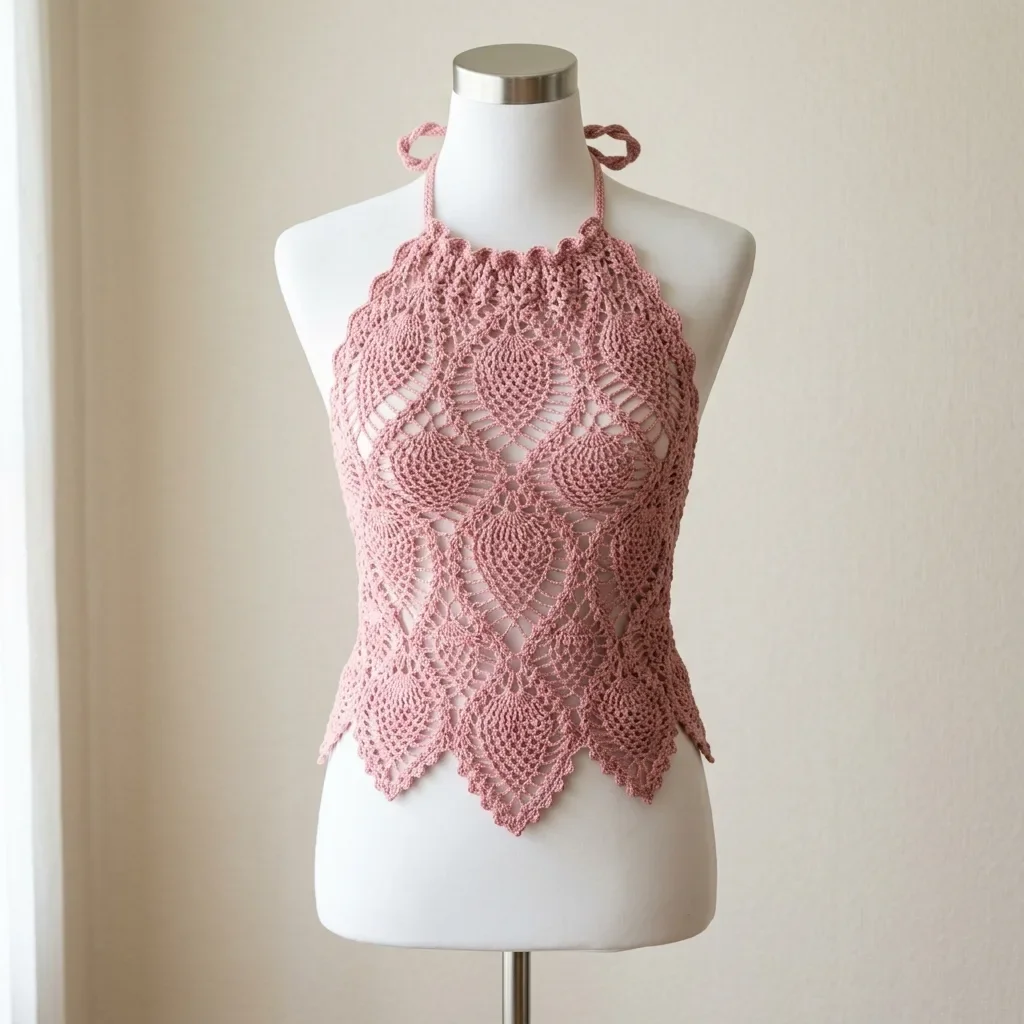
This is THE ONE. If you have ever scrolled past stunning pineapple lace tops and thought “someday I will learn to make that,” someday is TODAY. I am so excited to share this pattern with you because it is hands down one of the most impressive pieces you will ever create with a hook and some cotton yarn.
Yes, this is an advanced pattern. I am not going to sugarcoat that. But here is the thing. If you have ever successfully worked a shell stitch or followed a lace pattern without wanting to throw your hook across the room, you can absolutely do this. The pineapple motif is just a series of simple stitches repeated in a specific order. That is it. Once you understand the rhythm, your hands will practically work on autopilot.
The finished halter top is absolutely stunning. We are talking boutique quality. The kind of piece people will stop you on the street to ask about. And when you tell them you made it yourself? Pure magic. Let me walk you through everything you need to bring this beauty to life.
About This Pineapple Lace Crochet Pattern
This gorgeous halter top features an allover pineapple lace motif worked from the neckline down in one continuous flat piece for the front panel. The back panel is worked separately in a simpler mesh pattern, then the two pieces are seamed together at the sides. The result is a fitted silhouette through the torso with a slight flare at the hem created by those beautiful elongated pineapple points.
The neckline gets finished with a delicate scallop edging and ties at the back of the neck. The hemline falls into naturally pointed scallops formed by the pineapple motif tips. It is romantic, feminine, and perfect for summer evenings or layered over a tank for cooler days.
Skill level: Advanced. You will need to be comfortable with pineapple lace construction, working shells and fans, and tracking multiple active motif tiers across rows. If you are a confident intermediate crocheter, I recommend practicing a pineapple motif swatch first to build familiarity.
Time estimate: Approximately 20 to 30 hours for an experienced crocheter working the medium size. Worth every single minute.
Finished Measurements
This pattern is written for size Small with changes for Medium and Large in parentheses throughout in the format S (M, L).
Bust circumference: 32 (36, 40) inches / 81 (91, 102) cm
Top length from neckline to longest hem point: 17 (18, 19) inches / 43 (46, 48) cm
Back depth from neck tie to lower back border: 14 (15, 16) inches / 36 (38, 41) cm
The front panel measures approximately half the bust circumference plus one inch of ease at the widest point before side seaming.
Materials Needed
Yarn: Approximately 600 (700, 800) yards / 549 (640, 732) meters of light weight (weight 3) cotton or cotton blend yarn in dusty rose or any solid color of your choice.
Recommended yarns:
Substitution note: Any smooth, plied DK or light DK cotton yarn that achieves gauge will work beautifully. Avoid fuzzy, textured, or high stretch yarns. Cotton and cotton blend yarns are strongly recommended because the stitch definition required for pineapple lace gets lost in wool or acrylic blends that lack drape and crispness.
Hook: US size E-4 / 3.5 mm crochet hook
Notions: Yarn needle for weaving ends, blocking mats and pins, rust proof T-pins, measuring tape, 4 to 6 locking stitch markers
Gauge
After blocking: One complete pineapple motif (from tip to tip horizontally) measures 3.5 inches / 9 cm wide. Four rows of double crochet (dc) mesh equals 1 inch / 2.5 cm in height.
How to make a gauge swatch: Chain (ch) 40. Work the pineapple motif setup row and 12 rows of the pineapple pattern. Block the swatch completely. Measure one complete motif from chain space center to chain space center on either side.
Adjust hook size up if your motif is smaller than 3.5 inches. Go down a hook size if larger. Gauge is critical for achieving the correct bust measurement and overall drape.
Abbreviations and Stitch Definitions
Let me walk you through every stitch and term you will encounter. I have included plain English definitions so nothing catches you off guard.
beg = beginning
ch = chain (wrap yarn over hook and pull through the loop on your hook)
ch-sp = chain space (the gap created by a chain in the previous row)
dc = double crochet (yarn over, insert hook, pull up loop, yarn over, pull through 2 loops, yarn over, pull through remaining 2 loops)
hdc = half double crochet (yarn over, insert hook, pull up loop, yarn over, pull through all 3 loops)
lp(s) = loop(s)
rem = remaining
rep = repeat
rnd = round
RS = right side (the side that faces outward when worn)
sc = single crochet (insert hook, pull up loop, yarn over, pull through both loops)
sk = skip
sl st = slip stitch (insert hook, yarn over, pull through stitch and loop on hook in one motion)
sp = space
st(s) = stitch(es)
t-ch = turning chain
tog = together
tr = treble crochet (yarn over twice, insert hook, pull up loop, yarn over, pull through 2 loops three times)
WS = wrong side
yo = yarn over
Special Stitches for This Pattern
These special techniques create the signature pineapple lace texture. Read through them before you begin so they feel familiar when you encounter them in the instructions.
Pineapple Shell (P-shell)
Work (dc, ch 1, dc, ch 1, dc, ch 1, dc, ch 1, dc) all into the same stitch or chain space. This creates a 5-dc fan separated by ch-1 spaces. It forms the top row of each pineapple unit. Think of it as the crown of your pineapple.
Pineapple Body Row
This is how you narrow each pineapple from a wide shell down to a pointed tip. At the start of each body row, work a single crochet (sc) into the first ch-1 sp of the pineapple shell below. Then work (ch 3, sc) into each remaining ch-1 sp across that shell.
Each body row reduces the number of sc and ch-3 picots by one on each side. The pineapple naturally narrows until you reach a single sc at the tip.
Step by step:
1. Insert hook into first ch-1 sp of previous shell, yo, pull up a loop, yo, pull through both loops (sc made).
2. Ch 3.
3. Insert hook into next ch-1 sp, sc.
4. Repeat steps 2 and 3 across all ch-1 sps of the same pineapple.
5. End the final body row of each pineapple with a single sc into the last ch-1 sp. No ch-3 follows. This sc becomes the tip of the pineapple point.
Mesh Row
Work (dc, ch 2, sk 2 sts or ch-sps, dc) to create the diamond mesh lattice that separates adjacent pineapple columns and rows. This row also sets up positions for new P-shells to launch the next tier of pineapples.
Fan Border
Work (sc, hdc, 3 dc, hdc, sc) all in the same ch-sp. Used at neckline edging and along side edges.
Twisted Cord Tie
Cut 6 strands of yarn each 60 inches / 152 cm long. Fold in half and anchor the folded end (a doorknob works great). Twist firmly in one direction until the cord begins to kink back on itself. Fold in half again, allowing the two halves to twist together naturally. Knot both ends. Each finished tie will be approximately 14 inches / 36 cm long.
Important Pattern Notes Before You Begin
Read these notes carefully. They will save you confusion later.
1. The front panel and back panel are worked separately, then joined with a mattress seam or sl st seam at the side edges.
2. The front panel is worked flat from the top (neckline) downward.
3. The back panel is worked flat from the top (back neck) downward as a simple mesh with a solid lower band.
4. All turning chains for dc rows count as the first dc of that row unless otherwise stated.
5. Pineapple tiers are staggered. The second tier of pineapples is offset by half a motif width from the first, sitting in the spaces between the first tier pineapples. This creates the allover diamond arrangement you see in the finished top.
6. Stitch counts in parentheses at the end of each row reflect the working stitch and chain space count, not a literal stitch by stitch count. Where noted, motif units are counted instead for clarity.
7. The front panel widens slightly in the lower half because the staggered second tier extends the effective lace width. Side seaming corrects the width to the finished measurement.
8. Block vigorously. Pineapple lace must be wetted, pinned, and dried completely before measuring or seaming. The motifs will not open fully without blocking. This step is not optional.
Front Panel Instructions
Foundation Chain
Ch 59 (67, 75).
This chain provides the base for 4 (5, 6) pineapple motif units. Each unit requires 14 chains, plus 1 chain for each mesh column between units.
Row 1 (RS, Setup Row)
Ch 3 (counts as dc), dc in 4th ch from hook and in each ch across. 59 (67, 75) dc
This is the only all-dc row. It establishes a solid base for the first pineapple setup row and becomes the visible neckline edge.
Row 2 (Neckline Edging, RS)
Ch 1, turn. Sc in first st. (Sk 2 sts, Fan Border in next st, sk 2 sts, sc in next st) across. End with sc in last st. 9 (11, 13) fans plus 2 edge sc
The fan edging finishes the neckline. Do not cut yarn. Attach neck ties here during finishing.
Row 3 (Pineapple Setup, RS)
With RS facing, rejoin yarn to the first st of Row 1 with a sl st. Ch 4 (counts as dc plus ch 1). (Sk 1 st, P-shell in next st, sk 1 st, ch 1, dc in next st, ch 1) rep across, ending dc in last st. 4 (5, 6) P-shells separated by ch-1, dc, ch-1 columns
Stitch placement for Row 3 (Size S):
Rows 4 Through 11 (First Pineapple Body Tier)
Work Pineapple Body Rows across all 4 (5, 6) active pineapples simultaneously. Between each pineapple column, work the mesh: dc in mesh dc below, ch 2, dc in same or adjacent position.
Row 4: Ch 4, turn. (Dc in first ch-1 sp of P-shell, ch 2, sc in same ch-1 sp, ch 3, sc in next ch-1 sp, ch 3, sc in next ch-1 sp, ch 3, sc in last ch-1 sp of shell) work across mesh columns as: ch 2, dc in mesh dc, ch 2. Rep across all 4 pineapples. 4 pineapple body units with 3 ch-3 arches each plus 3 mesh columns
Row 5: Ch 1, turn. Work body row 2: sc in first ch-3 sp, (ch 3, sc in next ch-3 sp) twice, rep across. Mesh: ch 3, dc in mesh dc, ch 3. 4 pineapple units with 2 ch-3 arches each plus 3 mesh columns
Row 6: Ch 1, turn. Work body row 3: sc in first ch-3 sp, ch 3, sc in next ch-3 sp. Mesh: ch 3, dc in mesh dc, ch 3. 4 pineapple units with 1 ch-3 arch each plus 3 mesh columns
Row 7 (Pineapple Tip Row): Ch 1, turn. Sc in single ch-3 arch of each pineapple. Mesh: ch 3, dc in mesh dc, ch 3. 4 pineapple tip sc plus 3 mesh columns
The first pineapple tier is complete!
Checkpoint A: After Row 7, your front panel should measure approximately 3.5 inches / 9 cm from the foundation and 3 inches / 7.5 cm below the pineapple setup row. The four pineapple points should be clearly visible tapering downward.
Row 8 (Offset Mesh Setup)
Ch 5, turn. (Dc in pineapple tip sc, ch 2, dc in same tip sc, ch 2) across, ending with mesh dc in turning chain. 5 mesh arches for S
Row 9 (Second Tier P-shell Setup)
Ch 4, turn. (P-shell in center of mesh arch, ch 1, dc in next dc, ch 1) rep across. 3 full P-shells plus 2 half P-shells at edges
Half P-shell: Work (dc, ch 1, dc, ch 1, dc) into edge mesh position. This creates a half pineapple at each side that becomes a partial lace point at the side hem.
Rows 10 Through 17 (Second Pineapple Body Tier)
Repeat the body row sequence for all second tier pineapples. Work partial body rows on the half pineapples at edges, reducing them from 2 arches to the tip.
Row 10: 3 full pineapple body units with 3 arches each plus 2 half pineapple units with 2 arches each plus mesh columns
Row 11: 3 units with 2 arches each plus 2 units with 1 arch each plus mesh columns
Row 12: 3 units with 1 arch each plus 2 tips plus mesh columns
Row 13 (Tip Row): 3 full tips plus 2 edge tips plus mesh columns
Checkpoint B: After Row 13, your front panel should measure approximately 7 inches / 18 cm from the foundation. The staggered offset of the second tier should be visible as a diamond arrangement.
Rows 14 Through 17 (Third Tier Mesh and Setup)
Row 14 (Offset Mesh): Ch 5, turn. Bridge all second tier tips and mesh columns as in Row 8. 6 mesh arches for S
Row 15 (Third Tier P-shell Setup): Ch 4, turn. (P-shell in mesh arch center, ch 1, dc, ch 1) rep across. 4 P-shells for S
Rows 16 Through 22 (Third Pineapple Body Tier)
Row 16: 4 pineapple units, 3 arches each. Mesh as set.
Row 17: 4 units, 2 arches each.
Row 18: 4 units, 1 arch each.
Row 19 (Tip Row): 4 tips. Mesh as set.
Checkpoint C: After Row 19, the front panel should measure approximately 12 inches / 30.5 cm from the foundation. Three complete tiers with the staggered diamond arrangement should be visible.
Rows 20 Through 25 (Fourth Tier)
Row 20 (Offset Mesh): Ch 5, turn. Bridge all third tier tips. 5 arches for S
Row 21 (Fourth Tier P-shell Setup): Ch 4, turn. (P-shell in arch, ch 1, dc, ch 1) across. 3 full P-shells plus 2 half P-shells at edges
Row 22: Body row 1: 3 units with 3 arches plus 2 units with 2 arches
Row 23: Body row 2: 3 units with 2 arches plus 2 units with 1 arch
Row 24: Body row 3: 3 units with 1 arch plus 2 tips
Row 25 (Hem Tip Row): Sc in each remaining arch and tip across. Approximately 8 to 10 sc depending on size
Do not fasten off. Proceed to hem edging.
Row 26 (Hem Edging)
Ch 1, turn. Sc evenly around the entire lower edge, working sc into each stitch and ch-3 sp of the bottom tier pineapple tips. Work Fan Border (sc, hdc, 3 dc, hdc, sc) into each pineapple tip sc to accentuate the points. Work 3 sc into each mesh corner. Fasten off. Weave in ends.
Side Edges of Front Panel
With RS facing and using a yarn needle and yarn, work a sl st edging along both vertical side edges to stabilize for seaming. Alternatively, work 1 row of sc up each side edge, working 1 sc per dc row end and 1 sc per 2 ch rows.
Back Panel Instructions
The back panel features simple mesh lace with a solid sc waistband at the lower edge.
Foundation Chain
Ch 61 (69, 77).
Row 1 (RS)
Ch 3 (counts as dc), dc in 4th ch from hook and in each ch across. 61 (69, 77) dc
Row 2 (Neck Opening Setup)
Ch 4, turn. (Sk 2 sts, dc in next st, ch 2) rep across, ending dc in last st. 20 (23, 26) mesh sp
Rows 3 Through 26 (Mesh Body)
Ch 4, turn. (Dc in next dc, ch 2) rep across, ending dc in t-ch. Work even in mesh pattern until back panel measures 13 (14, 15) inches / 33 (36, 38) cm from foundation.
Back Opening Shaping
Begin when back panel measures 4 inches / 10 cm from top.
At Row 10 equivalent, divide the work into two separate back panels (left back and right back), each occupying approximately one third of the total width. Leave the center third unworked to create the open back.
Left back: Work mesh over the left 7 (8, 9) mesh columns only. Continue straight for the remaining back length.
Right back: Rejoin yarn to the right 7 (8, 9) mesh columns. Work straight to match left back.
Lower Back Border
Row 27 (Lower Back Join): With RS facing, rejoin yarn to the right edge base of the right back panel. Ch 1. Work sc across the lower edge of the right back panel (approximately 18 sc for S), sc across the center of any remaining foundation chains, sc across left back panel base. 54 (62, 70) sc total
Row 28: Ch 1, turn. Sc in each sc across. 54 (62, 70) sc
Row 29: Ch 1, turn. Sc in each sc across. 54 (62, 70) sc
Row 30: Ch 1, turn. Sc in each sc across. 54 (62, 70) sc
Fasten off. Weave in ends.
Back Neck Tie Foundation
At the center top of the back panel, ch 1, work 3 sc across the center 3 sts of Row 1. Make two Twisted Cord Ties and attach one to each end of this center sc group. Knot securely.
Assembly Instructions
Step 1: Block both front panel and back panel before seaming.
Step 2: Place front panel and back panel with RS together. Align side edges. The front panel is wider than each half of the back panel by design. Align the lower back border top edge with the row on the front panel that corresponds to waist height (approximately 3 to 4 inches / 7.5 to 10 cm up from the lowest pineapple hem point).
Step 3: Seam the side edges using mattress stitch or sl st seam with RS together. Seam from waist level upward to the underarm position (approximately 8 to 9 inches / 20 to 23 cm up from the lower back border top edge). Leave the upper portion open as the armhole gap.
Step 4: Attach two Twisted Cord Ties to the front neckline corners (at each end of Row 2 fan edging).
Step 5: All four ties come together at the nape of the neck and tie in a bow or knot.
Size Customization Tips
To go smaller than size S: Remove one complete pineapple unit from the foundation chains. Subtract 14 chains from both front and back panels. This produces an XS with approximately 28 inch / 71 cm bust.
To go larger than size L: Add one complete pineapple unit (add 14 chains to front and back). Each added unit adds approximately 3.5 inches / 9 cm to bust circumference and requires approximately 100 yards / 91 meters of additional yarn.
To lengthen: Add a complete fourth pineapple tier. This adds approximately 4 inches / 10 cm to length.
To shorten: End after the third tier tip row and work Hem Edging immediately. This creates a cropped version approximately 12 to 13 inches / 30 to 33 cm long.
Blocking and Finishing
Blocking is mandatory for this pattern. Pineapple lace will not achieve its beautiful defined shape without wet blocking.
1. Submerge each piece in cool water with a drop of wool wash for at least 15 minutes.
2. Gently press out excess water by rolling in a clean towel. Do not wring.
3. Lay on blocking mats. Pin each pineapple tip firmly with rust proof T-pins, pulling the lace open to 3.5 inches / 9 cm per pineapple. Pin the top edge straight and side edges at correct width.
4. Allow to dry completely (24 to 48 hours for cotton).
5. Check that each pineapple tip is a clearly defined point and each fan shell is fully open. Re-wet and re-pin any areas that did not open fully.
6. After blocking and seaming, weave in all ends on the WS.
Care Instructions
Machine wash cold on a gentle cycle in a mesh laundry bag, or hand wash in cool water. Use gentle detergent suitable for cotton. Do not wring. Roll in a towel to remove excess water. Lay flat to dry away from direct sunlight. Do not tumble dry. Steam blocking on a padded surface is acceptable for reshaping between wears. Store folded flat, not on a hanger.
You Did It!
Thank you so much for choosing this pineapple lace halter crochet pattern. I know it is a big project, but I truly believe you are going to love every moment of watching those pineapple motifs take shape under your hook. The finished piece is absolutely worth the time investment.
I would love to see your finished halter tops! Tag me on Instagram or share in our Facebook group so I can celebrate your beautiful work. Seeing your creations honestly makes my whole day.
If you loved this pattern, I hope you will save it to your Pinterest boards so you can find it again easily. And please drop a comment below when you finish yours. I cannot wait to hear how it turns out for you!
You Might Also Like
- Sage Green Boho Crochet Sundress Free Pattern
- Dusty Rose Heart Valentine Backpack Free Crochet Pattern
- Crimson Valentine Rose Crochet Dress Free Crochet Pattern
- Berry Blossom Lace Cardigan Free Crochet Pattern