Sage Green Mesh Cover Up Free Crochet Pattern
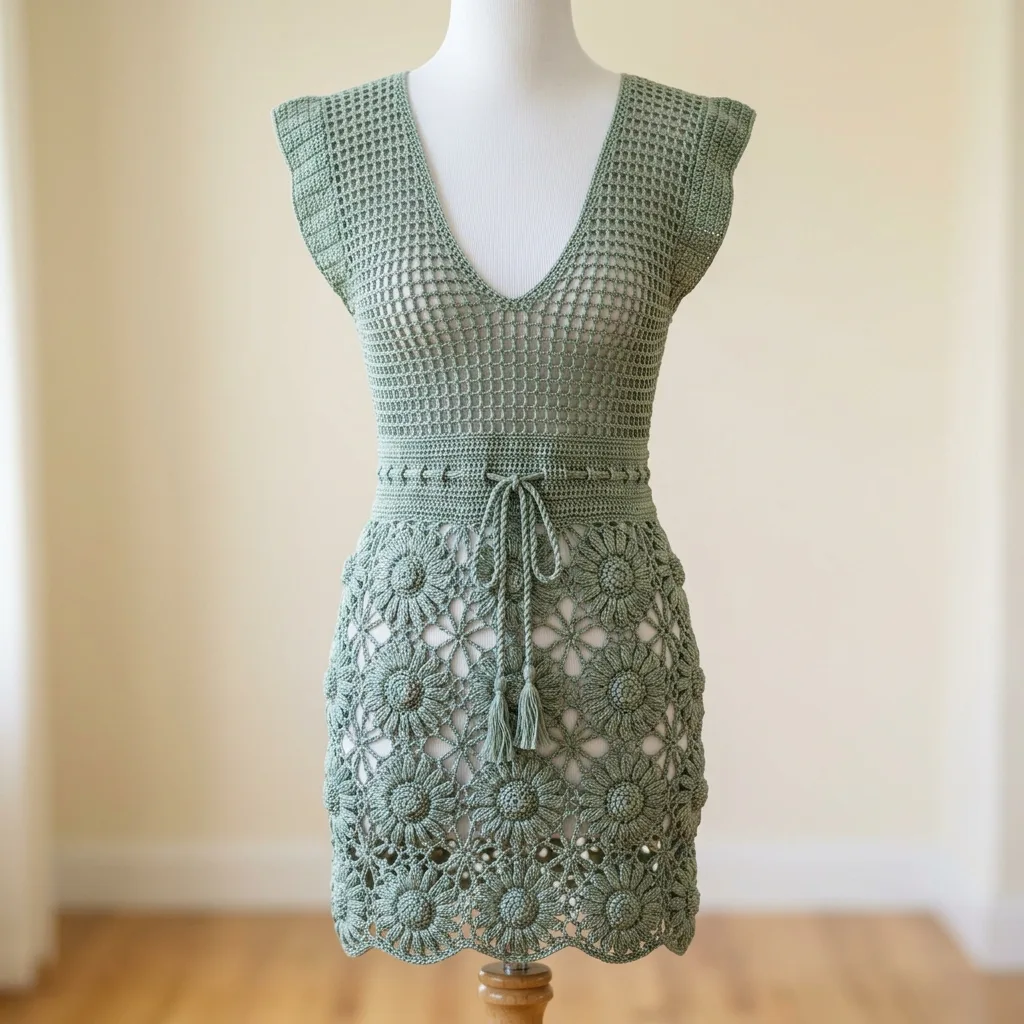
Last summer I found myself standing in a beachside shop, holding a crocheted cover-up with a price tag that made me laugh out loud. Seventy-five dollars for something I knew I could make myself? I put it back on the rack, snapped a mental picture of the construction details, and spent the whole drive home thinking about how I would design my own version.
That moment turned into months of swatching, frogging, and reworking until I landed on this sage green mesh cover-up. It combines everything I loved about that shop find with a few improvements of my own. The fitted filet mesh bodice, the gorgeous sunflower motifs cascading down the skirt, and that little braided tie at the waist that pulls the whole thing together.
This is not a weekend project, I will be honest with you. But if you have been crocheting for a while and want something truly stunning to show off at the beach or pool this season, this is the pattern that will get you there. Let me walk you through every single step.
About This Crochet Pattern
This mini dress cover-up features three distinct sections that come together beautifully. The bodice uses a filet mesh construction worked flat in rows from the bottom up. A decorative waistband with eyelets holds a braided tie closure. And the skirt? It is built entirely from joined sunflower motifs that create that romantic, bohemian look.
The V-neckline forms naturally by splitting the front bodice at the center and working each side separately. Small cap-sleeve extensions add a polished finishing touch. The entire garment uses a single sage green yarn with no color changes, which makes it perfect for showcasing that special skein you have been saving.
Skill Level: Advanced Intermediate
You will need to be comfortable with filet mesh construction, top-down V-neck shaping, working in the round for motifs, joining motifs as you go, and picking up stitches for waistband finishing. If those techniques feel unfamiliar, I recommend practicing each one separately before diving in. The good news is that no colorwork is involved, so you can focus entirely on construction.
Time Estimate: 20 to 30 hours for an experienced crocheter
Finished Measurements
This pattern is written for a size Small/Medium:
Materials You Will Need
Yarn: DK weight (CYCA #3), 100% mercerized cotton or cotton-blend, approximately 700 to 800 yards total in sage green
Recommended Yarn Options:
1. Lion Brand 24/7 Cotton in Sage at 186 yards per 3.5 oz skein. You will need 4 skeins. This yarn is smooth and mercerized with beautiful stitch definition.
2. Paintbox Yarns Cotton DK in Grass Green or Pistachio at 273 yards per 3.5 oz skein. You will need 3 skeins. Excellent value with great stitch clarity.
3. WeCrochet Shine DK in Eucalyptus at 190 yards per 1.75 oz skein. You will need 4 to 5 skeins. The cotton-modal blend gives a subtle drape and sheen perfect for resort wear.
Choose a smooth, plied DK cotton or cotton-blend with good stitch definition. Avoid fuzzy or stretchy yarns because they will obscure the filet mesh and motif texture.
Hooks:
Notions: Yarn needle, 6 stitch markers, scissors, blocking mats and pins, measuring tape
Gauge (Please Swatch!)
Bodice gauge with E-4 hook: 20 stitches x 22 rows = 4 inches x 4 inches in filet mesh pattern
Skirt motif gauge with F-5 hook: One completed sunflower motif = 3.75 inches from center to outer edge point
Gauge is critical for this garment. Even a small deviation will change the fit of the bodice significantly. Swatch and block before beginning, then adjust hook size as needed.
Abbreviations and Stitch Definitions
Special Stitches and Techniques
Filet Mesh (Used for Bodice)
The filet mesh creates a dense, square-grid texture. Each mesh cell consists of 1 dc, ch 1, sk 1 st. Work in straight rows with a turning chain of 3.
Each row begins: Ch 3, turn (counts as first dc), then work (dc in next st, ch 1, sk 1 st) across, ending dc in top of turning chain.
V-Stitch
Work (dc, ch 2, dc) all in the same stitch or chain space. Used decoratively at the waistband.
Sunflower Motif (Worked in the Round, 6 Rounds)
Round 1: MR, ch 3 (counts as first dc), work 11 dc into ring, join with sl st to top of beg ch-3. (12 dc)
Round 2: Ch 1, sc in same st, ch 3, (sc in next dc, ch 3) 11 times, join with sl st to first sc. (12 sc, 12 ch-3 sps)
Round 3 (Petal Layer): Sl st into first ch-3 sp. Work (ch 3, 4 dc, ch 1, 5 dc) in same sp. Ch 1. Work (5 dc, ch 1, 5 dc) in each of the remaining 11 ch-3 sps. Ch 1 after each petal. Join with sl st to top of beg ch-3. (12 petals)
Round 4: Ch 1. Working behind petals into the sc sts from Round 2, sl st into first Round-2 sc, ch 5, (sl st into next Round-2 sc, ch 5) 11 times, join with sl st to first sl st. (12 ch-5 loops behind petals)
Round 5: Sl st into first ch-5 loop. Work (sc, hdc, 5 dc, hdc, sc) in each ch-5 loop around. Join with sl st to first sc. (12 outer petals, each with 9 sts)
Round 6 (Joining/Edging Round): Ch 1. Work sc in each st around, working 3 sc into each petal tip and sc2tog in each valley between petals. Join with sl st to first sc. Fasten off or continue with JAYG as directed.
Join-As-You-Go (JAYG) for Motifs
When joining the second and subsequent motifs during Round 6, replace the center stitch at each joining point (the middle sc of a 3-sc tip group) with a sl st into the corresponding stitch on the adjacent motif. This creates a flat, seamless connection between motifs. Join at petal tips only.
Braided Tie
Cut 12 strands of yarn each measuring 36 inches. Divide into 3 groups of 4 strands. Braid tightly to desired length (approximately 14 inches). Knot each end firmly. Trim ends to form small tassels approximately 1.5 inches long.
Pattern Notes Before You Begin
1. The bodice is worked flat in rows from the lower edge upward to the shoulders. The front and back are worked separately.
2. The V-neck shaping begins at the center front approximately 5 inches below the shoulder.
3. The waistband is worked around the joined bodice after the bodice pieces are seamed at the shoulders and sides.
4. The skirt motifs are worked individually and joined using JAYG in a horizontal band arrangement, then joined row by row downward.
5. The skirt attaches to the waistband by slip stitching the top edge of the motif band to the lower edge of the waistband.
6. Turning chains: Ch-3 at the beginning of a row counts as the first dc throughout.
7. Block the finished garment before assembly for best results.
Step-by-Step Instructions for the Sage Green Mesh Cover-Up
Back Bodice
Foundation chain: Using E-4 hook, ch 90.
Row 1 (WS): Dc in 4th ch from hook (ch-3 counts as dc), ch 1, sk 1 ch, (dc in next ch, ch 1, sk 1 ch) across to last ch, dc in last ch. Turn. (44 mesh cells)
Row 2 (RS): Ch 3, turn. Dc in first ch-1 sp, ch 1, (dc in next dc, ch 1) across, dc in top of turning ch. (44 mesh cells)
Rows 3 through 28: Rep Row 2. Work even in filet mesh. (44 mesh cells per row)
After Row 28, back bodice should measure approximately 5 inches tall.
Armhole Shaping (Back)
Row 29: Sl st across first 6 sts (3 mesh cells), ch 3, work in filet mesh across until 6 sts remain unworked (3 mesh cells), turn. (38 mesh cells)
Rows 30 through 34: Work even in filet mesh. (38 mesh cells)
Row 35 (decrease row): Ch 3, dc2tog over first ch-1 sp (decrease 1 cell at beg), work in filet mesh to last 2 cells, dc2tog, dc in turning ch. Turn. (36 mesh cells)
Row 36: Work even. (36 mesh cells)
Row 37 (decrease row): Ch 3, dc2tog, work across to last 2 cells, dc2tog, dc in turning ch. Turn. (34 mesh cells)
Rows 38 through 50: Work even in filet mesh. (34 mesh cells)
After Row 50, back bodice should measure approximately 13 inches tall. Do not fasten off. Set aside.
Checkpoint: Confirm the back bodice measures 13 inches from foundation chain to top edge and approximately 17 inches wide at the hip and 13.5 inches wide at the shoulder.
Front Bodice (Lower Section, Below V-Neck Split)
Foundation chain: Using E-4 hook, ch 90.
Rows 1 through 22: Work exactly as Back Bodice Rows 1 through 22. (44 mesh cells per row)
V-Neck Split
Row 23 (begin left front panel, RS): Ch 3, work in filet mesh across first 21 cells, dc in next dc. Turn, leaving remaining stitches unworked. (21 mesh cells)
Left Front Panel
Row 24: Ch 3, work in filet mesh across. (21 mesh cells)
Row 25 (neck decrease): Ch 3, work across to last 2 cells, dc2tog, dc in turning ch. Turn. (20 mesh cells)
Row 26: Work even. (20 mesh cells)
Row 27 (neck decrease): Work across to last 2 cells, dc2tog, dc. Turn. (19 mesh cells)
Row 28 (armhole shaping row): Sl st across first 6 sts (3 mesh cells), ch 3, work across to last 2 cells, dc2tog, dc. Turn. (15 mesh cells)
Row 29 (neck decrease): Work across to last 2 cells, dc2tog, dc. Turn. (14 mesh cells)
Row 30: Work even. (14 mesh cells)
Row 31 (armhole decrease): Ch 3, dc2tog, work across. Turn. (13 mesh cells)
Row 32 (neck decrease): Work across to last 2 cells, dc2tog, dc. Turn. (12 mesh cells)
Row 33: Work even. (12 mesh cells)
Row 34 (armhole decrease): Ch 3, dc2tog, work across. Turn. (11 mesh cells)
Row 35: Work even. (11 mesh cells)
Row 36 (neck decrease): Work across to last 2 cells, dc2tog, dc. Turn. (10 mesh cells)
Row 37: Work even. (10 mesh cells)
Row 38 (neck decrease): Work across to last 2 cells, dc2tog, dc. Turn. (9 mesh cells)
Rows 39 through 50: Work even. (9 mesh cells)
Fasten off.
Right Front Panel
Return to Row 22. With RS facing, rejoin yarn at center front stitch.
Row 23 (right front, RS): Ch 3, work in filet mesh across remaining 21 cells. Turn. (21 mesh cells)
Row 24: Work even. (21 mesh cells)
Row 25 (neck decrease): Ch 3, dc2tog, work across. Turn. (20 mesh cells)
Row 26: Work even. (20 mesh cells)
Row 27 (neck decrease): Ch 3, dc2tog, work across. Turn. (19 mesh cells)
Row 28 (armhole shaping): Sl st across first 6 sts at armhole edge, ch 3, dc2tog at neck edge, work across. Turn. (13 mesh cells)
Row 29 (neck decrease): Ch 3, dc2tog, work across. Turn. (12 mesh cells)
Row 30: Work even. (12 mesh cells)
Row 31 (armhole decrease): Work across to last 2 cells, dc2tog, dc. Turn. (11 mesh cells)
Row 32 (neck decrease): Ch 3, dc2tog, work across. Turn. (10 mesh cells)
Row 33: Work even. (10 mesh cells)
Row 34 (armhole decrease): Work across to last 2 cells, dc2tog, dc. Turn. (9 mesh cells)
Row 35: Work even. (9 mesh cells)
Row 36 (neck decrease): Ch 3, dc2tog, work across. Turn. (9 mesh cells)
Row 37: Work even.
Row 38 (neck decrease): Ch 3, dc2tog, work across. Turn.
Rows 39 through 50: Work even. (9 mesh cells)
Both panels end at 9 mesh cells per shoulder.
Assembly (Shoulder and Side Seams)
With yarn needle, seam the left front shoulder to the left back shoulder using a mattress stitch or slip stitch seam. Seam the right front shoulder to the right back shoulder. Each shoulder seam spans 9 mesh cells (approximately 3.6 inches).
Then seam the side seams from underarm to lower edge, leaving the lower edge open for waistband attachment.
Checkpoint: The assembled bodice should measure approximately 34 inches in circumference at the lower edge and 13 inches from lower edge to highest shoulder point.
Cap Sleeve Edging
With RS facing and E-4 hook, join yarn at underarm seam. Work 1 rnd of sc evenly around the entire armhole opening, placing approximately 1 sc per dc row end and 1 sc per chain along any horizontal edges. Pm at underarm. Join with sl st. Do not turn.
Round 1 of cap sleeve: Ch 3, dc in each sc around, placing dc2tog at each underarm point to prevent flaring. Join. (approximately 36 dc)
Round 2: Ch 1, sc in each dc around. Join.
Round 3: Ch 3, dc in each sc around. Join.
Round 4: Ch 1, sc in each sc around, working sc2tog at each underarm point. Join. Fasten off. Weave in ends.
Repeat for second armhole.
Waistband
The waistband is worked in joined rounds around the lower edge of the assembled bodice.
With RS facing and E-4 hook, join yarn at the left side seam at the lower bodice edge.
Round 1: Ch 1, sc evenly around the entire lower edge of the bodice, working approximately 1 sc per dc post along side seams and 1 sc per mesh cell along horizontal edges. Total target count: 178 sc. Join with sl st. (178 sc)
Round 2: Ch 3, dc in each sc around. Join. (178 dc)
Round 3 (eyelets for tie): Ch 3, dc in next dc, (ch 1, sk 1 dc, dc in next dc) around, ending dc in last dc. Join. (89 dc, 89 ch-1 sp eyelet spaces)
Round 4: Ch 3, dc in each dc and ch-1 sp around. Join. (178 dc)
Round 5: Ch 1, sc in each dc around. Join. (178 sc)
Round 6: Sl st in BLO of each sc around. Join. Fasten off.
Skirt Motif Construction
Layout Planning:
The skirt circumference at the waist edge is 36 inches. Each motif is approximately 3.75 inches in diameter. You will need 10 motifs per horizontal row for Row 1 and Row 3, and 9 motifs per row for offset Rows 2 and 4.
Total motifs needed: Row 1: 10, Row 2: 9, Row 3: 10, Row 4: 9 = 38 motifs total.
Motif Row 1 (Top Row, Attached to Waistband)
Motif 1: Work Rounds 1 through 6 fully as described in Special Stitches. Fasten off.
Motifs 2 through 10: Work Rounds 1 through 5. On Round 6, work to the first join point (a petal tip that will connect to the previous motif), replace the center sc of the 3-sc tip with a sl st into the corresponding tip sc of the previous motif. Continue Round 6 independently for all non-joining tips, joining each subsequent motif to the previous one at 2 adjacent tip points.
After all 10 motifs in Row 1 are joined in a horizontal band, join the last motif to the first motif at their shared tip points to form a complete ring.
Attaching Motif Row 1 to Waistband
With RS facing, align the top tips of the Row 1 motif band with the lower edge (Round 6 BLO row) of the waistband. Using E-4 hook and yarn, sl st the top tip of each motif (center sc of each tip group) to the sl st row of the waistband. Space tips evenly around.
Motif Row 2 (Offset Row)
Work 9 motifs for Row 2. Each motif nestles between two motifs of Row 1, joining at 2 tips to Row 1 motifs above and 2 tips to adjacent Row 2 motifs. On the final motif, join to the first Row 2 motif to close the round.
Motif Row 3
Work 10 motifs, joining to Row 2 above and to each other laterally, exactly as Row 1.
Motif Row 4 (Bottom Row)
Work 9 motifs, joining to Row 3 above and to each other laterally. On the bottom edge, do not join the lower petal tips. Leave them free to create the scalloped hem.
Checkpoint: The skirt should hang approximately 15 inches from the waistband lower edge to the lowest hem point.
Finishing Your Cover-Up
Weave in all ends securely. Pay special attention to JAYG join points and the waistband attachment.
Blocking: Wet-block the entire garment. Soak in cool water with a drop of wool wash for 10 to 15 minutes. Gently press out excess water without wringing. Lay flat on blocking mats. Pin each motif to 3.75 inches point to point and pin the bodice to finished measurements. Allow to dry completely, typically 24 hours.
Braided Tie: Thread the braided tie through the eyelet round at the waist, entering and exiting at the center front.
V-Neckline Finish: With RS facing and E-4 hook, join yarn at one shoulder seam and work 1 round of sc evenly around the entire V-neck opening, working sc2tog at the base of the V-point. Join. Fasten off. Weave in end.
Size Customization Tips
For the bodice: Each mesh cell equals approximately 0.4 inches of width. To add 2 inches of circumference, add 5 cells (10 stitches) to the foundation chain of both front and back. To remove 2 inches, subtract 5 cells from each piece.
For the skirt: Each motif is 3.75 inches wide. Add or remove motifs per row in increments of 1 to adjust circumference. For a longer skirt, add additional motif rows.
For length: To add length to the bodice, work additional rows in filet mesh before beginning armhole shaping. Each 2 rows adds approximately 0.36 inches.
Care Instructions
Machine wash gentle in cold water, or hand wash in cool water. Do not wring. Lay flat to dry. Do not tumble dry. Do not iron directly on yarn. Store folded or laid flat. Do not hang, as the open mesh construction may stretch.
I really hope you love making this sage green mesh cover-up as much as I loved designing it. It is one of those projects that feels like a true accomplishment when you slip it on for the first time. If you make one, I would absolutely love to see it! Tag me on Instagram or share a photo in my Facebook group.
If this crochet pattern is calling your name, go ahead and save it to your Pinterest boards so you can find it when you are ready to start. And please drop a comment below if you give it a try. I love hearing how your projects turn out!
You Might Also Like
- Sage Green Textured Clutch Bag Free Crochet Pattern
- Ocean Wave Hexagon Throw Free Crochet Pattern
- Blush Pink Shell Stitch Halter Dress Free Crochet Pattern
- Ocean Blue Mermaid Plush Doll Free Crochet Pattern