Rose Gold Monarch Crochet Mini Dress Free Pattern
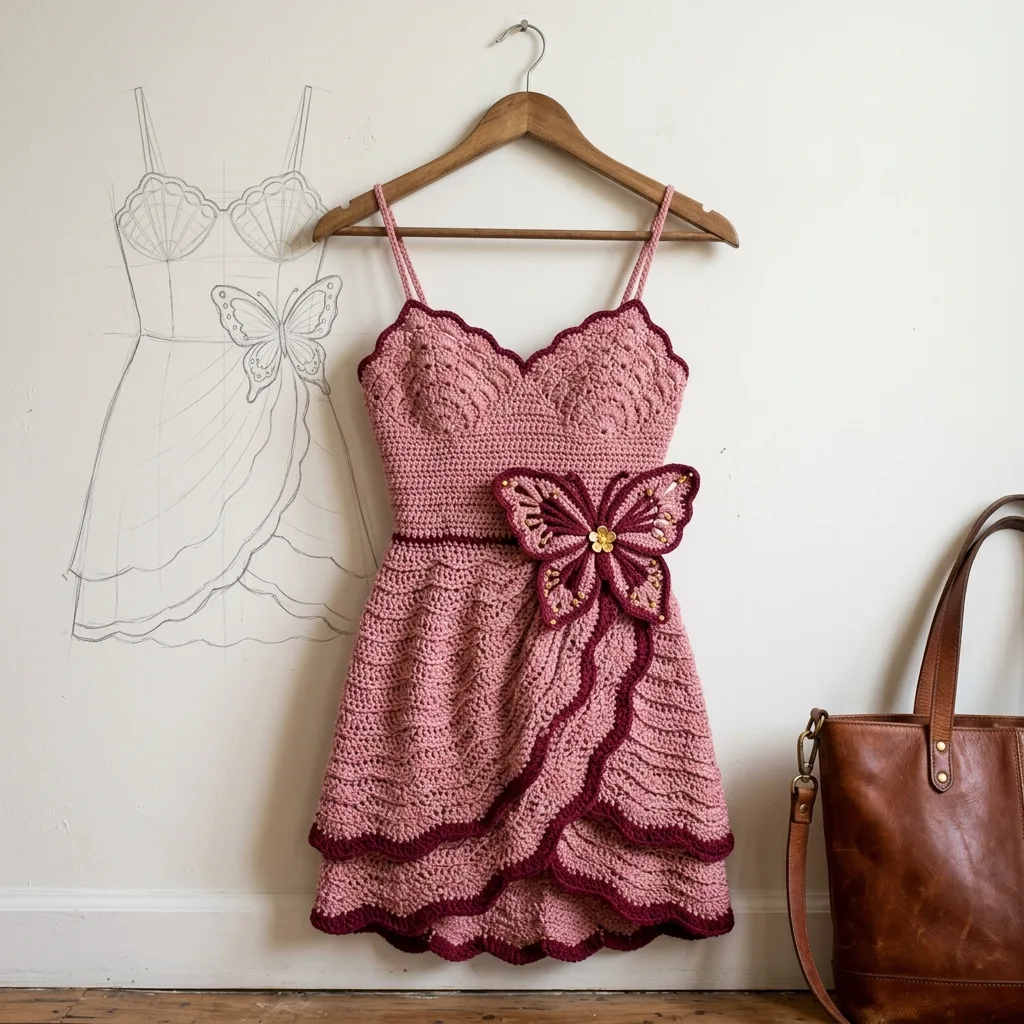
Think crocheting a fitted dress with a sweetheart neckline sounds way beyond your skill level? I completely understand that fear. When I first saw designs like this, I assumed they required years of experience and some kind of secret garment construction knowledge I did not possess.
Here is the truth. If you can work a single crochet, a double crochet, and count your stitches, you can absolutely make this dress. The shell stitch pattern that creates that gorgeous textured bodice is just five double crochets worked into one stitch. That is it. The sweetheart neckline looks intricate, but it is simply two curved sections worked separately then joined.
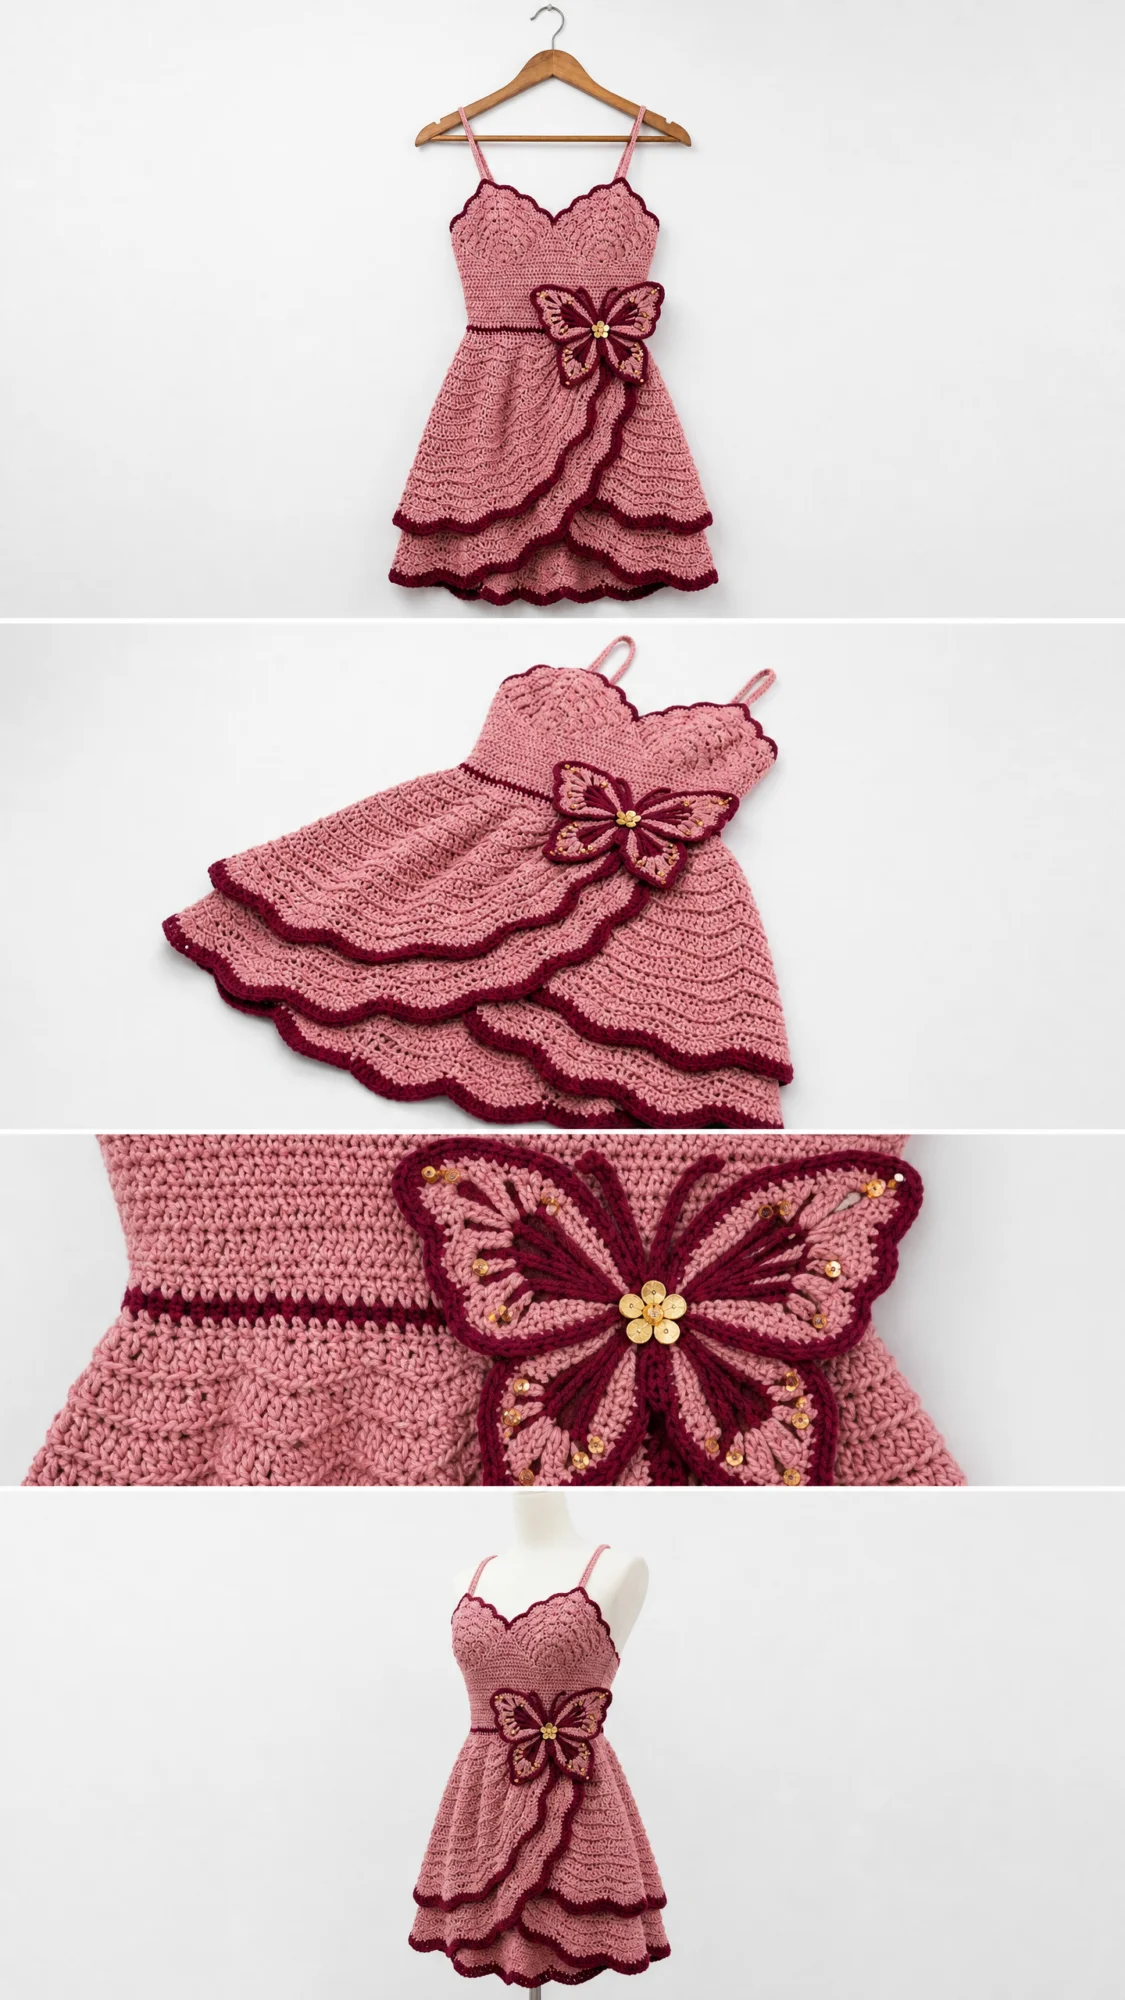
This Rose Gold Monarch Crochet Mini Dress breaks down into manageable pieces. A back panel. A front panel. A skirt worked in the round. A pretty overlay. Straps. And that stunning butterfly applique at the waist. Each piece uses stitches you likely already know. The magic happens when you put them all together.
Why This Crochet Dress Pattern Works for Multiple Skill Levels
I consider this an advanced beginner to intermediate project. The individual techniques are straightforward. Shell stitch, single crochet, scallop edging. Nothing fancy. What makes it intermediate is the multi-piece construction, fitted shaping, and the attention to stitch counts required throughout.
If you have completed at least two crochet garments before, you will find this manageable. If this is your first garment, take it slow, check your counts at every checkpoint, and trust the process. I have included detailed stitch counts at the end of every row so you can catch mistakes early.
The dusty rose main color with deep burgundy contrast trim creates that romantic vintage aesthetic. The butterfly applique with its gold button center adds a whimsical touch that elevates the entire piece.
Materials You Will Need
Yarn Main Color (MC): Approximately 1,200 yards of DK weight (CYCA 3) cotton or cotton blend yarn in dusty rose or mauve pink
Yarn Contrast Color (CC): Approximately 300 yards of DK weight (CYCA 3) cotton or cotton blend yarn in deep burgundy or wine
Hooks:
Additional Materials:
Yarn Suggestions That Work Beautifully
Option 1: Paintbox Yarns Simply DK (100% cotton, 137 yards per 50 g ball). Excellent stitch definition with appropriate drape for the fitted bodice. You will need approximately 9 balls MC and 2 to 3 balls CC.
Option 2: Lion Brand 24/7 Cotton (100% combed cotton, 186 yards per 100 g ball). Widely available, washes well, has good stitch definition, and gives the dress a slight sheen. You will need approximately 7 balls MC and 2 balls CC.
Option 3: Scheepjes Cahlista (100% natural cotton, 85 yards per 50 g ball). Premium option with exceptional stitch clarity and color accuracy. You will need approximately 14 balls MC and 4 balls CC.
Substitution note: Use a DK weight cotton or cotton acrylic blend with a twist. Avoid soft or fluffy yarns such as alpaca blends or mohair because the shell and scallop stitch definition will be lost. Always swatch your specific yarn before beginning.
Finished Measurements
This pattern fits a size Small to Medium adult, approximately US dress size 4 to 8.
Gauge for This Crochet Mini Dress
Getting gauge right is critical for fit. Please swatch before starting.
Using E-4 hook and MC, in single crochet:
20 stitches x 24 rows = 4 inches / 10 cm square, blocked
Using F-5 hook and MC, in shell stitch pattern:
One complete shell repeat (9 stitches) = approximately 1.75 inches / 4.4 cm wide
4 shell rows = approximately 2 inches / 5 cm tall
Adjust hook size up or down as needed to match gauge rather than changing hook sizes mid-pattern.
Abbreviations and Definitions
Let me walk you through every abbreviation used in this pattern with plain English explanations.
Special Stitches for This Pattern
Shell Stitch
This is the signature stitch that creates the beautiful texture across the bodice. Skip 2 stitches, work 5 dc into the next stitch or space, skip 2 stitches, sc in the next stitch. This creates a cluster of 5 double crochets centered over one stitch with a single crochet anchor on each side.
Full shell row setup: For rows worked in shell stitch on a base that is a multiple of 6 plus 1: ch 1, sc in first st, (sk 2 sts, 5 dc in next st, sk 2 sts, sc in next st) across. The pattern naturally ends with a sc at the final stitch.
Offset Shell
On the row after a shell row, ch 3 (counts as dc), work 2 dc in the same first sc (half shell at edge), sc in the center dc of the next shell below, (5 dc in the next sc, sc in the center dc of the next shell) across, end with 3 dc in the final sc (half shell at edge). The offset shell nestles between the shells of the previous row, creating that wave texture you see in the photos.
Scallop Edging
Join CC. Ch 1, sc in first st, (sk 1 st, 5 dc in next st, sk 1 st, sc in next st) around. Join with sl st to first sc. Fasten off. This is the same construction as the shell stitch but used as a decorative edging on a finished edge. It creates that gorgeous burgundy trim.
Pattern Notes Before You Begin
1. The bodice is worked flat in rows. The back bodice is worked first, then the front. Both are seamed at the side seams after the bodice shaping is complete.
2. The skirt is worked in the round, attached to the waistband after the bodice pieces are joined.
3. All CC trim rows and edgings are worked after the main MC construction in each section unless otherwise stated.
4. The overlay panel is a separate flat piece seamed to the left side seam of the skirt and left free at the right to create the wrap visual effect.
5. Turning chains: In sc rows, ch 1 and turn. The ch 1 does not count as a stitch. In dc rows or shell rows, ch 3 and turn. The ch 3 counts as the first dc unless otherwise specified.
6. Blocking is strongly recommended. The cotton yarn will relax and even out significantly after wet blocking.
7. Check stitch counts at every marked checkpoint. Correct any errors before proceeding.
8. Right side of work: The side facing you when the shell bumps curve outward (away from you) is the RS.
9. For color changes, always complete the last yarn over of the final stitch in the old color with the new color.
Step by Step Instructions
Back Bodice
The back bodice is worked from the hem edge of the bodice upward to the top edge (which will be the armhole and strap attachment point).
Using MC and E-4 hook.
Foundation: Ch 86. Sc in 2nd ch from hook and in each ch across. Turn. (85 sc)
This gives a bodice back width of 85 stitches, which equals approximately 17 inches when divided by your gauge of 20 stitches per 4 inches. This is the back width of the bodice laid flat, representing half the full bust circumference of 34 inches.
Row 1: Ch 1, sc in each st across. Turn. (85 sc)
Row 2: Ch 1, sc in each st across. Turn. (85 sc)
Row 3 (Shell row, RS): Ch 1, sc in first sc, (sk 2 sc, 5 dc in next sc, sk 2 sc, sc in next sc) 14 times. Turn. (85 sts)
Row 4 (Offset Shell, WS): Ch 3, 2 dc in first sc (half shell = 3 dc into first sc anchor), sc in center dc of first shell, (5 dc in next sc anchor, sc in center dc of next shell) 13 times, 3 dc in last sc anchor (half shell). Turn. (85 sts)
Row 5 (Shell row, RS): Ch 1, sc in first dc of half shell, (sk 2 sts, 5 dc in next sc anchor, sk 2 sts, sc in center dc of next 5-dc group) 13 times, sk 2 sts, 5 dc in last sc anchor, sk 2 sts, sc in top of turning ch. Turn. (85 sts)
Rows 6 through 12: Continue alternating shell row and offset shell row as established. No shaping. (85 sts each row)
CHECKPOINT 1: After Row 12, the back bodice should measure approximately 5 inches / 12.7 cm tall from the foundation chain. The shell texture should be visible across the full width. Count your stitches now before proceeding.
Waist Shaping
Waist shaping begins on Row 13. The bodice will taper from 85 stitches to a fitted waist over the next 6 rows.
Row 13 (Shell row with decrease): Ch 1, sc in first sc, work (sk 2, 5 dc in next sc, sk 2, sc in next) 12 times, sk 2, 5 dc in next sc, sk 2, sc in last st. Turn. (79 sts)
Row 14 (Offset shell): Work offset shell as established across 79 sts. Edge half shells at each side. (79 sts)
Row 15 (Shell row with decrease): Ch 1, sc in first sc, (sk 2, 5 dc in next sc, sk 2, sc in next) 11 times, sk 2, 5 dc in next sc, sk 2, sc in last st. Turn. (73 sts)
Row 16 (Offset shell): Work offset shell across 73 sts. (73 sts)
Row 17 (Shell row, maintain): Ch 1, sc in first sc, (sk 2, 5 dc in next sc, sk 2, sc in next) 11 times, sk 2, 5 dc in next sc, sk 2, sc in last. Turn. (73 sts)
Row 18 (Offset shell): Work as established. (73 sts)
CHECKPOINT 2: After Row 18, the bodice back should measure approximately 8 inches / 20 cm tall. The width should have visibly tapered at the sides. This represents the fitted waist area.
The waist line is at Row 18. Do not fasten off. Set aside.
Front Bodice
The front bodice has the same shell texture as the back but includes the sweetheart neckline shaping. It is worked as a single piece to the bust, then split into two sections for the neckline.
Using MC and E-4 hook.
Foundation: Ch 86. Sc in 2nd ch from hook and each ch across. Turn. (85 sc)
Rows 1 through 18: Work exactly as the back bodice Rows 1 through 18. (85 sts reducing to 73 sts by Row 18)
After Row 18, do not fasten off. The front now splits for the sweetheart neckline.
Sweetheart Neckline Shaping
The sweetheart neckline is achieved by working two separate cups on the upper bodice, each tapering toward the shoulder strap attachment.
Split the 73 stitches of Row 18 into two halves: 36 sts for the right cup, 1 st center (leave unworked), 36 sts for the left cup.
Mark the center stitch of Row 18 with a stitch marker.
RIGHT CUP (as worn):
Begin yarn at the right edge of Row 18.
Row 19 (Shell row, right cup): Ch 1, (sk 2, 5 dc in next, sk 2, sc in next) 6 times. Turn. (36 sts)
Row 20 (Offset shell, right cup): Work offset shell across with a sc2tog at the inner (center) edge to begin curving the sweetheart dip. (35 sts)
Row 21 (Shell row, right cup): Work shell row, reduce by 3 sts at inner edge. (32 sts)
Row 22 (Offset shell): Work across. sc2tog at inner edge. (31 sts)
Continue decreasing at the inner edge every row until the strap width is reached (approximately 8 to 10 sts). Fasten off.
LEFT CUP:
Join yarn at center of Row 18, work left cup as a mirror image of right cup, decreasing at the inner edge (now on the opposite side).
Assembly and Finishing
Join the front and back bodice panels at the side seams using a yarn needle and mattress stitch or whip stitch. The seams should align at the waist shaping rows.
Work the waistband trim in CC around the joined waist edge using single crochet, then attach the skirt by working in the round from the waistband.
The skirt is worked in offset shell pattern using the F-5 hook for better drape. Work in the round, increasing gradually at the hips, then straight to the hem. Add the burgundy scallop edging at the bottom.
The overlay panel is worked flat and attached at the left side seam, draping across the front of the skirt.
Add spaghetti straps by chaining the desired length and working single crochet back along the chain, or work a simple i-cord strap.
Butterfly Applique
The butterfly is worked in two wing halves using CC, then joined at the center. Each wing is a modified oval shape. Embellish with gold button at center and optional seed bead accents on the wings. Attach to the waist with a snap or hook and eye closure so it can be removed for washing.
Time Estimate and Project Planning
Plan for approximately 25 to 35 hours total depending on your working speed.
I recommend working this project over several weeks, completing one section at a time. The bodice alone makes a satisfying mini-project before moving on to the skirt.
Tips for Success with This Crochet Dress Tutorial
Count your stitches religiously. I cannot stress this enough. The fitted shaping requires accurate stitch counts at every row. Use a row counter and check against the pattern counts.
Block each piece before seaming. Cotton yarn relaxes significantly when wet blocked. Your pieces will even out and the shell texture will pop beautifully.
Try on as you go. Once the bodice is seamed, slip it on (carefully, with pins at the back if needed) to check the fit before committing to the skirt length.
Use stitch markers generously. Mark the center front, side seams, and any shaping points. This helps maintain symmetry.
I hope you love making this Rose Gold Monarch Crochet Mini Dress as much as I loved designing it. The combination of that romantic dusty rose with the deep burgundy trim creates something truly special. And that butterfly applique? It is the perfect finishing touch that takes this from pretty dress to statement piece.
If this pattern is calling your name, go ahead and save it to your Pinterest boards so you can find it when you are ready to start. And please, if you make this dress, I would absolutely love to see it. Drop a comment below with your progress or finished photos. Nothing makes my day quite like seeing these patterns come to life in your hands.
You Might Also Like
- Lavender Dream Ankle Socks Free Crochet Pattern
- Sage Green Textured Clutch Bag Free Crochet Pattern
- Blush Pink Round Chain Bag Free Crochet Pattern
- Dusty Rose Vine Crochet Midi Dress Free Pattern