Coral Sunset Mandala Crochet Two-Piece Free Pattern
I found this design tucked away in my old project notebook from a trip to the Mediterranean coast three summers ago. The terracotta walls, the palm fronds swaying in warm breezes, the way the sunset painted everything in shades of coral and peach. I sketched the basic concept on a napkin at a little café and promptly forgot about it until last spring.
When I finally pulled that crumpled napkin out and started translating those scribbles into actual stitches, something clicked. The flower motifs came together like they had been waiting for me. The tiered ruffles practically designed themselves. I named it the Coral Sunset Mandala because it captures exactly that moment when the sun dips low and everything glows warm.
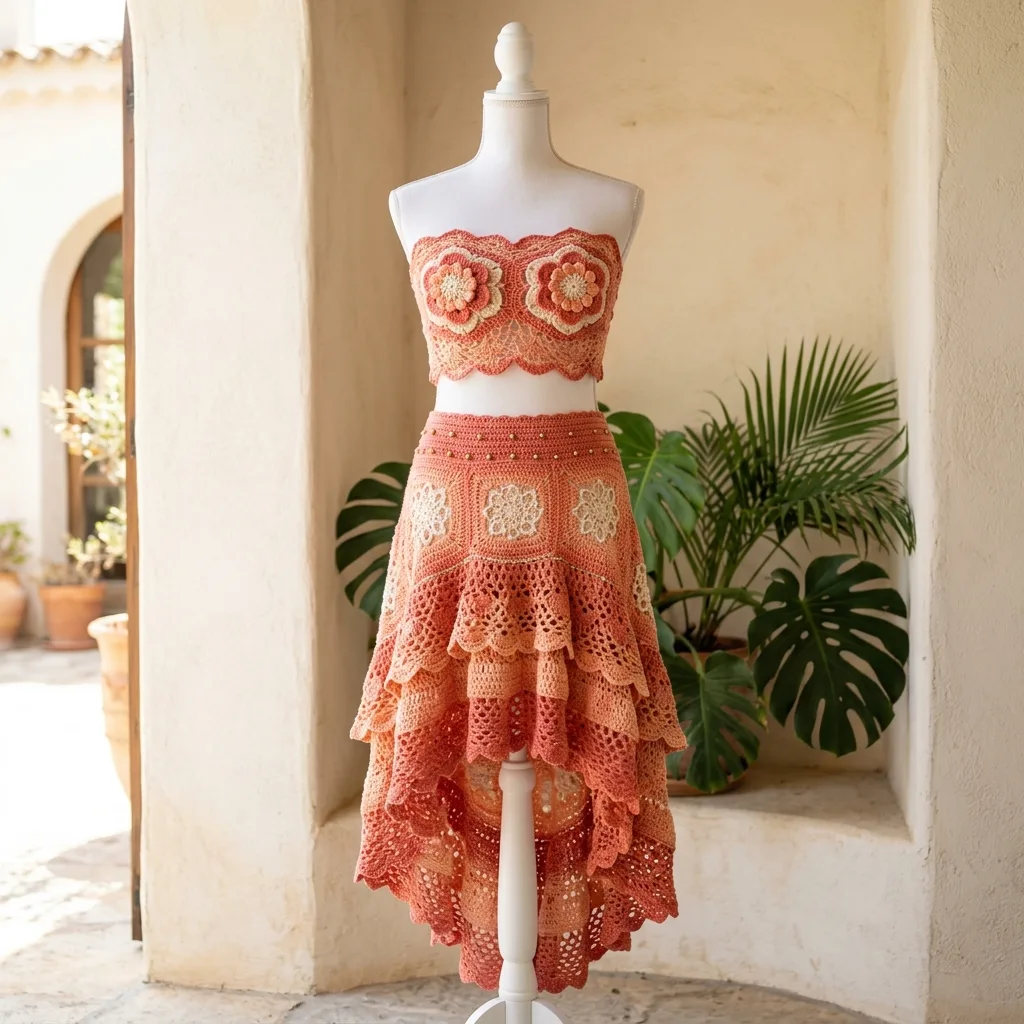
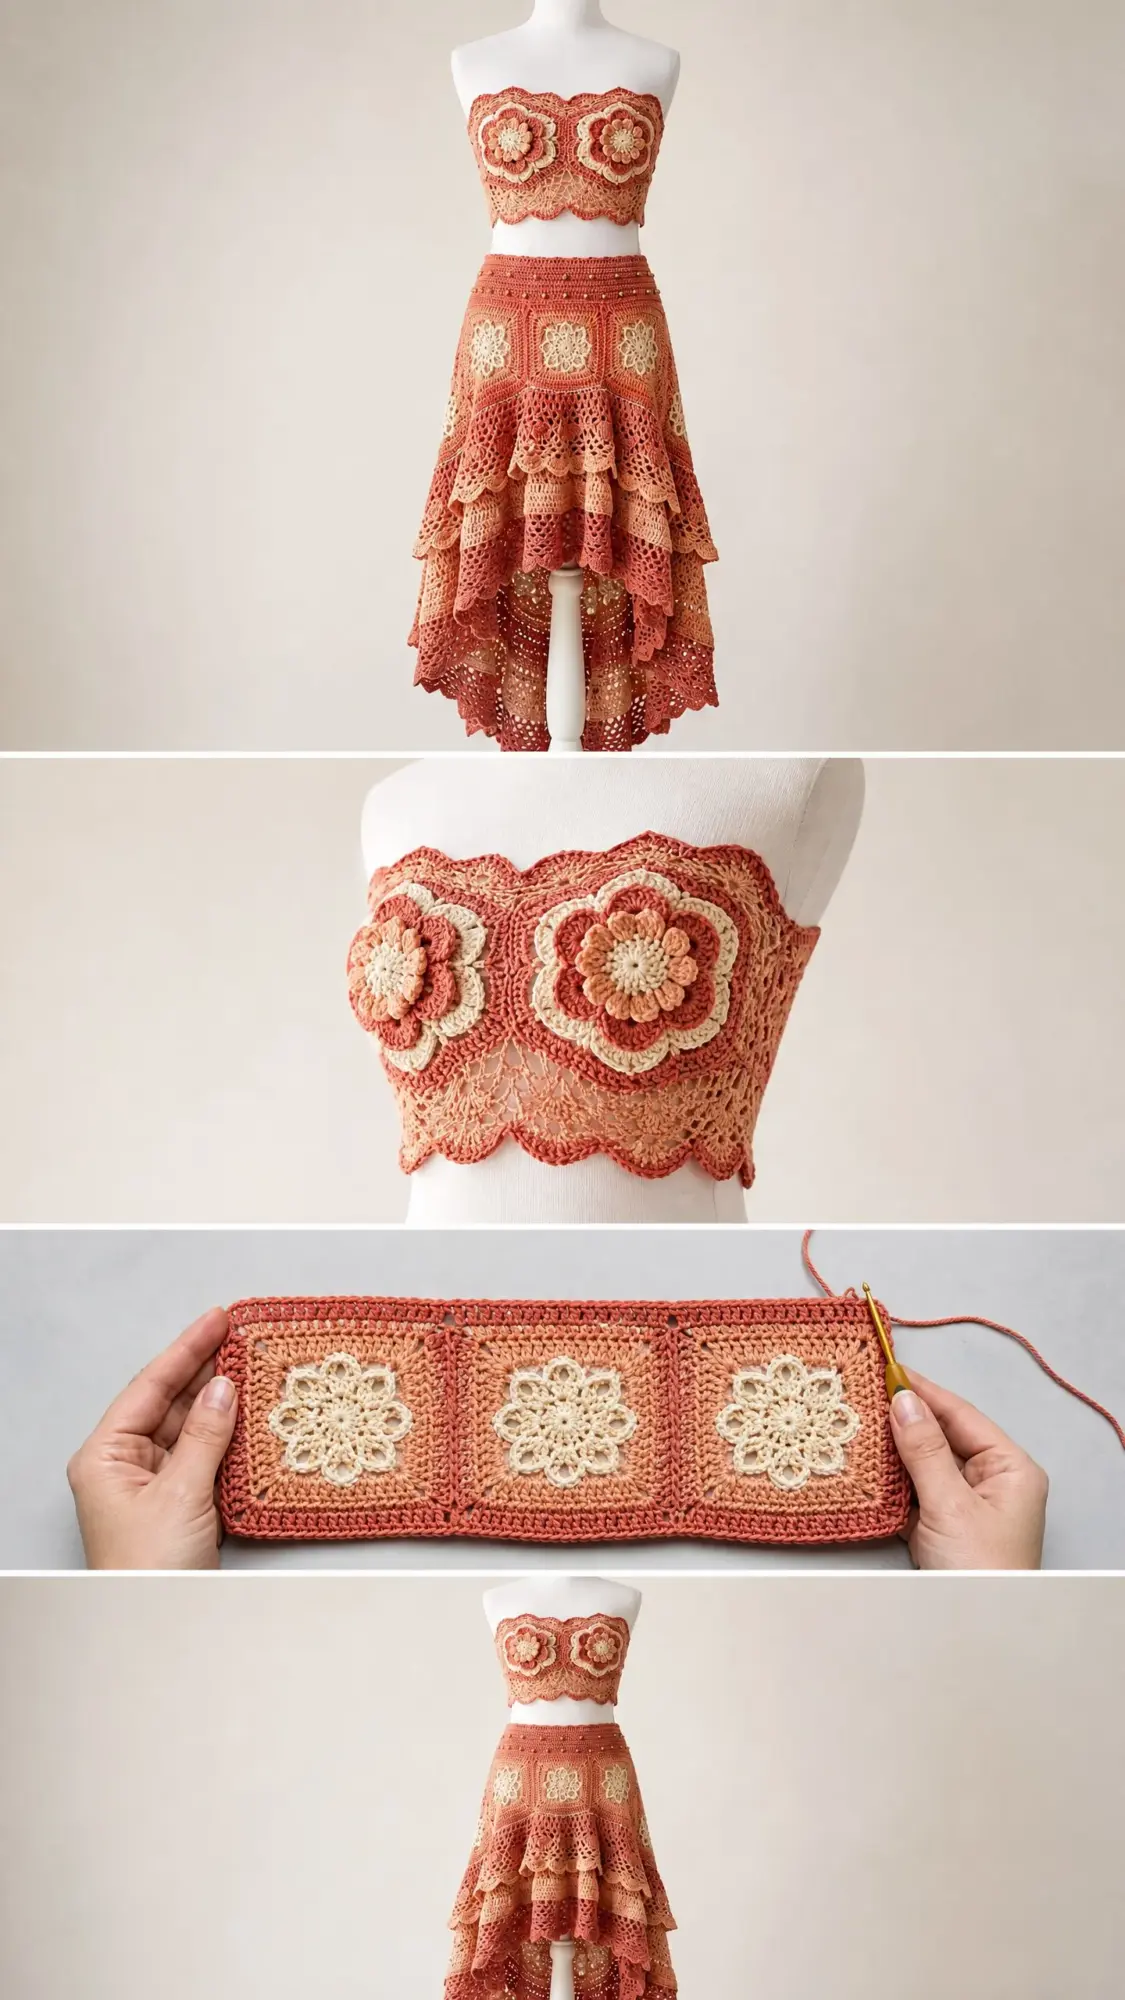
This two-piece set brings together dimensional flower motifs, granny square construction, and cascading lace tiers into one stunning coordinated outfit. The strapless bandeau top features large blooming flowers centered on each cup, while the high-low tiered skirt creates that dramatic silhouette perfect for warm weather adventures. Fair warning: this is not a weekend project. But every stitch is worth it.
About This Crochet Pattern
This boho-chic coordinated set consists of two pieces that work beautifully together or as separates. The bandeau top uses structured flower motifs surrounded by shell lace bands with scalloped edges. The skirt builds from a ribbed waistband down through granny square panels, then cascades into three progressively deeper ruffle tiers.
The high-low silhouette on the skirt creates visual drama. It sits shorter at the front (18 inches from waist to hem) and sweeps longer at the back (30 inches from waist to hem). The whole piece moves through a warm color palette of terracotta, coral, warm peach, and cream accents.
Skill Level: Advanced Intermediate. You should feel comfortable reading lace patterns, joining motifs as you go, working in the round on large circumferences, and managing multiple color changes. If any of those phrases made you nervous, take a breath. Each technique is explained step by step below.
Time Estimate:
Finished Measurements
This pattern is written for US size Small/Medium.
Bandeau Top:
Skirt:
Materials Needed
Yarn:
Recommended Yarn Brands:
Substitution Note: Use any smooth, non-fuzzy sport or light DK weight cotton. Avoid textured, slubbed, or stretchy yarns as they will obscure the lace stitch definition. Always swatch first since cotton yarns vary significantly between brands.
Hooks:
Notions:
Gauge
Using D/3 (3.25 mm) hook:
Using E/4 (3.5 mm) hook:
Gauge matters here. Even one stitch per inch difference will alter the circumference of both pieces significantly. Please swatch and adjust your hook size as needed.
Abbreviations and Stitch Definitions
Let me walk you through every stitch you will encounter in this pattern.
Special Stitches for This Pattern
These techniques appear throughout the set and are essential for achieving the lace texture.
Shell Stitch: Work 5 double crochet (dc) all into the same stitch or space. This creates a fan-shaped cluster emerging from a single point. You will see these throughout the bandeau and skirt ruffle edges.
V-Stitch: Work (dc, ch 2, dc) all into the same stitch or space. This creates an open V-shape used in the lace panels.
Picot: Chain 3, then slip stitch into the first chain made. This forms a small decorative loop at the edge. You will use these for the waistband detail and to attach beads.
Granny Cluster: Yarn over, insert hook into stitch or space, yarn over, pull up loop, yarn over, pull through 2 loops. Repeat this 3 times all into the same space. Then yarn over and pull through all 4 loops on hook. This is the classic 3-dc cluster used in granny squares.
Puff Stitch (for flower center): Yarn over, insert hook, pull up loop to approximately 0.5 inch height. Repeat 5 times all into the same stitch. Then yarn over and pull through all 11 loops on hook. Chain 1 to close. This creates the raised bobble at the flower center.
Extended Single Crochet (esc): Insert hook into stitch, yarn over, pull up loop (2 loops on hook), yarn over, pull through first loop only (still 2 loops on hook), yarn over, pull through both loops. This is slightly taller than regular sc and creates a tidier ribbed texture.
Join-As-You-Go (JAYG): When joining two motifs, replace the ch-2 corner space of the new motif with (ch 1, sl st into the corresponding corner ch-2 space of the adjacent completed motif, ch 1). For side joins, replace the ch-1 space between clusters with sl st into the corresponding ch-1 space of the adjacent motif. This joins motifs invisibly without sewing.
Important Pattern Notes
Before you begin, read through these notes. They will save you confusion later.
1. The bandeau top is worked in two halves (left cup and right cup as large flower motifs) which are then joined at center front and center back with lace bands.
2. The skirt is worked from the waistband downward. The waistband is worked first in rows, then seamed.
3. The granny square motif band is worked as individual squares joined using JAYG, then attached to the waistband lower edge.
4. The ruffle tiers are picked up from the lower edge of the granny square band and worked downward. Short rows within each tier create the high-low effect.
5. Color placement: Terracotta (Color A) is dominant. Peach (Color B) appears in mid-tier ruffles and alternate lace rounds. Cream (Color C) is used only for motif centers and interior lace panels.
6. The waistband beads are attached after blocking by threading onto a beading needle and anchoring through the picot loops. This step is optional but adds beautiful detail.
7. All rounds are joined rounds unless stated otherwise. Always join with a slip stitch to the top of the beginning chain or first stitch as specified.
8. Block all individual motifs before assembly for best results.
Large Flower Motif Instructions
Make 2 for the bandeau top. These measure 5.5 inches (14 cm) point to point when blocked.
Worked in the round. Start with Color C (Cream).
Round 1: MR, ch 3 (counts as first dc), work 11 dc into ring, join to top of beg ch-3. Pull ring closed. (12 dc)
Round 2: Ch 1, sc in same st as join, ch 4, skip 1 st, (sc in next st, ch 4, skip 1 st) 5 times, join to first sc. (6 sc, 6 ch-4 spaces)
Round 3: Sl st into first ch-4 sp, ch 1, (sc, hdc, 3 dc, hdc, sc) into each ch-4 sp around, join to first sc. (6 petals, 42 sts total)
Round 4: Working behind petals of Round 3, sl st around the post of the first Round 2 sc, ch 5, (sl st around post of next Round 2 sc, ch 5) 5 times, join to first sl st. (6 sl sts, 6 ch-5 spaces)
Round 5: Sl st into first ch-5 sp, ch 1, (sc, hdc, 5 dc, hdc, sc) into each ch-5 sp around, join to first sc. Change to Color A (Terracotta) at join. (6 large petals, 54 sts total)
Round 6: Working behind petals of Round 5, with Color A, sl st around post of first Round 4 sl st, ch 6, (sl st around post of next Round 4 sl st, ch 6) 5 times, join to first sl st. (6 sl sts, 6 ch-6 spaces)
Round 7: Sl st into first ch-6 sp, ch 3 (counts as dc), 4 dc in same sp (completing first Shell), ch 2, (5 dc Shell in next ch-6 sp, ch 2) 5 times, join to top of beg ch-3. (6 Shells, 6 ch-2 spaces, 30 dc total)
Round 8: Sl st to center dc of first Shell (3rd dc), ch 1, sc in same st, ch 5, (sc in center dc of next Shell, ch 5) 5 times, join to first sc. (6 sc, 6 ch-5 spaces)
Round 9: Sl st into first ch-5 sp, ch 3 (counts as dc), 2 dc in same sp, ch 2, 3 dc in same sp (corner cluster pair), ch 1, (3 dc in next ch-5 sp, ch 2, 3 dc in same sp, ch 1) 5 times, join to top of beg ch-3. Change to Color B at join. (12 clusters, 36 dc total)
Round 10: Sl st into first ch-2 corner sp, ch 3 (counts as dc), (2 dc, ch 2, 3 dc) in same sp (corner), ch 1, 3 dc in ch-1 sp, ch 1, (3 dc, ch 2, 3 dc) in next ch-2 corner sp, ch 1, 3 dc in ch-1 sp, ch 1, repeat from * 4 more times, join to top of beg ch-3. (24 clusters, 72 dc total)
Fasten off Color B. This completes the Large Flower Motif for the bandeau.
Bandeau Top Construction
Section 1: Cup Motif Preparation
Work 2 Large Flower Motifs as written above through Round 10. Block both motifs to 5.5 inches (14 cm) point to point. Set aside.
Section 2: Bandeau Side and Back Band
This band connects the two cup motifs and creates the structural tube.
Using Color A and D/3 (3.25 mm) hook, ch 181.
Row 1 (WS): Sc in 2nd ch from hook and in each ch across, turn. (180 sc)
Row 2 (RS): Ch 3 (counts as dc), dc in next 2 sts, (ch 1, skip 1 st, dc in next 3 sts) across, turn. (135 dc + 45 ch-1 spaces)
Row 3: Ch 1, sc in first dc, sc in next 2 dc, (sc in ch-1 sp, sc in next 3 dc) across, 2 sc in last st, turn. (181 sc)
Row 4: Ch 3 (counts as dc), (skip 2 sts, Shell of 5 dc in next st, skip 2 sts, dc in next st) 30 times, turn. (30 Shells, 31 dc, 181 sts)
Row 5: Ch 1, sc in first dc, (ch 2, sc in center dc of next Shell, ch 2, sc in next dc) 30 times, turn. (61 sc, 60 ch-2 spaces)
Row 6: Ch 1, sc in first sc, (2 sc in next ch-2 sp, sc in next sc, 2 sc in next ch-2 sp, sc in next sc) 30 times, turn. (181 sc)
Row 7: Ch 3 (counts as dc), dc in each st across, turn. (181 dc)
Row 8: Ch 1, sc in first dc, sc in each dc across. (181 sc)
Do not fasten off. Fold the band so Row 8 faces outward. Join with sl st at both short ends to create center back seam. The band should form a tube approximately 30 inches (76 cm) in circumference and 3.5 inches (9 cm) tall.
Section 3: Attaching Cup Motifs
With RS facing, place the two Large Flower Motifs side by side at the front of the band tube, centering them. Using Color A and a tapestry needle, whip stitch the lower edge of each motif to the top edge (foundation chain row) of the front band section.
Position the motifs symmetrically left and right of center front. The two motifs should meet at center front where the adjacent corner ch-2 spaces will be joined.
Join the two cup motifs at center front by slip stitching through both adjacent corner ch-2 spaces with Color A. Secure and fasten off.
Section 4: Bandeau Upper Edge Scallop
With RS facing, join Color A at center back upper edge.
Round 1: Ch 1, sc evenly around the entire upper edge of the band and the upper outer edges of both cup motifs. Work approximately 1 sc per st along the band top and 1 sc per dc or ch sp along the motif edges. Target: 180 sc total. Adjust by sc2tog or skip sts as needed to reach exactly 180. Join to first sc. (180 sc)
Round 2: Ch 1, sc in each st around, join. (180 sc)
Round 3 (Scallop Edge): Ch 1, (skip 2 sts, Shell of 5 dc in next st, skip 2 sts, sl st in next st) 30 times, join. (30 Shells, 30 sl sts)
Fasten off Color A.
Section 5: Bandeau Lower Edge Scallop
With RS facing, join Color A at center back lower edge (Row 8 of band).
Round 1: Ch 1, sc in each st around lower edge. (180 sc)
Round 2 (Scallop Edge): Ch 1, (skip 2 sts, Shell of 5 dc in next st, skip 2 sts, sl st in next st) 30 times, join. (30 Shells, 30 sl sts)
Fasten off Color A.
Bandeau Checkpoint
Your completed bandeau should measure approximately 6 inches (15 cm) total height at center front and 5 inches (12.5 cm) at center back. Circumference should be 32 to 34 inches (81 to 86 cm). The two cup flowers should sit symmetrically and lie flat.
Skirt Waistband
The waistband is worked flat in ribbing rows, then joined into a tube.
Using Color A and D/3 (3.25 mm) hook, ch 21.
Row 1 (WS): Sc in 2nd ch from hook and in each ch across, turn. (20 sc)
Row 2 (RS): Ch 1, sc in BLO of each st across, turn. (20 sc)
Repeat Row 2 until waistband measures 29 inches (73.5 cm) in length (approximately 144 rows at gauge). This creates the ribbed texture visible at the waist.
Join first and last rows with sl st through both layers to form a tube. The waistband tube should measure 29 inches (73.5 cm) in circumference and 2.5 inches (6.5 cm) tall.
Waistband Picot Edging (Upper Edge)
With RS facing, join Color A to upper edge of waistband.
Round 1: Ch 1, work 1 sc into the end of each row around. Approximately 144 sc. Adjust to nearest multiple of 3 if needed. Target 144 sc. Join. (144 sc)
Round 2: Ch 1, (sc in next 2 sts, Picot, sc in same st as Picot just worked) 48 times, join. (144 sc + 48 Picots)
Fasten off. Attach seed beads to each Picot loop after blocking.
Waistband Lower Edge Preparation
With RS facing, join Color A to lower edge of waistband. Work 1 sc into the end of each row around. (144 sc) Join. This is the attachment round for the granny square band.
Skirt Granny Square Panel
Each granny square is worked from the center outward. The central flower uses Color C for the center, transitioning to Color A for outer rounds.
Make 6 squares total, joining them as you go into a horizontal strip.
Granny Square for Skirt
Using Color C and D/3 (3.25 mm) hook.
Rounds 1 through 8: Work exactly as written in the Large Flower Motif section above.
Round 9 (Color A, revised for square): Sl st to center dc of first Shell, ch 1, sc in same st, ch 3, sc in center dc of next Shell, ch 5, sc in center dc of next Shell, ch 3, sc in center dc of next Shell, ch 5, sc in center dc of next Shell, ch 3, sc in center dc of next Shell, ch 5, join to first sc. (6 sc, 3 ch-5 spaces as corners, 3 ch-3 spaces as sides)
Square Frame Round 1 (Color B): Join to sc1. (3 dc, ch 3, 3 dc) in sc1 (corner 1). 3 dc in Shell1 center. 3 dc in sc2. 3 dc in Shell2 center. (3 dc, ch 3, 3 dc) in sc3 (corner 2). 3 dc in Shell3 center. 3 dc in sc4. 3 dc in Shell4 center. (3 dc, ch 3, 3 dc) in sc5 (corner 3). 3 dc in Shell5 center. 3 dc in sc6. 3 dc in Shell6 center. Join to top of beg ch-3.
Continue with additional granny rounds as needed to reach 6 inches (15 cm) per side.
Join the 6 squares using the JAYG method as you complete each one. Attach the completed strip to the waistband lower edge using slip stitches.
Ruffle Tiers Construction
The three ruffle tiers are picked up from the lower edge of the granny square band and worked downward using the E/4 (3.5 mm) hook. Each tier is progressively deeper.
To create the high-low effect, work short rows within each tier round. The front sections are shorter than the back sections. Place markers at center front and center back to guide your short row turning points.
Work Shell stitches along each tier edge for the scalloped finish visible in the design. Alternate between Color A and Color B for visual depth between tiers.
Finishing and Blocking
Block all pieces before final assembly. For cotton yarn, wet blocking works best. Soak pieces in lukewarm water for 15 to 20 minutes, gently squeeze out excess water (do not wring), and pin to blocking mats following the finished measurements.
After blocking, attach the seed beads to the waistband picot loops using a beading needle and thread. Space them evenly around the waistband, approximately one bead per picot.
Weave in all ends securely on the wrong side of the work.
Care Instructions
Machine wash on delicate cycle with cold water, or hand wash. Lay flat to dry and reshape while damp. Cotton will relax slightly with washing, so blocking after each wash is recommended for best results.
I hope you love making this Coral Sunset Mandala set as much as I loved designing it. Every shell stitch and flower petal brings you closer to a truly stunning piece. The high-low skirt creates such beautiful movement, and those dimensional flowers on the bandeau are guaranteed conversation starters.
If you have any questions as you work through this crochet pattern, do not hesitate to reach out. Sometimes a stitch that looks complicated on paper clicks into place once you have yarn on your hook. Trust the process and take your time with the motif joins.
This would make such a lovely addition to your Pinterest boards for future inspiration or your next warm-weather project planning session. Save it now so you can find it when you are ready to dive in. And please, leave a comment below if you make this set. I would absolutely love to see your color choices and finished pieces!
You Might Also Like
- Sky Blue Dragon Amigurumi Plush Free Crochet Pattern
- Ocean Teal Woven Purse on Linen Free Pattern
- Lavender Sunflower Granny Square Tote Free Crochet Pattern
- Sage Green Granny Square Hobo Bag Free Crochet Pattern