Ocean Breeze Granny Square Tote Free Crochet Pattern
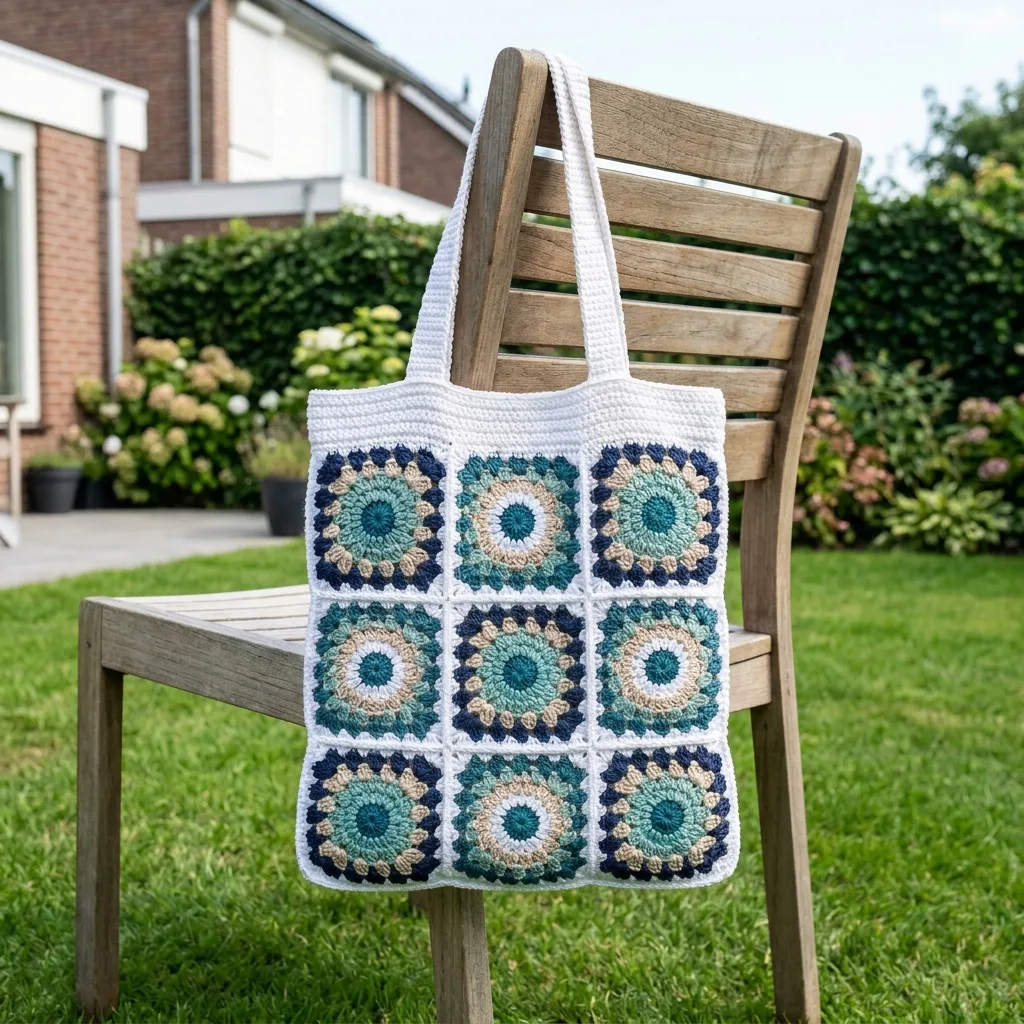
I pulled this one out of my project notebook last spring. It had been sitting there for ages, just a rough sketch and some color swatches I’d taped to the page years ago. I called it “Ocean Breeze” because I’d originally dreamed it up during a beach vacation, watching the way the water shifted between deep navy and bright seafoam as the waves rolled in.
Finally making it real felt like reuniting with an old friend. The sunburst centers, the crisp white grid holding everything together, the coastal blues that remind me of tide pools and sea glass. This tote has become one of my absolute favorite makes, and I think you’re going to love it too.
Whether you’re headed to the farmer’s market, the beach, or just need something beautiful to carry your latest library haul, this bag delivers. It’s roomy, structured, and endlessly customizable. Let me walk you through every step.
About This Ocean Breeze Granny Square Tote Pattern
This gorgeous tote brings together eighteen sunburst granny squares in a palette of coastal blues, sandy cream, and crisp white. The construction is straightforward once you understand the rhythm. You’ll make individual squares, join them into panels, add a sturdy top band, and finish with double-thick handles that can carry a serious load.
The finished bag measures approximately 12.5 inches wide by 14 inches tall (32 x 35.5 cm), with a comfortable 10-inch handle drop (25 cm). That’s perfect for carrying over your shoulder or in the crook of your arm.
I’d rate this pattern as easy to intermediate. If you can work basic granny clusters and join squares, you’ve got this. The sunburst center adds a lovely twist to the traditional granny square, but I’ll walk you through every round.
Materials You’ll Need
Before you start, gather these supplies. Having everything ready makes the process so much smoother.
Yarn
You’ll want a firm worsted or Aran weight cotton yarn. Cotton keeps the tote structured and makes those sunburst centers really pop. Here are some yarns that work beautifully:
Color quantities:
Tools
Gauge
Getting your gauge right matters here because your bag’s width depends on it. One finished square should measure 4 inches (10 cm) square. For the band, 14 half double crochet stitches by 11 rows should equal 4 inches (10 cm).
I recommend making one test square before committing to all eighteen. If your square is too big, try going down a hook size. Too small? Go up a size. Match the square size above all else.
Abbreviations and Stitches Used
Let me break down every stitch and term you’ll encounter. This pattern uses US crochet terminology.
For UK crocheters: US single crochet (sc) equals UK double crochet (dc). US half double crochet (hdc) equals UK half treble (htr). US double crochet (dc) equals UK treble (tr).
Special Stitches
3-dc group (granny cluster): This is simply 3 double crochet stitches worked into the same space or stitch. It’s the building block of granny squares.
Corner: Work (3 dc, ch 2, 3 dc) all into the same space. This creates the corner increase that shapes your square.
Pattern note: The chain 3 (ch 3) at the beginning of rounds counts as the first double crochet throughout this pattern.
How the Tote Comes Together
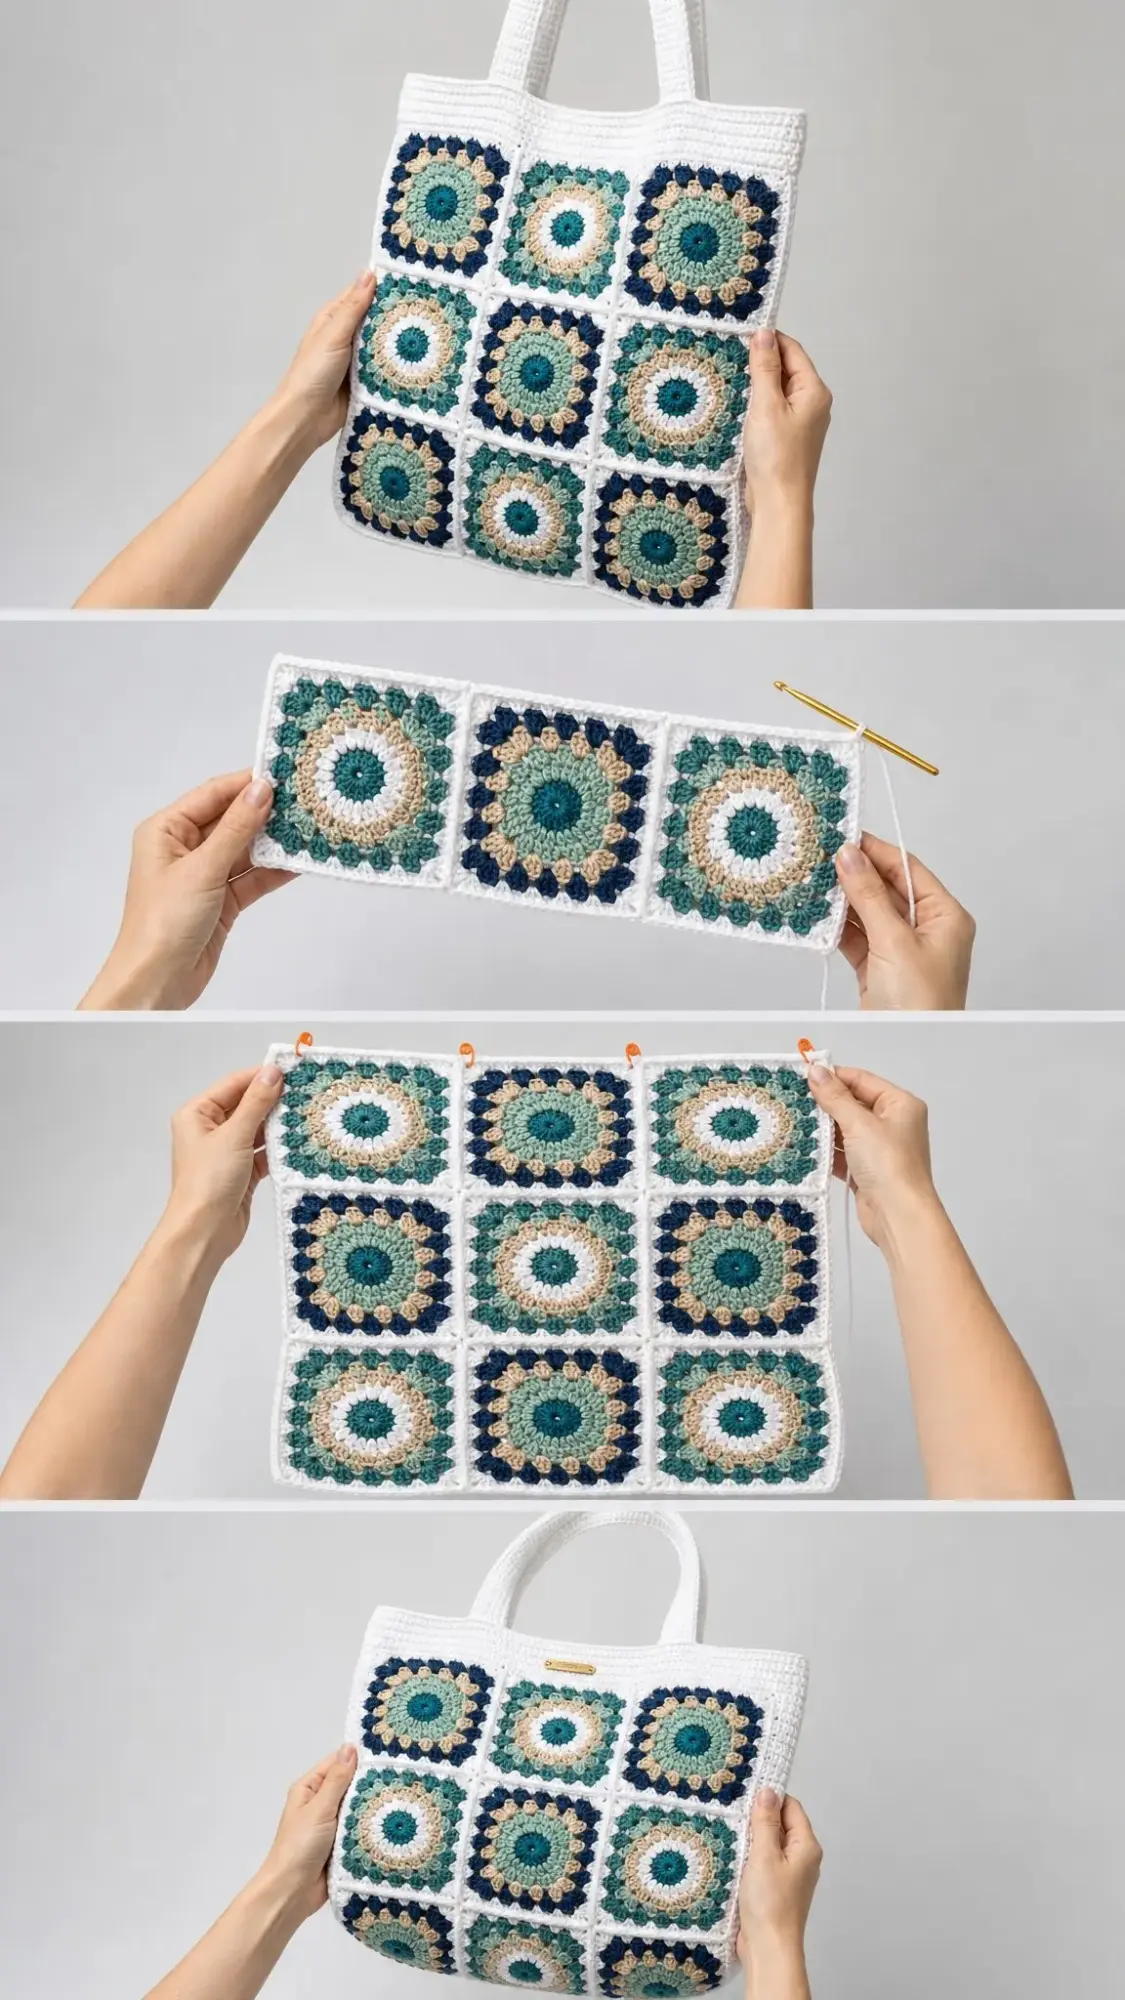
Here’s the big picture before we dive into details. The tote is made from 18 sunburst squares, arranged as 9 for the front panel and 9 for the back panel (3 squares wide by 3 squares tall). You’ll seam these panels together, add a white band around the top opening, and attach two sturdy handles.
Each square follows the same color sequence: teal center → sand or seafoam burst → navy corners → white border. The magic comes from varying those two inner colors (sand versus seafoam) from square to square. This creates that beautiful ocean-like effect where some squares feel bright and others feel deep.
I suggest making about half your squares with sand as the dominant inner color and half with seafoam forward. Keep navy and white constant across all squares for a clean, cohesive grid.
The Sunburst Square Pattern
Make 18 squares total. Work each square through five rounds, then block to a true 4-inch square before joining.
Round 1 (Teal)
Create a magic ring. Chain 3 (this counts as your first dc), then work 11 dc into the ring. Join with a slip stitch to the top of the chain 3. Pull the ring closed tightly.
Stitch count: 12 dc
Round 2 (Sand or Seafoam)
Join your chosen color in any stitch. Chain 3, work 1 dc in the same stitch (so you have 2 dc in that first stitch). Then work 2 dc in each stitch around. Join to the top of the chain 3.
Stitch count: 24 dc
Round 3 (Second Inner Color)
Join your second inner color in any stitch. Chain 1, single crochet in the same stitch. Chain 3, skip the next stitch, single crochet in the next stitch. Repeat from * around the entire round, ending with chain 3, skip the last stitch. Join to the first single crochet.
Stitch count: 12 sc and 12 chain-3 loops
This round creates those beautiful petal-like loops that give the sunburst its character.
Round 4 (Navy)
Join navy in any chain-3 loop. Chain 3, then work (2 dc, ch 2, 3 dc) in the same loop to create your first corner.
Work 3 dc in each of the next 2 loops. In the following loop, work (3 dc, ch 2, 3 dc) for the next corner.
Repeat from * two more times (creating corners 2, 3, and 4). Work 3 dc in each of the last 2 loops. Join to the top of the chain 3.
Stitch count: 48 dc and 4 corner spaces
Round 5 (White)
Join white in any corner space. Chain 3, then work (2 dc, ch 2, 3 dc) in the same space for your first corner.
Work 3 dc in each of the next 3 gaps between clusters. In the next corner space, work (3 dc, ch 2, 3 dc).
Repeat from * two more times. Work 3 dc in each of the last 3 gaps. Join to the top of the chain 3.
Fasten off, leaving a long tail for joining later.
Stitch count: 60 dc and 4 corner spaces
Blocking Your Squares
This step is crucial. Wet-block or steam-block all 18 squares to exactly 4 inches (10 cm) before joining. Even, consistent squares make a tote that hangs straight and seams together without any puckering or pulling.
I like to pin my squares to a blocking mat, spritz them with water, and let them dry completely. It takes a bit of patience, but the results are worth it.
Color Placement Tips
Here’s where you can really make this tote your own. Swap the two inner colors (sand versus seafoam) from square to square so the grid feels like the sea. Some squares will be bright and warm, others deep and cool, while the consistent navy and white hold everything together visually.
I recommend laying out all 18 squares before you start joining, arranging them until you’re happy with the distribution. Step back and squint at them. Move squares around until the overall effect feels balanced.
Assembly Instructions
Now for the satisfying part: bringing your squares together into a finished tote.
Step 1: Lay Out Your Squares
Arrange 9 squares as a 3 x 3 grid for the front panel and 9 squares for the back panel. Mix your sand-forward and seafoam-forward squares for visual interest.
Step 2: Seam the Squares
Using white yarn, join your squares together using either a whip stitch or single crochet join. Work through the back loops only, corner to corner.
First, join each row of three squares horizontally. Then join the three rows together vertically. Repeat for both panels.
Result: Two 3 x 3 panels
Step 3: Close the Bag
Hold your two panels with wrong sides together. Using white yarn, seam up the left side, across the bottom, and up the right side.
Turn the bag right side out.
Top Band
The band creates a clean, structured finish around the opening and provides a sturdy base for attaching the handles. Work this in the round.
Round 1 (White)
Join white at a top corner. Work single crochet evenly around the entire opening. Aim for about 48 sc across the front and 48 sc across the back. Join.
Stitch count: 96 sc total
Helpful tip: Work this first round at a relaxed tension so the top doesn’t pull in and pucker. A few more or fewer stitches is fine as long as your front and back match.
Rounds 2 through 6 (White)
Chain 1, then hdc in each stitch around. Join.
Repeat for a total of 5 rounds of hdc.
Fasten off after Round 6.
Stitch count: 96 hdc each round
Handles
These double-thick straps are designed to carry weight comfortably. You’ll make two identical handles, then sew them firmly to the inside of the band.
Make 2 Handles
Row 1 (White): Chain 91. Work hdc in the 2nd chain from the hook and in each chain across.
Stitch count: 90 hdc
Rows 2 through 6 (White): Chain 1, turn. Work hdc in each stitch across.
Stitch count: 90 hdc per row
Fold and Join: Fold the strip in half lengthwise. Single crochet the long edges together to create a sturdy double-thick strap.
Finished length: approximately 22 inches (56 cm)
Stitch count for joining: 90 sc
Attaching the Handles
Pin each handle to the inside of the top band. Position the ends about 4 inches (10 cm) apart, centered over the outer squares.
Sew down firmly using white yarn, reinforcing each end with extra stitches for durability. These handles will carry weight, so don’t skimp on the stitching here.
Repeat on the back panel so both handles mirror each other.
Pro tip: Try the tote on before sewing the second handle. Slip the first strap over your shoulder to check whether you’re happy with the handle drop, then match the second handle to it exactly.
Finishing Your Ocean Breeze Tote
Almost there! Take time with these final steps for a polished result.
Weave in all ends on the wrong side of your work. I know, I know. Nobody’s favorite task. But those loose ends will work themselves free if you skip this step.
Give your finished tote a final blocking. Steam-block or wet-block the completed bag, gently squaring the corners and smoothing the band so it stands tall and crisp.
Care Instructions
Hand wash your tote in cool water, reshape while damp, and dry flat. Cotton softens beautifully with use, developing a lovely drape over time. Skip the dryer to keep the tote crisp and square.
Customization Ideas
Want to make this tote uniquely yours? Here are some modifications to try:
Make it bigger: Add a 4th column or row of squares for a larger tote. You could also widen the band by continuing to Round 10 instead of stopping at Round 6.
Add depth: Seam a single column of 3 squares between the front and back panels on each side to create a boxed gusset. This gives the bag more structure and capacity.
Longer handles for shoulder carry: Add approximately 4 chains per extra inch you want to the handle starting chain.
Sturdier base: Line the bottom with fabric, or add a row of single crochet in back loops only along the base fold for extra stability.
Troubleshooting Common Issues
Squares aren’t lying flat: This usually means your tension is too tight. Try going up a hook size, or consciously relax your grip while crocheting.
Squares are different sizes: Block, block, block! Even small variations become noticeable when squares are joined. Blocking to exactly 4 inches solves most consistency issues.
Top band is pulling in: Work the first sc round at a looser tension. You want the band to sit naturally on top of the squares, not cinch them together.
Handles feel flimsy: Make sure you’re using a firm cotton yarn and that your double-thick straps are sewn together tightly. Reinforce the attachment points with extra stitching.
Why Cotton Yarn Works Best
I specified cotton for this project intentionally. Cotton yarn has several qualities that make it perfect for a structured tote:
It holds its shape. Unlike wool or acrylic, cotton doesn’t stretch much under weight. Your tote will maintain its structure even when loaded with heavy items.
It blocks beautifully. Cotton takes to blocking like a dream, allowing you to square up your motifs precisely.
It’s washable. A tote gets dirty. Cotton can be washed easily and comes out looking fresh.
It showcases texture. The sunburst pattern has lovely textural details that show up crisply in cotton yarn.
Final Thoughts on the Ocean Breeze Granny Square Tote Pattern
This tote has become my go-to summer bag. I reach for it every time I head to the farmer’s market or the library. There’s something so satisfying about carrying a bag you made yourself, especially one with this much personality.
The sunburst granny squares are meditative to make once you get the rhythm down. I found myself crocheting them during movies, on car trips, waiting in line. Before I knew it, all eighteen were done and I was ready to assemble.
I hope this Ocean Breeze Granny Square Tote crochet pattern brings you as much joy to make as it brought me. Take your time with the blocking, be patient with the handle placement, and don’t be afraid to customize the colors to match your own coastal dreams.
Thank you so much for choosing this pattern. I genuinely appreciate you being here. If you make this tote, I would absolutely love to see it! Tag me on Instagram or share a photo in my Facebook group. Nothing makes my day like seeing your finished projects.
If this pattern caught your eye, go ahead and pin it to your Pinterest boards so you can find it later when you’re ready to cast on. And please drop a comment below if you give it a try. I’d love to hear how it turns out for you, what colors you chose, and where your Ocean Breeze tote ends up traveling. Happy hooking!
You Might Also Like
- Ocean Blue Ombre Crochet Platform Wedge Sandals Pattern
- Pastel Rainbow Granny Square Purse Free Crochet Pattern
- Lavender Rose Granny Square Tote Free Crochet Pattern
- Warm Autumn Terracotta Shoulder Bag Free Crochet Pattern