Lavender Garden Bobble Pullover Free Crochet Pattern
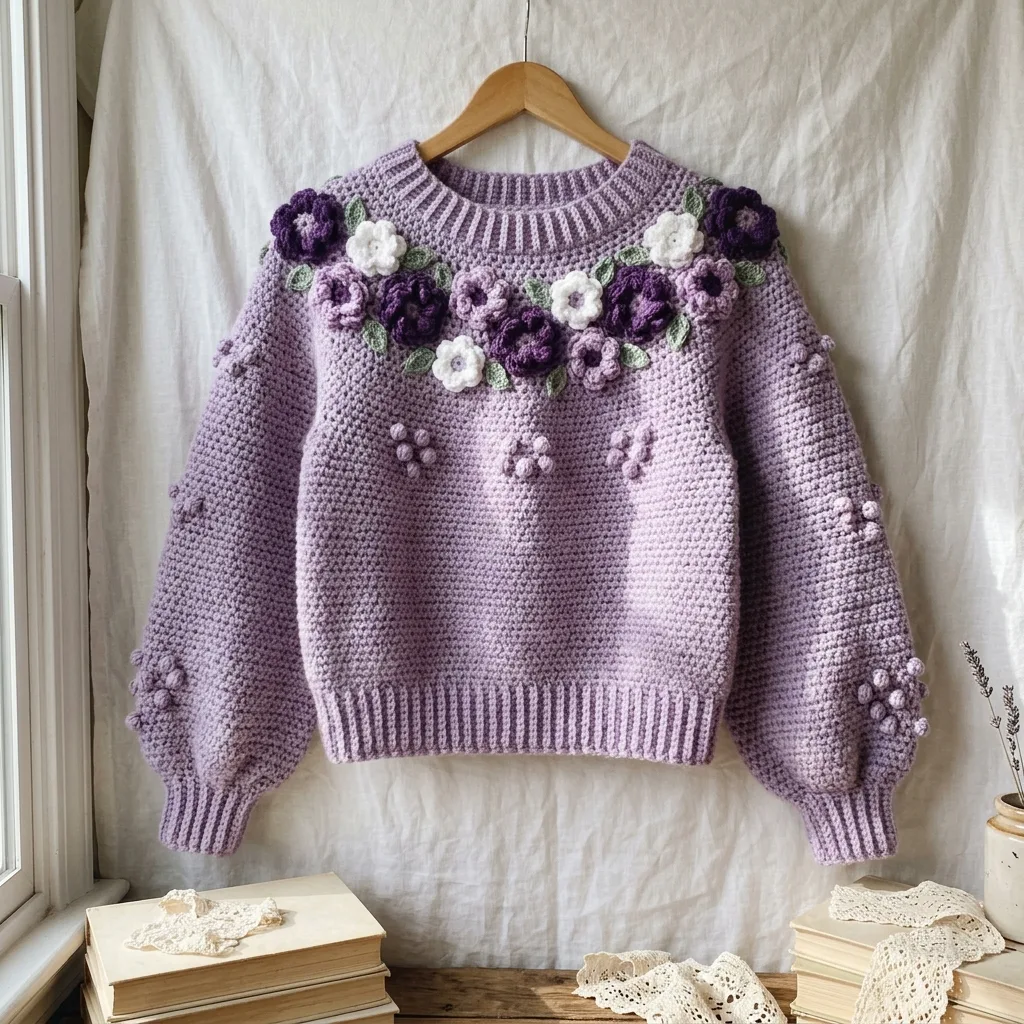
I’ve been looking for the perfect statement sweater pattern for ages, and this one absolutely stole my heart the moment I saw it. This Lavender Garden Bobble Pullover combines everything I love about crochet garments: a relaxed, cropped silhouette, those satisfying bobble stitches scattered across the body, and a stunning dimensional floral garland that makes the neckline look like a blooming garden. If you’ve been searching for a sweater project that feels special without being impossibly complicated, this is my top pick.
About This Lavender Garden Bobble Pullover Pattern
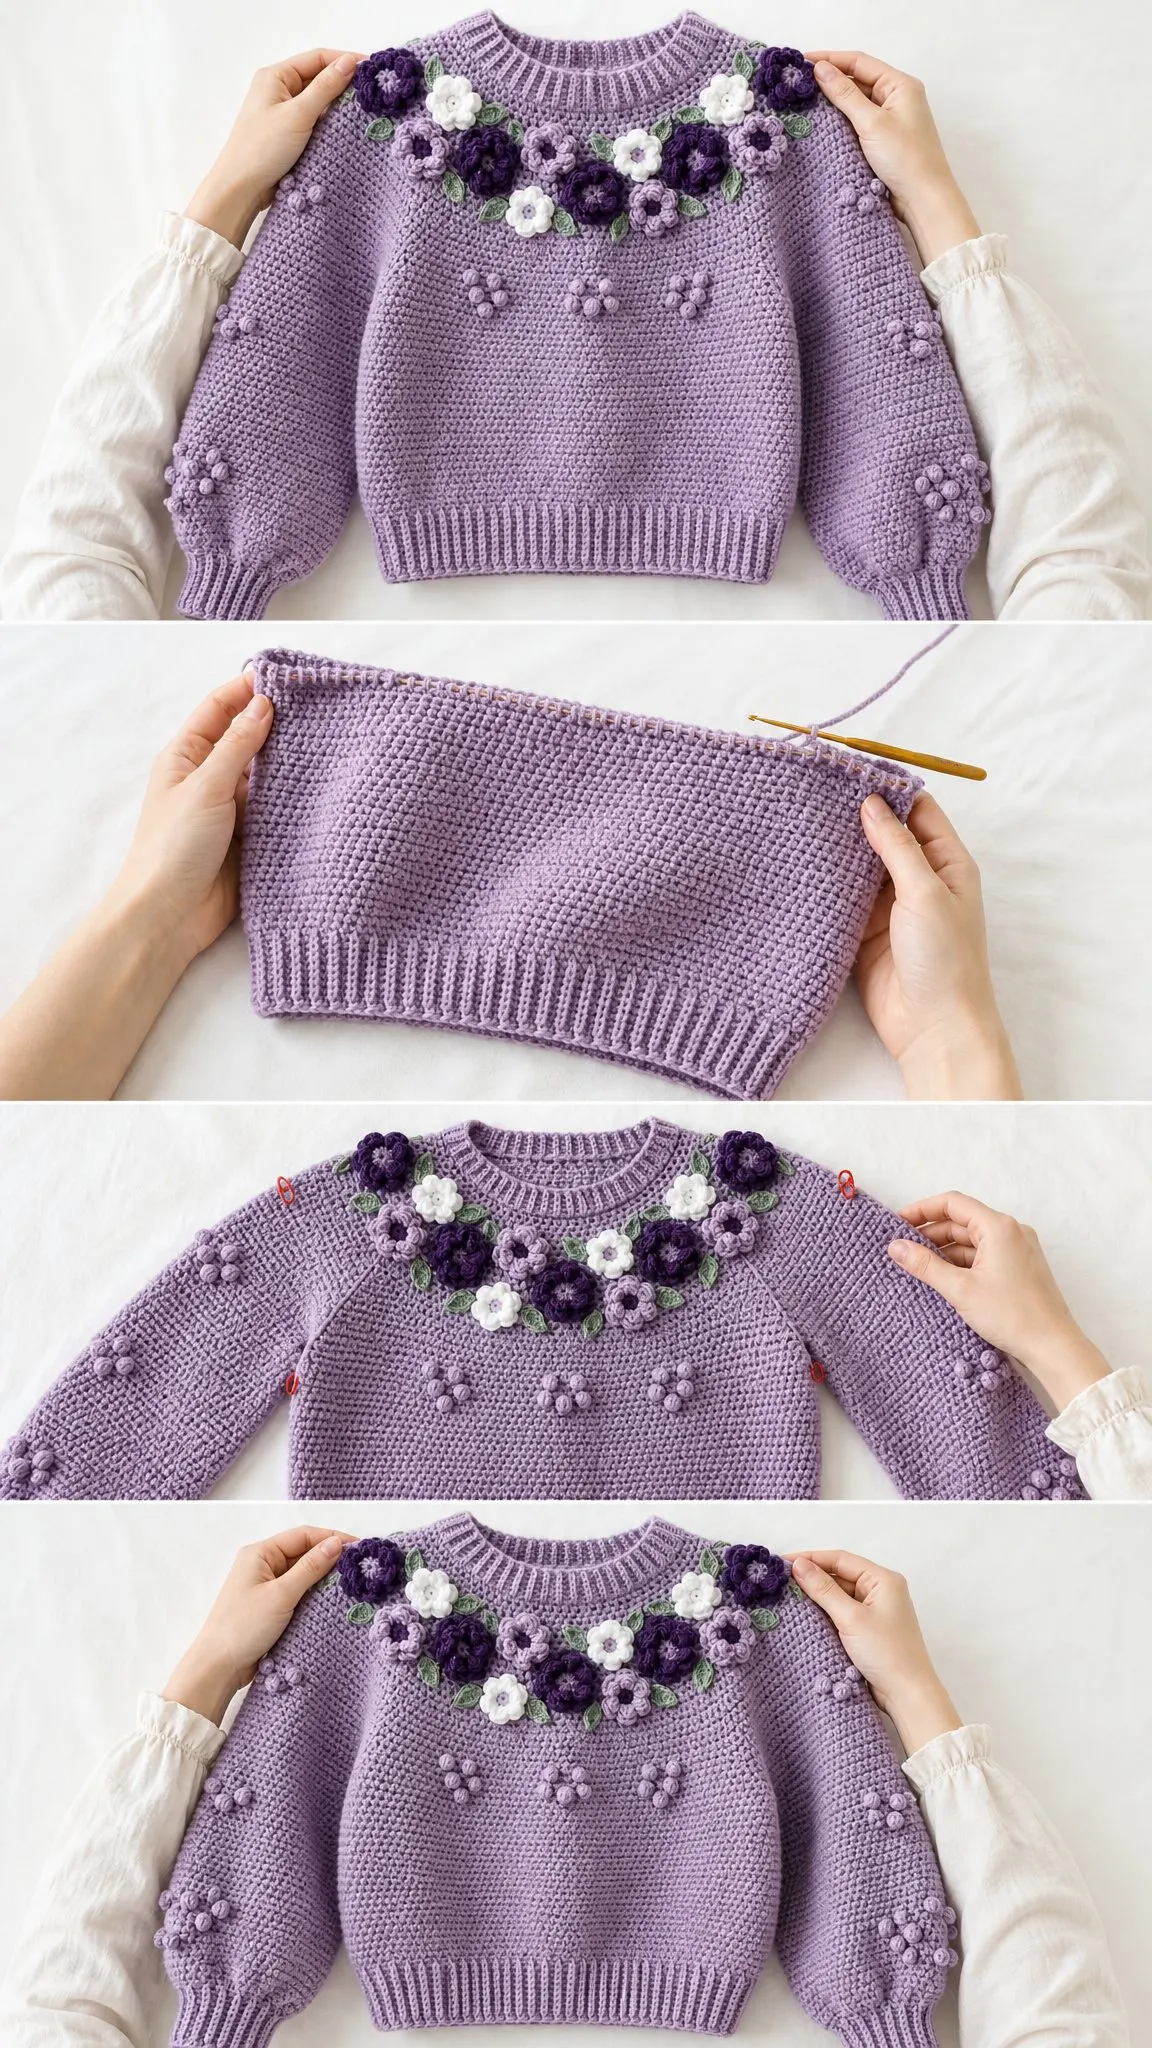
This cropped, relaxed pullover features a soft lavender body, rounded balloon sleeves, ribbed trims at the hem and cuffs, scattered bobble flower texture throughout, and a gorgeous dimensional garden of crocheted flowers and leaves arranged around the neckline. The construction is straightforward once you understand the pieces. You’ll make a front panel, a back panel, and two flat sleeves. After seaming everything together, you’ll create the floral garland separately and sew it on for that raised garden effect.
The finished sweater has a 38 3/4 inch (98.5 cm) chest measurement with 4 to 6 inches of positive ease built in. This means the pattern works best for a body chest measurement of 33 to 35 inches (84 to 89 cm). The body length from shoulder to hem measures 18 inches (45.5 cm), giving you that trendy cropped look without being too short.
Skill Level: This is an intermediate pattern. You should be comfortable with garment seaming, working into ribbing row ends, reading stitch positions, making bobbles, creating dimensional motifs, and neat finishing. If you’ve made a few garments before, you’ll find this very manageable.
Time Estimate: Plan for 18 to 24 hours of crochet time from start to finish.
Materials You’ll Need
Gathering your supplies before starting makes the whole process smoother. Here’s everything this crochet pattern calls for:
Yarn:
Hooks:
Notions:
Yarn Suggestions: Choose a smooth, soft worsted yarn with enough bounce for bobbles and ribbing. Good options include Lion Brand Wool-Ease, Paintbox Yarns Simply Aran, or Knit Picks Brava Worsted. When substituting yarn, match the gauge and choose something that blocks neatly without becoming limp.
Gauge
Getting gauge right matters a lot for garments. You want the pieces to fit together properly and the finished sweater to match the intended measurements.
Main fabric gauge: 14 half double crochet (hdc) stitches by 12 rows equals 4 inches (10 cm) in blocked fabric using the larger hook.
Ribbing gauge: 14 rib rows equals 4 inches (10 cm) unstretched.
Please swatch, block, and match gauge before starting. I know it feels tedious, but for a project this involved, you’ll be so glad you took the time.
Abbreviations Used in This Pattern
Let me walk you through every abbreviation you’ll encounter. Even if you’re familiar with these, a quick refresher never hurts.
UK Crocheters: US single crochet equals UK double crochet. US half double crochet equals UK half treble.
Special Stitches
These three techniques appear throughout the pattern. Take a moment to understand each one before diving in.
Ribbed Single Crochet BLO
This creates that stretchy, knit-look ribbing for the hem and cuffs. Insert your hook through the back loop only, yarn over, pull up a loop, yarn over, pull through both loops. Work every rib row this way.
5-HDC Bobble
Bobbles add that lovely scattered flower texture across the body and sleeves. In the indicated stitch, work: [yarn over, insert hook, pull up a loop, yarn over, pull through 2 loops] 5 times in the same stitch. You’ll have 6 loops on your hook. Yarn over and pull through all 6 loops at once. Chain 1 to close the bobble. This closing chain does not count as a stitch, so skip it on the next row.
Invisible Join
This gives your rounds a seamless finish. After your final round, cut the yarn and pull the tail through your last loop. Thread your tapestry needle under both loops of the first stitch, then back down through the last stitch. Tighten gently to mimic a regular stitch.
Pattern Notes Before You Begin
A few important things to keep in mind as you work:
Chain 1 to turn on both hdc rows and sc rows. Turning chains do not count as stitches in this pattern. Keep your first and last stitch firm to make seaming cleaner later.
Bobbles are worked on right side rows and should be pushed to the right side of the fabric. Don’t worry if they pop to the wrong side while you’re working. Just give them a gentle push through to the front.
The motif placement around the neckline is intentionally organic and garden-like. Use the placement map provided, but don’t stress about making everything perfectly symmetrical.
For Left-Handed Crocheters: Work the written instructions as stated. Your floral placement will mirror from left to right, which is perfectly fine. When sewing the garland, pin all flowers first, then balance the arrangement visually before stitching anything down.
Body Panels
Make one front panel and one back panel. Use the larger hook (5 mm) for main fabric and the smaller hook (4 mm) for ribbing.
Hem Rib (Work for Both Panels)
Chain 12.
Row 1: Single crochet in 2nd chain from hook and each chain across. (11 sc)
Rows 2 through 68: Chain 1, turn, sc BLO across. (11 sc)
Rotate your work to work along the long edge. Chain 1, then work 68 hdc evenly across the 68 rib row ends. (68 hdc)
Checkpoint: Your hem should measure about 19 1/2 inches (49.5 cm) long and 2 inches (5 cm) tall before the main body rows.
Front Panel Instructions
Rows 1 through 15: Chain 1, turn, hdc across. (68 hdc)
Row 16: Hdc with bobbles at stitches 18, 22, 46, and 50. (68 sts)
Rows 17 through 19: Hdc across. (68 hdc)
Row 20: Hdc with bobbles at stitches 20, 34, and 48. (68 sts)
Rows 21 through 22: Hdc across. (68 hdc)
Row 23: Hdc with bobbles at stitches 24, 30, 38, and 44. (68 sts)
Rows 24 through 39: Hdc across. (68 hdc)
Row 40: Hdc 22 stitches, leave center 24 stitches unworked, join new yarn and hdc the last 22 stitches. (22 + 22)
Rows 41 through 48: Work each shoulder separately in hdc. (22 each)
Fasten off. Your front main body height from top of ribbing should be 16 inches (40.5 cm).
Back Panel Instructions
Rows 1 through 17: Chain 1, turn, hdc across. (68 hdc)
Row 18: Hdc with bobbles at stitches 21, 26, 42, and 47. (68 sts)
Rows 19 through 21: Hdc across. (68 hdc)
Row 22: Hdc with bobbles at stitches 19, 34, and 49. (68 sts)
Rows 23 through 44: Hdc across. (68 hdc)
Row 45: Hdc 22 stitches, leave center 24 stitches unworked, join new yarn and hdc the last 22 stitches. (22 + 22)
Rows 46 through 48: Work each shoulder separately in hdc. (22 each)
Fasten off.
Sleeves
Make two identical sleeves. Each sleeve is worked flat from cuff to upper arm, then seamed.
Cuff Rib
Chain 11.
Row 1: Single crochet in 2nd chain from hook and each chain across. (10 sc)
Rows 2 through 26: Chain 1, turn, sc BLO across. (10 sc)
Rotate to work along the long edge. Chain 1, then work 38 hdc evenly across row ends by placing 1 hdc in each end and 12 extra hdc evenly spaced. (38 hdc)
Sleeve Body Instructions
Rows 1 through 3: Chain 1, turn, hdc across. (38)
Row 4: 2 hdc in first stitch, hdc across to last stitch, 2 hdc in last stitch. (40)
Rows 5 through 7: Hdc across. (40)
Row 8: Increase at first and last stitch. (42)
Rows 9 through 11: Hdc across. On Row 10, place bobbles at stitches 12 and 29. (42)
Row 12: Increase at first and last stitch. (44)
Rows 13 through 15: Hdc across. (44)
Row 16: Increase at first and last stitch, with bobbles at stitches 14 and 33. (46)
Rows 17 through 19: Hdc across. (46)
Row 20: Increase at first and last stitch. (48)
Rows 21 through 23: Hdc across. On Row 22, place bobbles at stitches 18 and 31. (48)
Row 24: Increase at first and last stitch. (50)
Rows 25 through 27: Hdc across. (50)
Row 28: Increase at first and last stitch, with bobbles at stitches 16, 25, and 34. (52)
Rows 29 through 31: Hdc across. (52)
Row 32: Increase at first and last stitch. (54)
Rows 33 through 35: Hdc across. (54)
Row 36: Increase at first and last stitch. (56)
Rows 37 through 42: Hdc across. (56)
Checkpoint: Each sleeve should measure about 16 inches (40.5 cm) from cuff edge to top. The top edge should measure about 16 inches (40.5 cm) wide before seaming.
Seaming and Neckband
This is where your sweater comes together. Take your time with the seaming for professional results.
Join Shoulders
With right sides together, seam each front shoulder to the matching back shoulder. Each shoulder seam joins 22 stitches to 22 stitches. Leave the center front and back neck openings unseamed.
Set Sleeves
Mark 8 inches (20.5 cm) down from each shoulder seam on both front and back. Center the top of each sleeve at the shoulder seam and pin the 56 stitch top edge evenly into the 16 inch (40.5 cm) armhole opening. Seam sleeve to body. Repeat for the second sleeve.
Side and Sleeve Seams
With right sides together, seam from hem to underarm and down each sleeve to cuff. Repeat on the second side. Turn right side out.
Neckband
Setup Round: With smaller hook, join yarn at back neck. Pick up 66 sc evenly around: 24 across front, 6 along each front neck side, 24 across back, and 3 along each back neck side. (66 sc)
Round 1: Chain 1, sc in each stitch around, slip stitch to join. (66 sc)
Round 2: Chain 2, [front post double crochet around next stitch, back post double crochet around next stitch] around, slip stitch to join. (66 sts)
Rounds 3 through 6: Repeat Round 2. Fasten off with invisible join. (66 sts)
Pick-up tip: Use about 3 stitches for every 4 row ends along vertical neckline edges so the band lies flat without ruffling.
Crocheted Flowers and Leaves
Use the smaller hook for all motifs. Make the quantities listed below, then pin everything before sewing so the garland arcs naturally around the neckline.
Large Layered Rose (Make 8)
Chain 31.
Row 1: Single crochet in 2nd chain from hook and across. (30 sc)
Row 2: Chain 3, 4 double crochet in first stitch, slip stitch in next stitch. [5 double crochet in next stitch, slip stitch in next stitch] 14 times.
Fasten off, leaving a long tail. Spiral the strip into a rose shape and stitch through the base to secure.
Small Five-Petal Flower (Make 8)
Make a magic ring.
Round 1: Chain 1, 10 sc in ring, slip stitch to first sc.
Round 2: [Chain 2, 3 double crochet in next stitch, chain 2, slip stitch in next stitch] 5 times.
Fasten off, leaving a sewing tail.
Tiny Center Dot (Make 8)
Make a magic ring, chain 1, 6 sc in ring, invisible join. Sew one dot to the center of each small flower.
Leaf (Make 24)
Chain 8. Working into the chain: slip stitch in 2nd chain, sc, hdc, dc, hdc, sc, slip stitch. Chain 1, rotate and work back along the opposite side: slip stitch, sc, hdc, dc, hdc, sc, slip stitch.
Fasten off with a sewing tail.
Color Plan
Floral Placement Guide
Lay the sweater flat and pin all motifs before stitching anything down. The front garland sits 1 to 2 inches (2.5 to 5 cm) below the neckband. The back garland sits slightly higher and shallower. Keep heavier roses near the shoulder line and fill gaps with small flowers and leaves.
Front neckline: Place 5 large roses across the yoke. Position one near each shoulder, two below the collarbones, and one near center. Add 5 small flowers between roses. Tuck 14 leaves under petals, angled outward.
Back neckline: Place 3 large roses in a shallow arc across upper back. Add 3 small flowers and 8 leaves.
Balance check: When worn, the front should look fuller than the back, with the deepest cluster just below the front neckband.
Sewing Tips for Motifs
Use the motif tails and a tapestry needle. Catch only the motif base and the top layer of sweater fabric so stitches aren’t bulky inside. Sew roses firmly through the center and outer petals. Sew leaves down the center vein only so the leaf tips can lift slightly for dimension.
Finishing, Care, and Fit
Blocking
Steam or wet block the sweater lightly to the finished measurements. Do not flatten the roses or bobbles. Shape the cuffs and hem while damp, then let dry fully before wearing.
Care Instructions
Hand wash or machine wash cold on gentle if your yarn allows. Lay flat to dry. Store folded rather than hanging to protect the shoulder seams and floral trim.
Troubleshooting Common Issues
Body too narrow? Add rib rows and matching body stitches in multiples of 2. Each 4 added stitches adds about 1 1/8 inches (3 cm) to total chest.
Armhole pulls? Open side seam 1 to 2 more rows below underarm, then reseam sleeve smoothly.
Neckband ruffles? Use fewer picked up stitches on vertical edges or go down a hook size.
Neckband pulls tight? Pick up 2 to 4 more stitches evenly around the opening.
Flowers flop? Add a few hidden stitches around the outer petal layer or use smaller hook for motifs.
Size Customization Tips
For width adjustments, add or remove hem rib rows and body stitches in pairs, keeping front and back identical. For length changes, add or remove plain hdc rows before neckline shaping. For sleeves, keep the 8 inch (20.5 cm) armhole depth and adjust sleeve top to match the armhole perimeter.
Quick Final Measurements
Before you finish, double check these key measurements:
Thank you so much for choosing this pattern for your next crochet project. I truly hope you love making this Lavender Garden Bobble Pullover as much as I enjoyed putting together this crochet tutorial. If you make one, I would absolutely love to see it. Tag me on Instagram or share a photo on Facebook so I can admire your beautiful work.
If you want to come back to this Lavender Garden Bobble Pullover pattern later, go ahead and save it to your Pinterest boards so you can find it easily when you’re ready to start. And please drop a comment below if you make one. I love hearing how these patterns turn out for everyone and seeing the color combinations you choose.
You Might Also Like
- Sky Blue Dragon Amigurumi Plush Free Crochet Pattern
- Blush Pink Spiral Envelope Clutch Free Crochet Pattern
- Spring Garden Granny Square Bag Free Crochet Pattern
- Lavender Sunflower Granny Square Tote Free Crochet Pattern