Sage Green Meadow Crochet Robe Free Pattern
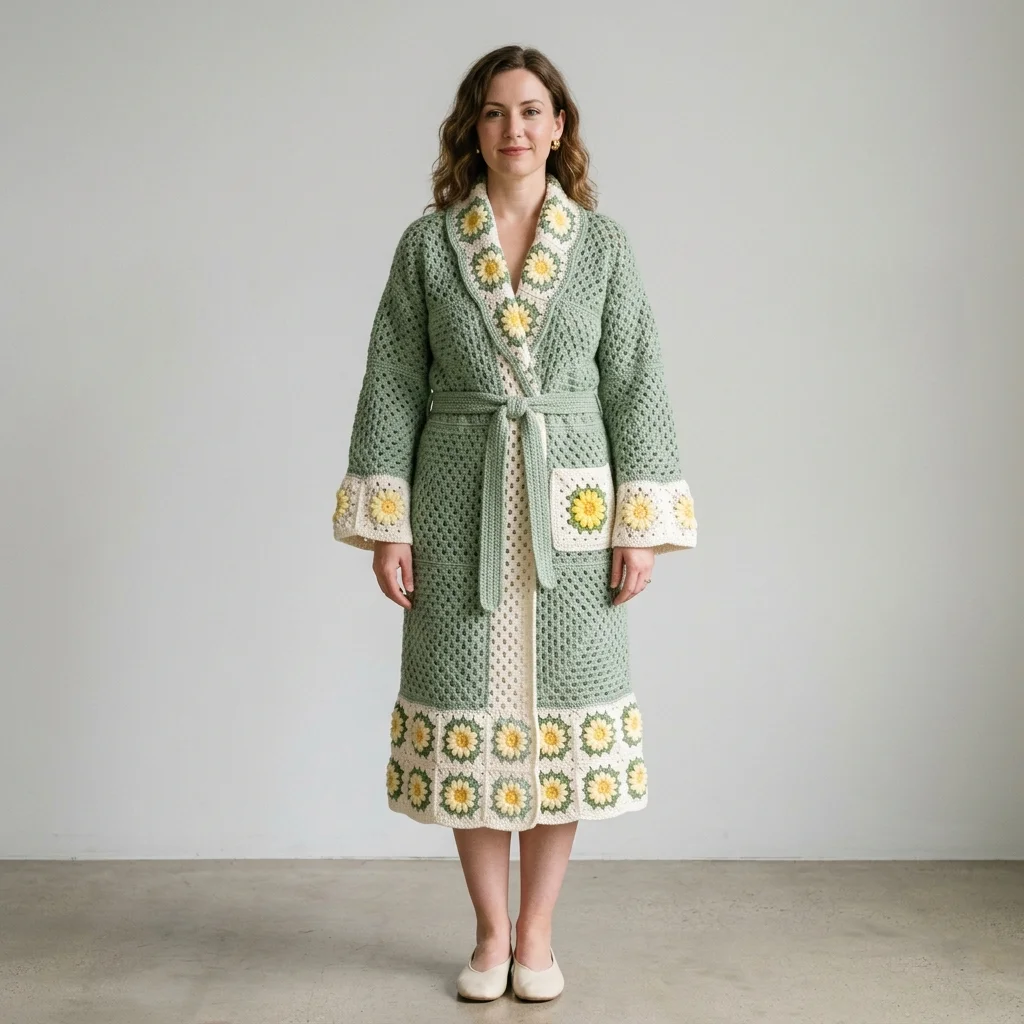
This is a crochet robe. It uses granny squares, an open mesh stitch for the body, and a tie belt. The main color is sage green with cream and yellow daisy motifs. If you can crochet a granny square and work basic stitches in rows, you can make this robe.

About This Crochet Robe Pattern
I designed this robe to feel like a wearable garden. The sage green body provides a soft, neutral backdrop while the daisy granny squares add cheerful pops of color along the hem, cuffs, collar, and pockets. This is a statement piece, but the construction is surprisingly straightforward once you break it down into components.
You will make the body panels using an open mesh stitch pattern, which creates a lightweight, breathable fabric perfect for lounging. The daisy granny squares are worked separately and then joined together for the decorative borders. Finally, everything gets assembled and finished with a simple crocheted belt.
Skill Level: Intermediate. You should be comfortable with changing colors, working granny squares, and seaming pieces together.
Finished Measurements: This pattern is written for a size medium robe. The finished bust measures approximately 44 inches with the fronts overlapping. The length from shoulder to hem is approximately 45 inches. The sleeves measure approximately 24 inches from shoulder to cuff.
Materials Needed for Your Crochet Robe
Yarn:
I recommend using a soft acrylic or cotton blend for drape and easy care. A yarn with good stitch definition will make your mesh pattern and granny squares look crisp and clear.
Hook:
Notions:
Gauge
Mesh Pattern: 14 stitches and 8 rows = 4 inches in the mesh pattern after blocking
Daisy Granny Square: Each finished square measures 4 inches x 4 inches after blocking
Gauge matters for wearables. Take time to make a swatch before starting. If your stitches are too tight, go up a hook size. If they are too loose, go down a hook size.
Stitch Abbreviations and Definitions
Ch = Chain. Wrap yarn over hook, pull through loop on hook. This creates the foundation for most crochet work.
Sl st = Slip stitch. Insert hook, yarn over, pull through both the stitch and the loop on your hook in one motion. Used for joining and moving across stitches without adding height.
Sc = Single crochet. Insert hook, yarn over, pull up a loop (2 loops on hook), yarn over, pull through both loops. The shortest basic stitch.
Dc = Double crochet. Yarn over, insert hook, yarn over, pull up a loop (3 loops on hook), yarn over, pull through 2 loops, yarn over, pull through remaining 2 loops. A taller stitch that creates the open, airy mesh fabric.
Dc3tog = Double crochet 3 together. A decrease that combines 3 double crochet stitches into one. Work each dc until 2 loops remain on hook, then yarn over and pull through all 4 loops at once.
Tr = Treble crochet. Yarn over twice, insert hook, yarn over, pull up a loop, (yarn over, pull through 2 loops) 3 times. An even taller stitch used in some granny square variations.
Pattern Notes Before You Begin
This robe is constructed in pieces and then seamed together. You will make the following components:
1. Back panel (1 piece)
2. Front panels (2 pieces, mirror images)
3. Sleeves (2 pieces)
4. Daisy granny squares (approximately 36 squares total)
5. Belt (1 piece)
6. Pocket panels (2 pieces)
A note about the mesh pattern: The open mesh creates a lacy, breathable fabric. It works up faster than you might expect because the chain spaces move quickly. Do not worry if it looks loose and floppy before blocking. Blocking transforms this fabric into something structured and beautiful.
Daisy Granny Square Pattern
You will need approximately 36 daisy granny squares for this robe. Make them all before assembling, so you can lay them out and plan your placement.
With Color B (yellow), make a magic ring.
Round 1: Ch 3 (counts as first dc here and throughout), 11 dc into ring, sl st to top of ch-3 to join. (12 dc)
Pull the magic ring closed tightly. Fasten off Color B.
Round 2: Join Color A (cream) in any stitch. Ch 3, dc in same st, ch 1, skip 1 st, *2 dc in next st, ch 1, skip 1 st* repeat around, sl st to top of ch-3 to join. (12 dc, 6 ch-1 spaces)
Round 3: Sl st into the ch-1 space. Ch 3, 2 dc in same space, ch 2, *3 dc in next ch-1 space, ch 2* repeat around, sl st to top of ch-3 to join. (18 dc, 6 ch-2 spaces)
This round creates the petal effect. Fasten off Color A.
Round 4: Join MC (sage green) in any ch-2 space. Ch 3, 2 dc in same space, ch 1, *3 dc in next ch-2 space, ch 1* repeat around, sl st to top of ch-3 to join. (18 dc, 6 ch-1 spaces)
Round 5: Ch 3, dc in each dc and each ch-1 space around, working (2 dc, ch 2, 2 dc) in every other ch-1 space to create 4 corners. Sl st to join. (28 dc, 4 corner ch-2 spaces)
Fasten off and weave in ends. Block each square to 4 inches x 4 inches.
Back Panel Pattern
With MC, ch 78.
Row 1 (RS): Dc in 4th ch from hook (skipped ch-3 counts as first dc), *ch 1, skip 1 ch, dc in next ch* repeat across. Turn. (38 dc, 37 ch-1 spaces)
Row 2: Ch 4 (counts as dc + ch 1), skip first dc and ch-1 space, dc in next dc, *ch 1, skip ch-1 space, dc in next dc* repeat across. Turn.
Repeat Row 2 until the back panel measures 38 inches from the beginning, or your desired length minus 8 inches (to account for the granny square border at the hem).
Fasten off. The back panel should measure approximately 22 inches wide and 38 inches long before adding the border.
Front Panels Pattern (Make 2)
With MC, ch 42.
Row 1 (RS): Dc in 4th ch from hook, *ch 1, skip 1 ch, dc in next ch* repeat across. Turn. (20 dc, 19 ch-1 spaces)
Row 2: Ch 4, skip first dc and ch-1 space, dc in next dc, *ch 1, skip ch-1 space, dc in next dc* repeat across. Turn.
Repeat Row 2 until the front panel measures 38 inches, matching the back panel length.

Shaping the Neckline
Continue working the mesh pattern while decreasing at the neck edge.
Decrease Row: At the beginning of the row (neck edge), ch 3, dc in first ch-1 space (skipping the first dc), continue in pattern across. Turn.
Work one decrease row every 4 rows, 6 times total. (14 dc, 13 ch-1 spaces remain)
Continue without decreasing until the front panel matches the back panel length.
Fasten off. Make a second front panel, reversing the neckline shaping by working decreases at the end of the row instead of the beginning.
Sleeves Pattern (Make 2)
With MC, ch 50.
Row 1 (RS): Dc in 4th ch from hook, *ch 1, skip 1 ch, dc in next ch* repeat across. Turn. (24 dc, 23 ch-1 spaces)
Row 2: Ch 4, dc in next dc, *ch 1, dc in next dc* repeat across. Turn.
Repeat Row 2 until the sleeve measures 18 inches, or your desired length minus 6 inches for the cuff border.
Fasten off.
Belt Pattern
With MC, ch 250.
Row 1: Sc in 2nd ch from hook and in each ch across. Turn. (249 sc)
Rows 2-6: Ch 1, sc in each sc across. Turn.
Fasten off and weave in ends. The belt should measure approximately 70 inches long and 1.5 inches wide.
Pocket Panels (Make 2)
Each pocket is made from 2 daisy granny squares joined together with a solid crochet border.
Join 2 squares: Place two daisy squares side by side. Using MC, sl st through both layers along one edge to join.
Border: With MC, work 1 round of sc evenly around all edges of the joined squares, working 3 sc in each corner. Sl st to join. Fasten off. (approximately 68 sc)
Assembly Instructions
This is where your robe comes together. Take your time with seaming. Neat, consistent seams make a huge difference in the finished look.
Step 1: Attach Hem Border
Join 9 daisy granny squares in a row for the back hem border. Join 5 daisy granny squares for each front hem border.
Using MC and a whip stitch or mattress stitch, sew the granny square borders to the bottom edge of each panel.
Step 2: Seam Shoulders
Place the back panel and front panels right sides together. Using MC, sl st or whip stitch along the shoulder seams, leaving the center open for the neck.
Step 3: Attach Sleeves
Find the center of each sleeve. Match it to the shoulder seam. Pin in place, then seam the sleeve to the body, easing in any fullness.
Step 4: Seam Sides and Underarms
Working in one continuous seam on each side, join the side of the body and the underarm of the sleeve. Leave an opening approximately 4 inches from the hem on each front panel for the belt loops.
Step 5: Add Cuff Borders
Join 6 daisy granny squares in a ring for each sleeve cuff. Sew the joined squares to the bottom edge of each sleeve, matching the circumference and easing if necessary.
Step 6: Create the Collar
Join 10 daisy granny squares in a long strip. Sew this strip along the front opening edges and around the back neck, creating the shawl collar shown in the design.
Step 7: Attach Pockets
Position one pocket panel on each front, approximately 6 inches below the waist and centered on the front panel. Using MC, whip stitch along the bottom and sides, leaving the top open.
Step 8: Add Belt Loops
Using MC, ch 15. Sl st to the side seam at waist height. Fasten off. Repeat on the other side. These loops will hold your belt in place.
Step 9: Thread Belt and Block
Thread the belt through the loops. Block your entire finished robe according to your yarn’s care instructions. Lay flat to dry, pinning the collar and hem to your desired shape.
Finishing Tips for a Professional Look
Weave in all ends thoroughly. With this many color changes in the granny squares, you will have a lot of ends. Take your time and weave each one in multiple directions so nothing pops loose during wear or washing.
Block aggressively. The mesh fabric really opens up and relaxes with blocking. Pin it out wider than you think you need to. It will spring back slightly when dry.
Consider a slip stitch edging around the collar for extra structure if your fabric feels floppy. One round of sl st in MC will firm things up without adding bulk.
Customization Ideas
Adjust the length: Add or subtract rows in the body and sleeve panels to make this robe longer or shorter.
Change the colorway: This pattern would look stunning in autumn colors, with rust, mustard, and cream. Or go monochrome for a more modern look.
Skip the pockets: If you prefer a sleeker silhouette, simply omit the pocket panels.
Add more squares: For a bolder look, use more granny squares throughout the body instead of just at the borders.
Care Instructions
Hand wash your crochet robe in cool water with a gentle detergent. Squeeze out excess water without wringing. Lay flat on a clean towel, roll up to absorb moisture, then reshape and dry flat.
If your yarn is machine washable, use a mesh laundry bag and the delicate cycle. Never put your handmade robe in the dryer unless you want a very small robe.

Why This Crochet Robe Pattern Works
What I love about this design is how the different elements balance each other. The open mesh keeps the robe from feeling heavy or stifling, while the granny square borders add visual interest and a bit of structure. The sage green is sophisticated but still soft and wearable. And that tie belt? It makes this feel like a real garment, not just a blanket with sleeves.
This is the kind of project you make for yourself. Something cozy to wear on weekend mornings with a cup of coffee. Something that makes you feel put together even when you are absolutely not put together.
Thank you so much for choosing this pattern. I hope you enjoy every stitch of this crochet robe tutorial, from the first daisy center to the final belt loop. Making something this substantial by hand is no small feat, and you should be proud of yourself for taking it on.
If you make this robe, I would absolutely love to see it. Tag me on Instagram or share a photo in my Facebook group. Seeing your finished projects genuinely makes my day.
If this pattern caught your eye, go ahead and pin it to your Pinterest boards so you can find it when you are ready to start. And if you do make this robe, please come back and leave a comment below. I love hearing how projects turn out, what colors you chose, and any tweaks you made along the way. Your feedback helps other makers too.
You Might Also Like
- Gray and Pink Heart Granny Square Blanket Free Crochet Pattern
- Ocean Blue Daisy Granny Square Blanket Free Crochet Pattern
- Coral Poppy Baby Dress Free Crochet Pattern
- Terracotta Mesh Crochet Flared Sleeve Shrug Pattern